Now that you’ve been introduced to the default desktop and have a good feel for where everything is, what it does, and how it works, you may wish to customize it to your own preferences—and personalization is something at which Ubuntu excels, due to its tremendous range of customization options and preference settings.
The place to start when customizing Ubuntu is the Appearance Preferences window, which you get to by selecting System → Preferences → Appearance. As Figure 4-30 shows, there are five main sections divided into tabs.
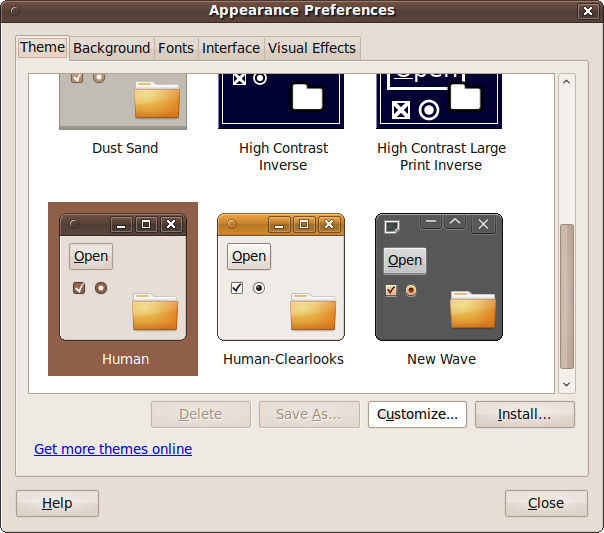
The Theme tab lets you choose between a selection of predefined themes, of which Human is the default. Try clicking different ones, and the desktop will change after a few seconds. For example, a good theme to choose for people with visual difficulties would be High Contrast Large Print Inverse. Whichever theme you choose will stay selected.
You can further modify a theme by clicking the Customize button, which brings up another window with five options (see Figure 4-31).
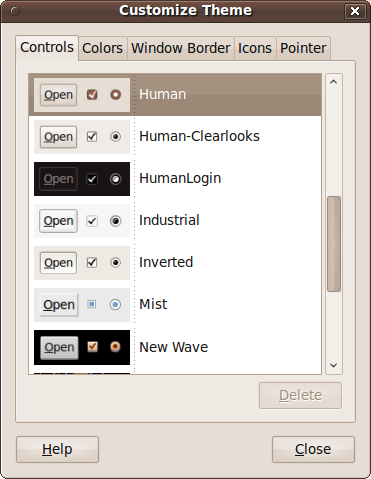
- Controls
Lets you choose how you want items such as checkboxes and buttons to appear. Just click the example you want to use.
- Colors
Lets you choose the text and background colors for windows, input boxes, selected items, and tooltips.
- Window Border
Lets you can choose a variety of border types for your windows.
- Icons
Lets you choose the icon set you prefer most.
- Pointer
Lets you choose the type of mouse pointer you prefer to use.
The Background tab chooses which wallpaper (if any) to use, how to display it, and which color to use for the desktop background. Some wallpapers include transparency, so these choices are not mutually exclusive and can be combined. Figure 4-32 shows some of the several backgrounds supplied by default.
You can choose between having the wallpaper tiled, zoomed, centered, scaled, or shown full screen by clicking the Style drop-down menu. Or you can choose a different image by either clicking one of the other wallpapers or clicking Add and browsing through the filesystem to locate a picture to use. Programs such as Firefox and the Image Viewer also have options to set the current image as the desktop background.
The Colors drop-down menu allows you to choose between a solid color and either a horizontal or vertical gradient for the background. A gradient shades gradually from one color to another. The box to the right can be clicked to select the actual color to use with a color picker, or you can type in its hexadecimal value (see Figure 4-33).
If you choose one of the gradients, two color boxes will be displayed next to the drop-down menu, one for each color in the gradient.
By the way, any background whose icon shows up as several images in a stack is just that: a group of images that will rotate at 30-minute intervals.
With the Fonts tab (see Figure 4-34), you can choose the default face and size of font to use for your applications, documents, desktop, window titles, and fixed-width text. Just click a font name and choose the new one. A window will then appear in which you can choose the font you want, whether it should appear by default in regular, bold, italic, or combined bold and italic style, and the size of the font. Click Cancel to return without making a change, or OK to make the change and go back.
There’s also quite a clever feature below the fonts with which you can specify the type of font rendering you prefer. Not all monitors are the same, so try clicking the various choices to see which you prefer.
For even finer control, you can then click the Details button (see Figure 4-35) to tell Ubuntu the number of dots per inch your monitor displays, the type of smoothing to use, what hinting setting you prefer, and the subpixel order. The latter is a setting you make to match the order of the red, green, and blue components of each pixel on your monitor, as this varies by manufacturer.
The Interface tab (see Figure 4-36) lets you change the way some icons and menus appear. In the Menus and Toolbars section, you can check the “Show icons in menus” box to place an icon before each menu item.
For example, Figure 4-37 shows what the Trash menu shown earlier in Figure 4-25 looks like with this box unchecked—notice how it’s a lot plainer. To my mind, the tiny amount of speed increase you might see by removing the icons is outweighed by the better look and feel and quicker comprehension that the icons’ visual cues provide.
If you check the “Editable menu shortcut keys” box you can define new keyboard shortcuts for menu items. To change an application shortcut key, open the menu, and with the mouse pointer on the menu item you wish to change, press the new combination of keys. To remove a shortcut key, press Backspace or Delete.
Warning
When using the “Editable menu shortcut keys” feature, you won’t be warned if assigning a new shortcut key to a command will also remove it from another command, and there is no way to restore the default keyboard shortcut for a command. You can also inadvertently assign a normal keyboard key, such as the letter e, to a function, making it so that typing the letter e would no longer result in that letter being sent to the application you are using. For this reason I recommend you keep this option disabled.
Using the drop-down menu next to “Toolbar button labels,” you can further specify the appearance of toolbars by choosing whether text should appear below or beside items, and whether to display only text or only icons.
With the release of Ubuntu 10.04, the Interface tab is
completely removed from the Appearance Preferences window. This was a
decision taken by the GNOME development team, which decided that such
options should be provided only by third-party user interface tweaking
tools. However, you are able to access the setting directly with the
GNOME Configuration Editor by pressing Alt-F2 and then entering
gconf-editor
. When the editor opens, drill down to
desktop → gnome → interface and then either check or uncheck
the box next to the entry “menus_have_icons”. You can also modify many
other aspects of GNOME with this interface, but be very careful in
case you mess up your desktop.
Depending on your hardware and the drivers installed, Ubuntu may be capable of providing enhanced visual effects (see Figure 4-38).
The three levels of effects are:
- None
This setting doesn’t make use of any special effects and is best suited to slower machines or older graphics hardware.
- Normal
This is the most common setting that should suit the widest range of computers and graphics cards. With it, you’ll see shadows around windows, windows will gracefully zoom as you minimize and maximize them, and opacity will be enabled, giving an effect similar to Windows Vista and 7’s Aero Glass.
- Extra
This setting gives you a set of ultra cool effects, such as wobbly windows when you shake them, but you need a fast graphics card and a suitable driver installed. For a great example effect (if your computer lets you select this setting), try opening a few programs and then press WindowsKey-Tab to see the task switcher shown in Figure 4-39.
If you choose a setting that requires a graphics driver that isn’t already installed, Ubuntu will attempt to locate and install it. If it can’t do so, that setting won’t be available to you.
Although I don’t recommend doing so, you can remove the top and bottom panels from your Ubuntu desktop simply by right-clicking them and selecting “Delete this panel.” In the same way, you can add more panels by right-clicking a panel and selecting New Panel. By default, the first new panel you add will be placed on the righthand side of the screen and the second will go on the left.
Warning
If you ever remove the default panels, you won’t have access to
the programs required to restore them. To fix this, press Alt-F2 and
then type gnome-terminal
and click Run. Next enter
the following commands into the Terminal window:
gconftool --recursive-unset /apps/panel rm -rf/.gconf/apps/panel pkill gnome-panel
Note that there are two dashes preceding the word recursive.
If you add more than two extra panels, new ones will be added underneath the top panel, but you can change the location by right-clicking a panel, selecting Properties, and using the Orientation drop-down menu.
To add an item to a panel, right-click it and then select Add to Panel to bring up the Add to Panel window. Here, you can select from a wide range of launchers and applets, as shown in Figure 4-40.
The first two options let you add an application of your choosing to the panel, either by creating a new launcher or by copying a launcher from the Applications menu. Alternatively, scroll down through the list of preselected applications and you may find the one you want already listed.
In fact, you can add more than applications using this window because it supports items such as a keyboard status indicator, a custom menu bar, a file searcher, Shut Down and Restart buttons, and many more.
There’s also an easy way to add any menu item to the top panel. Just locate the item using the mouse, right-click it, and select “Add this launcher to panel.”
To remove an item from the panel, right-click it and select Remove from Panel. Be careful, though, because you can remove the Quit menu and other important items that are not easy to restore using this feature.
To move an item to a different location in a panel, select Move and then use the mouse to move it left and right (or up and down) along the panel until you reach the desired destination, then click the left mouse button. Alternatively, you can drag and drop the icon into its new location.
If you wish to insert an item between two others that are right against each other, you will have to move them apart first to make room. Otherwise, you may end up dropping an item onto another, which would have the unwanted effect of opening up the latter item, passing the item dropped to it as if it were data to be acted on.
If you wish to prevent an item from being moved, right-click it and select “Lock to Panel.” Dragging and dropping that item will then be disabled. You may also need to uncheck this option to move items in the first place.
If you want to display a different icon for an item (or launcher) in a panel, right-click it and select Properties to bring up the launcher’s properties window. Now click the icon to bring up the icon browser, as shown in Figure 4-41. To reach the state shown in that figure, I created a new Calculator launcher in the top panel, opened up its properties window, and clicked its icon.
After browsing through the icons and selecting the one you want, click OK to change the launcher’s icon. Otherwise, click Cancel to back out again without making any changes.
Incidentally, as you can see, this window also lets you change a panel item’s type, name, command (the command to issue or program to run), and tooltip comment.
Ubuntu’s panels are already powerful and versatile tools, but you can make them even more useful by adding drawers to them. These are drop-down menus in which you can store other items. To add a drawer to a panel, right-click it and select Add to Panel, then scroll down to the Drawer entry, select it, and click the Add button. A small icon that looks like an open drawer will then appear on the panel. If you click this icon, it will drop down an empty box, as there’s nothing in it.
To add items to the drawer, as you can probably guess, right-click it and select Add to Drawer. This will bring up a window almost exactly the same as the one shown in Figure 4-40, except it will have the title Add to Drawer, and that includes featuring the Drawer entry again so that you can add drawers within other drawers and so on. Mostly, though, you’ll want to add a selection of related items to a drawer.
To change a drawer’s icon, right-click it and select Properties. Then, click the Choose Icon button and proceed in the same way as described in the earlier section Changing a launcher’s icon. You can also change the drawer icon’s size and background color or image.
But that’s not all, because you can also add complete menus to the top panel by right-clicking a single item within a menu and then selecting “Entire menu.” From here, you can then choose to add the menu to the panel, either as a drawer or as a menu, as you can see from Figure 4-42.
If you want to obtain a bit more desktop space, you can hide one or more of your panels by right-clicking one and selecting Properties, followed by checking the Autohide box. Then, click the Close button. The panel will disappear, but it can be brought back whenever you need it by moving your mouse to the edge of the screen and leaving it there. The panel will then slide into view and slide back again when you move the mouse away.
If you prefer, instead of checking the Autohide box, check the “Show hide buttons” box instead. This will place an arrow icon at the edge of the panel that, if you click it, will make the panel slide away lengthways to the screen’s edge, leaving only the arrow icon behind. Click it again to restore the panel.
When you right-click a panel and select Properties, you can also uncheck the Expand box, which will make the panel only as big as it needs to be to contain its contents. Or you can set the edge of the desktop (top, bottom, left, or right) to which the panel should be attached, and its width in pixels. Also, if you click the Background tab, you can change the panel’s background color and transparency or image.
Ubuntu comes with a sophisticated menu-editing program that makes it easy for you to customize your menus exactly to your preference. To use it, right-click any of the top panel menus out of System, Places, or Applications (it makes no difference which) and select Edit Menus. As you can see in Figure 4-43, this brings up the Main Menu editor window.
In the lefthand pane of the window you can see the two main menus, Applications and System, as they appear on your desktop, along with the items within them. In the righthand pane all the menu items are displayed, including some that have been set to invisible by unchecking their associated Show boxes.
Whichever item you click in the left pane is opened up in the right one. In the case of a new Ubuntu installation, the Debian, Education, and Science submenus have yet to be populated, and so they are shown in italics. Because they are empty, even if you check their Show boxes in the righthand pane, they will not be enabled on your desktop.
However, you may have items in one or more of the Programming, System Tools, or Universal Access menus, but they will have been set to hidden so that beginners won’t stumble across the programs in them and possibly mess up their Ubuntu installation.
Nevertheless, you can verify that they contain items by clicking them in the lefthand pane, so go ahead and click some of them, and you may see the righthand pane change to something like the one shown in Figure 4-44. At this point, I don’t recommend checking the Show boxes for any of these items unless you know what you’re doing.
To change the icon for a menu entry, first select the menu in the lefthand pane of the editor, and then select the entry within that menu in the righthand pane. You can now click the Properties button (or right-click the item and select Properties) to bring up the Launcher Properties window shown in Figure 4-41. To edit the icon, follow the procedure outlined in the earlier section Changing a launcher’s icon.
In this window, you can also edit the launcher’s type, name, the command used to launch a program, and the tooltip comment for the entry.
To move an entry, select it in the righthand pane and then click the Move Up or Move Down button until it is in the desired location.
If you wish to delete an entry, simply select it and click the Delete button. Be careful, though, as there is no “Are you sure?” warning for this action.
To add a new submenu, highlight the position where you want it to be inserted and click the New Menu button. A window will pop up asking you to enter a name and comment to be displayed as a tooltip, which you should fill in before clicking OK to create the menu. Click Cancel to return without making a change.
To add a new item to a menu, move to the place where you want it inserted and click the New Item button. A new window will pop up entitled Create Launcher, which is identical to the one shown in Figure 4-41, except that all of the fields are blank and need to be filled in. To complete the process, you will need to enter the entry’s type, name, and comment, as well as the command required to launch the item. The command is the critical piece of information you need to know; if you don’t have that information, click Cancel and see whether you can figure out the command after reading Chapter 7. Otherwise, enter the information and click the OK button to add the item.
Get Ubuntu: Up and Running now with the O’Reilly learning platform.
O’Reilly members experience books, live events, courses curated by job role, and more from O’Reilly and nearly 200 top publishers.