Chapter 4. Product Reviews
With more and more options for shoppers arriving on the Internet every day, finding the right products can be a challenge. Special interest websites that feature specific kinds of products and reviews by dedicated hobbyists are a popular way to help consumers sort through all of the options and find the right products. In this chapter, we’re going to use a handful of Drupal modules to build a product review website that lets community members give their opinions on every product that’s featured.
This chapter introduces the following modules:
- Amazon (http://drupal.org/project/amazon)
Gathers product information from Amazon.com
- Voting API (http://drupal.org/project/votingapi)
Provides a framework for standardizing voting data
- Fivestar (http://drupal.org/project/fivestar)
Allows rating of content
- Search (core)
Indexes content and allows searching within a site
- CSS Injector (http://drupal.org/project/css_injector)
Allows administrators to easily add CSS styling to the site
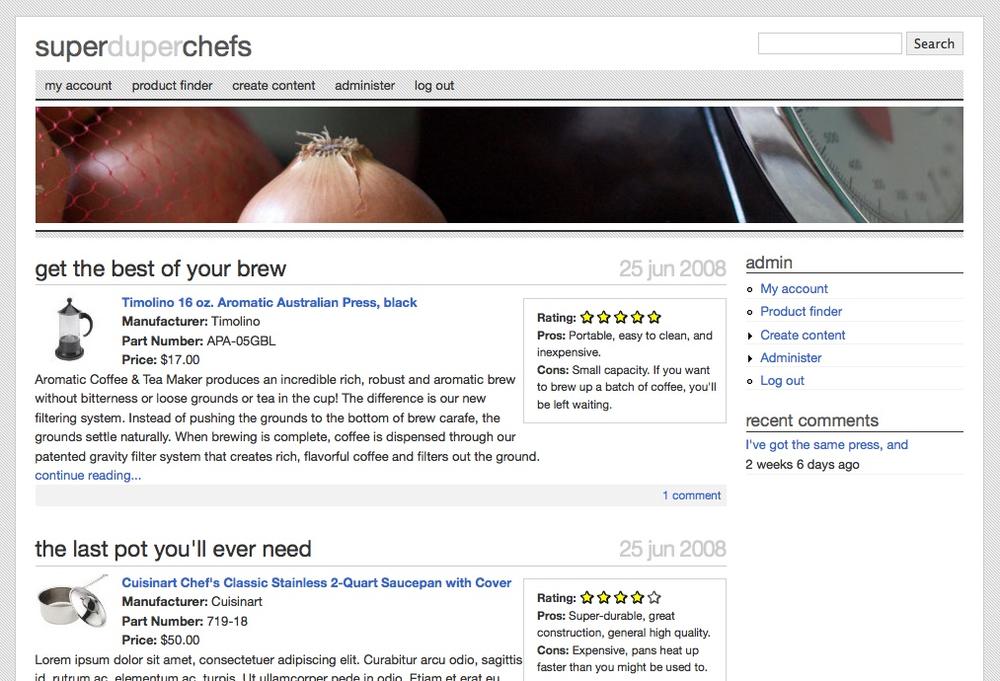
If you would like to participate in the hands-on exercises in this chapter, install Drupal using the Reviews installation profile from the book’s sample code. This will create the example website on your web server. The completed website will look as pictured in Figure 4-1 and found at http://reviews.usingdrupal.com. For more information on using the book’s sample code, see the Preface.
Case Study
Bob and Sarah are coworkers and food lovers who’ve both built up impressive kitchens full of gadgets, pots and pans, and other cooking tools. Supporting a culinary habit can be expensive, though, and they usually turn to fellow foodies for advice before purchasing new gear. They’ve decided to set up Super Duper Chefs, a website where they and their friends can write recommendations about the cooking equipment they use, share tips, and brag about their latest culinary achievements. They’d like it to be the kind of site they wanted when they were getting started: a fun place that highlights the most useful products and advice.
After talking things over with their friends, Bob and Sarah think they have a handle on what the site should offer. The most important feature is that kitchen products reviewed by the site’s official contributors should be listed with ratings and quick summaries of their best and worst features. Each review should also provide up-to-date pricing information. In addition to the official reviews, visitors to the site should be able to offer their opinions on the products and compare the official ratings with the opinions of other visitors who’ve read the reviews. Everyone that uses the site should also be able to search for reviews that match certain criteria. For example, it should be easy to find reviews of products by a particular manufacturer, or products that mention waffles.
Implementation Notes
The next step is figuring out how to translate that set of features into a shopping list of Drupal functionality. Bob and Sarah are fortunate: the core Drupal software can provide most of what they’re looking for without any additions. We’ll set up special permissions for contributors, and use Drupal’s administrative tools to create a custom Product Review content type. Those Product Reviews will be the meat of the site’s content.
We’ll use the CCK module to add custom fields to the Product Review content type for the various bits of information we want to record. We’ll also use the Views module to build a listing page of products for quick scanning. Three requirements for Bob and Sarah’s website, though, will require functionality that we haven’t seen yet: importing product information from another website, allowing users to rate and review content, and building a custom search page.
Product information
First, the site will need to display information about the products that are being reviewed. Who manufactured it? How much does it cost? Where can a visitor to the website purchase it? Although it’s possible to set up custom fields for each of these pieces of information with the CCK module, it’s a real hassle for the site’s editors to fill out all of them for every review. In addition, keeping the pricing information up-to-date can be a chore as the site grows older.
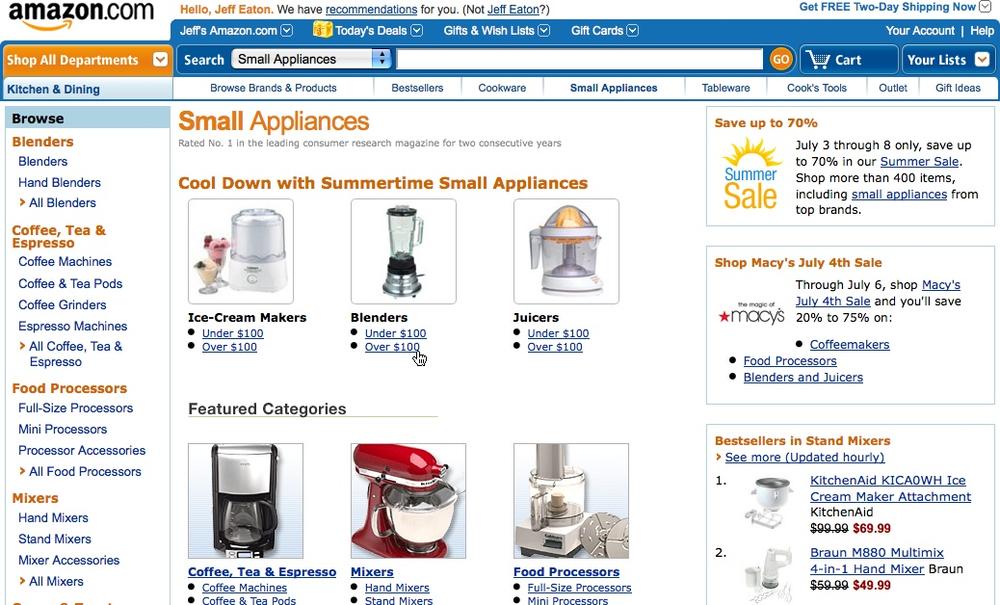
The easiest solution is to let someone else do the work! Amazon.com provides access to its full database of product information, including kitchen gadgets (shown in Figure 4-2), using the Amazon Associates Web Services API. The Amazon Module (see http://drupal.org/project/amazon) lets sites access that product information. That means that writers on the site can fill out one field about the product, and the rest will be handled behind the scenes.
In addition to saving time and energy entering in the product details, using the Amazon API means that Bob and Sarah can get referral fees whenever someone clicks from their website and purchases an item on Amazon.com. It’s a simple way of earning revenue, and for high-traffic sites, the commissions can add up quickly.
Product ratings
The second challenge is product ratings. The site will need every product to have an official review by an editor, but visitors reading the site need to be able to rate the products as well. Displaying the official rating and the users’ ratings separately will give a more trustworthy representation of how the products perform, reassuring new visitors that the site’s ratings aren’t dominated by a one-sided editor.
The Drupal community has built dozens of plug-in modules that add rating and voting capabilities to sites. A full list is available at http://drupal.org/project/Modules/category/60. Some, such as the NodeReview module (http://drupal.org/project/nodereview), allow visitors to evaluate pieces of content on multiple criteria. Others, such as the Plus1 module (http://drupal.org/project/plus1) add the ability to vote items up in a queue, like the popular sites Reddit (http://www.reddit.com) and Digg (http://digg.com). Still others allow each reader to rate content on a scale, then display the average to new visitors. Because it is this average rating capability that we’re interested in, we’re going to use the Fivestar module (http://drupal.org/project/fivestar).
In addition to letting users vote on content, Fivestar provides a CCK field to separate “official ratings” by a site editor from the normal ratings given by visitors. We can use the Views module to list the two kinds of ratings side by side for comparison. The Fivestar module, like most rating and evaluation modules, is based on Voting API (http://drupal.org/project/votingapi), another Drupal module that handles storage and presentation of voting and rating information for content. We’ll need to install it to use Fivestar.
Custom searching
The third piece of the puzzle is the custom search page that will let visitors to the site find the product reviews they’re looking for. Drupal’s built-in Search module can index the contents of each post, and give visitors a general “Search” page to find posts that contain specific keywords. However, it’s difficult to customize how search results are presented to users, and difficult to control exactly what kinds of content are searched. For example, finding reviews of kitchen appliances written by Bob and sorting them by price would be tricky. Fortunately, the Views module allows us to tie into that search index as well, giving full control over how the results are displayed. We’ll use it to build our custom product search page.
First Steps: Basic Product Reviews
Before we get started, log in to the site with the username admin and password oreilly if you are using the installation profile. We’ll get started with a few things that we are going to need.
One thing we will need is a new content type for the product reviews. Based on the Super Duper Chefs requirements, we’ll need the following for each review:
A Pros field and a Cons field to list quick summaries of each product’s strengths and weaknesses
An Amazon Product field to hold detailed product information
A Rating field, so that visitors can quickly find the cream of the crop
A Field Group that combines the rating, as well as the pros and cons, for a more attractive presentation
Comments so that visitors can weigh in with their own opinions
Creating the Product Review Content Type
We’ll start by creating the base content type and adding the simplest pieces: the basic text fields needed for the Pros and Cons, grouping those fields together, and allowing comments:
First, go to Administer→Site building→Modules (admin/build/modules) and enable the following modules:
CCK package
Content
Fieldgroup
Text
Next, go to Administer→Content management→Content types (admin/content/types) and add a new content type called “Product review,” using the settings indicated in Table 4-1.
Table 4-1. Settings for the Product Review content typeSetting
Value
Identification
Name
Product review
Type
review
Description
A featured product review by a contributing editor
Submission form settings
Title field label
Headline
Body field label
Review
Comment settings
Default comment setting
Read/Write
Comment subject field
Disabled
Location of comment submission form
Display below post or comments
Save the changes you’ve made by clicking the “Save content type” button and you’ll be returned to the listing of available content types. Click the “manage fields” link (admin/content/node-type/review/fields) for our new Product review content type to begin setting up the custom fields.
Because we want to group several of the fields in this content type together (the Pros and Cons, ratings, and so on), we’ll first create a Field group to organize them. Under “New group,” create a new group with a label of Summary“ and a group name of “summary” and save the form.
Click the “configure” link next to the Summary group (admin/content/node-type/review/groups/group_summary), set its style to collapsible, and then save the form.
Back at the “manage fields” tab (admin/content/node-type/review/fields), create a new field using the settings indicated in Table 4-2.
On the next screen, all of the additional settings for the new field can be left at their default values; click the “Save field settings” button. Next, repeat the process to create a second field using the same settings, but using the label “Cons” and the field name “cons.”
We have added the fields and a group to the content type. Now let’s group the Pros and Cons together in the Summary group and move them to the top of the form. Drag the fields into the following order (make sure to drag Pros and Cons under Summary and indent them). When you’re finished, click the “Save” button.
Headline
Menu settings
Summary
Pros
Cons
Review
Now that we have the Product Reviews content type started, we need to add permissions to allow the right people to create them. Bob and Sarah’s friends will each have their own account and be able to post and edit their own reviews as editors of the site. Bob and Sarah themselves will be the administrators of the site and will therefore be able to edit or delete anyone’s posts so that they can keep the site tidy, if needed. Go to Administer→User management→Permissions (admin/user/permissions) and fill in the values shown in Table 4-3. Click “Save permissions” when you are done.
Permission | anonymous user | authenticated user | editor | site administrator |
node module | ||||
create review content | Checked | Checked | ||
delete any review content | Checked | |||
delete own review content | Checked | Checked | ||
edit any review content | Checked | |||
edit own review content | Checked | Checked | ||
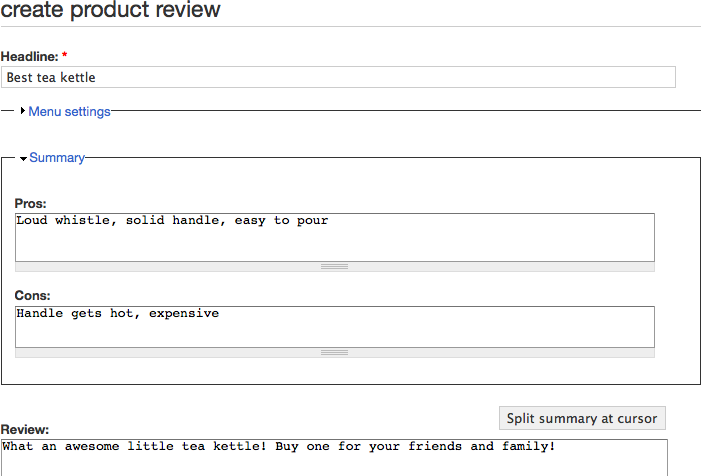
Once you have everything set up, go to Create Content→Product Review (node/add/review) and enter a simple review. Your new review creation form should look like Figure 4-3.
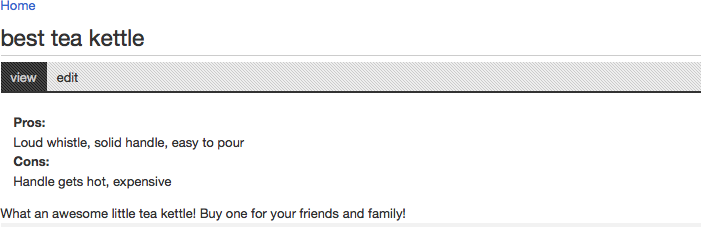
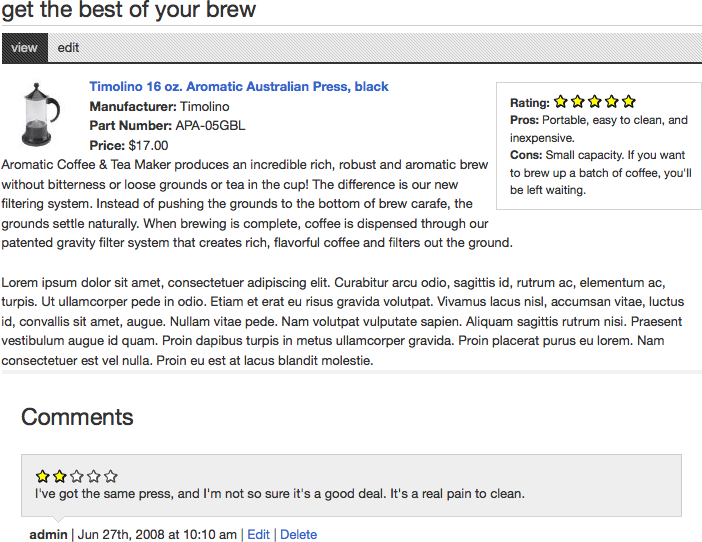
The Product review content type is well on its way—it’s now possible to create a new review, fill out the pros and cons, and display the results on the front page of the site. The finished review should look something like Figure 4-4. In the next section, we’ll be adding more complete product information, straight from Amazon.com.
Spotlight: Amazon Module
Amazon.com is one of a large number of web-based businesses that have opened up their product information databases for other sites to access. In the case of Super Duper Chefs, we want to retrieve useful data like product photos, pricing, and manufacturer information for display on our own website. The Amazon module for Drupal allows us to do just that.
What’s Included?
The Amazon module is actually an entire collection of modules, each with its own purpose:
The core Amazon API module handles communication with the Amazon.com website and ensures that pricing information on products stays up-to-date. All of the other modules included in the package require this one.
The Amazon Media module stores extra information about certain types of products. For example, it’s responsible for storing and displaying the MPAA rating for movies and the console that video games run on.
The Amazon Search module adds the ability to search for Amazon.com products from Drupal’s default Search page.
The Amazon Field module allows administrators to add a field to any content type that stores an Amazon product ID, and displays a photo of the product straight from Amazon.com. This module is the one that we’ll be using to enhance our Product Review content type.
The Amazon Filter module allows writers to insert product images and information into any piece of content using the
[amazon]tag. It’s useful for bloggers or writers who want to link to products occasionally but don’t need the structure of an explicit field just for product links.
The Amazon module doesn’t require much configuration, but there are several important settings that most site administrators will want to change on its configuration page, at Administer→Site configuration→Amazon API (admin/settings/amazon) and pictured in Figure 4-5.
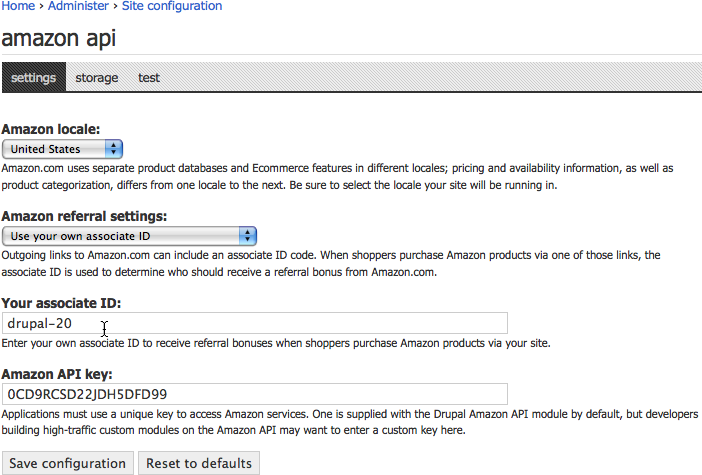
Locale
Because each country that Amazon operates in has a separate database of products, prices, and availability information, you’ll want to choose the Locale that your website’s users reside in. This setting will determine which Amazon website (http://www.amazon.com, http://www.amazon.jp, and so on) will be used to look up the information for a given product. In addition, whenever links from your site to Amazon.com are generated, they’ll point to the local Amazon site for the locale you’ve chosen. If you don’t choose a specific locale, the Amazon module will assume that your site is operating in the United States.
Referral Settings
Although it’s not required, setting up an Associate ID at http://affiliate-program.amazon.com/gp/associates/join allows Amazon to credit your site when your visitors click on an Amazon.com link and purchase a product. If you’re feeling generous, the Amazon module also allows you to use the Drupal Association’s ID, automatically donating any commissions from purchases to support the Drupal project.
Hands-On: Adding an Amazon Field
In the previous section of this chapter, we set up a content type for our product reviews. Now, we’re ready to add an additional field to store a link to the product on Amazon.com. We need to do a few things to get set up before we add the field to our content type:
First, go to Administer→Site building→Modules (admin/build/modules) and enable the following modules:
Amazon package
Amazon API
Amazon Field
Next, go to Administer→Site configuration→Amazon API (admin/settings/amazon). Select your locale and add your Amazon Associate ID, if you have one. If you are in the United States and do not have an Amazon Associate ID, you can use the default settings.
Adding the Product Field
Having set up the Amazon module, we’re ready to continue customizing the Product Review content type:
Go to Administer→Content management→Content types (admin/content/types) and click the “manage fields” link (admin/content/node-type/review/fields) for the Product Review content type and create a new field using the settings indicated in Table 4-4.
Click the Save button to create the field, and you’ll be taken to the next screen to fill out the field settings as shown in Table 4-5.
Click the “Save field settings” button to complete the process, and you’ll be returned to the “Manage fields” page for the Product review content type.
On the “Manage fields” page (admin/content/node-type/review/fields), rearrange the new Amazon field so that it is listed under the Pros and Cons fields, like so:
Headline
Menu settings
Summary
Pros
Cons
Amazon product ID
Review
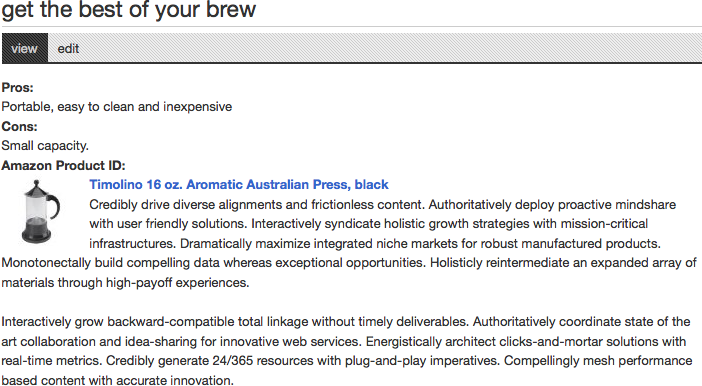
Go to Create content→Product review (node/add/types/review) and add a new review. This time, fill out the Amazon Product field as well as the normal Headline, Pros and Cons, and Review fields. Your new review should look something like Figure 4-6.
Later, we’ll use CCK’s Display Fields settings to control what information is output by Amazon on these nodes.
For even more fine-grained control over the display of Amazon product data, particularly on more standard “media” products such as books and software, the Amazon Media module touched on in the Spotlight section includes a series of template files that can be customized to grab the specific fields you’re looking for. We’ll talk about template files when we discuss theming in Chapter 11.
Our product reviews now contain fields for product pros and cons, and a link to Amazon.com for each product. What’s left? We need some way to capture the editorial rating for each product that’s reviewed, and a way for visitors to the site to add their own ratings as well. For that, we’ll take a look at the Voting API and Fivestar modules.
Finding Product IDs
Our Amazon field will automatically load product photos and pricing information whenever we enter a product ID. That’s great—but how will the site’s reviewers find those product IDs in the first place?
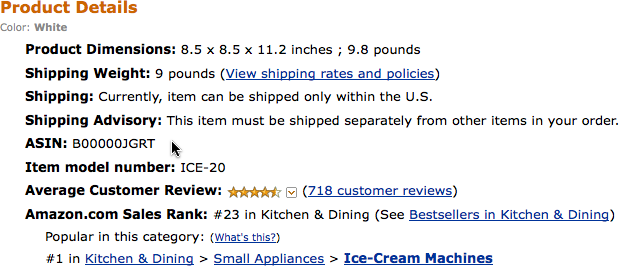
The simplest way is to find the product on the Amazon.com website using its own search function. Each product has its own page on Amazon.com, and the product ID usually appears there in two locations: the URL of the page itself, and the “Product details” section of the page, listed as the ASIN (short for Amazon Standard Identification Number). See Figures 4-7 and 4-8 for examples.

The Amazon module will ensure that any product IDs entered into Super Duper Chefs reviews point to real products on Amazon.com.
Spotlight: Voting API and Fivestar
Giving visitors a chance to evaluate and rate content is an extremely common pattern on content-rich websites. In addition to giving visitors a way to jump to the best content, it can give you—the site’s administrator—a way to determine what content on your site is most effective.
Almost all rating and evaluation modules for Drupal rely on a shared module called Voting API. Though it offers no features for your site on its own, it gives developers a set of tools for building rating systems and provides a common format for storing votes and calculating the results. This allows developers to focus on what makes their work unique (presenting vote results in a novel way, for example) while Voting API handles the grunt work.
One of the other advantages of this system is that modules based on Voting API can often share the same data. For example, the jRating (http://drupal.org/project/jrating), Criteria Rating (http://drupal.org/project/criteria_rating), and Fivestar (http://drupal.org/project/fivestar) modules all offer slightly different features, but they accomplish the same thing: rating content on a scale, and displaying the current average as an Amazon-style star rating. Although they look different and give administrators different options for presenting and using the results of the voting, they can be used interchangeably. Votes cast by one of these modules can be used by any of the others, as they’re stored and maintained by the shared Voting API.
The Fivestar module offers numerous configuration options, from the style and color of stars that it uses to display ratings to how results are presented when visitors look at a new piece of content. Figure 4-9 shows the Fivestar module’s selection of rating widgets. The widget visitors use to rate each post can be displayed in the post itself, in a floating sidebar block, or even in the commenting form when visitors submit a reply.

Despite what its name suggests, Fivestar can display any number of stars: 10 stars, 3 stars—even 1-star scales can be used. In addition, it provides a custom field type for the CCK module: a simple numeric field on any piece of content can be displayed using Fivestar’s custom widget, separate from the ratings cast with Voting API.
Hands-On: Adding Ratings
For the Super Duper Chefs site, we’ll be using both of Fivestar module’s unique features: adding a static Rating field to the Review content type, and attaching a voting widget to the comment form on each review. That approach will keep the official rating on each review separate from the reader ratings.
First, go to Administer→Site building→Modules (admin/build/modules) and enable the following modules:
Voting package
Fivestar
Fivestar Comments
Voting API
Adding the Rating Field
Go to Administer→Content management→Content types (admin/content/types), click the “manage fields” link for the Product Review content type (admin/content/node-type/review/fields), and create a new field using the settings indicated in Table 4-6.
Setting | Value |
Label | Rating |
Name | rating |
Field type | Fivestar Rating |
Widget | Stars |
Click the Save button to create the field, and you’ll be taken to the detailed settings page. Choose the settings indicated in Table 4-7, and click “Save field settings” to add the field. Because these are editorial reviews, it doesn’t make sense for users to be able to remove their vote, so we’re going to remove the ability to do so. We’ll also add this field to the Summary group so that it’s displayed along with the pros and cons.
Setting | Value |
Product review settings | |
Allow user to clear value | Unchecked |
Global settings | |
Required | Checked |
Number of Stars | 5 |
When you return to the “Manage fields” tab (admin/content/node-type/review/fields), rearrange the new Rating field above the Pros and Cons inside the Summary group. After you click the Save button, the list should look like this:
Headline
Menu settings
Summary
Rating
Pros
Cons
Amazon product ID
Review
Turning on Visitor Ratings
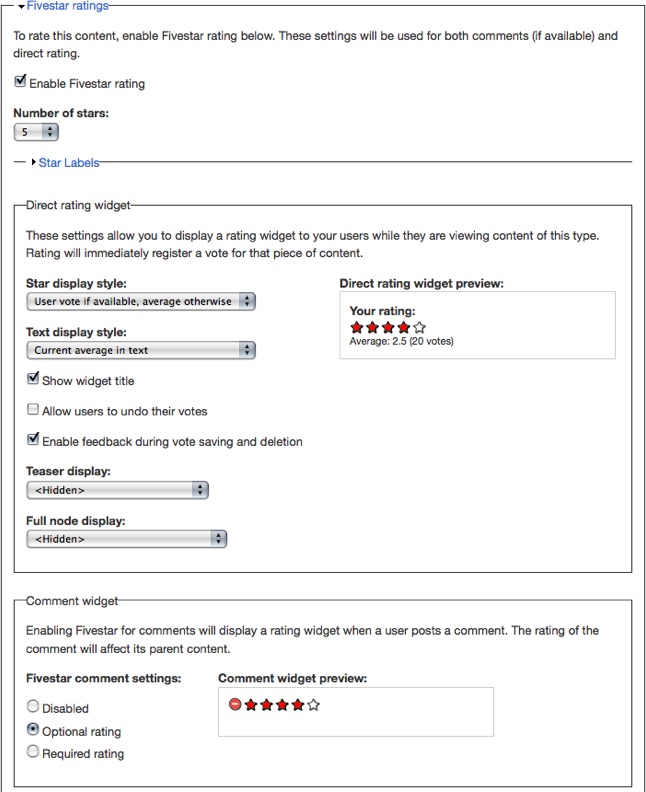
Click the “edit” tab for the Product review content type (admin/content/node-type/review) and open the “Fivestar ratings” section of the page. Once you’ve checked “Enable Fivestar rating” for the content type, a preview of the rating widget based on the settings you’ve selected will appear on the page. Feel free to experiment with different settings: the Fivestar module will offer a preview that reflects your choices. Fill out the settings with the values in Table 4-8, as shown in Figure 4-10. This setup will show the user’s own vote if available; otherwise, it shows the average vote across all users.
Field | Value |
Direct rating widget | |
Star Display Style | User vote if available, average otherwise |
Text Display Style | Current average in text |
Full node display | <Hidden> |
Comment widget | |
Fivestar comment settings | Optional rating |
Click the “Save content type” button to save your changes.
Note
Remember that you can play with the settings at Administer→Site configuration→Fivestar (admin/settings/fivestar) to choose fun icons such as hearts or flames that users can use to rate content. If you choose a widget listed under “Custom color widgets,” you can even choose a color scheme that matches your site.
With the ratings in place, we need to allow the site users to actually rate things. Go to Administer→User management→Permissions (admin/user/permissions) and set the permissions shown in Table 4-9. Click the “Save permissions” button to finish up.
Permission | anonymous user | authenticated user | editor | site administrator |
fivestar module | ||||
rate content | Checked | Checked | Checked | |
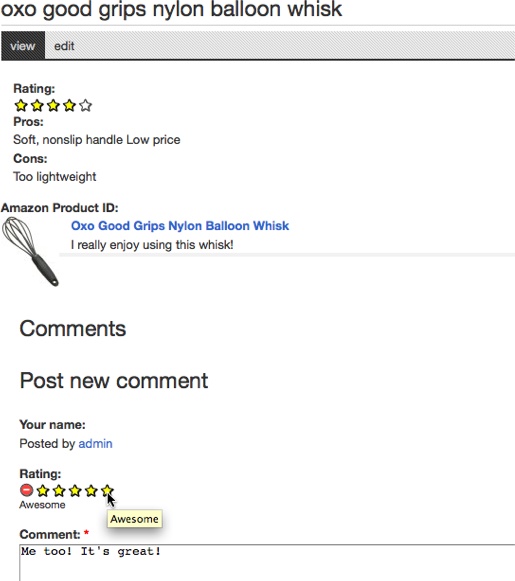
All of the essentials for the reviews are now in place. Writers on the site can write reviews that include pros and cons about the product, rate the product using an intuitive five-star scale, and pull in full pricing and manufacturer information from Amazon.com. In addition, users can post their own comments about the product and rate it themselves. Figure 4-11 shows our new Fivestar ratings in action.
Hands-On: Building a Product List
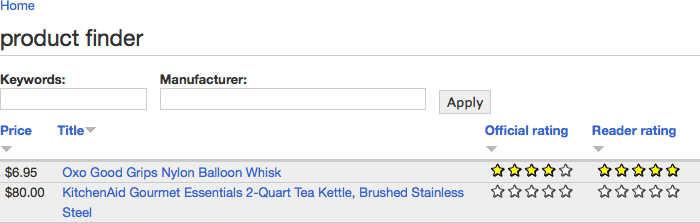
Now that we have a few products, we really ought to add a listing page that lets visitors look over all of the products that have been reviewed, comparing official ratings with visitor ratings and sorting by various criteria, as pictured in Figure 4-12. This page will be simple to build with the Views module.

Go to Administer→Site building→Modules (admin/build/modules) and enable the following modules:
Other package
Advanced help
Views package
Views
Views UI
Go to Administer→Site building→Views and click on the Add tab (admin/build/views/add) and fill in the new view settings using Table 4-10.
After clicking the Next button, configure the “Basic settings” section of the view, using Table 4-11.
After setting those Basic settings, you will see a message that states “You need at least one field before you can configure your table settings.” We are going to go ahead and do that in a minute, but first we need to create a relationship for our fields so that we can use Amazon-specific fields in the view and display the average rating given to each product by visitors to the site.
Click the
+(plus) icon in the Relationships section and check both the “Content: Amazon item: Amazon product ID (field_product_id)” and “Node: Voting results” relationships. Click the Add button to add the relationship and then fill out the settings in Table 4-12 when prompted. Press Update after each form is presented.
In the Fields section of the View, click the + (plus) icon, check the following fields, and click Add. This will give us the product title, price, official rating, and reader rating:
Amazon: List price
Amazon: Title
Content: Fivestar Rating: Rating (field_rating)
Voting API results: Value
Configure the settings for each new field as shown in Table 4-13. Click Update when you’re finished configuring each field’s settings.
Table 4-13. Field configuration settings for the Product finder viewDefaults: Field configure setting
Value
Amazon: List price
Label: Price
Amazon: Title
Link behavior: A link to the node the product is associated with
Content: Fivestar Rating: Rating (field_rating)
Label: Custom
Custom label: Official rating
Voting API results: Value fields
Appearance: Fivestar Stars (display only)
Relationship: Voting results
Label: Reader rating
Let’s rearrange the fields into a different order. Click the ↑↓ (rearrange) icon in the Fields section. Drag the “(field_product_id_asin) Amazon: Title” field to the top of the list so that the product title is listed first.
Now that we have the fields, click the
 (gear) icon next to
Style to configure the table settings, and use
the values listed in Table 4-14 for a sortable
table. Click Update when finished.
(gear) icon next to
Style to configure the table settings, and use
the values listed in Table 4-14 for a sortable
table. Click Update when finished.
In the Filters section, click the + (plus) icon and check the Node: Published or admin and Node: Type filters. This setup shows only published review nodes, unless the logged-in user has the ability to see unpublished nodes (administer nodes permissions), which can be handy. After clicking the Add button, configure the new fields according to Table 4-15, clicking Update after each form.
Finally, use the links on the left side of the View page to add a new Page display to the view. Configure the display’s Page settings to match the values in Table 4-16.
When all those steps have been completed, save the view, which should look like Figure 4-13.
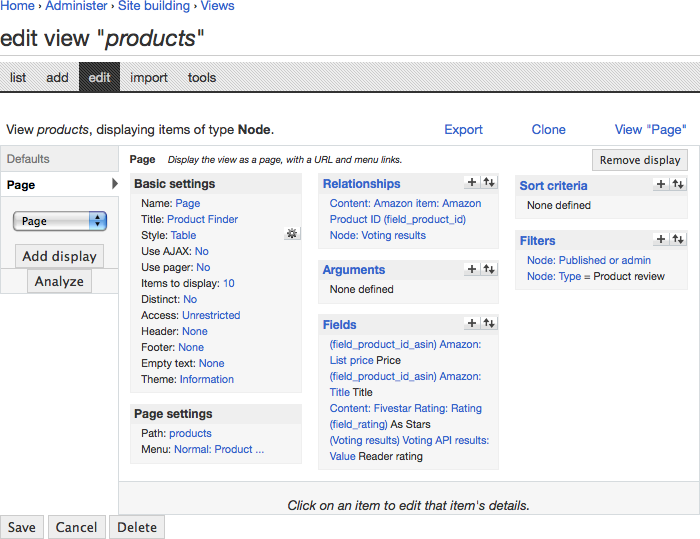
With the settings we’ve used, you should now see a “Product finder” link (products) in the site’s navigation menu. Upon clicking it, you should see a tidy listing of all the reviews on the site, with official and reader ratings compared side by side, as shown earlier in Figure 4-12.
Only one feature remains from our to-do list: build searching capabilities into our product list so visitors can easily filter it down to find products that interest them.
Spotlight: The Search Module
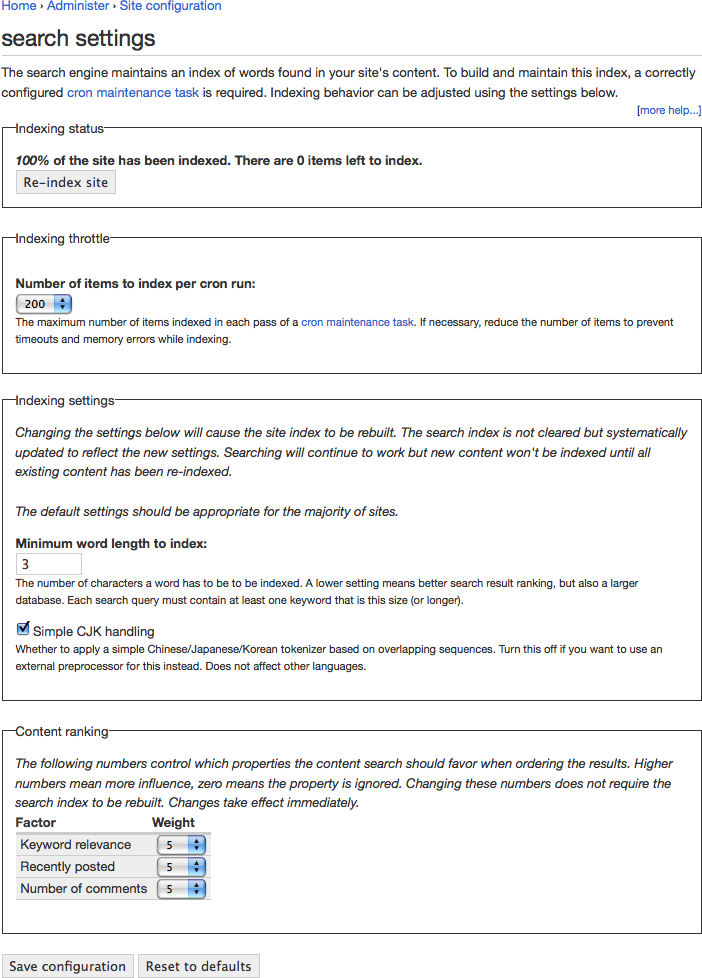
Drupal’s built-in Search module offers powerful, flexible searching features and intelligent ranking of results. Behind the scenes, it’s silently building an index of all the words used in the site’s content. When users search for a phrase on the site, content is ranked using customizable rules and displayed in order of relevance. On any Drupal site, you can refine these rules by going to Administer→Site Configuration→Search Settings (admin/settings/search) and changing the Content Ranking weights, pictured in Figure 4-14.
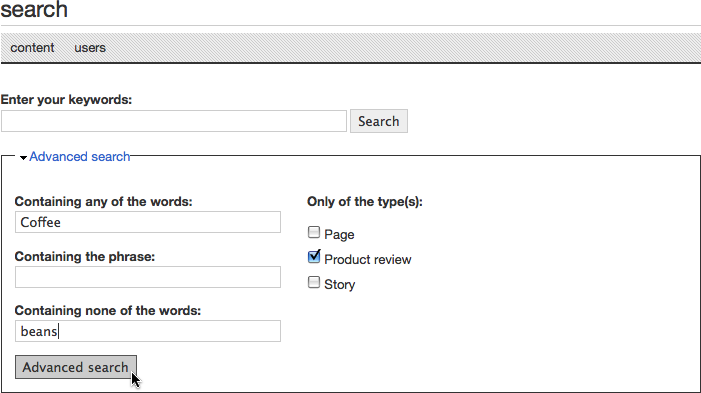
The Search module also offers more detailed options for sites with large amounts of content. The Advanced Search screen, pictured in Figure 4-15, allows users to choose exactly what content they want to search, filtering based on content type, free tagging terms, and other criteria.
The Importance of Cron
The indexing process used by Drupal’s Search module only works when the “cron” utility has been properly configured. cron is a utility used to run various commands at scheduled intervals on your web server. It is responsible for performing maintenance tasks on a Drupal site, such as clearing old log entries, as well as scheduling bulk email and other tasks that happen with regular frequency.
Each time cron runs, Drupal will catalog some of the site’s content; by default, it indexes 200 posts each time. If your site has a large number of posts already, the speed of the indexing will depend on how frequently cron is configured to run on your server.
If you’re not sure whether cron has been set up, or if you’re running on your local computer to test the site out, you can tell Drupal to perform its cron tasks by visiting Administer→Reports→Status report (admin/logs/status) and clicking the “run cron manually” link. For more information on setting up cron for your site, see http://drupal.org/cron.
Note
An alternative to setting up cron is to install the Poormanscron module (http://drupal.org/project/poormanscron). This module passes along the task of checking to see whether scheduled events need to happen to your website’s visitors, transparently. Each time a visitor hits the website, Poormanscron will check to see whether it needs to do anything new since the last time it ran and, if so, will perform the cron actions. This check triggers events after the page is loaded, so the visitor doesn’t know the difference.
Of course, this works only if your site gets regular traffic. But then again, if it doesn’t, it probably doesn’t matter how often your search index is updated.
Searching with Views
Although the Advanced Search form allows quite a bit of control for users, it’s very difficult for us to change how that page appears and control how the results are displayed. It also can present a daunting array of options, especially when a site has lots of taxonomy terms.
The Views module is one way to exercise more control over searching: its filters can narrow down lists of content based on words indexed by the search system. A view might list only blog posts mentioning kittens, for example. For the Super Duper Chefs site, we’ll be using this module to add custom filtering to our Product finder page.
Hands-On: Make the Product List Searchable
To transform the Product finder page into a searchable index, we’ll be adding two new filters to the view: one that restricts the results by manufacturer and another that restricts results to reviews that mention specific words.
Normally, these filters are locked in place and can’t be modified, except by the site’s administrator. We need users to enter their own criteria, however. Fortunately, Views allows us to “expose” any of its normal filters. Doing so adds a small form to the heading of the view’s display page. Visitors to the site can use it to change how Views filters its results, turning any view into a simple search tool, as pictured in Figure 4-16.
Here are the steps to get your searchable list:
Enable searching on the site: go to Administer→Site building→Modules (admin/build/modules) and enable the Core - optional: Search Module.
Go to Administer→Site building→Views (admin/build/views) and click the Edit link for our Product view.
Click the
+(plus) icon in the Filters section to check the Amazon: Manufacturer and Search: Search Terms filters.On the settings form for each of the filters, click the Expose button, which will present the filter as a form field that a site visitor can interact with. Configure the Exposed Filter settings for each filter using the values in Table 4-17. As usual, click Update to move between the configuration forms.
Click the ↑↓ (rearrange) icon on the Filters section and move Search: Search Terms above Amazon: Manufacturer so that its box will appear first.
Save the view, which should now look like Figure 4-17.

Before we test our new search feature, we need to make sure that we give search permissions to the users. We want everyone who visits the site to be able to search. Go to Administer→User management→Permissions (admin/user/permissions) and set the permissions as indicated in Table 4-18, which will give the option to all users, both logged in and anonymous. Save the permissions.
Permission | anonymous user | authenticated user | editor | site administrator |
search module | ||||
search content | Checked | Checked | ||
The last thing we need to do is make sure that our site has been indexed, so that when we do a search the keywords will be accessible. Although you definitely want to set up an automated cron job to handle this, we will manually update our site so we can see that our search is working properly. Go to Administer→Reports→Status report (admin/reports/status), and in the table you will see a row for “Cron maintenance tasks.” Click the “run cron manually” link.
Now go to our Product finder page (http://example.com/products). You should see the normal page full of products, this time with filter fields above the list. Enter a phrase that appears in one of your reviews, and click the Apply button. You should see an attractive list of the top results that contain the phrase, as we saw earlier in Figure 4-16.
Spotlight: CSS Injector
Drupal’s theming system, which is introduced in Chapter 11, gives designers complete control over how a site’s content is rendered for a web browser, and custom themes (like the Nitobe theme that we’re using for the Super Duper Chefs site) can give any site a distinctive look. But sometimes it’s useful to make minor tweaks to a site’s appearance using nothing but CSS rules. They allow designers to tweak font sizes, colors, and so on without altering the underlying HTML that defines the site’s structure.
The CSS Injector module (http://drupal.org/project/css_injector) gives administrators the ability to add those snippets in an administration screen within your site, without having to make changes to the current theme’s files. This feature can be useful when a new version of your site’s theme is released on Drupal.org—if you change the theme to add your own CSS, it’s easy to lose those modifications when you download the new version. Keeping them in CSS Injector will preserve them even if you change themes.
CSS Injector offers a number of advanced options, including the ability to add the CSS rules conditionally on certain pages. If your CSS tweaks only apply to the front page, for example, you can ensure that it won’t add the unnecessary rules to the entire site. You can also specify a media type for your CSS, which makes it possible to add styling information that applies only when a page is being printed. Finally, each rule can use the Preprocess CSS checkbox to control whether Drupal should merge its rules with the current theme’s CSS. In most cases, this step saves time, because a visitor’s web browser makes only a single trip to your site’s web server to download all the stylesheets. If you’re adding extremely large amounts of CSS code that only apply to one or two pages, it can be more efficient to keep that code separate by turning preprocessing off. Otherwise, leave it enabled.
Note
If you’re mystified by CSS, http://w3schools.com/css/default.asp provides interactive work areas for learning all types of web technologies, including CSS. It’s a great resource to keep bookmarked.
Hands-On: Polishing the Presentation
In this section, we’ll do some final tweaking to make the review display look nice and tidy, as pictured in Figure 4-18.
Setting CCK Display Fields Options
Although our Product Reviews content type has all of its data in order, and our product listing pages are looking great, the individual reviews still look a bit untidy. Fortunately, we can use the CCK module’s display settings to tweak how each type of field is displayed in the reviews.
Go to Administer→Content management→Content types (admin/content/types), click the “edit” link for the Product review type, and then click the “Display fields” tab (admin/content/node-type/review/display). Fill out the fields using the settings in Table 4-19, which will help streamline the display of review information. Click the Save button when you are done.
Configuring CSS Injector
Changing the CCK Display settings for our reviews cleans things up quite a bit, but the Summary information still seems awkward. In Chapter 11, we cover some of the basics of theming the HTML that Drupal outputs, but for now we can improve things quite a bit by adding some CSS rules using CSS Injector. We’ll use it to reduce the width of the Summary box and float it to the side of each review, turning it into a floating sidebar rather than a header at the top of each review. Here’s how:
Go to Administer→Site building→Modules (admin/build/modules) and enable the Other: CSS Injector module.
Go to Administer→Site configuration→CSS Injector (admin/settings/css_injector) and click the “Create a new rule” link to add a new CSS rule.
Name the rule “Floating Amazon fields,” and enter the following text into the CSS code field. You can see the completed form in Figure 4-19.
div.fieldgroup {
  border: 1px solid lightgrey;
  float: right;
  padding: 10px 2px;
  width: 200px;
  font-size: .9em;
}

div.field-label-inline-first {
  float: left;
}
Note
Not a fan of typing? Not to worry. This code is also available in the assets/ch04-reviews/amazon.css file in the book’s source code for easy copying and pasting.
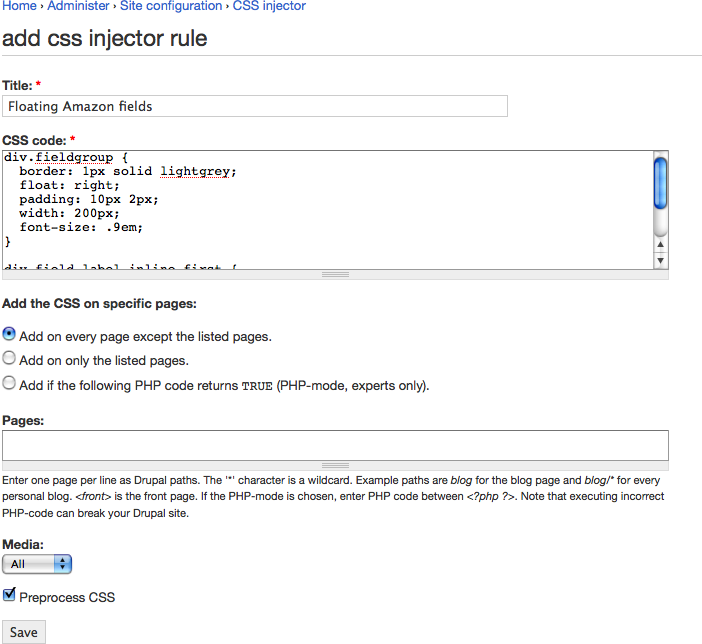
Click the Save button to add the new rule.
Depending on your web browser’s settings, you may need to clear the browser’s cache to see the changes to the stylesheet. Once you’ve done that, returning to one of the product reviews added earlier should look quite a bit more attractive, as shown earlier in Figure 4-18. What a difference a dash of CSS makes!
Taking It Further
Congratulations! All of the major features for the site are in place. If you’re interested in experimenting further, there are quite a few opportunities for additional enhancements using other Drupal modules.
- Notifications (http://drupal.org/project/notifications)
This module gives visitors to the site the ability to request email notifications each time a new review is posted. It also allows official site contributors to receive email when visitors post comments to their reviews.
- AdSense (http://drupal.org/project/adsense)
This module allows Bob and Sarah to place ads in the sidebar to offset the costs of hosting the site.
- Blog (core)
This module allows the site’s writers to each have their own blog on which to discuss their cooking tips, latest recipes, and other culinary exploits, even when they’re not reviewing products.
Summary
After all that work, where have we arrived? We’ve hit all of the major pieces of functionality that Bob and Sarah wanted. Using CCK, Amazon, and Fivestar, writers can post their reviews of cool kitchen products to the site. With Fivestar and Voting API, visitors to the site can offer their opinions on those same products and participate in the reviewing process. And with Views’ Search module integration, it’s easy for them to find the exact products that they’re interested in. Finally, the CSS Injector module allowed us to sprinkle on those finishing touches that make the site really shine.
Here are the modules that we referenced in this chapter:
AdSense: http://drupal.org/project/adsense
Amazon: http://drupal.org/project/amazon
CSS Injector: http://drupal.org/project/css_injector
Fivestar: http://drupal.org/project/fivestar
Poormanscron: http://drupal.org/project/poormanscron
Voting API: http://drupal.org/project/votingapi
Here are some other resources we referenced:
Amazon Associates program: http://affiliate-program.amazon.com/
Configuring cron jobs: http://drupal.org/cron
Evaluation and rating modules: http://drupal.org/project/Modules/category/60
Third-party integration modules: http://drupal.org/project/modules/category/52
Voting Systems Drupal group: http://groups.drupal.org/voting-systems
W3Schools CSS Tutorial: http://w3schools.com/css/default.asp
Get Using Drupal now with the O’Reilly learning platform.
O’Reilly members experience books, live events, courses curated by job role, and more from O’Reilly and nearly 200 top publishers.

