Windows 7 can handle full-screen, high-definition video streamed over the Internet from websites like Hulu without any special software beyond a web browser, the Adobe Flash plugin, and a suitable video driver. But try to play a low-res video file sitting on your hard disk, and it gets complicated.
Unlike most other types of files, the filename extension alone doesn’t dictate the encoding scheme of a video. All .jpg image files use standard JPEG compression, but a given .avi movie file may employ any one of dozens of available compression standards, called codecs. Without the proper codec for a video file, you won’t be able to play the video or even convert it to a playable format.
A codec (which stands for compressor/decompressor) is software installed on your PC, akin to a device driver, with most of the pitfalls and frustrations that implies. Codecs are frequently buggy, and a bad one can cause video playback problems and even application crashes.
Windows 7 only includes codecs for a few common (and aging) standards; need anything else, and you’re on your own. And since Windows provides no “Device Manager” or “Windows Update” tool for codecs, there’s no easy way to list the codecs installed on your PC, get updates, or install missing ones. (At least not without add-on software.) And don’t even get me started on the More Information link in Windows Media Player, which doesn’t provide anything one would recognize as useful information.
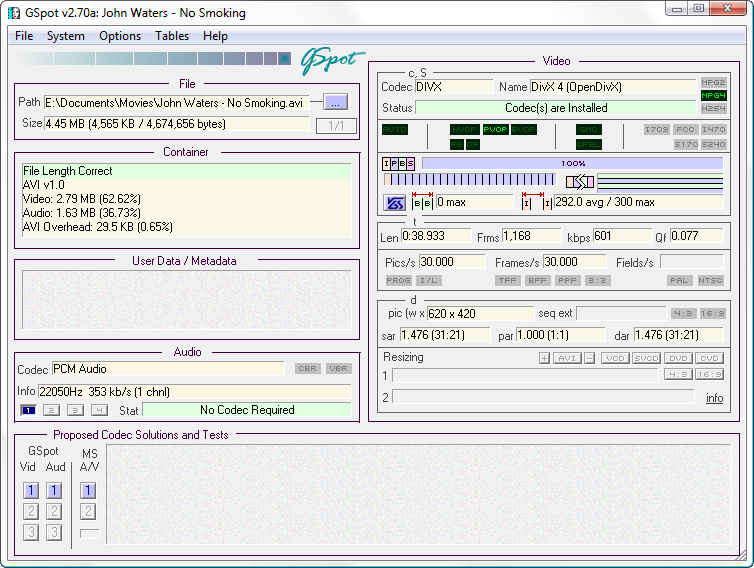
To play a particular video, you need to install the same codec that was used to create (compress) the video in the first place, regardless of the player application you’re using. (In other words, a missing codec isn’t a deficiency of Windows Media Player, per se, but rather of Windows.). To determine which codec was used for a particular video, you’ll need a program like GSpot or AVIcodec, both of which are free. Just drag-drop the video file onto GSpot (Figure 4-1) or AVIcodec, and the program will display the file’s video codec, audio codec, and other statistics.
Note
The codec utility may indicate that the required codec is already installed. As comforting as that may be, you might still need to download and install the latest version of the codec to play the troublesome video. Otherwise, you may not have all the latest bugs…er, fixes.
If one of these tools can’t identify the codec, the file might be corrupted or encoded with a nonstandard scheme. This doesn’t necessarily mean the video isn’t playable, but rather that it might be a bit of a chore to find out how to make it playable.
Provided you’re not able to personally ask whoever created the video
for details about the software used, the easiest trick is to open the file
in a standard text editor and look for the four-digit 4CC code near the beginning. Figure 4-2 shows the code
buried in a file, DIVX in this case,
which indicates that the DivX decompressor is needed to play this
video.
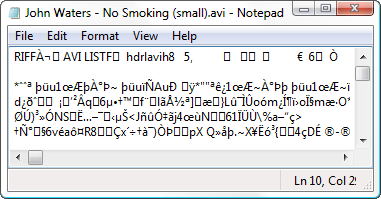
Figure 4-2. A hex editor or text editor will show you the 4CC code embedded in the beginning of most movie files
Armed with the name (or 4CC code) of the codec, go to http://www.fourcc.org/fcccodec.htm, and download the codec installer from the list. If the 4CC code isn’t there, a quick Google search (along with the word “codec”) should turn up some useful leads. After a bit of searching, you’ll probably figure out how widespread this video codec problem really is.
Once you’ve installed the codec, close any lingering Windows Media Player windows, and then try playing the video again. Keep in mind that there are often multiple versions of a single codec available—sometimes from different vendors—so you may need to install several codecs before you find the one that works.
Some of the more requested codecs include DivX, Xvid for MPEG-4,Apple Quicktime, and and FLV/Flash Video (described in the next section, ). After installing the latest versions of these four codecs, you should be able to play most of the videos you come across.
Warning
Some enterprising individuals have created codec packages, large installers that include several, if not dozens, of the codecs that people seem to need most. While these packages may seem convenient, there are several problems with this approach. For one, you’re installing more software and drivers than you really need. Second, these packages typically do away with the standalone installers, which means updating or removing individual codecs can be a chore. And worst of all, if one or of the installed programs or codecs causes a problem, it’s nearly impossible to troubleshoot it. My advice: avoid the packages and install codecs one-by-one as you need them.
If, after installing an individual codec or codec package, some of your videos no longer play (or their thumbnails no longer show up), there’s a little trick you can try before you uninstall and give up. The FFDShow Video Decoder Configuration tool, included with many codec packages and shown in Figure 4-3, helps you troubleshoot specific codec problems.

Figure 4-3. When more than one codec is installed for a specific video format, you can choose which one to use with FFDShow Video Decoder Configuration Tool
For instance, on one occasion, Windows lost the ability to play back some .avi files: Media Player crashed every time it tried to play one, and Windows Explorer displayed an error message whenever it attempted to render thumbnails for the videos. To fix a problem like this, open the FFDShow Video Decoder Configuration tool, select Codecs on the left, and in the right pane, find the codec used by the video file that’s causing the problem. Then, in the Decoder column, use the drop-down listbox to choose a different decoder from the list. Click OK when you’re done; the change should take effect immediately.
Another way to manage codecs is with the free CodecInstaller utility (http://www.jockersoft.com/). Not only does it list all the codecs installed on your PC—along with their version numbers and filenames—but it can analyze media files to identify required codecs and even download common codec installers.
The FLV codec is the one used to create—and therefore play back—Adobe Flash video, the format used to stream video on many websites (most notably, YouTube). If you have the Adobe Flash authoring software installed, you can play FLV files with Adobe Player; but if you don’t have the full Flash package, or you want to play FLV files with Windows Media Player, you’ll need to install the standalone codec. Unfortunately, Adobe doesn’t provide the codec by itself, so you’ve got to obtain and register the files manually.
Note
In an attempt to find the right codec to play a video, you might come across a lone .ax codec file that doesn’t have its own installer (sometimes referred to as a splitter). This procedure is an example of how to install such a codec.
First, download the FLV DirectShow Filter (FLV Splitter), which you can get from the Guliverkli2 project (http://sourceforge.net/projects/guliverkli2/files/).
To install the codec, just copy the FLVSplitter.ax file to your \Windows\System32 folder.
Open a Command Prompt window in Administrator mode (see Chapters 9 and 8, respectively) and type:
regsvr32 \Windows\System32\FLVSplitter.ax
to register the file. Or, to uninstall, type
regsvr32 /u \Windows\System32\FLVSplitter.ax
If you see a message like “DLLRegisterServer in C:\Windows\System32\FLVSplitter.ax succeeded,” then the new codec is installed and ready to use. Test it out by double-clicking any .flv video file.
Note
Don’t want to hassle with the command prompt every time you register an .ax or .dll file? Try EMSA Register DLL Tool or DllRegSvr, both free, to do it with the Windows GUI.
To get thumbnail previews of FLV files in Windows Explorer, you’ll need to make a connection manually in the registry:
Open Registry Editor (see Chapter 3), and navigate to
HKEY_CLASSES_ROOT\.flv.Look at the
(Default)value and then navigate to the key by that name underHKEY_CLASSES_ROOT. For instance, if(Default)is set toflvfile, then you’d go toHKEY_CLASSES_ROOT\flvfile.Select the ShellEx key here (e.g.,
HKEY_CLASSES_ROOT\flvfile\ShellEx), and then from the Edit menu, select New and then Key.Name the new key
{BB2E617C-0920-11D1-9A0B-00C04FC2D6C1}.Inside the new
{BB2E617C-0920-11D1-9A0B-00C04FC2D6C1}key, double-click the(Default)value and type{c5a40261-cd64-4ccf-84cb-c394da41d590}for its contents.
If you don’t want to do all this by hand, you can download a
registry patch file from http://annoyances.org/downloads/flvthumbs.reg. Next,
complete steps 1 and 2 above; if the (Default) value is not
set to flvfile, edit the flvthumbs.reg file with Notepad and replace
flvfile with whatever (Default) is set to. When you’re ready, just
double-click the file and click Yes
to merge it with your registry. See Export and Import Data with Registry Patches for more on
.reg files.
If you can’t get the codec to work, or you’d prefer not to undertake the messy installation, you can get a dedicated .flv player like FLV Player (free at http://www.martijndevisser.com).
There are reasons that Windows Media Player might have trouble playing a video other than a missing or broken codec—namely, problems with the video file itself. First, make sure your video file is complete; if you downloaded it from the Web, try clearing your browser cache and downloading the file again.
If you’re unable to obtain an intact version of the video, you may be able to repair it with the free MPEG Header Corrector, available at http://www.videohelp.com/tools/sections/video-repair-fix, although this typically only works on true .mpg files. Need to repair an .avi file? Use DivFix (free, http://divfix.maxeline.com) instead.
OK, I know I just said that the filename extension doesn’t dictate the codec, but it does determine how the video data is organized in the file. See the sidebar if you suspect a video file has been misnamed.
But what if you’re in the middle of downloading a video from the Web? Eventually, it’ll be intact and playable, but if you want to start playing it before the download is complete, you’ll need to employ a few tricks.
First thing to know: Windows Media Player (and many other players) won’t play most kinds of videos while they’re in use—that is, while they’re currently being saved by another program (e.g., your browser). The big exception to this rule is streaming video, commonly found in files with the .asf or .wmv extension (Quicktime .mov files, too); by design, these files can be played even while in use by other applications.
To get around this limitation for non-streaming video formats, open the folder containing the file, and create a duplicate of the partially downloaded file. Using the right mouse button, drag the file to an empty area in the same folder, and select Copy Here from the menu that appears. When that’s done, you should be able to open the duplicate file with no problems.
Note
You may have to change the filename extension when playing videos that are in the midst of downloading. For instance, if you’re downloading a video with certain types of peer-to-peer clients named skiing.mpg, the intermediate filename will be something like skiing.mpg.downloading, and thus the filename of the duplicate you create will be skiing.mpg-Copy.downloading. Just rename the file to skiing.mpg-Copy.downloading.mpg (or simply skiing.mpg) and then double-click the file to play it. Of course, some P2P programs download files out of order, so your video will only play the first contiguous block of complete data.
With some video formats, particularly .avi files, there’s a catch: the index, essential information about the sequence of frames in the video, is located at the end of the file instead of the beginning. Thus an incomplete .avi file won’t have an index, and can’t be played at all. The solution is to use a rendexing utility to rebuild this data and make the file playable. DivFix, shown in Figure 4-4, does this quite nicely, but only works on true .avi files (discussed earlier in this section). If DivFix can’t repair your file, the Windows Media Encoder (free, http://www.microsoft.com/windows/windowsmedia/forpros/encoder/default.mspx) is capable of indexing video files, albeit requiring a bit more work to navigate the complex interface.

So, what if your video plays, but not well? Problems like stretched or squashed video (too wide or too tall), bad color, and choppy playback can all be caused by buggy, misconfigured, or out-of-date video codecs. Just track down and install the latest version of the codec required by the misbehaving video, as described at the beginning of this chapter, and try again. If that doesn’t help, there are some other fixes, as follows:
- Change the aspect ratio
If all your videos seem squashed (too narrow) or stretched out (too wide), you may have to correct your display’s aspect ratio setting. In Windows Media Player, press the Alt key by itself to open the menu, and then from the Tools menu, select Options. Choose the Devices tab, highlight Display in the list, and then click Properties. Move the slider until the oval looks like as close to a true circle as possible, and then click OK.
On the other hand, if only a single video clip has an incorrect aspect ratio, it may’ve been encoded that way. Sure, you can fix the file with a video-editing program like River Past Video Perspective, Open Video Converter, or Adobe Premiere, but that’s a lot of trouble for a video you might only watch once. Instead, open the file in Windows Media Center and use the Zoom feature, or watch the video with VLC Media Player (free from http://www.videolan.org/vlc/), which lets you change the aspect ratio on the fly.
If you do decide to reencode the video, the hardest part is the math (and it’s not that hard). Most video has a 4:3 aspect ratio, which means the width is four-thirds the height. (HD television and some feature films typically have a 16:9 aspect ratio, while wider “anamorphic” feature films have a 2.39:1 aspect ratio.) If your botched video clip has, say, a resolution of 400×400 (giving you a 1:1 aspect ratio and a square video frame), you can either increase the width to 600 (400×4/3) or decrease the height to 300 (400 divided by 4/3). Of the two choices, decreasing the height will usually give you a sharper-looking video, since compressed pixels always look better than stretched pixels.
- Synchronize audio and video
If all your videos are out of sync, open the Sound page in Control Panel. Choose the Playback tab, select your speakers in the list, and then click Properties. Choose the Enhancements tab, select Room Correction from the list, and click the Settings button. (If Room Correction isn’t there, your sound card driver doesn’t support the feature.) You’ll need a microphone and a few minutes to complete the exercise.
If the Room Correction tool doesn’t help, or if it’s unavailable, open Windows Media Player and press the Alt key by itself to open the menu. From the Tools menu, select Options, and then choose the Performance tab. Turn on the Drop frames to keep audio and video synchronized option, and then click OK.
Note
If the audio is out of sync while playing a DVD, try pausing playback, waiting a few seconds, and then starting up again. Sometimes that’s all it takes to get a movie back on track.
If settings alone don’t fix the problem, there may be a problem with your hardware drivers. Go ahead and install the latest drivers for your video card and sound card, and then run Windows Update to make sure you have the latest video-related updates.
If the audio and video in only a single clip are out of sync, try watching the video with VLC Media Player (free from http://www.videolan.org/vlc/), which lets you fix the sync on the fly. But to repair the file, you’ll need a timeline-based video-editing application like Adobe Premiere. (Unfortunately, Windows Live Movie Maker, which comes with Windows 7, won’t let you manipulate video and audio streams separately.) Drag your video to the timeline, then drag the audio portion of the clip slightly to the left or right until it’s synced up with the video. (Naturally, this takes some trial and error, so I hope it’s not a boring clip.)
Note
The aforementioned dragging method works only if the audio and video are out of sync consistently throughout the video. If the movie starts out in sync but gradually gets out of sync, a little more massaging of the audio track is necessary. Either you have to insert delays or delete tiny bits of silence here and there to straighten everything out, or you have to stretch or shrink the entire audio track by a small amount—a two-second lag on a two-hour movie is just under 0.03%.
When you’re done, export the project into a new movie file. Consult the documentation that comes with your video application for details.
- Speed it up or slow it down
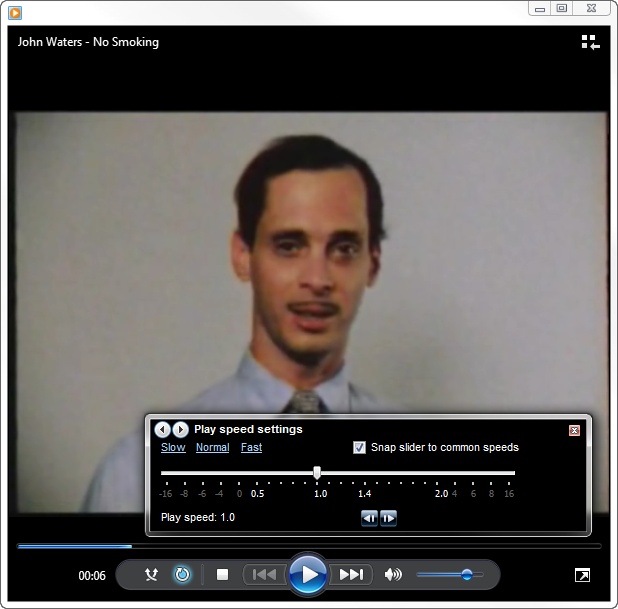
Is a video playing too fast or too slow? In Windows Media Player, click the Now Playing button, select Enhancements, and then select Play Speed Settings (Figure 4-5). Adjust the slider until the video plays at the correct speed.
- Fix bad color
If some of your videos seem to have messed-up color, open Windows Media Player, click the Now Playing button, select Enhancements, select Video Settings, and then click the Reset link. Next, click the little arrows until you see Color Chooser, and click the Reset link here as well. Now, play a video to try it out; if the colors are still off, you may have to play with the Video Settings and Color Chooser sliders to fine-tune the color.
If that doesn’t do the trick, or if you see colored lines running through your videos, you can usually correct the problem by updating your display drivers.
- Shed light on blank videos
Ever feel like Sergeant Schultz from Hogan’s Heroes?[5] You might hear something, but you definitely see nothing when you play most videos. This is often caused by a missing video codec, but might instead point to a video overlay problem.
When you play video, Windows usually paints a special rectangle on your screen, and your video driver is responsible for superimposing the moving video over it. This overlay scheme allows your display adapter (video card) to handle the burden of playing the video rather than your CPU, which affords better performance and smoother video. Unfortunately, it can also be the source of problems in some cases, usually manifesting itself as only the black rectangle where video should appear.
First, conduct a little test to see whether you indeed have an overlay problem. Try maximizing or resizing the Windows Media Player window, or cover it with another window and then bring it to the front. If this makes the video play, or if you see pieces of windows left behind in the black rectangle, your video card driver may be to blame. Visit your video card manufacturer’s website and download the latest driver. Also, pay a visit to the company’s support website and look for recommended BIOS settings (see Appendix A).
The Windows Media Player has lots of interesting features and gadgets, most of which just get in the way when all you want to do is play a simple video. Of course, it looks downright minimalistic compared with Real Networks’ cumbersome RealPlayer. Fortunately, you have a few choices.
To switch to the simpler Windows Media Player window, just press Ctrl-2 to switch to Skin Mode. (Or, press Alt to show the normally hidden menu, and then select View→Skin Mode.) The default skin is “Corporate,” but you can choose another skin by clicking Alt and selecting View→Skin Chooser.
Alternatively, Media Player Classic - Home Cinema, available for free at http://sourceforge.net/projects/mpc-hc/, can take the place of Windows Media Player, RealPlayer, and QuickTime Player. It has a slimmed-down interface (shown in Figure 4-6), loads more quickly than Windows Media Player, and doesn’t need to be installed (it’s just a standalone .exe file). Best part is that it plays any video format that Windows Media Player can play. (Really, it’s just replacement “shell” that ties into the playback engines that come with the aforementioned media players.)
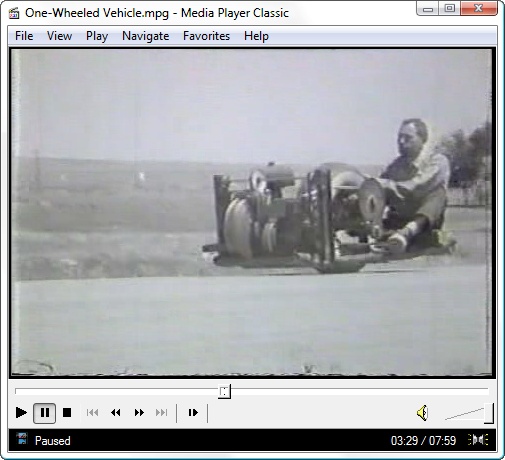
Figure 4-6. Media Player Classic is an alternative to the overblown Windows Media Player and messy RealPlayer applications
Aside from the streamlined interface and its ability to handle just about any video format, Media Player Classic has several features that make it worth using. For instance, you can play more than one video at once, something Windows Media Player won’t let you do. And it’s kind enough to show detailed error messages with enough information to solve the problem, such as listing any missing codecs.
Also available is the free VLC Media Player, which, in addition to providing a simple, clean interface, gives you superior control over playback speed, aspect ratio, audio/video sync, color, subtitles, and volume.
You’ve probably encountered a video on the Web that won’t let you jump back (without starting over) or skip ahead. It’s not such a big deal with a 20-second clip, but when you’re watching a half-hour broadcast mostly featuring a talking head, it can be infuriating when you can’t just skip ahead to the car chase.
Usually, this is a limitation of the video file (or of the player), and not simply an option that can be turned on or off. A lot of streaming video clips have this problem, particularly .wmv and .asf videos. To jump to an arbitrary position while watching these videos, they must be indexed, something you can only do if the video file is stored on your hard disk. If there’s a web-based video you want to index, you’ll need to download it to your hard disk first, as described in Download Online Video Clips.
To index a .wmv file, download the free Windows Media Encoder at http://www.microsoft.com/windows/windowsmedia/forpros/encoder/default.mspx (don’t worry about the “9 series” moniker; it’ll work fine with Windows 7 and Media Player 12. Open the Windows Media File Editor, drag-drop the video onto the Editor window, and from the File menu, select Save and Index. Thereafter, you’ll never have to wait for the car chase again.
Most online video clips are designed to stream, allowing you to start watching before your PC has finished downloading. To keep the video playing smoothly, video players often download a few seconds of video ahead of the playback, a technique called buffering (or caching), and sometimes this means you have to wait. The good news is that you can choose when to wait: now, or later.
Note
The buffering settings discussed here have no effect on video clips stored on your hard disk, nor on video handled by other players (e.g., Flash, Quicktime, and RealOne). To eliminate buffering messages altogether, see the next section, .
In Windows Media Player, click the Now Playing button, select More Options, and then choose the Performance tab. Select Buffer [5]
seconds of content, the second option
in the Network buffering
section.
To shorten the lead time so that videos will start playing sooner,
enter a small number, say 3.
Depending on the speed of your Internet connection and number of
visitors the web server is currently juggling, those 3 seconds of
content could take anywhere from 2 seconds to 20 minutes to download.
(Obviously, upgrading to a faster Internet connection will minimize the
waiting most of the time.)
Unfortunately, entering a small number means that Media Player has
to stop playback more often to buffer more content. If you find that
Media Player frequently stops playing to buffer more data,
raise the buffer number to 10 or
20 seconds. You’ll get smoother
playback, but you’ll have to wait longer before your online videos
play.
Most online video publishers don’t make it easy to download video files to your hard disk, and for good reason. For one, if you’re forced to watch video only on the originating website, the video provider can monetize your visit with ads, cross-promotions, etc.. And of course, nobody wants you to take copyrighted material and upload it to YouTube. That’s all well and good, but who’s looking out for your needs?
What happens when the publisher takes down a video or moves it to a subscription-based archive before you have a chance to watch it? What if the server is too busy, and your PC isn’t able to stream it smoothly? What if you want to save the video so you can index it (as described earlier in this section)? What if the video is long, and you want to watch it later on your mobile phone or laptop on the road? What if you just want to needlessly fill up your hard drive?
It’s often tricky to save online video for several reasons, not the least of which is the variety of delivery protocols and anti-downloading mechanisms in use. So before you start mucking around, look for the simplest solution. Some sites, such as Google Video, include a download link right on the page. Or, if the video is presented bare in the middle of the browser window (as opposed to having been embedded in a page), and the URL ends with a filename extension commonly associated with video files (e.g., .mpg, .mov, .wmv), then you can often just save the file by pressing Ctrl-S. (Likewise, Page→Save As in IE or File→Save Page As in Firefox.)
Otherwise, the first step is to find out what kind of video file you’re dealing with, and the easiest way to do that is to right-click the center of the video frame in the browser window. The context menu that appears should indicate the plug-in being used: most notably, the About entry (if there is one). If you’re having trouble playing an embedded video, see the sidebar Straighten Out Browser Video Plug-ins.
How you proceed depends on the plug-in.
Flash-based videos typically come in two parts: the player module and the video file. The Flash plug-in first loads the player module (an .swf file), which then downloads and controls the video source (an .flv file); the .flv file is what you want. (This isn’t always the case; sometimes there’s no separate .flv file, and the video is likely embedded in the main .swf file.)
As soon as the player has finished downloading the entire .flv file, you can usually find it in your web browser cache, as described in the sidebar Pull Files Out of Your Browser Cache.
Note
Windows Media Player can’t play .flv files unless you install a special codec, as described in Install the FLV Flash Video Codec.
If you don’t feel like digging through your cache folder, you can use one of these handy browser add-ons designed to provide direct links to .flv files on the most popular Flash-based video websites:
- Bookmarklet (JavaScript button on your Links toolbar):
If you’re using Firefox, SeaMonkey, or Opera, go to http://1024k.de/bookmarklets/video-bookmarklets.html and drag the “All-In-One Video Bookmarklet” link from the page onto your browser’s Links toolbar. Then, navigate to a video page and click the bookmarklet to open a pop-up window with a download link.
Since Internet Explorer doesn’t support bookmarklets longer than 2,083 characters, you won’t be able to use the aforementioned “All-In-One” link in IE. Instead, use the “old” bookmarklets listed at http://1024k.de/bookmarklets/video-bookmarklets.html; you’ll need to install a bookmarklet for each website you use (e.g., YouTube, Google Video, etc.).
- Greasemonkey User Script (Firefox/SeaMonkey only):
If you have the Greasemonkey extension (available from http://greasespot.net), go to http://1024k.de/bookmarklets/video-bookmarklets.html, click the “All-In-One Video Script” link, and then click Install. Next, navigate to a video page, and click the yellow bar that appears to display the download link.
There are also many Greasemonkey user scripts specialized for individual websites, all available for free from http://userscripts.org. For instance, the excellent YousableTubeFix script not only provides convenient FLV and MP4 download links on all YouTube pages, it enlarges the video and reorganizes the page to improve usability.
- Firefox Extension (Firefox only):
First, install the VideoDownloader extension from http://videodownloader.net/, and then restart Firefox. Next, navigate to a video page, and click the VideoDownloader status bar icon to display a pop-up window with the download link.
Unfortunately, not every Flash player caches video. In this case, follow the instructions for Windows Media Player later in this section; just substitute the .flv filename extension for the Windows Media extensions in the instructions.
QuickTime files are typically the easiest videos to deal with. If the video file is playing by itself in the center of the browser window, select Page→Save As in Internet Explorer (or File→Save As in any other browser). If the video is playing in a standalone QuickTime window, you can select File→Save As and save the file right on the spot, but only if you’re using QuickTime Pro (the extra-cost upgrade to the free QuickTime player).
If the video is embedded in a web page, you’ll need one of these add-ons to yank it out:
- Bookmarklet (Internet Explorer, Firefox, SeaMonkey):
Go to http://plasmasturm.org/code/bookmarklets/ and drag the “unembed” link from the page onto your browser’s Links toolbar. Then, navigate to a video page and click the bookmarklet to download the embedded video.
- Greasemonkey User Script (Greasemonkey extension plus Firefox/SeaMonkey).
If you have the Greasemonkey extension (available at http://greasespot.net), go to http://neugierig.org/software/greasemonkey/, and install the “unembed” user script. This adds a download link next to any embedded video; just click the link to download the video file.
- Firefox/SeaMonkey Extension (Firefox or SeaMonkey).
Get the AdBlock Plus extension from http://adblockplus.org/, and then restart your browser. Open the Adblock Plus Preferences window, select Options, and turn on the Show tabs on Flash and Java option. Thereafter, a small tab will appear just above embedded videos; click the tab to view the URL, highlight the URL text and copy it to the clipboard, and then click Cancel. Armed with the URL of the source video file, download the file as described in the sidebar .
If the video is embedded in a web page (including a small pop-up web page), try right-clicking the video itself. Select Play in RealPlayer to open the clip in a standalone window, and then in Real Player, select File→Clip Properties→View Clip Info. Armed with the URL of the file, download it as described in the sidebar above.
The file you download likely won’t be the video itself, but
rather only a .ram file, a playlist of sorts that
points to one or more videos stored on a server somewhere. Open
Notepad and drag the .ram file into it to view
the URL inside. If the URL begins with http://, you can probably download it normally, again following the
routine in the sidebar . On the other hand, if the URL begins
with rtsp:// (which stands for Real
Time Streaming Protocol), you’ll need a special program capable of downloading
the stream to a file.
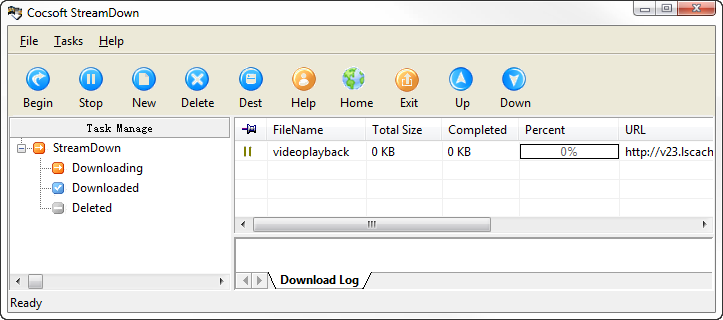
Copy the URL (highlight and press Ctrl-C) and paste it (Ctrl-V) into a program like CoCSoft Stream Down, shown in Figure 4-7, WMRecorder, or WebVideoCap, and it will stream the file and save it to your hard disk.
Windows Media Player videos are a pain in the neck because of the wide variety of tricks publishers must use to get the videos to appear in web pages. If you encounter one of these beasts, first try the bookmarklets and extensions for QuickTime videos, listed earlier in this section. If none of those work, you’ll need to do some digging to get the URL of the source file.
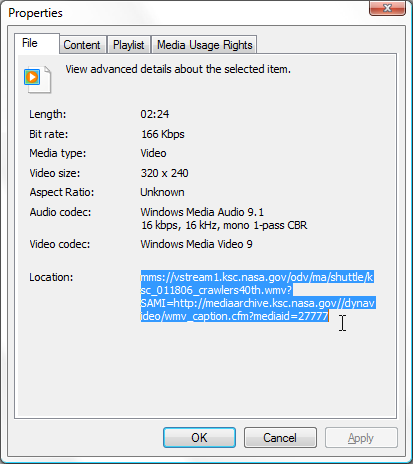
If the video is playing in a standalone Windows Media Player window, getting the URL is not too hard: from the File menu, select Properties, and it will be shown in the Location field (see Figure 4-8).
If the video is embedded in a web page, getting the URL is a little trickier. If you’re using Firefox or SeaMonkey, right-click an empty area of the web page and select View Page Info. Click the Media tab, and then scroll down the list until you see the URL of the video, which is often the only entry that isn’t an image file (.jpg, .gif, etc.).
Note
Firefox and SeaMonkey users can also use the AdBlock Plus extension, described in the Apple QuickTime portion of this section, to get the URL of an embedded Media Player video file.
If you’re using Internet Explorer, right-click an empty area of
the web page and select View Source
(this works in Firefox and SeaMonkey, too); some familiarity with HTML
will make this task much easier. Press Ctrl-F and search
the code for text that would likely appear in a video clip URL, such
as .asf, .asx, .wmv, or rstp:. Somewhere in the code, you’ll
hopefully find a full (or partial) URL for the source video clip that
looks something like
rstp://www.some.server/videos/penguin.asx. If
you’re lucky enough to find the URL, you can proceed to download it by
following the instructions for Real Player, covered earlier in this
section.
As a last-ditch solution, you can try a screen recording program such as CamStudio (free from http://camstudio.org/), Jing (free from http://www.jingproject.com/), Webinaria (free from http://www.webinaria.com/record.php), Hypercam (free trial at http://www.hyperionics.com/hc/), or Camtasia (free trial at http://www.techsmith.com/camtasia.asp). You won’t get the original video files, but you will get something you can play back at your convenience.
Get Windows 7 Annoyances now with the O’Reilly learning platform.
O’Reilly members experience books, live events, courses curated by job role, and more from O’Reilly and nearly 200 top publishers.

