Linux-based netbooks have some pretty huge advantages over Windows-based PCs: they’re cheaper, faster, lighter, less crash-prone, and safer (no malware threats, yet). But there’s no place for your stuff. Aside from some bewildering shortcomings, Windows 7 does a good job of giving you a home for your tens of thousands of photos (not to mention music, video, etc.).
But things could be better. Photo sorting is harder in Windows 7 than in Vista. Windows doesn’t support all the file formats it could. And getting decent color takes some work. Here’s how to make Windows take better care of your pictures.
Windows Vista was a big leap in photo management over its predecessor, XP, and Windows 7 offers a few additional enhancements…with one glaring omission. In Windows Vista, you could view a folder full of photos in the Large Icons view, and retain the useful column headers from the Details view for quick and easy sorting. Alas, the column headers are gone in Windows 7. Stupid Microsoft.
Things get worse when you drag new photos into a sorted folder. Sometimes the file stays where you put it, and sometimes Windows Explorer moves it after a short delay…and not always to the correctly sorted place. If the column headers were present, you could simply click, say, Date Modified (twice), to quickly re-sort the listing. Even if you didn’t need to change the sorting of a collection of photos, the column headers would show the current sort order at a glance, something that isn’t available anywhere else on the surface of Windows Explorer.
Instead, you’ve got to right-click an empty area of the folder (be careful not to select a photo), select Sort By and then the sorting method you want; that’s three clicks plus some careful mousing. To sort an unordered listing, that’s at least six clicks.
Alas, there’s no quick fix for this one. But there are some workarounds:
- Use the keyboard
Press Alt+V, then ON to sort by name, OT to sort by type, and OS to sort by size. But since the letter D is used to sort descending (and A to sort ascending), the only way to sort by date with a keyboard shortcut is to press Alt+V, down arrow, and then Enter.
To do this with fewer keystrokes, use a Hotkeys tool (part of Creative Element Power Tools, http://creativelement.com/powertools/) to assign the command
%(V)O{Down}{Enter}to a short keystroke like Alt-D. (See the included help for details on building hotkey strings.)- Use a different program
Few applications provide quick image sorting. DxO Optics Pro, for instance, has a Sort drop-down above the file list, right where Windows Explorer should have one. Picasa (free from http://picasa.google.com) offers basic sorting through a toolbar drop-down and the Album menu. And Adobe Lightroom offers sorting through controls at the bottom of the window. But none offer the simple pleasure of single-click sorting we got for free in Windows Vista.
One way Windows helps you organize your files is to direct different kinds of content to different locations. There’s a Music folder, a Videos folder, a Saved Games folder, and a Pictures folder. Put all your digital pictures in your Pictures folder, for example, and that’s where most photo applications will prompt you to open and save your files.
Note
This, of course, is separate from Windows 7’s Pictures library, which is a database of photos stored in any number of different locations. To change which photo folders are included, right-click the Pictures library and select Properties. Although some newer applications look in your Pictures library by default, many programs still default to the Pictures folder discussed in this solution.
Because the pictures folder can grow quite large, it’s not unusual to store your photos on a second drive. And if you change the physical location of your Pictures folder to that new location, applications will default to that folder when you open and save files. Here’s how to tell Windows where your Pictures folder ought to be, a task that requires a quick Registry modification:
Open the Registry Editor (described in Chapter 3).
Expand the branches to
HKEY_CURRENT_USER\Software\Microsoft\Windows\CurrentVersion\Explorer\User Shell Folders.
Note
Also in the Explorer branch
of the Registry is the Shell Folders key. According to Microsoft,
the key is no longer used in Windows 7, although you should still
update it for applications that still read it.
Double-click the
My
          Pictures
value in the right pane, and type (or paste) the full path of the folder you want to use (e.g.,d:\Photos). (The default here is%USERPROFILE%\Pictures, which is an expandable string value that points to the Pictures subfolder of your personal profile folder.)Click OK and then close the Registry Editor when you’re done.
Next, open Windows Explorer, open your profile folder (the one matching your user name at the top of the tree), and select the Pictures folder inside.
Right-click the desktop.ini file and select Copy. (This file is hidden; see Chapter 2 for details on configuring Windows Explorer to show hidden files.)
Navigate to your new pictures folder (e.g.,
d:\Photos), right-click an empty area of the folder, and select Paste.
The change should take effect immediately, but you may have to restart any open applications before they’ll recognize the new location. (Strictly speaking, the copying of desktop.ini in steps 5–7 is optional, but it does help Windows Explorer display the folders properly.) To test the change, open Paint (mspaint.exe), and select File→Open. If the folder that appears is the folder you chose, then you’re all done.
Note
You can change the locations of other “special” folders with the
same technique. For instance, put the location of your MP3 collection
into the My Music value. Or, put
the location of your Media Center recordings into the My Video value.
Windows understands a bunch of common image and movie formats out of the box, and can produce thumbnails for your files in Medium, Large, and Extra Large Icons views. To get Windows to recognize a new format, though, you need to install the appropriate Windows Imaging Component (WIC) codec.
If you’ve set up your digital SLR camera to produce “RAW” images (as opposed to the more common JPEG or TIFF formats), you can install one of these codecs to get Windows to display thumbnails for your files:
If your camera isn’t supported, or if the appropriate codec doesn’t work, try the free ArcSoft RAW Thumbnail Viewer, available at http://www.arcsoft.com/products/rawviewer/. It adds thumbnail support to Windows for RAW formats from Canon, Hasselblad, Kodak, Leica, Mamiya, Nikon, Olympus, Pentax, Ricoh, Samsung, Sigma, and Sony, and even works with Adobe Digital Negative (DNG) files.
The alternative is to use a separate picture viewer with its own thumbnail display, like Google’s free Picasa manager (http://picasa.google.com/), or commercial products like Adobe Photoshop Elements and DxO Optics Pro.
To add thumbnail support for new video formats, just install the latest video codecs, covered earlier in this chapter, and Windows will do the rest.
The Green Ribbon of Death, covered in Chapter 2, is your sign that Windows Explorer is either busy or broken. When it’s busy, it’s often busy building thumbnail previews of your photos.
In theory, Explorer caches its thumbnails so you don’t have to wait so long next time you view a folder. But if the thumbnail cache were seamless, the Green Ribbon of Death would be nothing but folklore; it’s not uncommon to be forced to wait while Explorer rebuilds the cache, even for a folder you’ve viewed recently. What you may not know, however, is that the cache can also be a security or privacy risk.
Windows stores the thumbnail cache in two different places. The main cache is located in six separate .db files in this folder:
| C:\Users\{your user name}\AppData\Local\Microsoft\Windows\Explorer |
which have names like thumbcache_32.db, thumbcache_96.db, thumbcache_256.db, and thumbcache_1024.db (each representing different thumbnail sizes). But you might also find a file named thumbs.db, or perhaps several thousand of them, stored in your individual photo folders.
Note
The thumbs.db file was used in Windows XP and previous versions as the sole means of caching thumbnails. So if you’ve been a Windows user since before Vista, you likely have plenty of these lying around. But Windows 7 uses thumbs.db too when browsing network folders; if you’ve got any on your hard disk, they were likely created by remote users browsing your shared folders. If you don’t see them at all, Windows Explorer is probably not set to show “protected operating system files,” as described in the section Customize Windows Explorer.
Since most people won’t see the thumbs.db file, it’s hard to make the case that it just adds clutter (although it does, dagnabbit). But since thumbs.db is usually readable by anyone, it does mean that anyone rifling through your files may be able to see the thumbnails of your images even if they can’t open the images themselves. (See the sidebar Extract Images From the Thumbnail Cache for details.) What’s more, if you zip up a folder of files to send to someone else, any thumbs.db files therein will go along for the ride, and you may be sharing more than you meant to.
Have the Professional, Ultimate, or Enterprise editions of Windows 7? Open the Local Group Policy Editor (gpedit.msc) and expand the branches to User Configuration\Administrative Templates\Windows Components\Windows Explorer. In the right pane, double-click the Turn off caching of thumbnail pictures entry, select Enabled, and then click OK. In the same folder, also double-click the Turn off the caching of thumbnails in hidden thumbs.db files entry, select Enabled, and then click OK. (To re-enable thumbnail caching later on, set each of these options to Not Configured.)
If you have Windows 7 Home Premium edition, you won’t have
access to the Local Group Policy Editor. Instead, open the Registry Editor (see Chapter 3)
and navigate to HKEY_CURRENT_USER\Software\Microsoft\Windows\CurrentVersion\Policies\Explorer.
From the Edit menu, select
New and then DWORD (32-bit) Value, and then type NoThumbnailCache for the name of the new
value (or double-click the NoThumbnailCache value if it’s already
there). Type 1 for the value data,
and click OK. Next, navigate to HKEY_CURRENT_USER\Software\Policies\Microsoft\Windows\Explorer
and create a DWORD (32-bit) Value
named DisableThumbsDBOnNetworkFolders. Likewise,
set its value data to 1, and close
the Registry Editor when you’re finished.
The changes should take effect immediately; the next time you browse a folder full of photos, you’ll notice that it takes considerably longer to display the thumbnails. However, any existing cache files will remain on your hard disk indefinitely; read on if you want to delete the lingering cache as well.
As the thumbnail cache grows, it becomes less efficient. Years of navigating folders—not to mention deleting and moving photos—causes bloat, which slows down the index. As with any cache, all you need to do is delete the cache files, and they’ll be recreated as needed (unless, of course, you’ve disabled the cache).
Note
Your Windows Explorer sluggish when you’re browsing photo folders? Try disabling the cache and then reenabling it as described previously; sometimes this is all it takes to speed things up.
Although you can use the Search tool to find and delete all the thumbs.db files on your drive, it’s quicker to open a Command Prompt window (see Chapter 9), and type this:
del /s /q /f /a:h c:\thumbs.dbwhere c: can be any valid drive
letter containing drive containing thumbs.db files to delete. In usually less
time than it would take for Search to populate a list of thumbs.db files, the del command can wipe them all out in a
single shot.
The main cache files are a little trickier, though, since Windows Explorer locks them while it’s running. The easiest way to clear them is with the Disk Cleanup utility (cleanmgr.exe); just place a checkmark next to Thumbnails and click OK.
Note
If Disk Cleanup doesn’t do the trick, you can clear the main
cache from the Command Prompt window. First, fire up the Windows
Task Manager by pressing Ctrl+Shift+Esc, choose the Processes tab, and close all instances of
explorer.exe. Then, at the
prompt, type del
%userprofile%\AppData\Local\Microsoft\Windows\Explorer\thumbcache*.*
and press Enter. When that’s
done, switch back to Task Manager, and from the File menu, select New Task (Run). Type explorer.exe in the box and click OK to
get back your desktop and Start menu.
Open an Explorer window and navigate back to C:\Users\{your user name}\AppData\Local\Microsoft\Windows\Explorer. Don’t worry that the .db files you just deleted are still there; Explorer recreated them when it started back up; confirm this by checking their file sizes and times.
If left unchecked, the thumbnail cache could grow to a gargantuan size. It would be nice if Windows Explorer kept the cache trim by routinely purging infrequently-used thumbnails and checking for deleted photos, but that’s ultimately a poor use of system resources. That’s why Explorer takes the simple (and dumb) approach of automatically deleting the entire cache once any single .db file reaches 500 Mb.
But the consequence of this rapidly revolving cache is that you frequently have to wait while Explorer rebuilds the thumbnails for folders you visited as recently as yesterday.
The good news is that you can stop Explorer from deleting the thumbnail cache, and you’ll see improved folder browsing performance as a result. The bad news is that it will grow very quickly, particularly if you have a lot of photos. Here’s how to do it:
Open Windows Explorer and navigate to C:\Users\{your user name}\AppData\Local\Microsoft\Windows\Explorer.
Right-click the Explorer folder in the tree, select Properties, and then choose the Security tab.
Click the Advanced button and then click Change Permissions.
Click Add, type
Everyoneinto the Enter the object names to select field, and then click OK.With the new Everyone entry highlighted, click Edit.
In the Permissions list, place two checkmarks in the Deny column: one next to Delete subfolders and files and one next to Delete.
Click OK in each of the four open windows to return to Explorer.
The change takes effect immediately. To restore the folder to its default permissions, return to the Advanced Security Settings for Explorer window (steps 1‒3), highlight the Everyone entry, and click Remove.
Care to use your own image viewer or editor to manage your photos? Unfortunately, the Windows Photo Gallery application is not easy to get rid of. You can choose any application as the default for opening pictures, and the Windows Photo Gallery will still appear when you double-click image files.
Note
If you want to use another image viewer without making any changes to your system, there are ways to open images other than double-clicking. For instance, you can drag-drop an image file onto the window of any viewer to open it, or even right-click an image file and select Open With to choose another program.
To choose a different application as the default for photos, you may have to disable the Windows Photo Gallery:
Open the Registry Editor (described in Chapter 3).
Expand the branches to
HKEY_CLASSES_ROOT\SystemFileAssociations\.ico\ShellEx\ContextMenuHandlers\ShellImagePreview.Highlight the
ShellImagePreviewkey, select File→Export, type a filename, and click Save to back up this Registry key. (See Chapter 3 for details.)Delete the
ShellImagePreviewkey and close the Registry Editor when you’re done.
If you don’t want to mess around in the Registry, you can also do this with File Type Doctor (free trial from http://www.creativelement.com/powertools/):
Note
To back up this setting before you delete, click Export, type a filename, and then click Save. To subsequently re-enable the Windows Photo Gallery, just double-click the .reg file you created here. See Chapter 3 for more information on registry patch files.
Click the Remove button.
Note that in 2007, Microsoft created a new image file format to
coincide with the release of Windows Vista. JPEG XR—formerly known as Windows Media Photo, formerly known as HD Photo—supports better compression and a wider color gamut than
the ordinary JPEG format. But since few applications support this
format, you may wish to re-enable the Windows Photo Gallery for only
files with the .hdp, .jxr, and .wdp filename extensions. To do this, you’ll
need to manually edit the corresponding file type keys in the Registry
Editor, as described in Chapter 3, and add the
ShellImagePreview key to
its ContextMenuHandlers
key.
Ever notice that the colors in digital photos you view in Windows don’t quite match the real thing, or even the colors on the little screen on the back of your digital camera? Likewise, have you noticed that the colors your printer reproduces don’t match those on your monitor?
This is a common problem, and one, unfortunately, without a clear-cut, foolproof solution. The problem is that your monitor, printer, scanner, and digital camera all handle color a little differently, and subtleties like ambient light, paper color, and how much you’ve had to drink can all affect how an image looks. It’s up to you to calibrate Windows so that all of these devices know what adjustments they need to make to preserve your colors without botching your photos too badly.
Note
Before you proceed, make sure your display adapter (video card) is set to the highest color depth it supports. Right-click an empty portion of the desktop, select Screen resolution, click the Advanced settings link, and then choose the Monitor tab. From the Colors drop-down list, select True Color (32 bit) and then click OK. If the Resolution slider to the left drops when you do this, see Chapter 5.
The best way to get accurate color is with dedicated color-calibration hardware. To calibrate your monitor, you place a mouse-like sensor (called a colorimeter) on your screen and then run a calibration program. One by one, the software displays known colors on the screen, and the sensor reports back to the software what it “sees.” Finally, the software generates a custom color profile and installs it; the whole process takes about 5–10 minutes. Thereafter, your monitor will display all colors more closely to their “true” values. Most modern packages even configure reminders in Windows to recalibrate at regular intervals to accommodate aging displays, changing ambient lighting, and undo inadvertent monitor settings.
Note
If you have two or more monitors, it’s not unusual for them to display colors differently, even if they’re the same make and model. Color calibration equipment is the only reliable way to adjust your screens so they all display color consistently and accurately. But beware; not all calibration devices support multiple monitor setups. If yours doesn’t, you may be able to calibrate your screens individually, changing the default display between each calibration. See Chapter 2 for more multimonitor tips.
Likewise, you can calibrate a flatbed scanner by scanning a special color key and then having software analyze the scan and produce an appropriate scanner profile. You can calibrate a printer by printing a color key and using a calibration sensor to read it. And you can calibrate your digital camera by shooting photos of a camera-profiling chart and a neutral gray card, and have software analyze the photos.
While the expense of calibration hardware might be justifiable for professional designers and perfectionist photographers, there are ways of improving the color reproduction of your hardware without spending any money.
If your screen has built-in gamma controls, the simplest method is to go to http://epaperpress.com/monitorcal/ and adjust your screen by hand. Your goal is to make the individual bars on the Black Point and White Point test strips distinct and evenly-spaced. Also, the smooth gray patch in the center of the gamma pattern should blend in evenly with the crosshatch pattern when you stand back a few feet.
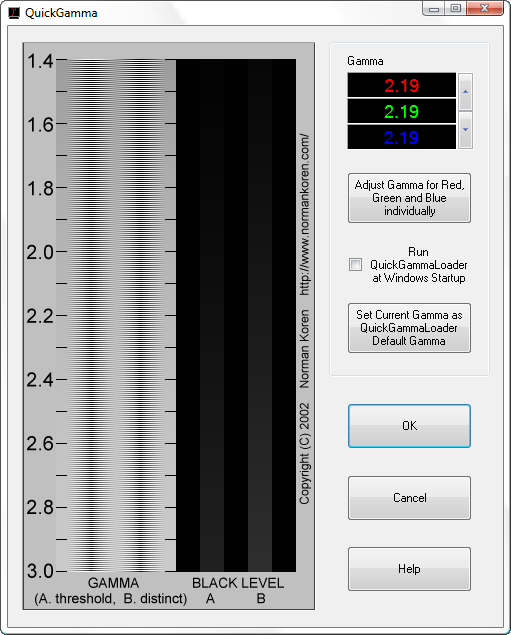
A better choice, however, is to install gamma-correcting software like QuickGamma (Figure 4-13), available for free at http://quickgamma.de/indexen.html. (A similar utility also comes with Adobe Photoshop, although the author of QuickGamma claims that QuickGamma is more accurate.) The process essentially involves adjusting a few controls until two different grayish regions appear indistinguishable when you squint. If you have the patience to do so, you can elect to adjust red, green, and blue values independently.
Next, open the Color Management page in Control Panel. Each imaging device on your system should be accompanied by a matching International Color Consortium (ICC) profile, and the Color Management window, shown in Figure 4-14, is where you manage these files.
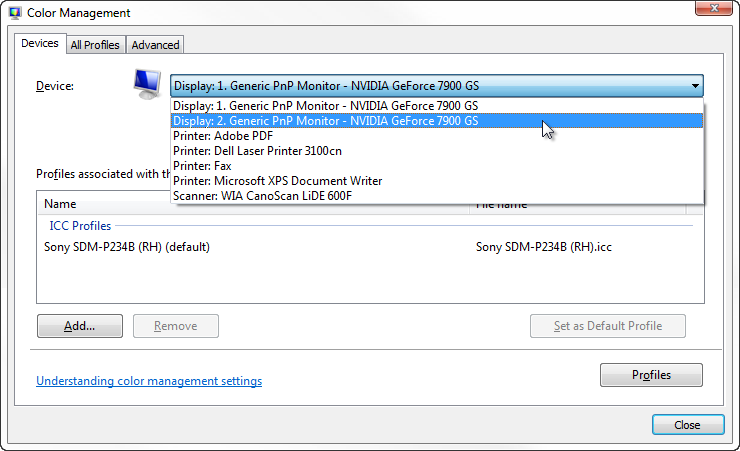
Figure 4-14. The Color Management window is a new, central interface for installing and configuring ICC profiles in Windows 7
Start with your monitor; select it from the Device drop-down list, and then click the Add button. If you’re lucky, you’ll see an appropriate profile (the file having been installed with your driver); otherwise, you’ll have to dig up the correct ICC profile from the manufacturer of your monitor and then install it by clicking the Browse button.
Note
If you have trouble finding ICC profiles from the
manufacturers of your monitor, scanner, printer, or camera, try a
site like Chromix or
IPhotoICC. Of
course, you can also search Google for your specific product and
model, like this: Epson 1520
ICC.
In some cases, you may find more than one ICC profile for your
device, each differentiated with a numeric code like D93 or 6500K. These numbers indicate the
color temperature, a number that describes the
color of light emitted by the light source, specifically a theoretical
object called a blackbody radiator. (In the real
world, the closest analogy is the sun.) The K numbers indicate temperatures in degrees
Kelvin (e.g., 5000K, 6500K, 9300K)
while the D numbers indicate standard illuminants (colors of
light) corresponding to specific correlated color temperatures
(CCT). If in doubt, choose 5000K or D50, both of which correspond to “soft
daylight.”
When the new ICC profile shows up in the Profiles associated with this device list, highlight it and click Set as Default Profile.
When you’re done with your monitor, repeat the process for your
printer(s) and scanner(s). In most cases, you’ll want to use the same
color temperature (D or K value) for each ICC profile you
use.
Now, your digital camera does things a little differently. If it’s like most cameras, it should store the appropriate ICC information in the EXIF data (discussed in the next section) embedded into each photo file you shoot. And most high-end applications, such as modern versions of Adobe Photoshop, should be capable of reading these tags and putting them to use. But in the unlikely event that your camera is included in the Device list, and you have an ICC profile provided by your camera’s manufacturer, then you can go ahead and install it just like the others.
Now, playing with gamma correction and color profiles will only take you so far. Variations in ink or toner, as well as paper, can all affect color reproduction on a printer, and the lighting in your room can affect how color looks on your monitor, so you’ll have to employ a little trial and error to get the desired results. If you can’t get satisfactory color with free tools, it’s time to move up to a colorimeter.
Let me guess. You just had this big party (say, a wedding or commitment ceremony), and you’ve gotten hundreds of photos from a dozen different people. But when you stick them all in the same folder and sort them by date, they’re all out of order.
The Date Modified column in Windows Explorer (go to View→ Details if you don’t see it) probably won’t reliably sort your photos. If the photographer did any post-processing (e.g., color correction, cropping, retouching) in a program like Photoshop, file dates will reflect the last time the files were saved, not when the photos were originally shot.
But aren’t you lucky you live in an enlightened age of obsessive photographers and feature-laden gadgets? Embedded in each digital photo is a goldmine of information stored by the camera as part of the EXIF (EXchangeable Image File) format used in .jpg files, .tif files, and raw formats like Nikon’s .nef files. EXIF data includes the date and time the photo was taken, the camera settings used (f-stop, exposure, metering mode), the photographer’s name (sometimes), and the dimensions of the image. If the camera supports it, even GPS data indicating the exact geographical location of the camera when the photo was shot can be included.
To view EXIF data for a single photo, highlight the image file in Windows Explorer, and then stretch the Details pane until it looks like Figure 4-15. If you don’t see a Details pane, click the Organize drop-down and select Layout→Details Pane.
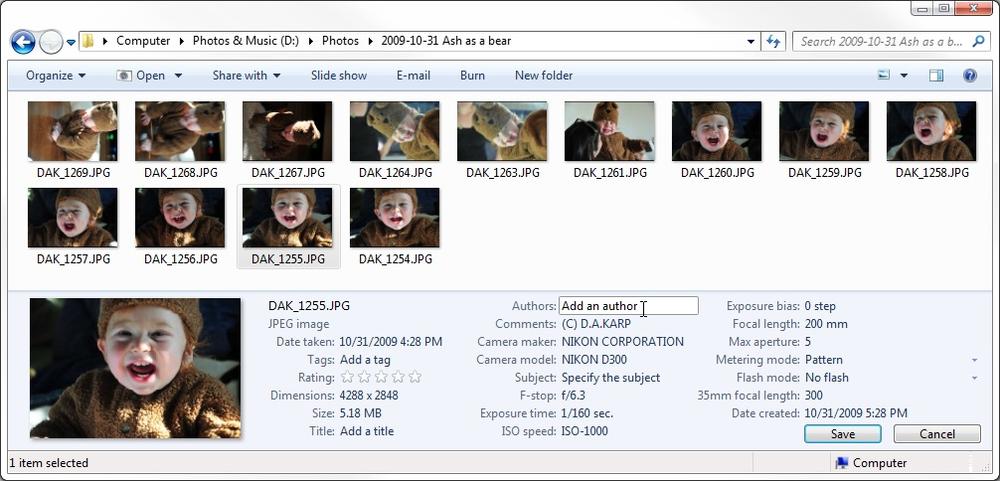
Figure 4-15. Windows Explorer shows all the EXIF information embedded in your digital photos, if you know where to look
If you select more than one file, Explorer will only show the data the selected files have in common in the Details pane. To view selective EXIF data for a bunch of photos at once, right-click the column header bar in Windows Explorer and select More. Place a checkmark next to any new details you’d like to display, and click OK. Unfortunately, the details aren’t organized at all here; the EXIF data is mixed in with MP3 tags, and other things like Search ranking and Parental rating reason. But with a little digging, you should be able to find the relevant bits, like Dimensions, Camera model, and, thankfully, Date Picture Taken.
Note
Of course, you won’t find EXIF data in scans of film, nor in digital photos that were modified by software that doesn’t support the format. For the record, recent versions of Adobe Photoshop and Paint Shop Pro, and even Windows’ measly little Paint program, retain all EXIF data in most circumstances, but many older programs and image converters don’t. If in doubt, run a test before you modify any precious photos: open a photo in your program and save it to a new filename. If the information shows up in Windows Explorer when you highlight the new file, then your software is safe to use.
Now, sort the photos chronologically by clicking the Date Picture Taken column header. Voilà!
But what if you want to make this sorting more permanent? Use the free Stamp utility (http://www.snapfiles.com/get/stamp.html) to rename your files with their EXIF dates. After you do this, your photos will appear in chronological order even when sorted alphabetically.
What Stamp doesn’t do, unfortunately, is allow you to compensate for the differences among the various cameras’ internal clocks. The discrepancies might be as small as three or four minutes among your local guests, or several hours for the party guest who last set up his or her camera in a different time zone. As a result, your photos won’t sort properly even after you use Stamp, a problem requiring the following fix:
First, download the free trial of Creative Element Power Tools (available at http://www.creativelement.com/powertools/), and turn on the Change file dates and Rename files with ease options.
Highlight all the photos you want to fix, right-click, and select Change Date.
Choose the Date/Time from file metadata option, select Date & time photo taken by digital camera from the list, and then click Accept. This will change all the file dates so they exactly match the dates and times the photos were taken.
Next, you’ll need to determine the discrepancies among your photographers. Pick one photographer to use as the baseline, and then figure out how far off every other photographer is from that baseline. To do this, you’ll need to find common points of reference: one or two representative photos of the same instant by each of your photographers. (The more photos you have, the easier this will be.) After a minute or so of studying, you might find that, say, Kathryn’s camera was about 3 hours faster than the baseline, while Henry’s camera was 6 minutes, 11 seconds slower. (If you’re not as compulsive as I am, you don’t necessarily need to get it down to the exact second.)
To fix the dates, pick a photographer (other than the baseline you chose in step 4), and highlight all of that person’s photos. Right-click the files and select Change Date.
This time, choose the Relative Date/Time option and then make your adjustments with the controls below, like the example in Figure 4-16. Click Accept when you’re done.
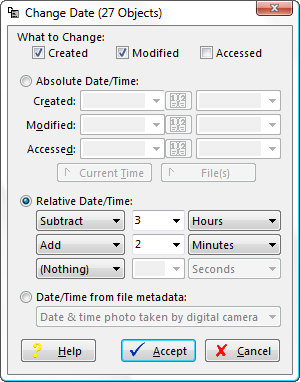
Figure 4-16. Use the Change Date tool to fix discrepancies among the times of different photographers’ digital photos
Repeat steps 5 and 6 for everyone else’s photos. When you’re done, the photos should be in perfect order when sorted by Modified Date (but not Date Taken, at least not yet).
[Optional] To update the EXIF data with your new dates, use AttributeMagic Pro. Select the recently modified files in the main window, use the Change Dates feature, and instruct it to set date taken (exif) to modified (file system).
Note
If you don’t feel comfortable messing with your photos’ valuable EXIF tags, you can alternatively change only the filenames, as described next.
At this point, all your photos should appear in chronological order when sorted by modified date or date taken, but depending on what you plan to do with your pictures, this may not be enough.
Are you uploading your photos to an online photo sharing/printing service? Or perhaps you’re handing them off to someone else to sift through and possibly modify them? If you want to make sure your careful date manipulations remain intact, you may want to tag your filenames as well.
You can do this with Stamp, as described earlier, but only if you’ve updated the EXIF dates as described in step 8. But if you want to rename your photos without changing any EXIF data, you’ll need Power Rename (also part of Creative Element Power Tools) to tag the filenames with their modified dates. To do this, highlight all the photos, right-click, and select Power Rename.
Note
If you’ve already renamed the photos with Stamp, place a checkmark next to Power Rename’s Crop option, select from beginning, and type a number representing the amount of text to remove. This will get rid of Stamp’s addition to the filename and make room for Power Rename’s own Add stamp feature.
In Power Rename, place a checkmark next to the Add stamp option, select file date & time, and then click the
Format button. From the Choose a format list, select Custom format and then use the date/time
placeholders from the list to assemble a date format conducive to
sorting. Your best bet is to start with the year (yy or yyyy), followed by the month, day, hour,
minute, and finally, the second, like this:
yyyy-mm-dd_hh-mm-ss |
For example, Power Rename would take a file with the date August 28, 2005 at 4:53:06 pm and add this to the beginning of the filename:
2005-08-28_16-53-06 |
Click OK and then the Accept button to rename the files. With all your photos date- and time-corrected and renamed accordingly, they’ll appear in chronological order in almost any circumstance.
Get Windows 7 Annoyances now with the O’Reilly learning platform.
O’Reilly members experience books, live events, courses curated by job role, and more from O’Reilly and nearly 200 top publishers.

