The humble Search command looks no more special than anything else on the Start menu. In Windows XP, however, it’s a newly revised powerhouse that’s far more complex to navigate. Microsoft has even given it a new name—Search Companion. You’ll probably use it often.
The Search function can quickly find all kinds of computer-ish things: file and folder icons, computers on your network, Web sites, email addresses, and phone numbers.
If you save your files exclusively into the My Documents folder (Section 1.16), you’ll have little need to use the Search function to locate your files. You’ll always know where they are: right there in that folder.
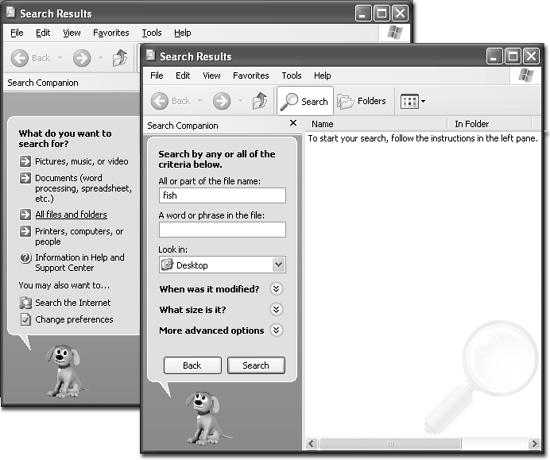
Every now and then, however, you won’t remember where you filed something, or you’ll download something from the Internet and not be able to find it again, or you’ll install something and not know where to look for it. In those situations, the Search command is just what you need (Figure 1-11). It lets you look for a particular file or folder based on its description—by its name, size, date stamp, and so on.
The Search command can also look for the words inside your files. That’s a powerful feature if you remember having typed or read something, but can’t remember what you named the file.
Microsoft wanted to make absolutely sure you’d be able to find the Search command. It has provided at least seven different ways to begin a search:
Choose Start→Search.
Press F3 or Windows key+F (that’s the Windows logo key on the bottom or top row of most keyboards).
If a disk or folder window is already open, press Ctrl+E, click the Search toolbar button, or choose View→Explorer Bar→Search.
In each case, the Search window appears, as shown in Figure 1-11.
Figure 1-11. Left: The basic Search panel. You might expect that Microsoft had learned its lesson about cute anthropomorphic cartoon characters. Microsoft Bob and Clippy the paper clip, for example, have both gone to the great CompUSA in the sky. But Microsoft is at it again, now with Rover, the search-companion dog. He wags and sometimes even barks as you perform your search. Right: If you click the desktop itself and then press F3, or if you click the “More advanced search options” checkbox that occasionally appears, the Search panel may look slightly different, as shown here.
Windows XP comes with a set of canned searches (listed at left in Figure 1-11) designed to help you find what you’re looking for faster. Click the green arrow next to the one you want (or click the words next to the arrow).
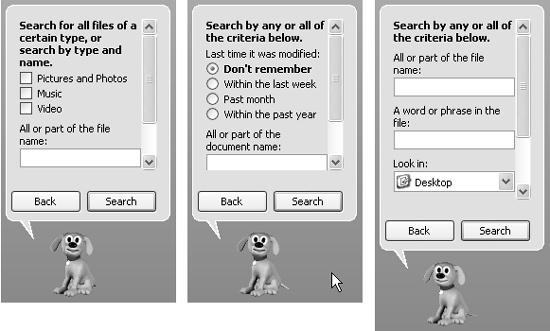
When you click this link, the Search panel changes (Figure 1-12, left). Turn on the checkboxes you want, and type in part of the file name.
Tip
As a bonus, this kind of search can also find text inside the metadata stored with each multimedia file—the behind-the-scenes descriptive information like pixel dimensions (for photos), and rock group name or music genre (for music files). You can type, for example, Beatles into the “All or part of the file name” text box to turn up MP3 files recorded by that band, or 800 x 600 into the text box to find JPEG files of precisely that size.
Figure 1-12. Left: This panel appears to help you search for multimedia files. Middle: You’re all set to search for documents that you’ve created or downloaded. Right: This kind of search is slower, but more complete—it searches for everything, including program files and Windows system files. (It doesn’t, however, search for metadata in picture, movie, and music files, as does the first kind of search.)
This link produces the panel shown second from left in Figure 1-12. It comes set to search only for documents—files that you can create or download. In other words, it doesn’t bother looking through hidden files, system files, application files, and so on. And it doesn’t find the names of folders at all—just files.
Clicking this link produces the panel shown at right in Figure 1-12. This is the slowest kind of search, because it searches the thousands of hidden in-system files as well as the ones that you’ve created yourself.
This kind of search offers a number of useful power features:
A word or phrase in the file. Sooner or later, it happens to everyone: A file’s name doesn’t match what’s inside it. Maybe a marauding toddler pressed the keys, inadvertently renaming your doctoral thesis “xggrjpO#$5%////.” Maybe, in a Saturday afternoon organizing binge, your spouse helpfully changed the name of your “ATM Instructions” document to “Cash Machine Info,” without realizing that it was a help file for Adobe Type Manager. Or maybe you just can’t remember what you called something.
The “A word or phrase in the file” option searches for words inside your files, regardless of their names. It’s extremely slow, since Windows has to read every single file, which it does only slightly faster than you could. (But there’s a workaround—see Section 1.8.7.) Furthermore, this kind of search works only if you can remember an exact word or phrase in the missing document. Even punctuation has to match exactly.
Finally, the text you enter should be unique enough to assume it only exists in the file you’re looking for; if you search for, say, Microsoft, Windows will find so many files that the search will be pointless.
Look in. Use this drop-down menu if you want to limit your search to a single folder or disk. Every disk attached to your PC at the moment—your hard drive, Zip disk, CD-ROM, and so on—shows up in this list. (To search your whole computer, choose My Computer and then proceed.)
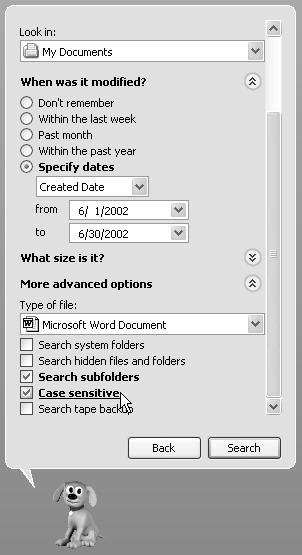
When was it modified? What size is it? When you click one of the double-down-arrow circle buttons, like this one, you expand the Search panel for additional options. For example, the “When was it modified?” feature lets you find only files or folders you created or changed in a certain date range (see Figure 1-13), and the “What size is it?” feature lets you screen out files larger or smaller than a number of KB you specify.
More advanced options. These controls offer even more choices (again, see Figure 1-13). For example, you get a “Type of file” drop-down menu that lets you confine your search to only compressed files or Word documents. Search system folders makes Windows look inside all of the folders that contain the operating system itself—not something you’ll generally find useful. Likewise, Search hidden files and folders makes the Search program find matching files among the thousands that Windows generally hides from you (see Section 2.2.4).
Search subfolders is much more practical. It looks for files within folders inside the disk or folder you’ve specified. Turn this option off only when you know for sure that the file you need is in the disk or folder you’re starting with, but not within any subfolders there. Skipping the subfolders makes the search process much faster. Case sensitive instructs the Search program to match the capitalization of the characters you enter; searching for files containing “dentist” won’t find files containing “Dentist.” And Search tape backup, of course, searches for the specified files on your tape-backup system, if you have one.
Windows uses the checkboxes you turn on in addition to any data you entered into the basic search fields.
Figure 1-13. By clicking the double-down-arrow circle buttons, you can expand the Search panel considerably (shown here scrolled down so far that you can’t even see the file names you’re searching for). The search shown here will find Word documents created during June 2002 in the My Documents folder.
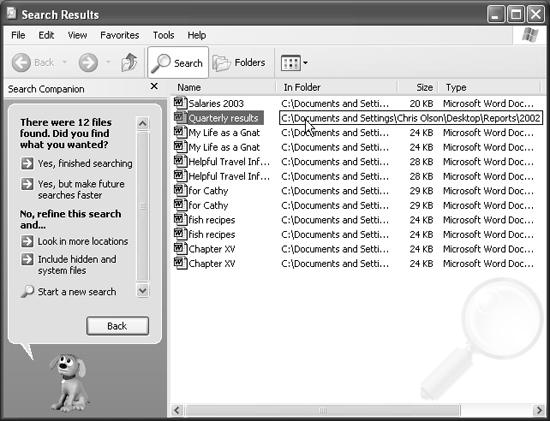
Once you’ve set up the search, click the Search button (or press Enter). As the search proceeds, the screen changes. On the right side of the window, you now see a list of files and folders whose names contain what you typed in the blank. (Figure 1-14 shows this list.)
Note
Anything that Windows XP finds in your My Documents folder shows up twice in the list. Repeat to yourself each morning: “It’s not my fault.”
Figure 1-14. You can manipulate the list of found files much the way you’d approach a list of files in a standard folder window. For example, you can highlight something in the list by typing the first couple of letters of its name, or move up or down the list by pressing the arrow keys. You can also highlight multiple icons simultaneously. Highlight all of them by choosing Edit→Select All, highlight individual items by Ctrl-clicking them, drag vertically over the list to enclose a cluster of them, and so on.
At this point, you can proceed in many different ways. A few of these ways are listed in the panel at the left side of the window (the exact assortment depends on the kind of search you performed).
Yes, finished searching. Click to close the whole left panel (and lose the dog).
Yes, but make future searches faster. Click this link to turn on Indexing Service, described in Section 1.8.7.
Refine this search. Windows XP often offers you a number of links that let you adjust the search settings you just used. For example, you may opt to perform the search again, this time including hidden and system files, or restrict the search to a different folder or disk, and so on.
Sort results by category. Click the double-down-arrow circle button to open controls that let you sort the list—by name, date, and so on.
View results differently. Click this double-down-arrow circle button to change the view of the results window—to Details, Tiles, or Thumbnails view, for example (see Section 2.2.1).
Start a new search. Click this option to start all over with new search parameters.
You can also manage the list of found files by treating the right side of the window just as you would any desktop window. For example:
Read all about it. If you point to the name of a found icon, a pop-up rectangular balloon displays a little paragraph identifying the file’s path, full name, modification date, size, and other information.
Find out where something is. The In Folder column just to the right of an icon’s name shows you exactly where it is on your machine, using the standard Windows path notation described in Section 1.7.3.
Tip
You may have to widen the column to see the complete pathname; to do so, drag the dividing line at the top of the column, to the right of the In Folder column heading. Alternatively, point to the location information without clicking. As shown in Figure 1-14, a pop-up tooltip appears, revealing the complete folder path.
Open the file. If one of the found files is the one you were looking for, double-click it to open it. This, in fact, is what most people do most of the time when using the Search program. In many cases, you’ll never even know or care where the file was—you just want to get into it.
Jump to an icon in its home folder. If you want to view the found file in its native habitat, sitting somewhere on your hard drive, right-click the icon in the Search window and choose Open Containing Folder from the shortcut menu. The Search window instantly retreats to the background, as Windows opens the folder and then highlights the icon in question, sitting wherever it is on your hard drive.
Move or delete the file. You can drag an item directly out of the found-files list onto the desktop, directly onto the Recycle Bin icon, or into a different folder, window, or disk. (For more on moving icons, and all related hazards, see Chapter 3.)
Send To, rename, or create a shortcut. After highlighting an icon (or icons) in the list of found files, you can use any of the commands in the File menu: Send To (which lets you move the icon to one of several standard folders), Rename, and so on. See Section 3.5 for more on shortcuts.
Adjust the list. By clicking the column headings of the results window, you can sort the list of found files in a variety of ways: by name, size, date modified, and so on. (You can reverse the order by clicking the column heading a second time.) You can also adjust the relative widths of the columns just by dragging the column-name dividers. And, as with almost any Windows window, you can drag the lower-right corner of the window to make it bigger or smaller.
Save the search setup. By choosing File→Save Search, you can immortalize the search you’ve just set up. You might use this feature if you perform the same search each day—if, for example, you like to round up all the documents you created yesterday for backing up.
Windows XP automatically names the search file with a description it derives from the criteria you entered into the search fields, and adds the extension .fnd (for example, Files Named Budget.fnd). You can save the resulting search icon anywhere you like.
To use the search criteria again, double-click the saved .fnd file. The Search window opens, with your data already entered. Click the Search button to get the canned search underway.
When you’re logged on to your Windows network domain, you search for Active Directory printers by clicking “Printers, computers or people” on the first Search screen. (Chapter 19 explains all about Active Directory.)
Note
The Find Printers dialog box isn’t available to workgroup computers. If your PC is on such a network, use the Printers and Faxes option instead to locate, view, or add printers.
If you’re part of a network domain, on the other hand, you can use either the “Printers, computers or people” to search for Active Directory printers or using the “Printers and Faxes” feature to add, locate, or view printers that are used by your PC. (Chapter 13 discusses the Printers and Faxes feature in detail.)
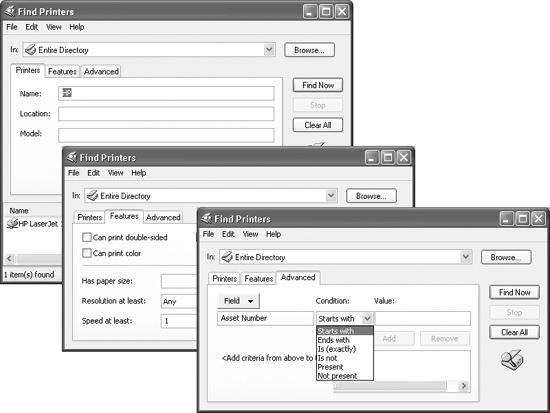
On the next screen, click “A printer on the network” to open the Find Printers dialog box, as shown in Figure 1-15. On the Printers tab, click the In box’s down arrow to select the entire directory or specific domain that you want to search, or click Browse to locate the domain. It isn’t necessary to enter any further search criteria, but if you do want to get more specific, you have a few search options available:
On the Printers tab, if you know the name (or part of the name) of the printer you’re searching for, type it in the Name text box.
If you want a list of all printers (or only the printers that fulfill the criteria you entered) in a particular location, enter the location’s name in the Location text box.
Tip
If the Location text box is already filled in, it’s because your network administrator has set up the Windows network to display the printers nearest to you. If the Location text box isn’t filled in and you don’t enter a location to search, Windows will search the entire Windows domain for printers, using whatever criteria you’ve entered.
If you’re trying to locate a specific printer model (you have a certain affinity for HP printers, say), enter the model name in the Model text box.
On the Features tab, you can get even more specific with your search criteria, such as whether the printer can print double-sided pages or in color. You can even specify page size and resolution.
Figure 1-15. The Find Printers dialog box lets you refine your search criteria using the Printer, Features, and Advanced tabs. Left: The Printer tab lets you enter basic search information. Middle: On the Features tab, you can get more specific in your search for the perfect printer: whether it prints in color or on both sides of the paper, for example. Right: The Advanced tab affords you the most specific search of all. You can use formulas to specify search criteria like the language the printer “speaks” or the minimum print resolution you need.
The Advanced tab gives you additional fields to specify search criteria, like the number of pages the printer can churn out per minute. (This is a good option if you’re in a big hurry.) See Figure 1-15 for details.
After you’ve entered your search criteria, click Find Now. When the PC finishes the search, a list of printers that fulfill your criteria appears. Connect to one of them by right-clicking its name and then choosing Connect from the shortcut menu.
If you click “Printers, computers or people” on the first Search screen, and then click “A computer on the network” on the next one, the Search program lets you type in the name of another computer on your network (if you’re on one). If you search for ac, the search will turn up accounts, packages, and so on. There’s no browse function; you have to know at least part of the name of the computer you want to find.
Of course, if you’re trying to find another PC on the network, you can simply open the My Network Places window (Section 1.12), which shows you icons representing all the computers on your network. So why would you ever use the Search function to find a computer? Because it sometimes finds computers that My Network Places can’t. Every Windows veteran has lost count of the number of times computers have been missing from My Network Places. In such cases, the Search function is the reliable way to locate the computer and thus access its contents.
If you click “Printers, computers or people” on the first Search screen, you’ll find, on the second screen, an option called “People in your address book.” This tantalizing option lets you type in somebody’s name; the Search program can consult any of several “White Pages” Web sites online in an attempt to track down that person’s email address and telephone number. It can also search your own Windows address book when you want to check someone’s phone number or other information.
Note
This option has additional power when used on a corporate domain network. See Chapter 19 for more on domains, and Section 1.8.7 for more on searching for people (or their phone numbers) on yours.
As one of the bonus freebie programs that come with Windows XP, you get a program called Address Book. (It’s an address book.) You can look at yours by choosing Start→All Programs→Accessories→Address Book, although the place you’re likely to use it the most is when you’re in an email program like Outlook Express, which is described in Chapter 12.
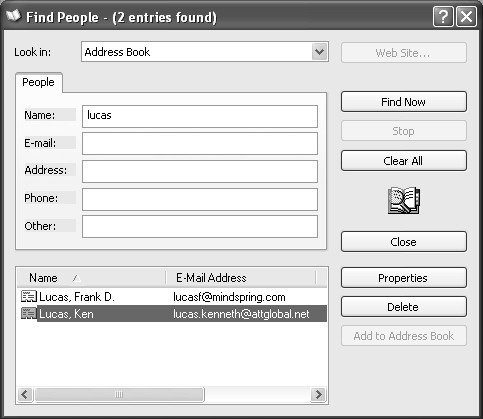
In any case, clicking “People in your address book” brings up the dialog box shown in Figure 1-16.
No matter how social a person you are, it’s theoretically possible somebody out there has managed to elude your address book. There may be times that you want to look up the phone number or email address of someone who’s not only not in your address book, but not even in your physical phone book. Fortunately, you live in the Internet age, where a number of Web sites serve as worldwide “White Pages.”
Use the Look In drop-down list (see Figure 1-16) to display a list of these people-finding Web sites (Bigfoot, WhoWhere, and so on). Now choose a search service; as a little experimentation will quickly demonstrate, some of these sites work better than others.
Figure 1-16. Windows assumes that you want to search your address book for a certain name or email address. Enter information in one or more fields—you can use partial words—and then click the Find Now button. All matching entries appear at the bottom of the window.
You must be connected to the Internet to use this feature (or your browser must be configured to start your Internet connection automatically when it opens; see Section 9.5.3). The dialog box that appears has two tabs:
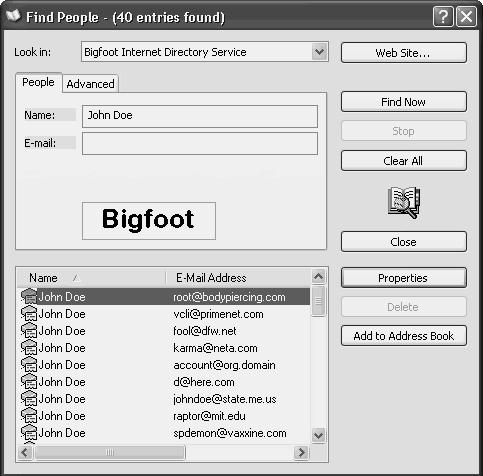
The People tab provides a place to enter a name, email address, or both. Use this tab if you know that information, and need a street address or a telephone number.
The Advanced tab lets you narrow your search. As you can see in Figure 1-17, you can make some very fine distinctions when describing the person you’re trying to find.
Figure 1-17. A straightforward name search by no means turns up every one of the 200 million Internet citizens, but it’s occasionally successful in turning up a few matches for the name you specify.
When you’re finished setting up your search, click the Find Now button. The Search program uses your existing Internet connection to send the query off to the chosen Web site. After a few minutes, you’ll get a response, even if it’s “No response.”
Unfortunately, the technology gods don’t smile on this feature. Sometimes you get outdated email addresses. And sometimes you get no results at all—the search Web sites do one quick pass of their databases and then return an error message. That message might say simply that the person couldn’t be found, or it might say, “The search could not be completed within the time specified for this directory service.” (In other words, the search engine took a quick look, didn’t find an exact match, and doesn’t want to keep looking.)
Tip
Instead of using the Find People dialog box, it’s frequently more productive to work directly on the directory Web page. After choosing the search engine you want to use from the drop-down list, click the Web Site button. In a flash (or in a few minutes, depending on the speed of your Internet connection), you’re on the Internet and the browser window displays the search engine you selected. Working from the search engine directly on the Web instead of using the Search feature as an intermediary offers more powerful choices for searching.
Any old computer can search for the files on its own hard drive. The Search Companion’s special twist, however, is that it lets you use exactly the same program to search for information on the World Wide Web.
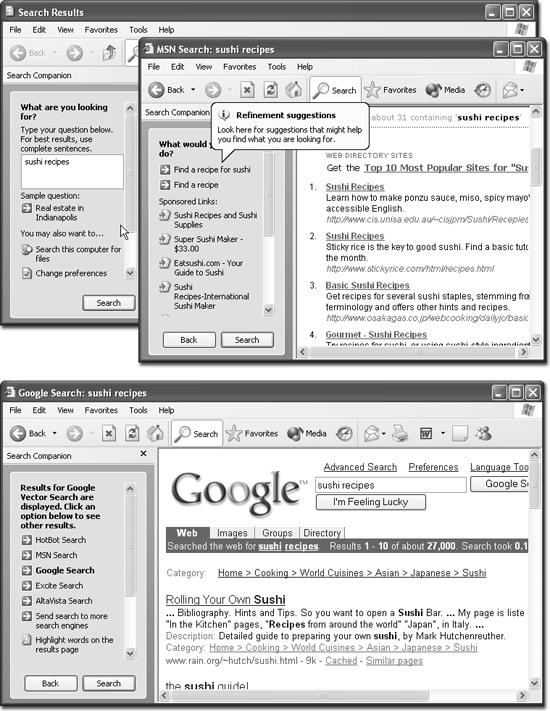
To put the program into search-the-Internet mode, click Search the Internet on the main Search panel (shown at left in Figure 1-11). The “What are you looking for?” panel appears, complete with a place to type a search phrase.
When you click the Search button, your PC goes online and submits that request to MSN Search, which is Microsoft’s version of a search page like Google or Yahoo.
Figure 1-18. Top left: When you search the Internet, don’t mind the “Sample question” that appears beneath the search blank; it’s simply designed to give you some ideas of the ways you can phrase your search requests. Top right: You get a list of Web pages that contain the text you seek, along with some suggestions on ways to “refine your search” (such as visiting Microsoft’s commercial partners to buy books, music, and so on). The best part is the “Automatically send your search to other search engines” link (not shown). If you click it, Windows puts each of the major search pages only one click away. Bottom: From here, you can generally read the first paragraph of text that appears on the Web page, go to the page by clicking its link, and so on.
Tip
To specify which search engines Windows XP consults, click “Change preferences” in the main Search panel and then click “Change Internet search behavior.” You now have the opportunity to specify the default search engine you want Windows to use: Google, AltaVista, Yahoo, or whatever.
Windows now goes online, sends your search request to the selected Web site and, after a moment, shows you the results of its search: a list of Web pages containing the text you typed (see Figure 1-18).
The regular Windows XP Search command can locate words inside your files—a handy feature when you’re trying to turn up a document whose contents you know, but whose name you can’t remember. Just don’t try it on a deadline; it’s painfully slow.
To eliminate that delay, Microsoft has programmed Windows XP with an optional feature that does something ingenious. Like a kid cramming for an exam, it can read, take notes on, and memorize the contents of all of your text-based files: text files, HTML documents, Microsoft Office files, email, and so on. (You can make it understand other kinds of documents, too, if you buy additional filters made by third-party software companies.)
After indexing your hard drive in this way, XP can pinpoint text or file properties in seconds. The only downside is that you sacrifice a few megabytes of disk space to the hidden “card catalog.”
If that’s a tradeoff you’re willing to make, you’ll definitely enjoy the Windows XP Indexing Service, as it’s called (just as it was in Windows 2000).
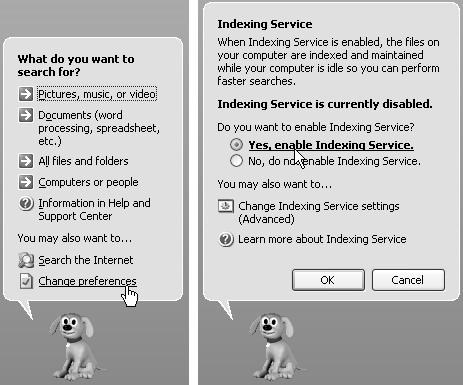
Figure 1-19. Left: To turn on the Indexing Service, open the Search panel and then click “Change preferences.” On the next panel, click “With Indexing Service” (for faster local searches).” Right: Click “Yes, enable Indexing Service.” The Indexing Service starts and works automatically in the background, creating a file that takes up about 25 percent as much disk space as the documents it indexes. (It tosses out unhelpful words like the, of, and a, and performs other compression tricks to reduce the index file size.)
To index your files, proceed as shown in Figure 1-19.
Tip
The free Google Desktop Search program, available at www.google.com, is a powerful and much easier to use replacement for both the regular Windows Search program and the indexing service. It can even find words inside your email messages, chat-session logs, and Web pages you’ve visited.
Once the Indexing Service has completed its analysis of the files on your machine—which can take many hours—you don’t need to do anything special when searching for words inside your files. Just enjoy the amazing speed with which your Search program now rounds up files according to their contents or properties—and enjoy the fact that the Indexing Service will continue to keep itself up to date, automatically indexing any files you create or edit.
Note
Note: When Indexing Service is turned on, capitalization doesn’t matter, and Windows ignores short words like of, it, is, and so on. Note, too, that Indexing Service refuses to search folders that belong to other people with accounts on your PC (unless, of course, they marked those folders as Shared). Chapter 20 has full details.
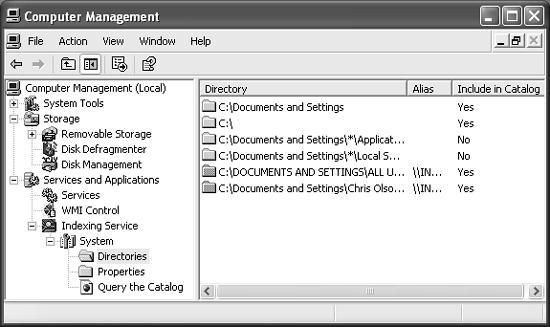
Figure 1-20. Power users have vast amounts of control over what gets cataloged when Indexing Service is set loose. This display, for example, offers Yes and No indicators regarding which folders have been indexed. To get here, choose Start→Control Panel→Administrative Tools→Computer Management. In the list, click the + buttons to expand Services and Applications, then Indexing Service, then System.
Get Windows XP Pro: The Missing Manual, Second Edition now with the O’Reilly learning platform.
O’Reilly members experience books, live events, courses curated by job role, and more from O’Reilly and nearly 200 top publishers.
