Both of the navigational schemes described so far in this chapter have only one goal in life: to help you manage your icons. You could spend your entire workday just mastering the techniques of naming, copying, moving, and deleting these icons—and plenty of people do.
Here’s the crash course.
To rename a file, folder, printer, or disk icon, you need to open up its renaming rectangle. You can do so with any of the following methods:
Highlight the icon and then press the F2 key at the top of your keyboard.
Click carefully, just once, on a previously highlighted icon’s name.
Right-click the icon and choose Rename from the shortcut menu.
Tip
You can even rename your hard drive, so that you don’t go your entire career with a drive named “Local Disk.” Just rename its icon (in the My Computer window) as you would any other. You’re not allowed to rename important system folders like Documents and Settings, Recycle Bin, Windows, WINNT, and System32, however.
In any case, once the renaming rectangle has appeared around the current name, simply type the new name you want, and then press Enter. Feel free to use all the standard text-editing tricks while you’re typing: Press Backspace to fix a typo, press the left and right arrow keys to position the insertion point, and so on. When you’re finished editing the name, press Enter to make it stick. (If another icon in the folder has the same name, Windows beeps and makes you choose another name.)
A folder or file name can be up to 255 characters long, including spaces and the filename extension (the three-letter suffix that identifies the file type). Because they’re reserved for behind-the-scenes use, Windows doesn’t let you use any of these symbols in a folder or filename: \ / : * ? " < > |
Tip
If you highlight a bunch of icons at once and then open the renaming rectangle for any one of them, you wind up renaming all of them. For example, if you’ve highlighted folders called Cats, Dogs, and Fish, renaming one of them Animals changes the original names to Animals (1), Animals (2), and Animals (3).
If this new Windows XP feature hits you unexpectedly, press Ctrl+Z repeatedly until you’ve restored all the original names.
If you like, you can give more than one file or folder the same name, as long as they’re not in the same folder. For example, you can have as many files named “Letter to Smith” as you wish, as long as each is in a different folder.
Note
Windows XP comes factory set not to show you filename extensions. That’s why you sometimes might think you see two different files called, say, Quarterly Sales, both in the same folder.
The explanation is that one filename may end with .doc (a Word document), and the other may end with .xls (an Excel document). But because these suffixes are hidden (Section 6.9.1), the files look like they have exactly the same name.
As you may have read in Chapter 1, properties are a big deal in Windows. Properties are preference settings that you can change independently for every icon on your machine.
To view the Properties dialog box for an icon, choose from these techniques:
Right-click the icon; choose Properties from the shortcut menu.
While pressing Alt, double-click the icon.
Highlight the icon; press Alt+Enter.
These settings aren’t the same for every kind of icon, however. Here’s what you can expect when opening the Properties dialog boxes of various icons (see Figure 4-4).
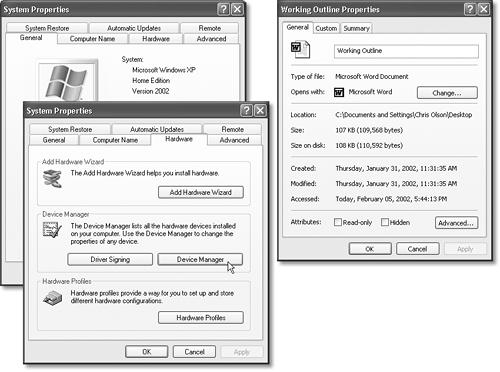
Figure 4-4. The Properties dialog boxes are different for every kind of icon. In the months and years to come, you may find many occasions when adjusting the behavior of some icon has big benefits in simplicity and productivity. Left: Two tabs of the System Properties dialog box (which appears when you check the proper-ties of your My Computer icon). Right: The Properties dialog box for a Word document.
This Properties dialog box is packed with useful information about your machine.
The General tab tells you what kind of processor is inside, how much memory (RAM) your PC has, and what version of Windows you’ve got.
The Hardware tab (shown in Figure 4-4) includes a link to the Device Manager, which breaks down your equipment even more specifically—it provides the manufacturer and model name of each component on your machine (modem, monitor, mouse, and so on).
The Computer Name tab is where you set up your computer’s name, as it will appear to other people on an office network.
The Advanced tab offers buttons that serve as rabbit holes into ever more technical dialog boxes. They include Performance (see the box Performance Options), User Profiles (see Section 17.8.1), and Startup and Recovery (advanced controls related to dual-booting [Section A.3] and what happens when the system crashes).
Tip
One button on the Advanced tab is actually not advanced at all—the Error Reporting button. You may have noticed that whenever a program crashes, freezes, or abruptly quits, Windows XP offers to email a report of the event to Microsoft for the benefit of its debugging teams. Using the Error Reporting dialog box, you can turn off this frequent attempt to contact the mother ship—or limit the attempts to certain programs.
See Section 16.1 for details on the System Restore tab, Section 9.23.6 for information on Automatic Updates , and Section 5.3 for details on the Remote tab.
In a disk’s Properties dialog box, you can see all kinds of information about the disk itself:
General. This tab shows you the disk’s name (which you can change), its capacity (which you can’t change), and how much of it is full.
Tools. Offers quick access to such disk-maintenance tools as ScanDisk and Defrag (see Chapter 16).
Hardware. Lists the individual drives—hard drives, CD drives, and so on—connected to your machine, complete with troubleshooting and Properties buttons.
Sharing. Controls who can access the disk, in person or by network (Chapter 20).
Security. Not only can you share certain folders or files with other people (either across a network or when they log into your PC using their own accounts), but you can also specify exactly who is allowed how much access to each file or folder. More about security in Chapter 17.
Note
If you don’t see the Security tab, it’s probably because simple file sharing is turned on (see Section 20.5.1). If you turn it off, the Security tab reappears (if you’ve formatted your hard drive using the NTFS file system, as described in Section A.4).
GEM IN THE ROUGHPerformance Options
It’s a funny quirk of people in the computer industry that they can’t bring themselves to use English. They say form factor when they means size, the user when they mean you, and price point when they mean price.
As the System Properties dialog box illustrates, they also say performance when they mean speed.
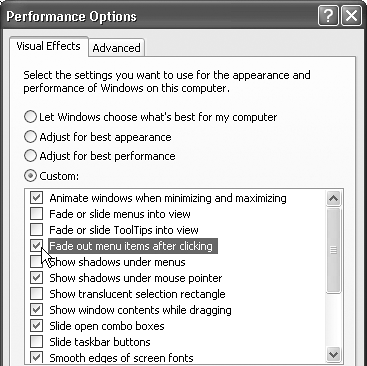
For example, if you click the Advanced tab and then the Setting button in the Performance section of the box, you get to the Visual Effects tab of the Performance Options dialog box. It offers a long list of check¬boxes that control the little animations and visual accents that define the more modern look and feel of Windows XP. For example, “Animate windows when minimizing and maximizing” makes Windows animate the shrinking of a window onto the taskbar when you minimize it. “Show shadows under mouse pointer” produces a tiny shadow beneath your cursor, as though it were floating a quarter-inch above the surface of your screen.
All these little animations and shadows look cool, but each saps away a tiny scrap of speed and power from your processor. Using this dialog box, you can turn off the checkboxes of features you can do without. Turning all of them off often produces a PC that feels snappier and more responsive, although a bit less Macintosh-esque. (Leave “Use visual styles on windows and buttons” turned on, however, if you like the new, softened look of Windows XP.)
The Advanced tab of this dialog box is a far less casual business. It controls how Windows XP uses your processor power and memory, and provides a button that opens the Virtual Memory control center for your machine. These are extremely technical settings that you should adjust only with the guidance of a licensed geek.
Quota . If different people use this PC, each with a different account, you can limit the amount of disk space each person is allowed to use. Details are in Disk Quotas.
The Properties for a plain old document depend on what kind of document it is. You always see a General tab, but other tabs may also appear (especially for Microsoft Office files).
General. This screen offers all the obvious information about the document—location, size, modification date, the program that opens the document (which you can change with a click of the Change button), and so on—along with a few interesting-looking checkboxes. For example, the read-only checkbox locks the document. In the read-only state, you can open the document and read it, but you can’t make any changes to it.
Note
If you make a folder read-only, it affects only the files already inside. If you add additional files later, they remain editable.
Hidden turns the icon invisible. (It’s a great way to prevent something from being deleted. Of course, because the icon becomes invisible, you may find it a bit difficult to open it yourself, unless you’ve turned off “Do not show hidden files and folders” in the Folder Options dialog box, as described in Section 3.2.4.)
The Advanced button offers a few additional options. File is ready for archiving means, “Back me up.” This message is intended for the Backup program described in Chapter 16, and indicates that this document has been changed since the last time it was backed up (or that it’s never been backed up). For fast searching, allow Indexing Service to index this file lets you indicate that this file should, or should not, be part of the quick-search database created by Indexing Service (described in Section 2.8.7). Compress contents to save disk space and Encrypt contents to secure data are both described later in Chapter 15.
Security. The Security tab shows who’s allowed to open this file or folder and how much freedom they have to mess with its contents (Chapter 17). You can use this tab to delete or add groups, users, or permission.
Custom. As explained below, the Properties window of Office documents includes a Summary tab that lets you look up a document’s word count, author, revision number, and many other statistics. But you should by no means feel limited to these 21 properties—nor to Office documents.
Using the Custom tab, you can create properties of your own—Working Title, Panic Level, Privacy Quotient, or whatever you like. Just type the property name into the Name text box (or choose one of the canned options in the Type drop-down menu) and then click Add. You can then fill in the Value text box for the individual file in question (so that its Panic Level is Red Alert, for example). Especially technical people can later use Indexing Service (see Section 2.8.7) to perform query-language searches for these values.
The Summary tab tells you how many words, lines, and paragraphs are in a particular Word document. For a graphics document, the Summary tab indicates the graphic’s dimensions, resolution, and color settings.
The Properties boxes for folders reveal the same checkbox options as found for data files. But now there’s a separate tab called Sharing, which makes the folder susceptible to invasion by other people—either in person, when they log into this machine, or from across your office network (see Chapters 18 and 20).
There’s not much here that you can change yourself, but you certainly get a lot to look at. For starters, there are the General, Security, and Summary tabs described earlier. But wait—that’s not all:
Version. This tab offers a considerable wealth of detail about the program’s version number, corporate parent, language, and so on.
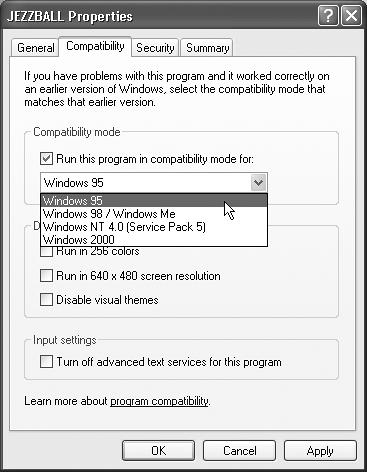
Compatibility. There may come a day when you’re more grateful for this tab than just about any other new Windows XP feature. The idea is to provide you with a way out of an uncomfortable situation. An example might be when you try to run a pre-2002 program on Windows XP, and (because it’s never heard of Windows XP) it doesn’t work right, or doesn’t work at all. Figure 4-5 illustrates the magic in action.
Figure 4-5. By turning on “Run this program in compatibility mode for” and choosing the name of a previous version of Windows from the drop-down list, you can fool that program into thinking that it’s running on Windows 95, Windows Me, Windows NT, or whatever. While you’re at it, you can also specify that this program switch your screen to certain settings required by older games—256 colors, 640 × 480 pixel resolution, and so on—or without the new Windows XP look (turn on “Disable visual themes”).
You can change the inch-tall illustrations that represent the little icons replete in your electronic world. You can’t, however, pick a single method to do so, because Microsoft has divided up the controls among three different locations.
For example, one approach is to change the icon used by all files of a certain type. If you’re French, for example, you might want to change the big W on a Word document to a big M (for Mot). Instructions appear on Section 6.9.4.
You can also change the icon for some of the important Windows desktop icons: the Recycle Bin, My Documents, and so on. Open the Display program in the Control Panel (see Chapter 9), click the Desktop tab, then click Customize Desktop. You’ll see a sliding collection of those important Windows icons. Click one, and then click Change Icon to choose a replacement from a collection Microsoft provides. (You haven’t lived until you’ve made your Recycle Bin look like a green, growing tree.)
Finally, if you’re sneaky, you can replace the icons for individual folder and shortcut icons on your PC. Here’s how:
Right-click the folder or shortcut whose icon you want to change. From the shortcut menu, choose Properties.
The Properties dialog box appears.
Click the Customize tab (for a folder) or the Shortcut tab (for a shortcut). At the bottom of the dialog box, click the Change Icon button.
Yet another dialog box, filled with prefab replacement icons, appears. If you see one that suits your fancy, click it; otherwise, continue.
Click Browse.
Windows XP now lets you hunt for icons on your hard drive. These can be icons that you’ve downloaded from the Internet, icons embedded inside program files and .dll files, or icons that you’ve made yourself using a freeware or shareware icon-making program like AX-Icons (available at http://www.missingmanuals.com, among other places).
Click OK twice.
You should see your new replacement icon happily in place.
Get Windows XP Professional: The Missing Manual now with the O’Reilly learning platform.
O’Reilly members experience books, live events, courses curated by job role, and more from O’Reilly and nearly 200 top publishers.

