Chapter 1. Word Under the Hood
Introduction: Hacks #1-2
Few consumer software packages are as malleable as Microsoft Word—it has to be malleable, to meet the unique needs of millions of users around the globe. However, many (perhaps most) Word users spend months, or even years, using Word “out of the box,” without taking advantage of a single one of its limitless customization tools.
There’s a palpable reluctance among long-time Word users to peek behind the curtain. They may curse the wretched Bullets and Numbering buttons 20 times a day or take 2 hours to manually change the font size of every heading in a lengthy report, but they will still not tear off the cover and start tinkering. For too long, they’ve been seduced by Word’s supposed simplicity (“There must be a menu to fix this somewhere...”).
If you’re one of those users, this chapter will help you find your inner hacker. It asks you to choose the Red Pill and take a trip into Word’s inner workings. You will also learn the very basics needed to start really hacking. For everyone else, consider it calisthenics for the rest of the book.
Tweak the Interface
Take charge of toolbars, menus, and screen real estate with a few trips to the Tools menu.
Simple adjustments to the Word environment can save you lots of time. The gateway to tweaking your toolbars and menus is the Tools→Customize command, which brings up the dialog shown in Figure 1-1. Whenever this dialog is active, your menus and toolbars no longer perform their regular duties—they become adjustable elements of the interface that can be moved, modified, renamed, or even deleted.
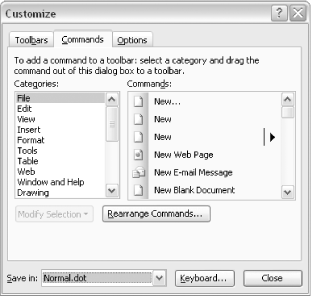
The big kahuna of the Customize dialog is the Commands tab, which we’ll explore in the following two sections. But the other two tabs, Options and Toolbars, are also important for understanding—and hacking—Word.
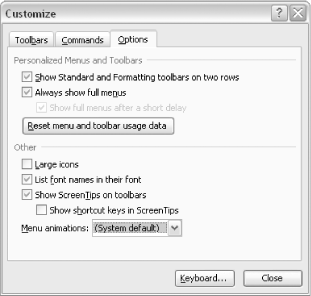
Some of Word’s more elusive options live on the Options tab, shown in Figure 1-2. For example, you can check the “Always show full menus” box to turn off that unholy “Adaptive Menus” feature that displays only some commands on each menu. You can also tell Word to stop displaying font names in the fonts themselves, which can speed up the display on a slow machine. And the “Show shortcut keys in ScreenTips” setting can help you learn the shortcuts for toolbar buttons you use regularly.
Use the Toolbars tab to manage your toolbars, reset their default arrangements, or delete custom arrangements you’ve created but no longer need. You can also create new toolbars and make the Shortcut Menu toolbar [Hack #3] visible for modifying.
Use the Keyboard button (available on all three tabs in the Customize dialog) to add, remove, or modify keyboard assignments.
Tip
To print a list of active keyboard assignments in the current template, select File→Print and choose “Key assignments” from the “Print what” drop-down list.
Now, here are a few simple hacks to get your feet wet.
Replacing a Toolbar Button
The Standard toolbar includes a button for creating multiple text columns, which is illogically located next to the buttons for inserting tables and Excel worksheets. A more sensible neighbor for those buttons would be the Sort command, which usually requires a trip to the Table menu.
Tip
The Sort command also works on text not included in a table, such as a list of names you want to alphabetize.
Here’s how to replace the Columns button with a Sort button.
First, select Tools→Customize. With the Customize dialog open, drag the Columns button off the Standard toolbar. (Don’t worry; you can always restore it in a snap.)
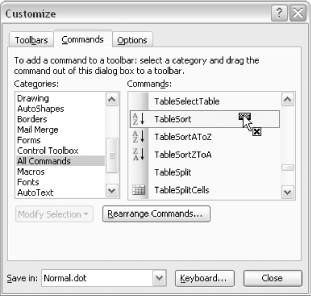
Next, click the Commands tab in the Customize dialog and choose Normal.dot from the “Save in” drop-down list at the bottom of the dialog. If you select this setting, any customizations you make will affect all of your documents (whenever you’re working in Word, even if you’re working on a document based on another template, the Normal template is still present).
In the Categories column (on the left), select All Commands. In the Commands column (on the right), scroll down and select TableSort, as shown in Figure 1-3. Drag it to the Standard toolbar, next to the Insert Excel Worksheet button.
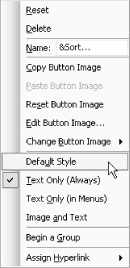
By default, a command you drag to a toolbar appears with its name, not its icon, displayed. To change this, with the Customize dialog still open, right-click your new Table Sort button and select Default Style, as shown in Figure 1-4. The new button will be active after you close the Customize dialog.
Modifying a Menu Item
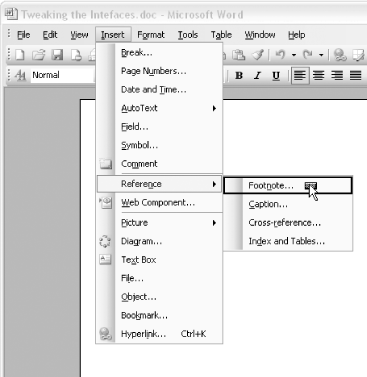
Many Word users frequently insert footnotes. But as of Word 2002, the Footnote command was moved to a new submenu on the Insert menu, called Reference (see Figure 1-5).
Here’s how to move the Footnote command to the top of the Insert menu and make it more accessible.
First, select Tools→Customize, click the Commands tab, and make sure you save the changes in Normal.dot (see the previous section “Replacing a Toolbar Button”).
Next, select Insert from the Categories list and then select the Footnote command from the list on the right (Word 2002 and 2003 users will find it on a submenu). Drag it to the top of the Insert menu, as shown in Figure 1-6.

The Footnote command will work from its new home as soon as you close the Customize dialog.
Activating Important Viewing Options
To reliably control (or even understand) Word’s features and formatting, you need to set a few important options.
A Word document offers more than just words (even if it lacks fancy pictures or tables). For example, a multitude of special nonprinting characters control how the words in a document are formatted.
To view some of these characters, select Tools→Options, click the View tab, and check the following items:
Paragraph marks
Tab characters
Bookmarks
Also, set field shading to “Always.”
None of the characters that you can now see will print, and you can always select File→Print Preview to view your document without them.
The value of these characters will become more apparent as you work with the other hacks in this book, but here’s one quick example.
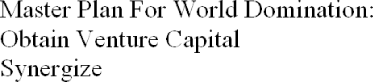
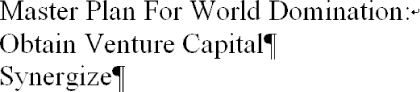
Say your boss asks you to add some project background to her report and to format it with centered headings. The document contains only plain text, as shown in Figure 1-7.
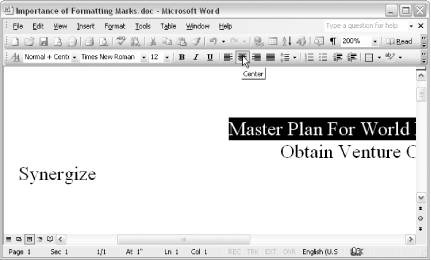
You want to center the first line as a heading, then add bullets to the next two items. With the heading selected, you press the Center button on the Formatting toolbar—but the paragraph below the heading moves too, as shown in Figure 1-8.
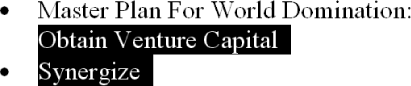
Yikes! After you press the Undo button, you decide to switch tactics. You select the second and third paragraphs and press the Bullets button on the Formatting toolbar. You start to sweat profusely when Word applies the Bullets style to the heading and not the second paragraph, as shown in Figure 1-9.
What’s going on here? With paragraph marks showing, as in Figure 1-10, the problem becomes clear. The first and second lines are actually part of the same paragraph. Your boss inserted a “soft” return after the heading (by pressing Shift-Enter) to force a line break without starting a new paragraph. So even though they appear as two separate paragraphs, they act as one. You can avoid similar headaches if you get into the habit of working with formatting marks showing.
Macros 101: A Crash Course
This hack offers a whirlwind tour of macros, which can help you automate tedious and time-consuming tasks.
Word 6 or later lets you write, record, and play macros, or short programs that automate tasks in Word. The term macro comes from macrocommand, which originally referred to a bunch of commands strung together and executed all at once. Typically, you would record a sequence of commands, give the sequence a name, and then play it back as needed. You can certainly use Word macros for this purpose, but it represents only the tip of the iceberg.
You create Word macros using Visual Basic for Applications, usually abbreviated as VBA. Even recorded macros get translated into VBA, which you can then examine or edit.
VBA belongs to the BASIC family of computer languages. Compared to other computer languages, such as C or Java, you may find it easier to master. But like any language, you’ll need to use it in order to learn it.
A true VBA tutorial falls outside the scope of this book. This hack simply shows you how to create and run a macro like the ones used in this book.
Nuts and Bolts
Most of the macros in this book, as
well as
any you record within Word, use the subroutine
(Sub) procedure. Each one begins with the
following line:
Sub MacroNamewhere MacroName is the name of the macro.
Each ends with this line:
End Sub
The instructions you give Word fit between these two lines. Cooking offers a useful analogy. In fact, you can think of a macro as a recipe. You begin with the list of ingredients at the top and then add a sequence of actions to transform those ingredients into something edible. You can even split some recipes into several shorter recipes—i.e., one for the sauce, one for the meat—to make them easier to follow. The same goes for macros. In the example below, note the list of “ingredients” at the top, followed by the rest of the code to work those ingredients into the main course:
Sub CountCommentsByBob( )
Dim oComment As Comment
Dim iCommentCount As Integer
Dim doc As Document

iCommentCount = 0
Set doc = ActiveDocument

For Each oComment In doc.Comments
    If oComment.Author = "Bob" Then
        iCommentCount = iCommentCount + 1
    End If
Next oComment

MsgBox "Bob made: " & iCommentCount & " comments"
End Sub
The next section shows you how to put macros to work in your documents.
Hello, World
A tradition in computer books is to present the first example as a simple program that announces its existence to the world. In Word VBA, that would go something like this:
Sub HelloWorld
MsgBox "Hello, World"
End Sub
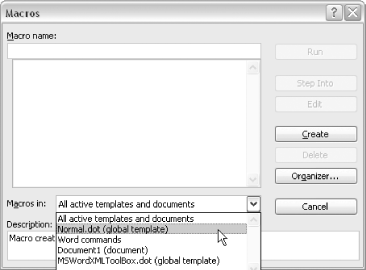
To create this macro, select Tools→Macro→Macros to display the Macros dialog. A listbox at the bottom, labeled “Macros in,” lists all the open templates and documents where you can store your macro, as shown in Figure 1-11. For example, choose the “All active templates and documents” option to create your macro in the Normal.dot template.
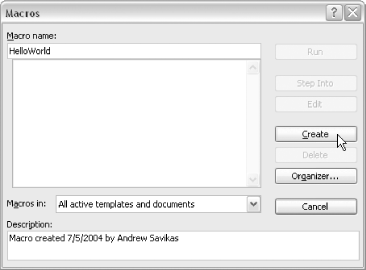
Next, type HelloWorld in the
“Macro name” field and press the
Create button, as shown in Figure 1-12.
When you press this button, Word does three things:
Within your Normal template, Word creates a new module to hold your macro code, named
NewMacros.Word fills in the first and last lines of the macro for you and inserts some comments about the macro. (The comments help the people who read the programs. In VBA, comments always start with a single quotation mark or apostrophe.)
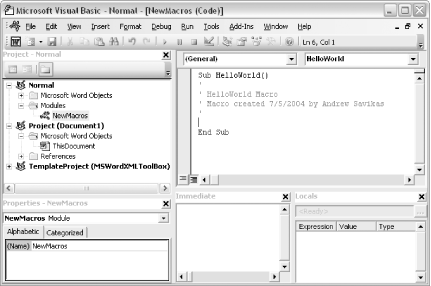
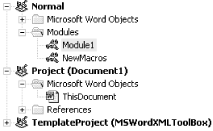
You will see the shell of your new macro in the Visual Basic Editor,
as shown in Figure 1-13. The Project Explorer,
in the top left,
lists all open documents and templates, including any add-ins (such
as the MSWordXML ToolBox
[Hack #92]
).
Notice that the NewMacros module is highlighted in
the Modules section of the Normal template.
To finish the macro, just put your cursor in the blank line above
End
Sub and type the following:
MsgBox "Hello, World!"
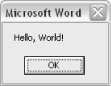
Now press the Play button (the green wedge) on the toolbar to run the macro. You’ll see the dialog shown in Figure 1-14.
To create another macro in the same module within the Normal
template, just start a new line after End
Sub and type in the first line for another macro.
You can also paste code from other macros directly into the Visual
Basic Editor.
Organizing and Debugging Your Macros
If you want to create a new
module to help organize your macros,
select the template or document where the new module will go from
within the Project Explorer, then select Insert→Module. New
modules created like this are always named
Module1, Module2, and so on, as
shown in Figure 1-15. In the Properties window,
located just under the Project Explorer (see Figure 1-13), you can rename the modules.
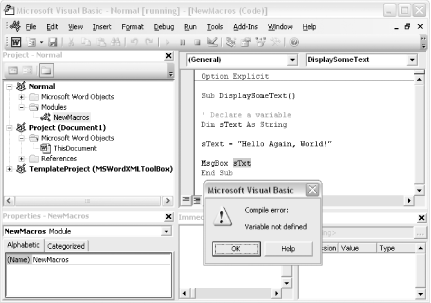
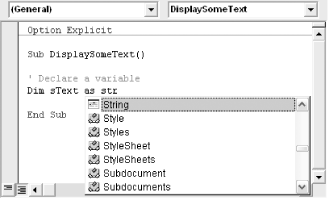
To help you cut down (or at least easily pinpoint) the number-one source of program bugs—typing errors—you should always include the following as the very first line of code in any module:
Option Explicit
This tells Word to make sure you’ve declared every variable you use in the macro. To continue with the cooking analogy, it’s like checking the recipe to make sure you listed every ingredient at the top. If you try to run a macro with a misspelled variable name, Word will warn you and highlight the undeclared variable, as shown in Figure 1-16.
Once you finish editing your macro, select File→Close and Return to Microsoft Word.
Running Macros
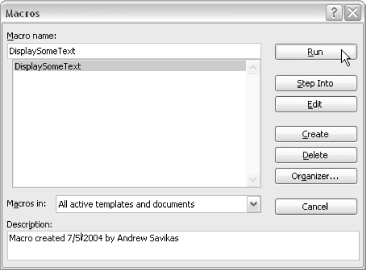
To run a macro from within Word, select Tools→Macro→Macros, select it from the list, and press the Run button, as shown in Figure 1-17.
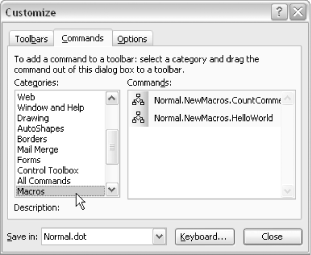
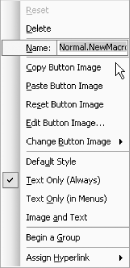
If you frequently use the same macro, you can assign it a toolbar button or keyboard shortcut. Select Tools→Customize, click the Commands tab, and select Macros from the Categories column, as shown in Figure 1-18. In the Commands column, find the macro and drag it to a toolbar or menu. After you place the macro, you can right-click it to change its name or add an image to its button, as shown in Figure 1-19.
If you use or create a set of macros that become an integral part of your workflow, consider separating those into a separate Macros template [Hack #50] that will load automatically whenever Word starts.
Getting Help from the Editor
The Visual Basic Editor is a full-featured development environment that includes several features designed to help you write VBA code.
IntelliSense
As you type VBA code, the editor will attempt to complete the statement for you, as shown in Figure 1-20.
Though the lists will generally appear automatically as you type, you can explicitly request a list of items that match the text you’ve already typed by pressing Ctrl-spacebar.
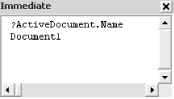
The Immediate window
In the Immediate window, you can enter individual statements that are executed immediately. When a statement is prefaced with a question mark, the return value is printed to the Immediate window, as shown in Figure 1-21.
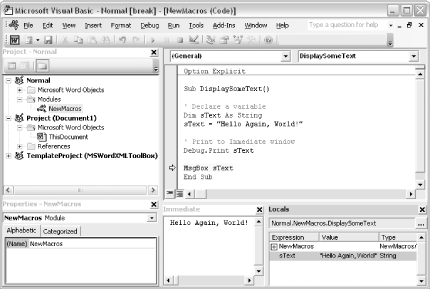
The Immediate window is a helpful tool for testing out a macro. Type the following line of code in a macro:
Debug.Print StringToPrintReplace StringToPrint with a text string
or a string variable you want to keep an eye on, which will be
printed to the Immediate window. This technique is shown in Figure 1-22.
Stepping through code
As you test out a macro, it can help to “step” through it as it runs. Word will execute one line of the macro, then wait for you to tell it to run the next line. In this way, you can slow down a macro and better understand it. If you hover your mouse over a variable while stepping through the code, Word displays the current contents of the variable as a ToolTip.
To step through a macro, put your cursor anywhere inside it and press F8. Each time you press F8, you execute another line of code. The line that will be executed the next time you press F8 will be highlighted in yellow, and an arrow will appear at the left, as shown in Figure 1-22.
Exploring the Word Object Model
In Word VBA, all of Word’s parts are represented as objects. A document is an object, a paragraph is an object, and even a font name is an object. All of these objects are interrelated, and evaluating and manipulating them is the basis of programming Word with VBA.
To browse the Word object model, select View→Object Browser from within the Visual Basic Editor. Using the Object Browser can be an overwhelming experience for beginners, but it can be a great help in figuring out how to automate a particular component or task within Word. The Object Browser is shown in Figure 1-23.

Get Word Hacks now with the O’Reilly learning platform.
O’Reilly members experience books, live events, courses curated by job role, and more from O’Reilly and nearly 200 top publishers.

