Chapter 4. Editing Power Tools
Introduction: Hacks #27-44
Word is probably used more for editing existing text than writing new documents. Revising, reviewing, and reformatting likely make up most of your work in Word. The hacks in this chapter show how to automate some of the more mundane editing chores and speed up some common formatting commands.
Crunch Numbers Quickly in Word
Sometimes a spreadsheet is overkill. For quick and dirty math, dust off one of Word’s oldest commands: Calculate.
If you used Word when the first President Bush was in office, you might remember a handy feature from the Tools menu: the Calculate command. With the standard four functions, plus exponents and percentages, Calculate could handle a lot of the math needed for simple sales reports or budget proposals.
Though Microsoft removed the command from the Tools menu in Word 6.0, you can still find it if you know where to look.
Tip
This hack shows you how to put the Calculate command back on the Tools menu, but you can also put it on any of the toolbars or shortcut menus [Hack #3] .
Resurrecting Calculate
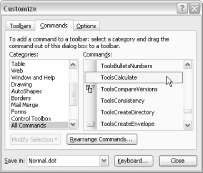
First, select Tools→Customize and click the Commands tab. In the Categories column, choose All Commands. Scroll down until you find ToolsCalculate, as shown in Figure 4-1.
Drag the command to the Tools menu and place it right under the Speech option (or anywhere else on the menu). Right-click the new menu item and rename it “Calculate,” as shown in Figure 4-2.
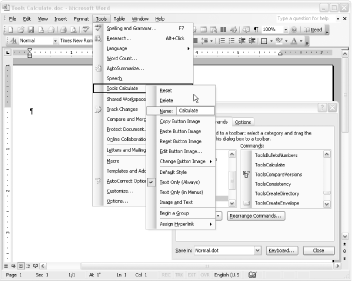
When you first place the command on a menu or toolbar, it may appear grayed-out. Calculate is available only when you’ve selected some text.
Using Calculate
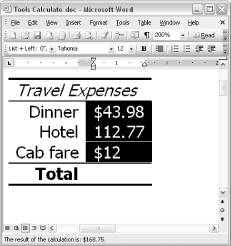
By default, the Calculate command will add any set of selected numbers separated by whitespace. Word temporarily displays the result in the status bar, as shown in Figure 4-3, and also places it on the clipboard.
Calculate ignores any text that isn’t a number, except for currency symbols, periods, and commas, which it recognizes when these are part of a number.
For operations other than addition, you must include the mathematical operator. Table 4-1 lists the operations in reverse order of precedence. To force a calculation out of precedence order, enclose the expression in parentheses. Addition and subtraction are of equal precedence and are evaluated left to right. Multiplication and division also are of equal precedence and are evaluated left to right.
|
Operation |
Operator |
Example |
Result |
|
Addition |
+ or space |
220 + 419 982 |
1621 |
|
Subtraction |
- or ( ) |
1440 (312) - 96 |
1032 |
|
Multiplication |
* |
24 * $199 |
$4776.00 |
|
Division |
/ |
$20,000/36 |
$555.56 |
|
Exponential (power or root) |
^ |
(32^(1/5))^8 |
256 |
|
Percentage |
% |
$89 * 15% |
$13.35 |
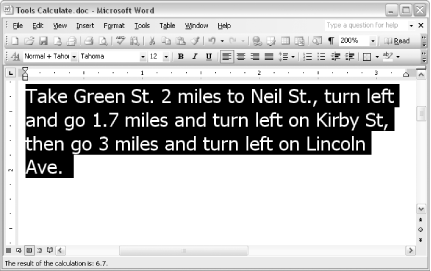
Though Calculate is most often used in tables, it works on any selected text. For example, you can use this command to quickly add all the numbers in a paragraph of text, as shown in Figure 4-4.
Hacking the Hack
The calculation results are displayed in the status bar for only a few seconds. After that, if you want to see the results, you must either paste them from the clipboard or redo the calculation, paying closer attention to the status bar. If you prefer to display the calculation results more directly, you can intercept the command [Hack #61] and have Word display the results in a message box.
Place the following macro in the template of your choice [Hack #50] . It will run in place of the Calculate command when you select Tools→Calculate.
Sub ToolsCalculate( )
MsgBox Selection.Range.Calculate
End Sub
However, when you intercept the command, Word neither displays the calculation results in the status bar nor copies them to the clipboard. To also put the results in the status bar, use the following code instead:
Sub ToolsCalculate( )
Dim sResult as String
sResult = Selection.Range.Calculate
StatusBar = "The result of the calculation is: " & sResult
Msgbox sResult
End Sub
It takes a bit more work to get the results copied to the clipboard. There’s no direct way to access the clipboard from VBA, so you need to use Windows API calls. You can find sample code for accessing text on the clipboard at http://support.microsoft.com/default.aspx?scid=kb;en-us;138909.
With the code from that site included in the same module, use the
site’s example Clipboard_SetData
subroutine to put the results on the clipboard:
Sub ToolsCalculate( )
Dim sResult As String
sResult = Selection.Range.Calculate
StatusBar = "The result of the calculation is: " & sResult
MsgBox sResult
ClipBoard_SetData (sResult)
End Sub
Unlink Every Hyperlink
Sometimes uninvited, often distracting, and always hard to wrangle, hyperlinks tend to stick around your documents like unwelcome guests at a party. Here’s how to show them the door.
Maybe it’s because they’re so difficult to edit; maybe it’s the tacky combination of blue and underline; or maybe it’s having to continually dismiss that web browser or email editor you didn’t mean to open. Whatever the reason, many users have just one thing to say about hyperlinks in Word: “How do I get rid of them!?”
Tip
To stop Word from creating hyperlinks, select Tools→AutoCorrect Options (Tools→AutoCorrect in Word 97 and 2000), click the “AutoFormat As You Type” tab, and uncheck the “Internet and network paths with hyperlinks” box.
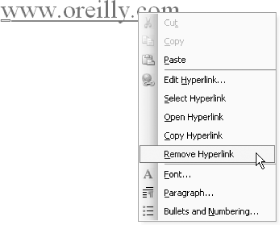
To unlink a single hyperlink, select it, then right-click and choose Remove Hyperlink from the shortcut menu, as shown in Figure 4-5.
You can also unlink a hyperlink by selecting it and then pressing Ctrl-Shift-F9. However, this key command unlinks all the fields in the current selection. So selecting all the text in your document and then pressing Ctrl-Shift-F9 would remove all the hyperlinks and unlink every other field in your document, making it a poor choice for the task at hand.
Word offers no built-in way to unlink just every hyperlink in a document all at once. However, you can use a macro to get the job done.
The Code
Place this macro in the template of your choice [Hack #50] and either run it from the Tools→Macro→Macros dialog or put a button for it on a menu or toolbar [Hack #1] .
Running the following macro achieves the same result as selecting each hyperlink and choosing Remove Hyperlink from the shortcut menu:
Sub RemoveAllHyperlinks( )
Dim i As Integer
For i = ActiveDocument.Hyperlinks.Count To 1 Step -1
    ActiveDocument.Hyperlinks(i).Delete
Next i
End Sub
Notice that while the shortcut menu uses the term “remove,” in this macro, each hyperlink is “deleted.” Though the terminology is inconsistent, the result is the same: the text remains in your document, but it is no longer an active hyperlink and no longer appears as blue and underlined.
Tip
You may want to add this macro to the Hyperlink shortcut menu [Hack #3] .
Hacking the Hack
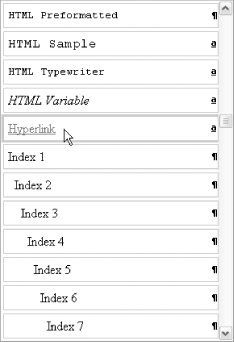
When a hyperlink is inserted into your document (either manually or automatically), the Hyperlink character style is applied to its text. The Hyperlink character style is just like any other character style in Word. You can see it displayed in the Styles pull-down menu on the Formatting toolbar, as shown in Figure 4-6.
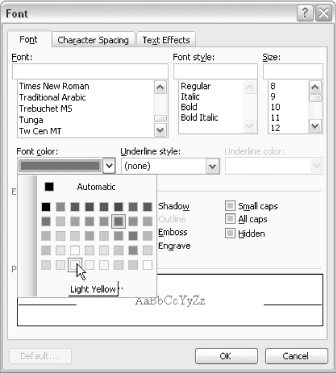
If you like having the links but can’t stand the blue underlining, you can change it. Select Format→Styles and Formatting (Format→Style in Word 2000), choose the Hyperlink style, and click the Modify button. Next, click the Format button and choose Font. The Font dialog, shown in Figure 4-7, lets you change the style to suit your tastes.
If you remove a hyperlink, the Hyperlink character style goes with it. The reverse, however, is not true—that is, if you select a hyperlink and alter its styling (e.g., remove the underlining), you will still be left with a fully “clickable” hyperlink.
Tip
You can apply any style or formatting you like to a hyperlink, and it will remain active. But if you apply the Hyperlink style to regular text, it won’t create a hyperlink (though its appearance will certainly confuse you).
If you want to remove all the hyperlinks in a document but keep the Hyperlink character style applied to the text, modify the macro as follows:
Sub RemoveHyperlinksKeepStyle( )
Dim oHyperlink As Hyperlink
Dim i As Integer
Dim rng As Range
For i = ActiveDocument.Hyperlinks.Count To 1 Step -1
    Set oHyperlink = ActiveDocument.Hyperlinks(i)
               Set rng = oHyperlink.Range
               oHyperlink.Delete
               rng.Style = wdStyleHyperlink
Next i
End Sub
To completely remove all the hyperlinks in
a document,
including their text, change the
RemoveAllHyperlinks macro to the following:
Sub ReallyRemoveAllHyperlinks( )
Dim i As Integer
For i = ActiveDocument.Hyperlinks.Count To 1 Step -1
    ActiveDocument.Hyperlinks(i).Range.Delete
Next i
End Sub
Exclude Text from Find and Replace
This hack turns “Find what” into “Find not what."
Say you’re editing a scholarly book that contains dozens of block quotations from old journals. The author has consistently misspelled several geographical and personal names, so you get ready to fire up Find and Replace.
But wait—although you want to replace the author’s misspellings, you don’t want to replace the original misspellings in the block quotations. Those should be reproduced verbatim. And you certainly don’t want to OK every replacement by hand in this long, long book.
Though you can’t explicitly tell Word what text not to search in, this hack takes advantage of the fact that Word automatically ignores any hidden text in its searches.
Let’s say all of your block quotations use Word’s built-in Block Text style. If you set the text in that style as hidden, Word will skip over it during your Find/Replace.
Select Format→Styles and Formatting (Format→Styles in Word 2000). Choose the Block Text style and click the Modify button.
In the next dialog, click the Format button and choose Font to display the dialog shown in Figure 4-8.
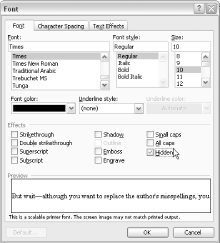
Check the Hidden box, click the OK button, and then click the OK button again to exit the Modify Style dialog. Finally, click the Close button on the Styles dialog to return to your document.
All of the block quotations will have disappeared—as long as you’re not displaying hidden text. If you still see the block quotes, select Tools→Options, click the View tab, and check the “Hidden text” box.
Now, with your block quotations hidden, you can find and replace the misspellings in the rest of your text.
Once you finish, just repeat the above procedure (this time unchecking the Hidden box) to make your block quotations visible again. All of your block quotations will reappear, with their misspellings intact.
—Jack Lyon
Use Character Codes to Find or Insert Special Characters
It’s easy to find common characters on the keyboard. But when you need to find or create an uncommon character, using character codes can make things much easier.
Word uses Unicode characters to internally store all the text you type, including special characters and symbols. Unicode is, to paraphrase the official Unicode web site (http://www.unicode.org), a universal character-encoding standard, designed to ensure that any text can be represented on any platform, and in any language.
Prior to the introduction of the Unicode standard, many software programs used (and many still do use) other character encodings, such as the original ASCII character set, or similar encodings that include the ASCII characters and some additional ones. ASCII and other older character-encoding standards do not have the capacity to represent all the characters possible in multiple languages, and they often create problems when transferring text among applications used in different countries or regions.
Though Word uses Unicode internally, its ASCII roots poke through when you insert characters into documents and search for characters using Find and Replace.
Tip
In this hack, the term “ASCII” refers to the characters represented in Word by the codes 0-255. ASCII is a bit less of a mouthful than “Windows Code Page 1052,” the real name of the encoding set—see http://www.unicode.org/Public/MAPPINGS/VENDORS/MICSFT/WINDOWS/CP1252.TXT.
Inserting Special Characters
You can use both ASCII character codes and Unicode character codes to insert special characters into text in Word.
Using ASCII codes
There are 256 characters in the ASCII set, numbered from 0 to 255. Not all of the codes represent printable characters, and not all are used in Windows, but if you’re familiar with the code for a particular symbol, entering it from the keypad can be quicker than going through Insert→Symbol.
For example, the ASCII code for a micro sign (μ) is 181. To insert a micro sign at the insertion point, do the following:
Turn on Num Lock for the numeric keypad.
Hold down the Alt key.
On the numeric keypad, type
0181.Release the Alt key.
The micro symbol will be inserted into your document.
Using Unicode codes
Unicode supports many more than 256 characters. It has enough “space” to represent every character in every language, with plenty to spare. Unicode codes are usually represented as hexadecimal values, so they’re a mix of digits and the letters A-F.
Not all fonts support Unicode, but many of the common ones, such as Times and Arial, do.
The Unicode code for a musical eighth-note character is 266A. To insert one at the insertion point, do the following:
Type
266A.Press Alt-X.
The code you typed will be converted to the eighth-note symbol.
Tip
Though you can search for characters by their Unicode numbers in Word 2000 (as described in the next section), you can’t insert them directly using this method in Word 2000.
You may find that it’s easier to search for codes using the links available at the Unicode web site (http://www.unicode.org) and insert characters using this method than it is to search among the thousands of characters in the Insert→Symbol dialog.
Searching for Special Characters
You can use these same character codes when searching for special characters in text. The ASCII codes are particularly useful when you’re performing a wildcard search.
Searching with ASCII codes
Independent
of the ASCII and Unicode codes, Word
includes several special character codes that you’ve
likely seen before, such as ^p to search for a
paragraph mark or ^t to search for a tab. The Word
help files cover these codes extensively, but three deserve special
attention because they can match more than one character:
^#matches any digit.^$matches any letter.^wmatches any whitespace.
The special character codes will help you with simple searches, but if you check the “Use wildcards” box in the Find and Replace dialog, you’ll get the error message shown in Figure 4-9.

So how do you match a paragraph mark when wildcard searching is
active? By using the ASCII code. To search for a character by its
ASCII code, type ^0 in the
“Find what” box, followed by the
character code.
The ASCII code for a paragraph mark (technically,
it’s a carriage return) is 13.
So, to search for paragraph marks while wildcard searching is
activated, you’d type ^013 in
the “Find what” box.
With wildcard searching active, you can also search for ranges of
characters. For example, type [^0100-^0104] in
the “Find what” box to search for
characters between d and f.
Searching with Unicode codes
You can
also search for a character using its
Unicode code by prefacing it with ^u. However, you
can’t directly search using the hexadecimal code;
you must enter its decimal equivalent.
For example, the decimal equivalent of 266A, the musical eighth-note
character, is 9834. So, to search for that character, enter
^u9834 in the “Find
what” box.
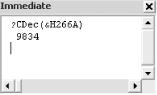
So how do you convert a hexadecimal number to a decimal number? Fortunately, VBA includes a function that will do it for you. To convert a “hex” number to its decimal equivalent, select Tools→Macro→Visual Basic Editor to display the Visual Basic Editor in a separate window.
In the small window titled “Immediate” near the bottom of the screen, type the following and press Enter:
?CDec(&Hcode)
code is the Unicode code, as shown in
Figure 4-10.
What’s That Character?
What if you need to replace some obscure character in an unusual font? For example, say you open a giant document from a client and find the same odd character at the beginning of every paragraph. If Word won’t let you paste the character into its Find and Replace dialog, it seems you’re stuck repairing it by hand.
If you knew the character’s numeric code, you could
search for it, but this character falls way off the usual list. How
can you find its numeric code? Put the following macro in the
template of your choice
[Hack #50]
,
select Tools→Macro→Macros, choose
WhatCharacterCode from the list, and click the Run
button:
Sub WhatCharacterCode( )
MsgBox Asc(Selection.Text)
End Sub
This macro will display the ASCII character code for the first
character in the current selection; you can then search for it using
the ^0 syntax.
If the macro reports a value of 63 and fails to match the character,
you may be facing a Unicode character. The following macro will
report the Unicode code of a character, which you can search for
using the ^u syntax:
Sub WhatUnicodeCharacterCode( )
MsgBox AscW(Selection.Text)
End Sub
Tip
The result displayed will be the decimal version of the Unicode character code, not the hexadecimal version used when inserting Unicode characters.
—Jack Lyon and Andrew Savikas
Find/Replace in Multiple Files
Make the same substitution on several files at once using the code in this hack.
Find and Replace is a real time-saver, but when you have to perform the same substitution on multiple files, it can seem like more of a hindrance than a help.
If you regularly perform the same types of substitutions on multiple documents, developing a set of macros to do the work for you can represent a real improvement in efficiency.
The Code
For example, say your law firm, Dewey & Cheatham, just added a partner, and now you’re Dewey, Cheatham & Howe. The following macro searches all the Word documents in the folder C:\My Documents and replaces the old name with the new name wherever it occurs:
Sub FindReplaceAllDocsInFolder( )
Dim i As Integer
Dim doc As Document
Dim rng As Range

With Application.FileSearch
    .NewSearch
    .LookIn = "C:\My Documents"
    .SearchSubFolders = False
    .FileType = msoFileTypeWordDocuments
    If Not .Execute( ) = 0 Then
        For i = 1 To .FoundFiles.Count
             Set doc = Documents.Open(.FoundFiles(i))
             Set rng = doc.Range
              With rng.Find
                .ClearFormatting
                .Replacement.ClearFormatting
                .Text = "Dewey & Cheatem"
                .Replacement.Text = "Dewey, Cheatham & Howe"
                .Forward = True
                .Wrap = wdFindContinue
                .Format = False
                .MatchCase = False
                .MatchWholeWord = False
                .MatchWildcards = False
                .MatchSoundsLike = False
                .MatchAllWordForms = False
                .Execute Replace:=wdReplaceAll
               End With

             doc.Save
             doc.Close

             Set rng = Nothing
             Set doc = Nothing
        Next i
    Else
        MsgBox "No files matched " & .FileName
    End If
End With
End Sub
The macro uses the FileSearch object to examine
each file in the folder. If it finds a Word document, it opens the
file, changes the name wherever it occurs, and then saves and closes
the file. If the macro finds no Word files in the folder, it displays
a message on the screen.
Place this macro in the template of your choice [Hack #50] and either run it from the Tools→Macro→Macros dialog or assign it a button on a menu or toolbar [Hack #1] .
Hacking the Hack
The code in the first section has a subtle problem related to the
Find object. When you perform a substitution from
VBA, it includes only the main part of the document in the
substitution. It leaves the headers, footers, comments, footnotes,
text boxes, and so forth out of the search.
To modify the macro above to search every nook and cranny in a
document, wrap the replacement inside a For
Each loop
[Hack #66]
that cycles through each part of the document. The modified sections
are highlighted in bold:
Sub FindReplaceAllDocsInFolder( )
Dim i As Integer
Dim doc As Document
Dim rng As Range

With Application.FileSearch
    .NewSearch
    .LookIn = "C:\My Documents"
    .SearchSubFolders = False
    .FileType = msoFileTypeWordDocuments
    If Not .Execute( ) = 0 Then
        For i = 1 To .FoundFiles.Count
             Set doc = Documents.Open(.FoundFiles(i))
                For Each rng In doc.StoryRanges
                 With rng.Find
                    .ClearFormatting
                    .Replacement.ClearFormatting
                    .Text = "Dewey & Cheatem"
                    .Replacement.Text = "Dewey, Cheatem & Howe"
                    .Forward = True
                    .Wrap = wdFindContinue
                    .Format = False
                    .MatchCase = False
                    .MatchWholeWord = False
                    .MatchWildcards = False
                    .MatchSoundsLike = False
                    .MatchAllWordForms = False
                    .Execute Replace:=wdReplaceAll
                 End With
                Next rng
             doc.Save
             doc.Close

             Set rng = Nothing
             Set doc = Nothing
        Next i
    Else
        MsgBox "No files matched " & .FileName
    End If
End With
End Sub
Find and Replace Without Find and Replace
This brute-force hack lets you power through simple substitutions without complicated code.
VBA newbies (and even veterans) find it frustrating to use the Find and Replace command from within a macro.
Why the difficulty? Most people think of Find and Replace as an
action, which would translate to a procedure in
VBA. Word, however, uses a Find
object to handle searching and replacing.
Scripting languages such as Python and Ruby implement their substitution capabilities as objects, too. If you implement Find as an object, you can assign and retain properties in memory for the next time you use the object. The same phenomenon occurs when you do a search and the text you last searched for remains in the “Find what” box.
While the Find object is a powerful tool for
working with Word from VBA, its complexity can really bog you down
when all you need is a quick fix. Find has more
than two dozen properties, and while it does execute very quickly,
you will probably spend any time you save using the
Find object figuring out how
to use it. This hack shows you how to replace it (pun intended) with
a simple For
Each loop
[Hack #66]
.
For example, say your document uses four different highlighting colors in each paragraph: red, blue, yellow, and green. Just as you finally finish applying the highlighting, your boss decides she prefers teal instead of blue and asks you to make the change. The clock reads 10 minutes to noon, and you want this project wrapped up before your lunch date.
First, you try Edit→Replace, but you quickly discover that although you can search for highlighting, you cannot specify a color.
You decide to try a macro instead, but 30 minutes later you still
need to figure out how to coerce the Find object
into doing your bidding. Hungry and frustrated, you finally give up
and start making the change by hand. There must be a better way!
The Code
It would probably take you five minutes to write these five lines of code with the help of VBA’s IntelliSense [Hack #1] , and maybe another five minutes to test and debug it on a snippet of your document. And five lines of brute-force VBA is all it takes:
Sub FixHighlightColor( )
Dim char As Range
For Each char In ActiveDocument.Characters
    If char.HighlightColorIndex = wdBlue Then
        char.HighlightColorIndex = wdTeal
    End If
Next char
End Sub
Notice that the macro iterates through each character in the active document (including spaces).
Running the Hack
Place this macro in the template of your choice [Hack #50] and either run it from the Tools→Macro→Macros dialog or put a button for it on a menu or toolbar [Hack #1] .
Obviously, it takes some time to run such a resource-intensive procedure. But on a sample 27-page document, with 83,000 characters (including spaces), this macro took a grand total of four minutes. You might have made that lunch date after all.
Of course, if your document is hundreds of pages long, or if you have dozens of documents to fix, it might make sense to develop more efficient code. But even if your document was 10 times longer than our sample (or you had nine more of them), this macro would have solved your problem before you even finished lunch.
Hacking the Hack
Although “each character in the active
document” sounds all-encompassing, it leaves out a
few important things. Each document is actually made of several
story ranges: one for the main text, another for
the footnotes, another for the headers and footers, and so on. The
macro, however, searches only the main text story range, so if a
header contained highlighting, the
FixHighlightColor macro would fail to catch it.
To solve this problem, nest your code inside another
For
Each loop:
Sub FixHighlightColorInAllStories( )
Dim char As Range
Dim stry as Range
               For Each stry In ActiveDocument.StoryRanges
    For Each char In stry.Characters
        If char.HighlightColorIndex = wdBlue Then
            char.HighlightColorIndex = wdTeal
        End If
    Next char
Next stry
End Sub
To see how much simpler a For
Each loop can be, take a look at the following
macro, which performs the same substitution as the five-line
FixHighlightColor macro shown above.
The Find object works a lot faster (about 70%
faster on that same test document), but it’s a lot
trickier to code:
Sub FixHighlightUsingFind( )
Dim rngToSearch As Range
Dim rngResult As Range

Set rngToSearch = ActiveDocument.Range
Set rngResult = rngToSearch.Duplicate

Do
    With rngResult.Find
        .ClearFormatting
        .Text = ""
        .Forward = True
        .Wrap = wdFindStop
        .Highlight = True
        .Execute
    End With

    If rngResult.Find.Found = False Then
        Exit Do
    End If

    If rngResult.HighlightColorIndex = wdBlue Then
               rngResult.HighlightColorIndex = wdTeal
               End If
    rngResult.MoveStart wdWord
    rngResult.End = rngToSearch.End
Loop Until rngResult.Find.Found = False

End Sub
As the bolded lines show, the part of the macro that does the actual
substitution is nearly identical to the
FixHighlightColor macro above. Everything else is
excess baggage.
Just like the For
Each loop in
the FixHighlightColor macro, the
Find object in this macro misses items not in a
document’s main story range. To find everything,
including headers, footers, footnotes, and text boxes, you need to
wrap the Find and Replace inside of a For
Each loop, as the following code shows:
Sub FindInEveryStory( )
Dim rngStory As Range
Dim rngToSearch As Range
Dim rngResult As Range
For Each rngStory In ActiveDocument.StoryRanges
               Set rngToSearch = rngStory
    Set rngResult = rngToSearch.Duplicate

    Do
        With rngResult.Find
            .ClearFormatting
            .Text = ""
            .Forward = True
            .Wrap = wdFindStop
            .Highlight = True
            .Execute
        End With

        If rngResult.Find.Found = False Then
            Exit Do
        End If

        If rngResult.HighlightColorIndex = wdBlue Then
            rngResult.HighlightColorIndex = wdTeal
        End If
        rngResult.MoveStart wdWord
        rngResult.End = rngToSearch.End
    Loop Until rngResult.Find.Found = False
    Next rngStory
End Sub
Quickly Create a Custom Dictionary
Adding items to a custom dictionary one by one is a tedious exercise. Here’s how to add an entire list of words to your existing custom dictionary, or as a separate, new custom dictionary.
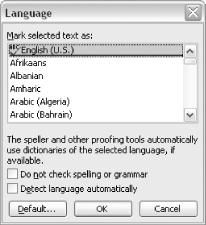
When Word performs a Spelling and Grammar check on your document, it uses whichever dictionary is available for your language. You can select Tools→Language→Set Language to change the dictionary, as shown in Figure 4-11. Any language listed with a checkmark next to it has a dictionary installed on your computer.
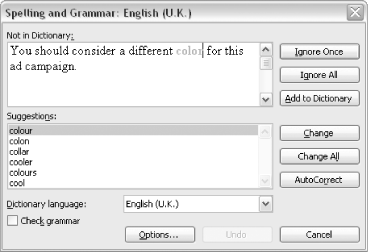
For example, if you’re working on a document for a client from the United Kingdom, and you change the language to “English (U.K.),” Word marks words such as “color” as misspellings and prompts you to change them to their English counterparts, as shown in Figure 4-12.
But often a document or set of documents uses a very specialized set of terms not included in any of the installed dictionaries. Although you can add words to the dictionary—or, rather, to the default custom dictionary file (in most cases, CUSTOM.DIC)—if the project exists for only a short time, you may not want those new entries for future documents. Rather than temporarily adding the terms to your standard custom dictionary, which you may prefer to reserve for items you use all the time, you’re better off adding a new custom dictionary for your project or client, which you can later remove when the project’s finished.
The method for creating and populating a custom dictionary from within Word involves the use of a lot of dialogs, and it can become a real pain if you want to enter a long list of words at once.
Fortunately, there’s an easier way. A custom dictionary is nothing more than a text file with a .dic extension, saved in a special folder. In Word 2000, 2002, and 2003, the folder is typically C:\Documents and Settings\<username>\Application Data\Microsoft\Proof.
Creating the Custom Dictionary
To create your new custom dictionary, create a list of the words you want to add using your favorite text editor, such as Notepad, and save the file with a .dic extension in the Proof folder.
Tip
Though you can create plain-text files using Word, you can avoid the possibility of extraneous formatting characters being included by using a standard text editor, such as Notepad.
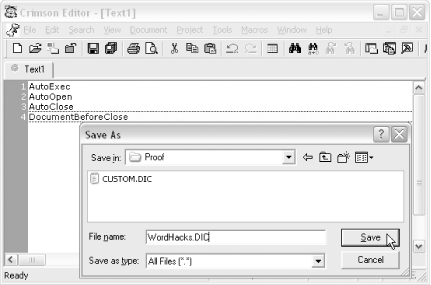
As an example, let’s say that while writing a book about Word macros, you want the Spelling and Grammar check to ignore certain terms, such as “AutoExec” and “DocumentBeforeClose.” After you enter the list of terms in a text editor, save the file in the Proof directory described above, as shown in Figure 4-13.
Activating the Custom Dictionary
To tell Word to start checking your new custom dictionary during the Spelling and Grammar check, you must first activate it.
Select Tools→Options and click the Spelling and Grammar tab. Click the Custom Dictionaries button to display the Custom Dictionaries dialog shown in Figure 4-14.
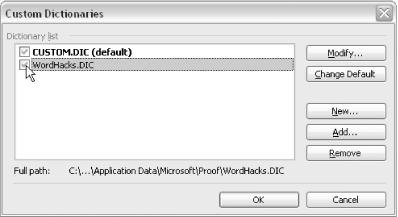
Any .dic files in the Proof directory will be included in the dictionary list. To activate your new custom dictionary, just check the box next to its name and click the OK button. When you’re finished with the project, use the same dialog to deactivate the custom dictionary.
Create a Dictionary Exclusion List
You can’t remove words from any of Word’s built-in dictionaries, but you can create a list of words that the Spelling and Grammar check will always flag.
An exclusion list contains words you want the Spelling and Grammar check to find, regardless of their spelling or usage, as if they’d been excluded from the Dictionary. For example, say you decide to write a book on Microsoft Word and add “word” to your exclusion list. After you complete each chapter, you can then run the Spelling and Grammar check to make sure you didn’t mix up “Word” and “word” somewhere along the way.
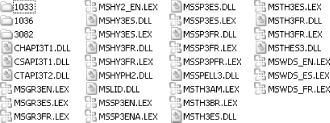
To create an exclusion list, make a list of words to exclude (in the sense that they will be flagged, rather than passed over as correct) using a standard text editor such as Notepad and save the file in your Proof directory (C:\Documents and Settings\<username>\Application Data\Microsoft\Proof). The exclusion list must use the same name as the dictionary you use. For example, Word uses the dictionary named Mssp3en.lex for U.S. English. If you’re using this dictionary, you must name the exclusion list Mssp3en.exc. (Note that the file uses the .exc extension.) The list will take effect the next time you start Word.
To add an exclusion list for a different dictionary, you need to know its name. Windows-based systems store the dictionaries in C:\Program Files\Common Files\Microsoft Shared\Proof, as shown in Figure 4-15.
Disable Overtype Permanently
Inspiration strikes, and you begin a flurry of typing with nary a glance at the screen. A few minutes later, you look up and discover with horror that you’ve accidentally entered Overtype mode, that zero-sum game of editing by attrition. This hack shows you how to disable Overtype mode once and for all.
Do you know anyone who uses Overtype mode? Didn’t think so. In fact, many people simply reassign the Insert key to some other function—typically Paste, though any command will do. Word even includes an option to use the Insert key for pasting: simply select Tools→Options, click the Edit tab, and check the “Use the INS key for paste” box.
But if you’ve been burned before, even this may not be enough to assuage your fears. With this hack, Overtype can never hurt you again. It also offers a great example of intercepting built-in commands [Hack #61] , one of the most powerful customization features available in Word.
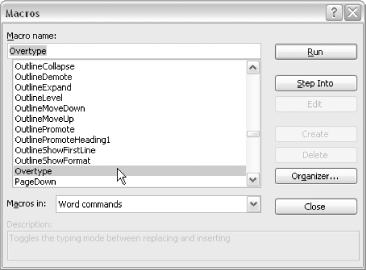
Select Tools→Macro→Macros, choose Word Commands from the “Macros in” drop-down list, and select Overtype from the “Macro name” list, as shown in Figure 4-16.
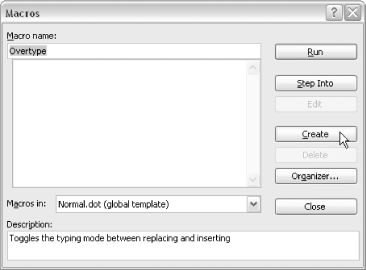
Next, choose Normal.dot (or the template of your choice [Hack #50] ) from the “Macros in” drop-down list and click the Create button, as shown in Figure 4-17.
The Visual Basic Editor will open, and you’ll see a brand new macro named Overtype, already filled in with the VBA code equivalent to toggling the Insert button, as shown in Figure 4-18.
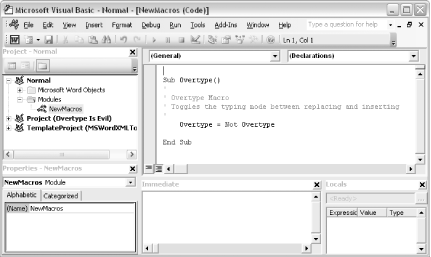
Select the line of code that says:
Overtype = Not Overtype
and replace it with the following:
Selection.Paste
Now select File→Save, and then go to File→Close and Return to Microsoft Word.
Delete All Comments in a Document
Word 2002 and 2003 include a command on the Reviewing toolbar that deletes all the comments in a document. For users of earlier versions of Word, this hack does the same thing.
Comments let one or more reviewers comment on the text of a document without interfering with the content of the document. But once you finish editing or reviewing a document, getting rid of those comments can be a hassle.
To quickly delete a single comment, right-click its reference and choose Delete Comment from the shortcut menu [Hack #3] . But if you’re facing dozens or hundreds of comments, deleting each one in turn will take you quite a while.
Another method for deleting comments is to use Find and Replace. Select Edit→Replace and do the following:
Leave the Find What box empty.
Click the Format button, choose Style, and select the Comment Reference style. (Don’t see the Format button? Click the More button to make it visible.)
Leave the Replace With box empty.
Click the Replace All button.
But occasionally some comments just won’t go quietly, so a VBA macro is your best bet for quickly getting rid of them.
The Code
Place this macro in the template of your choice [Hack #50] and either run it from the Tools→Macro→Macros dialog or put a button for it on a menu or toolbar [Hack #1] :
Sub DeleteAllComments
Dim i As Integer
For i = ActiveDocument.Comments.Count To 1 Step -1
ActiveDocument.Comments(i).Delete
Next i
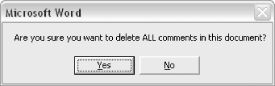
End SubIf you’re concerned about running the macro unintentionally, perhaps because you’ve placed it on a toolbar near another command you use frequently, the following version includes a prompt asking you to confirm that you do indeed want all the comments deleted, as shown in Figure 4-19. It also pops up a message when it finishes, notifying you how many comments were removed.
Sub DeleteAllCommentsAndConfirm( )
Dim i As Integer
Dim iNumberOfComments As Integer
               If MsgBox( _
    "Are you sure you want to delete ALL comments in this document?", _
               vbYesNo) = vbYes Then
               iNumberOfComments = ActiveDocument.Comments.Count
    For i = iNumberOfComments To 1 Step -1
        ActiveDocument.Comments(i).Delete
    Next i
MsgBox iNumberOfComments & " Comment(s) Deleted", vbInformation
End If
End Sub
Delete All Bookmarks in a Document
Word offers no built-in way to delete all of a document’s bookmarks at once. This hack shows you how to do it with some VBA.
Bookmarks let you quickly navigate through a document. But if you will eventually import your document into another program, such as Quark or FrameMaker, those bookmarks can cause trouble—for example, FrameMaker attempts to convert some bookmarks into its own similar “marker” feature, but it often creates unresolved cross-references that you must delete. Conversely, when exporting to Word format from another program, the program may create bookmarks of questionable value in the Word document.
You can select Insert→Bookmark and delete bookmarks one at a time, but if a document has dozens or more, you’ll be clicking for a while. The macro in this hack will delete them all at once.
The Code
Place this macro in the template of your choice [Hack #50] and either run it from the Tools→Macro→Macros dialog or put a button for it on a menu or toolbar [Hack #1] .
The following macro deletes every bookmark in a document:
Sub DeleteAllBookmarks( )
Dim i As Integer
For i = ActiveDocument.Bookmarks.Count To 1 Step -1
    ActiveDocument.Bookmarks(i).Delete
Next i

End Sub
Hacking the Hack
Word hides some of the bookmarks it creates, such as the ones for cross-references, by default. A hidden bookmark isn’t included when iterating through each bookmark in a document, unless the “Hidden bookmarks” box in the Insert→Bookmark dialog is checked. To be sure you get all of them, this version of the macro turns on that setting before running:
Sub DeleteAllBookmarksIncludingHidden( )
Dim i As Integer
Activedocument.Bookmarks.ShowHidden = True
For i = ActiveDocument.Bookmarks.Count To 1 Step -1
    ActiveDocument.Bookmarks(i).Delete
Next i

End Sub
Turn Comments into Regular Text
This hack shows you how to replace a comment’s reference with its text and author.
Comments let reviewers annotate the text without interfering with the text. But if you later import the document into another program, such as Quark or FrameMaker, those comments can cause trouble. Also, when you save a file as a plain-text (.txt) file, you lose any comment references, and the comments end up tacked on at the end, out of context.
In many cases, you can just delete all the comments [Hack #36] , but if those comments contain important instructions for a compositor, or other useful information, you may prefer to incorporate the comments into the text and set them off with a bit of markup. A macro can quickly convert those comments into regular text, while retaining their positions in the document.
Tip
Select Tools→Options and click the User Information tab to view the author name assigned to comments you create.
The Code
This macro replaces each comment reference in a document with the text of the comment itself and adds the name of the comment’s author at the end. The entire entry is surrounded in brackets and styled with the built-in Emphasis character style, as shown in Figure 4-20.

Place this macro in the template of your choice [Hack #50] and either run it from the Tools→Macro→Macros dialog or put a button for it on a menu or toolbar [Hack #1] . Be sure your cursor is currently in the main text of the document when you run this macro.
Sub ConvertCommentsToInlineText( )
Dim c As Comment
Dim i As Integer
For i = ActiveDocument.Comments.Count To 1 Step -1
    Set c = ActiveDocument.Comments(i)
    c.Reference.Style = wdStyleEmphasis
    c.Reference.Text = " [" & c.Range.Text & " -- " & c.Author & "] "
Next i
End Sub
Though the code never explicitly deletes the comments, Word removes them when the macro replaces their references with text.
Hacking the Hack
Rather than retaining the comments within the text, you can create a separate document containing just the comments.
The following macro creates a table listing each comment in a document, along with the comment’s author. The table is created in a new, blank document.
Sub CreateTableOfComments
Dim c As Comment
Dim i As Integer
Dim docForComments As Document
Dim docActive As Document

Set docActive = ActiveDocument
Set docForComments = Documents.Add
docForComments.Range.InsertAfter _
    "Comment" & vbTab & "Author" & vbCr

For Each c In docActive.Comments
docForComments.Range.InsertAfter _
   c.Author & vbTab & c.Range.text & vbCr
Next c
docForComments.Range.ConvertToTable _
   Separator:=vbTab, _
   Format:=wdTableFormatList1
End Sub
See Also
Apply Context-Sensitive Formatting
Which character style you apply to a selection of text may depend on its context. This hack makes it easy to apply the correct one of several similar styles by using a macro to examine the selection’s surroundings.
A complex document template
may have several similar character
styles, each fulfilling a different semantic purpose in the
document’s structure. The template used for this
manuscript, for example, has two styles used to emphasize portions
of
text: one called emphasis (used to emphasize
normal body text) and the other
replaceable (used to emphasize text
presented in a constant-width font). Which style is used depends on
the context of the text to be emphasized.
One way to ensure the correct application of several different, but similar, character styles is to provide users with a detailed set of instructions about which style to use in any particular situation (and when not to use a particular style, such as in a heading). But many people will simply do what they’ve always done in Word to emphasize text: press the I button on the Formatting toolbar.
Unfortunately, this action only applies direct formatting on top of the paragraph style already in use. You can try just telling people not to reach for the I button, or you can opt to intercept the Italic command [Hack #61] and apply the correct character style based on the current paragraph style.
For example, assume that there are two character styles,
emphasis and
replaceable, governed by the following
four rules:
Do not apply character styles with multiple paragraphs selected.
Do not use character styles in headings.
If the paragraph style’s name includes the word “Code,” use the
replaceablecharacter style.In all other situations, use the emphasis character style.
The Code
The following macro examines the context of the selected text when you press the I button and then, based on the rules described above, performs one of three possible actions:
Ignores the command
Warns the user that the attempted action is not permitted
Applies one of the two character styles
After you place this macro in the template of your choice [Hack #50] , it will run whenever you press the I button on the toolbar or the key command associated with italic (typically Ctrl-I):
Sub Italic( )
Dim sel As Selection
Dim sParagraphStyleName As String

Set sel = Selection

' Quietly exit if selection spans multiple paragraphs
If sel.Range.Paragraphs.Count <> 1 Then Exit Sub

' Warn then exit if selection is in a heading
sParagraphStyleName = sel.Range.Paragraphs.First.Style
If InStr(sParagraphStyleName, "Heading") Then
    MsgBox "Sorry, Character Styles aren't allowed in headings"
    Exit Sub
End If

' Apply appropriate character style
If InStr(sParagraphStyleName, "Code") Then
    sel.Style = "replaceable"
Else
    sel.Style = "emphasis"
End If

End Sub
Tip
For another example of intercepting toolbar buttons, check out [Hack #42] .
Send a Document as a Plain-Text Outlook Email
Use a macro to turn the text of a Word document into the body of an Outlook email.
Sometimes sending a document as an email attachment is overkill, especially if you just want the recipient to review the text of a simple document. And if the recipient is under a particularly restrictive mail server, he may not be able to receive Word document attachments, for fear of a virus.
Now, you can always try to cut and paste the text into the body of an email, but that rarely produces anything better than a giant block of continuous text that can be difficult to read from an email window.
Another option is to save the document as a plain-text .txt file, open up that file in a text editor such as Notepad, add some extra line breaks for readability, then cut and paste that into an email. Yuck.
Here’s an easier option: after changing a few settings from within the Visual Basic Editor, you can write macros that directly access Outlook from within Word, let you get the text-only contents of a document, add some extra line breaks for readability, quickly create a new email message, and insert the text as the message body.
Setting the Reference to Outlook
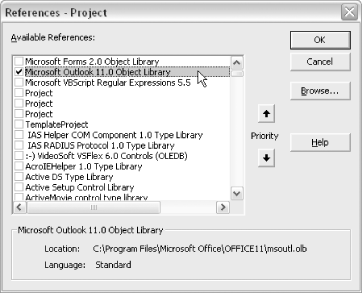
First, make sure you can access the Outlook object model from within Word. Select Tools→Macro→Visual Basic Editor, then choose Tools→References. Scroll down and check the “Microsoft Outlook 11.0 Object Library” box, as shown in Figure 4-21.
Tip
If you’re using an earlier version of Outlook, select the reference to that version. The code in this hack will still work.
Once you’ve established that reference, you can access the Outlook object model from your Word macros.
The Code
Place this macro in the template of your choice [Hack #50] and either run it from the Tools→Macro→Macros dialog or put a button for it on a menu or toolbar [Hack #1] .
Since there’s a good chance Outlook may already be open when running a macro that accesses it, the code first tries to reference the currently open instance of Outlook. If it can’t find one, the code creates and uses a new instance of Outlook.
Sub doc2outlookemail( )
Dim sDocText As String
Dim oOutlook As Outlook.Application
Dim oMailItem  As Outlook.MailItem

' Get currently running Outlook, or create new instance
On Error Resume Next
Set oOutlook = GetObject(Class:="Outlook.Application")
If Err.Number = 429 Then
    Set oOutlook = CreateObject(Class:="Outlook.Application")
ElseIf Err.Number <> 0 Then
    MsgBox "Error: " & Err.Number & vbCr & Err.Description
    Exit Sub
End If

sDocText = ActiveDocument.Content.Text
' Replace each paragraph break with two paragraph breaks
sDocText = Replace(sDocText, Chr(13), String(2, Chr(13))
Set oMailItem = oOutlook.CreateItem(olMailItem)

oMailItem.Body = sDocText
oMailItem.Display

' Clean up references to Outlook objects
Set oMailItem = Nothing
Set oOutlook = Nothing
End Sub
The code leaves the email open and unaddressed. Just fill in the recipient’s address and click the Send button.
Hacking the Hack
Rather than sending the entire contents of a Word document, you may want to send just the outline as a plain-text email. To do so, first switch to Outline view in your document and select the outline level you want included in the email. Only the text visible from Outline view will be included in the email.
Now make a minor adjustment to the earlier macro, as shown in bold:
Sub SendOutlineOnly( )
Dim sDocText As String
Dim oOutlook As Outlook.Application
Dim oMailItem  As Outlook.MailItem

' Get currently running Outlook, or create new instance
On Error Resume Next
Set oOutlook = GetObject(Class:="Outlook.Application")
If Err.Number = 429 Then
    Set oOutlook = CreateObject(Class:="Outlook.Application")
ElseIf Err.Number <> 0 Then
    MsgBox "Error: " & Err.Number & vbCr & Err.Description
    Exit Sub
End If
' Just want the outline
               ActiveDocument.Content.TextRetrievalMode.ViewType = wdOutlineView
sDocText = ActiveDocument.Content.Text
' Replace each paragraph break with two paragraph breaks
sDocText = Replace(sDocText, Chr(13), String(2, Chr(13)))
Set oMailItem = oOutlook.CreateItem(olMailItem)

oMailItem.Body = sDocText
oMailItem.Display

' Clean up references to Outlook objects
Set oMailItem = Nothing
Set oOutlook = Nothing
End Sub
Swap Revision Authors
This hack shows you how to edit the information Word stores when you edit a document using the Track Changes feature.
In addition to marking revisions in a document, Word’s Track Changes feature remembers who made the revisions. It lets you view up to eight different revision authors in a single document, each of whose changes are displayed in a different color.
But what if you want to modify the name of the author of a particular set of revisions? For example, say you took some work home for the weekend and accidentally did your editing while logged into your computer as one of your kids. Now all your revisions appear as though your teenage son made the changes. Many coworkers would be forgiving, but a client would hardly look kindly on this error.
Unfortunately, you can’t modify a revision author
from VBA. It does have a Revision object with an
Author property, but the property is read-only,
meaning you can’t give it a different value.
To make the change, you’ll need to get the document into a format that takes it out of Word’s control, such as RTF (Rich Text Format). When you save a document as an RTF file, you retain the revision information. You can then edit the RTF file with any standard text editor, such as Notepad.
Here’s how to change the author of a set of revisions in a Word file.
First, select File→Save As and choose Rich Text Format in the “Save as type” field to save the file as an .rtf file. Next, open the file with a text editor such as Notepad.
Tip
You can find many free text editors available on the Internet with a lot more to offer than Notepad. Check out http://www.crimsoneditor.com for one such free editor.
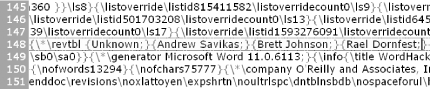
To locate the part of the file that contains the names of the revision authors, do a search in the file for the following:
{\*\revtblYou will see a list of revision authors following the string characters, as shown in Figure 4-22. The first entry in the list is always Unknown, which you should leave as is. If you edit any of the other names in the list, all revisions attributed to that name will show the change when you open the document in Word.
After you make the change to the RTF file, save it, and then open it in Word. You can now select File→Save As and return it to the native .doc format.
Tip
Be careful when you edit the RTF file. Word (and any other program that reads RTF files) is very sensitive to the correct positioning of those braces. Make sure you don’t accidentally delete one of the braces when you edit the name. If you do, Word may not be able to open the file.
Hacking the Hack
Editing RTF files by hand is tricky business. If you regularly swap revision authors in a document, a Perl script can take over the dirty work.
Tip
You can download Perl for a Windows machine for free from http://www.activestate.com.
The following script requires the RTF::Tokenizer
module. If you use the ActiveState distribution of Perl, you can use
the Perl Package Manager, available from the ActivePerl entry on your
Start menu, to install RTF::Tokenizer.
#!/usr/bin/perl

use strict;
use Getopt::Long;
use RTF::Tokenizer;

my %opts = ( );
GetOptions (\%opts, 'from=s', 'to=s');

my $filename = shift;

die "Please provide an rtf file to parse.\n" unless $filename;

my $tokenizer = RTF::Tokenizer->new( file => $filename);

while( my ( $type, $arg, $param ) = $tokenizer->get_token( ) ){
    last if $type eq 'eof';

    if($type eq 'control' and $arg eq 'revtbl') {
        my $match = 0;
        put($type, $arg, $param) if $opts{from} and $opts{to};

        my $brace = 1;

        while($brace > 0){
            my @attr = $tokenizer->get_token( );

            $brace++ if $attr[0] eq 'group' and $attr[1] == 1;
            $brace-- if $attr[0] eq 'group' and $attr[1] == 0;

            if( $attr[0] eq 'text') {
                $attr[1] =~ s/;$//;

                if( $opts{from} and $opts{to} ){
                    if( $opts{from} eq $attr[1] ) {
                        $attr[1] = $opts{to};
                        $match = 1;
                    }

                    $attr[1] .= ';';
                    put( @attr);
                } else {
                    print $attr[1], "\n" unless $attr[1] eq 'Unknown';
                }
            } else {
                put(@attr) if $opts{from} and $opts{to};
            }
        }

        if($opts{from} and $opts{to} and !$match) {
            print STDERR "The author $opts{from} was not found
                              in the document!\n";
        }
    } else {
        put($type, $arg, $param) if $opts{from} and $opts{to};
    }
}

sub put {
    my ($type, $arg, $param) = @_;

    if( $type eq 'group' ) {
        print $arg == 1 ? '{' : '}';
    } elsif( $type eq 'control' ) {
        print "\\$arg$param";
    } elsif( $type eq 'text' ) {
        print "\n$arg";
    }
}
Save the script as “authorswap.pl” and put it in the same folder as the RTF file. Run it at a DOS prompt without any arguments to get a list of the revision authors in the document, as shown below:
> perl authorswap.pl MyDoc.rtf
> Brett Johnson
  Rael Dornfest
To replace one revision author with another, use the
to and from options, as shown
below. Place the names inside quotation marks.
> perl authorswap.pl -from "Brett Johnson" -to "Bob Smith" MyDoc.rtf > NewFile.rtf
The file NewFile.rtf will reflect the changes.
—Andrew Savikas and Andy Bruno
Corral Basic Bullets and Numbering
Word offers 10 reliable, customizable, and, best of all, predictable built-in styles for making bulleted and numbered lists. So how come they’ve got nothing to do with those decidedly unpredictable list buttons on the toolbar? Here’s how to hack some more helpful buttons.
Admit it: the first time you ever clicked one of those little list buttons, you were impressed. Bullets! Numbers! Indented and aligned! How do they do that? Not very well, as it turns out.
What happens when you press one of those buttons depends not on the document you’re using, nor on the template on which the document is based. It doesn’t even necessarily depend on what happened the last time you clicked the button. It depends on which one of the seven different available list formats you last chose from the Format→Bullets and Numbering dialog, as shown in Figure 4-23.
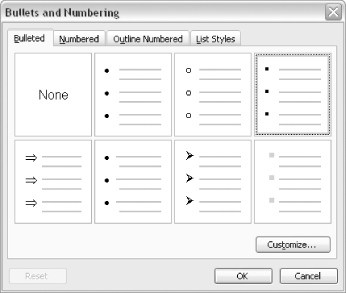
And those seven formats? They aren’t necessarily the same seven each time. Which of the seven you last chose is stored in the Windows registry, a massive internal database Windows uses to store information. If you click the same button, in the same document, on two different computers, it can yield different results. Still impressed? It gets worse. Once you’ve gone through the trouble of populating a long document with lists by using the Bullets or Numbering toolbar buttons, there’s no easy way to globally change how those lists are formatted.
Most Word pros avoid these two buttons like the Plague. They prefer to use a paragraph style to include lists in a document. If you use paragraph styles, you can modify every paragraph that uses a particular style at the same time. For the same reason, many power users eschew the Bold and Italic buttons in favor of the Strong and Emphasis character styles (see [Hack #39] ).
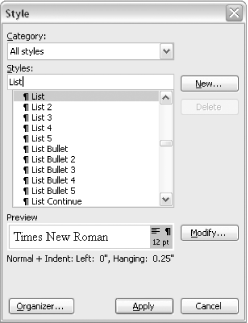
Word provides a boatload of built-in list styles for you. In addition to the 10 bullet and numbering styles, Word has 10 more for nonnumbered lists and list-continuation paragraphs. The list styles all come factory-set with some basic formatting (the “List Bullet 2” style is indented more than the “List Bullet” style, for example). You can see a few of these styles in Figure 4-24. The five List Bullet styles, as they’re formatted by default, are shown in Figure 4-25.

But even users who know all about built-in list styles rarely go so far as to actually remove the list buttons from the Formatting toolbar. So the buttons get used anyway, especially for short documents and, unfortunately, for long documents you thought were going to be short.
By intercepting some built-in commands [Hack #61] , you can reeducate those buttons (along with the Increase Indent and Decrease Indent buttons) to apply Word’s predictable and reliable built-in list styles, which you can easily modify as needed in your documents or templates.
Mapping the Styles to the Buttons
In addition to the Bullets and Numbering buttons, this hack also intercepts the Decrease Indent and Increase Indent buttons. These four buttons, shown in Figure 4-26, sit adjacent to each other on the formatting toolbar.
This hack will use those four buttons to selectively apply the 10 built-in bullet and numbering list styles (List Bullet, List Bullet 2, List Bullet 3, List Bullet 4, List Bullet 5, List Number, List Number 2, List Number 3, List Number 4, and List Number 5).
When you implement this hack, the action taken when you click each of the four buttons will depend on the style currently applied to the selected text. For example, if you select text styled as “List Bullet 2,” the following will happen when you click each of the four buttons:
- Bullets
Change back to Normal
- Numbering
Change to “List Number”
- Increase Indent
Change to “List Bullet 3”
- Decrease Indent
Change to “List Bullet”
To implement this hack, you must create a fairly lengthy description of which style gets applied for which button. Fortunately (for you, not the author), that’s already been done, so the code below will work straight out of the box, so to speak.
The Code
This hack is a combination of five separate macros: one that makes the decisions and applies the formatting, and four others that intercept the commands used by the four toolbar buttons. Each of the macros used to intercept the buttons “calls” the fifth macro, the one that does the formatting, and “tells” it which button was clicked.
The selected text will always be in one of 11 possible states: either one of the 10 list styles, or some other style altogether. For each scenario, you can take four possible actions—one for each button.
These are the four macros that intercept the buttons. Put these,
along with the BetterBulletsAndNumbering macro
that follows, in the template of your choice
[Hack #50]
.
Sub FormatBulletDefault( )
Call BetterBulletsAndNumbering(Selection, "Bullets")
End Sub

Sub FormatNumberDefault( )
Call BetterBulletsAndNumbering(Selection, "Numbering")
End Sub

Sub IncreaseIndent( )
Call BetterBulletsAndNumbering(Selection, "IncreaseIndent")
End Sub

Sub DecreaseIndent( )
Call BetterBulletsAndNumbering(Selection, "DecreaseIndent")
End Sub
Warning
These four macros must be named exactly as shown, or Word won’t use them in place of the commands they’re named after.
The next macro does the real work of deciding which style to use and
applying it to the selected text. To efficiently handle such a large
number of options, this code uses VBA’s
Select
Case statements, a much
neater alternative to a massive set of complex If... Then...
Else statements.
Function BetterBulletsAndNumbering(ByRef sel As Selection, _
                                   ByVal sButton As String)
' We'll convert the passed sButton string
' to a constant for more efficient code
Const cBULLETS = 1
Const cNUMBERING = 2
Const cINCREASE_INDENT = 3
Const cDECREASE_INDENT = 4

Dim DocStyles As Styles
Dim styBullet1 As Style
Dim styBullet2 As Style
Dim styBullet3 As Style
Dim styBullet4 As Style
Dim styBullet5 As Style
Dim styNumber1 As Style
Dim styNumber2 As Style
Dim styNumber3 As Style
Dim styNumber4 As Style
Dim styNumber5 As Style
Dim styBodyText As Style

Dim iButtonPressed As Integer
' A variable for looping through
' each paragraph in the selection
Dim para As Paragraph

Set DocStyles = sel.Document.Styles
Set styBullet1 = DocStyles(wdStyleListBullet)
Set styBullet2 = DocStyles(wdStyleListBullet2)
Set styBullet3 = DocStyles(wdStyleListBullet3)
Set styBullet4 = DocStyles(wdStyleListBullet4)
Set styBullet5 = DocStyles(wdStyleListBullet5)

Set styNumber1 = DocStyles(wdStyleListNumber)
Set styNumber2 = DocStyles(wdStyleListNumber2)
Set styNumber3 = DocStyles(wdStyleListNumber3)
Set styNumber4 = DocStyles(wdStyleListNumber4)
Set styNumber5 = DocStyles(wdStyleListNumber5)

' Assumes you want the "default" body text to be
' Normal style.
Set styBodyText = DocStyles(wdStyleNormal)

Select Case sButton
    Case Is = "Bullets"
        iButtonPressed = cBULLETS
    Case Is = "Numbering"
        iButtonPressed = cNUMBERING
    Case Is = "IncreaseIndent"
        iButtonPressed = cINCREASE_INDENT
    Case Is = "DecreaseIndent"
        iButtonPressed = cDECREASE_INDENT
End Select

For Each para In sel.Paragraphs

    Select Case para.Style

         ' Paragraph is  List Bullet
        Case Is = styBullet1
            Select Case iButtonPressed
                Case Is = cBULLETS
                    para.Style = styBodyText
                Case Is = cNUMBERING
                    para.Style = styNumber1
                Case Is = cINCREASE_INDENT
                    para.Style = styBullet2
                Case Is = cDECREASE_INDENT
                    para.Style = styBodyText
            End Select

        ' Paragraph is List Bullet 2
        Case Is = styBullet2
            Select Case iButtonPressed
                Case Is = cBULLETS
                    para.Style = styBodyText
                Case Is = cNUMBERING
                    para.Style = styNumber2
                Case Is = cINCREASE_INDENT
                    para.Style = styBullet3
                Case Is = cDECREASE_INDENT
                    para.Style = styBullet1
            End Select

        ' Paragraph is List Bullet 3
        Case Is = styBullet3
            Select Case iButtonPressed
                Case Is = cBULLETS
                    para.Style = styBodyText
                Case Is = cNUMBERING
                    para.Style = styNumber3
                Case Is = cINCREASE_INDENT
                    para.Style = styBullet4
                Case Is = cDECREASE_INDENT
                    para.Style = styBullet2
            End Select

        ' Paragraph is List Bullet 4
        Case Is = styBullet4
            Select Case iButtonPressed
                Case Is = cBULLETS
                    para.Style = styBodyText
                Case Is = cNUMBERING
                    para.Style = styNumber4
                Case Is = cINCREASE_INDENT
                    para.Style = styBullet5
                Case Is = cDECREASE_INDENT
                    para.Style = styBullet3
            End Select

        ' Paragraph is List Bullet 5
        Case Is = styBullet5
            Select Case iButtonPressed
                Case Is = cBULLETS
                    para.Style = styBodyText
                Case Is = cNUMBERING
                    para.Style = styNumber5
                Case Is = cINCREASE_INDENT
                    ' Do Nothing
                Case Is = cDECREASE_INDENT
                    para.Style = styBullet4
            End Select

          ' Paragraph is List Number
        Case Is = styNumber1
            Select Case iButtonPressed
                Case Is = cBULLETS
                    para.Style = styBullet1
                Case Is = cNUMBERING
                    para.Style = styBodyText
                Case Is = cINCREASE_INDENT
                    para.Style = styNumber2
                Case Is = cDECREASE_INDENT
                    para.Style = styBodyText
            End Select

        ' Paragraph is List Number 2
        Case Is = styNumber2
            Select Case iButtonPressed
                Case Is = cBULLETS
                    para.Style = styBullet2
                Case Is = cNUMBERING
                    para.Style = styBodyText
                Case Is = cINCREASE_INDENT
                    para.Style = styNumber3
                Case Is = cDECREASE_INDENT
                    para.Style = styNumber1
            End Select

        ' Paragraph is List Number 3
        Case Is = styNumber3
            Select Case iButtonPressed
                Case Is = cBULLETS
                    para.Style = styBullet3
                Case Is = cNUMBERING
                    para.Style = styBodyText
                Case Is = cINCREASE_INDENT
                    para.Style = styNumber4
                Case Is = cDECREASE_INDENT
                    para.Style = styNumber2
            End Select

        ' Paragraph is List Number 4
        Case Is = styNumber4
            Select Case iButtonPressed
                Case Is = cBULLETS
                    para.Style = styBullet4
                Case Is = cNUMBERING
                    para.Style = styBodyText
                Case Is = cINCREASE_INDENT
                    para.Style = styNumber5
                Case Is = cDECREASE_INDENT
                    para.Style = styNumber3
            End Select

        ' Paragraph is List Number 5
        Case Is = styNumber5
            Select Case iButtonPressed
                Case Is = cBULLETS
                    para.Style = styBullet5
                Case Is = cNUMBERING
                    para.Style = styBodyText
                Case Is = cINCREASE_INDENT
                    ' Do Nothing
                Case Is = cDECREASE_INDENT
                    para.Style = styNumber4
            End Select

           Case Else
            Select Case iButtonPressed
                Case Is = cBULLETS
                    para.Style = styBullet1
                Case Is = cNUMBERING
                    para.Style = styNumber1
                Case Is = cINCREASE_INDENT
                    WordBasic.IncreaseIndent
                Case Is = cDECREASE_INDENT
                    WordBasic.DecreaseIndent
            End Select

    End Select

Next para

End Function
This code has two important features:
Sometimes you might click one of the indent buttons when you’ve selected text that isn’t part of a list. In that case, the macro just “passes” the command on to Word, which will indent as it would if the button had never been intercepted.
If you select multiple paragraphs with different styles applied, the code loops through and formats each paragraph in the selection separately, using a
ForEachloop [Hack #66] .
Running the Hack
Once you’ve placed these macros in an active template, they’ll spring into action when you click any of the four toolbar buttons shown in Figure 4-26.
If you want to change the formatting of the bullets or numbering, modify the corresponding built-in list style.
Cross-Reference Automatically
Using the Cross-reference dialog to insert references, particularly in a lengthy document, can be frustrating because it shows you only a few headings at a time. This hack shows you how to create references automatically, without a visit to the dialog.
Whoever decided that the Cross-reference dialog in Word (Insert→Reference→Cross-reference or Insert→Cross-reference, depending on your version of Word) should display only nine items at a time clearly didn’t have your best interests in mind. Most lengthy documents include more than nine headings, captions, or other items to reference.
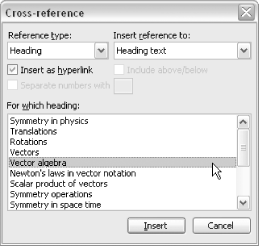
In many cases, creating a cross-reference means converting static text into a dynamic reference by selecting it, then replacing it with the corresponding item from the Cross-reference dialog (as shown in Figure 4-27). But since there’s that nine-item limit, you’re in for some serious scrolling if you need to make many references. In a Sisyphean spiral, the longer your document is, the more references you likely need, and the longer it will take to find each item in that teeny, tiny list.
This hack shows you two ways to use VBA to automatically create cross-references to headings. In each case, the selected text is compared to the headings in a document, trying to find a match and create a cross-reference.
Referencing the Way Word Does
The procedure shown in this section uses Word VBA’s
GetCrossReferenceItems method, which returns a
list of potential reference targets in a document. Because Word
continually updates and indexes this list, accessing it is very
fast. This code runs
significantly faster than the code in the next section, but that
speed comes at a price: you’re limited to creating
cross-references to items that Word considers potential targets, such
as headings that use one of the built-in heading styles. If
you’ve also got a different kind of heading style in
your document, such as SidebarTitle, those headings
don’t “count” as
possible reference targets.
Place this macro in the template of your choice [Hack #50] and either run it from the Tools→Macro→Macros dialog or put a button for it on a menu or toolbar [Hack #1] .
If your current selection includes more than one paragraph, the macro exits without taking any action.
Sub InsertAutoXRef( )

Dim sel As Selection
Dim doc As Document
Dim vHeadings As Variant
Dim v As Variant
Dim i As Integer

Set sel = Selection
Set doc = Selection.Document

' Exit if selection includes multiple paragraphs
If sel.Range.Paragraphs.Count <> 1 Then Exit Sub

' Collapse selection if there are spaces or paragraph
' marks on either end
sel.MoveStartWhile cset:=(Chr$(32) & Chr$(13)), Count:=sel.Characters.Count
sel.MoveEndWhile cset:=(Chr$(32) & Chr$(13)), Count:=-sel.Characters.Count

vHeadings = doc.GetCrossReferenceItems(wdRefTypeHeading)

i = 1
For Each v In vHeadings
    If Trim (sel.Range.Text) = Trim (v) Then
        sel.InsertCrossReference _
           referencetype:=wdRefTypeHeading, _
           referencekind:=wdContentText, _
           referenceitem:=i
        Exit Sub
    End If
i = i + 1
Next v

MsgBox "Couldn't match: " & sel.Range.Text
End Sub
There are two important limitations to note about this code. First, if multiple headings match the selected text, the code creates a reference to the first match and ignores subsequent matches. This limitation is a problem if you have multiple headings with the same text, such as “The Code,” used throughout this book.
Second, the code offers no protection against creating a self-reference. If the match found by the code is the text you’ve selected, the reference that’s created will replace the text it’s supposed to reference, resulting in a broken reference, as shown in Figure 4-28.
This kind of inadvertent text deletion is also possible when creating references from the Word Cross-reference dialog. When you create a self-reference, Word displays a message telling you the reference is empty—but only after the text has been deleted.
A Better Way to Reference
This method won’t match the speed offered by the code shown above, but its flexibility makes it a better starting point for hacking your own solutions.
Rather than looking only at paragraphs that use one of Word’s built-in heading styles, this code examines every paragraph in the document, looking for a match to the selected text. That means you can easily create a reference to a heading that uses a custom paragraph style, such as SidebarTitle.
Unlike the code in the previous section, this procedure also checks to be sure the match it’s found isn’t the selected text, avoiding the possibility of a self-reference.
This code is divided into five separate procedures: the
MakeAutoXRef procedure and four supporting
procedures, each of which performs an operation needed to create the
reference. Place all five procedures in the template of your choice
[Hack #50]
and run the one named MakeAutoXRef to create a
reference in place of the selected text.
The first procedure, named MakeAutoXRef, is shown
first. In conjunction with the supporting procedures shown afterward,
it examines each paragraph in the document. If it finds one that
matches the selected text, it creates a bookmark around the match and
then replaces the selected text with a reference pointing to the
bookmark. If the matched paragraph has already been referenced
elsewhere, the existing bookmark is used.
Sub MakeAutoXRef( )
Dim sel As Selection
Dim rng As Range
Dim para As Paragraph
Dim doc As Document
Dim sBookmarkName As String
Dim sSelectionText As String
Dim lSelectedParaIndex As Long

Set sel = Selection
Set doc = sel.Document

If sel.Range.Paragraphs.Count <> 1 Then Exit Sub

lSelectedParaIndex = GetParaIndex(sel.Range.Paragraphs.First)

sel.MoveStartWhile cset:=(Chr$(32) & Chr$(13)), Count:=sel.Characters.Count
sel.MoveEndWhile cset:=(Chr$(32) & Chr$(13)), Count:=-sel.Characters.Count

sSelectionText = sel.Text

For Each para In doc.Paragraphs
    Set rng = para.Range
    rng.MoveStartWhile cset:=(Chr$(32) & Chr$(13)), _
        Count:=rng.Characters.Count
    rng.MoveEndWhile cset:=(Chr$(32) & Chr$(13)), _
        Count:=-rng.Characters.Count
    If rng.Text = sSelectionText Then
        If Not GetParaIndex(para) = lSelectedParaIndex Then
            sBookmarkName = GetOrSetXRefBookmark(para)
            If Len(sBookmarkName) = 0 Then
                MsgBox "Couldn't get or set bookmark"
                Exit Sub
            End If
                sel.InsertCrossReference _
                    referencekind:=wdContentText, _
                    referenceitem:=doc.Bookmarks(sBookmarkName), _
                    referencetype:=wdRefTypeBookmark, _
                    insertashyperlink:=True
                Exit Sub
        Else
            MsgBox "Can't self reference!"
        End If
    End If

Next para

End Sub
The code shown in bold is the part of the procedure that actually creates the reference. Note that it’s very similar to part of the code shown in the previous section.
The supporting procedures
The following function removes from a string characters that Word won’t allow in bookmark names (except for spaces, which are replaced by underscores in a different procedure):
Function RemoveInvalidBookmarkCharsFromString(ByVal str As String) As String
Dim i As Integer
For i = 33 To 255
    Select Case i
        Case 33 To 47, 58 To 64, 91 To 96, 123 To 255
            str = Replace(str, Chr (i), vbNullString)
    End Select
Next i
RemoveInvalidBookmarkCharsFromString = str
End Function
The next function takes a string and turns it into a valid bookmark name, including prefacing it with “XREF” for easier identification and adding in a five-digit random number [Hack #68] to ensure that it’s unique.
In addition, the function replaces spaces with underscores. So, for example, the heading “Foo the bar” would be converted into something like “XREF56774_Foo_the_bar”—a bit easier to work with than the “_Ref45762234"-style names that Word assigns to its own cross-reference bookmarks.
Function ConvertStringRefBookmarkName(ByVal str As String) As String
str = RemoveInvalidBookmarkCharsFromString(str)
str = Replace(str, Chr$(32), "_")
str = "_" & str
str = "XREF" & CStr(Int(90000 * Rnd + 10000)) & str
ConvertStringRefBookmarkName = str
End Function
This next function just determines a paragraph’s index in the document (e.g., the second paragraph in the document has an index of 2):
Function GetParagraphIndex(para As Paragraph) As Long
GetParagraphIndex = _
    para.Range.Document.Range(0, para.Range.End).Paragraphs.Count
End Function
The final function creates cross-reference bookmarks in paragraphs that do not contain bookmarks and returns the bookmark name for use in the cross-reference. If the paragraph already has a cross-reference bookmark, it simply returns the existing bookmark name for use in the cross-reference.
Function GetOrSetXRefBookmark(para As Paragraph) As String
Dim i As Integer
Dim rng As Range
Dim sBookmarkName As String

If para.Range.Bookmarks.Count <> 0 Then
    For i = 1 To para.Range.Bookmarks.Count
        If InStr(1, para.Range.Bookmarks(i).Name, "XREF") Then
            GetOrSetXRefBookmark = para.Range.Bookmarks(i).Name
            Exit Function
        End If
    Next i
End If

Set rng = para.Range
rng.MoveEnd unit:=wdCharacter, Count:=-1
sBookmarkName = ConvertStringRefBookmarkName(rng.Text)
para.Range.Document.Bookmarks.Add _
    Name:=sBookmarkName, _
    Range:=rng
GetOrSetXRefBookmark = sBookmarkName
End Function
Running the hack
This hack wouldn’t be much of a time-saver if you had to go through a menu to run it. This code is most helpful when assigned to a keyboard shortcut.
To assign a macro to a keyboard shortcut, select
Tools→Customize and click the Keyboard button. Save your
changes in the same template in which you installed the code. In the
Categories column, select Macros, and in the Commands column, select
MakeAutoXRef
. Choose and assign a keyboard shortcut
using the dialog.
Hack More Flexible Cross-Referencing
Word’s cross-referencing feature locks you into a box of predetermined possibilities. This hack shows you how to build a better box.
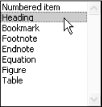
Word’s Cross-referencing dialog offers only a few choices for the types of items you can create cross-references to, as shown in Figure 4-29.
But what if the items you want to reference aren’t in that list? If you’re working in a template that has several different types of headings, including some that aren’t styled using one of Word’s built-in styles, creating cross-references to those headings is no simple task.
This hack shows you how to build your own cross-reference dialog, like the one shown in Figure 4-30. The left column lists every paragraph style in the document, and the right column lists each paragraph that uses the selected style.
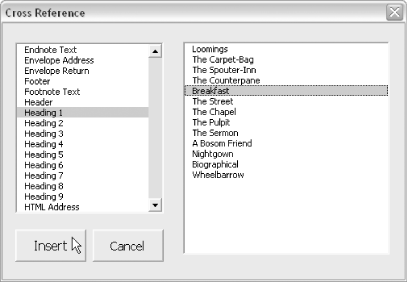
In addition to offering more choices of items to cross-reference, the dialog lists many more at once than does Word’s dialog, which means less scrolling to find what you’re looking for.
Tip
If you want to create cross-references from one Word document to another, be sure to check out [Hack #78] .
Making the Dialog
Here’s how to create the user form shown in Figure 4-30. To keep this example simple, extras such as titles for the listboxes have been left off. Feel free to modify the dialog’s design to suit your needs.
First, select Tools→Macro→Visual Basic Editor. Then, with the template of your choice [Hack #50] selected in the Project Explorer, choose Insert→UserForm.
In the Properties window, change the user form’s name to “ufXRefs” and change its caption to “Cross Reference.”
Resize the user form to about 380 pixels wide by 260 pixels deep by grabbing and dragging the resizing handle in the form’s bottom-right corner.
Next, from the Toolbox, insert two listboxes, as shown in Figure 4-31. From the Properties window, name the one on the left “lbStyles” and the one on the right “lbParas.”
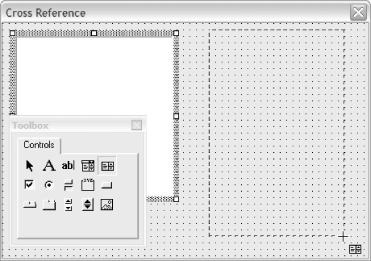
Now insert two CommandButtons underneath the first listbox. Name them “cmbInsert” and “cmbCancel,” and change their captions accordingly.
The Code
The code for this hack relies on a few utility functions introduced in [Hack #43] :
GetOrSetXRefBookmarkConvertStringToXRefBookmarkNameGetParagraphIndex
Be sure these three procedures are located in the same template as the user form before trying out this hack.
With the user form still open, select View→Code to access the form’s code module and insert the following code:
Option Explicit
Private colParagraphData As Collection

Private Sub cmbCancel_Click( )
    Unload Me
End Sub

Private Sub UserForm_Initialize( )
Dim v As Variant
Dim sty As Style
For Each sty In ActiveDocument.Styles
    If sty.Type = wdStyleTypeParagraph Then
        lbStyles.AddItem sty.NameLocal
    End If
Next sty
lbStyles.Selected(0) = True
End Sub

Private Sub lbStyles_Change( )
Dim col As Collection
Dim para As Paragraph
Dim k As Integer
Set colParagraphData = New Collection
lbParas.Clear

k = 1
For Each para In ActiveDocument.Paragraphs
   If para.Style = lbStyles.Value Then
        Set col = New Collection
        col.Add Key:="Index", Item:=k
        col.Add Key:="Text", Item:=Left(para.Range.Text, _
                             para.Range.Characters.Count - 1)
        colParagraphData.Add Item:=col
        lbParas.AddItem (col("Text"))
        Set col = Nothing
   End If
k = k + 1
Next para
End Sub

Private Sub cmbInsert_Click( )
Dim lSelectedParaIndex As Long
Dim sBookmarkName As String
Dim para As Paragraph
lSelectedParaIndex = colParagraphData(lbParas.ListIndex + 1)("Index")
Set para = ActiveDocument.Paragraphs(lSelectedParaIndex)

sBookmarkName = GetOrSetXRefBookmark(para)
    If Len(sBookmarkName) = 0 Then
        MsgBox "Couldn't get or set bookmark"
        Unload Me
    End If
Selection.InsertCrossReference _
    referencekind:=wdContentText, _
    referenceitem:=ActiveDocument.Bookmarks(sBookmarkName), _
    referencetype:=wdRefTypeBookmark, _
    insertashyperlink:=True

Unload Me
End Sub
Each time a different style is selected in the lbStyles listbox, the
colParagraphData collection is reset and then
populated with information about all the paragraphs in the document
that have the selected style applied. In this example, that
information is each paragraph’s position in the
document (its index) and its text.
Running the Hack
In the same template that contains the user form, insert the following into one of the code modules:
Sub ShowBetterCrossReferenceDialog
    ufXRefs.Show
End Sub
To display the dialog, run the
ShowBetterCrossReferenceDialog macro, either from
Tools→Macro→Macros or by assigning it to a menu or
toolbar
[Hack #1]
.
When you select a paragraph and click Insert, it creates a bookmark around the target paragraph and replaces the current selection with a cross-reference pointing to that bookmark. The bookmark and the reference are shown in Figure 4-32. The reference field codes are also shown at the bottom of the figure.
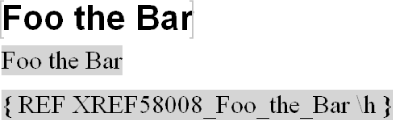
If the paragraph you want to reference has been referenced before, the existing bookmark is used, and no new bookmark is created.
Get Word Hacks now with the O’Reilly learning platform.
O’Reilly members experience books, live events, courses curated by job role, and more from O’Reilly and nearly 200 top publishers.

