The easiest way to create a new timeline from a video clip is to drag it to a menu, just as we did in Chapter 1. However, if you want to create a timeline without messing with a menu, follow these steps:
Select the media in the project window. In this case, just select an AVI clip that consists of both audio and video.
Tell Encore to create a New Timeline. Choose Timeline → New Timeline (or use the right-click context menu), or click the convenient Create a New Timeline button at the bottom of the Project window. Encore creates a new timeline, lists it in the Project window, and brings up the Timeline window with a tab for the new timeline. Finally, it displays the Monitor window with a tab to view the contents of the currently selected timeline, as shown earlier in Figure 4-2.
Once you’ve reached this point, you can start building timelines to give each video clip one or more audio and subtitle tracks. After creating the timeline directly from the video clip, Encore places the video portion in the video track, aligned at the beginning and continuing for the duration of the clip. If the asset has an associated audio track (e.g., AVI files often contain both audio and video), Encore will also add the audio to the Audio 1 track in the timeline, also aligned at the beginning of the track. You then can edit the video and audio tracks independently, deleting and replacing them in the timeline.
Note
The timeline we created was from a mixed audio/video asset, Igonish Beach Waves.avi. To create a timeline from an asset that contains just audio or just video, just do the same thing. Encore will automatically create an appropriate track and leave the other empty. If you have an empty video track, Encore with display it as black in the Monitor.
If you’re used to editing with a nonlinear editor such as Adobe Premiere Pro, you’re in for a rude shock with Encore timelines. First, the video track can contain only a single video clip. Second, the only trimming you can perform with video and audio clips in Encore is to change the duration of the clip in a track by dragging its start or end (in- or out-Point). This will change the length of the clip in the track. In addition, Encore will always align a trimmed video clip at the start of the track, as shown in Figure 4-3.
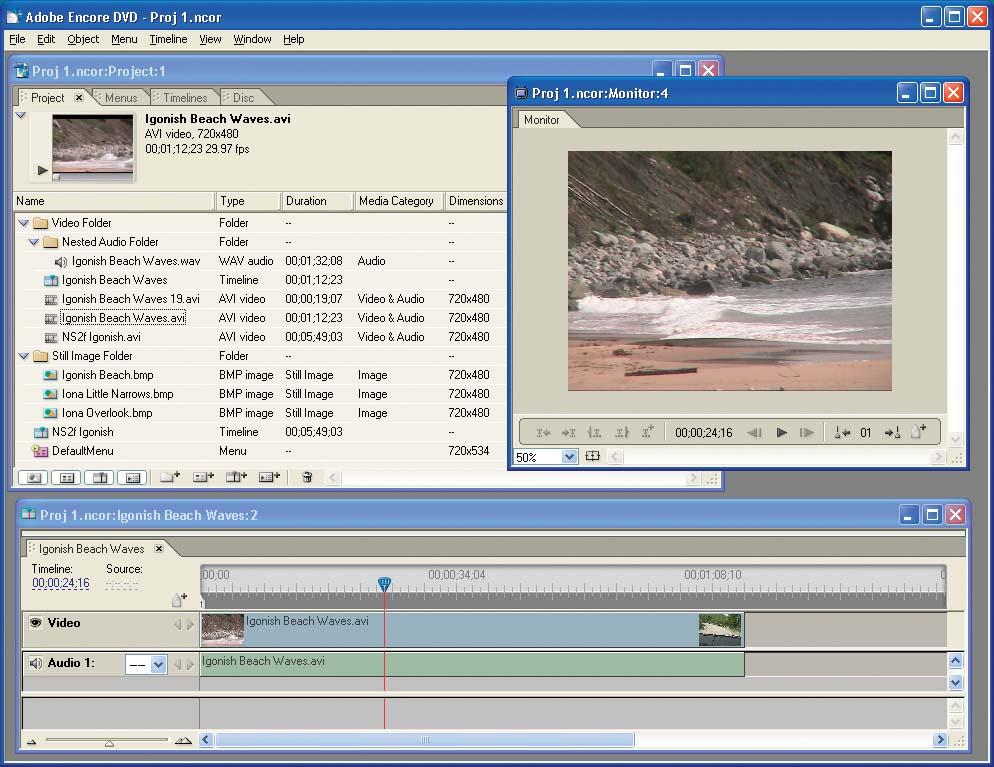
Figure 4-3. Encore displays the Timeline and Monitor window to edit and view the contents of the timeline.
If you want to trim the video track, choose the Selection tool (arrow) in the toolbox, and then hover the cursor over one end of the clip in the track. The cursor will change to a red trim icon, with a square bracket indicating the edge being trimmed and arrows showing the available directions to trim. Click and drag the end of the clip to reduce its duration or, if already trimmed, to increase its duration up to the length of the original clip. Encore will modify the length of the audio track to match. You can view the current in-and out-point timecodes, as well as the duration, in the Video Clip Properties palette, shown in Figure 4-4. To bring up this information, just click the video clip in the timeline.

A simple DVD design such as what we saw in Chapter 1 includes a collection of clips that a viewer might want to play, accessed from a main menu with a link to each clip. By default, when the viewer clicks the associated menu button, the DVD plays the clip from beginning to end, and then returns back to the menu.
However, besides a collection of short clips, DVDs also can contain very long clips—for example, a two-hour movie. In this case, it is useful to include a scene index menu so that viewer can jump directly to a favorite part in the clip, or resume watching at the point where she last stopped. With this in mind, the DVD specification provides the ability to define chapter points that can be used as the target of navigational links from menus and other timelines. To add a chapter point in a timeline, do the following:
Position the playhead at a precise frame. It helps to zoom in to the timeline until you can see the playhead moving for each frame. You can play or step through the clip using the Monitor controls, click and drag in the timecode display, or type a timecode value.
Add a chapter point. Next, click the Add Chapter button to the left of the time ruler, or choose Timeline → Add Chapter Point. Encore adds a numbered chapter marker along the bottom of the time ruler at the position indicated by the playhead, as shown in Figure 4-5. Note that the chapter marker that appears is red; this is because it represents the currently selected chapter. As such, its properties are displayed under the Chapter heading in the Properties palette. You can click other chapter icons to select them and display their properties.
Edit the chapter points as needed. You can add, move, delete, or otherwise edit chapter points within a timeline using the methods described in Table 4-3.
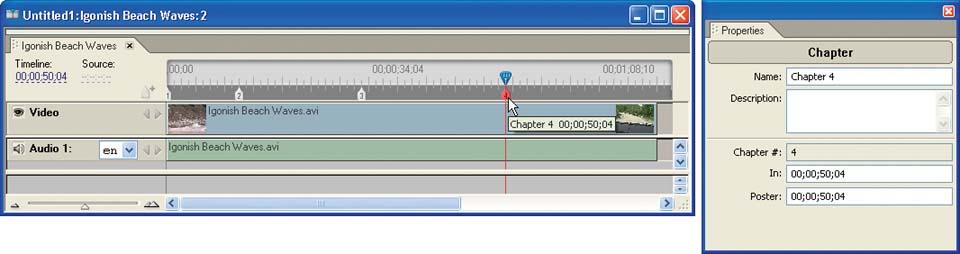
Table 4-3. Methods for editing chapter points in a timeline
|
Action |
How to do it |
|---|---|
|
Add another chapter point |
Reposition the playhead, and then click the Add Chapter button to the left of the time ruler, choose Timeline → Add Chapter Point (or use the right-click context menu), or click the Add Chapter button at the left of the time ruler or at the bottom of the Monitor window. |
|
Display chapter point information |
Hover the cursor over the chapter point to display its number and timecode in a pop-up tooltip. You can also click the chapter point to select it (it will turn red) and then view or edit its information in the Properties palette. |
|
Move chapter point |
Click and drag a chapter point marker along the timeline, or edit the timecode in the Properties palette. Note that Encore renumbers the chapter points as needed to keep them in sequential order. |
|
Delete chapter point |
Click to select a chapter point marker. Next, press the Delete key, choose Edit → Clear, or choose Delete Chapter Point from the right-click contextual menu to delete the chapter point. |
Warning
When a timeline contains a video clip that was imported in DVD-compliant MPEG-2 format, chapter points can be inserted only at specific frames in the compressed data.
Why is this? Well, MPEG compresses a series of frames into blocks called Group of Pictures (GOPs). Here, the frames in the middle of the group cannot stand alone, but are dependent on the contents of other frames in the group. To jump into a compressed MPEG clip and start playing at a specific frame, that frame needs to be a standalone I-frame (Intra-frame compressed). I-frames typically occur every 15 frames or so in an MPEG-2 clip.
To support DVD linking, MPEG video should be compressed so that each GOP starts with an I-frame, which then is a possible location for a chapter point. When a timeline contains an MPEG clip, Encore displays I-frame markers in the time ruler (you may need to zoom in to see them). You can add chapter points at the I-frame marks. Encore will also move any chapter point that’s not on an I-frame to the nearest one.
There are a few things you should take note of with chapter points. First, Encore always places a chapter point numbered “1” at the beginning of the video clip. You cannot delete this chapter point, nor can you edit its In point (it’s grayed in the Properties palette). Second, when you play a timeline, the Monitor window displays the chapter number for the current position of the playhead between the Previous Chapter and Next Chapter buttons, much like a DVD player does. Of course, don’t forget that you can use these buttons to jump to adjacent chapters in the timeline.
In the opening chapter, Encore automatically inserted a thumbnail image from each linked clip into the menu’s autogenerated buttons. More specifically, it took the first frame of the first (and only) chapter and used it as a poster frame, which it then embedded inside the menu button. However, we now know that we can have more than one chapter in a timeline. And sometimes the first frame of the chapter is not the best visual representation of it. (This is especially true if the clip begins with a fade-up from black.) For these cases, you can define an explicit poster frame to be used for each chapter’s thumbnail instead. To add a poster frame for the current chapter, do the following:
Select the chapter that you want to set the poster frame for. Just click on its marker with the mouse—it will turn red.
Position the playhead at a precise frame. It’s easiest to use the Monitor window for this. However, it helps to zoom in to the timeline until you can see the playhead moving for each frame.
Set the poster frame. Choose Timeline → Set Poster Frame, or right click on the chapter icon or playhead and select the Set Poster Frame menu item. (You can also set the timecode for the poster frame for the current chapter in the Properties window.) Encore displays poster frames in the Timeline window as rectangular icons on the time ruler, numbered to correspond with the chapter points (see Figure 4-6). Note that you can set the poster frame for the chapter anywhere in the timeline—you are not constrained to material inside the current chapter.
Edit the poster frames as needed. You can add, move, and delete poster frames associated with chapter points in the Timeline window, as shown in Table 4-4.
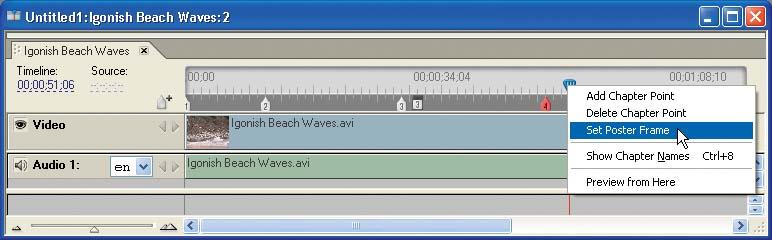
Table 4-4. Poster frames associated with chapter points
|
Action |
How to do it |
|---|---|
|
Display poster frame information |
Hover the cursor over the poster frame to display its chapter number and timecode in a pop-up tooltip. You also can click to select the poster frame or associated chapter point to view its information in the Properties palette, and to edit the poster frame timecode directly. |
|
Move poster frame |
Click to select a chapter point or its associated poster frame, and then set a new poster frame position. In addition, you can explicitly change its timecode in the Properties palette for the Chapter. |
|
Delete poster frame |
There is no explicit menu option for this, so the easiest way to do this is to reset it back to the chapter point. Move the playhead to the associated chapter point (i.e., by clicking the Prev/Next Chapter buttons in the Monitor window), and then choose Set Poster Frame to set the poster frame back to the original chapter point. Or just drag the poster frame icon on top of the chapter point. |
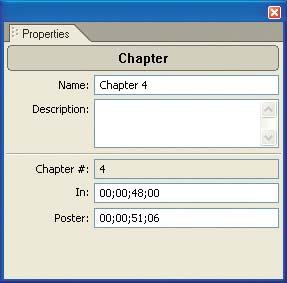
The properties information for a chapter point falls under the title “Chapter,” as shown in Figure 4-7. In addition to using this dialog to set the description of the chapter, you can enter a new In timecode to reset the beginning of the chapter, as well as a new Poster timecode to move the poster frame away from the chapter point location, or to move the poster frame back to the chapter point.
Besides setting chapter points in Encore, you also can define chapter points in video files created in Adobe Premiere Pro and After Effects, and then import them into Encore. To export chapter points, define numbered markers in Premiere Pro, or layer markers in After Effects, and enter a text name to mark them as chapter points. Encore then sets a chapter point at each such marker, and uses the text as the chapter name. To display the chapter names in Encore, right-click in the Timeline window and select Show Chapter Names.
The DVD specification permits up to a total of eight audio tracks, providing the ability to include features such as alternate languages, soundtracks, and commentary for the same video clip. You can add a mono, stereo, or surround-sound channel to the timeline. However, you cannot edit the contents or imaging of the sound (e.g., pan the sound from the left channel to the right channel, fade in or out, change the volume, etc.) inside of Encore. This must be done in a separate audio editing application before the clip is imported into Encore as an asset.
Encore provides several different options to both insert and delete audio tracks in a timeline, as shown in Table 4-5.
To preview the contents of an audio track in the Monitor window, be sure the target audio track has the speaker icon—you can do this by clicking the Monitor track icon box at the left edge of the track in the Timeline window. Previewing the correct audio or subtitle track in the Monitor window is often a source of confusion. The Monitor window will not play the audio track currently selected for editing. Instead, it will play the audio track that is marked with the small speaker icon in its Monitor track icon box at the extreme left side of the timeline. See Figure 4-8.
You may get even more confused when you see that the Properties palette always displays the attributes of the currently selected object (or multiple objects), independent of what is targeted for the Monitor window. Just remember that the Monitor window always previews the audio and subtitle that shows the appropriate Monitor track icon in the timeline.
Table 4-5. Audio tracks in the timeline
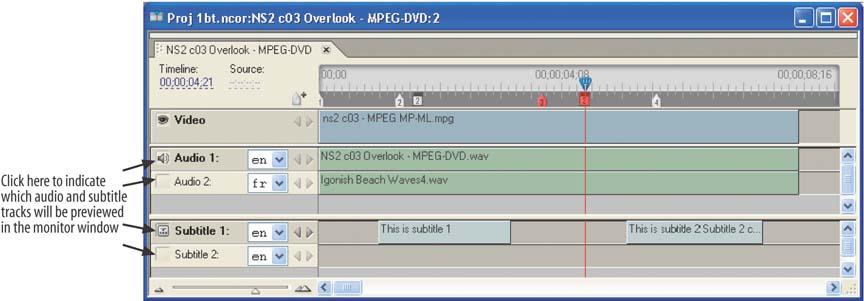
Figure 4-8. Use the speaker icon on the left side of the tracks to select the tracks to be viewed in the Monitor window.
As with video tracks, you can trim the contents of an audio track by dragging the beginning or the end of the clip with the Selection tool to set its in- or out-point (and associated duration), as displayed in the Properties palette. And, while audio tracks also can contain only one clip, you can move the track so that it is offset from the beginning of the timeline.
However, when a timeline contains both a video file and its associated audio track, Encore keeps them both in sync. Trimming either the video or audio clip simply changes the duration of both, and they both remain aligned to the start of the track.
Warning
Here’s an important point to remember: a DVD player will continue to play the current track unless the author or viewer explicitly changes it. The DVD player always references audio tracks by number, not by the language settings. So, when you create a DVD with multiple timelines, each with multiple audio tracks (e.g., a director’s commentary track or alternate language), be sure to use the same numbered audio track for each specific type of audio throughout the timelines. This way, the DVD player will not unexpectedly jump from one kind of audio track to the next when switching from one timeline to the next.
A DVD player plays only one of the eight possible audio tracks at any given time. The audio track that is played can be selected in several different ways: the DVD author can force a specific track, the viewer can select a track through a menu selection, or the viewer can just step through all the available tracks (usually via an option on the DVD remote control).
The second choice is the most common. You can design your DVD project to include a language selection menu, much like you see in commercial movie DVDs. The menu can include buttons to explicitly select the desired audio or subtitle language. When the user clicks a button, you can have Encore set playback to use the associated track.
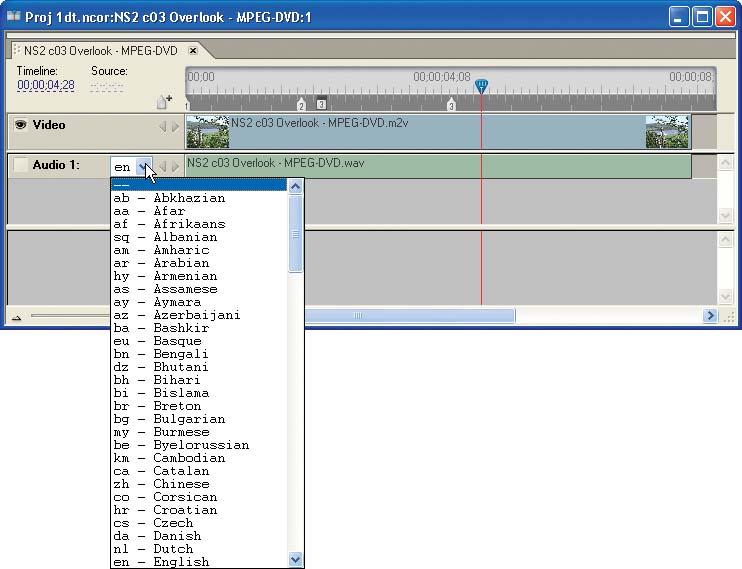
The DVD specification offers another solution for the common case of multiple audio tracks with different languages to accompany the video. First, you can tag each audio (and subtitle) track with a language code to identify it. Then, the viewer can make a global selection of the language he wants to use, and the DVD player will automatically use the desired audio and/or subtitle tracks. The viewer typically makes this selection on the set-up menu of the DVD player itself, and the choice applies to all DVD discs that are then played (if they have alternate languages). When previewing your DVD projects in Encore, you can choose the default audio and subtitle language under Edit → Preferences → Preview.
Tagging tracks with a language code is easy: just click the drop-down Language menu to the right of the track name on the timeline and choose one of the predefined DVD language codes. You’ll quickly see that it has an impressively long list, as shown in Figure 4-9.
Each timeline has a number of configurable properties; use the Properties palette to view or edit this information. To view the properties, first open the Properties palette to view its attributes (choose Window → Properties), assuming it is not already visible. Next, select the timeline either in the Project window, or using the index tabs at the top of the Timeline window itself. Note that just like assets, you can enter a text description of each timeline up to 254 characters. Unlike assets, however, you can also change its name. See Figure 4-10.
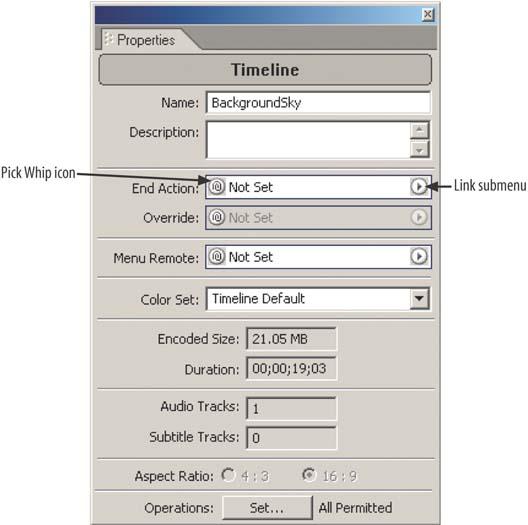
The End Action specifies the menu or timeline that the DVD player will jump to after the current timeline has completed, as discussed further in Chapter 7 on DVD navigation. You can use this option to return to a specific menu, return to the previous menu, jump directly to another point in another timeline, or stop entirely. There are two ways to set this option.
The first method to set a link is by clicking the small button with the triangle on the right side of the box. This will bring up a submenu that looks similar to Figure 4-11.
This submenu first lists the standard clipboard options, for copying and pasting actions from other timelines and menus, as well as a Delete option that will return the end action to “Not Set.” Below that, Encore lists recently accessed menus and timelines in the project (including the current timeline). Note that if you want to jump to a menu, you have the choice of jumping to the menu itself in its default state (i.e., with the default button selected), or jumping to the menu with the chosen button selected. The latter is useful if you want to run the user down a menu of extras or outtakes, one after another, but do not want to lump them into a single timeline. In the same manner, if you want to jump to another timeline, you must specify at which chapter you want to begin playing. Remember that Chapter 1 is always the beginning of the timeline.
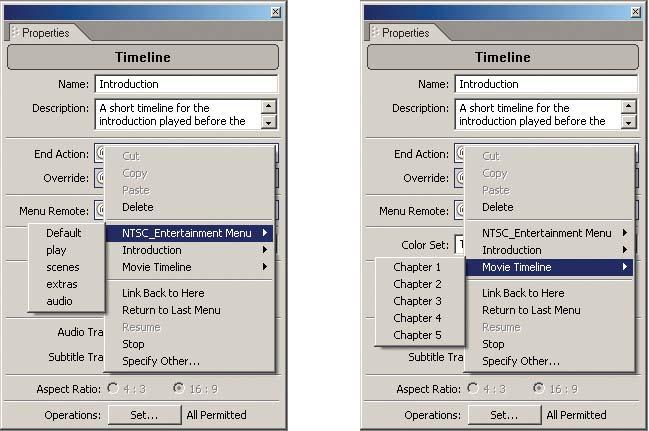
Figure 4-11. Setting the End Action in the Timeline Properties using the Link Submenu (left: menu; right: timeline).
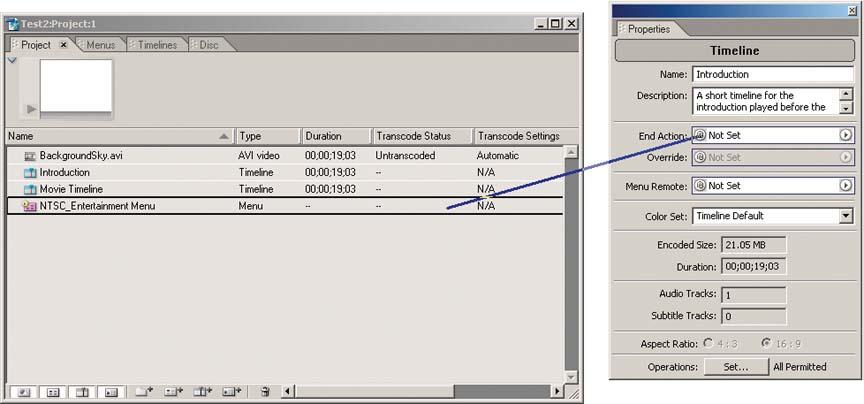
The second way to set a link is to click in the pick whip icon at the left of the link entry, and then drag the pick whip (which looks like a semitransparent line) across to an element inside of the Project window. Acceptable elements will be outlined inside the Project window. Once you let go of the mouse button, the link will appear inside the Properties dialog. The pick whip is shown in Figure 4-12.
As discussed in Chapter 7, you also can set links using the bottom options on the right-click contextual menu, including the Specify Other dialog.
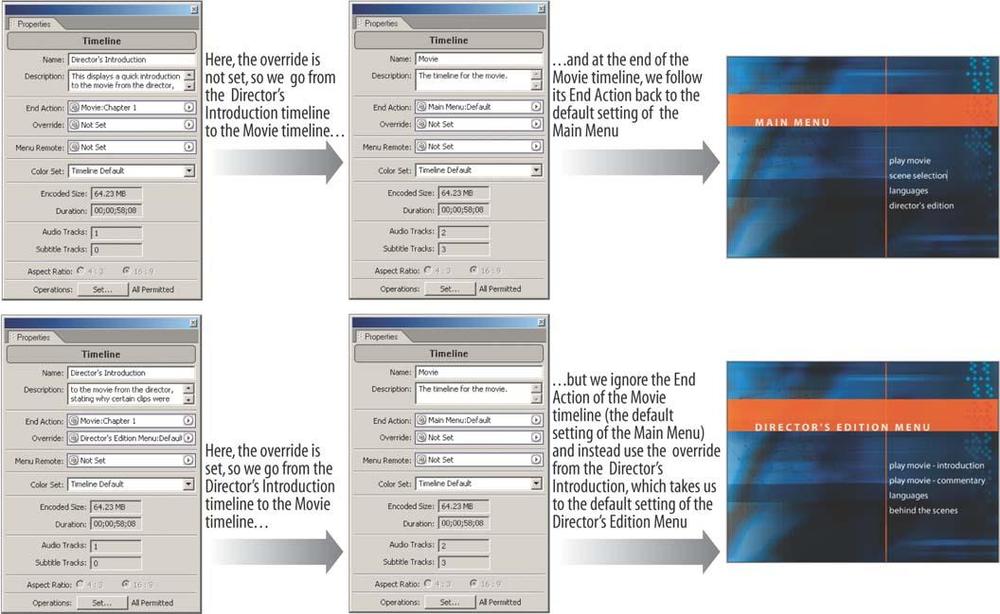
The Override link is optional. When set, it works in conjunction with this timeline’s End Action link, and allows you to set a link to the same targets that we saw with the End Action link. Here’s how it works: when playback hits the current end action and jumps from, say, this timeline to a second timeline or menu, the DVD player typically plays through that second element and follows that element’s end action. However, if the override option is set here in the first timeline, the end action defined for the second timeline or menu will be ignored. Instead, the DVD player will follow the override link that you specify here. This gives you the ability to reuse the same assets in different ways in your project, by defining multiple end actions for the same timeline or menu, depending on how the user arrived there in the first place. See Figure 4-13.
The Menu Remote link specifies where the player should jump to if the user presses the Menu button on the remote control. It works the same as the End Action and the Override link.
The aspect ratio field has two options, 4:3 and 16:9, one for each of the DVD screen aspect ratios for displaying video. This option is typically grayed; Encore will calculate the aspect ratio based on the asset occupying the video track. If Encore cannot determine this (e.g., you have a still image or slide show track), you can set the aspect ratio here. Otherwise, you can change this setting by reinterpreting the video asset to a different pixel aspect ratio with the File → Interpret Footage option.
This defines the colors that subpicture overlays (such as subtitles) can use on the timeline. We’ll discuss color sets later in the chapter.
The operations button specifies whether you want to lock out any specific user operations while this timeline is playing, such as pressing the Title button or the Menu button on the remote control. If you press the Set button, you’ll see a small dialog that demonstrates the individual user operations that are allowed during a timeline (see Figure 4-14).
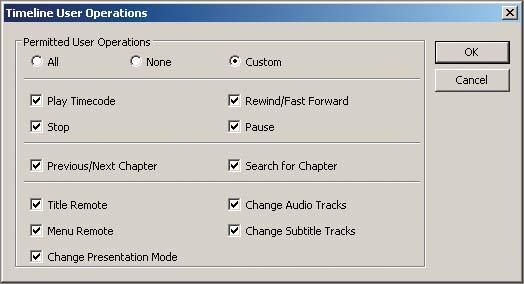
Figure 4-14. The DVD remote operations that can be enabled or disabled within the Encore timeline properties palette.
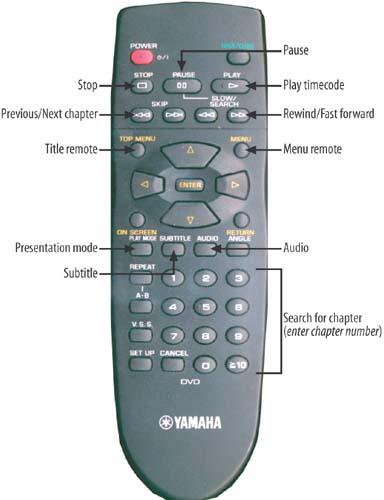
You have the choice of allowing all of the operations, none of them, or anything in between. If you want to allow some and not others, choose the Custom option at the top of the dialog box and check or uncheck the necessary operations in the dialog. Figure 4-15 shows how each checkmark option maps to a standard DVD remote control.
While you can view the project timelines by sorting with the Type column in the Project tab, Encore offers a better way to review, access, and check the timelines in your project. Click the Timelines tab in the Project window (or choose Window → Timelines) to view a list of just the timelines in your project in the top half of the window. Then, select a timeline to view its associated chapter points in the bottom half of the window, as shown in Figure 4-16. Much like the columns in the Project tab, you can click the heading tabs to reorganize the chapter listings however you want.
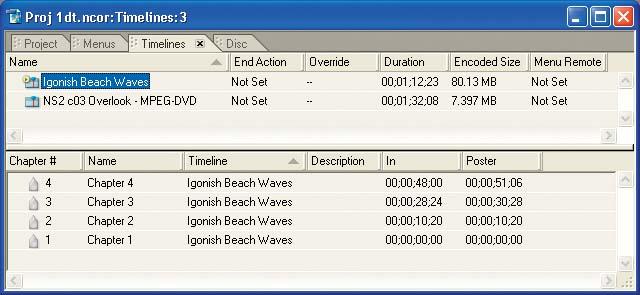
Figure 4-16. Use the Timelines tab in the Project window to view and access the timelines in your project.
As you will see in later chapters, the Timelines tab and the similar Menus tab are great tools for accessing the various elements in your project, both to make links between them and for reviewing the structure and elements in your project to ensure that they are correct and consistent.
Get Adobe Encore DVD: In the Studio now with the O’Reilly learning platform.
O’Reilly members experience books, live events, courses curated by job role, and more from O’Reilly and nearly 200 top publishers.

