Chapter 4. Data Validation
In Chapter 3, we discussed how we can ingest data from various sources into our pipeline. In this chapter, we now want to start consuming the data by validating it, as shown in Figure 4-1.

Figure 4-1. Data validation as part of ML pipelines
Data is the basis for every machine learning model, and the model’s usefulness and performance depend on the data used to train, validate, and analyze the model. As you can imagine, without robust data, we can’t build robust models. In colloquial terms, you might have heard the phrase: “garbage in, garbage out”—meaning that our models won’t perform if the underlying data isn’t curated and validated. This is the exact purpose of our first workflow step in our machine learning pipeline: data validation.
In this chapter, we first motivate the idea of data validation, and then we introduce you to a Python package from the TensorFlow Extended ecosystem called TensorFlow Data Validation (TFDV). We show how you can set up the package in your data science projects, walk you through the common use cases, and highlight some very useful workflows.
The data validation step checks that the data in your pipelines is what your feature engineering step expects. It assists you in comparing multiple datasets. It also highlights if your data changes over time, for example, if your training data is significantly different from the new data provided to your model for inference.
At the end of the chapter, we integrate our first workflow step into our TFX pipeline.
Why Data Validation?
In machine learning, we are trying to learn from patterns in datasets and to generalize these learnings. This puts data front and center in our machine learning workflows, and the quality of the data becomes fundamental to the success of our machine learning projects.
Every step in our machine learning pipeline determines whether the workflow can proceed to the next step or if the entire workflow needs to be abandoned and restarted (e.g., with more training data). Data validation is an especially important checkpoint because it catches changes in the data coming into the machine learning pipeline before it reaches the time-consuming preprocessing and training steps.
If our goal is to automate our machine learning model updates, validating our data is essential. In particular, when we say validating, we mean three distinct checks on our data:
-
Check for data anomalies.
-
Check that the data schema hasn’t changed.
-
Check that the statistics of our new datasets still align with statistics from our previous training datasets.
The data validation step in our pipeline performs these checks and highlights any failures. If a failure is detected, we can stop the workflow and address the data issue by hand, for example, by curating a new dataset.
It is also useful to refer to the data validation step from the data processing step, the next step in our pipeline. Data validation produces statistics around your data features and highlights whether a feature contains a high percentage of missing values or if features are highly correlated. This is useful information when you are deciding which features should be included in the preprocessing step and what the form of the preprocessing should be.
Data validation lets you compare the statistics of different datasets. This simple step can assist you in debugging your model issues. For example, data validation can compare the statistics of your training against your validation data. With a few lines of code, it brings any difference to your attention. You might train a binary classification model with a perfect label split of 50% positive labels and 50% negative labels, but the label split isn’t 50/50 in your validation set. This difference in the label distribution ultimately will affect your validation metrics.
In a world where datasets continuously grow, data validation is crucial to make sure that our machine learning models are still up to the task. Because we can compare schemas, we can quickly detect if the data structure in newly obtained datasets has changed (e.g., when a feature is deprecated). It can also detect if your data starts to drift. This means that your newly collected data has different underlying statistics than the initial dataset used to train your model. This drift could mean that new features need to be selected or that the data preprocessing steps need to be updated (e.g., if the minimum or maximum of a numerical column changes). Drift can happen for a number of reasons: an underlying trend in the data, seasonality of the data, or as a result of a feedback loop, as we discuss in Chapter 13.
In the following sections, we will walk through these different use cases. However, before that, let’s take a look at the required installation steps to get TFDV up and running.
TFDV
The TensorFlow ecosystem offers a tool that can assist you in data validation, TFDV. It is part of the TFX project. TFDV allows you to perform the kind of analyses we discussed previously (e.g., generating schemas and validating new data against an existing schema). It also offers visualizations based on the Google PAIR project Facets, as shown in Figure 4-2.
TFDV accepts two input formats to start the data validation: TensorFlow’s TFRecord and CSV files. In common with other TFX components, it distributes the analysis using Apache Beam.
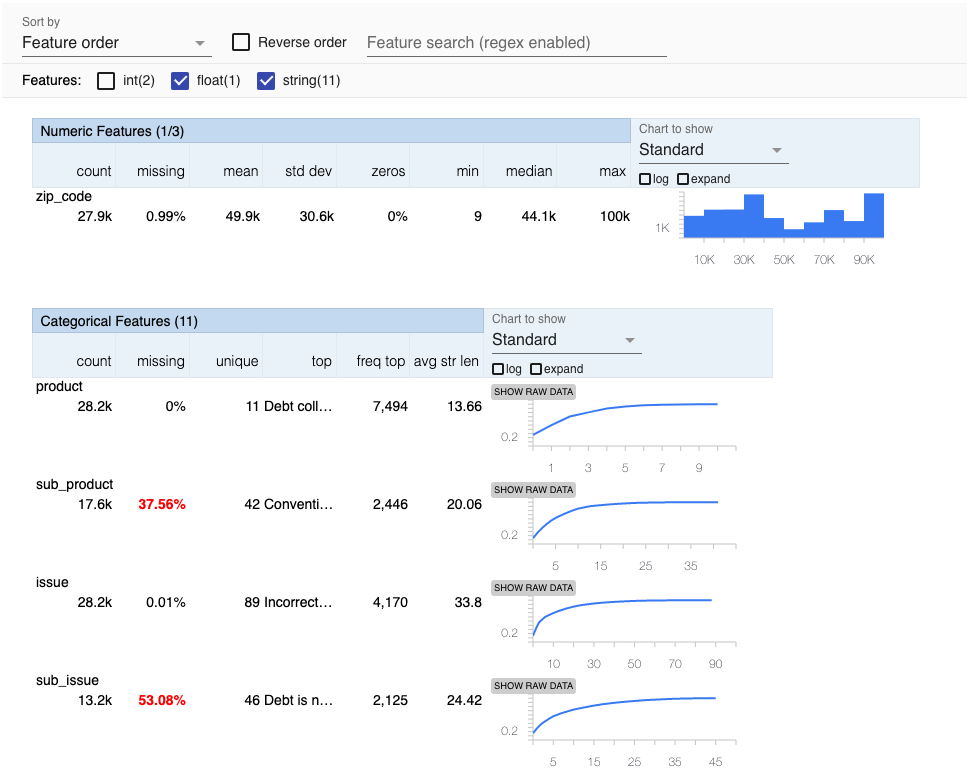
Figure 4-2. Screenshot of a TFDV visualization
Installation
When we installed the tfx package introduced in Chapter 2, TFDV was already installed as a dependency. If we would like to use TFDV as a standalone package, we can install it with this command:
$ pip install tensorflow-data-validationAfter installing tfx or tensorflow-data-validation, we can now integrate our data validation into your machine learning workflows or analyze our data visually in a Jupyter Notebook. Let’s walk through a couple of use cases in the following sections.
Generating Statistics from Your Data
The first step in our data validation process is to generate some summary statistics for our data. As an example, we can load our consumer complaints CSV data directly with TFDV and generate statistics for each feature:
importtensorflow_data_validationastfdvstats=tfdv.generate_statistics_from_csv(data_location='/data/consumer_complaints.csv',delimiter=',')
We can generate feature statistics from TFRecord files in a very similar way using the following code:
stats=tfdv.generate_statistics_from_tfrecord(data_location='/data/consumer_complaints.tfrecord')
We discuss how to generate TFRecord files in Chapter 3.
Both TFDV methods generate a data structure that stores the summary statistics for each feature, including the minimum, maximum, and average values.
The data structure looks like this:
datasets{num_examples:66799features{type:STRINGstring_stats{common_stats{num_non_missing:66799min_num_values:1max_num_values:1avg_num_values:1.0num_values_histogram{buckets{low_value:1.0high_value:1.0sample_count:6679.9...}}}}}}
For numerical features, TFDV computes for every feature:
-
The overall count of data records
-
The number of missing data records
-
The mean and standard deviation of the feature across the data records
-
The minimum and maximum value of the feature across the data records
-
The percentage of zero values of the feature across the data records
In addition, it generates a histogram of the values for each feature.
For categorical features, TFDV provides:
-
The overall count of data records
-
The percentage of missing data records
-
The number of unique records
-
The average string length of all records of a feature
-
For each category, TFDV determines the sample count for each label and its rank
In a moment, you’ll see how we can turn these statistics into something actionable.
Generating Schema from Your Data
Once we have generated our summary statistics, the next step is to generate a schema of our dataset. Data schema are a form of describing the representation of your datasets. A schema defines which features are expected in your dataset and which type each feature is based on (float, integer, bytes, etc.). Besides, your schema should define the boundaries of your data (e.g., outlining minimums, maximums, and thresholds of allowed missing records for a feature).
The schema definition of your dataset can then be used to validate future datasets to determine if they are in line with your previous training sets. The schemas generated by TFDV can also be used in the following workflow step when you are preprocessing your datasets to convert them to data that can be used to train machine learning models.
As shown in the following, you can generate the schema information from your generated statistics with a single function call:
schema=tfdv.infer_schema(stats)
tfdv.infer_schema generates a schema protocol defined by TensorFlow:1
feature{name:"product"type:BYTESdomain:"product"presence{min_fraction:1.0min_count:1}shape{dim{size:1}}}
You can display the schema with a single function call in any Jupyter Notebook:
tfdv.display_schema(schema)
And the results are shown in Figure 4-3.
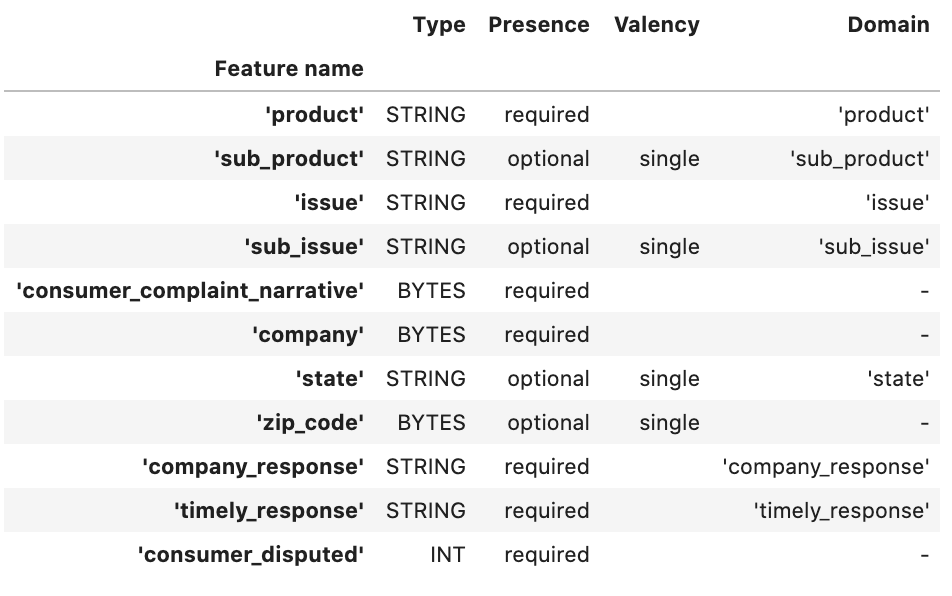
Figure 4-3. Screenshot of a schema visualization
In this visualization, Presence means whether the feature must be present in 100% of data examples (required) or not (optional). Valency means the number of values required per training example. In the case of categorical features, single would mean each training example must have exactly one category for the feature.
The schema that has been generated here may not be exactly what we need because it assumes that the current dataset is exactly representative of all future data as well. If a feature is present in all training examples in this dataset, it will be marked as required, but in reality it may be optional. We will show you how to update the schema according to your own knowledge of the dataset in “Updating the Schema”.
With the schema now defined, we can compare our training or evaluation datasets, or check our datasets for any problems that may affect our model.
Recognizing Problems in Your Data
In the previous sections, we discussed how to generate summary statistics and a schema for our data. These describe our data, but they don’t spot potential issues with it. In the next few sections, we will describe how TFDV can help us spot problems in our data.
Comparing Datasets
Let’s say we have two datasets: training and validation datasets. Before training our machine learning model, we would like to determine how representative the validation set is in regards to the training set. Does the validation data follow our training data schema? Are any feature columns or a significant number of feature values missing? With TFDV, we can quickly determine the answer.
As shown in the following, we can load both datasets and then visualize both datasets. If we execute the following code in a Jupyter Notebook, we can compare the dataset statistics easily:
train_stats=tfdv.generate_statistics_from_tfrecord(data_location=train_tfrecord_filename)val_stats=tfdv.generate_statistics_from_tfrecord(data_location=val_tfrecord_filename)tfdv.visualize_statistics(lhs_statistics=val_stats,rhs_statistics=train_stats,lhs_name='VAL_DATASET',rhs_name='TRAIN_DATASET')
Figure 4-4 shows the difference between the two datasets. For example, the validation dataset (containing 4,998 records) has a lower rate of missing sub_issue values. This could mean that the feature is changing its distribution in the validation set. More importantly, the visualization highlighted that over half of all records don’t contain sub_issue information. If the sub_issue is an important feature for our model training, we need to fix our data-capturing methods to collect new data with the correct issue identifiers.
The schema of the training data we generated earlier now becomes very handy. TFDV lets us validate any data statistics against the schema, and it reports any anomalies.
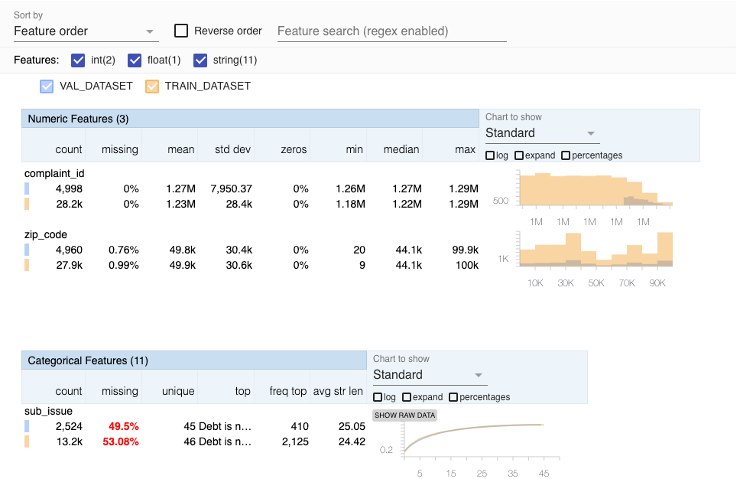
Figure 4-4. Comparison between training and validation datasets
Anomalies can be detected using the following code:
anomalies=tfdv.validate_statistics(statistics=val_stats,schema=schema)
And we can then display the anomalies with:
tfdv.display_anomalies(anomalies)
This displays the result shown in Table 4-1.
| Feature name | Anomaly short description | Anomaly long description |
|---|---|---|
“company” |
Column dropped |
The feature was present in fewer examples than expected. |
The following code shows the underlying anomaly protocol. This contains useful information that we can use to automate our machine learning workflow:
anomaly_info{key:"company"value{description:"The feature was present in fewer examples than expected."severity:ERRORshort_description:"Column dropped"reason{type:FEATURE_TYPE_LOW_FRACTION_PRESENTshort_description:"Column dropped"description:"The feature was present in fewer examples than expected."}path{step:"company"}}}
Updating the Schema
The preceding anomaly protocol shows us how to detect variations from the schema that is autogenerated from our dataset. But another use case for TFDV is manually setting the schema according to our domain knowledge of the data. Taking the sub_issue feature discussed previously, if we decide that we need to require this feature to be present in greater than 90% of our training examples, we can update the schema to reflect this.
First, we need to load the schema from its serialized location:
schema=tfdv.load_schema_text(schema_location)
Then, we update this particular feature so that it is required in 90% of cases:
sub_issue_feature=tfdv.get_feature(schema,'sub_issue')sub_issue_feature.presence.min_fraction=0.9
We could also update the list of US states to remove Alaska:
state_domain=tfdv.get_domain(schema,'state')state_domain.value.remove('AK')
Once we are happy with the schema, we write the schema file to its serialized location with the following:
tfdv.write_schema_text(schema,schema_location)
We then need to revalidate the statistics to view the updated anomalies:
updated_anomalies=tfdv.validate_statistics(eval_stats,schema)tfdv.display_anomalies(updated_anomalies)
In this way, we can adjust the anomalies to those that are appropriate for our dataset.2
Data Skew and Drift
TFDV provides a built-in “skew comparator” that detects large differences between the statistics of two datasets. This isn’t the statistical definition of skew (a dataset that is asymmetrically distributed around its mean). It is defined in TFDV as the L-infinity norm of the difference between the serving_statistics of two datasets. If the difference between the two datasets exceeds the threshold of the L-infinity norm for a given feature, TFDV highlights it as an anomaly using the anomaly detection defined earlier in this chapter.
L-infinity Norm
The L-infinity norm is an expression used to define the difference between two vectors (in our case, the serving statistics). The L-infinity norm is defined as the maximum absolute value of the vector’s entries.
For example, the L-infinity norm of the vector [3, –10, –5] is 10. Norms are often used to compare vectors. If we wish to compare the vectors [2, 4, –1] and [9, 1, 8], we first compute their difference, which is [–7, 3, –9], and then we compute the L-infinity norm of this vector, which is 9.
In the case of TFDV, the two vectors are the summary statistics of the two datasets. The norm returned is the biggest difference between these two sets of statistics.
The following code shows how you can compare the skew between datasets:
tfdv.get_feature(schema,'company').skew_comparator.infinity_norm.threshold=0.01skew_anomalies=tfdv.validate_statistics(statistics=train_stats,schema=schema,serving_statistics=serving_stats)
And Table 4-2 shows the results.
| Feature name | Anomaly short description | Anomaly long description |
|---|---|---|
“company” |
High L-infinity distance between training and serving |
The L-infinity distance between training and serving is 0.0170752 (up to six significant digits), above the threshold 0.01. The feature value with maximum difference is: Experian |
TFDV also provides a drift_comparator for comparing the statistics of two datasets of the same type, such as two training sets collected on two different days. If drift is detected, the data scientist should either check the model architecture or determine whether feature engineering needs to be performed again.
Similar to this skew example, you should define your drift_comparator for the features you would like to watch and compare. You can then call validate_statistics with the two dataset statistics as arguments, one for your baseline (e.g., yesterday’s dataset) and one for a comparison (e.g., today’s dataset):
tfdv.get_feature(schema,'company').drift_comparator.infinity_norm.threshold=0.01drift_anomalies=tfdv.validate_statistics(statistics=train_stats_today,schema=schema,previous_statistics=\train_stats_yesterday)
And this gives the result shown in Table 4-3.
| Feature name | Anomaly short description | Anomaly long description |
|---|---|---|
“company” |
High L-infinity distance between current and previous |
The L-infinity distance between current and previous is 0.0170752 (up to six significant digits), above the threshold 0.01. The feature value with maximum difference is: Experian |
The L-infinity norm in both the skew_comparator and the drift_comparator is useful for showing us large differences between datasets, especially ones that may show us that something is wrong with our data input pipeline. Because the L-infinity norm only returns a single number, the schema may be more useful for detecting variations between datasets.
Biased Datasets
Another potential problem with an input dataset is bias. We define bias here as data that is in some way not representative of the real world. This is in contrast to fairness, which we define in Chapter 7 as predictions made by our model that have disparate impacts on different groups of people.
Bias can creep into data in a number of different ways. A dataset is always, by necessity, a subset of the real world—we can’t hope to capture all the details about everything. The way that we sample the real world is always biased in some way. One of the types of bias we can check for is selection bias, in which the distribution of the dataset is not the same as the real-world distribution of data.
We can use TFDV to check for selection bias using the statistics visualizations that we described previously. For example, if our dataset contains Gender as a categorical feature, we can check that this is not biased toward the male category. In our consumer complaints dataset, we have State as a categorical feature. Ideally, the distribution of example counts across the different US states would reflect the relative population in each state.
We can see in Figure 4-5 that it doesn’t (e.g., Texas, in third place, has a larger population than Florida in second place). If we find this type of bias in our data and we believe this bias may harm our model’s performance, we can go back and collect more data or over/undersample our data to get the correct distribution.
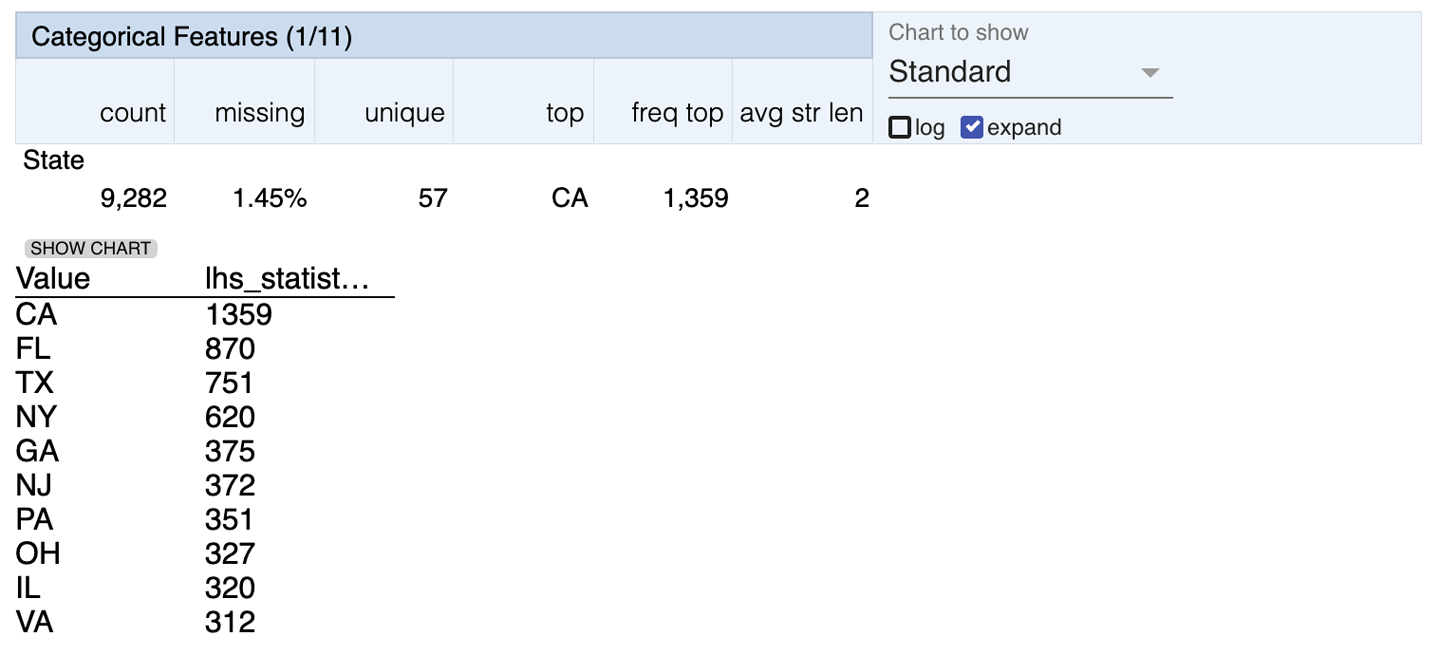
Figure 4-5. Visualization of a biased feature in our dataset
You can also use the anomaly protocol described previously to automatically alert you to these kinds of problems. Using the domain knowledge you have of your dataset, you can enforce limits on numeric values that mean your dataset is as unbiased as possible—for example, if your dataset contains people’s wages as a numeric feature, you can enforce that the mean of the feature value is realistic.
For more details and definitions of bias, Google’s Machine Learning Crash Course has some useful material.
Slicing Data in TFDV
We can also use TFDV to slice datasets on features of our choice to help show whether they are biased. This is similar to the calculation of model performance on sliced features that we describe in Chapter 7. For example, a subtle way for bias to enter data is when data is missing. If data is not missing at random, it may be missing more frequently for one group of people within the dataset than for others. This can mean that when the final model is trained, its performance is worse for these groups.
In this example, we’ll look at data from different US states. We can slice the data so that we only get statistics from California using the following code:
fromtensorflow_data_validation.utilsimportslicing_utilslice_fn1=slicing_util.get_feature_value_slicer(features={'state':[b'CA']})slice_options=tfdv.StatsOptions(slice_functions=[slice_fn1])slice_stats=tfdv.generate_statistics_from_csv(data_location='data/consumer_complaints.csv',stats_options=slice_options)
We need some helper code to copy the sliced statistics to the visualization:
fromtensorflow_metadata.proto.v0importstatistics_pb2defdisplay_slice_keys(stats):(list(map(lambdax:x.name,slice_stats.datasets)))defget_sliced_stats(stats,slice_key):forsliced_statsinstats.datasets:ifsliced_stats.name==slice_key:result=statistics_pb2.DatasetFeatureStatisticsList()result.datasets.add().CopyFrom(sliced_stats)returnresult('Invalid Slice key')defcompare_slices(stats,slice_key1,slice_key2):lhs_stats=get_sliced_stats(stats,slice_key1)rhs_stats=get_sliced_stats(stats,slice_key2)tfdv.visualize_statistics(lhs_stats,rhs_stats)
And we can visualize the results with the following code:
tfdv.visualize_statistics(get_sliced_stats(slice_stats,'state_CA'))
And then compare the statistics for California with the overall results:
compare_slices(slice_stats,'state_CA','All Examples')
The results of this are shown in Figure 4-6.
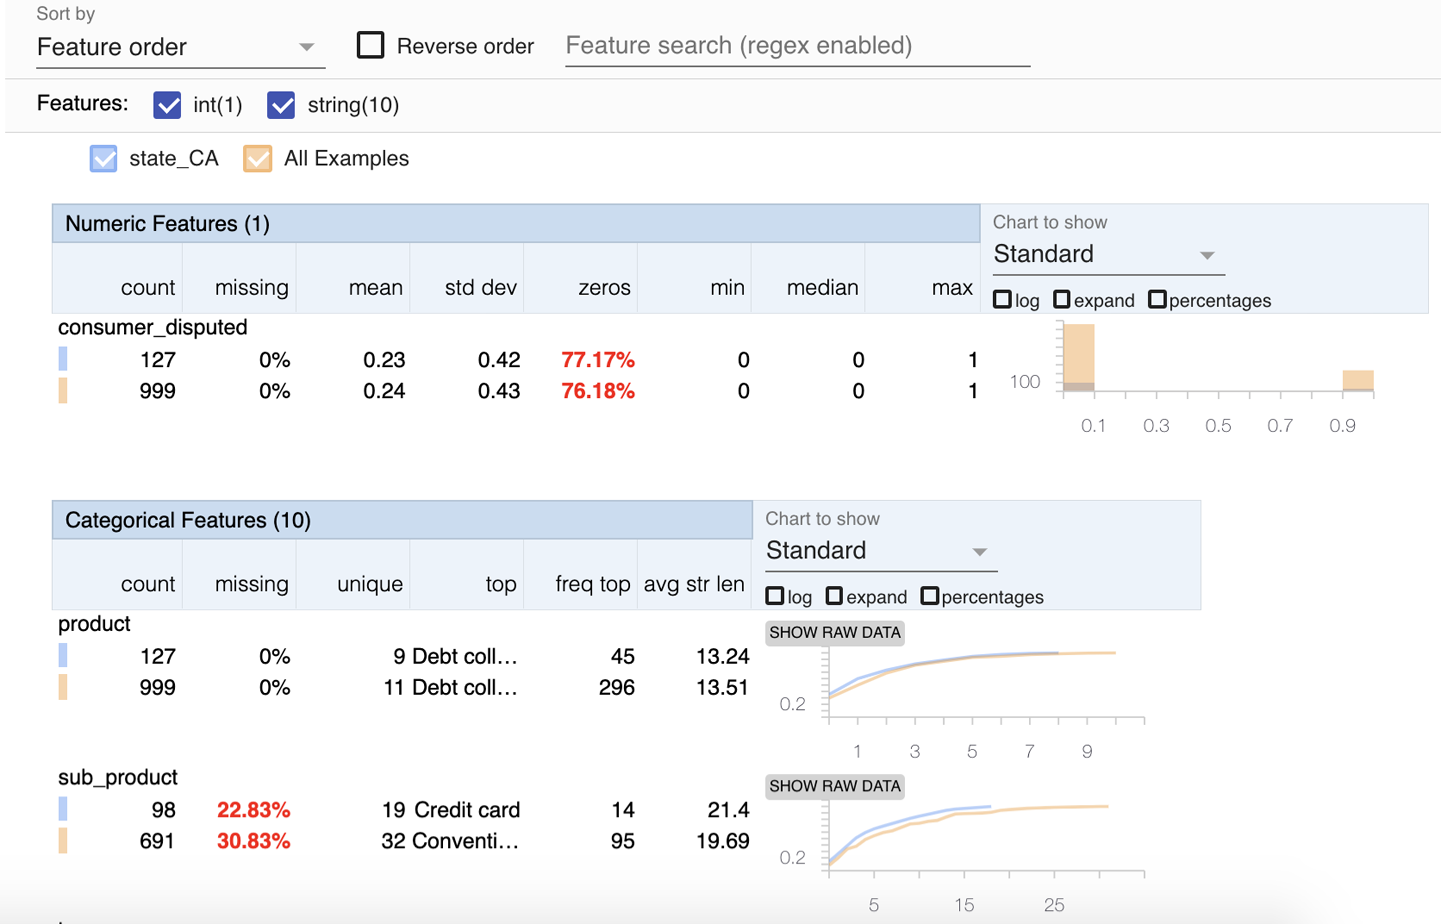
Figure 4-6. Visualization of data sliced by feature values
In this section, we have shown some useful features of TFDV that allow you to spot problems in your data. Next, we’ll look at how to scale up your data validation using a product from Google Cloud.
Processing Large Datasets with GCP
As we collect more data, the data validation becomes a more time-consuming step in our machine learning workflow. One way of reducing the time to perform the validation is by taking advantage of available cloud solutions. By using a cloud provider, we aren’t limited to the computation power of our laptop or on-premise computing resources.
As an example, we’ll introduce how to run TFDV on Google Cloud’s product Dataflow. TFDV runs on Apache Beam, which makes a switch to GCP Dataflow very easy.
Dataflow lets us accelerate our data validation tasks by parallelizing and distributing them across the allocated nodes for our data-processing task. While Dataflow charges for the number of CPUs and the gigabytes of memory allocated, it can speed up our pipeline step.
We’ll demonstrate a minimal setup to distribute our data validation tasks. For more information, we highly recommend the extended GCP documentation. We assume that you have a Google Cloud account created, the billing details set up, and the GOOGLE_APPLICATION_CREDENTIALS environment variable set in your terminal shell. If you need help to get started, see Chapter 3 or the Google Cloud documentation.
We can use the same method we discussed previously (e.g., tfdv.generate_statistics_from_tfrecord), but the methods require the additional arguments pipeline_options and output_path. While output_path points at the Google Cloud bucket where the data validation results should be written, pipeline_options is an object that contains all the Google Cloud details to run our data validation on Google Cloud. The following code shows how we can set up such a pipeline object:
fromapache_beam.options.pipeline_optionsimport(PipelineOptions,GoogleCloudOptions,StandardOptions)options=PipelineOptions()google_cloud_options=options.view_as(GoogleCloudOptions)google_cloud_options.project='<YOUR_GCP_PROJECT_ID>'google_cloud_options.job_name='<YOUR_JOB_NAME>'google_cloud_options.staging_location='gs://<YOUR_GCP_BUCKET>/staging'google_cloud_options.temp_location='gs://<YOUR_GCP_BUCKET>/tmp'options.view_as(StandardOptions).runner='DataflowRunner'

Set your project’s identifier.

Give your job a name.

Point toward a storage bucket for staging and temporary files.
We recommend creating a storage bucket for your Dataflow tasks. The storage bucket will hold all the datasets and temporary files.
Once we have configured the Google Cloud options, we need to configure the setup for the Dataflow workers. All tasks are executed on workers that need to be provisioned with the necessary packages to run their tasks. In our case, we need to install TFDV by specifying it as an additional package.
To do this, download the latest TFDV package (the binary .whl file)3 to your local system. Choose a version which can be executed on a Linux system (e.g., tensorflow_data_validation-0.22.0-cp37-cp37m-manylinux2010_x86_64.whl).
To configure the worker setup options, specify the path to the downloaded package in the setup_options.extra_packages list as shown:
fromapache_beam.options.pipeline_optionsimportSetupOptionssetup_options=options.view_as(SetupOptions)setup_options.extra_packages=['/path/to/tensorflow_data_validation''-0.22.0-cp37-cp37m-manylinux2010_x86_64.whl']
With all the option configurations in place, you can kick off the data validation tasks from your local machine. They are executed on the Google Cloud Dataflow instances:
data_set_path='gs://<YOUR_GCP_BUCKET>/train_reviews.tfrecord'output_path='gs://<YOUR_GCP_BUCKET>/'tfdv.generate_statistics_from_tfrecord(data_set_path,output_path=output_path,pipeline_options=options)
After you have started the data validation with Dataflow, you can switch back to the Google Cloud console. Your newly kicked off job should be listed in a similar way to the one in Figure 4-7.

Figure 4-7. Google Cloud Dataflow Jobs console
You can then check the details of the running job, its status, and its autoscaling details, as shown in Figure 4-8.
You can see that with a few steps you can parallelize and distribute the data validation tasks in a cloud environment. In the next section, we’ll discuss the integration of the data validation tasks into our automated machine learning pipelines.
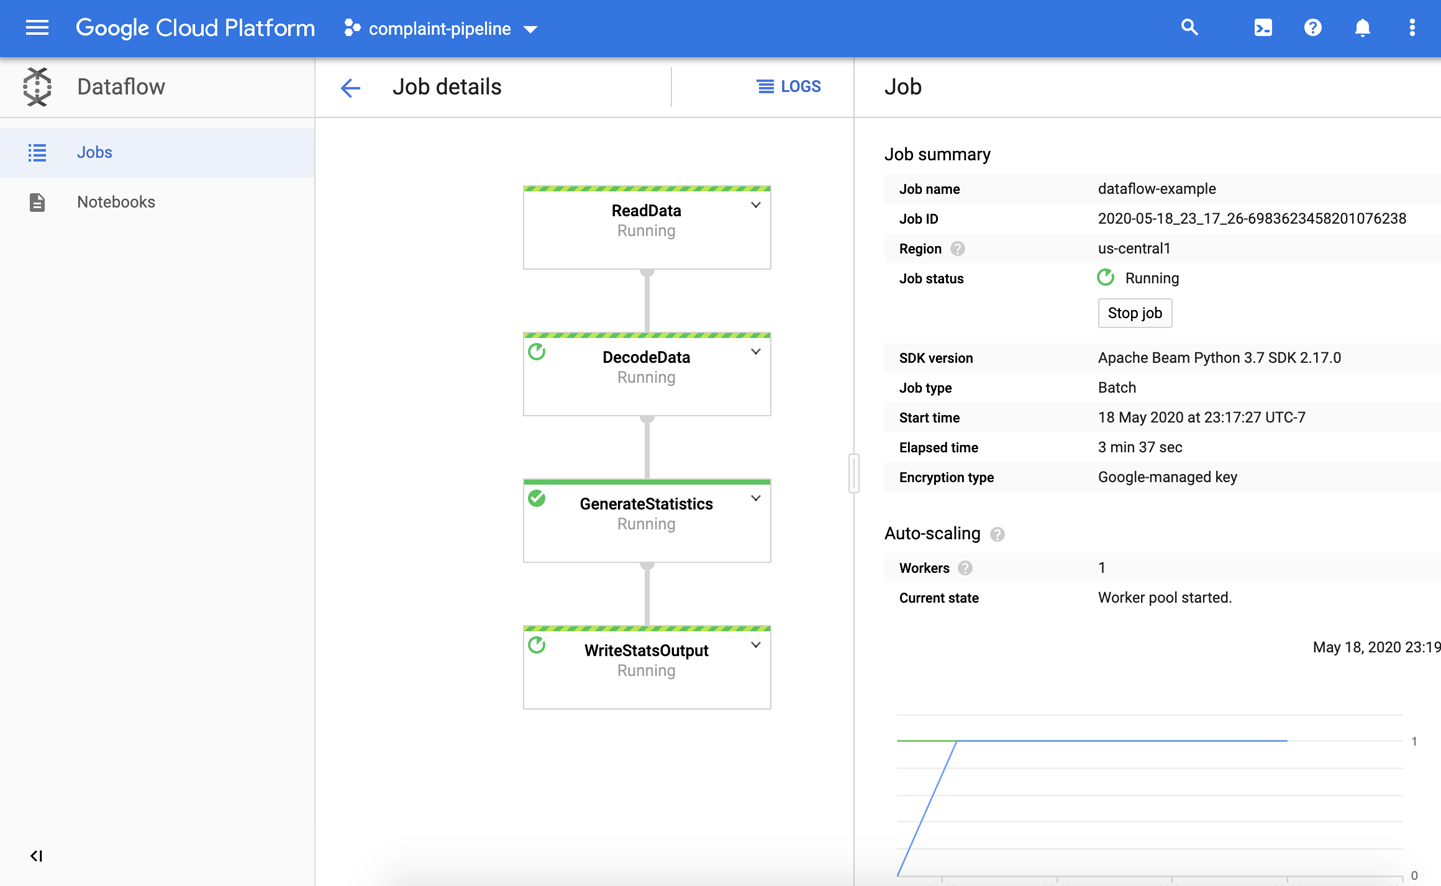
Figure 4-8. Google Cloud Dataflow Job details
Integrating TFDV into Your Machine Learning Pipeline
So far, all methods we have discussed can be used in a standalone setup. This can be helpful to investigate datasets outside of the pipeline setup.
TFX provides a pipeline component called StatisticsGen, which accepts the output of the previous ExampleGen components as input and then performs the generation of statistics:
fromtfx.componentsimportStatisticsGenstatistics_gen=StatisticsGen(examples=example_gen.outputs['examples'])context.run(statistics_gen)
Just like we discussed in Chapter 3, we can visualize the output in an interactive context using:
context.show(statistics_gen.outputs['statistics'])
This gives us the visualization shown in Figure 4-9.
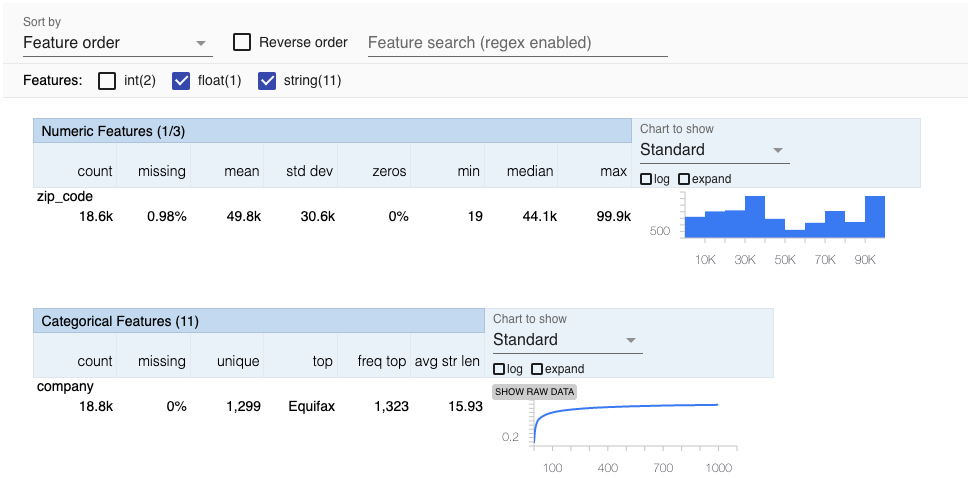
Figure 4-9. Statistics generated by the StatisticsGen component
Generating our schema is just as easy as generating the statistics:
fromtfx.componentsimportSchemaGenschema_gen=SchemaGen(statistics=statistics_gen.outputs['statistics'],infer_feature_shape=True)context.run(schema_gen)
The SchemaGen component only generates a schema if one doesn’t already exist. It’s a good idea to review the schema on the first run of this component and then manually adjust it if required as we discussed in “Updating the Schema”. We can then use this schema until it’s necessary to change it, for example, if we add a new feature.
With the statistics and schema in place, we can now validate our new dataset:
fromtfx.componentsimportExampleValidatorexample_validator=ExampleValidator(statistics=statistics_gen.outputs['statistics'],schema=schema_gen.outputs['schema'])context.run(example_validator)
Note
The ExampleValidator can automatically detect the anomalies against the schema by using the skew and drift comparators we described previously. However, this may not cover all the potential anomalies in your data. If you need to detect some other specific anomalies, you will need to write your own custom component as we describe in Chapter 10.
If the ExampleValidator component detects a misalignment in the dataset statistics or schema between the new and the previous dataset, it will set the status to failed in the metadata store, and the pipeline ultimately stops. Otherwise, the pipeline moves on to the next step, the data preprocessing.
Summary
In this chapter, we discussed the importance of data validation and how you can efficiently perform and automate the process. We discussed how to generate data statistics and schemas and how to compare two different datasets based on their statistics and schemas. We stepped through an example of how you could run your data validation on Google Cloud with Dataflow, and ultimately we integrated this machine learning step in our automated pipeline. This is a really important go/no go step in our pipeline, as it stops dirty data getting fed through to the time-consuming preprocessing and training steps.
In the following chapters, we will extend our pipeline setup by starting with data preprocessing.
1 You can find the protocol buffer definitions for the schema protocol in the TensorFlow repository.
2 You can also adjust the schema so that different features are required in the training and serving environments. See the documentation for more details.
3 Download TFDV packages.
Get Building Machine Learning Pipelines now with the O’Reilly learning platform.
O’Reilly members experience books, live events, courses curated by job role, and more from O’Reilly and nearly 200 top publishers.

