Dreamweaver CC is a powerful program for designing and building websites. If you’re brand-new to Dreamweaver, turn to What Dreamweaver Is All About for a quick look at what the program can do; if you’re a longtime Dreamweaver fan, What’s New in Dreamweaver CC tells you what’s new in this latest incarnation of the program.
This chapter gives you an overview of Dreamweaver—a guide to the windows, toolbars, and menus you’ll use every time you build a web page. It also shows you how to set up the program so you can begin building pages. And, because doing is often a better way to learn than just reading, you’ll get a step-by-step tour of web page design—the Dreamweaver way—in the tutorial at the end of this chapter.
To install a Creative Cloud app like Dreamweaver, go to Adobe’s Download Center (www.adobe.com/downloads.html). Once there, you can try out an application or go ahead and sign up for the Creative Cloud app itself—that is, pay the licensing fee for the program. To download and install Dreamweaver, click the Join button next to the Dreamweaver icon and then follow the links. In addition to adding the application, this download installs Adobe’s Creative Cloud desktop app, which keeps track of all the Creative Cloud apps on your computer and notifies you when there are updates.
When you launch Dreamweaver, the program’s Welcome screen greets you (Figure 1-1). This simple starting point lets you reopen the last nine most recently opened files, create a new web page, view instructional videos, and get online help.
Dreamweaver CC’s interface shares its look and feel with the other programs in Adobe’s Creative Cloud suite, including Photoshop, Illustrator, and Flash. The various panels that make up Dreamweaver’s main screen appear as a unified whole (see Figure 1-2). That is, the edges of all the windows touch each other, and resizing one window affects the others around it. This type of interface is common on Windows computers, but Mac fans accustomed to independent floating panels might find it strange. Give it a chance. As you’ll soon see, this layout has its benefits. (If you just can’t stand this locked-in-place style, you can detach the various panels and place them wherever you like; see The Application Bar for instructions.)
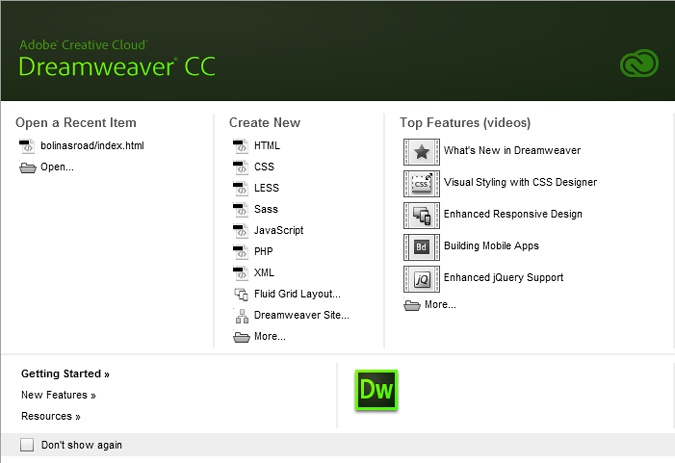
Figure 1-1. Dreamweaver’s Welcome screen lets you open existing Dreamweaver files, create new ones, and learn more about the program. It disappears as soon as you open a web page. If you don’t have any use for this window, turn on the “Don’t show again” checkbox in the lower-left corner.
Many of Dreamweaver’s individual windows help you handle specific tasks, like building CSS styles. You’ll read about each panel in relevant chapters of this book, but you’ll frequently interact with three main groups of windows: the document window, the Properties panel (below the document window), and a set of panels on the right side of the workspace.
Note
The look of Dreamweaver’s windows depends on whether you use a Windows or Mac PC, and what changes you make in the program’s Preferences settings. Even so, the features and functions generally work the same way on both computers. In this book, where the program’s operation differs dramatically in one operating system or the other, special boxes and illustrations (labeled “For Windows Only” or “For Macs Only”) will let you know.
What you see on a web page is the end result of the interaction between your browser and the page’s underlying code: its HTML, CSS, and (sometimes) JavaScript. Because of this interrelationship, Dreamweaver’s document window lets you view pages-in-progress four ways: as straight code (in Code view), in an editable, visual view (called Design view, pictured in Figure 1-3), with both views side-by-side (known as Split view, pictured in Figure 1-2), and as the page will appear in a web browser (Live view, which turns the document window into a real web browser).
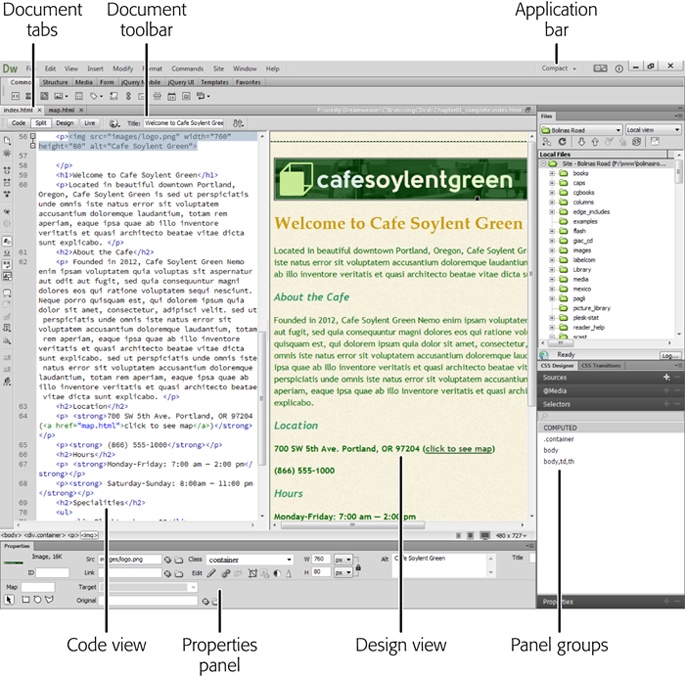
Figure 1-2. Dreamweaver lets you view your documents several ways. Split view, shown here, displays HTML code on the left and a visual preview of the current page on the right. If you prefer to see how your page looks as you add and delete elements, click the Design button in the Document toolbar; that hides the HTML view and brings the preview page full-screen. To switch among open documents, click one of the tabs immediately above the Document toolbar.
If your monitor is wide enough, Split view is a great way to work: Click into the Design view half of the document window to add HTML visually, and, when it’s easier just to type HTML, click into the Code view part of the document window and type away. Split view even lets you see the code in one half, and turn on Live view in the other half so you can work on the HTML code while you see the page as it will appear in a real web browser (you can’t, however, edit a page in Live view). In addition, if you’re new to HTML, Split view is a great way to learn the language: Add elements like paragraphs, headlines, and tables in Design view and see the relevant HTML in Code view. (You work in the document window’s Design view much as you do in a word processor: To add text to a page, for example, you simply click inside the window and start typing.)
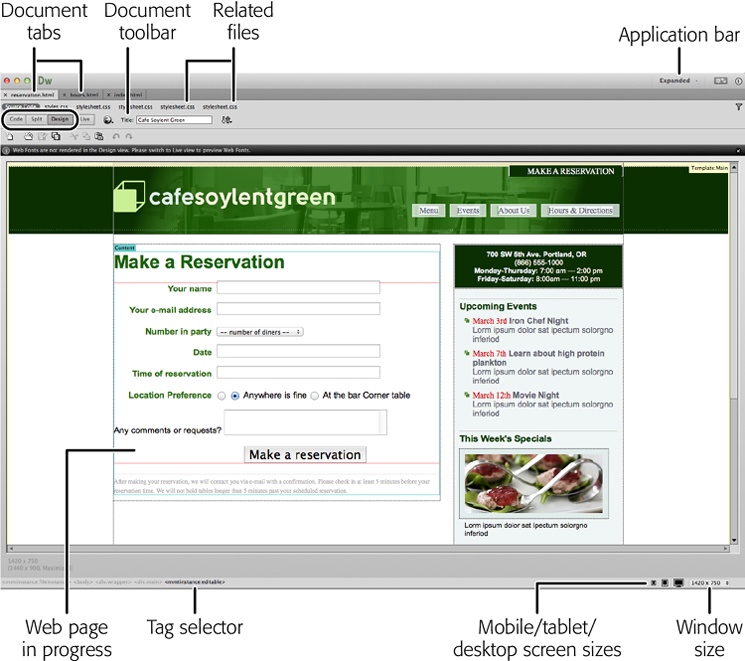
Figure 1-3. A document window like this represents a web page in progress; here’s where you add text, graphics, and other objects as you build the page. Useful widgets and document information surround the window. For example, you can instruct Dreamweaver to display the current document at different widths and heights so you can simulate what the page will look like in different size browsers, like those on mobile phones, tablets, and desktop computers. The window size setting lets you see the page as it would appear on different-size monitors.
When you build a page, you work in the document window, and, as you add pages to your site or edit existing ones, you open new document windows. Several screen components provide useful information about your document. They may appear in different locations on Windows and Mac computers (see Figure 1-2 and Figure 1-3, respectively), but they work the same way.
For example:
Document tabs. When you have more than one web document open at a time, small tabs appear at the top of the document window—one for each open file. The name of the file appears in the tab; to switch to it, just click its tab.
Related Files bar. The Related Files bar lists all CSS (Cascading Style Sheets), JavaScript, and server-side programming pages (like PHP pages) the current web page uses. You’ll learn more about these external files later in this book, but as a quick summary, it’s common in current web design to have other files supply design and interactivity to a page of HTML. Web designers frequently work on these files in addition to the basic HTML file, so the Related Files bar lets you quickly jump to and work on these “helper” files. You choose which files to display using the Filter Related Files button on the right side of the related files toolbar.
Document toolbar. The Document toolbar (View→Toolbars→Document) lets you change the title of a page, switch between Design and Code views, jump to Live view (to see how the page looks and works in a web browser), preview a page in different browsers, make sure your page is free of HTML errors, and change the look of the document window. You’ll read about the toolbar’s various buttons and menus in the relevant chapters of this book, but you’ll want to be aware of the Code, Split, and Design buttons (circled in Figure 1-3). They let you see the page you’re working on in the four views described earlier.
Note
You may also find Dreamweaver’s Standard toolbar useful. The Standard toolbar is common on many Windows programs and includes buttons for frequent file and editing tasks, like creating a new page, opening a page, saving one or all open documents, canceling and repeating commands, and cutting, copying, and pasting page elements. (Dreamweaver hides this toolbar until you summon it by choosing View→Toolbars→Standard.)
Tag Selector. The Tag Selector is extremely useful. It provides a sneak peek at the HTML that composes your web page, behind the scenes. It indicates how Dreamweaver nests HTML tags in your document to create what you see on the page. In addition, it lets you isolate, with a single mouse click, an HTML tag and all the information inside it. That means you can cleanly remove a page element or set its properties (see The Files Panel), and precisely control the application of styles to it (Chapter 3).
You’ll make good use of the Tag Selector in the tutorials to come. For experienced Dreamweaver fans, it’s one of the program’s most useful tools.
Note
In Design view, clicking the <body> tag in the Tag Selector is usually the same as pressing Ctrl+A (⌘-A) or choosing Edit→Select All. It selects everything in the document window. However, if you click inside a table (Chapter 6) or a <div> tag (see The Mighty <div> Tag), choosing Edit→Select All selects only the contents of the table cell or the <div> tag. In such a case, you need to press Ctrl+A (⌘-A) several times to select everything on the page. After you do, you can press the delete key to instantly get rid of everything in your document.
Careful, though: Pressing Ctrl+A (⌘-A) or choosing Edit→Select All in Code view selects all the code, including the information in the head section of the page. Deleting all the code gives you an empty file—and an invalid web page.
Dreamweaver provides many windows (also referred to as panels) for working with the various technologies required to build and maintain a website. You open and close all these windows using the Window menu. For the most part, they appear in tidy groups on the right edge of your screen. The windows and their uses will come up in relevant sections of this book, and you’ll learn how to organize the panels on Organizing Your Workspace. But two are worth mentioning up front: the Insert panel and the Files panel.
If the document window is your canvas, the Insert panel holds your brushes and paints, as you can see in Figure 1-4. You can create a page simply by typing HTML in Code view, but it’s often easier to work in Design view, where the Insert panel can simplify the process of adding page elements like images, video, horizontal rules, forms, and special text characters. Want to put a picture on your web page? Just click the Images icon in the Insert panel.
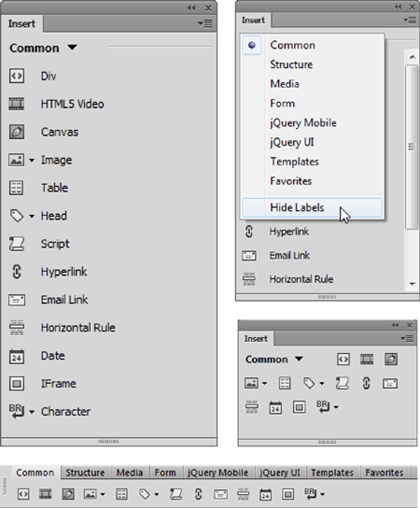
Figure 1-4. The Insert panel offers several drop-down menus that let you select the type of page element you want to add, in categories like Common (pictured here), Structure, Media, and so on. You can see that the list of elements—which has both icons and labels—take up a lot of real estate. Fortunately, you can display the Insert panel more compactly by hiding the labels. When you choose Hide Labels from the list of Insert categories (middle), Dreamweaver displays the icons side by side in rows, taking up a lot less space (top-right). Finally, you can turn the Insert panel into an Insert bar that appears above the document window instead of grouped with the right-hand panels; this space-saving option is a favorite among many web developers (bottom). To get the Insert toolbar, drag the Insert panel by its tab into position above the document tabs. Release the mouse button when you see a blue bar.
Note
Adding elements to your web page using the Insert panel may feel like magic, but it’s really just a quick way to add HTML to a page. Clicking the Images icon, for instance, simply inserts the <img> tag into the underlying HTML of your page. Of course, Dreamweaver’s visual approach hides that code and cheerfully displays a picture on the page.
When you first start Dreamweaver, it opens in what is known as the Expanded workspace, where Dreamweaver’s windows and panels are arranged in a certain layout. (For more details on workspaces, see Organizing Your Workspace.) At first, in the expanded workspace, the Insert panel is open in the upper-right corner. If you ever close it by mistake, you can reopen the Insert panel by choosing Window→Insert or by pressing Ctrl+F2 (⌘-F2). On the other hand, if screen space is at a premium, you can close the Insert panel and use the Insert menu instead. The menu offers all the objects in the panel or toolbar, but they’re not grouped by sets, as the panel and toolbar are. (You can turn the Insert panel into a toolbar that sits above the document window as described in Figure 1-4.)
The Insert panel offers eight sets of objects, each available from the drop-down menu at the top of the panel (see Figure 1-4, top right) or by clicking one of the tabs on the Insert toolbar (bottom image in Figure 1-4):
Common. Common objects are those you’ll most likely add to web pages: images, videos, hyperlinks, email links, tables, horizontal lines, heading tags, canvas tags, and the most versatile all-around utility player, the div tag.
Structure. There’s some overlap between Common and Structure objects. You’ll find the div and heading tags here, along with paragraph, list, navigation, article, and aside tags. You use structure tags to identify elements on your web page. Then you use CSS to format those elements
Media. The media insert objects include: Edge Animate compositions, HTML5 video, HTML5 audio, Flash SWF, Flash Video, and a less well-defined catchall, Plugin. For details on inserting media into web pages, see Chapter 15.
Form. Want to hear back from your visitors? Forms let them make comments, order products, and answer questions. You can add form elements like radio buttons, pull-down menus, and text boxes (see Chapter 15). And because Dreamweaver includes sophisticated form validation, you can make sure visitors input the correct information before they submit the form.
jQuery Mobile. jQuery Mobile is a JavaScript-powered toolset for building websites that work well on mobile devices, like iPhones and Android phones. The objects listed here include page elements like lists, form fields, and text areas for mobile-enhanced websites. You’ll learn about these tools in Chapter 12.
jQuery UI. Another part of the jQuery family, this toolset provides familiar user interface objects like buttons, checkboxes, sliders, accordion sections, and progress bars. You don’t need to reinvent the wheel every time you want to add a widget to your web page.
Templates. Templates let you build basic web page designs you can use over and over again, speeding up page development and facilitating easy updates. See Chapter 20 for details.
Favorites. Perhaps the most useful category, Favorites can be anything you want it to be. After you discover which objects you use the most (like the Image command, if you work with a lot of graphics), you can add those objects to this set of personal tools. You may find that once you populate this category, you’ll never again need the other categories in the Insert panel. For instructions on adding objects to the Favorites category, see the box below.
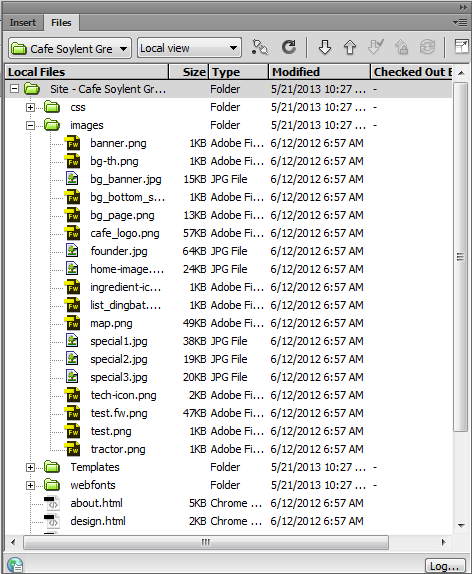
The Files panel, another Dreamweaver element you’ll turn to frequently (see Figure 1-5), lists all the files—web pages, graphics, CSS, and JavaScript—that make up your website. It gives you a quick way to open the files you want to work on—just double-click the file name in the panel—lets you switch among different sites you’re building or maintaining, and provides some valuable tools for organizing your files. If the Files panel isn’t open, summon it by choosing Window→Files or by pressing F8 (Shift-⌘-F on Macs).
To use the Files panel effectively, you need to create a local site for each website you work on—setting up a site is a specific Dreamweaver task and one of the most important steps in using Dreamweaver correctly. You’ll learn how to do so starting on Setting Up a Site.
After dropping an image, table, or anything else from the Insert panel into your web page, you can use Dreamweaver’s Properties panel to fine-tune the element’s appearance and attributes (see Figure 1-6). Suppose, for example, that your boss has decided she wants her picture to link to her personal blog. After highlighting her picture in the document window, you can use the Properties panel to add the link.

Figure 1-6. If you don’t see the Properties panel, open it by choosing Window→Properties or pressing Ctrl+F3 (⌘-F3).
The Properties panel, sometimes referred to as the Properties Inspector, is a chameleon. It’s aware of what you’re working on in the document window—a table, an image, some text—and displays the appropriate set of properties (that is, options). It works whether you’re in Design view or Code view. You’ll use the Properties panel extensively in Dreamweaver.
For now, though, here are two essential tips to get you started:
In the Properties panel, double-click any blank light gray area to hide or show the bottom half of the panel, where Dreamweaver displays a set of advanced options. (It’s a good idea to leave the panel fully expanded, since you may otherwise miss some useful options.)
At its heart, the Properties panel simply displays the attributes of HTML tags. The src (source) attribute of the image tag (<img>), for instance, tells a web browser where to find an image file.
You can most easily make sure you’re setting the properties of the correct object by selecting its tag in the Tag Selector (see The Document Window).
Note
When you work with text, the Properties panel has two buttons—labeled HTML and CSS—that let you either work with the page’s HTML properties related to text or create CSS styles. You’ll read more about these two buttons in Chapter 3, but here’s a quick pointer: When you want to create paragraphs, headlines, bulleted lists, and bold or italic text, click the HTML button. When you want to change the appearance of text (its font, color, and size), use the CSS button—or, better yet, use the CSS Designer panel, described on Creating Styles, to choose from a much wider range of formatting options.
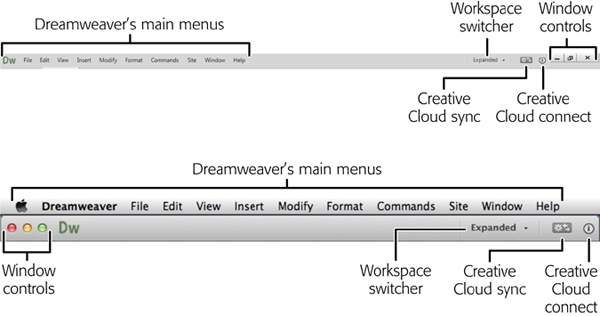
As in most programs, the Application bar offers menus and the usual controls for expanding, shrinking, hiding, and closing the workspace window. As you can see in Figure 1-7, these controls are in their usual positions on Windows PCs (top) and Macs (bottom). The application bar gives you two other toolsets, on the right side:
The Workspace Switcher lets you reorganize Dreamweaver’s layout. You can choose one of Dreamweaver’s stock workspaces, or, as discussed on Organizing Your Workspace, you can design a custom layout to create the ultimate workspace. (You can access these same options from the Window→Workspace Layout menu.)
The Creative Cloud tools let you sync CC files on your computer with those stored in the cloud. They also give you quick access to Adobe’s Creative Cloud pages and let you log into your personal cloud using your Adobe ID.
Dreamweaver’s basic user interface includes the document window, Application bar, Properties panel, and panel groups. All these windows act as though they were a whole; that is, if you resize one window, the other windows readjust themselves to fit the available space. For example, you can drag the left edge of the panel groups to the left to make the panels wider or to the right to make them thinner. The windows that touch the panels (the document window and the Properties panel) change their widths accordingly. This kind of joined-at-the-hip interface is common in Windows applications, but may feel a bit weird for Mac enthusiasts. (If you prefer the “floating palette” look and feel common to a lot of Mac programs, you can set up Dreamweaver that way—see the next section below.)
Note
On Macs, if you turn off the Application Frame, Dreamweaver’s windows act independently of each other. See The Application Bar for more.
You can customize your workspace in many ways when you control the panel group (Figure 1-8):
You can open a particular panel from the Window menu. For example, to open the Files panel, choose Window→Files.
If the panel is hidden but its tab is visible (for example, the CSS Transitions tab in Figure 1-11), click the tab once to open it. Double-click the tab again, and the panel (and any other panels grouped with it) collapses down to a single bar.
Drag the horizontal line between an open panel and another panel to resize the panel. For example, to make the CSS Styles panel taller, grab the thick border between that panel and the Business Catalyst panel and then drag down. The CSS Styles panel gets taller and the open panel below it gets shorter.
To completely close a panel so that even its tab no longer appears, right-click (Control-click) the tab and then choose Close. (Choose Close Tab Group to hide all the tabs in a group.) To get the panel back, use the Window menu or use the panel’s keyboard shortcut—for example, F8 opens and closes the Files panel.
To hide all windows except the document window, choose Window→Hide Panels or press F4—a useful trick when you want to maximize the amount of screen space for the web page you’re working on. To bring back all the panels, press F4 again or choose Window→Show Panels
As mentioned earlier, you can drag a panel by its tab to another part of the screen. Dragging it to the edge of the screen docks the panel to that edge. However, if you drag a panel and drop it when it’s not near a screen’s edge, it becomes a floating panel (see Figure 1-9). Floating panels are often nuisances, since they hide whatever is beneath them, so you often end up having to move them out of the way just to see what you’re doing. However, they come in handy when you have two monitors. If that’s the case, you can dedicate your main monitor to the document window and Properties panel (and maybe your most important panels), and then drag a bunch of floating panels onto your second screen.
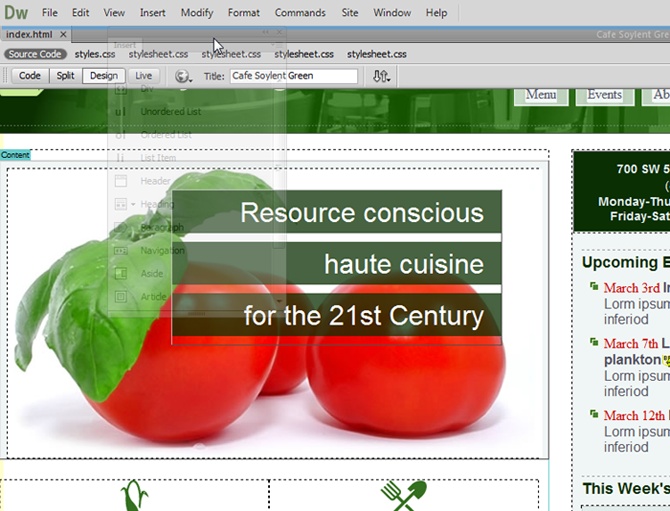
Figure 1-8. You’re not limited to keeping all of Dreamweaver’s panels on the right side of the screen—you can move individual panels to more comfortable positions. In this figure, grabbing the Insert tab lets you drag the panel elsewhere, in this case, to the top-left of the screen. When you approach an edge where the panel can dock, Dreamweaver gives you two visual cues: It ghosts out the panel and displays a blue line. Releasing the mouse button docks the panel in its new position.
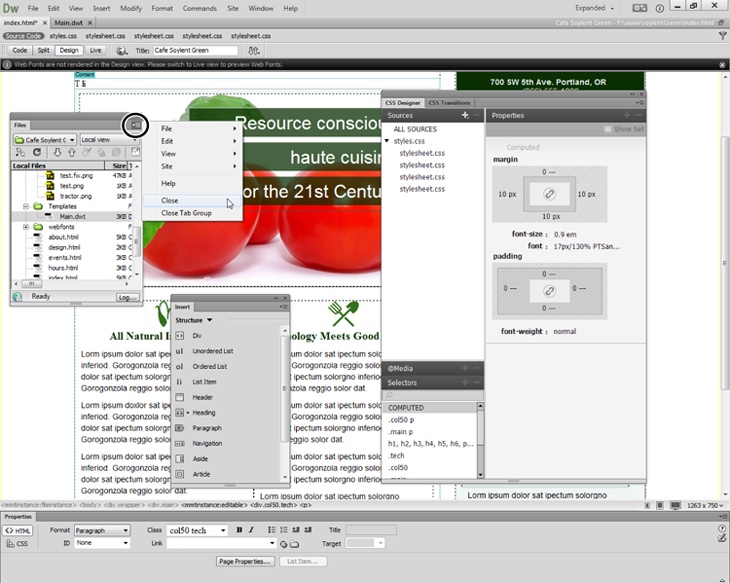
Figure 1-9. Here, the Files, Insert, and CSS Designer panels float. Each panel has its own Context menu icon (circled in the Files panel). Clicking the button reveals a shortcut menu that lets you work with commands specific to that panel. This menu also offers generic panel actions, such as closing the panel. If you find you’ve made a mess of your workspace and want to return Dreamweaver to the way it normally lays out panels, use the Workspace Switcher.
To “unfloat” a floating panel, drag it to the edge of your screen (if you have more than one monitor, drag the panel to one of the edges of your main monitor). If you already have panels at that edge, drag the panel to either the bottom of the panels (to dock it at the bottom of the column of panels), between the bottom edge of one panel group and the top edge of another (to insert the panel in its own group between the other panels), or next to another panel’s tab to group the panels together.
As if you didn’t already have enough ways to organize your panels, Dreamweaver includes yet another one. By clicking the “Collapse to Icons” button at the top right of a column of panels, you can shrink the panels to a group of much smaller icons. To reopen the controls for a panel you shrunk, click the panel name. For example, in Figure 1-10, clicking CSS Designer opens the CSS Designer panel to the left. Once you finish working with the panel, click the panel name again or click elsewhere on the screen and the pop-up panel disappears. This so-called iconic view is particularly good if you have a small monitor and need to preserve as much screen real estate as possible.
Sometimes too much choice is a bad thing, and even though Dreamweaver lets you pretty much organize its windows and panels any way you like, it also means you can easily accidentally click or drag the wrong thing and suddenly find panels strewn across the screen or completely gone.
Fortunately, Dreamweaver includes a wonderful, timesaving productivity enhancer that ensures you always have your windows organized the way you want, and you can return to that setup if you accidentally move anything. The Workspace Layouts feature lets you save the position and size of Dreamweaver’s panels and windows as a custom “layout” you can invoke by selecting the layout’s name from the Workspace Switcher menu in the Application bar or by choosing Window→Workspace Layout.
For example, when you work on a mobile website, you may like to have the jQuery swatches panel and the Snippets panel open, and the CSS panel tucked away. When you work on design-heavy sites, on the other hand, you probably want the CSS panel open but couldn’t care less about the Code Inspector. You can create a different layout for each situation and then switch among them.
Note
If you have a small screen or an older, squarish screen, the Compact workspace is a great way to free up real estate. It tucks the Insert, File, CSS Designer, and CSS Transitions panels into a relatively small strip on the right side of the screen. If you have a larger, or cinema-style, display, you may want to use the Expanded workspace. It provides more room for the panels, but fits well on a wide screen.
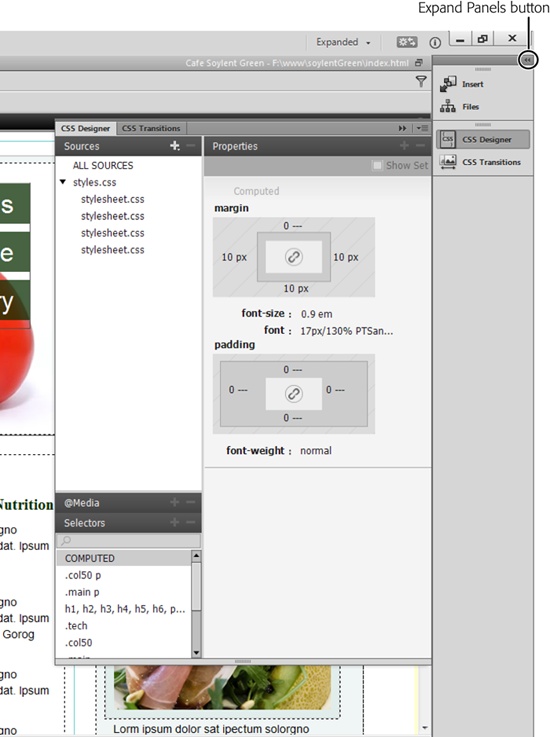
Figure 1-10. Iconic panes, like those for Insert and Files in the top-right here, let you preserve screen real estate. To return the panels to their normal widths, click the Expand Panels button.
After you tweak a workspace to perfection by closing, opening, and rearranging panels, you can save the result as a custom layout. Go to Window→Workspace Layout→New Workspace; when the New Workspace dialog box appears, provide a meaningful name like “Dual Monitors” and click OK. (You’ll find the same New Workspace command on the Workspace Switcher menu in the Application bar.) If you type in a name that matches a workspace you already use, Dreamweaver gives you the option to replace the old layout with the new one. That’s the only way to update a workspace layout you previously created. Once you save a custom workspace, you can call it up in the Workspace Switcher with a couple of mouse clicks. If you prefer menus, you can choose Window→Workspace Layout→[Name of Your Layout].
Here are a few other tips when you’re ready to lay down a custom layout:
Open the panels you work with most frequently. For example, choose Window→Files to open the Files panel.
Increase or decrease the height of a panel by dragging up or down the empty space to the right of a panel or panel-group name (see Figure 1-11).
You can move a panel to another area of your screen by dragging its tabs as described on Organizing Your Workspace. This trick is especially useful if you have a large monitor, since you can place one group of panels on the right edge of the monitor and another group either next to the first one or on the left side of the monitor. As described on Organizing Your Workspace, you can also create untethered panels—if you’ve got two monitors, you can spread the panels across both screens.
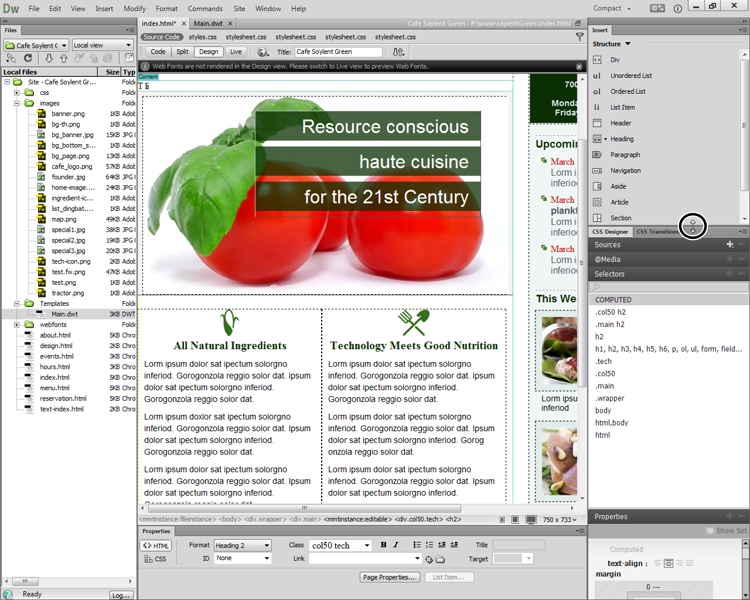
Figure 1-11. Resizing a panel vertically (circled at the bottom of the Insert panel) is as easy as dragging its bottom border up or down. If you’re lucky enough to have a large monitor, it’s often helpful to put the Files panel by itself on either the left or right side of the screen.
Tip
The Workspace Layout feature is also handy if you share your computer with other people. You can create your own workspace layout (“Bob’s Workspace,” for example) with the panels and windows exactly where you like them. Then, when you go to use the computer and the bozo before you has rearranged the entire workspace, just select your layout from the Application bar or the Window→Workspace Layouts menu.
Whenever you build a new website or want to edit a site you created outside of Dreamweaver, you have to introduce the program to the site—a process Dreamweaver calls setting up a site. This is the most important first step when you start using Dreamweaver, whether you plan to whip up a 5-page site, build a 1,000-page online store, or edit the site your sister built for you. At its most basic, defining a site lets Dreamweaver know where you store your web pages on your computer. It also helps Dreamweaver correctly insert images and add links from one page to another. In addition, if you want to take advantage of Dreamweaver’s many timesaving site-management tools, such as the link checker (Find and Fix Broken Links), Library items (Chapter 19), templates (Chapter 20), and FTP feature for moving your files to a web server (Chapter 18), you have to set up a site.
There are a lot of ways to configure a site, depending on your needs. For example, if you’re ready to move pages to the Web, you need to tell Dreamweaver how to connect to your web server. But to get started with a new site, you only need to provide a couple of pieces of information:
Choose Site→New Site to open the Site Setup window (Figure 1-12).
You’ll supply basic site info here.
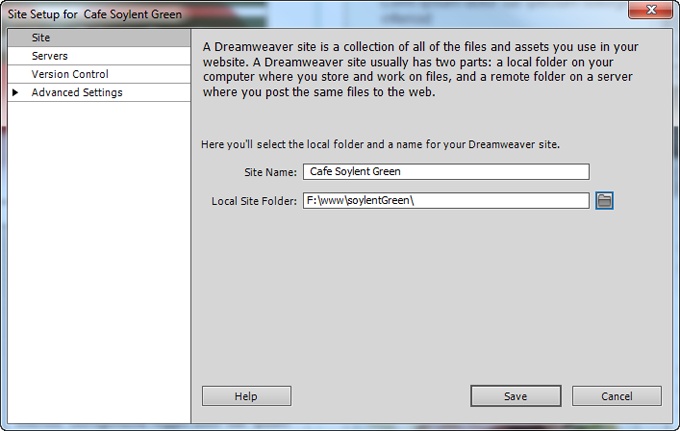
In the “Site name” field, name your site.
The name you type here is for your own reference, to help you identify the site when it appears in the Files panel; the name won’t show up on the Web.
Click the folder icon to the right of the “Local site folder” field.
The Choose Root Folder window opens, letting you select a folder on your hard drive to serve as your local site or, more specifically, your local site’s main, or root, folder. You’ll store all your site’s files—HTML documents and graphics, CSS files, and so on—in this local root folder or in the root’s subfolders (such as an Images subfolder).
Note
Another way to think of the local site folder is as the folder on your computer in which you’ll put your site’s home page.
Figure 1-12. The Site Setup window tells Dreamweaver about your site—where you store your files, how to connect to your web server so you can upload pages to the Internet, and so on. But to get started, you only need to fill in these two fields. You’ll find the other Site Setup categories, listed on the left, discussed later: The Servers category lets you point Dreamweaver to your online web server so you can upload files to your site (Chapter 18) and to a “testing server” so you can put complex, database-driven websites through their paces before going live (Chapter 22); the Version Control category is for those using the (very complex) Subversion system (most people—the author of this book included—never use this option, but if you’re curious, see the box on page 788 for more). You’ll find the Advanced settings discussed in step 5 below and elsewhere in this book.
Browse to and select a folder for your site’s files.
Figure 1-13 demonstrates the process. If you’re editing an existing site, select the folder that contains the site’s files. If you’re creating a new site, create a folder for that site using the New Folder button in this window.
For a few additional options, select Advanced Settings from the left-hand list of setup categories (see Figure 1-14).
This step is optional and you can happily skip it to begin building web pages. You’ll find most of the categories listed here discussed elsewhere in the book, but you may want to visit the options in the Local Info category:
Figure 1-13. The dialog box for selecting a folder in Windows (top) is pretty much the same as that for Macs (bottom). You can verify which folder you’re about to select by looking in the Folder field on Windows PCs (circled, top) or in the path menu on Macs (circled, bottom).
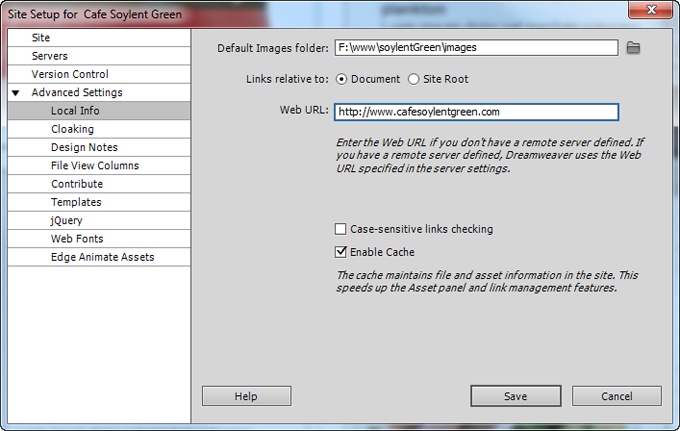
The “Default Images folder” field lets you select (or create) a folder inside your local site folder to hold the images you’ll use on your web pages. Choosing a default images folder is useful only if you tend to add images to your pages-in-progress from outside your local site folder—if, for example, you add images that are sitting on your desktop or in another folder on your hard drive. In that case, Dreamweaver automatically copies those files to the Images folder on your local site; that way, when you upload your local site to your online web server, all your images go along for the ride. (Dreamweaver copies “outside” image files to your local site without setting this option, but each time you add an image, you have to tell Dreamweaver where to save the file. If you’ll primarily use images you already saved in your local site, skip this setting.)
Figure 1-14. You can happily use Dreamweaver without ever visiting Advanced Settings in the Site Setup window. The Local Info options are discussed earlier, and the other options are discussed elsewhere in this book: cloaking on page 782, Design Notes on page 795, File View columns on page 723, templates in Chapter 20, jQuery on page 573, Web fonts on page 128, and Edge Animate assets on page 701.
The “Links relative to” setting determines how Dreamweaver writes links to other pages in your site, links to images in your site, and links to external files, like Cascading Style Sheets, Flash movies, and so on. Unless you’re an experienced web designer, stick with the normal “Document” setting here—you can read about the difference between (and uses for) document- and site root-relative links on Absolute Links.
Type the web address for your site in the Web URL field, like http://www.cafesoylentgreen.com/. If you don’t yet have a web address, you can leave this blank. In some cases, you may need to add information after the domain name. For example, if you’re a teacher and you have a site on your college’s web server, its address might look something like this: www.somecollege.edu/~bob. Or you might be responsible for maintaining just part of a larger site—sometimes called a “sub-site”—so you might need to append, for example, /marketing to the end of the URL. Regardless, just type the address you normally type into a web browser to visit your site; for example, www.mybigcompany.com/marketing.
Leave the checkbox next to “Case-sensitive links checking” turned off. This is useful only when you have web pages and files on a UNIX server that allows files with the same name but different letter cases: for example, HOME.html, home.html, and HoMe.html. Since Windows PCs and Macs don’t let you do this, you’ll probably never have a site with file names like these.
Keep the Enable Cache checkbox turned on. Dreamweaver creates a cache for each site you set up. That’s a small database that tracks pages, links, images, and other site components. The cache helps Dreamweaver’s site-management tools avoid breaking links, lets Dreamweaver warn you when you’re about to delete important files, and lets you reorganize your site quickly. The only reason to turn off this checkbox is if you have a really large website (tens of thousands of pages and images) and you notice that Dreamweaver is really slow whenever you begin to work on the site, move a file, change a file’s name, delete a file, or perform one of Dreamweaver’s other site-management tasks. In that case, you may see a box saying “updating the site cache” or “checking links” that stays open and prevents you from using Dreamweaver for a minute or more—basically your site is so big that Dreamweaver has to spend a lot of time keeping track of your files and links.
Click Save to finish the site setup.
Your site’s files (if there are any yet) appear in the Files panel. Now you’re ready to create and edit web pages and take advantage of Dreamweaver’s powerful site-building tools.

Note
Dreamweaver lets you set up multiple websites, a handy feature if you’re a web designer with several clients, or if your company builds and manages more than one site. To define an additional site, choose Site→New Site and then repeat the steps on Setting Up a Site. You can then switch from one site to another using the Sites menu at the top-left of the Files panel.
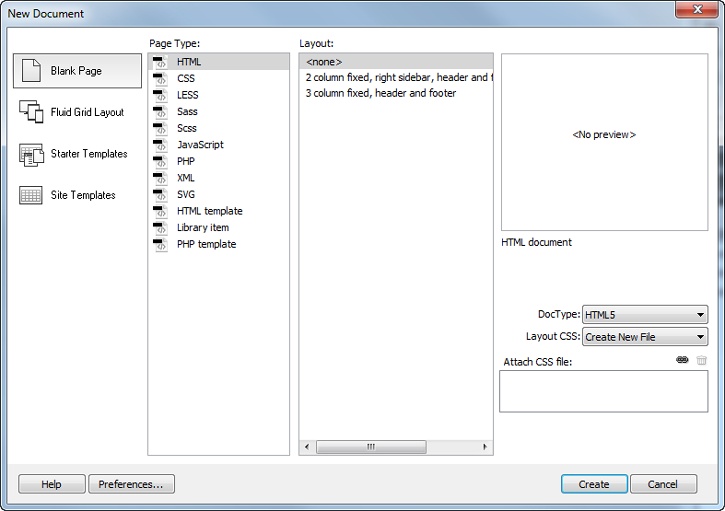
After you define a site, you’ll want to start building pages. Just choose File→New or press Ctrl+N (⌘-N on Macs) to open Dreamweaver’s New Document window (see Figure 1-15). It’s a little overwhelming at first—there are so many options, it’s hard to know where to start. Fortunately, when you just want to create a new HTML file, you can skip most of these options.
To create a basic HTML file for a web page:
From the left-hand list of document categories, choose Blank Page.
The Blank Page category lets you create a new empty document—maybe a web page or something a bit more esoteric, like an XML file, an external JavaScript file, or one of the several types of server-driven pages (such as a PHP file, discussed in Chapter 22).
Figure 1-15. The New Document window lets you create nearly every type of web document under the sun. Dreamweaver CC includes a set of prepackaged CSS layouts that use the latest Web design tools, including HTML5. You’ll learn more about these layouts in Chapter 10.
The Fluid Grid Layout option is relatively new in Dreamweaver. It lets you create a web page that adapts to three browser widths: one for a phone, a tablet, and a desktop browser. You’ll learn how to use this feature on Launching Your jQuery Mobile Site.
The Starter Templates and Site Templates categories relate to Dreamweaver’s Template feature discussed in Chapter 20. Within Starter Templates you’ll find starter pages for creating mobile-only websites (Adding Styles to Media Query Style Sheets). The Site Templates category holds templates for sites you’ve created, so initially it will be empty.
From the Page Type list, choose HTML.
You can create other types of documents, too, some of which you’ll learn about later in this book, such as templates (Chapter 20), Library items (Chapter 19), and CSS files (Chapter 3).
From the Layout list, choose <none>.
This creates a blank document. The other choices (“2 column fixed, right sidebar, header and footer,” “3 column fixed, header and footer,” and so on) are pre-designed page layouts (you’ll learn more about using these layouts in Chapter 10). They use CSS, which you’ll learn about in Chapter 3.
Select a document type from the DocType menu.
Selecting a doctype, or document type, identifies the type of HTML you’ll use to create your page. It affects how Dreamweaver writes HTML code and how a web browser understands it. Fortunately, since Dreamweaver writes all the code for you, you don’t need to worry about the subtle differences between the different doctypes.
HTML5 is the latest version of HTML, and the normal setting in Dreamweaver—it’s what all the cool kids on the block are using, and you should, too. However, XHTML 1.0 Transitional, as well as HTML 4.01 Transitional, HTML 4.01 Strict, and XHTML 1.0 Strict also work just fine; so if you’re working on a site whose pages use one of these older doctypes, you might want to stick with it.
If you don’t really understand or care about doctypes, just select HTML5, making sure to avoid None (which can force browsers to display pages in what’s called “quirks mode” and makes perfecting designs difficult), XHTML Mobile, and XHTML 1.1 (which is not only obsolete, it also requires a special setting on your web server to work properly).
Tip
If you don’t want to deal with the New Document window every time you create a page using Dreamweaver’s New Document keyboard shortcut (Ctrl+N in Windows, ⌘+N on Macs), choose Edit→Preferences in Windows (Dreamweaver→Preferences on Macs). In the Preferences dialog box, click the New Document category and then turn off the “Show New Document Dialog on Ctrl+N (⌘+N)” checkbox.
While you’re at it, you can specify the type of file Dreamweaver creates whenever you press Ctrl+N (⌘-N). For example, if you usually create plain HTML files, choose HTML. But if you usually create dynamic pages, choose a different type of file—PHP, for example. You can also select the default doctype—choose HTML5—for all new pages.
Once you set these options, pressing Ctrl+N (⌘-N) instantly creates a new blank document using the doctype you chose previously. (Choosing File→New, however, still opens the New Document window.)
Click Create.
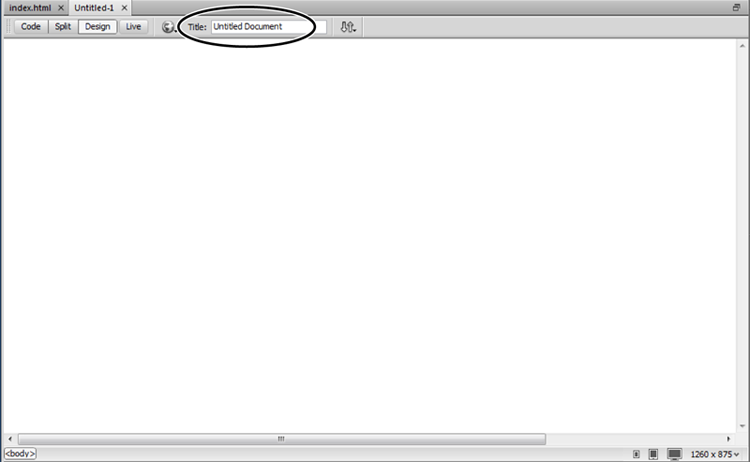
Dreamweaver opens a new, blank page ready for you to save and title (see Figure 1-16).
Choose File→Save.
The Save As dialog box appears. You need to save the file somewhere inside your local site folder. You can save it inside any subfolder within the site folder as well.
Tip
If you’ve set up a site, Dreamweaver provides a quick shortcut to the local root folder. When you save a web page, click the Site Root button in the Save As dialog box—this jumps directly to the local root folder. The Site Root button appears at the bottom-right of the Save As dialog box in Windows, and at the bottom-left of that window on Macs.
Type a name for the file and then click Save.
Make sure the name doesn’t contain spaces or any characters except letters, numbers, hyphens, and underscores, and that it ends in either .html or .htm.
Although most operating systems let you save files with long names, spaces, and characters like #, $, and & in them, some browsers and servers have trouble interpreting anything other than letters and numbers. Furthermore, web servers rely on file extensions like .htm, .html, .gif, and .jpg to know whether a file is a web page, graphic, or some other type of file. Dreamweaver for Windows automatically adds the extension to your saved documents. But on Macs—which let you save files without extensions—make sure the file ends in the suffix .html or .htm when you save it.
At the top of the document window, click inside the Title field and then type a name for the page.
Every new document Dreamweaver creates has the unflattering name “Untitled Document.” If, at any given time, you do a quick search on Google for “Untitled Document,” you’ll find about 40 million pages. Dreamweaver probably created most of those pages, but obviously some people still need to pick up a Missing Manual. You should change this to a descriptive title indicating the main topic of the page, like “Directions to Cafe Soylent Green,” “About Cafe Soylent Green,” or “Technical Specifications for the Anodyne 3000 Indoor Lawn Mower.” Not only is replacing “Untitled Document” more professional, providing a descriptive title can improve a web page’s ranking among search engines.
Dreamweaver’s Files panel provides a fast way to add blank web pages to your site. With one click, you can create a new page in any folder, saving you several steps compared to using the File menu. In addition, you can use the Files panel to add folders, rename files and folders, and move files into and out of folders on your site.
To create a new, blank web page, open the Files panel using one of the methods described on Creating a Web Page (for example, choose Window→Files), and then right-click (Control-click) on a file or folder in the Files panel. In the shortcut menu that appears, choose New File. Dreamweaver creates a new, empty page in the same folder as the selected page or, if you selected a folder, it creates the page there.
The type of file Dreamweaver creates depends on the type of site you’re creating. For a plain HTML site, Dreamweaver produces a blank HTML page. If you’re building a dynamic, database-driven site, however (like those described in Chapter 22), Dreamweaver creates a blank page based on the type of server model you select. For example, if you build a site using PHP and MySQL, Dreamweaver creates a blank PHP page (named untitled.php).
Note
The doctype (Document Types) of a new web page created with the Files panel depends on your Dreamweaver Preferences settings: Choose Edit→Preferences (Dreamweaver→Preferences on Macs), select the New Document category, and choose HTML5 (or whichever doctype you prefer) from the Default Document Type menu. You can set other options for new documents in this window as well, such as the file extension you prefer (.html or .html, for instance).
The new file appears in the Files panel with a highlighted naming rectangle next to it; type a name for the page here. Don’t forget to add the appropriate HTML extension (.htm or .html)—if you do forget, Dreamweaver creates a completely empty file, no starter HTML included (and changing the name by adding the .html extension won’t fix the problem). If this happens, delete the file and create a new one. (If you’re creating a PHP file, make sure the file name ends in .php.)
You can add folders to your site using the Files panel, too. Right-click (Control-click) any file or folder. From the shortcut menu, choose New Folder. If you click a file name, Dreamweaver creates the new folder in the same folder as that file; if you click a folder, you get a new folder inside the existing one.
If you crave variety, you can add a folder another way. Select a file or folder in the Files panel, click the contextual menu button (at the top-right of the Files panel), and then select File→New Folder. Finally, in the naming rectangle that appears in the Files panel, type a name for the new folder.
Because the Dreamweaver Files panel looks and acts so much like Windows Explorer and the Mac Finder, you may think it does nothing more than let you move and rename files and folders. You may even be tempted to work with your site files directly on your Windows or Mac desktop, thinking that you’re saving time. Think again. When it comes to moving site files and folders, Dreamweaver does more than your computer’s desktop ever could.
In your Web travels, you’ve probably encountered the dreaded “404: File Not Found” error. This “broken link” message doesn’t necessarily mean that the page doesn’t exist; it just means that your web browser didn’t find the page at the location (URL) the link specified. Someone working on the website probably moved or renamed the file without updating the link. Because website files are interrelated in such complex ways—pages link to other pages, which include paths to graphics, which in turn appear on other pages—an action as simple as moving one file can wreak havoc on an entire site. That’s why you should always use the Files panel, rather than Windows Explorer or the Macintosh Finder, to rearrange your files.
Moving and reorganizing website files is so headache-ridden and error-prone that some web designers avoid it altogether, leaving their sites straining under the weight of thousands of poorly organized files. But Dreamweaver’s Files panel makes organizing a site easy and error-free. When you use the panel to move files, Dreamweaver looks for actions that could break your site’s links and automatically rewrites the paths of links, images, and other media (see the cautionary note below).
Tip
Note to JavaScript coders: If your custom JavaScript programs include paths to web pages, images, or other files on your site, Dreamweaver can’t help you. When you reorganize your site with the Files panel, the program updates links it created, but not any paths in your JavaScript programs.
Just be sure to do your file and folder moving from within Dreamweaver, like this: In the Files panel, drag the file or folder into its new folder (see Figure 1-17). To move multiple files, Ctrl-click (⌘-click) each and then drag them as a group; to deselect a file, Ctrl-click or ⌘-click it again. You can also select a file or folder and then Shift-click another file or folder to select all the content between the two.
Note
Close all your web documents before you reorganize your files. Dreamweaver has been known to skip updating links in open files. But if you do end up with malfunctioning links, you can always use Dreamweaver’s Find Broken Links tool (Find and Fix Broken Links) to ferret out and fix them.
When you release the mouse button, the Update Files dialog box appears (Figure 1-17); click Update and Dreamweaver rewrites the links.
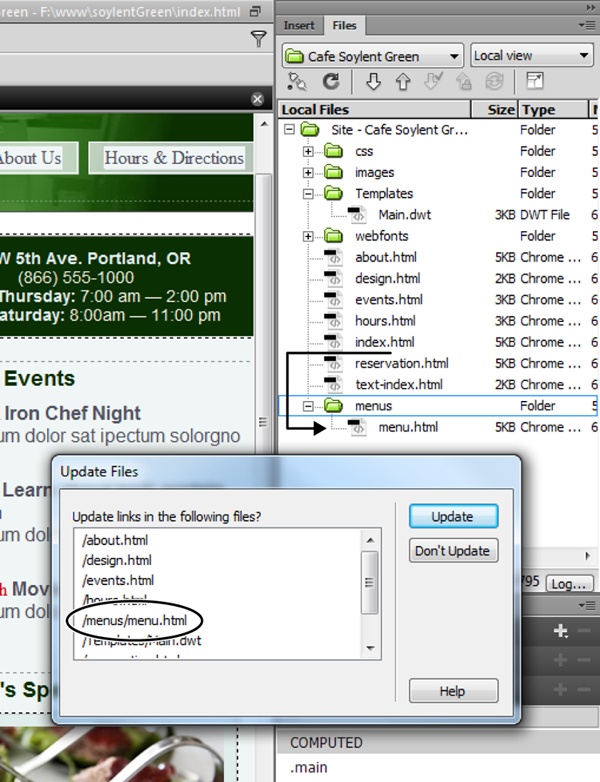
Figure 1-17. You can move files and folders within the Files panel just as you would in Windows Explorer or the Macintosh Finder. Simply drag the file into (or out of) a folder. Here, you’re moving the menu.html file from the Webfonts folder to the Menus folder. Unlike your computer’s file system, Dreamweaver monitors the links between web pages, graphics, and other files. If you move a file using Windows Explorer or the Finder, you’ll most likely end up breaking the links. By contrast, Dreamweaver is smart enough to know when moving files will cause problems. The Update Files dialog box triggers Dreamweaver to update the links to and from the moved files so your site keeps working properly.
Renaming files and folders poses the same problems as moving them. Because links include file and folder names, altering a name can break a link just as easily as moving or deleting a file or folder.
Say you create a new site with a home page named home.html. You cheerfully continue building the other pages of your site, linking them to home.html as you go along. But after reading this chapter and checking the default file name your web server requires (see Setting Up a Site), you find you need to rename your home page index.html. If you were to rename the file index.html using Windows Explorer or the Macintosh Finder, every link to home.html would result in a “File not found” error!
Dreamweaver handles this potential disaster effortlessly, as long as you rename the file in the Files panel. To do so, click the file or folder name in the panel, pause a moment, and then click it again. (The pause ensures that Dreamweaver won’t think you just double-clicked the name to launch the file.) Dreamweaver highlights the name, ready for you to type in a new name. Be sure to include the proper extension. For example, image GIFs end with .gif and Cascading Style Sheets end with .css. Although Dreamweaver lets you name files without using an extension, extension-less files won’t work when you move them to a web server, and Dreamweaver may not open the file correctly without an extension.
Finally, in the Update Files dialog box, click Update. Dreamweaver updates all the links to the newly named file or folder.
Note
It bears repeating: Never rename or move files or folders outside of Dreamweaver. If you use Windows Explorer or the Macintosh Finder to reorganize your site’s files, links will break, images will disappear, and the earth will open underneath your feet. (Well, that last thing won’t happen, but it can feel that way when your boss comes in and says, “What happened to our website? Nothing works!”)
If you move files outside of Dreamweaver by accident and break links, see Finding Broken Links to learn how to fix them.
It’s a good idea to clean up your site from time to time by deleting old and unused files. Just as with moving and renaming files, you delete them from the Files panel.
To delete a file or folder, select it in the Files panel and then press Backspace or Delete. (To select multiple files or folders, Ctrl-click [⌘-click] them.) If no other page references the doomed file or folder, a simple “Are you sure you want to delete this file?” warning appears; click Yes.
If other files link to the file or to files within the folder you want to delete, Dreamweaver displays a warning message (Figure 1-18) informing you that you’re about to break links on one or more pages.
The message even lists the first few pages that use the file.
If you’re sure you want to delete the file or folder, click Yes. If you made a mistake, click No to leave your site untouched.
Clicking Yes breaks the links in all the pages. Repairing those links, which usually means using a new URL, requires a separate step: using the Site→Change Links Sitewide command, as described on Changing a Link Site-Wide.
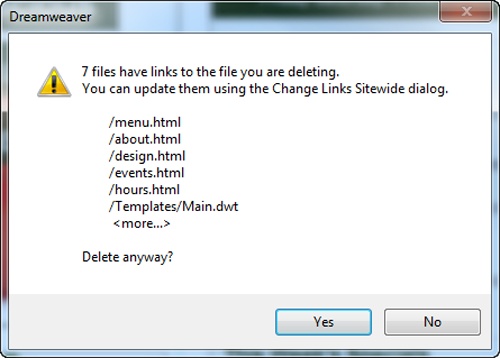
Figure 1-18. When you delete files in the Files panel, Dreamweaver tells you if other site pages link to that file. If they do, you need to repair the links in the relevant files. Dreamweaver makes that easy via the Change Links Sitewide command (see page 751)—and it reminds you of the feature in this dialog box.
Note
If you move files to your site folder using Windows Explorer or the Mac Finder, Dreamweaver might not be aware of those files or links between those files and others in your site. If that’s the case, when you move or delete files, Dreamweaver may not correctly update links or warn you of broken links caused by deleting a necessary file. To make Dreamweaver aware of any new files you add, choose Site→Advanced→Recreate Site Cache. Dreamweaver scans the files in the local site folder and updates the cache (its database of files and links on the site).
Although reading a book is a good way to learn the ins and outs of a program, nothing beats sitting in front of a computer and putting that program through its paces. Many of this book’s chapters, therefore, conclude with hands-on training: step-by-step tutorials that show you how to create a real, working, professionally designed website for a fictional cafe, Cafe Soylent Green.
The rest of this chapter introduces Dreamweaver by taking you step by step through the process of building a web page. It shouldn’t take more than an hour. When it’s over, you’ll have learned the basic steps for building any web page: creating and saving a new document, adding and formatting text, inserting graphics, adding links, and tapping the program’s site-management features.
If you already use Dreamweaver and want to jump right into the details of the program, feel free to skip this tutorial. (And if you’re the type who likes to read first and try second, read Chapters Chapter 2 through Chapter 5 and then return to this point to practice what you just learned.)
Note
The tutorial in this chapter requires the example files from this book’s website at http://oreilly.com/missingmanuals/cds/dreamweaverccmm13/. Click the Download Tutorials link to save the files to your local drive. The tutorial files are in ZIP format, a technology that compresses a lot of files into one, smaller archive file.
Windows folks should download the ZIP file and then double-click it to open the archive. Click Extract All Files and then follow the instructions to store the files on your computer. Mac users can just double-click the file to decompress it.
After you download and decompress the files, you should have an MM_DWCC folder on your computer, containing all the tutorial files for this book.
Before you start working in Dreamweaver, make sure the program’s set up to work for you. In the following steps, you’ll double-check some key Dreamweaver settings and organize your workspace using Dreamweaver’s Workspace Layout feature.
First, make sure your preferences are all set:
If it isn’t already open, start Dreamweaver.
Hey, you’ve got to start with the basics, right?
Choose Edit→Preferences (Windows) or Dreamweaver→Preferences (Macs).
The Preferences dialog box opens, listing a dizzying array of categories and options (see Figure 1-19).
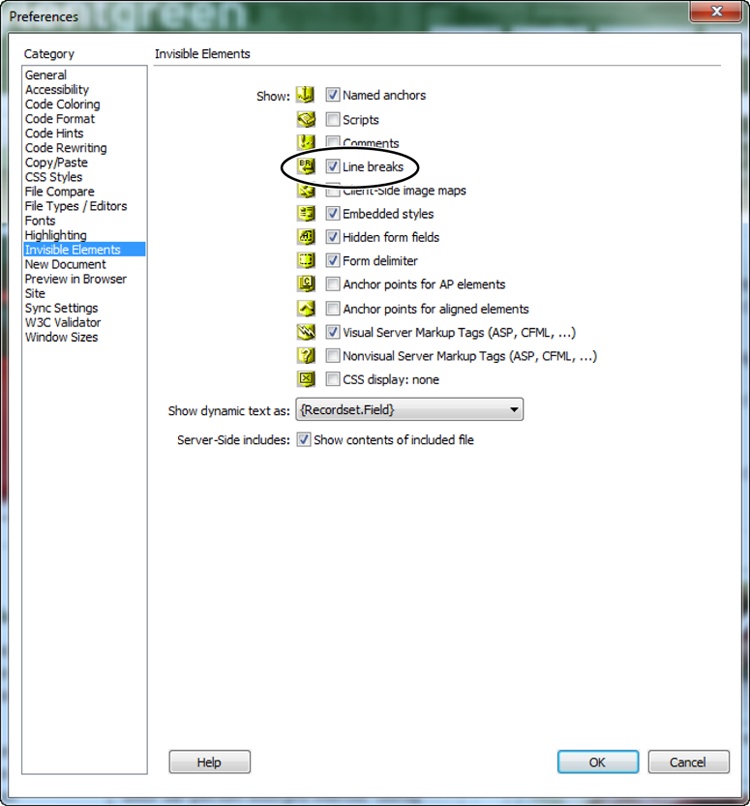
Figure 1-19. Dreamweaver’s Preferences dialog box is a smorgasbord of choices that let you customize the program to look and work the way you want. This panel lets you choose whether to keep Dreamweaver’s invisible elements hidden or exposed. For example, if you turn on the checkbox next to the “Line breaks” (circled), you can easily see where the breaks fall as you work on a page.
Select the Invisible Elements category and then turn on the fourth checkbox from the top, Line Breaks (circled in Figure 1-19).
Sometimes, when you paste text from other programs, like Microsoft Word or an email program, Dreamweaver displays what were once separate paragraphs as one long, single paragraph broken up with invisible characters called line breaks (for you HTML-savvy readers, this is the <br> tag). Normally, you can’t see the line break character in Dreamweaver’s Design view. This setting makes sure you can—it uses a little gold shield to represent breaks in the document. The shield gives you an easy way to select a line break and remove it to create a single paragraph by combing the text before and after the line break, or to create two paragraphs from one long one.
Click OK.
The Preferences dialog box closes. You’re ready to get your workspace in order. As noted at the beginning of this chapter, Dreamweaver offers many windows to help you build web pages. For this tutorial, though, you need only four: the Insert panel, the document window, the Properties panel, and CSS Designer. But for good measure (and to give you a bit of practice), you’ll open another panel and rearrange the workspace a little. To get started, have Dreamweaver display the space-saving Compact workspace.
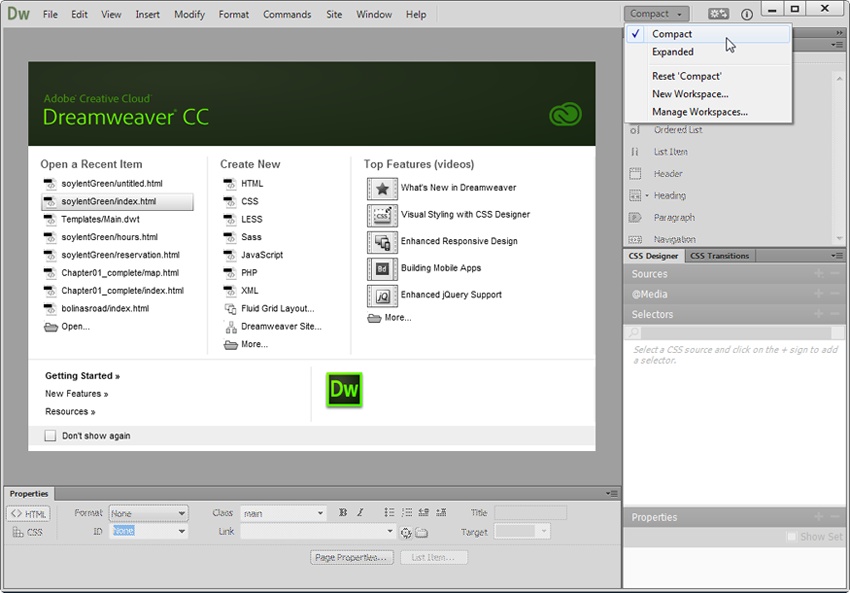
From the Workspace Switcher on the Application bar, select Compact (see Figure 1-20), or go to Window→Workspace Layout from the main menu and then select Compact from the drop-down list.
If you see Compact already selected, choose Reset ‘Compact,’ which moves any panels that were resized, closed, or repositioned back to their original locations. The Compact workspace puts the Properties panel below the document window and displays the Insert and Files panels on the right. You choose one or the other of these panels by clicking the appropriate tab. Below that, in the panels group, you find the CSS Designer and the CSS Transitions panels.
In the next step, you’ll turn the handy Insert panel into a toolbar, so you have easy access to its commands.
Figure 1-20. The Dreamweaver Welcome screen (middle) lists recently opened files in the left-hand column. Clicking a file name opens that file for editing. The middle column provides a quick way to create a new web page or define a new site. In addition, you can access introductory videos and other getting-started material from the screen’s right-hand panel. Dreamweaver displays the Welcome screen when you have no documents open in the document window.
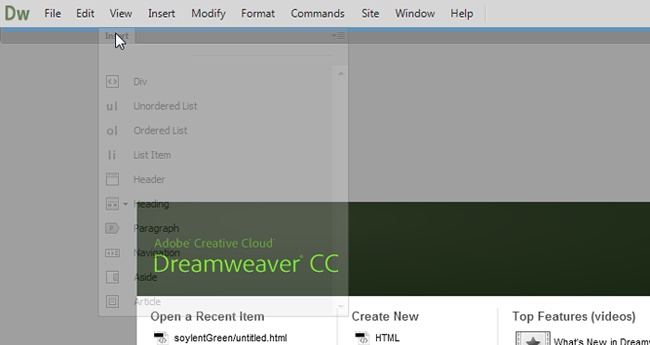
Grab the Insert tab and then drag the Insert panel to just below the Application bar. When you see a blue line as shown in Figure 1-21, release the mouse button.
When you drag the Insert panel away from the panel group, it looks like a floating palette, and that’s what it would be if you let go of the mouse button. When it’s near workspace edges where it can dock, you see a blue line. When you let go of the mouse to dock the panel, Dreamweaver transforms it into a toolbar with no text labels, just icons. Tabs across the top let you choose from different Insert sets like Common, Media, and Favorites. If you don’t know what a button does, hold the cursor over the button and Dreamweaver displays a descriptive tooltip. That won’t work now because the buttons are disabled since you don’t have a document open.
Now the workspace looks great. It displays most of the tools you need for this tutorial (and for much of your web page building). Since this arrangement is so useful, you’ll want to save it as a custom layout (OK, maybe you don’t, but play along).
Figure 1-21. Customize your workspace to match the way you want to work. A key to this is positioning Dreamweaver’s windows and palettes where you need them. Here, you’re positioning the Insert panel under the Application bar. When you see a thick blue line, the panel is ready to dock in a new location. When you move the Insert panel to this position, it changes into a toolbar.
From the Application bar’s Workspace Switcher, choose New Workspace.
The Save Workspace window appears, waiting for you to name your new layout.
Type Missing Manual (or any name you like), and then click OK.
You just created a new workspace layout. To see if it works, switch to another one of Dreamweaver’s layouts, see how the screen changes, and then switch back to your new setup.
From the Workspace Switcher, choose Expanded.
This moves the panels around a bit. The Insert panel jumps back over to the panels group. The whole group is wider, which gives the CSS Designer more room to display its tools. This is just a demonstration/detour, so now you’ll switch back.
From the Workspace Switcher, choose Missing Manual (or whatever you named your custom space in step 8).
Voilà Dreamweaver resets everything the way you had it before. You can create multiple workspaces for different websites or different types of sites.
As discussed on Setting Up a Site, whenever you use Dreamweaver to create or edit a website, your first step should always be to show Dreamweaver the location of your local site folder (also called the local root folder)—the master folder for all your website’s files. You do this by setting up a site, like so:
Choose Site→New Site.
The Site Setup window appears. You only need to provide two pieces of information to get started.
Type Test Drive in the Site Name field.
The name you type here is for your own reference; it lets you identify the site in Dreamweaver’s Site menu. Dreamweaver also asks where you want to store the website’s files. In this example, you’ll use one of the folders you downloaded from this book’s website (at other times, you’ll choose or create a folder of your own).
Click the folder icon next to the label “Local site folder.”
The Choose Root Folder window opens so you can navigate to a folder on your hard drive to serve as your local folder. (This is where you’ll store the HTML documents and graphics, CSS, and other web files that make up your site.)
Browse to and select the Chapter01 folder located inside the MM_DWCC folder you downloaded earlier. Click the “Select Folder (Choose)” button to set this folder as the local root folder.
At this point, you’ve given Dreamweaver all the information it needs to successfully work with the tutorial files.
Click Save to close the Site Setup window.
After you set up a site, Dreamweaver creates a site cache for it (see Creating a Web Page). Since there are hardly any files in the Chapter01 folder, you may not even notice this happening—it goes by in the blink of an eye.
“Enough already! I want to build a web page,” you’re probably saying. You’ll do just that now:
Choose File→New.
The New Document window opens. Creating a blank web page involves a few clicks.
From the left-hand list of document categories, select Blank Page; in the Page Type list, highlight HTML; and from the Layout list, choose <none>. From the DocType menu in the bottom-right, select HTML5.
As discussed on Document Types, HTML comes in a variety of flavors, called doctypes. HTML5 is the latest and greatest version, so use it.
Click Create.
Dreamweaver opens a new, blank HTML page. Even though the underlying code for an HTML page differs in slight ways depending on which document type you chose (HTML 4.01 Transitional, XHTML 1.0 Strict, HTML5, and so on), you have nothing to worry about: When you add HTML in Design view, Dreamweaver writes the correct code for your doctype.
If you see a bunch of strange text in the document window, you’re looking at the underlying HTML, and you’re in either Code or Split view. If your monitor is wide enough to view both the Code and Design views side by side, select the Split button at the top of the document window; if your monitor is on the small side, click Design. (If you don’t see these buttons, choose View→Toolbars→Document.) You’ll work mainly in the visual Design view for this tutorial.
Choose File→Save.
Always save a newly created page right away. This good habit prevents serious headaches if the power goes out as you finish that beautiful—but unsaved—creation.
Save the page in the Chapter01 folder as index.html.
You could also save the page as index.htm; both .html and .htm are valid extensions for HTML files. On most web servers, you’ll name the home page index.html (see the box on All Those Index Pages for an explanation).
Make sure you save this page in the correct folder. In Phase 2 earlier, you told Dreamweaver to use Chapter01 as the site’s root folder—the folder that holds all the pages and files for the site. If you save the page in a folder outside of Chapter01, Dreamweaver gets confused and its site-management features won’t work correctly.
If the document window toolbar isn’t already open, choose View→Toolbars→Document to display it.
The toolbar at the top of the document window provides easy access to a variety of tasks you’ll do frequently, like titling a page, previewing it in a browser, and looking at the HTML.
In the toolbar’s Title field, select the text “Untitled Document,” and then type in Welcome to Cafe Soylent Green.
The Title field holds the page’s title—the information that appears in the title bar of a web browser. The title also shows up as the name of your page when someone searches the web. In addition, a clear and descriptive title that identifies the main point of a page can also help increase a page’s rank among the major search engines.
If you have Split view turned on, you’ll notice that in Code view, Dreamweaver updated the <title> tag in the HTML to read “<title>Welcome to Cafe Soylent Green</title>.”
In the Properties panel, click the Page Properties button, or choose Modify→Page Properties.
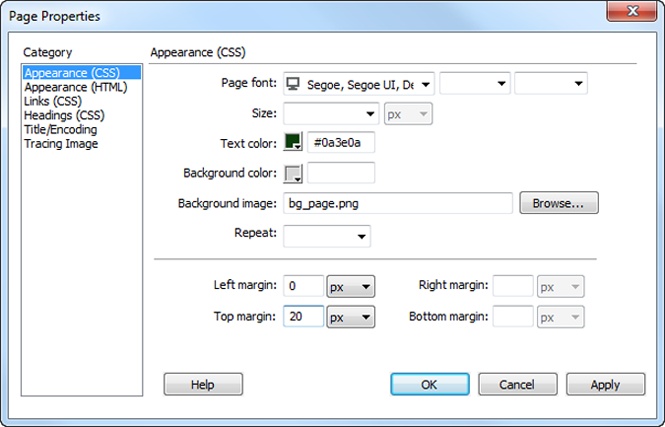
The Page Properties dialog box opens (see Figure 1-22), letting you define the basic look of each web page you create. Six categories of settings control attributes like text color, background color, link colors, and page margins.
From the “Page font” menu, select “Segoe, Segoe UI, DejaVu sans, Trebuchet MS, sans-serif.”
This sets a basic font (and backup fonts, in case your visitor’s machine lacks Segoe) that Dreamweaver automatically uses for all the text on the page. But as you’ll see later in this tutorial, you can always specify a different font for selected text.
Next, you’ll set a basic text color for the page.
Click the small gray box next to “Text color.” From the palette that pops up, choose a color (a dark green color works well with this site).
Unless you intervene, all web page text starts out black; the text on this page reflects the color you select here. In the next step, you’ll add an image as a background to liven up the page.
Note
Alternatively, you could type a color value, like #333333, into the color field. That’s hexadecimal notation, which is familiar to HTML coding gurus. Both the pop-up color palette and the hexadecimal color-specifying field appear fairly often in Dreamweaver. Dreamweaver CC even lets you specify a color using other values, such as RGB (red-green-blue) and HSL (hue-saturation-lightness) values. See Picking a Font Color for more on setting colors in Dreamweaver.
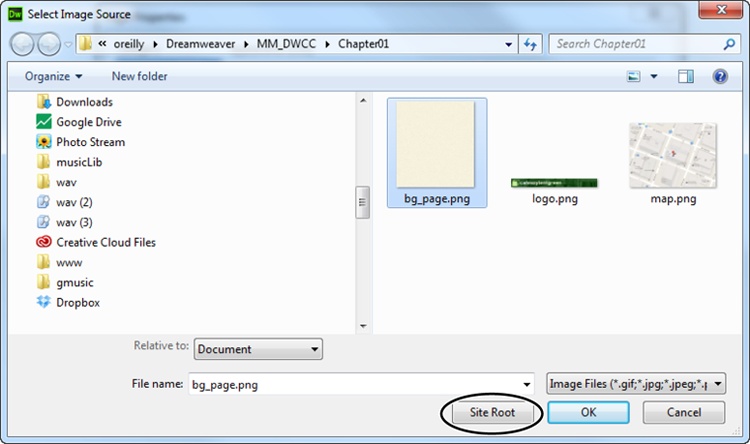
To the right of “Background image,” click the Browse button.
The Select Image Source window appears (see Figure 1-23). Use it to navigate to and then select a graphic.
Click the Site Root button at the top of the window (bottom on Macs). Select the file bg_page.png, and then click OK (Open).
In Dreamweaver, you can select a file and close the selection window just by double-clicking the file name.
Figure 1-23. Use the Select Image Source window to insert graphics on a web page. The Site Root button (circled) is a shortcut to your local site’s main, or root, folder—a nifty way to quickly get to your root folder when you search for a file.
Note
Note for Windows users: Windows normally doesn’t display a file’s extension. So when you navigate to the images folder in step 12 previously, you might see bg_page instead of bg_page.png. Since file extensions are an important way people (and web servers) identify the types of files a website uses, you probably want Windows to display extensions. Here’s how you do that: In Windows Explorer, navigate to and select the MM_DWCC folder. If you use Windows 7 or Vista, choose Organize→“Folder and search options.” If you use Windows XP, choose Tools→Folder Options. In the Folder Options window, select the View tab, and then turn off the “Hide extensions for known file types” checkbox. To apply this setting to the tutorial files, click OK; to apply it to all the files on your computer, click the “Apply to Folders” button, and then click OK.
In the Left margin field, type 0; in the Top margin field type 20.
The 0 setting for the left margin removes the little bit of space web browsers insert between the contents of your web page and the left side of the browser window. The 20 adds 20 pixels between the top of the browser window and the page contents.
If you like, you can change this setting to make the browser add more space to the top and left side of the page, or set both values to 0 to remove any space between the page’s content and the browser window edges. In fact, you can even add a little extra empty space on the right side of a page. (The right margin control is especially useful for languages that read from right to left, like Hebrew or Arabic.)
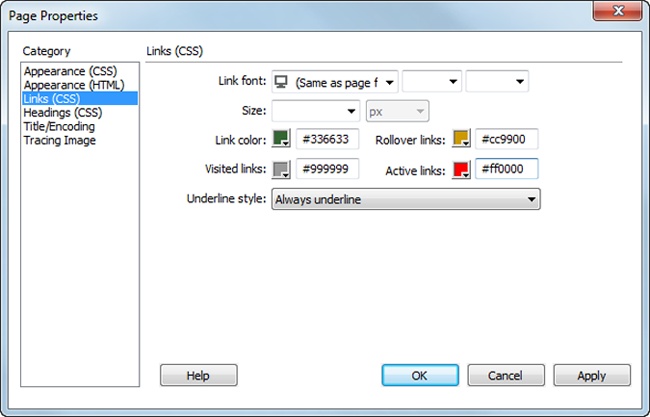
Back in the Category menu (far left of the Page Properties window), click Links (CSS), and then add the following properties: In the “Link color” field, type #336633; in the “Visited links” field, type #999999; in the “Rollover links” field, type #CC9900; and in the “Active links” field, type #FF0000 (see Figure 1-24).
These hexadecimal codes specify the colors for links on your web page (see Picking a Font Color for more on choosing colors in Dreamweaver).
Figure 1-24. You can set several hyperlink properties using the Links (CSS) category of the Page Properties dialog box. For example, you can choose a different font and size for links, as well as specify colors for the four link states (unvisited, hovered over, clicked, and visited). Finally, you can choose whether (or when) a browser underlines links. Most browsers automatically do, but you can override that behavior with the help of this dialog box.
Links come in four varieties: regular, visited, active, and rollover. A regular link is a plain old link, unvisited, untouched. A visited link is one you’ve already clicked, as noted in your browser’s History list. An active link is one you’re currently clicking, so you see this color for the split second that you’re pressing the mouse button. And finally, a rollover link changes color as you mouse over it without clicking. You can choose different colors for each of these states.
While it may seem like overkill to have four link colors, the regular and visited links provide useful feedback to visitors by telling them which links they already followed and which remain to be checked out. For its part, the rollover link gives you instant feedback, changing color as soon as you move your cursor over it. The active link color isn’t that useful for navigating a site since its color changes so briefly you probably won’t even notice it.
Click OK to close the window and apply your changes.
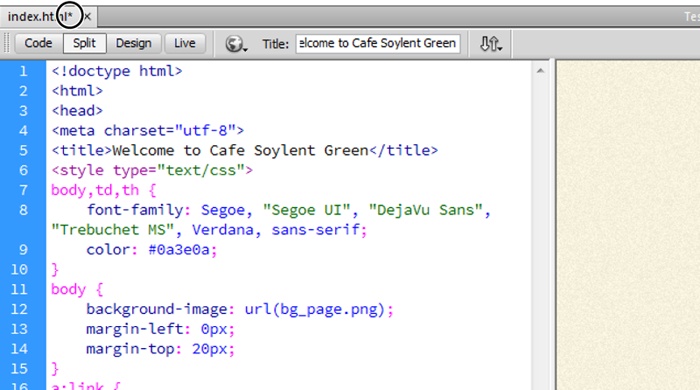
If you look at the top of the document window, you’ll see an asterisk next to the file name—that’s Dreamweaver’s way of telling you that you haven’t saved a page you edited, a nice reminder to save your files frequently and prevent heartache if the program suddenly shuts down (see circled image in Figure 1-25).
Figure 1-25. An asterisk next to a file name (circled) means you’ve made changes to the file, but haven’t yet saved it—quick, hit Ctrl+S (⌘-S)!
If you’ve been working in Split view, you’ll also notice that Dreamweaver added the HTML <style> tag along with some other code—this is called a CSS style sheet and the code dictates how a browser displays your pages (you’ll learn all about this in Chapter 3).
Choose File→Save (or press Ctrl+S [⌘-S]).
Save your work frequently. (This isn’t a web technique so much as a computer-always-crashes-when-you-least-expect-it technique.)
Now you’ll add the real meat of your web page, words and pictures:
From the Image menu on the Insert bar’s Common tab, select Image (see Figure 1-26).
Alternatively, choose Insert→Image. Either way, the Select Image Source dialog box opens. (If you didn’t make changes to your workspace as described in Phase 1 earlier, the Insert bar is really the Insert panel and it appears in the right-hand group of panels.)
Make sure you’re in the local root folder and double-click the logo.png graphics file.
The Cafe Soylent Green image appears in the upper-left corner of your web page. After you insert an image, it remains selected as shown in Figure 1-27. Its properties appear in the Properties panel below the document window. If you click elsewhere on the page, that deselects the image and its properties are no longer displayed.
Figure 1-26. Some of the buttons on Dreamweaver’s Insert toolbar do double duty as menus (the ones with the small, black, down-pointing arrows). Once you select an option from the menu (in this case, the Image object), it becomes the button’s current setting. If you want to insert the same type of object again, you don’t need to use the menu—just click the button.
In the Properties panel’s Alt text box (circled in Figure 1-27), type Cafe Soylent Green.
“Alt” stands for Alternative, but the text you type here is really all about accessibility. It makes your pages more accessible to people who visit websites using alternative devices—for example, people with viewing disabilities who require screen readers to read the contents of a web page out loud. That’s where the alt property comes in. This text description is useful not only for screen-reading software, but for people who deliberately turn off pictures in their web browser so pages load faster. (Search engines also look at alt properties when they index a page, so an accurate description can help your site’s search-engine rankings.)
Figure 1-27. When you select an image in the document window, the Properties panel reveals the image’s dimensions. A thumbnail of the image appears in the top-left of the panel, as does the word “Image” (to identify the type of element you selected), along with the image’s file size (in this case, 16 KB). You’ll learn about other image properties in Chapter 5.
Deselect the image by clicking anywhere else in the document window or by pressing the right arrow key.
Keep your keyboard’s arrow keys in mind—they’re a great way to deselect a page element and move your cursor into place to add text or more images.
Press Enter (Return) to create a new paragraph. Type Welcome to Cafe Soylent Green.
Make sure you’re in Design view here—pressing Enter (Return) in Code view simply inserts a carriage return and no paragraph tags. Notice that the text is a dark color and uses the Segoe (or, if you don’t have Segoe installed, a substitute sans-serif) font; you set these options earlier, in the Page Properties dialog box. The Properties panel now displays text-formatting options.
In the Properties panel, click the HTML button and then, from the Format menu, choose Heading 1 (see Figure 1-28).
The text you just typed becomes big and bold—the default style for Heading 1. Right now, the text doesn’t stand out enough, so you’ll change its color.
Figure 1-28. The Properties panel includes two views: HTML and CSS. The HTML view, shown here, lets you control the HTML tags Dreamweaver uses to create standard text elements like bulleted lists, paragraphs, and links. The CSS view provides a simple interface so you can create fancy CSS styles that format your text to look great.
Select the text you just typed.
Do so by either dragging carefully across the entire line or by triple-clicking anywhere inside the line. (Unlike the Format menu, which affects an entire paragraph at a time, many options in the Properties panel—like the one you’ll use next—apply only to text you select.)
In the Properties panel, click the CSS button so you can style the text. Look for New Rule under the Targeted rule drop-down menu, and then choose <New Inline Style> from the submenu. In the Color field to the right, replace the current value with #CC9900 (or select a color using the color box). Click in the document window to deselect the text so you can see its new color.
Congratulations! You created a new CSS style in the middle of your content using what’s known as an inline style. With your cursor somewhere inside this headline, the Properties panel’s Targeted Rule box shows that it is an <inline style>.
In the panels group on the right and part way down, you see the tab for CSS Designer. Under that is a section called Selectors. Section headers like Selectors and Properties work like an accordion—when you click a headline, the section expands to display the contents inside. If necessary, click the Selectors bar to view the contents, where you’ll see a few selectors, including “<inline style>: h1.”
This is another way of explaining that the cursor is inside an h1 heading, but the heading isn’t displaying the usual style because you added an inline style for it.
To see the style Dreamweaver applies to a selector, look in the Properties section of CSS Designer (just below the Selectors section). Use the scroll bar to see all the properties.
The items Dreamweaver displays in the Properties section change depending on what you highlight in the Selectors section. For example, if you click <inline style>: h1 in Selectors, you see all the properties you can use to format your h1 headings. Grayed out properties are undefined—you haven’t assigned any values to them. Scroll down a bit and you’ll see the color property, along with a swatch and the hex code that defines the hue. If you click Computed in the Selectors section, Dreamweaver displays the properties in use for the currently selected element. In this example, if you position your cursor in the heading and highlight Computed in the Selectors section, the Properties section displays the color and font-family you chose earlier.
Note
It’s easy to get confused between the Properties panel below the document window and the properties section of the CSS Designer, which lives in the panel group. The Properties section of the CSS Designer displays the properties of CSS styles. Chapters Chapter 3 and Chapter 9 give you more details.
With your cursor still in the document window, right-click (Control-click) any text. Choose “CSS Styles→Convert Inline CSS to Rule.”
The Convert Inline CSS dialog box opens.
Set the “Convert to” menu to “All h1 tags,” turn on the radio button labeled “The head of this document,” and then click OK.
You’ve successfully redefined the h1 style in your document. Now all h1 tags will sport the new color. Dreamweaver writes the CSS definition in the “head” section of your document. Want to take a peek? Change your document view to Split or Code view, and then look for h1 near the top of the code window.
In the CSS Designer panel’s Selectors section, you’ll see h1 listed, but it no longer displays <inline style> because you’re no longer using an inline style. Dreamweaver formats the text using the new h1 style. What’s more, when you create new h1 paragraphs, they’ll look the same as this one.
You’re not done yet. Next, you’ll make more changes to h1, using the CSS Designer panel.
In CSS Designer’s Sources section, click <style>.
The <style> entry represents the internal style sheet in the <head> part of your web page. When you choose <style>, CSS Designer’s Selectors section displays the selectors defined in the internal style sheet.
In the Selectors section of CSS Designer, click h1. In the Properties section, scroll down until you see the Text group and the font-family property within it. Click the grayed out words default font and then choose “Baskerville, Palatino Linotype, Palatino, Century Schoolbook L, Times New Roman, serif” from the drop-down menu.
Once again, you’re changing the definition of the h1 heading (also called the h1 tag). No extra steps are necessary when you change the definition in the CSS Designer panel. You can confirm the change by inspecting the code in the document window as you did in the previous step.
Time to add more text.
Back in Design view, click to the right of the heading, and then press Enter (Return) to create a new paragraph.
Although you may type a headline now and again, you’ll probably get most of your text from word processing documents or emails from your clients, boss, or coworkers. To get that text into Dreamweaver, you simply copy it from the document and paste it into your web page.
In the Files panel, double-click the file home-page.txt to open it.
This file is just plain text—no formatting, just words. To get it into your document, you’ll copy and paste it.
Click anywhere inside the text, and then choose Edit→Select All, followed by Edit→Copy. Click the index.html tab to return to your web page and, finally, choose Edit→Paste.
You should see a few gold shields sprinkled among the text (circled in Figure 1-29). If you don’t, make sure you completed step 3 in Phase 1. These shields represent line breaks—spots where text drops to the next line without creating a new paragraph. You’ll often see these shields in pasted text. If you find them, you need to remove them, and then create separate paragraphs.
Click one of the gold shields and then press Enter (Return). Repeat this on all the other gold shields in the document window.
This deletes the line break in the document (it actually deletes the HTML tag <br>) and creates two paragraphs out of one.
At this point, the pasted text is just a series of paragraphs. To give it some structure, you’ll add headings and a bulleted list.
Click in the paragraph that has the text “About the Cafe.” In the Properties panel, click the HTML button, and then choose Heading 2 from the Format menu.
That changes the paragraph to a headline, making it bigger and bolder.
Using the same technique as in step 19, assign the Heading 2 tag to the labels Location, Hours, and Specialties.
You now have one Heading 1 and four Heading 2 headlines. The Heading 2 headlines could use a little style.
Triple-click the headline “About the Cafe” to select it. In the Properties panel, click the CSS button. Make sure Targeted Rule is set to <New Inline Style>. Then, in the Size field, delete “none,” and type 20.
Once again, you’ve created an inline style. This time it’s within this h2 heading (About the Cafe). Notice that it is the only h2 heading affected by the size change to 20 pixels (px). Next, you’ll update all the h2 headings to match.
With your cursor in the “About the Cafe” heading, right-click (Control-click) and choose “CSS Styles→Convert Inline CSS to Rule.”
The Convert Inline CSS dialog box appears.
Using the “Convert to” menu, choose “All h2 tags.” In the “Create rule in” group, turn on the radio button labeled “The head of this document,” and then click OK.
Notice that all the h2 headings now look the same. The text gets a little smaller—the style you just created applies to all <h2> tags, and they now share the same font size, 20 pixels.
Next, you’ll change the text’s color.
In CSS Designer Selectors, choose h2. Below that, in the Properties section, scroll down until you see the Text group and the color property. Replace the color currently there with #339966.
You changed the color to a lighter and brighter shade of green.
Under font-style, choose Italic.
This italicizes the text and updates the h2 style you created earlier—that’s why the other Heading 2 headlines are now italicized, too.
Select the four paragraphs under the headline Specialties; drag from the start of the first paragraph to the end of the fourth paragraph.
You can also drag up starting from the end of the last paragraph.
In the Properties panel, click the HTML button, and then click the Unordered (bulleted) List button (see Figure 1-28).
The paragraphs turn into a bulleted list of items, called an “unordered list” in HTML-speak. Finally, you’ll highlight the Cafe’s location and hours.
Select the two paragraphs below the Location headline (beginning with “700 SW 5th” and ending with the phone number).
You’ll make the address bold.
Make sure you have the HTML button pressed in the Properties panel, and then click the B button.
Dreamweaver boldfaces the text, but you won’t see any change in CSS Designer. Even though you find the Bold options in two places—the HTML Properties panel and the CSS Font Weight setting (Font→Font Weight→Bold)—they do different things. When you select bold in HTML mode, Dreamweaver inserts the HTML <strong> tag—used to “strongly” emphasize text. But when you choose Font→Font Weight→Bold button in CSS mode, Dreamweaver adds CSS code to the page to make the text look bold. It’s a subtle but important difference—in HTML mode, you change the formatting of just the selected text, but in CSS mode, you’d create a style, and that style could change the formatting of all the text that shares the same tag, the paragraph tag (<p>) in this example. (You’ll read more about this on Creating Styles.) In this case, you want to use the HTML <strong> tag to emphasize the selected text.
Repeat the previous step for the two paragraphs below the Hours headline, and then save the page.
You’ll add a few more design touches to the page, but first you should see how the page looks in a real web browser.
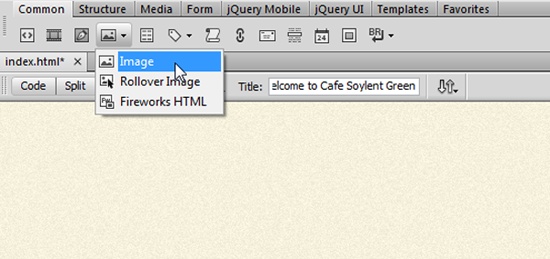
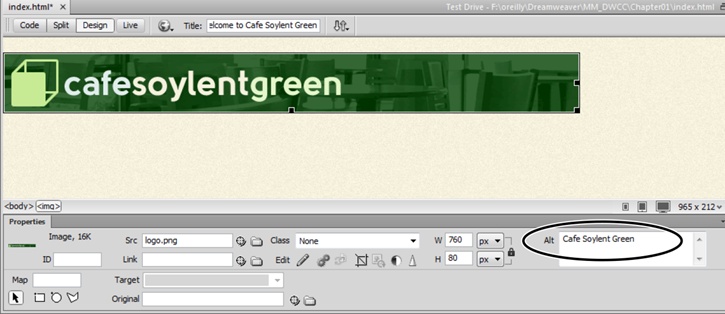
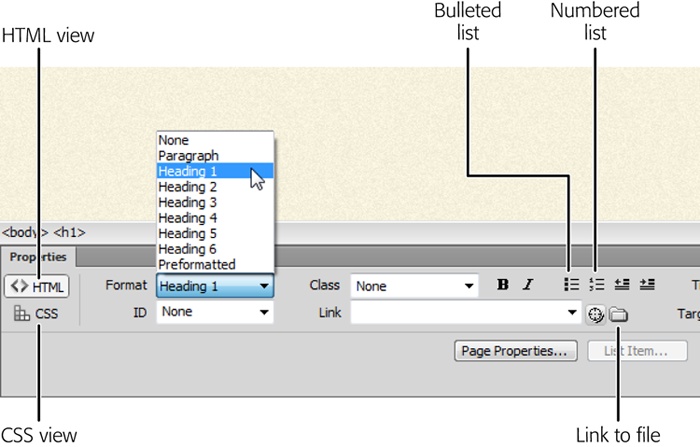
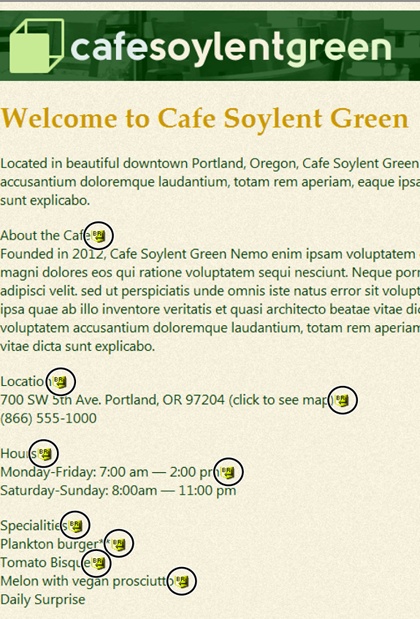
Dreamweaver’s Design view gives you a visual way to add and edit HTML, but its page presentation is frequently a long way off from that of a real web browser. Dreamweaver may display more information than you’d see on the Web, for example, including “invisible” objects, like table borders and those line breaks you removed earlier, or it may display less information (it sometimes has trouble rendering complex designs).
Furthermore, much to the eternal woe of web designers, different browsers display pages differently. Pages you view in Internet Explorer don’t always look the same in other browsers, like Safari, Firefox, or Chrome. In some cases, the differences may be subtle (text may be slightly larger or smaller, for instance). In other cases, the changes are dramatic: Earlier versions of Internet Explorer, for example, can’t display the text or drop shadows discussed on Common CSS3 Properties.
If you’re designing web pages for a company intranet and only have to worry about the one web browser your IT department puts on everyone’s computer, you’re lucky. Most people have to deal with the fact that their sites must withstand scrutiny from a wide range of browsers, so it’s a good idea to preview your pages using whatever browsers you expect your visitors to use. Fortunately, Dreamweaver lets you do that using any browser you have on your computer.
Note
With the increasing popularity of tablets and mobile phones, you can no longer just worry about how your web pages look in desktop browsers; you also have to think about how they look on the small screens of an iPhone, Android phone, or Windows phone. Chapter 12 has information on how Dreamweaver CC can help you make your websites mobile-ready.
One quick way to check a page in a web browser is to use Dreamweaver’s built-in Live view, which lets you preview a page using a browser that’s built into Dreamweaver.
In the Document toolbar, click the Live button (circled in Figure 1-30).
The Live button highlights. The page doesn’t look that different—for a simple page like this it won’t, but Live view is great for previewing more complex CSS and for testing JavaScript interactivity (see JavaScript, jQuery, and jQuery UI).
Figure 1-30. Dreamweaver’s Live view (circled) lets you preview a page in a real web browser, one built into Dreamweaver.
There is one problem with Live view: It uses the page display engine that’s working behind Google’s Chrome browser. Chrome isn’t the only browser out there, of course, so you want to test your page designs in other browsers, too. Fortunately, Dreamweaver makes it easy to jump straight to any browser installed on your computer.
Click the Live button again to exit Live view.
This is an important and easily overlooked step. When you’re in Live view, you can’t edit a page in Design view. Since a page in Live view can look very much like it does in Design view, it’s easy to try to work on the page while you’re in Live view and say “Hey, what’s going on? Dreamweaver isn’t working any more!” So always remember to exit Live view when it’s time to work on your pages.
To preview your page in a web browser, you need to make sure Dreamweaver knows which browsers you have installed and where they are.
Tip
While you can’t edit a page in Design view while Live view is on, you can edit the HTML code in Code view. One common technique among HTML jockeys is to display Split view, and then turn on Live view. This opens the HTML code on the left and a live browser display on the right. They then merrily edit the HTML and view the changes in Live view. However, to see the effect of any changes you make in Code view, you need to click into the Live view area or press F5 to refresh the page.
Choose File→Preview in Browser→Edit Browser List.
The “Preview in Browser” preferences window opens (see Figure 1-31). When you install Dreamweaver, it detects the browsers on your computer; a list of them appears in this window. If you installed a browser after you installed Dreamweaver, it doesn’t appear here, and you need to follow steps 4 and 5 next; otherwise, skip to step 6.
The Add Browser or Select Browser window opens.
Click the Browse button. Search your hard drive to find the browser you want to add to the list.
Dreamweaver inserts the browser’s default name in the Name field. To change it, select it, and then type in a new name. (But don’t do this before you select the browser, since Dreamweaver erases anything you typed as soon as you select a browser.)
In the window’s Browser list, select the browser you most commonly use. Turn on the Primary Browser checkbox, and then click OK.
You just designated this browser as your primary one. You can now preview your pages in this browser with a simple keyboard shortcut: F12 (Option-F12 on Macs—unfortunately, Apple assigned the F12 key to the Mac’s Dashboard program, so it takes two keys to preview a web page—Option and F12 together; you can change this by creating your own keyboard shortcut, as described on Keyboard Shortcuts). If you use a Macintosh laptop, you may have to press Option-F12 and the function [fn] key in the lower-left corner of the keyboard.
Figure 1-31. Dreamweaver can launch a web browser and load a page so you can preview your design-in-progress. One option—“Preview using temporary file”—comes in handy when you work with an external CSS style sheet, as described on page 150.
If you like, you can choose a secondary browser, which you launch by pressing Ctrl+F12 (⌘-F12).
Now you’re ready to preview your document in your favorite browser.
Press F12 (Option-F12) or choose File→Preview in Browser and then, from the menu, select a browser.
The F12 key (Option-F12) is the most important keyboard shortcut you’ll learn; it opens a web page in your primary browser so you can preview your work.
You can also use the “Preview in Browser” menu (the globe icon) in the document window to preview a page (see Figure 1-32).
When you finish previewing the page, go back to Dreamweaver.
Do so using your favorite way to switch programs on your computer—the taskbar in Windows or the Dock in Mac OS X.
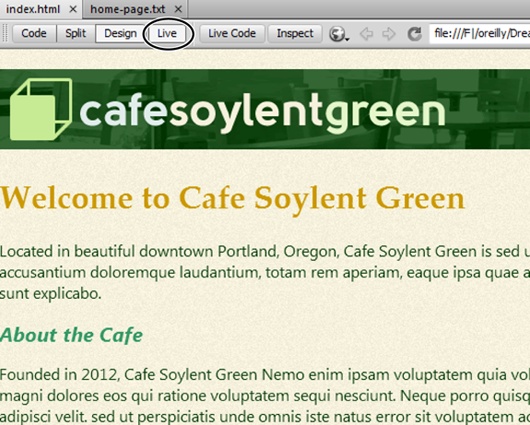
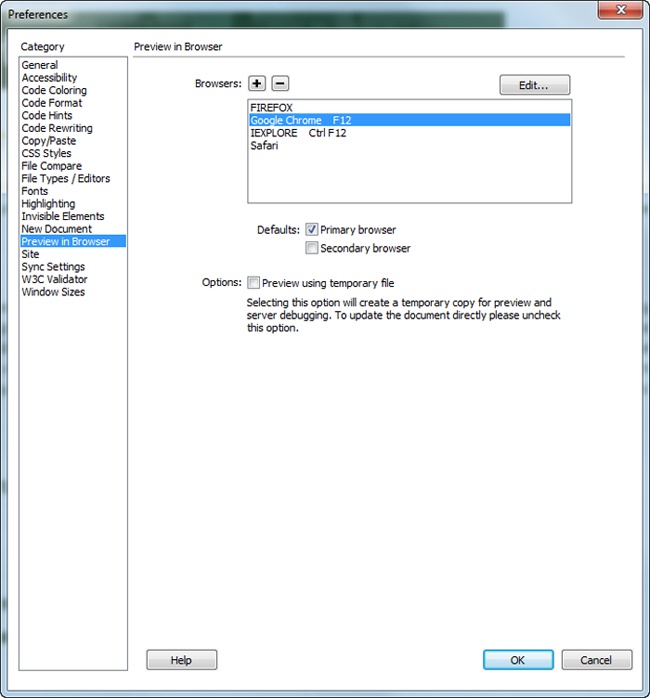
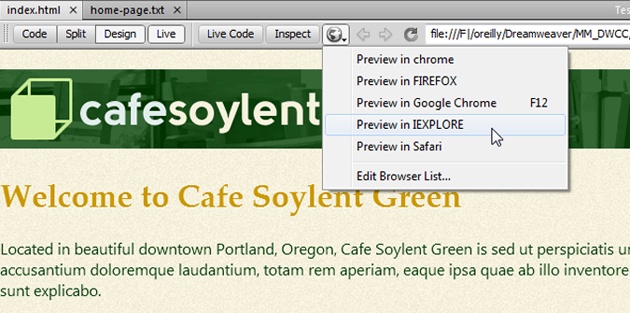
You’ve covered most of the steps you need to finish this web page. Now you just need to add a graphic, format the copyright notice, and provide a little more structure to the page.
Scroll to the bottom of the page and select all the text in the copyright notice.
You can either triple-click inside the paragraph or drag from beginning to end.
Click the CSS button in the Properties panel and make sure the Targeted Rule menu displays <New Inline Style>. Then, from the Size menu, choose 12.
You’ve created a new CSS style within a paragraph <p> tag. You can see the result in the CSS Designer’s Selectors section. This time you want to create a reusable style that applies only to specific paragraphs of text—not every paragraph. So, you need to use what’s called a class style.
With your cursor still in the copyright text, right-click (Control-click) and then choose CSS Styles→Convert Inline CSS to Rule.
Leave the “Convert to” menu set to “A new CSS class.” In the text box to the right, type the word copyright. Click the “The head of this document” button and then click OK.
While you won’t see a change in the document’s design, you’ve successfully created a new CSS class that you can apply to any paragraph you want. Notice in the Properties panel’s CSS view that the Targeted rule now displays .copyright. Don’t overlook the period (.) that precedes the word, as that’s how browsers identify the CSS style as a class. Look in the CSS Designer’s Selectors (Figure 1-33) and you see .copyright listed there, too. Scroll through the Properties for the .copyright selector and you see that it has the font-size property set to 12 px (pixels).
Another way to separate the copyright notice from the page’s main content is to add a simple line above it. CSS lets you do that in the CSS Designer with a property called Border.
Figure 1-33. To view or edit a CSS class, position your cursor within some text that has that class applied to it. Then, in the CSS Designer’s Selectors section, click the class name to highlight it (.copyright here). In the Properties section below, you can view the defined properties. Grayed-out properties are undefined. Here the font-size property is set to 12 px (pixels).
In CSS Designer’s Sources section, click <style>.
Dreamweaver displays all the CSS selectors defined in the document’s head in the Selectors section.
In Selectors, click the .copyright class.
You may need to scroll through the list to find it.
In the Properties section of the CSS Designer, click the Border button (Figure 1-34) to scroll down to the Border group. Then, choose solid from the border-top-style menu.
The CSS Designer panel is the command center for working with style sheets (see Figure 1-34). It lists all the styles available to the current web page and lets you edit them. You can even use CSS Designer to add new styles, as you’ll learn on Creating Styles.
Note
It takes three properties to define a border: border-style, border-width, and border-color. To add to this smorgasbord, you can place your border left, right, top, bottom, or on all sides of the selected text (see Figure 1-35).
In Border properties, set border-top-width to 1px and border-top-color to #CC9900.
With all three properties defined (border-top-style, border-top-width, and border-top-color), your copyright notice has a handsome line to separate it from the rest of the page. Borderlines touch the content of the element they surround—in other words, this top line sits very close to the copyright text. It’ll look better if there’s a bit of space between it and the copyright notice.
In the CSS Designer’s Properties section, click the Layout icon to scroll to Layout properties (Figure 1-36). Then, find the Padding properties.
Padding is the space that appears between an element’s content (like the text in a paragraph or the graphic in the image tag) and its border. Dreamweaver displays its padding properties using a rectangle to represent content. As you make changes to the border properties, you see the results in the document window.
Replace the 0 at the top of the box with 5, as shown in Figure 1-36.
Initially, the border setting is grayed out because the property hasn’t been defined. After you enter a number, you see the change in the document window—there’s more distance between the copyright text and the border. Next, you’ll link to a map that shows the location of the cafe.
Figure 1-34. You’ll often work in the CSS Designer panel from the top down, selecting from the sections Sources, Selectors, and Properties. Here, you’ve selected the <style> in the Sources section and the .copyright class in the Selectors section, and you’re in the process of setting the border-style property.
Figure 1-35. The CSS Border settings let you add a border around any (or all) of the four edges of any page element. In this case, you’re adding a line just above the copyright notice. If, on the other hand, you were formatting a “What’s new” sidebar, you might add a border around all four edges to make it stand out.
In the middle of the page, select the parenthetical text “click to see map.”
To create a link, you just need to tell Dreamweaver which page you want to link to. You can do this several ways. Using the Properties panel is the easiest.
In the Properties panel, click the HTML button, and then click the folder icon that appears to the right of the Link field.
The Select File dialog box appears.
Click the Site Root button and double-click the file map.html.
The Site Root button jumps you right to the folder containing your site. It’s a convenient way to move quickly to your root folder. Double-clicking the file name tells Dreamweaver to insert the HTML needed to create a link along with the link’s address.
If you save the page and then preview it in a web browser, click the link you just added. The browser jumps to another page (one already created for you). You’ll notice that there’s text near the bottom of the map that reads “back to home page.” Since you just learned the powerful link-adding skill, open map.html and add a link to that page. Select the text “back to home page” and link to the index.html file by following steps 11 and 12, and then save the map.html file. We’ll wait for you….
You may have noticed that the map page’s content is contained in a box that’s nicely centered in the middle of the screen. That would look great on your home page. You’ll create a new layout element to achieve this effect.
Return to the index.html file; click anywhere inside the page, and then choose Edit→Select All or press Ctrl+A (⌘-A).
You selected all the contents on the page. You’ll wrap all the text and images in a <div> tag to create a kind of container for the page contents.
Choose Insert→Div.
The Insert Div window opens (see Figure 1-37). A <div> tag simply provides a way to organize content on a page by grouping HTML—think of it as a box containing other HTML tags. For example, to create a sidebar that includes navigation links, news headlines, and Google ads, you’d wrap them all in a <div> tag. It’s a very important tag for CSS-based layouts. You’ll read more about it on The Mighty <div> Tag.
Figure 1-37. The Insert Div window provides an easy way to divide sections of a web page into groups of related HTML—like the elements that make up a page banner, for example (logo, navigation bar, and so on). You’ll learn all the functions of this window on page 430.
Next, you need to create a style that provides the instructions that format this new <div> tag. You’ve already used the Properties panel to create a style, but that works only for text. To format other tags, you need to create a style in another way.
Click the New CSS Rule button at the bottom of the Insert Div window.
The New CSS Rule window appears (a CSS style is technically called a “rule”). This window lets you specify the type of style you create, the style’s name, and where Dreamweaver should store the style. You’ll learn the ins and outs of this window in Chapter 3.
From the top menu, choose “Class (can apply to any HTML element),” and then type .container in the “Choose or enter a name for your selector” field. Don’t forget to include the period, and make sure you have “This document only” selected in the bottom menu. Click OK.
The “CSS Rule definition” window appears. (There’s a lot going on in this box, but don’t worry about the details at this point. You’ll learn everything there is to know about creating styles later in this book. This part of the tutorial is intended to give you a taste for some of a web designer’s daily page-building duties. So relax and follow along.) First, you’ll add a border around the edges.
From the left-hand list of categories, select Border. Leave the three “Same for all” checkboxes turned on, and choose “solid” for the style, type in 1 for the width, and then type #336633 for the color.
This action adds a green border around the edges of the content. Next, you’ll give the <div> tag a set width and center it on the page.
Click the Box category, and then, in the width field, type 760.
This makes the box 760 pixels wide—the same width as the banner. To make sure the text doesn’t butt right up against the edge of the box, you’ll add a little padding around the inside of this style.
Make sure the “Same for all” checkbox is turned on, and then type 10 in the Top field under Padding.
This adds 10 pixels of space inside the box, essentially pushing the text and the graphics away from the edges of it.
Under the Margin settings, turn off the “Same for all” checkbox, and then, for both the right and left margin menus, select auto.
The window should now look like Figure 1-38. Selecting “auto” for the left and right margins is your way of telling a browser to automatically supply values for those margins—in this case, as you’ll see in a moment, it has the effect of centering the <div> element in the middle of a browser window.
Click OK to complete the style.
The Insert Tag window reappears, and the name of the style you just created—“container”—appears in a field labeled Class.
In the Insert Div window, click OK.
This inserts the new <div> tag and at the same time applies the style you just created. Now it’s time to take a look at your handiwork.
Choose File→Save All, and then press F12 (Option-F12) to preview your work in your browser (Figure 1-39).
The Save All command saves the changes you made to both index.html and map.html. Test the link to make sure it works. Resize your browser and watch how the content centers itself in the middle of the window.
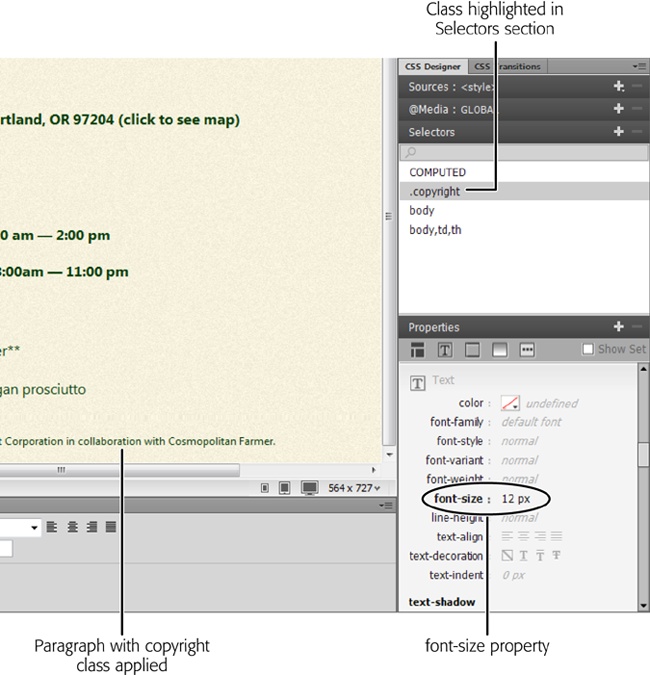
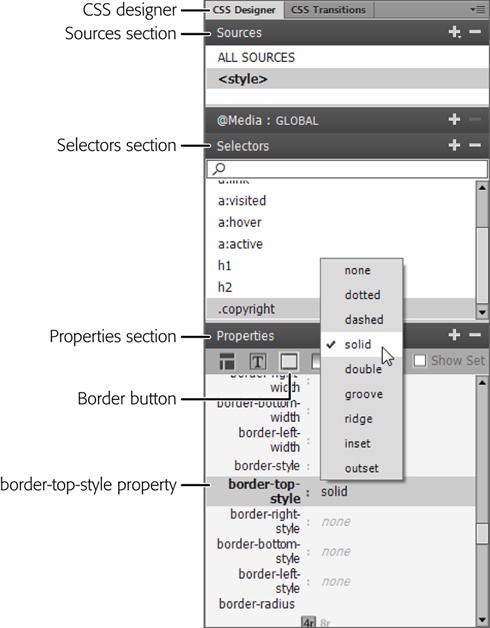
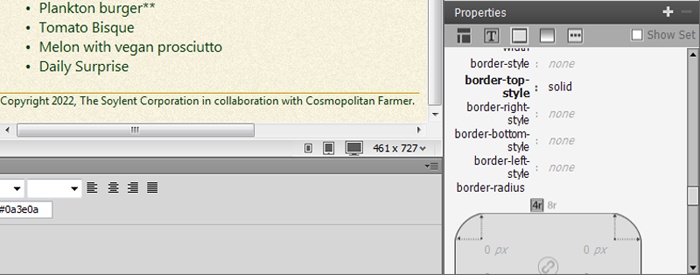
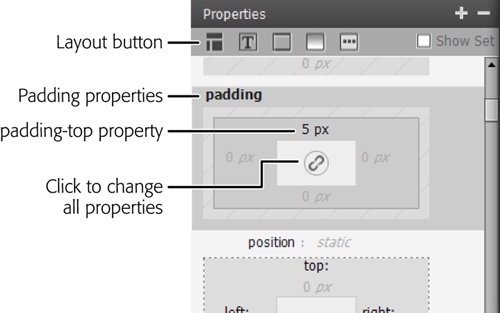
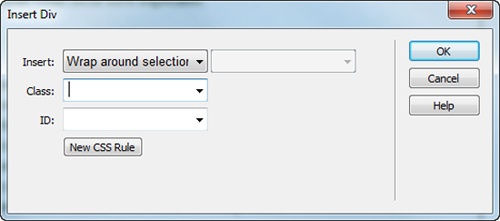
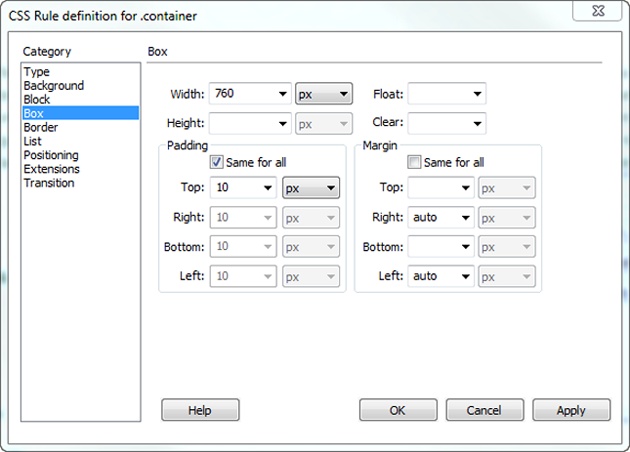
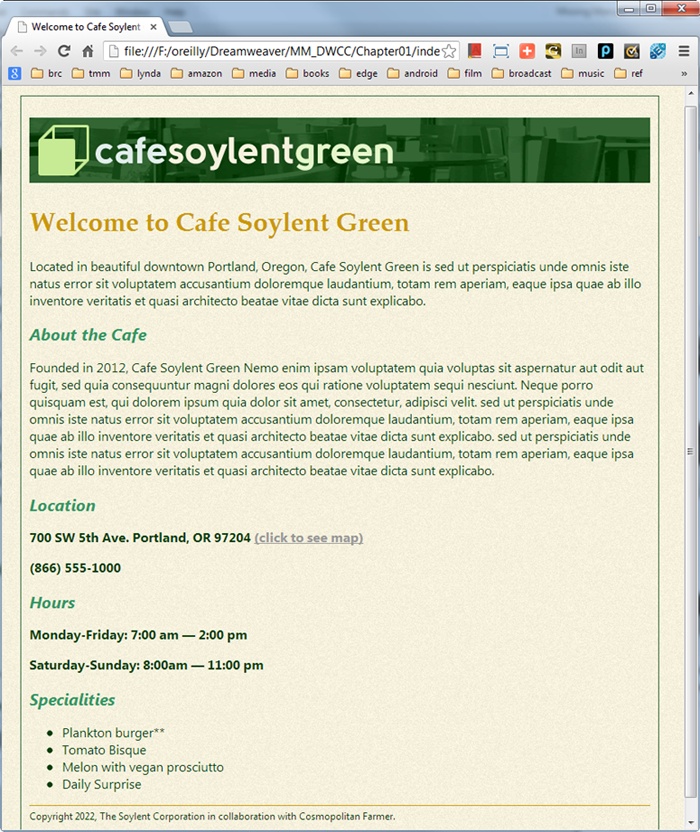
There’s one last housekeeping chore to attend to. If you look at the Files panel, you’ll notice that there are two web pages, three graphics (.png files), and a text file. Most web designers like to organize graphics files into folders to keep them in one place. You could create a folder in Windows Explorer or the Mac Finder, but why bother when you can do it directly in Dreamweaver?
In the Files panel, right-click (Control-click) the Site folder listed under “Local view” (circled in Figure 1-40). From the drop-down menu, choose New Folder.
Dreamweaver adds a new “untitled” folder to the files list and highlights the name, ready for editing.
Figure 1-40. Dreamweaver’s Files panel is more than just a way to see all the files in your site. You can use it to open a file (double-click the file name), rename a file (click the file name, pause, and then click the file name again), add folders (right-click on a file or folder and choose New Folder), and move files around (drag a file into a folder, for example).
Type images to name the folder, and then press Enter (Return).
The folder might still read “untitled” if you click elsewhere in the program before you edit the name; doing so deselects the folder. If that happens, simply click “untitled” to select the folder, pause a moment, and then click “untitled” again to highlight the name so you can change it.
Now you just need to get your images into this new folder.
Ctrl-click (⌘-click) the three image files (bg_page.png, logo.png, and map.png) to select them, and then drag them into the images folder.
The Update Files window appears, letting you know that by moving these files, you’ll affect the index.html and map.html files. That’s because those pages use these images. Normally, moving a web file that another page uses breaks the link between the files. Fortunately, Dreamweaver’s smart enough to update the links so they still work.
Click Update.
Dreamweaver quickly updates the web pages so that they now reference the new location for the three images.
Choose File→Save All to save all the changes you just made.
The Save All command is an invaluable tool. It saves any changes you’ve made to all open files.
Congratulations! You just built your first web page in Dreamweaver, complete with graphics, formatted text, and links. You’ve even used one of Dreamweaver’s site-management features to create a new folder and organize your site’s files without breaking them! If you want to compare your work with the finished product, go to Chapter01_complete in the Tutorials folder and load the file index.html.
Much of the work of building websites involves the procedures covered in this tutorial—defining a site, adding links, formatting text, placing graphics, creating styles, and inserting <div> tags. The next few chapters cover these basics in greater depth and introduce other important tools, tips, and techniques for using Dreamweaver to build great web pages.
Tip
To get a full description of every Dreamweaver menu, see Appendix B.
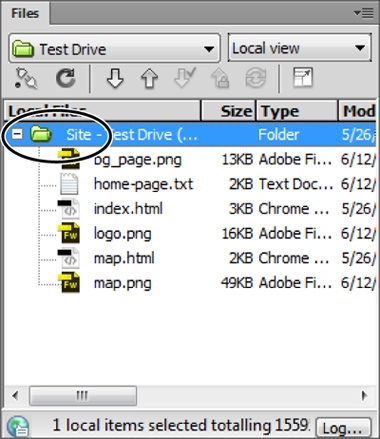
Get Dreamweaver CC: The Missing Manual now with the O’Reilly learning platform.
O’Reilly members experience books, live events, courses curated by job role, and more from O’Reilly and nearly 200 top publishers.

