The humble hyperlink may not raise eyebrows anymore, but the notion that you can navigate a whole sea of information, jumping from one island of content to another with a simple mouse click, is a powerful phenomenon. Interested in a particular band? Go to Google, type in the band’s name, click to go to its website, click to see its upcoming gigs, click to go to the venue’s website, and then click to buy tickets.
Although embedding links is a basic task in building web pages, and even though Dreamweaver—for the most part—shields you from the complexities of doing so, links can be tricky to understand. The first section of this chapter gives you an overview of links and explains the technical distinctions between different types of links. The rest of the chapter, with sections on formatting the appearance of your links and creating navigation menus, will help turn you into a link-crafting maestro.
Note
If you already understand links or you’re eager to start using them, jump to the tutorial on Link Tutorial.
Links are snippets of code that give web browsers directions to get from one web page to another. What makes links powerful is that the distance covered by those directions doesn’t matter. A link can lead to another page on the same site just as easily as it can lead to a page on a web server halfway around the globe. Behind the scenes, a simple HTML tag called the anchor tag (<a>) makes each and every link work. Links come in three flavors: absolute, document-relative, and root-relative. Link from the Home Page to the Contact us Page (contact.html) shows you examples of each.
When people want to mail you a letter, they ask for your address. Suppose it’s 123 Main St., Smithville, NY 12001, USA. No matter where in the country your friends are, if they write 123 Main St., Smithville, NY 12001, USA on an envelope and mail it, their letters will get to you. That’s because your address is unique.
Similarly, every web page has a unique address, called a URL (most people pronounce it “you-are-el”), or Uniform Resource Locator. If you open a web browser and type http://www.cafesoylentgreen.com/events/index.html into the address bar, the browser opens the events page for Cafe Soylent Green.
This URL is an absolute link—it’s the complete, unique address for a single web page. Absolute links always begin with http://, and an absolute link leads to the same destination page, no matter what page you put that link on—an absolute link in a web page can call up another page within the same site or a page on another site entirely. You’ll use absolute links any time you link to a web page outside of your own site—that’s the only way a web browser can go from a page on your site to a page outside of your site. However, when you want to call up a page within your site, there’s another way to write a link, described next.
The bottom line: Use absolute links when you want to link to a page on another website.
Suppose you, the resident of 123 Main Street, drop in on a couple who just moved into a house directly across the street. After letting them know about all the great restaurants nearby, you tell them about a party you’re having at your place.
When they ask you where you live, you could say, “I live at 123 Main St., Smithville, NY 12001, USA,” but your neighbors would probably think you needed psychiatric help. Instead, you’d say something like, “Just walk across the street, and there you are.” Of course, you can’t use these instructions as your mailing address, nor would they make sense, for a neighbor who lived seven houses down. Those directions only help the neighbors directly across the street get from their house to yours.
To link from one web page to another in the same website, you use a similar shorthand, called a document-relative link. In essence, a document-relative link—like the directions you gave your neighbor—tells a browser where to find a page relative to your current location, in this case, relative to the current web page. If two pages are in the same folder, for instance, the path is as simple as the code version of “Go to that page over there”—in its entirety, the link is no more than the target filename, index.html, for example. You can leave off all that http://www.your_site.com/ business, because you’re already on that site and within that directory.
Document-relative links can be finicky, however, because they’re completely dependent on the location of the page containing the link. If you move that page to another part of your site—filing it in a different folder, for example—the link won’t work. It’s as though your neighbors moved across town—they can’t walk across the street to get to your house any longer. This vulnerability makes web designers reluctant to use document-relative links, even though they’re ideal for linking from one page to another in the same site.
Fortunately, Dreamweaver makes working with document-relative links so easy you may forget what all the fuss is about. In Dreamweaver, whenever you save a page that has a document-relative link on it to a folder different from the page’s original folder—a maneuver that would normally shatter all the links on a page—Dreamweaver quietly rewrites the links before it saves the file so that the links still work. Even better, using the program’s site-management tools, you can cavalierly reorganize your site with impunity, moving files and folders without harming the delicate connections between your site’s files. (You’ll learn about Dreamweaver’s site-management features in Part 4 of this book.)
Root-relative links, also called site root-relative links, tell browsers how to get from one page to another within the same site, just as document-relative links do. But in this case, the link describes the path relative to the site’s root folder—the folder that contains the home page and all your other site pages, folders, and files. (For a detailed description of the root folder and the structure of a website, see Chapter 16.)
Here’s how a root-relative link works. Imagine you work in a big office building. You need to get to a coworker’s office in the same building, so you call her for directions. She may not know the precise directions from your office to hers, but she can tell you how to get from the building’s entrance to her office. Since you both know where the building’s front door is, these directions work well. In fact, she can give everyone in the building the same directions and they’ll be able to find her office, too (they all know where the entrance is). Think of the office building as your site, and its front door as the root of your site. Root-relative links always begin with a slash (/). This slash is a stand-in character for the root folder—the front door—of your site. The same root-relative link always leads to the same page, no matter where the link is on your website.
If you use Dreamweaver for all your web page development, you probably won’t need root-relative links. Using document relative links, Dreamweaver does a great job of mapping the connections to all the pages and files on your site, with very little effort on your end. Still, on rare occasions, you may find it necessary to create root-relative links. For example, suppose your boss asks you to create a new page for an existing site. Your client gives you text, some graphics, and a list of the other pages on the site that this page needs to link to. The problem is, your client doesn’t know where on the site the new page needs to go, and his webmaster won’t return your calls.
Fortunately, you can use root-relative links to solve this dilemma. Since root-relative links work no matter where the page is on your site, you could complete the page and let the client put it wherever in her site, and the links will still work.
There’s one major drawback to root-relative links: They don’t work when you test them on your own computer. If you view a web page sitting on your computer’s hard drive, clicking a root-relative link in your browser either doesn’t work at all or produces only a “File not found” error. Root-relative links work only when their pages reside on a web server. That’s because the technology behind web servers understands root-relative links, but your personal computer doesn’t.
One solution to the root-relative links problem is to install a web server on your computer and put your site files inside it (see Dynamic Websites: The Setup). That’s the approach you’ll take when you build dynamic sites, discussed in Chapter 22.
Note
There’s one exception to the “root-relative links don’t preview correctly” dilemma. Dreamweaver lets you preview a web page two ways: with a temporary file or without one. The temporary-file option has a couple of advantages: You can preview a page without having to save it first, and you can preview on your local computer any root-relative links on the page.
To turn this feature on, go to Edit→Preferences (Dreamweaver→Preferences), click the “Preview in Browser” category, and then turn on the Preview Using Temporary File checkbox. Behind the scenes, Dreamweaver rewrites root-relative links as document-relative links whenever it creates a temporary file. If you see files in your site with weird names like TMP2zlc3mvs10.htm, those are the temporary files Dreamweaver creates. Feel free to delete them.
Unless you have a specific reason to use root-relative links (like your IT department tells you to), avoid their pitfalls by sticking to document-relative links for your pages. But keep this discussion in mind. (Later in the book, you’ll see that, behind the scenes, Dreamweaver’s site management features use root-relative paths to track your site’s files.)
Note
You can run into trouble with root-relative links if the site you’re working on is located in a folder inside a web server’s root folder. For example, say your buddy gives you space on his web server. He says you can put your site in a folder called my_friend, so your URL is http://www.my_buddy.com/my_friend/. In this case, your web pages don’t sit at the root of the site—they’re in a folder inside the root. So a root-relative link to your home page would be /my_friend/index.html. Dreamweaver can handle a situation like this, but only if you provide the correct URL for your site—http://www.my_buddy.com/my_friend/—when you set it up (see Figure 4-1).
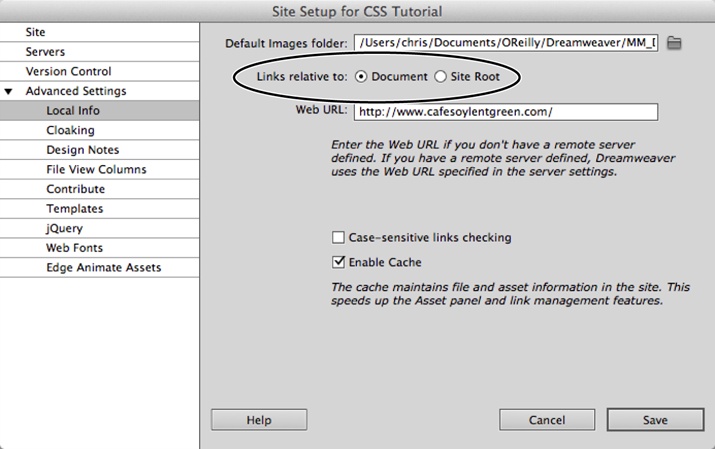
Figure 4-1. When you set up a new site, Dreamweaver asks you for the site’s URL. Even if that address leads to a subfolder within your root folder, it’s easy to figure out—it’s the site’s actual address on the Internet. Expand the list of Advanced Settings options on the left of the Site Setup window, click the Local Info category, and then type the full web address of your site in the Web URL box. You can also tell Dreamweaver which type of link—document-relative or root-relative—it should use when it points to another page on your site (circled). You can always return to this window to change this option. Choose Site→Manage Sites, select your site, and then click Edit.
Figure 4-2 shows a website as it appears on a hard drive: folders filled with HTML documents and graphics. Here’s a closer look at some links you might find on those pages and how they might work.
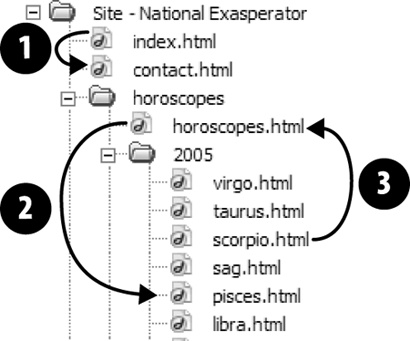
Figure 4-2. Here are a few examples of links for a fictitious website located at http://www.nationalexasperator.com. The three arrows show the original page (where each arrow starts) and the page it links to (where each arrow ends).
Most websites use the filename index.html or index.htm for the home page. You can link from this page to the contact.html page—identified by the number 1 in Figure 4-2—using any of the three link types and these addresses:
Absolute link address: http://www.nationalexasperator.com/contact.html. What it means: Go to the website at http://www.nationalexasperator.com and download the page contact.html.
Document-relative link address: contact.html. What it means: Look in the folder the current page is in and download contact.html.
Root-relative link address: /contact.html. What it means: Go to the top-level folder of the current site and then download contact.html.
Tip
If you can write an absolute URL, you can easily write a root-relative URL. Simply strip off the http:// and the web server name. In the example above, erasing the http://www.nationalexasperator.com in the absolute address leaves /contact.html—the root-relative path.
Now imagine you built a web page that you want to link to a page in a subfolder of your site. Here’s how you’d use each of the three link types to do that (in this example, the subfolder’s called “2005”), as identified by the number 2 in Figure 4-2:
Absolute link address: http://www.nationalexasperator.com/horoscopes/2005/pisces.html. What it means: Go to the website http://www.nationalexasperator.com, look in the Horoscopes folder, then look in the folder 2005, and then download the page pisces.html.
Document-relative link address: 2005/pisces.html. What it means: From the current page, look in the folder 2005 and then download the page pisces.html.
Root-relative link address: /horoscopes/2005/pisces.html. What it means: Go to the top-level folder of this site, go to the Horoscopes folder, look in the folder 2005, and then download the page pisces.html.
Now suppose you built a web page and stored it in a deeply nested folder, and you want to link it to a document outside of that folder, like link 3 in Figure 4-2:
Absolute link address: http://www.nationalexasperator.com/horoscopes/horoscopes.html. What it means: Go to the website at http://www.nationalexasperator.com, look in the Horoscopes folder, and then download the page horoscopes.html.
Document-relative link address: ../horoscopes.html. What it means: Go up one level—outside of the current folder—and download the page horoscopes.html. In website addresses, a slash (/) represents a folder or directory. The two dots (..) mean, “Go up one level,” into the folder that contains the current folder. So to link to a page that’s up two levels—for example, to link from scorpio.html to the home page (index.html)—you would use ../ twice, like this: ../../index.html.
Root-relative link address: /horoscopes/horoscopes.html. What it means: Go to the top-level folder of this site, look in the folder Horoscopes, and then download the page horoscopes.html.
In short, use absolute URLs to link to pages outside your site folder, use document-relative links to link to pages within your site, and, unless you know what you’re doing (or your IT department tells you to), avoid using root-relative links altogether.
If all this talk of links gets you confused, don’t worry. Links are confusing, making them one of the best reasons to use Dreamweaver. If you can navigate to a document on your own computer or anywhere on the Web, you can create a link to it in Dreamweaver.
To create a link from one page to another on your local website, use the Properties panel’s “Browse for File” button (see Figure 4-3) or its keyboard shortcut Ctrl+L (⌘-L).
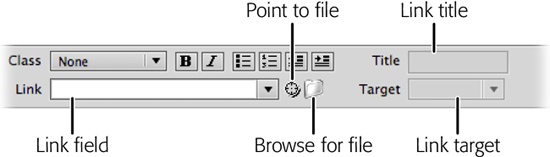
Figure 4-3. The Properties panel gives you three ways to add links to a web page: by specifying the URL in the Link field, or by finding and selecting the file using either the “Point to file” tool (the bull’s-eye icon) or the “Browse for file” button (the folder icon).
To browse for a file in Dreamweaver, you use the same type of dialog box that you use to open or save a file, making “Browse for File” the easiest way to add a link. (To link to a page on another website, you need to type the web address into the Properties panel. Turn to Typing (or Pasting) a URL or Path for instructions.)
In the document window, select the text or image you want to make a link.
For text links, you can select a single word, a sentence, or an entire paragraph. When you add a link to text, the selected words appear blue and underlined (depending on your visitors’ web browser settings), like billions of links before them.
You can turn a picture into a link, too—a great way to add attractive graphics-based navigation buttons. Your visitors will see the “pointing finger” icon when they mouse over the picture.
Note
When you add a link to an image, Internet Explorer 8 and earlier draws a blue border around the image, just like linked text has a blue underline. Fortunately, with some simple CSS, you can get rid of that blue outline by creating a CSS style for the <img> tag (see Creating Styles if you’re unsure about creating styles). Under the Border category of the CSS Rule Definition window, set the border style to “none” (see Adding Borders for more information on CSS borders).
In the Properties panel, click the folder icon (a.k.a. the “Browse for File” button), or choose Modify→Make Link, or press Ctrl+L (⌘-L).
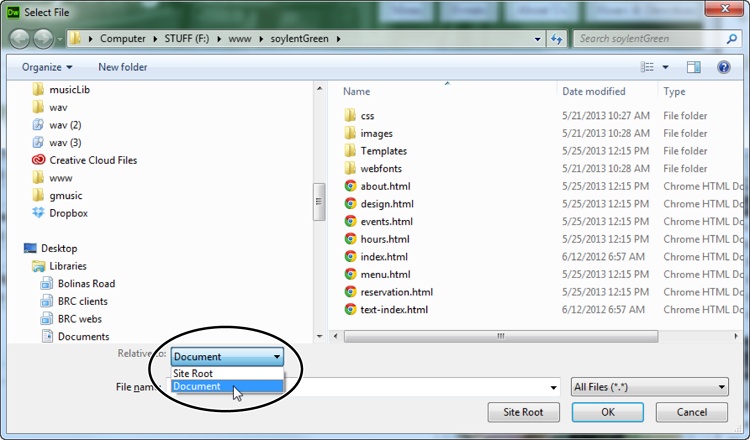
Whichever command you use, the Select File dialog box opens (see Figure 4-4 for Windows, Figure 4-5 for Macs).
Navigate to and select the target file; that is, the file you want the link to open.
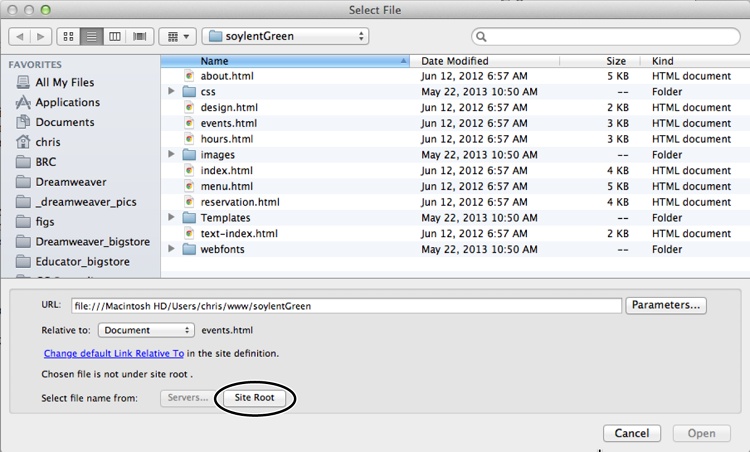
When you use the Browse for File technique, you can only specify a file that’s part of your website—you can’t “browse” to an external web page via the Browse for File dialog box, in other words—the file needs to reside in your local root folder (see the box on Terms Worth Knowing) or in a folder therein. Why? Remember that, to a website, the root folder is like the edges of the known universe—nothing exists outside of it. If you try to link to a file outside the root folder—like to a file on your desktop—Dreamweaver tells you it’s a problem and offers to copy the file to your root folder for you. Accept the offer.
Note
You can double-click the name of a file in the Select File dialog box and Dreamweaver selects the file and closes the Select File dialog box in one step.
Figure 4-4. In Windows, use the Select File dialog box to identify a link’s target file. When you initially set up a site, you can tell Dreamweaver whether to use document- or root-relative links. Later, if you find the need to temporarily switch to a different type of link (to a root-relative link if you set up your site to use document-relative links, for example), use the “Relative to” drop-down menu (circled).
Figure 4-5. Every file in a website has to be somewhere inside a local root folder (see the box on page 25). This master folder holds all your site’s files, including subfolders that hold yet other files. Because the site root is so central to site management, Dreamweaver includes a Site Root button (circled) in every window that requires selecting or saving a file. (This example shows a Mac window; on Windows PCs, the button’s near the lower-right corner, as shown in Figure 4-4.) Click this button to jump straight to your site’s root folder so you know exactly where you are on your hard drive, making it easy to navigate to the file you need.
Make sure you select the correct type of link—document- or root-relative—from the “Relative to” drop-down menu.
As noted earlier, document-relative links are usually your best choice. Root-relative links don’t work when you preview your site on your own computer. (They do, however, work once you move the pages to your web server.)
Note
You can skip step 4; just set the type of link you want in the Site Setup window, and then forget about it. Dreamweaver always uses the link type you specify there. See Figure 4-1 for details.
Click OK (Windows) or Choose (Mac) to apply the link.
The text or image you made a link in step 3 now links to another web page. If you haven’t yet saved the other web page in your site, Dreamweaver doesn’t know how to write the document-relative link. Instead, it displays a dialog box saying that it will assign a temporary path for the link until you save the page—see the box above.
After you apply a link, the link text appears underlined and colored in Design view (using the color defined by the Page Properties window, shown in Figure 1-22). Press F12 (Option-F12 on Macs) to preview the page in your browser, where you can click the link.
You can also create links by dragging an icon from the Properties panel to the Files panel (see Figure 4-6). If your site involves a lot of links, learning to use the Point-to-File tool will save you time and energy.
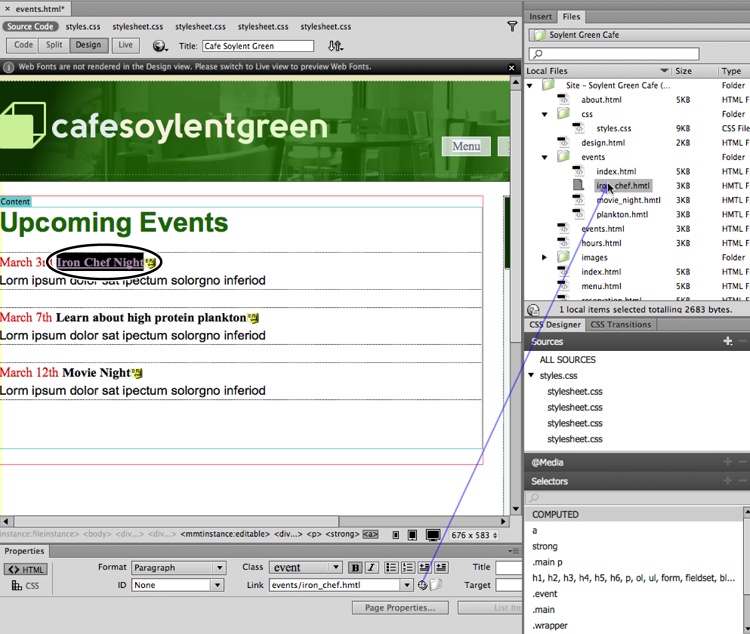
Figure 4-6. In the document window, select the text you want to turn into a link (circled). To link to another page, drag the Point-to-File icon (the bull’s-eye icon in the Properties panel) to a web page in the Files panel (right). In this example, Dreamweaver creates a link to the web page iron_chef.html. You could create the same link by Shift-dragging from the selected text to the directions.html page in the Files panel.
To use this trick effectively, position your document window and Files panel side by side.
In the document window, select the text or image you want to turn into a link.
Make sure you have both the Properties panel and Files panel open. To open the Properties panel, choose Window→Properties. To open the Files window, choose Window→Files. (Before using the Files window, you need to create a local site, as described on Setting Up a Site.)
Drag the Point-to-File icon from the Properties panel onto a web page in the Files window.
Or Shift-drag the selected text or image in the document window to any web page in the Files panel, bypassing the Properties panel altogether (this method only works in Design view, however).
Tip
You can also drag a file from the Files panel into the Link box in the Properties panel to link to it. If you haven’t selected any text, when you drag a file from the Files panel, Dreamweaver automatically adds its name as text. For example, if you drag “mysong.mp3” from the Files panel, that filename appears on the page.
With your mouse hovering over the right web page, release the mouse button.
The selected text or image in your web page now links to the file you just pointed to.
Note
Bizarre Bug Alert: If you use two monitors as you build web pages, the Point-to-File icon might not work. If your main monitor (the one with the Start menu for Windows, or the one where a program’s menu bar appears on Macs) is on the right, and the second monitor is on the left, the Point-to-File icon may not work. Then again, it might! Strange, but truly infuriating.
If you need to link to another website, or you feel comfortable working with document-relative links, you can simply type the URL to the target page into the Properties panel. Note that this technique and the hyperlink object tool discussed next are the only ways to add links to pages outside your website.
In the document window, select the text or image you want to make a link.
In the Properties panel’s Link field (Figure 4-3), type the URL (the path) to the file.
If the link leads to another website, type an absolute URL—that is, a complete web address, starting with http://.
Tip
An easier approach is to copy a complete URL—including the http:// part—from the address bar in your browser window and paste it into the Link field.
To link to a page on your own site, type a document-relative link (see Link from the Home Page to the Contact us Page (contact.html) for some examples). Letting Dreamweaver write the correct path using the point-to-file or browsing technique described above is a good way to avoid typos. But typing the path name can come in handy when, say, you want to create a link to a page you haven’t yet created, but know its eventual URL.
Press Enter (Return) to apply the link.
While you don’t necessarily have to hit Enter (Return)—sometimes you can just click elsewhere on the page and keep working—Dreamweaver has been known to forget the link and not apply it. This is true for most fields in the Properties panel. So if you type information directly into the Properties panel (to create a link, add a title, and so on), get into the habit of hitting the Enter (Return) key to make sure your change sticks.
Note
If you add an absolute link to a website without specifying a web page, add a final forward slash (/) to the end of the address. For example, to link to Yahoo, type http://www.yahoo.com/. The final slash tells the web server that you’re requesting the default page (the home page) at Yahoo.com.
Although leaving out the slash works, too (http://www.yahoo.com), the server has to do a little extra work to figure out which page to send back, resulting in a slight and unnecessary delay.
Also include the final slash when you link to the default page inside a folder on a site, like this: http://oreilly.com/missingmanuals/. That saves the browser from first requesting a file named missingmanuals, and then requesting the default page inside the folder “missingmanuals.”
Dreamweaver gives you yet another way to add a link. The Hyperlink object in the Common category of the Insert panel (Figure 4-7) lets you insert a link with many optional properties. Its only real benefit is that it lets you add text and a link in one step (instead of adding text to a page, selecting it, and then specifying a link address). Unfortunately, this tool only works with text (not graphics), and some of the optional properties don’t work in all browsers.
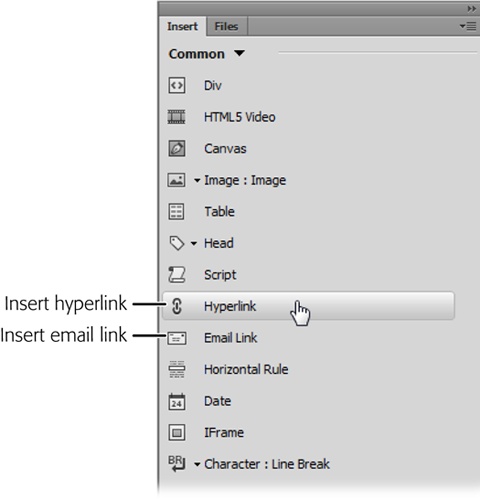
Figure 4-7. The Insert panel’s Common category offers one-button access to creating hyperlinks and email links (to link to an email address).
Here’s how you add a hyperlink.
Click the spot on a web page where you want to insert the hyperlink, or select a section of text (or the image) that you want to turn into a hyperlink.
Let your cursor sit there for a minute.
Choose Insert→Hyperlink, or click the chain icon on the Insert→Common toolbar.
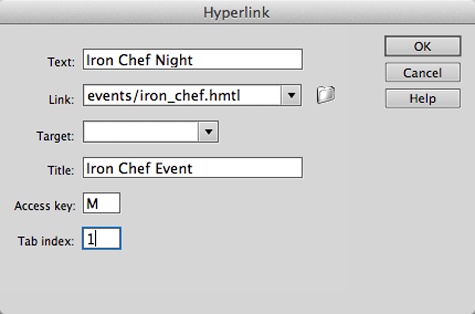
The Hyperlink dialog box opens (see Figure 4-8).
Figure 4-8. As an alternative to using this dialog box, you can apply all the settings you see here, except the “Access key” and “Tab index” properties (see steps 6 and 7 below), to existing text or images from the Properties panel. Also, keep in mind one somewhat special case. If you want to add an access key and tab index to an existing link, you have a couple of options: Go into Code view (as described in Chapter 7) and hand-edit the HTML.
In the Text box, type the label for your link (that is, the link’s text).
Whatever you type here is what you’ll see on the page, and what your audience will click to follow the link. If you selected existing text on the page, Dreamweaver displays that text in the Text box automatically.
Click the folder icon and find the page you want to link to.
Alternatively, type a URL in the Link box.
Set the target window for the link.
If you want the linked page to open in the current window—as most linked pages do—don’t select anything. To make the page open in a new window, select _blank (see the box on Targeting and Titling Links for more on targeting links).
The last three options—Title, Access key, and Tab index—are more interesting.
Type a title for the destination page.
This is optional. Most browsers display page titles in a small tooltip window when a visitor mouses over the associated link, as described in the box on Link Types in Action.
Type a key in the “Access key” box.
An access key lets you trigger a link from your keyboard. For example, if you type h in the link’s “Access key” box, a visitor using Google Chrome for Windows can press Alt+H to mouselessly open the link. Of course, unless your visitors are psychic, you should tell them about the access key next to the link itself, as in “Home Page (Alt+H).”
To actually use access keys requires a little computer-savvy on the part of your visitors. In addition to knowing they can use an access key, they need to know how to use an access key with their browser. The key combinations are different depending on the browser and the operating system, and in the past, browsers were all over the place as to the key combinations. It’s a little more uniform with the latest batch of browsers. Here’s the rundown on current Windows browsers:
Alt+ the access key works in Google Chrome, Safari, and Opera.
Alt+ the access key + Enter for Internet Explorer.
Alt+Shift+ the access key works on Firefox.
Recently, Mac browsers have achieved a little consistency:
In the “Tab index” box, type a number for the tab order.
In most browsers, you can press the Tab key to step through the links on a page (and boxes on a form). This feature not only gives you a handy way to go from link to link from your keyboard, it also lets people who can’t use a mouse due to disabilities cycle through the links.
Normally when you press Tab, web browsers highlight the links in the order they appear in the page’s HTML. The Tab index, by contrast, lets you control the order in which links light up. For example, you can give your navigation buttons priority when someone presses Tab, even if those buttons aren’t the first links on the page.
For the link that you want first in the Tab order, type 1 in the “Tab index” box. Number the other links in the order you want the Tab key to trigger them. If you aren’t concerned about the order of a particular link, leave this option blank or type 0. The web browser highlights that link after the visitor tabs through all the links that do have a Tab index.
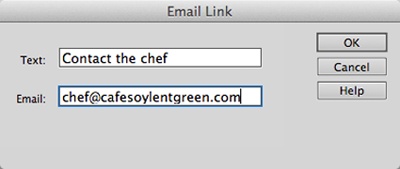
If you want to invite your site visitors to contact you, an email link is the perfect solution. When someone clicks an email link, his email program automatically launches, and a new, empty message opens with your email address already in the To field. Your guest can then just type his message and click Send.
Consider the email link mailto:chef@cafesoylentgreen.com. The first part of any email link, mailto, indicates the type of link (an email link in this case), while the second part (chef@cafesoylentgreen.com) specifies the email address.
Note
Email links work only if the person who clicks the link has an email program set up and running on his computer. If someone visits your site from a computer at the public library, for example, he might not be able to send mail. Likewise, if he’s using a web-based email client, like Gmail, clicking an email link won’t open his Gmail page in a web browser.
You create an email link the same way you create any other Dreamweaver link: by selecting text or an image and typing the mailto address in the Properties panel’s Link field, as shown above. Dreamweaver offers a shortcut, too:
Type in or select the text you want to turn into a link. Email me! or Email the webmaster are good options.
You have to have something to link from, right?
Under the Insert panel’s Common category, click the “Email link” icon, which looks like an envelope (see Figure 4-7).
Alternatively, choose Insert→Email Link. The Email Link dialog box opens (see Figure 4-9).
Check the Text field. The word or phrase you highlighted in step 1 should appear here.
Type an email address in the Email field.
This is the address that appears in your visitors’ email program when they click the link. (You don’t have to type mailto—Dreamweaver adds it automatically.)
Click OK.
Dreamweaver makes the mailto link active.
Note
Some people don’t add email links to their websites because they’re afraid of spammers’ automated programs that search the web and collect email addresses. There are some tricks to fool these “spambots,” but spammers have figured most of them out. The fact is, spammers can attack even “Contact Us” web forms.
If you’re absolutely obsessed with never being spammed, leave your email address off your site. However, many businesses rely on people contacting them for more information, and the harder you make it for a legitimate visitor to contact you, the fewer legitimate contacts you’ll receive—after all, you wouldn’t have much of a freelance design business if you never provided a way for someone to contact you. Your best bet is to let the spam come, but add a spam filter to your email program to separate the wheat from the chaff.
Clicking a link usually loads a web page in a browser window, but what if you want to link to a specific spot on the same page? You see this technique used frequently on long web pages, like FAQs, where links at the top of the page let visitors jump to specific content lower on the page; see Figure 4-10. You create this type of link by adding an HTML tag to the target section of the destination page, giving it a unique ID and then linking to that ID. Although this method is newer, it works with all current web browsers.
Note
If you’ve been building web pages for a while, you’re probably familiar with the “named anchor” technique for creating in-page links. That method uses an <a> anchor tag with a name attribute. Because the named anchor isn’t used in HTML5, Dreamweaver no longer offers the Insert→Named Anchor command. Instead of named anchors, use the ID method described here.
To link to a specific spot in a destination page, assign an ID to that spot. For example, if you want to link to a subhead way down on a page (a Heading 2, or <h2> tag, for example), you can assign an ID to that heading. For text, you add an ID by clicking anywhere inside a paragraph and, in the Properties panel’s ID box, typing the ID name you want to use. (Keep in mind that you can’t use spaces or punctuation marks.)
For non-text elements, like images or tables, select the tag (the Tag Selector discussed on The Document Window is the best way), and type a name in the ID box on the left side of the Properties panel.
Figure 4-10. To make it easy for visitors to navigate long web pages, you might list the contents for that page first and add bookmark links for each entry so that, when a visitor clicks a link (left), she jumps to the appropriate section of the page (right).
You might use IDs in another context, too: to identify and style discrete sections of your page by adding an ID to a tag and then styling the page using CSS (see Applying IDs to a Tag for more on ID styles). The good news is you can use that same ID to both identify the destination point in a target page and to style the tag in a style sheet.
Once you add an ID to a tag, creating a link to that ID from within the same web page or from a different page isn’t all that different from linking to a web page.
To link to an ID on the same page:
In the document window, select the text or image you want to turn into a link.
For example, drag across some text, or highlight a graphic.
In the Properties panel’s Link field, type #, followed by the ID name you chose.
The # sign indicates that the link points to an ID. So, to link to an ID named directions, you’d type #directions.
You can also link from one web page to a particular location on another web page. First, you need to add an ID to the destination page. Then, follow the same process you followed to link to a same-page ID, except that you have to specify not only the ID, but the path to the web page as well.
In the document window, select the text or image you want to turn into a link. Then, in the Link field of the Properties panel, type or choose the URL or path to the destination page.
You can use any of the methods described above: browsing, point-to-file, or typing in the path name. Unfortunately, if you browse to select the destination page, Dreamweaver doesn’t display any of the IDs on that page, so you need to type in the ID’s name as explained in the next step.
Click at the end of the URL or path. Type # followed by the ID’s name.
In the end, the Link field should look something like this: contact.html#directions.
At some point, you may need to change or edit a link. Perhaps the URL you were linking to has changed, or you simply no longer need that link.
As you’ll read in Part 4 of this book, Dreamweaver provides some amazing tools for automatically updating links on your pages so that your site keeps working, even if you move files around. But even Dreamweaver isn’t smart enough to know when a page on someone else’s website has been moved or deleted. And you may decide you simply need to change a link so that it points to a different page on your own site. In both cases, you need to edit the links by hand:
Select the text or picture link.
The link path appears in the Properties panel’s Link field.
Use any of the techniques described on Link from the Scorpio Page to the Horoscopes Page to specify the link’s new target.
For example, click the “Browse for File” button in the Properties panel and locate a different web page on your site, or type a complete URL that points to a page outside your site.
Sometimes, you want to stop a link from linking—when the web page you were pointing to no longer exists, for example. You want to keep the originating text or image, but remove the outdated link. In that case, select the link text or image and then use one of these tactics:
Choose Modify→Remove Link, or press Ctrl+Shift+L (⌘-Shift-L).
Delete the text in the Link field of the Properties panel and then press Enter (Return).
The text or image remains on your web page, but it no longer links to anything. If it’s a text link, the color changes from your site’s link color to the normal text color for the page.
Of course, if you’re feeling particularly destructive, you can delete the link’s text or image itself, which simultaneously deletes the link.
You can control the basic look of links from the Links category of the Page Properties window (Figure 4-11). To open it, choose Modify→Page Properties→Links (CSS), press Ctrl+J (⌘-J)→Links (CSS), or click the Page Properties button in the Properties panel (the button appears only when you have either nothing on the page selected or you have text selected; it doesn’t appear if you have an image selected). In the Category list, click “Links (CSS).”

Figure 4-11. The Page Properties’ Links (CSS) window lets you set basic properties for the links on a page, including their font, color, and size. This window is mainly a shortcut for creating CSS styles.
The top set of options—font, size, bold, italic—sets the basic format for every link on the page. The next group of options sets the color of the links under specific conditions. Web browsers keep track of how a visitor interacts with the links on a page, such as when you move your mouse over a link. Each link has four modes (called states): a plain, unvisited link is simply called a link; a link that a visitor has already clicked (determined by your guest’s browser history) is called a visited link; a link that a guest’s mouse is currently pointing to is technically called a hover state, though Dreamweaver refers to it as a rollover state; and a link in the process of being clicked (where a visitor has pressed but not released his mouse button) is known as an active link.
You can style each type of link individually. In most web browsers, a plain link appears blue until you visit the linked page—then the link turns purple. This helpful color-coding lets a visitor know whether to follow a link: “Hey, there’s a page I haven’t seen,” or, “Been there, done that.”
The rollover (or hover) link is useful in telling visitors they can click the link because it provides visual feedback, and it lends itself to a lot of creative potential. For example, you can change the link’s color when a visitor mouses over it add a background image, or change its background color. (To get neat effects like these, you need to go beyond the Page Properties window and set styles for your links via CSS, as described next.)
Finally, an active link is for that fleeting moment when a visitor clicks a link but has yet to release the mouse button. It happens so fast that it’s usually not worth spending too much time formatting the state.
Note
Internet Explorer applies the active link style to any link a visitor tabs to (some web surfers can’t, or don’t want to, use a mouse, so they rely on the keyboard to navigate websites). Firefox, Safari, Opera, and Chrome use yet another link state, called focus, to style links that someone reaches via the Tab key. See the note on Note for more on a link’s focus state.
The Page Properties window lets you change the color of each link state. In addition, the “Underline style” menu lets you control whether a browser underlines a link (the default), displays nothing beneath the link, displays an underline when a guest mouses over the link, or underlines the link by default but removes it once a visitor mouses over it. Since web surfers are accustomed to thinking of underlined text as a big “Click Me” sign, think twice before removing underlines from links. Without some clear indication that the text is a link, visitors may never see (or click) the links on your page.
One problem with using the Page Properties window to style links is that the settings apply only to the current page. That’s because the Page Properties window saves the CSS styles to an internal style sheet in the current page. Fortunately, you don’t need to set the Page Properties on every page of your site; you can export those styles or even drag them into an external style sheet. (To learn how, see Moving and Managing Styles.) Alternatively, you can bypass the Page Properties window altogether and create CSS link styles from scratch—which you’ll learn about next.
Using CSS Designer to style your links gives you access to many more formatting options besides the font, color, and size options that Page Properties gives you. In fact, CSS Designer lets you apply nearly every CSS property to links. For example, you can use all the text options discussed on Aligning Text—font size, weight, variant, letter spacing, and so on—to format a link. In addition, you can add a border (Phase 6: Finishing the Page) and a background color to a link to make it look like a button.
To format the look of all your links, create a tag style (Types of Styles) for the <a> tag (the tag that creates links) using the instructions on Creating Styles. To create a different look for a particular link (if you want that “Buy Now!” link to be bigger and bolder than other links on a page, for example), create a class style (Types of Styles) and apply it to that link.
To control how a link looks for different states (link, visited, hover, and active), you need to dip a little deeper into the CSS pool and use what’s called a pseudo-class. As you may remember, a selector is merely the part of a style that instructs a browser where to apply the style—h1 is the selector for formatting every Heading 1, for example. When you work with links, it’s all about the <a> tag, so you want to find and choose the a selector in CSS Designer’s Selector section. In CSS, you distinguish pseudo classes from selectors by using a colon between the two. So in a style sheet, the four pseudo classes for the a link look like this: a:link, a:visited, a:hover, and a:active. It’s easy to create a selector and pseudo classes in CSS Designer because a pop-up menu prompts you with valid classes as soon as you type in the colon (see Figure 4-12).
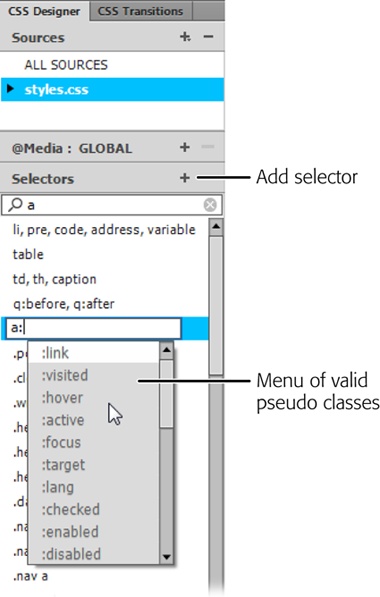
Figure 4-12. Create a selector for <a> tags by clicking Add Selector (the + sign button) and then typing “a.” To add a pseudo class to the selector, type a colon (:). As soon as you do, a pop-up menu appears with the names of valid pseudo classes. All you need to do is click. The first three are the most common pseudo classes used with links: link, visited, and hover.
You don’t have to set all four pseudo-classes; if you’re not interested in how your link looks during the nanosecond that a visitor clicks it, skip the a:active option. If you want to set more than one pseudo-class, you must create them in the order that they appear in the pop-up Class menu, or the styles may not display as you intend them. In CSS Designer’s Selectors section, that means your pseudo-classes should be in this order, from the top: a:link, a:visited, a:hover, and, if you’re using it, a:active. (A helpful mnemonic for remembering this rule is LoVe HAte—that is, :link comes before :visited, which comes before :hover, which comes before :active.) If your links are in the wrong order in Selectors, move them. Click the source in CSS Designer’s Sources section, and then, in Selectors, click and drag your selectors and their pseudo classes to the proper position. This actually rearranges the code in the style sheet.
Note
Safari, Firefox, and Chrome browsers understand an additional pseudo-class related to links: a:focus. This selector applies when a visitor uses the Tab key to move from one link to another on a page. Each time she jumps to a new link, the browser highlights it and gives the link “focus.” All versions of IE treat a:active as if it were a:focus.
To create a style that formats a link when a visitor tabs to it (instead of mouses over it), create what’s called a group style. Here’s how: When you create the “highlighted” link style, choose Compound for the selector type. For the selector name, type in a:focus, a:active. This highlights the “tabbed to” link in all current browsers.
Using these styles, you can make your link text appear red and underscored before a visitor clicks the link, twice as large when he mouses over it, purple and boldfaced when he clicks it, and pale pink after he visits the linked site. (Granted, if you try this design, Martha Stewart may never hire you to design her site, but you get the point.)
Note
For security reasons, current browsers limit the styling you apply to a visited link to just a different color. In other words, say you create the pseudo-class style a:visited and change the font, font-size, background-color, underline, and set its text color to red; the only visual change the browser will make to a visited link is to change its text color to red—browsers simply ignore the font, background-color, and other settings.
Note that these link pseudo-classes have one drawback: Setting them affects all the links on a page. In that respect, adding pseudo-classes to the <a> tag is like creating tag styles.
To apply a style to only certain links on a page, you need to create a class and then create CSS rules to style the class and its pseudo classes, like link and hover. For example, to create a special look for the text link “Buy Now!”, create a selector called .buynow:link in CSS Designer. The class, .buynow, has the pseudo class :link tacked onto it. To make that link look different when someone mouses over it, create a .buynow:hover selector. Naturally, you need to create the style rules that go along with the .buynow class and its pseudo classes. You can change the color, size, style, and other properties for the text to make the link stand out. To do that, follow the steps for creating a style on Adding Another Style. Once you define the style, all you need to do is apply the .buynow class to the text on your page. You can do that easily in the Properties panel’s Class menu. Check your work in Live view and you’ll see the link with the .buynow class applied.
Note
Descendent selectors provide a more efficient—but more complex—way to format specific links differently from all the other links on a page. You’ll find this CSS concept discussed in Descendent Selectors.
Every website should have navigation links that let visitors quickly jump to different sections of a site. On a shopping site, for example, those links might point to the categories of products for sale—books, DVDs, CDs, electronics, and so on. For a corporate intranet, links to human resources, office policies, company events, and each department might be important. Whatever the site, you should strive to get visitors where they want to go via the shortest route possible. Navigation menus are a good solution, because everyone using a computer is familiar with them.
Dreamweaver CC doesn’t have a built-in system for building navigation menus, but with the help of some third-party tools, you can easily do so. Some menus rely on JavaScript and its jQuery plug-in, while others use only CSS to work their magic. Most, however, use HTML unordered lists to create a hierarchy of menus, submenus, and menu items. (For details on unordered lists, see Creating and Formatting Lists.) That makes it easy to add and remove menu items over time, and keeps the structure of the menu separate from its formatting.
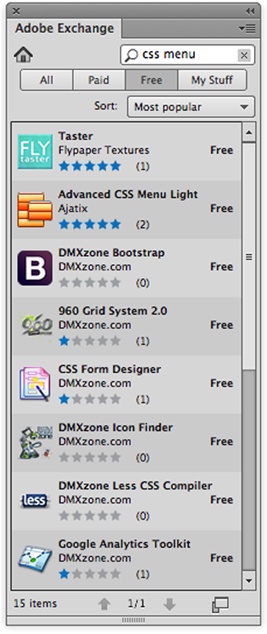
The tutorial in this chapter uses a menu-builder called Advanced CSS Menu Light from Ajatix (Menu Light for short). There are a number of menu creators out there, but this one is available from Adobe Exchange, which means it’s easy to get and install. Ajatix offers a few menu builders, but this one is everyone’s favorite price—free.
Follow these steps to download and install Advanced CSS Menu Light from Adobe Exchange:
Choose Window→Extensions→Adobe Exchange.
The Adobe Exchange panel opens. Four buttons at the top filter the extensions displayed. For example, you can limit the list to extensions that are free or to those that you have to pay to use.
Click Free.
The panel displays no-cost extensions. At this point you may see Advanced CSS Menu Light in the list of extensions. If not, take the next step.
In the Search box (upper-right) type CSS Menu, as shown in Figure 4-13.
Extensions related to CSS and menus appear in the list.
Click Advanced CSS Menu Light.
Details about Advanced CSS Menu Light fill the panel. If you want more information, explore the Info, Previews, Notes, and Reviews sections.
Click the blue Free button.
The Exchange displays a warning telling you to save your work, because Dreamweaver may need to close to install the extension. This is good advice even though downloading and installing this extension doesn’t usually require a Dreamweaver restart. But you do usually need to restart Dreamweaver before you can use extensions.
Click OK to close the warning.
The download and installation begins. An “Installing” message and graphic appears in the panel. When the installation is complete, a dialog box reports “Installation successful.”
Figure 4-13. Adobe Exchange is your tool for finding and installing Dreamweaver extensions like Advanced CSS Menu Light. To browse the extensions, use the All, Paid, and Free buttons. To search for a specific one, type a couple of keywords in the Search box. Once you find an interesting candidate, click to see more details.
Click OK to close the Info box. Then close the Adobe Exchange panel.
You’ve installed the extension in Dreamweaver. To double-check, see the next step.
Restart Dreamweaver and then go to the Insert panel and open the Categories menu, as shown in Figure 4-14.
The Ajatix group appears at the bottom of the menu. In that category, you see Advanced CSS Drop Down Menu Light. The command to launch Menu Light also appears in the Insert menu (Insert→Ajatix→Advanced CSS Drop Down Menu Light), but you need to restart Dreamweaver before you can see it.
The first step in inserting a menu is deciding where on the page to put it. A horizontal menu bar, with buttons sitting side by side, works well either at the very top of a page or below the area dedicated to a logo (often called a “banner”; see Figure 4-15). A vertical menu bar, whose buttons are stacked one on top of the other, usually sits at the left edge of a page, below the banner area.
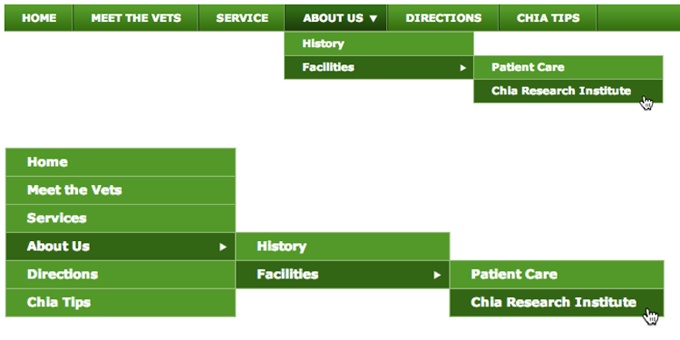
Figure 4-15. Menu builders like Advanced CSS Menu Light usually let you choose between a horizontal (top) or vertical (bottom) navigation bar for your website. Drop-down submenus let you cram loads of links into a small space, but be merciful to your visitors: Navigating a rat’s maze to reach a link in a sub-submenu is sometimes a tiring test of patience and hand-mouse coordination.
In the next steps, you’ll create a menu with submenus for the imaginary Chia Vet web site. You can follow along, or change the item names for your own nefarious purposes. These steps assume you’ve already downloaded and installed the menu builder described in the previous section.
Here are the steps to build a menu using Advanced CSS Menu Light:
Start with a web page you’ve already named and saved. In the document window, click the spot where you want to insert the menu.
You can add a menu bar in either Design view or Code view, but it’s easier to position it in Design view.
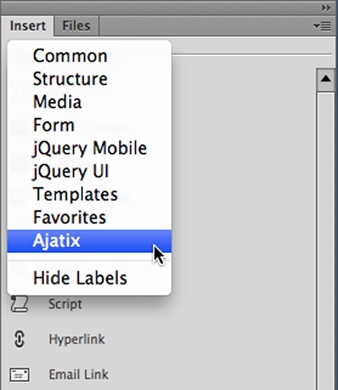
In the Insert panel (Window→Insert), click the Categories menu, and then click Ajatix.
The Insert panel shows extensions from Ajatix that you can use in document-building. If you installed Menu Light as described on Getting a CSS Menu System from Adobe Exchange, you see it listed here as Advanced CSS Drop Down Menu Light. If you have other products from the company, they appear here, too.
Double-click Advanced CSS Drop Down Menu Light.
Menu Light opens its Start Wizard, offering two choices, “Create a new menu” and “Insert an existing menu.”
Choose “Create a new menu,” and then click OK.
Menu Light replaces the Start Wizard with a Select Theme panel. The box on the left shows a number of themes of different styles. Horizontal menus top the list, while vertical menus appear near the bottom.
In the left-hand box, click “Horizontal – Leaf Green,” and then click Apply (lower-right corner).
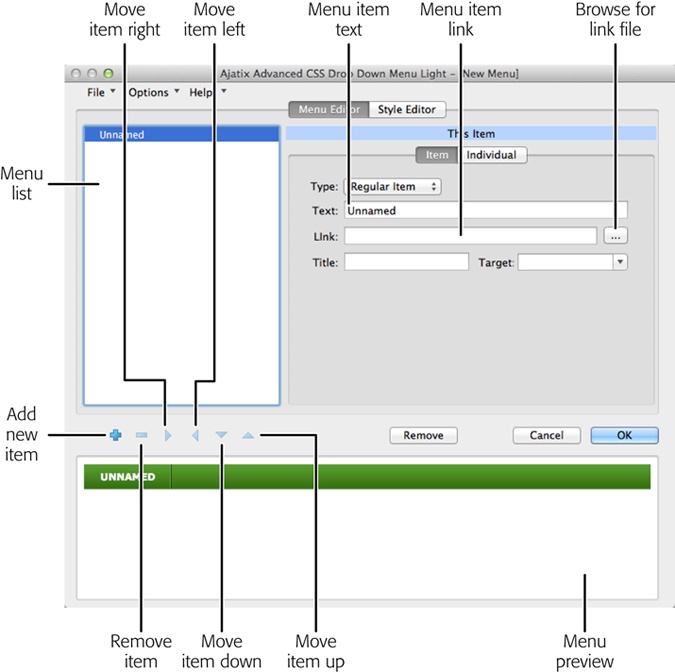
As you click theme names on the left, Menu Light previews them on the right. Once you choose a theme that has the color, font, and styles you want, click Apply. Menu Light closes the Select Theme window and opens yet another window, the New Menu window (Figure 4-16). This window is worth getting to know because you use it to build your menu link by link. And later, when you need to make changes to an existing menu, you use a very similar control panel.
Tip
If you want to insert an incomplete menu in a page to serve as a placeholder, you can do that now. Click OK, then give your menu a name and click Save. A menu bar appears in your document with a single item named Unnamed. With your placeholder menu on the page, you can come back later and build your menu by adding items, submenus, and all the trimmings, as explained on Adding, Editing, and Removing Menu Links.
Figure 4-16. Menu Light’s New Menu panel gives you all the tools you need to create a snazzy menu for your site. You build one menu item at a time by adding a name in the Text box; these words appear on the web page’s menu. Then, add a link to another page in the Link box. The best way to do that is to click the browse button and navigate to the page.
In the box labeled Text, type Home.
The words you type in the Text box are the words that will appear in the menu. For this first menu item, change the word “Unnamed” to “Home.” As you type, Menu Light adds your new item to the list on the left and changes the preview at the bottom to read “Home.”
In the Link box, type index.html.
You can type in any valid link. For this example, it makes sense to type index.html because that’s the standard name for a website’s home or default page. However, the best way to add most links is to click the Browse button (“…”) next to the Link box and browse your way to the destination page. That creates a link with the proper path and no typos!
At a minimum, you should provide a label and URL for your menu items. As explained in the box on Targeting and Titling Links, you don’t have to add a title or target. In fact, ignore the target option unless you want the linked page to open in a new browser window. Fill in a title for the link if you feel the need to provide a better description than the one in the Text box. Titles benefit people with screen readers and they can give you a boost with search engines. In this example, we’ll add a title.
In the Title box, type Welcome to Chia Vet.
For most browsers, this message appears as a tooltip that pops up when someone mouses over a menu item. Screen readers read these words aloud to visitors, and some search engines read and evaluate these words when ranking a page.
Click the + sign button on the left side of the panel.
That adds a new menu item. The functions for the other buttons on this row are pretty easy to figure out. The – sign button removes an item from the list, while the arrow buttons move items up and down, and in- and outdents them. The details are on Adding a Menu with Submenus.
For the new menu item, change “Unnamed” to “About Us” in the Text box. Then, type about.html in the Link box. In the Title box, type More Info about Chia Vet.
It’s just that easy to create a second menu item, complete with a link and title. In the next step, you’ll add a submenu to About Us.
Click the + sign button on the left side of the panel. Below the menu list, click the right arrow button (the Move Item Right button).
When you click the + sign button, a new Unnamed item appears below About Us. When you click the Move Item Right button, the Unnamed item shifts to the right in the list. In preview, a down arrow (triangle) appears next to About Us—a standard indication that this menu includes a submenu. If you mouse over About Us, you see the submenu with one “Unnamed item” listed.
Using the arrows below the menu list (Figure 4-16), move items from one place to another in the list. Moving items up and down changes their position in the list. You see the results immediately in the preview at the bottom. To create a submenu or to add an item to a submenu, click the right arrow button. The left arrow button removes an item from a submenu, bumping it up a level. If it’s the last item in the submenu, it removes the submenu.
With “Unnamed item” selected in the list, type History in the Text box and then type history.html as the link.
The submenu item now has both a title and a link. Continue adding items and submenus as needed.
When you’re done, click OK.
The “Save Menu As” box appears where you name the menu.
Type NavChiaVet and then click Save.
You use the CSS filename NavChiaVet.css to add this same menu to other pages on your site. When you click Save, Menu Light creates two new files in your site’s root folder. The file NavChiaVet.css formats the menu and its items. The file NavChiaVet.ajm is an Ajatix proprietary file (.ajm) that stores information about the menu you just created. Dreamweaver uses this information when you add the menu to other web pages.
You won’t need to edit these files, so don’t worry about them too much, but don’t move or delete them, either. If you do, your menus won’t work as expected.
Once you finish a menu, you’ll see something like the menu shown in Figure 4-18. It may include several submenus, like the About Us and Facilities menus do here. Naturally, you’ll adapt the actual menu to match your project. Adding the CSS Menu to Other Pages explains how to add an existing CSS menu to another page. The next section explains how to make changes to your menu after you create it.
At some point, you’re going to want to edit one of your menus—your site structure may have changed and you need to relink pages, or you may have added a section to your site that you want to appear in the menu.
To edit a menu, open a page that uses it. Go to the Insert panel (Window→Insert), click Ajatix, and then double-click Advanced CSS Drop Down Menu Light. Dreamweaver opens the panel shown in Figure 4-17. It has three choices: Create a new menu, Insert an existing menu, and Edit menu on page. Choose the last item, “Edit menu on page.” A box at the bottom of the panel lists all the menus you’ve created for the site so far. Select the menu you want to edit and then click OK. Dreamweaver opens your menu in a window like the one in Figure 4-16.
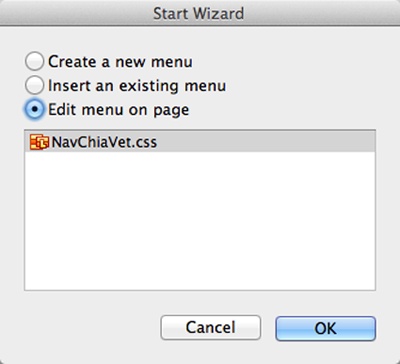
Figure 4-17. After you create a menu, you can reopen it to edit it or add new entries. To do that, use the Insert panel or go to Insert→Ajatix→Advanced CSS Drop Down Menu Light. If you already created and saved a menu, you can add it to the current page. If the current page already has a menu, you can edit it.
At this point, editing your menu is like creating a new one (described on Adding a Menu with Submenus). Your menu panel should look like the one in Figure 4-18. Use the + and – sign buttons to add and remove menu items. Use the arrow buttons to position items in the list, or to move them back and forth between submenus. If you need to edit a link, select the menu item (that is, the link’s label) from the list on the left and then use the browse button next to the Link field to select a new destination.
Note
As you work with the Light version of Advanced CSS Drop Down Menu, you’re likely to encounter features that have an asterisk and a note that says “Not available in the Light version.” These features let you create and edit animated effects, highlight current items, add rounded corners to drop-down menus, and manually position submenus. Bottom line: If you need to support touch devices, assign individual colors to specific buttons, or want the most recent update to the CSS menus, you’re better off ponying up the cash for the full-featured version of the program at http://www.ajatix.com/.
When you first create a menu with Advanced CSS Drop Down Menu Light (Menu Light for short), you choose from 18 themes. They include horizontal and vertical menus, and offer a choice of color schemes and fonts. Some themes have a rounded, three-dimensional appearance, while others appear flat. Chances are, you’ll find something suitable for your site.
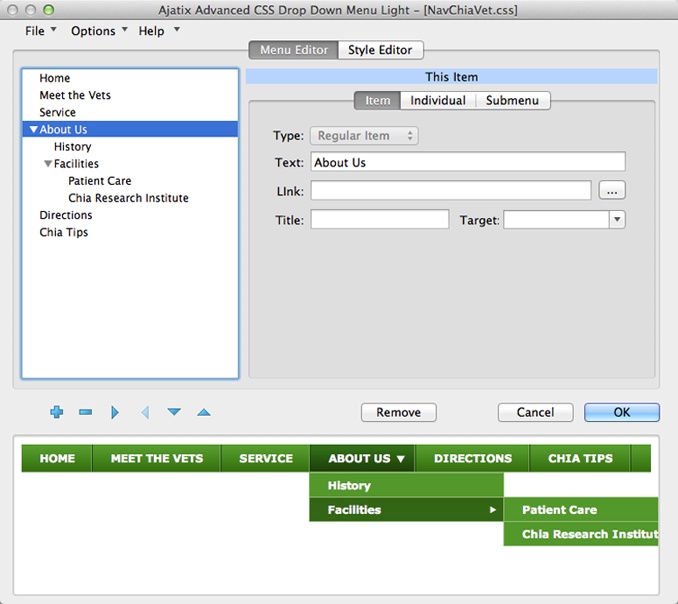
Figure 4-18. You’ll find everything you need to change the structure of your menu under this panel’s Menu Editor tab. As you make changes, Dreamweaver previews the results at the bottom of the panel. The menu actually works, so you can click submenus to open them. The structure of your menu is displayed in the list on the left. Use the buttons below to add, move, and rearrange items. You can edit the text, links, or label for any item you select in the list. Want to remove a menu from a web page? Click the Remove button.
But when it comes to making your menu “perfect” for your site, you probably have your own ideas about colors, fonts, and other styles. Menu Light formats its menus using CSS style sheets. So you could head over to CSS Designer, find the source for your menu, and start editing styles. However, Menu Light uses some pretty cryptic names for selectors, so you’d spend way too much time just identifying the selectors that control the styles you want to change. The easier way to edit your menu is with the Style Editor, found under an eponymous tab at the top of the edit window. The Style Editor (see Figure 4-19) makes it easy to identify page elements and then apply changes. As you saw in the previous section, you use the Menu Editor to create the structure of your navigation menu. You use the Style Editor to modify its appearance. These two editing tools share the same window, so you fire them up in the same manner.
Suppose you want to change the font the Chia Vet menu uses. You first open a page that has the menu in it. Then, from the Insert panel, open the Ajatix category and double-click Advanced CSS Drop Down Menu Light. In the Start Wizard that opens (Figure 4-17), choose “Edit menu on page,” select the NavChiaVet.css menu, and then click OK.
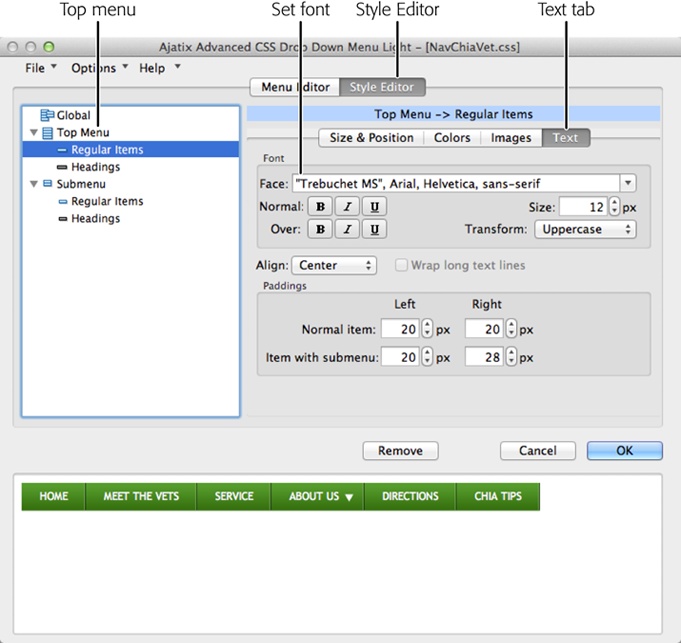
Figure 4-19. To change the appearance of your menus, click the Style Editor tab and then, in the lower row of tabs, choose the type of change you want to make: Size and Position, Colors, Images, or Text (selected). You make changes using the editor’s buttons, boxes, and drop-down menus. Behind the scenes, it writes the CSS that creates the styles you specify.
When Dreamweaver opens the menu editor, click the Style Editor tab, shown in Figure 4-19. The style editor’s layout is similar to the menu editor’s, and you work with the two the same way. Use the pane on the left to select a section of your menu, the main part of the window to edit styles, and the bottom pane to preview your changes. For example, to edit the font for your menu items, you’d select that element from the list on the left.
The entries on the left—Global, Top Menu, and Submenu—identify the major sections of any menu. To see the properties for a menu item, click Regular Items under Top Menu. Dreamweaver displays the properties for top menu items in the main part of the window. An additional row of tabs (Size & Position, Colors, Images, and Text) lets you refine styles. Click Text, for example, and you see several text-related widgets, including one that lets you change fonts.
So the key to styling menus is identifying the menu item you want to format in the Style Editor list and then hunting down the property you need to tweak. The good news is that the menus all use CSS styles and the tabbed panels are fairly well organized. So if you’re familiar with CSS color, text, border, background, and positioning properties, you have a head start with the Style Editor. The next few sections explain how to style different parts of your menu.
Tip
The preview at the bottom of the Style Editor shows you the effect of your new style. When you click OK and close the Style Editor, you should see those changes reflected in Design view, but that doesn’t always happen. Sometimes, the display gets “stuck” on the previous styles. You can take a few steps to fix this. First, choose File→Save All Related Files. If you find Save All Related Files grayed out, choose Save All. This saves your website and any changes you made to it, and saves the CSS style sheets the menu builder uses. Switch to Live view and you should see the effect of your edits. If the page still looks odd, click the Refresh button (the one with two arrows going in a circle). One of those steps should update the menu to your new styles.
In Menu Light, buttons in the Top Menu are always visible, whether you use a vertical or horizontal menu. You can style the background of the top menu bar and the menu items themselves—that is, the navigation buttons. To change the background bar, select it in the Top Menu list. Menu Light displays the top menu properties under two tabs in the main window, Layout and Style.
Use the Layout tab (Figure 4-20) to change the menu’s orientation, set the width of the background bar, and align the menu on your web page.
Orientation. This drop-down menu gives you two options, horizontal and vertical. Even if you initially chose a theme with a horizontal orientation, you can use this menu to change it to a vertical menu.
Width. Choose none if you don’t want to specify a width. In that case, the length of the button labels determine the width of the menu bar. Choose Fixed to set a specific width using pixels as the unit of measure. Choose 100% if you want the menu bar to fill the available space. Choose Min to set the minimum space, in pixels, for the menu background. That way, the width of your menu bar will always be equal to or greater than the minimum value. Choose auto to have the background menu bar change size depending on the size of menu items, their spacing, and padding.
Menu align. You can choose left, center, or right to position your menu on the page. Most people choose left.
Sublevel offset. Use these settings to position submenus when they pop up. Left to the default of 0, the submenus will touch the menu item that triggered them. To move the menu down from a triggering item, set a positive value (in pixels) in the y property. To move a submenu to the right, set a positive value in the x property. Negative values position submenus up or to the left of their triggering items.
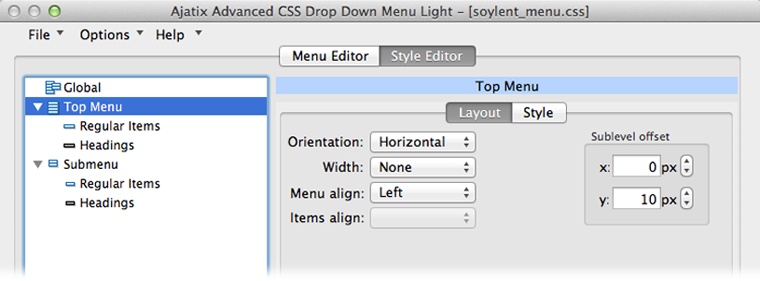
Figure 4-20. The Style Editor tab gives you the tools you need to change the appearance of your menus. With Top Menu selected on the left and the Layout tab selected in the main part of the window, you see the properties to orient, size, and position the top menu; that is, the part of the menu that’s always visible.
Using the Style Editor’s Style tab, you can change the color and images of the menu’s background. Make sure you select Top Menu in the list on the left, and then set values for these properties:
Background color. Click the swatch and choose a color. Use the Transparent option to make the background invisible so that Dreamweaver displays only the menu items (buttons), not the backgrounds. Menu Light uses your operating system’s color picker, so the Windows tools look different from the Mac tools.
Border. To add a border, turn on the checkbox and click the swatch to choose a color.
Background image. You can use an image for your menu’s background. Use the alignment tools to position the image horizontally and vertically. If your image is smaller than the background bar, set the Repeat menu to “Repeat.” This replicates the image both horizontally and vertically. Choose repeat-x if you want to repeat the image horizontally only, or repeat-y to repeat it vertically. The repeat options are standard CSS settings, which you can learn more about on Background-Repeat.
To change the background color of a menu item (as opposed to the entire menu bar), go to the list on the left and, beneath Top Menu, choose Regular Items. The main part of the window displays the properties related to the buttons in the menu. Menu Light groups the properties under four tabs: Style & Position, Colors, Images, and Text.
Width. Turn on the Width checkbox to use a fixed width, measured in pixels. Otherwise, Menu Light automatically adjusts the width to fit the text.
Height. This works the same way as the width. Turn on the Height checkbox and type in a value in pixels.
Padding. As usual with CSS, padding is the amount of space between the text and the edge of an element, in this case the menu button.
Spacing. To add space between menu items, set a value in pixels here. When you have space between menu items, the background shows through, (if the bar’s transparent, you see elements on the web page peek through).
Overlap child dropdown. Turn on this checkbox when you want drop-down menus to overlap the triggering menu item.
Use the color settings to change the appearance of buttons in their Normal and Over states (the latter when a mouse is positioned over them). Clicking the color swatches next to Items (the button’s background), Text, and Border standard opens your operating system’s standard color picker, which will look different for Windows and Macs. In either case, you specify colors by clicking them or typing in values.
Click this tab to choose background images for buttons. You can choose different images for buttons that lead to submenus and for those that don’t. For even snazzier effects, choose different images for the normal and hover states.
The Text tab lets you format the “usual suspects”: the font (called Face in the Font group), size (specified in pixels), style (bold, italic, or underlined), and capitalization (none, Capitalize, Uppercase, and Lowercase), known as Transform in Menu Light. Use the Align menu to position the button text left, right, or center. You can add left and right padding and specify different values for items that lead to submenus.
Visitors get instant feedback when they interact with menus. Moving a mouse over a menu button changes the color of the button and its text, letting visitors know “Hey, I’m a link, click me!” You set the colors when you style your menus, as described in the previous section. With the Style Editor tab selected, from the list on the left, select Top Menu→Regular Items. This displays the properties that style your Top Menu buttons. Click the Colors tab. To set the colors Dreamweaver displays when a mouse hovers over a button, change the Mouseover values.
To create rollover buttons for submenus, choose Submenu→Regular Items, and then click the Colors tab. To set the background color for a submenu item, click the Normal swatch under the Item heading, and then choose a color from your color picker. Repeat the process with the Mouseover swatch under Item, but, of course, choose a different color. In this case, you choose the background color that appears when your guest moves her mouse over the submenu item. If your color scheme calls for it, you can repeat the process to create different Normal and Mouseover colors for the submenu button’s text and border.
Submenu buttons appear in Menu Light’s drop-down menus. In fact, with Menu Light, your submenus can have submenus. But don’t get carried away nesting menus or you’ll try the patience of your visitors.
Using the Style Editor, format your submenus the same way you format the top menu. In fact, you use the same properties and have the same options as in the top menu. If you prefer an understated appearance, style your submenus with the same colors and rollover properties as your top menu. If you want your submenus to stand apart from the top menu, use different but complementary colors.
To format a submenu’s background box, click Submenu in the list. To format the submenu’s buttons, click Regular Items beneath Submenu.
Note
Menu Light displays an Animation tab when you choose Submenu from the list. This feature is listed, but not available, in the Light version of the menu builder. Its properties control the speed, direction, and other effects used to display the submenu. If you’re interested in controlling a submenu’s animation, you can get the full version of Advanced CSS Drop Down Menus from Ajatix at http://www.ajatix.com/.
In this tutorial, you’ll link to other pages on your own site, link to another site on the Web, and create a great-looking CSS-powered navigation bar, complete with fancy drop-down menus. (To see the completed page, skip ahead to Figure 4-28.
Tip
You’ll need to download sample files from http://oreilly.com/missingmanuals/cds/dreamweaverccmm13/ to complete this tutorial. See the Note on Note for details.
Once you download the tutorial files and open Dreamweaver, set up a new site as described on Setting Up a Site. In a nutshell, Choose Site→New Site. In the Site Setup window, type Links Tutorial into the Site Name field, click the folder icon next to the Local Site Folder field, navigate to and select the Chapter04 folder inside the MM_DWCC folder, and then click Choose or Select. Finally, click OK.
Once again, you’ll be working on a page from Cafe Soylent Green.
In the files panel, double-click the file index.html.
You can also choose File→Open, select the filename, and then click OK (Select on Macs). You’re looking at a basic web page, with a banner, some text, and a footer. It’s all contained inside a <div> tag that’s 800 pixels wide and centered on the screen (you learned how to do this in the tutorial in Chapter 1, “Finishing the Page”).
If your screen is wide enough to show both Code and Design views side-by-side, click the Split button in the top-left corner of the document window. If you can’t fit both comfortably, click the Design button.
At the end of the last paragraph on the page, in the section with the headline “All Natural Ingredients,” you’ll see the text “Read more about our natural ingredients.” This sentence should link to another page.
Select the text “Read more about our natural ingredients.” In the Properties panel, to the right of the Link box, click the Browse for File button, the folder icon.
Dreamweaver opens the Select File window.
Click the Site Root button (at the bottom-right) to go to your site’s main folder. Double-click ingredients.html.
Dreamweaver closes the Select File window. That’s it? Yup. You just created a link. Now, you’ll learn an even faster way to do the same thing.
In the last paragraph before the page’s footer, select the text “Read more about our nutritional principles.”
Make sure you have the Files panel open (Window→Files).
In the Properties panel, drag the small Point-to-File icon (see Figure 4-6) beside the Link box into the Files panel, move your mouse over the file nutrition.html, and then release the mouse button.
Dreamweaver adds the link to your page. (If you have the double-monitor configuration discussed in the Note on Note, this point-to-file technique won’t work. Use the method described in steps 3 and 4 to link to nutrition.html.)
Note that if you wanted to link the text in the examples above to a page on another website, you couldn’t use either of the methods outlined here. Instead, you’d need to type an absolute URL into the Link box, as you’ll see in the next two steps.
Scroll to the bottom of the page. In the footer, find the phrase “in collaboration with Cosmopolitan Farmer.” Select the text “Cosmopolitan Farmer.”
You want this text to link to the site’s parent company.
In the Properties panel’s Link box, type http://www.cosmofarmer.com/, and then press Enter (Return).
Now the text “Cosmopolitan Farmer” links to the CosmoFarmer.com website. Unfortunately, the blue links don’t fit in with the cafe’s color palette. You’ll remedy that next.
You can change the look of links using a little CSS.
Make sure you have CSS Designer open (Window→CSS Designer). In the Sources section, choose soylent_styles.css.
In the Selectors section, you see the selectors you created in soylent_styles.css. You haven’t added a selector for links (the <a> tag) yet. (That’s why the text for your link uses the link default color, blue.)
In Selectors, click the
 sign to add a selector. In the text box, type a, and then press Enter (Return) twice.
When you type a, the new selector replaces the selector CSS Designer suggested. The first time you press Enter (Return), you select the <a> tag from the pop-up menu. The second time you press Enter (Return), you create a new selector for anchor tags.
In the Properties section of CSS Designer, click the T (text) button. Make sure you have the “Show Set” box unchecked.
Dreamweaver scrolls the list of properties until it gets to Text.
Click the swatch next to the color property field, type #417F2C, and then press Enter (Return).
This color makes your text green. After you press Enter (Return), the links on the page change to green. You’ll change one more property to remove the underline from your links.
With the a selector still highlighted in the Selectors section of CSS Designer, find the text-decoration property in the Properties section. Click the first box—the one with the diagonal line through it (circled in Figure 4-21).
Setting text-decoration to none overrides the default value, underlined links. As a result, browsers won’t underscore your links and pseudo classes like hover will inherit the text-decoration style. In fact, hover’s up next for some styling.
Figure 4-21. To remove an underline from a link, set the CSS Text-decoration property to “none.” You can create a look similar to an underline (but with a lot more design choices) by turning underlining off here, and then using the CSS Border property to create a dotted, dashed, or different-color underline.
In CSS Designer’s Selectors section, click the + sign to add a selector, type a:hover in the text box, and then click Enter (Return) twice.
A new selector appears in the list. This time, the selector includes the pseudo class hover.
With a:hover selected in Selectors, click the T (for text) in the Properties section. Then, find the color property, click the swatch next to it, and then type #0A2F02.
To see how this rollover style works, use Dreamweaver’s Live view.
In the Selectors section of CSS Designer, choose the a selector.
At the top of the document window, click the Live button (or choose View→Live View).
Dreamweaver includes an embedded version of the Google Chrome browser, and Live view uses it to let you preview the look and functionality of a web page. With Live view, you can interact with JavaScript and see CSS hover effects. Move your mouse over the various links on the page, and you see the link change to dark green and the underline disappear. (Of course, to check your work thoroughly, you should also preview your pages in Safari, Internet Explorer, and Firefox. You can do that using the File→Preview in Browser command if you have those browsers installed.)
Click the Live button (or choose View→Live View) a second time to leave Live view.
You can’t edit a page in Live view, so you always need to click out of it when you’re ready to work on your page again.
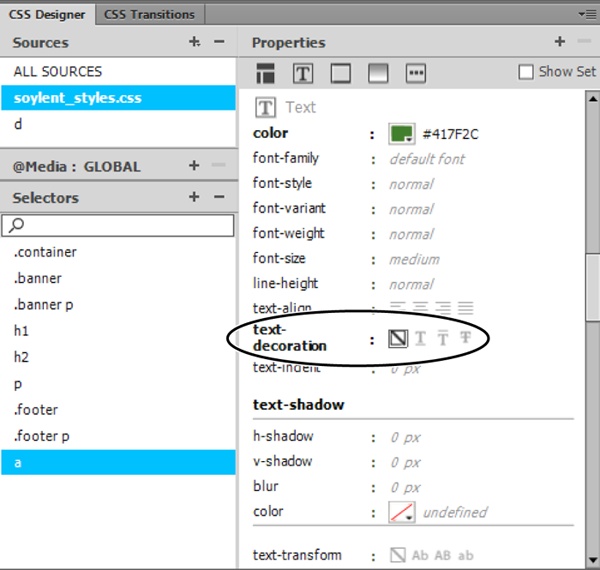
You’ll find the Café’s email address—info@cafesoylentgreen.com–at the bottom of the index.html page. Clicking it, however, doesn’t do anything. Here’s how you turn that address into a link that opens your visitor’s email program and addresses a note to you:
Select the text info@cafesoylentgreen.com, or place your cursor where you’d like to add the email link.
The text you select doesn’t have to be an email address—it could say “Email us” or something similar. Likewise, if you haven’t selected any text, click where you’d like to insert the email link and move on to step 2.
Choose Insert→Email Link (or click the Email link button under the Common category of the Insert panel, shown in Figure 4-7).
Dreamweaver opens the Email Link window (Figure 4-22) with the link text and email address already filled in (it copies the link text from the text you selected in step 1). If you didn’t select any text, the Text box is blank. The Email box displays the address for the last Email link you created. You’ll find this helpful if you link to the same email address all the time, or annoying if you don’t.
Click OK.
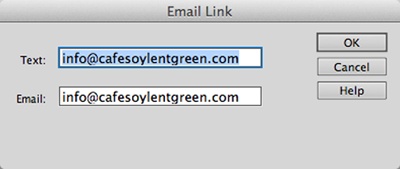
A navigation bar with rollover effects and smooth drop-down menus gives your website a professional look and feel, and it makes navigating your site easy for visitors.
These next steps use the Advanced CSS Drop Down Menu Light from Ajatix (which we’ll call Menu Light for the sake of brevity). If you haven’t downloaded and installed this Dreamweaver extension, do that now by following the steps on Getting a CSS Menu System from Adobe Exchange. Then:
Return to Dreamweaver and make sure you have the file index.html open; in the banner at the top of the page, click just to the right of the word “Green.”
You’ll insert a horizontal menu bar that spans most of the page’s width. Placing it near the top of the page, as part of the banner, lets site visitors easily find and use it.
Choose Insert→Ajatix→Advanced Drop Down Menu Light.
The Start Wizard dialog box opens, giving you two choices: “Create a new menu” and “Insert an existing menu.”
Choose “Create a new menu,” and then click OK.
Menu Light closes the Start Wizard and opens the Select Theme window. Choose from any of the themes listed in the box on the left. Click a theme to preview it in the box on the right.
Choose the “Horizontal-Dark Olive” theme and then click Apply.
Menu Light closes the Select Theme window and opens the New Menu window (see Figure 4-23).
In the Text field where the word Unamed is displayed, type Home.
The words you type here will show up as a button in your menu. As you type, you’re replacing the “Unnamed” label that Menu Light automatically gave the button with your own name for the link, Home in this case. You see the change to Home in the page list on the left and in the preview window.
Click inside the blank field next to Link, and then click the Browse button (the three dots) at the end of the box.
Menu Light opens a window displaying your website’s files.
Click index.html, and then click Open (Select on Macs).
A link to index.html appears in the Link box.
In the Title box, type Welcome to Cafe Soylent Green.
You won’t include a title for every link in the menu, but the text “Home” is so generic that a description will help web visitors who use screen readers.
Figure 4-23. With Menu Light, you build your navigation menu one item at a time. You use the Menu Editor list (shown on the left in this figure) to add and organize the items in your menu. Select a menu item in the list and Menu Light displays its properties on the right, the most important of which are Text and Link. As you can see from the preview at the bottom, the words you type in the Text box appear in the navigation menu. The Link box stores the link to a specific page or to a bookmark on a page.
Below the list, click the
sign (“Add New Item”) button.Menu Light adds a new, “Unnamed” menu item to the list. Next, you’ll create a drop-down menu that holds Cafe Soylent Green’s breakfast, lunch, and dinner menus.
In the Text box, type Menu. Click the Browse button next to the Link field, select the file menu.html, and then click Open (Select on Macs).
The “Menu” button ranks at the same hierarchical level as the Home button. The next three items you add—Breakfast, Lunch, and Dinner—will go in a submenu.
Click the Add New Item button (the
sign) again, and then click the right-pointing triangle, a.k.a. the “Move Item Right” button.After you add a new, top-level menu item, you turn it into a submenu by using the right arrow key to nest the item under an existing menu item.
In the Text box, change “Unnamed” to “Breakfast.” In the Link field, click the Browse button, and then select breakfast.html.
You’ve labeled your first button and created the first link for this menu bar.
Repeat steps 6 and 7 to add Lunch and Dinner buttons to the submenu.
No mysteries here. Use lunch.html and dinner.html for the link URLs respectively. When you finish, the New Menu window should look like the one in Figure 4-24. Time to move on to the About Us page.
Figure 4-24. In the list pane, the structure of your menu appears in standard outline form. You can expand and collapse the submenus by clicking the + or – sign buttons in Windows (shown here) or the flippy triangle on Macs. The preview pane not only shows you what your menu looks like, it lets you try out the drop-down menus, too. Triangle icons automatically added to menu items with submenus let visitors know there are more options.
Click the Add New Item button (the
sign) to add a new, unnamed menu item to the list, and then click the left arrow to move the item left and make it a top-level button. Type About Us in the Text field, and then, in the Link box, browse to and select about.html.The left arrow button repositions the new Unnamed item so that it’s at the same level as the Home and Menu buttons. Next, you’ll add two submenu items under About Us, Directions and Hours.
Repeat steps 6 and 7, using the labels Directions and Hours in the respective Text boxes, and directions.html and hours.html as the two link destinations.
As you add each button, Menu Light previews it as a submenu item under About Us.
Click OK. In the File name box of the Save Menu As window, type soylent_menu. Click Save to save your menu with a descriptive name. This is a good time to save all your work, so choose File→Save All.
The New Menu window closes and you see your menu in Design view in all its glory. If you’re eager to give it a test drive, switch to Live view. On the document toolbar’s Live View Options menu, turn on the Follow Links Continuously checkbox. You haven’t added your menu to the other pages in your site, so you’ll need to use the “back” arrow on the document toolbar to return to the Home page. Remember to turn Live view off when you move on to the next section, where you’ll style your menu.
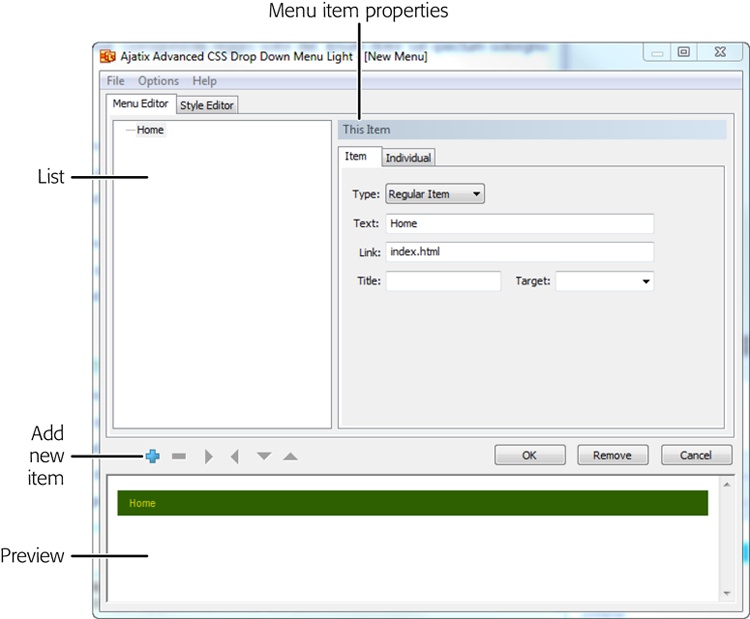
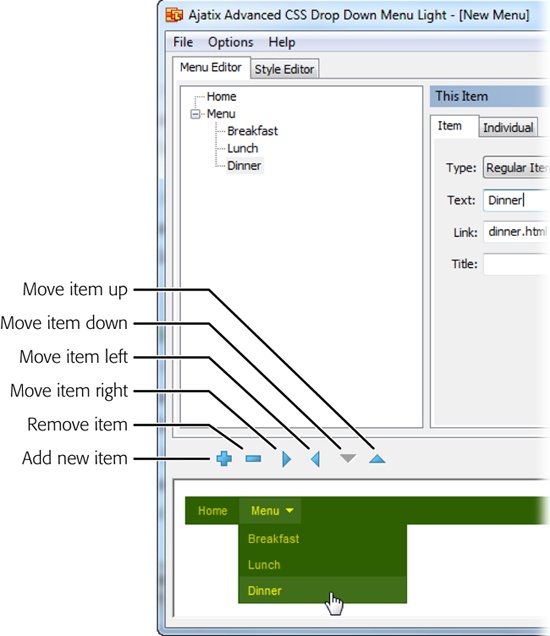
The basic look of your menu isn’t too bad, but it could benefit from some style changes. For example, the text is a little small, and the menu bar has only three items, so it doesn’t need to extend across the banner. Fortunately, styling your menu is almost as easy as creating it.
With index.html open in Design view, choose Insert→Ajatix→Advanced Drop Down Menu Light.
The Start Wizard opens, with the radio button “Edit menu on page” preselected and the menu you just created listed in the filename box. If your cursor is inside of your menu, when you choose the Insert→Ajatix→Advanced Drop Down Menu Light command, the Start Wizard does not appear. The menu editor opens with your menu loaded and ready for editing. In that case, you can skip the next step.
Click soylent_menu.css, and then click OK.
Menu Light’s Menu/Style Editor window opens, with the name of the menu in the title bar. You used the Menu Editor in the previous exercise to build your menu. Now, you’ll use the Style Editor to make it look nice.
Click the Style Editor tab.
The list on the left changes from listing the individual menu buttons you previously created like Home and About Us, to listing the generic terms Global, Top Menu, and Submenu. In the following steps you will see that the Global styles apply to the entire menu. Top Menu styles affect all Top Menu items and Submenu styles apply to all submenu items.
Initially, the Global item is selected so you see the Z-index property on the right. You see other Global properties grayed out because they’re not available in the Light version of Advanced CSS Drop Down Menu.
Leave the Z-index set to 100 and then, in the list, click Top Menu.
The Z-index determines whether your menu appears in front of or behind other elements on the page. It’s a standard CSS property covered on Visibility. Here’s how it works: The Z-index controls the order of stacked elements on a web page. An element with a larger Z-index (a higher number) appears in front of other elements. Menu Light automatically gives your menu a very high Z-index number: 100. In most cases, you won’t need to change it. However, if your menu is hidden underneath another page element, say the banner at the top of the page, you can enter a higher number here, to fix the problem. And, if you want your menu underneath another element, change this to a lower number. It may take some experimenting to get the order just right.
When you click Top Menu, the window changes. Two tabs divvy up the styling chores, Layout and Style.
Click the Layout tab, leave Orientation set to Horizontal, change the Width value to None, and leave “Menu align” set to Left.
When you finish, the settings should look like those in Figure 4-25. The Width property affects the width of the bar that holds your Top Menu buttons. Set to None, Menu Light applies no specific width to the menu bar. This removes the green band (background) that extends beyond the three menu items. The “Menu align” setting—Left, Center, or Right—positions the top menu bar. The Left option works best for Cafe Soylent Green because it places the menu directly below the name of the cafe.
Figure 4-25. To change a menu from horizontal orientation to vertical or vice versa, use Menu Light’s Orientation option. In this example, you set the width to None, so the menu bar can stretch and shrink to fit menu items. The Alignment option positions the menu bar to the right, left, or center of the page.
Click the Top Menu’s Style tab and then click the Background color swatch. In the Select Color window, choose Transparent. Turn off the Border option.
The Top Menu color and border settings apply to the background bar that appears behind menu items. With these settings, you hide that background bar. In the following steps, you’ll space out the menu buttons so you can see part of the banner behind them.
In the menu list, click Regular Items under Top Menu.
The properties here format the top-level menu buttons. Initially, the Size & Position tab is selected.
Set the width to 100px, the height to 30px, and the spacing to 20px.
With the Width and Height boxes checked, the dimension item (the rectangle) is set to fixed dimensions. So an item with the text “lunch” will have the same size background rectangle as an item with more text, like “early breakfast.” There’s one case that overrides this setting. If the text overflows the width of the box, the width remains fixed, but the “height” automatically adjusts, adding more lines to accommodate the text. For this project, with a width of 100px and a height of 30px, the text in the top menu buttons has some breathing room. The Spacing setting puts some distance between each of the menu items. With the background bar hidden (step 6), you see the site’s banner behind the top menu items. You can’t quite see the effect at this point because the top menu items don’t have any background color. You’ll fix that next.
Click the Colors tab and then turn on the checkboxes next to Normal and Mouseover.
You’ll pick the colors for a menu item’s normal state (when the link just sits on the page) and for the state when someone’s mouse hovers over the button. For each state, you can choose colors for the button’s background, text, and border.
Click the color swatch for Normal/Item.
The process for choosing a color in Menu Light is different for Windows PCs (Figure 4-26, left) and Macs (Figure 4-26, right). For the menu portion of this tutorial, you’ll specify colors as Red, Green, Blue (RGB) values.
On Windows PCs you see the operating system’s familiar color picker with swatches on the left and a spectrum square on the right. Below that, boxes let you specify color as a hex value, an HSL value, or a Red, Green, Blue (RGB) value. For this tutorial, use the RGB system.
When you click a color swatch on Macs, you see familiar color picker options. Choose your color using the color bar sliders (second button from left in the Colors window). Then, from the drop-down menu, choose RGB Sliders.
For the Normal menu link, set the RGB values as follows:
For Items, use 70, 133, 49.
For text, specify 242, 229, and 194.
As a finishing touch, turn on the border checkbox and set the border color to match the text (242, 229, and 194).
With these settings, buttons in their normal state have a green background and a dark gray border. The text is the same light color you used at the bottom of the page for the copyright background. For the menu’s mouseover state, you’ll swap the text and background colors.
Figure 4-26. Advanced CSS Menu Light uses your operating system’s color picker. That means it looks different for Windows PCs and Macs, even though you enter the same red, green, and blue (RGB) values. Left: For Windows PCs, type the color values in the circled boxes. Right: For Macs, choose the color bars (circled) and RGB sliders. Then, type the color values in the Red, Green, and Blue boxes.
Move to the Mouseover color swatches. Set the Item color to 242, 229, 194 and the text color to 70, 133, 49.
Reversing colors is a good way to provide feedback for rollover items. In the next step, you increase the size of the button text.
Click the Text tab and then, in the Face (think typeface) drop-down menu, choose “Verdana, Geneva, sans-serif.” Turn on the B (Bold) buttons next to Normal and Over, set the size of the text to 14px, set the Transform menu to Uppercase, and then set “Align menu” to Center.
CSS menus don’t currently recognize web fonts, so choosing “Verdana, Geneva, sans-serif” is a reasonable substitute for pt-sans. The bold and size settings make the button text easier to read. The Uppercase setting makes the text for all the items uniform in appearance. The Top Menu Text settings should now match Figure 4-27.
You style submenu items separately from top menu items. That’s next on the agenda.
In the list, click Submenu and then click the Style tab. Set the background and border colors to RGB (242, 229, 194).
You can use dramatically different colors for submenus, but that can be distracting. In this case, you’re styling the submenu to complement the colors in the Top Menu.
In the list under Submenu, click Regular Items. In the Size & Position tab, set the width to 100px, the height to 27px, and the spacing to 3px.
This width—100px—matches that of the top menu, while the height makes the submenus a tad shorter than the top menu. The spacing lets the submenu background show through. In effect, this creates a matching border around each of the submenu buttons.
In the Colors tab, set the Normal colors to match the Normal colors in the top menu.
For Items, use (70, 133, 49).
For text, specify (242, 229, 194).
For the border, use (242, 229, 194).
Next, pick the colors for the Mouseover (hover) state.
For the Mouseover state, set the Item color to “242, 229, 194” and the text and border colors to “70, 133, 49.”
The button’s background and text switch colors when a guest mouses over the item.
Click the Text tab. In the group of fonts at the top of the window, set Face to “Verdana, Geneva, sans-serif,” and the font size to 12. Turn on the bold setting (click the B button) for the Normal and Over states, set the Transform menu to Uppercase, and then set the Align menu to Center.
The text for the submenu will be a little smaller than the text for the Top Menu, but the other characteristics will match.
Click OK.
Menu Light rewrites the soylent_menu.css file to match your specifications.
Note
If you don’t see the changes immediately in your document, it may be because Dreamweaver hasn’t loaded the changes from the CSS file. If that’s the case, follow these steps. Choose File→Save All Related Files. That command may not be available if you used it recently. If that’s the case, choose File→Save All. Click the Live view button and then, in the document toolbar, click Refresh to reload the HTML and CSS files.
Choose File→Save All.
You save any changes made to index.html and to your CSS files. The next step is to add your menu to the other pages in your website.
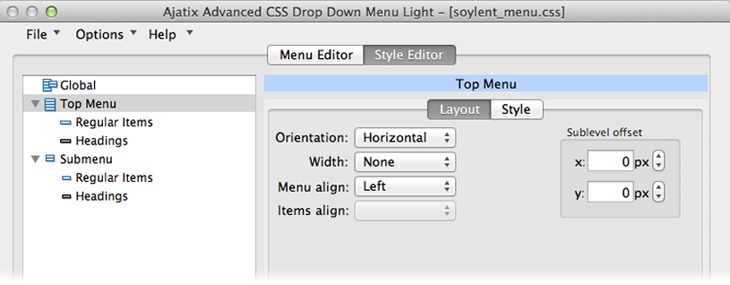
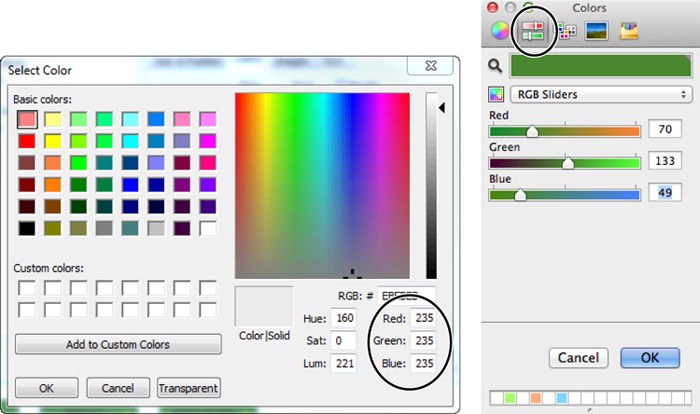
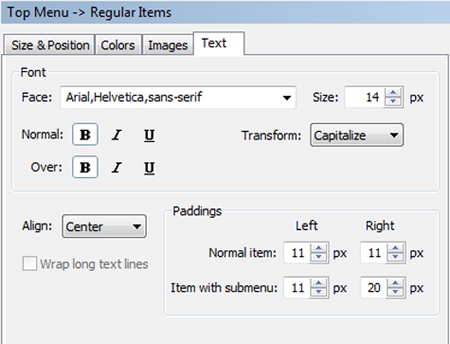
You’ve built a menu that links the pages in your site. The problem is that those pages don’t have the same navigation bar. Fortunately, it’s easy to add an existing menu to a web page. After all, the CSS file soylent_menu.css has all the formatting your menu needs, and Menu Light’s definition file, soylent_menu.ajm, stores the menu description.
Choose File→Open and select about.html.
You need to have a web page open in the document window to add an existing menu.
In the banner, click after the word “Green.”
This positions the cursor where you want to insert the menu.
Choose Insert→Ajatix→Advanced CSS Drop Down Menu Light.
Menu Light’s Start Wizard offers two options, “Create a new menu” and “Insert an Existing menu.”
Click “Insert an existing menu” and then click OK.
The dialog box closes and the Open Menu window appears, where you can select a file.
Choose soylent_menu.css and then click Open (Select for Macs).
The menu editor appears, where you see the Menu Editor and Style Editor tools. You don’t need to make any changes at this point.
Click OK.
The menu editing window closes and Menu Light adds your menu to the page.
Choose File→Close. When prompted to save your page, click Yes.
Menu Light saves and closes your web page, complete with its shiny new menu.
Repeat steps 1 through 7 for each page in your site.
Once all the pages have the same menu, visitors will find it a snap to jump from one to the other.
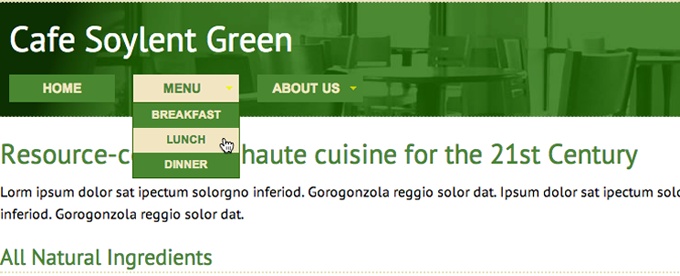
Get Dreamweaver CC: The Missing Manual now with the O’Reilly learning platform.
O’Reilly members experience books, live events, courses curated by job role, and more from O’Reilly and nearly 200 top publishers.

