Chapter 1. Introduction
Welcome to Google Cloud! Whether you’re a seasoned cloud developer or a sysadmin moving to the cloud for the first time, you’ll find Google Cloud a great platform for building everything from the smallest serverless apps to the largest enterprise applications and data pipelines.
This chapter is a high-level overview of the platform, with some tips on how to get started. If you are already using Google Cloud, you can likely skip this chapter. If you are new to the platform, whether coming from on-premises (on-prem) or another cloud provider, you’ll find here a brief overview of the services, tools, and features you need to know to get started. Toward the end of the chapter, we’ll describe how to translate your existing cloud provider knowledge quickly. Future chapters are all traditional collections of recipes you’ll find in a cookbook.
Overview
Like most cloud platforms, Google Cloud is a collection of physical resources such as servers and storage as well as higher-level services like BigQuery or AppEngine built on top of them, all running in Google data centers. The platform is organized into zones, regions, multiregions (continents), and then the entire globe. Table 1-1 shows a rough mental model of what each of these means.
| Service regionality | Description |
|---|---|
| Zonal | A large cluster of compute in one or several data center buildings. Should be considered a single failure domain.a |
| Regional | A cluster of data center buildings (campus). Made of multiple zones. Each zone is generally on a different power and network infrastructure and on a different upgrade schedule. Regional services will be served out of multiple zones or automatically fail over in the case of a zonal outage. |
| Multiregional | A group of regions generally on the same continent. Multiregional services will be served out of multiple regions and handle a regional failure. |
| Global | A service deployed across Google Cloud regions around the globe. |
a Technically, a zone is a logical abstraction of a region with the failure domain properties described, though this physical analogy can be helpful to understand the difference and is often how they are deployed. | |
Different services have different scopes; for example, a virtual machine (VM) lives in a zone, whereas an L7 network load balancer exists globally. Figure 1-1 shows an example of some basic compute resources.
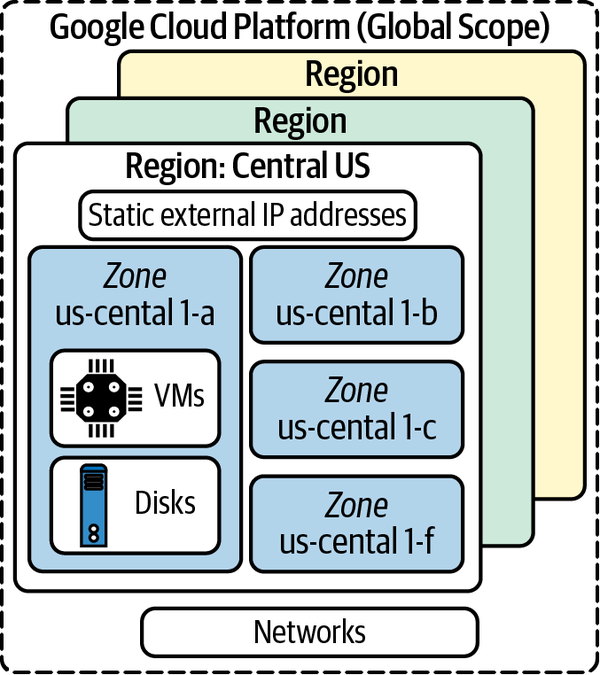
Figure 1-1. Compute and network resources in a region
In general, you should design production services to be deployed at least across a region, if not across multiple regions. This is often easier in Google Cloud than in other platforms, due to the large number of multiregional and global services, and the fact that these data centers are all connected with Google-owned fiber.
Projects
One of the key differences between Google Cloud and some other cloud platforms is the construct of a project. Every resource you create or interact with will exist in a project, and security roles and rules tend to be applied at a project level, though they can certainly be more granular. Resources within a project generally work together to form an application. A project naturally organizes resources securely, based on real-life use cases.
Often an application will have its own project for each life cycle, for example, “myapp-dev,” “myapp-staging,” and “myapp-prod.” Each successive project can have different security rules and a different copy of your application, with little work needed on your end to segment them. Sometimes projects are used at the team level. For example, a data science team primarily authoring data pipelines or performing data exploration will share a project for all this work, whereas the pipelines that get promoted to production will run in a separate, more locked-down project.
The majority of the time, most resources and services will interact with resources only in that project, and default security rules allow this. However, you can share resources between projects, and this becomes more common the larger your application or organization grows. For example, you may peer networks between projects or create security rules to allow objects stored on Google Cloud Storage (GCS) to be accessed across projects. Crossing a project boundary usually requires a conscious setup step, which helps with security.
How to create your first google cloud project
Here, we’ll set up an empty Google Cloud project and get $300 in credits.
Go to the Getting Started page and log in with a valid Gmail account.
Accept the terms of service, as shown in Figure 1-2.
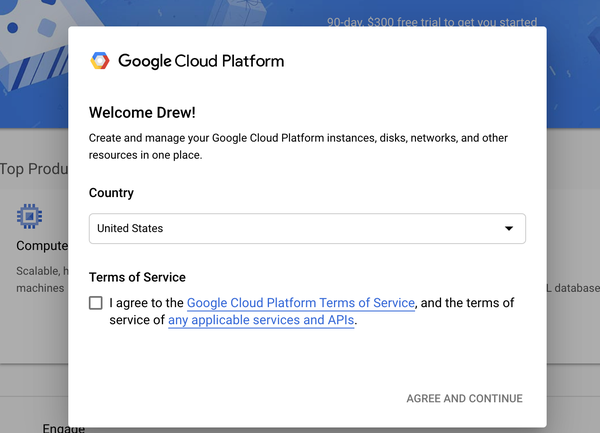
Figure 1-2. Google Cloud Terms of Service dialog box
Activate your free trial with the button in the upper right to receive $300 in credits.
Add a credit card to get started, as shown in Figure 1-3. Don’t worry; there is no autocharge or any extra charges after you go through your $300, so long as you turn off VMs and delete your data. It is generally hard to run up a huge bill, given your default quota for resources.
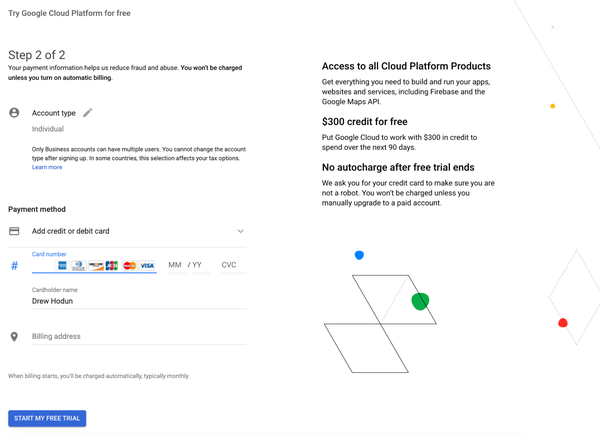
Figure 1-3. Google Cloud credit card dialog box
You’ll notice a new project has been created for you, as in Figure 1-4. You can decide to change the display name (but not the project ID or project number), or you can create a new project with the name you want.
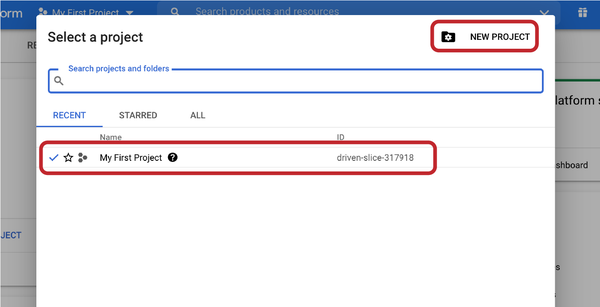
Figure 1-4. New project view
Congrats! You now have a project up and running on Google Cloud.
Enterprise projects
Google Cloud makes it easy to create one (or several) small projects for personal use, using a Gmail account. However, if you’re working in an enterprise context, projects will belong to an organization (your company, for example) and be organized into folders (think departments). Almost all resources still belong to individual projects, with the exception of some security rules and network resources.
Your experience as a solo personal developer and as an enterprise developer will also feel very similar, although some more security rules and restrictions may be in place. For example, you may not be able to create projects at will the way you did with your Gmail account, and you won’t have full power over those projects and resources. You will also likely see more errors related to organizational policies and restraints—for example, you shouldn’t be exposing port 22 for SSH on all your VMs, and you’ll see an error if you try. We recommend this guide to developing in a constrained Google Cloud environment.
Figure 1-5 is an example of a Google Cloud organization hierarchy, which organizes projects and resources.
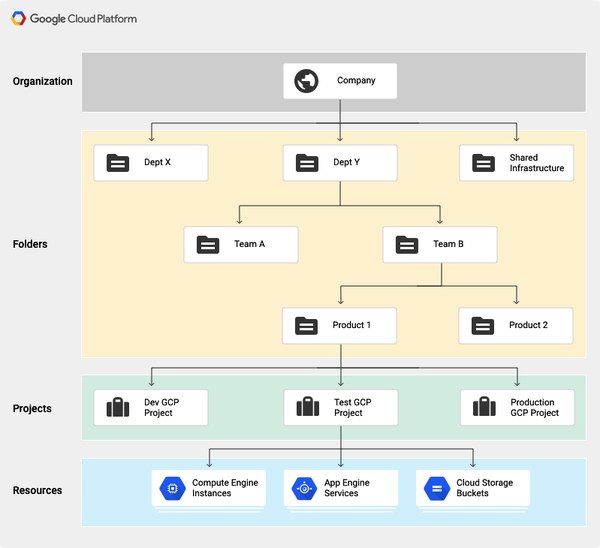
Figure 1-5. Google Cloud organization hierarchy (https://oreil.ly/eXevQ)
Cloud Console
Much of your day-to-day interaction with Google Cloud will be through the console via your browser. You’ve already seen the console, but you can again access it at the Google Cloud Platform landing page. Figure 1-6 shows the console with many of the more important items noted.
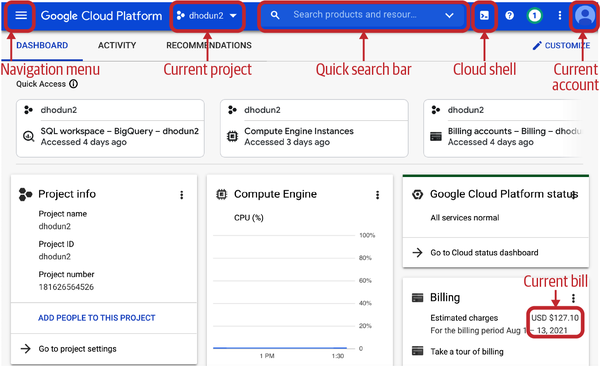
Figure 1-6. The Google Cloud Console
Table 1-2 shows some of the most commonly used parts of the Google Cloud Console.
| Name | Description |
|---|---|
| Navigation Menu | Click here to access the many GCP services. |
| Current Project | If you’re working in a few different projects, it’s helpful to see which one you’re in. |
| Quick Search Bar | As much as I used to pride myself on knowing where all the services were listed in the service menu and pinning them for quicker access, I find myself using the search bar more and more to get to different pages quickly. Google is a search company after all. |
| Cloud Shell | Quickly open up a shell in your browser with gcloud and other tools installed. More on that in a bit. |
| Current Account | This is where you can easily see which account you’re logged in as—particularly helpful if you are switching between your corporate account and Gmail account. |
| Current Project Bill | This is where your current month-to-date charges on the project appear. |
Click the navigation menu to see the available services. You can click Compute Engine directly if you want to go straight to the default page (a list of your VMs in that project), or you can hover over Compute Engine and see the additional subpages you can directly access, as shown in Figure 1-7.
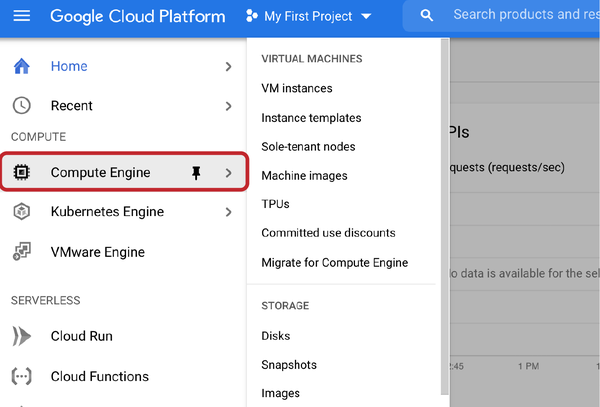
Figure 1-7. The navigation menu, where you access a service’s main page and subpages
Note that you can pin individual services if you use them frequently so they show up at the top of the navigation menu, as shown in Figure 1-8.
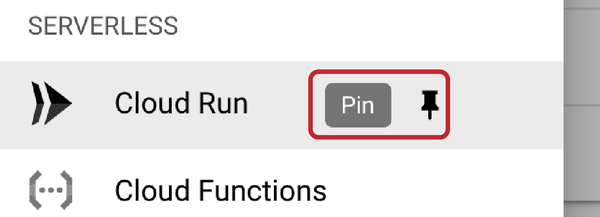
Figure 1-8. Pinning services in the navigation menu
Or you can use the search bar, which is often faster if you use many services.
Now, let’s show you a few things you can do in the Cloud Console. First, we’ll upload a file, and then we’ll run a query.
This example shows how to use the console to perform simple, day-to-day actions that we have previously performed using command-line interface (CLI) tools. In this case, we’ll create a GCS bucket and upload a file to it:
-
From the Cloud Console, open the Cloud Storage section, as in Figure 1-9.
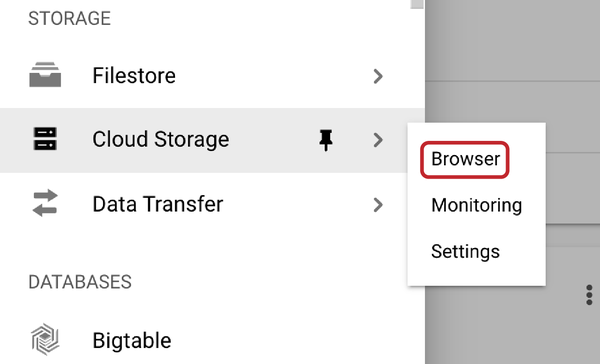
Figure 1-9. Cloud Storage browser from the navigation menu
-
Create a new bucket, as shown in Figure 1-10. Call it whatever you like.
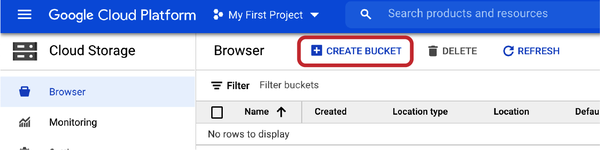
Figure 1-10. Create a new bucket
-
You should see your new bucket, as in Figure 1-11.
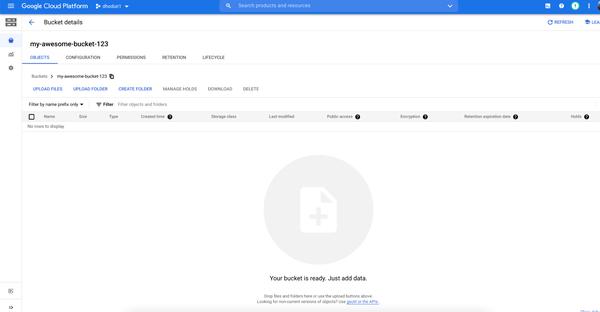
Figure 1-11. An empty bucket in the console
-
There are many ways to upload files to Cloud Storage. For now, create an empty text file or document on your desktop and then upload it through your browser. The result will look like Figure 1-12.
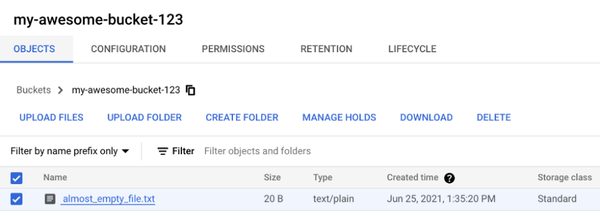
Figure 1-12. A new file in the new bucket
-
Congrats! You’ve uploaded a file. You can click it to see more data about the file, the size, and even an authenticated download link.
-
Don’t forget to delete the object and the bucket to avoid long-term charges.
gCloud Command-Line Tool
Much of your work interacting with Google Cloud, whether creating VMs, deploying apps, or running BigQuery queries, can easily be done from your workstation, using the gcloud suite of utilities. While every Google Cloud service has an API and often a client library in your preferred language, gcloud is a hugely useful, common, and first-class way to interact with Google Cloud.
Installing gcloud
The client software development kit (SDK) (gcloud) is an easy way to get started quickly with these services from the CLI and through scripting. Your system will need Python installed. If you have any issues with installation, skip ahead to the “Cloud Shell” section for an easy, browser-based gcloud experience.
Head to the SDK installer documentation to download the gcloud client for your OS. Your install sequence will look something like this (for macOS):
curl https://sdk.cloud.google.com | bash
Choose a directory (usually home directory). Just press Enter for default.
Allow the installer to modify your $PATH environment variable so you can immediately use gcloud just by typing it. Press y to continue.
Update your .bashrc or .bash_profile file so that the gcloud directory is always added to the
$PATHenvironment variable. Leave it blank and press Enter to keep the default.Restart your shell:
exec -l $SHELL
Initiate your gcloud installation:
gcloud init
You will need to choose an account (which may involve exiting to the browser to authenticate and copy and paste a code).
Pick a default project:
You are logged in as: [dhodun@google.com].
Pick cloud project to use:
 [1] dhodun1
 [2] dhodun2
Please enter numeric choice or text value (must exactly match list
item):
You will also have the choice of a default region or zone. These are common and helpful, particularly for VMs (in Google Compute Engine), especially if you are mainly working in a single region or zone and don’t want to specify those as flags on every gcloud command.
gCloud commands
Now that you have gcloud installed, here are a series of useful commands you’ll use. I recommend trying all of them now to get a feel for the tool.
Most gcloud commands follow the same format:
`gcloud` + `service` + `resource in that service` + `command`
Common commands are list, create, delete, and so on.
gcloud config listThis lists your current gcloud config, including the currently set project, account, region, and zone:
dhodun@cloudshell:~ (dhodun2)$ gcloud config list
[compute]
region = us-central1
zone = us-central1-c
[core]
account = dhodun@google.com
disable_usage_reporting = True
project = dhodun2
gcloud auth login- This adds another credentialed account to gcloud, which kicks off the browser-based auth workflow.
gcloud auth listThis lists all the accounts currently logged in to gcloud. This is common if you have a corporate account and a personal account (and can somehow be logged in on both on the same system) or if you have a couple of personal accounts for various projects.
dhodun@cloudshell:~ (dhodun2)$ gcloud auth list
 Credentialed Accounts
ACTIVE ACCOUNT
*       dhodun@google.com
        dhodun@mycorp.com
gcloud config set project <project_ID>- This command sets your currently configured default project for gcloud. Many other gcloud commands and even client libraries will infer the project to point at based on how gcloud is configured. Often, it is more convenient to set your default project with this command than to append “-p <project_ID>” to every other gcloud command you’re running.
gcloud auth set account <your_name@gmail.com>- This enables you to change accounts when a few of them are authenticated in gcloud.
gcloud components update- This updates gcloud. Remember to do this somewhat frequently; new commands, services, and capabilities are always being launched on Google Cloud.
gcloud compute instances create my-new-vm --image-family ubuntu-1604-lts --image-project ubuntu-os-cloud-
This creates a new Ubuntu VM with all the other default settings in your project. Output:
Created [https://www.googleapis.com/compute/v1/projects/dhodun2/zones/us-central1-c/instances/my-new-vm].
NAME       ZONE           MACHINE_TYPE   PREEMPTIBLE  INTERNAL_IP  EXTERNAL_IP   STATUS
my-new-vm  us-central1-c  n1-standard-1               10.128.0.29  35.223.11.69  RUNNING
gcloud compute instances list- This lists all the VMs in your currently set project.
gcloud container clusters list- This lists all the current Google Kubernetes Engine (GKE) clusters running in your project. You won’t see anything if you haven’t created a cluster yet.
gcloud compute instances delete my-new-vm- This command deletes the same VM you created in the previous example. Press y to confirm.
gcloud projects list --format="json"-
You can add formatting and filtering patterns to any gcloud to make it more readable. This command shows what happens if you want to see your details for all your projects in pretty JSON format.
[
  {
    "createTime": "2021-08-06T11:02:22.009Z",
    "lifecycleState": "ACTIVE",
    "name": "dhodun2",
    "projectId": "dhodun2",
    "projectNumber": "181626564526"
  }
]
If you want a deeper dive into gcloud, check out the official cheat sheet.
Other gcloud Tools
Now that you have gcloud installed, you actually have a few other tools as well:
bq for CLI access to BigQuery, Google Cloud’s serverless data warehouse
kubectl, the open source tool to access and interact with Kubernetes clusters
These tools will be covered in future chapters, but here are a few sample commands to give you the flavor:
gsutil ls- This lists all the GCS buckets you have access to.
gsutil ls gs://gcp-public-data-landsat/-
This is the normal list command on a folder in a bucket.
dhodun@cloudshell:~ (dhodun2)$ gsutil ls gs://gcp-public-data-landsat/
gs://gcp-public-data-landsat/index.csv.gz
gs://gcp-public-data-landsat/LC08/
gs://gcp-public-data-landsat/LE07/
gs://gcp-public-data-landsat/LM01/
gs://gcp-public-data-landsat/LM02/
gs://gcp-public-data-landsat/LM03/
gs://gcp-public-data-landsat/LM04/
gs://gcp-public-data-landsat/LM05/
gs://gcp-public-data-landsat/LO08/
gs://gcp-public-data-landsat/LT04/
gs://gcp-public-data-landsat/LT05/
gs://gcp-public-data-landsat/LT08/
bq ls -project_id bigquery-public-data-
This lists all the data sets you have list access to in the given project. Or leave the project flag blank to see everything you have access to in the current project. (If you have a new project, you won’t see anything.)
dhodun@cloudshell:~ (dhodun2)$ bq ls -project_id bigquery-public-data
               datasetId
 -------------------------------------
  austin_311
  austin_bikeshare
  austin_crime
  austin_incidents
  Austin_waste
...
bq query --nouse_legacy_sql \-
'SELECT
   COUNT(*)
 FROM
   `bigquery-public-data`.samples.shakespeare'
This runs a query on a BigQuery data set, in this case simply counting the number of rows on a publicly available table. You’ll see this output:
dhodun@cloudshell:~ (dhodun2)$ bq query --nouse_legacy_sql \
> 'SELECT
>    COUNT(*)
>  FROM
>    `bigquery-public-data`.samples.shakespeare'

Waiting on bqjob_r5dc0d7cca7a2a56_0000017b2be329b3_1 ... (0s) Current status: DONE
+--------+
|  f0_   |
+--------+
| 164656 |
+--------+
gcloud container clusters get-credentials CLUSTER_NAME --zone ZONE-
Authenticate and store credentials to a Google Kubernetes Engine cluster so you can then use the kubectl Kubernetes CLI. You can see in the output that the credentials are cached and a kubeconfig entry generated so that you can then use kubectl naturally.
dhodun@cloudshell:~ (dhodun2)$ gcloud container clusters get-credentials my-first-cluster-1 --zone us-central1-c
Fetching cluster endpoint and auth data.
kubeconfig entry generated for my-first-cluster-1.
kubectl get podsNow you can use kubectl to interact with your cluster like you would any Kubernetes clusters. You’ll use this in Chapter 6.
dhodun@cloudshell:~ (dhodun2)$ kubectl get pods
NAME                                            READY   STATUS        RESTARTS   AGE
Redis                                           3/3     Running       0          2m1s
web-server                                      3/3     Running       0          79s
Cloud Shell
One of the great features for getting started with Google Cloud is Cloud Shell, a browser-based development and operations environment. It is essentially a just-in-time small VM that boots with gcloud, kubectl, client libraries, and other tools installed and is preauthenticated to Google Cloud with your account. It even has a web-based integrated development environment (IDE). This allows you to operate against your cloud environment without having to install any software on your desktop. It also can be used to log on to VMs in your browser, which prevents the need for downloading and managing SSH keys.
Here’s how to connect to a VM, using Cloud Shell:
From the Cloud Console, click the Cloud Shell icon in the upper right, as in Figure 1-13.
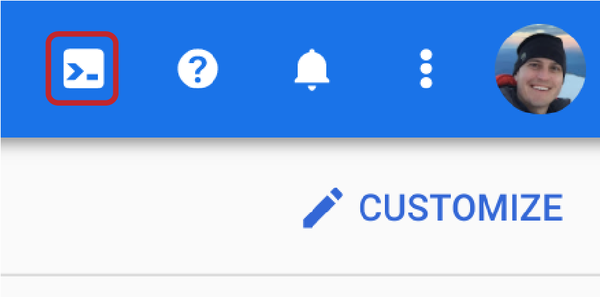
Figure 1-13. Cloud Shell icon
Once it is provisioned, run
gcloud config listas in Figure 1-14 to see that you’re authenticated, pointing to your current project, and ready to run other commands.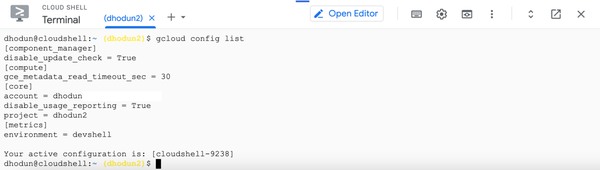
Figure 1-14. Basic Cloud Shell output
You can also use Cloud Shell from the GCE page to use SSH directly on a VM. If you haven’t already deleted that test VM, you can go to the Google Compute Engine page and click the SSH button to the right of the VM to test this, as in Figure 1-15.
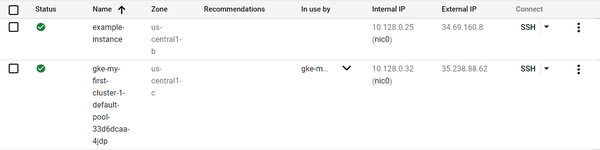
Figure 1-15. The Cloud Shell button in the GCE VM list
A new window opens, and fresh SSH keys will be transferred to the VM so you can securely connect. Note: you don’t have to worry about transferring these keys yourself!
Now that you’re on the VM, as in Figure 1-16, you can verify that you have gcloud access. However, you will be authenticated as the default service account and not as your user account. Putting your user credentials on VMs is not recommended, because anyone who gains access to that machine could impersonate you when calling other Google Cloud APIs.
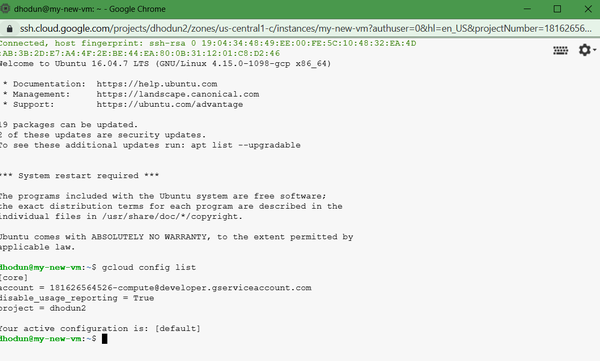
Figure 1-16. Cloud shell SSH session into a GCE VM
Client Libraries
As you write increasingly cloud-native applications, you will interact with more and more cloud services in your code. For example, you may store files on Google Cloud Storage or write messages to the Pub/Sub message bus. Rather than write directly to the API, Google Cloud has client libraries in many languages to make this much easier, including Go, Java, Node.js, Python, Ruby, PHP, C#, and C++. Often they are shipped for individual services or groups of services. You can see all of them in the Cloud Client Libraries.
Here is a very simple example of using a client library versus using the gcloud and similar CLI commands we’ve used before. We will create a bucket with the Storage Client Library and Cloud Shell. We’ll use a Python script and the client library to create a Google Cloud Storage bucket and upload a file.
This code sample, as well as all other code samples for this chapter, is in this book’s GitHub repository. You can follow along and copy the code for this example.
Open a Cloud Shell environment as we just did.
Click Open Editor in the upper right of Cloud Shell to open the Cloud Shell IDE, as in Figure 1-17.

Figure 1-17. Open Editor button
In the File explorer, click File and then New File; and name it storage_script.py. Enter the following code to this file. Change the bucket name to something unique and random. Your project name is a good option. Save the file. You can also find the script in the GitHub repo, which you can clone into your Cloud Shell environment.
from google.cloud import storage

BUCKET_NAME = "INSERT-NEW-BUCKET-NAME"
FILE = "file.txt"

client = storage.Client()

# create a new bucket
bucket = client.bucket(BUCKET_NAME)
bucket.storage_class = "STANDARD"
new_bucket = client.create_bucket(bucket, location="us")

# get the bucket (useful if it already exists)
bucket = client.get_bucket(BUCKET_NAME)

# create and upload a new blob from text
blob = bucket.blob('remote/path/new_file.txt')
blob.upload_from_string('New file!')
print(blob.download_as_string())

# create and upload a new blob from file
blob2 = bucket.blob('remote/path/file.txt')
blob2.upload_from_filename(filename='file.txt')
print(blob2.download_as_string())
Create another file and name it file.txt. Add some text like “Hello World!” and save the file.
When you finish editing, click Open Terminal on the right side of Cloud Shell, as in Figure 1-18, to go back to terminal mode.

Figure 1-18. Open Terminal button in Cloud Shell
Before you run your script, you’ll need to use the pip tool to install the Cloud Storage client library for Python from PyPi, Python’s package repository.
pip3 install google-cloud-storage
Now you can run your script.
python3 storage_script.py
You should see the following output from the script reading the contents of both files:
b'New file!'
b'Hello World!'
Delete your files and the bucket, using the browser to avoid extra charges.
You just used one of the client libraries to connect programmatically to a Google Cloud service. There are many client libraries, depending on the services you’re working with.
If you are working more on the infrastructure side, you will largely use the CLI tools or infrastructure workflow tools like Terraform, but if you are on the application side, you will frequently be using these client libraries.
Also note that when we created the client, client = storage.Client(), we didn’t provide any credentials or a project ID. This is because the client libraries can infer credentials based on a number of settings on the local machine, starting with Application Default Credentials. In Cloud Shell, this has already been set for you to your user account.
This is beyond the scope of the intro, but just know that when you use your own credentials as Application Default Credentials, any code running on your machine that hits a Google Cloud API will try to use your potentially powerful user credentials. Refer to this guide for more.
Billing
While advanced setup of enterprise billing accounts is outside the scope of this book, you should understand the basics of billing. As you consume Google Cloud resources in a project, charges are accumulated and usually updated in the console nightly. If you open the Billing section of the console, you will see a summary of your current charges, as in Figure 1-19.
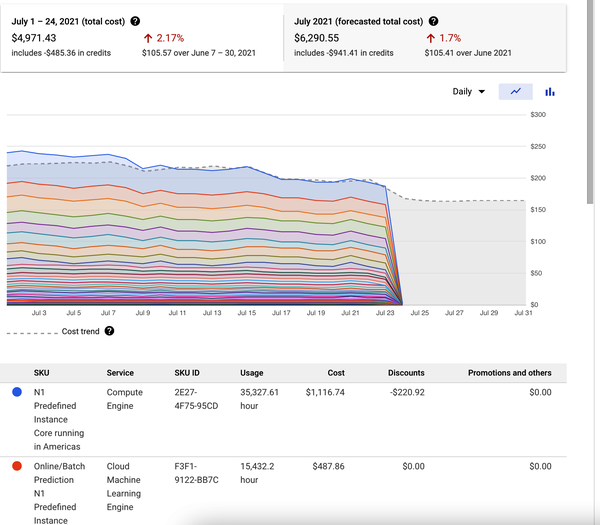
Figure 1-19. Billing breakdown for a single project
A project is always assigned to a billing account, which pays for the project. If you created a project on your credit card, you also created a billing account. In an enterprise setting, you will likely be given a project with a billing account already assigned. The finance or procurement team may run this account, allowing them control of the payment process, and you control of your project resources. You can still see the current cost of your project, however.
Pricing
Google Cloud services are charged as you use them. That is, there are no up-front costs, and services are often billed by the second or even less. If you have a VM powered on for 95 seconds, you pay for only 95 seconds of compute usage.
Each service has a different pricing model. For example, in BigQuery you pay for the underlying storage based on how much data you have and how long it is stored, and then you also pay for each query based on how much data is scanned. In Google Compute Engine, however, you pay per second for resources consumed for powered-on VMs, such as cores, RAM, and disk storage.
If you just created an account, you have $300 in free credits to use for a few months. Many services also have a free tier for small usage to help you get started. Check out documentation for each service for more details. A great tool to understand and predict your charges is the Google Cloud Pricing Calculator. You can add services to estimate your bill, as in Figure 1-20.
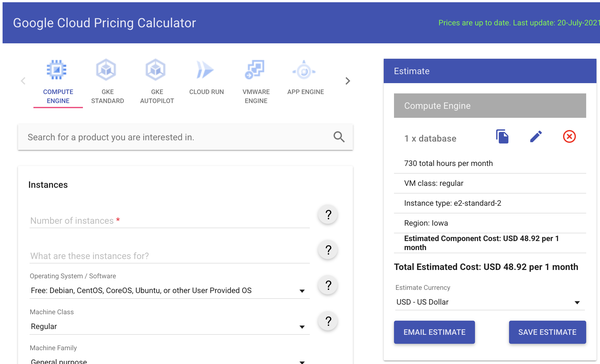
Figure 1-20. Google Cloud Pricing Calculator
Cloud Code (IDE Extensions)
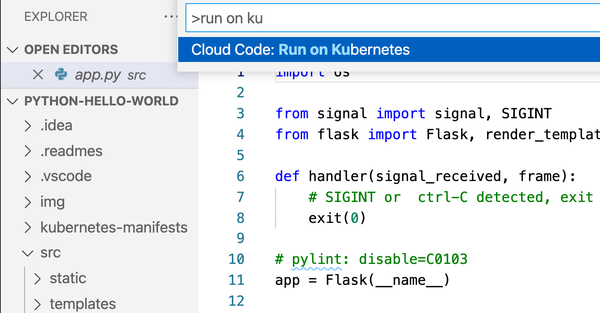
Another tool absolutely worth installing is Cloud Code, a plug-in for popular IDEs, VSCode, and IntelliJ as well as Cloud Shell. Cloud Code provides auto-completion and in-IDE tooling for Kubernetes and Cloud Run–based applications. It bridges the gap between local development and deployment in cloud environments, provides live debugging for your container workloads, and allows you to manage these environments with a single click. Figure 1-21 shows easily running an application from the IDE, targeting a local Kubernetes minikube cluster. You can just as easily target a cluster in the cloud.
This Cookbook
The rest of this book is divided based on technology or product areas. Specific chapters, for example, cover topics like Kubernetes and BigQuery. The rest of these chapters are also divided into the typical cookbook format, with a problem to be solved and a solution, using cloud tools, accompanied by example code or scripts. Now, on to Chapter 2, which covers Google Cloud Functions.
Get Google Cloud Cookbook now with the O’Reilly learning platform.
O’Reilly members experience books, live events, courses curated by job role, and more from O’Reilly and nearly 200 top publishers.

