Chapter 6. Mixing HTML5 Video and Canvas
Using the new <video> tag,
HTML5 lets sites show video directly in HTML without needing any plug-in
technologies. However, the simple <video> tag opens up a whole slew of
complexities and opportunities for developers. While we can’t cover
everything related to video in this chapter, we will introduce you to the
HTML5 <video> tag, and then show
you ways in which video can be incorporated and manipulated by HTML5
Canvas.
HTML5 Video Support
HTML5 specifies a new tag, <video>, that allows developers to place
video directly in an HTML page. With a few simple options, you can
autoplay, loop, and add playback controls to the embedded video.
First, let’s talk about video format support, which is a very complicated issue. Some video formats are free, and others are licensed. Some formats look better than others, some make smaller file sizes, and some are supported in one browser while others are supported in a different browser. In this chapter we will concentrate on three formats that either have broad support now or promise to have broad support in the future: .ogg, .mp4, and .webm.
We will discuss these video formats in terms of video codecs. Each format uses one or more codecs to compress and decompress video. Codecs are usually the secret sauce of a video format because compression is the key to making video that, in the wild, can convert very large files into file sizes that can be easily transported on the Internet.
Theora + Vorbis = .ogg
Theora (http://www.theora.org/) is an open source, free video codec developed by Xiph.org. Vorbis (http://www.vorbis.com) is a free, open source audio codec that is used in conjunction with Theora. Both Theora and Vorbis are stored in an .ogg file. .ogg files have the broadest support among traditional web browsers, but, unfortunately, not on handheld devices. Many commercial companies (e.g., Apple) have balked at using Theora/Vorbis because they are unsure whether somewhere, someplace, someone might own a patent that covers part of the technology, and thus they might get sued for using it.
Note
Sometimes technology companies get hit with what is known as a submarine patent. This was a patent tactic—available up until 1995 in the U.S.—that allowed a filer to delay the publication of a patent. Because patents were only enforceable for 17 years, if someone filed one but delayed the publications, he could wait years (even decades) until someone else came up with the same idea, then hit that person with a lawsuit.
H.264 + $$$ = .mp4
H.264 is a high-quality video standard that has received the backing of some very big players, such as Apple, Adobe, and Microsoft. However, despite offering high-quality video, it only defines a standard—not a video codec. An organization named MPEG LA owns the intellectual property, and they license it out to software and hardware vendors. Many companies that have implemented H.264 have done so with their own proprietary codecs. As a result, the varying codecs are incompatible with one another, making this a tricky format to use across multiple platforms. H.264 videos have the .mp4 extension. Most for-profit corporations have implemented support for this format on their platforms, but the developers of open source browsers like Firefox and Opera have not. In late 2010, Google dropped H.264 support in Chrome in favor of WebM.
VP8 + Vorbis = .webm
WebM is a new open source video standard supported by Google, Adobe, Mozilla, and Opera. It is based on the VP8 codec and includes Vorbis (just like Theora) as an audio codec. When YouTube.com announced they had converted many of their videos to be HTML5-compatible, one of the formats they used was WebM. Currently, only Google Chrome and Opera support WebM, but broader support should be coming in the future.
To summarize, here is a chart of the video formats supported by various browsers.
Platform | .ogg | .mp4 | .webm |
Android | X | ||
Firefox | X | ||
Chrome | X | X | |
iPhone | X | ||
Internet Explorer 9 | X | ||
Opera | X | X | |
Safari | X |
As you can see, no one format is supported by all browsers or platforms. Because HTML5 Canvas only supports video in the format supported by the browser it is implemented within, we must apply a strategy that uses multiple formats to play video.
Combining All Three
The examples in this chapter will introduce a strategy that may
seem crazy at first—using all three formats at once. While this might
seem to be more work than necessary, right now it is the only way to
ensure broad support across as many platforms as possible. The HTML5
<video> tag allows us to
specify multiple formats for a single video, and this will help us
achieve our goal of broad video support when working with HTML5
Canvas.
Converting Video Formats
Before we get into some video demonstrations, we should discuss video conversions. Since we are going to use .ogg, .mp4, and .webm videos in all our projects, we need to have a way to convert video to these formats. Converting video can be a daunting task for someone unfamiliar with all the existing and competing formats; luckily, there are some great free tools to help us do just that:
- Miro Video Converter (http://www.mirovideoconverter.com/)
This application will quickly convert most video types to .ogg, .mp4, and .webm. It is available for both Windows and Mac.
- SUPER © (http://www.erightsoft.com/SUPER.html)
This is a free video-conversion tool for Windows only that creates .mp4 and .ogg formats. If you can navigate through the maze of screens trying to sell you other products, it can be very useful for video conversions.
- HandBrake (http://handbrake.fr/)
This video-converter application for the Macintosh platform creates .mp4 and .ogg file types.
- FFmpeg (http://ffmpeg.org/)
This is the ultimate cross-platform, command-line tool for doing video conversions. It works in Windows/Mac/Linux and can do nearly any conversion you desire. However, there is no GUI interface, so it can be daunting for beginners. Some of the tools above use FFmpeg as their engine to do video conversions.
Basic HTML5 Video Implementation
In the <video> tag’s most
minimal implementation, it only requires a valid src atrribute. For example, if we took a nifty
little video of the waves crashing at Muir Beach, California (just north
of San Francisco), and we encoded it as an H.264 .mp4 file, the code might look like
this:
<video src="muirbeach.mp4" />
Note
To see an example of this basic code, look at the CH6EX1.html file in the code distribution.
There are many properties that can be set in an HTML5 video embed.
These properties are actually part of the
HTMLMediaElement interface, implemented
by the HTMLVideoElement object. Some of the
more important properties include:
srcautoplaytrueorfalse. Forces the video to play automatically when loaded.looptrueorfalse. Loops the video back to the beginning when it has finished playing (at the time of this writing, this did not work in Firefox).volumeA number between 0 and 1. Sets the volume level of the playing video.
posterA URL to an image that will be shown while the video is loading.
There are also some methods of HTMLVideoElement that are necessary when playing
video in conjunction with JavaScript and Canvas:
Additionally, there are some properties you can use to check the status of a video, including:
durationcurrentTimeThe current playing time of the video in seconds. This can be used in conjunction with
durationfor some interesting effects, which we will explore later.endedtrueorfalse, depending on whether the video has finished playing.mutedtrueorfalse. Used to inquire whether the sound of the playing video has been muted.pausedtrueorfalse. Used to inquire whether the video is currently paused.
Note
There are even more properties that exist for HTMLVideoElement. Check them out at http://www.w3.org/2010/05/video/mediaevents.html.
Plain-Vanilla Video Embed
To demonstrate a plain-vanilla embed, we are going to work under our previously established rules for video formats. We will use three formats because no one format will work in every browser. We have created a version of the Muir Beach video as a .webm, an .ogg, and a .mp4. For the rest of this chapter, we will use all three formats in all of our video embeds.
To support all three formats at once, we must use an alternative
method for setting the src attribute
of the <video> tag. Why?
Because we need to specify three different video formats instead of one
in our HTML page. To do this, we add <source> tags within the <video> tag:
<video id="thevideo"  width="320" height="240">
 <source src="muirbeach.mp4" type='video/mp4; codecs="avc1.42E01E, mp4a.40.2"' >
 <source src="muirbeach.webm"type='video/webm; codecs="vp8, vorbis"' >
 <source src="muirbeach.ogg" type='video/ogg; codecs="theora, vorbis"'>
</video>
Note
We put the .mp4 file first
in the src list because on certain
iOS (iPhone, iPad) devices, the browser will not attempt to load any
other src type than the first one
listed. Since those devices support .mp4 files, we list them first to get the
broadest support for HTML5 video.
When a web browser reads this HTML, it will attempt to load each video in succession. If it does not support one format, it will try the next one. Using this style of embed allows the code in Example 6-1 to execute on all HTML5-compliant browsers.
Also notice that we have set the width and height properties of the video. While these
are not necessarily needed (as we saw earlier), it is proper HTML form
to include them, and we will need them a bit later when we start to
manipulate the video size in code.
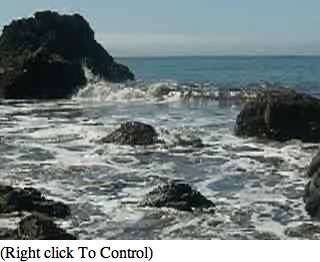
<!doctype html>
<html lang="en">
<head>
<meta charset="UTF-8">
<title>CH6EX1: Basic HTML5 Video</title>
</head>
<body>
<div>
<video id="thevideo"  width="320" height="240">
 <source src="muirbeach.mp4" type='video/mp4; codecs="avc1.42E01E, mp4a.40.2"' >
 <source src="muirbeach.webm"type='video/webm; codecs="vp8, vorbis"' >
 <source src="muirbeach.ogg" type='video/ogg; codecs="theora, vorbis"'>
</video>
</div>
<div>
(Right-click To Control)
</div>
</body>
</html>
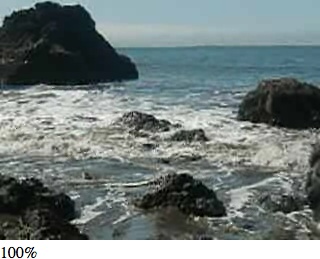
Figure 6-1 is an example of the plain-vanilla video embed in an HTML5 page. There are no controls displayed in the default settings, but if you right-click on the video, controls will appear that can be used in conjunction with the embedded video.
Video with Controls, Loop, and Autoplay
While a video displayed without controls might suit your needs, most users expect to see some way to control a video. Also, as the developer, you might want a video to play automatically or loop back to the beginning when it finishes. All of these things (if supported in the browser) are very easy to accomplish in HTML5.
Adding controls, looping, and autoplay to an HTML5 video embed is
simple. All you need to do is specify the options controls, loop, and/or autoplay in the <video> tag, like this:
<video autoplay loop controls id="thevideo" width="320" height="240">
 <source src="muirbeach.mp4" type='video/mp4; codecs="avc1.42E01E, mp4a.40.2"' >
 <source src="muirbeach.webm"type='video/webm; codecs="vp8, vorbis"' >
 <source src="muirbeach.ogg" type='video/ogg; codecs="theora, vorbis"'>
</video>
Note
As of this writing, loop does
not work in Firefox; however, support is expected in version
4.0.
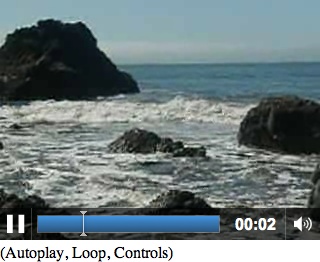
The code to embed our Muir Beach video with controls, loop, and autoplay is in CH6EX2.html in the code distribution. Figure 6-2 shows what a video with controls looks like in Google Chrome.
You can see the full code in Example 6-2.
<!doctype html>
<html lang="en">
<head>
<meta charset="UTF-8">
<title>CH6EX2: Basic HTML5 Video With Controls</title>
</head>
<body>
<div>
<video autoplay loop controls id="thevideo" width="320" height="240">
 <source src="muirbeach.mp4" type='video/mp4; codecs="avc1.42E01E, mp4a.40.2"' >
 <source src="muirbeach.webm"type='video/webm; codecs="vp8, vorbis"' >
 <source src="muirbeach.ogg" type='video/ogg; codecs="theora, vorbis"'>
</video>
</div>
<div>
(Autoplay, Loop, Controls)
</div>
</body>
</html>
Altering the Width and Height of the Video
In our first example, we showed how you could embed a video
without changing the default width or height. However, there are many
good reasons why you might want to change the default width and height
of a video in the HTML page, such as fitting it into a particular part
of the page, or enlarging it so it is easier to see. Similar to
embedding an image into HTML with the <img> tag, a video will scale to
whatever width and height you provide in the <video> tag. Also, like with the
<img> tag, this scale does not
affect the size of the object downloaded. If the video is 5 megabytes at
640×480, it will still be 5 megabytes when displayed at 180×120—just
scaled to fit that size.
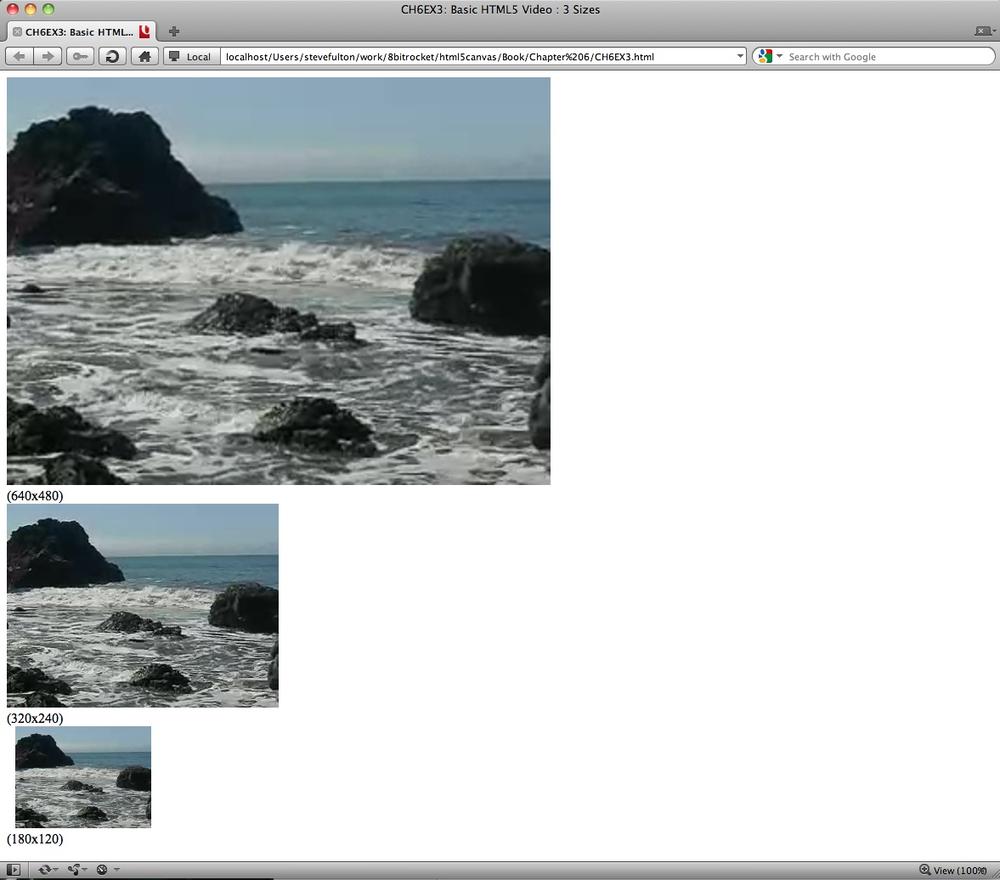
In Example 6-3 (CH6EX3.html) we have scaled the same video to three different sizes and displayed them on the same page. Figure 6-3 shows what this looks like in HTML (again, rendered in the Google Chrome browser).
<!doctype html>
<html lang="en">
<head>
<meta charset="UTF-8">
<title>CH6EX3: Basic HTML5 Video: 3 Sizes</title>
</head>
<body>
<div>
<video autoplay loop controls  width="640" height="480" id="thevideo">
 <source src="muirbeach.mp4" type='video/mp4; codecs="avc1.42E01E, mp4a.40.2"' >
 <source src="muirbeach.webm"type='video/webm; codecs="vp8, vorbis"' >
 <source src="muirbeach.ogg" type='video/ogg; codecs="theora, vorbis"'>
 <source src="muirbeach.mp4" type='video/mp4; codecs="avc1.42E01E, mp4a.40.2"' >
</video>
</div>
<div>
(640×480)
<div>
<video  autoplay loop controls  width="320" height="240"id="thevideo">
 <source src="muirbeach.mp4" type='video/mp4; codecs="avc1.42E01E, mp4a.40.2"' >
 <source src="muirbeach.webm"type='video/webm; codecs="vp8, vorbis"' >
 <source src="muirbeach.ogg" type='video/ogg; codecs="theora, vorbis"'>
</video>
</div>
<div>
(320×240)
</div>
<div>
<video autoplay loop controls  width="180" height="120"id="thevideo">
 <source src="muirbeach.mp4" type='video/mp4; codecs="avc1.42E01E, mp4a.40.2"' >
 <source src="muirbeach.webm"type='video/webm; codecs="vp8, vorbis"' >
 <source src="muirbeach.ogg" type='video/ogg; codecs="theora, vorbis"'>
</video>
</div>
<div>
(180×120)
</body>
</html>
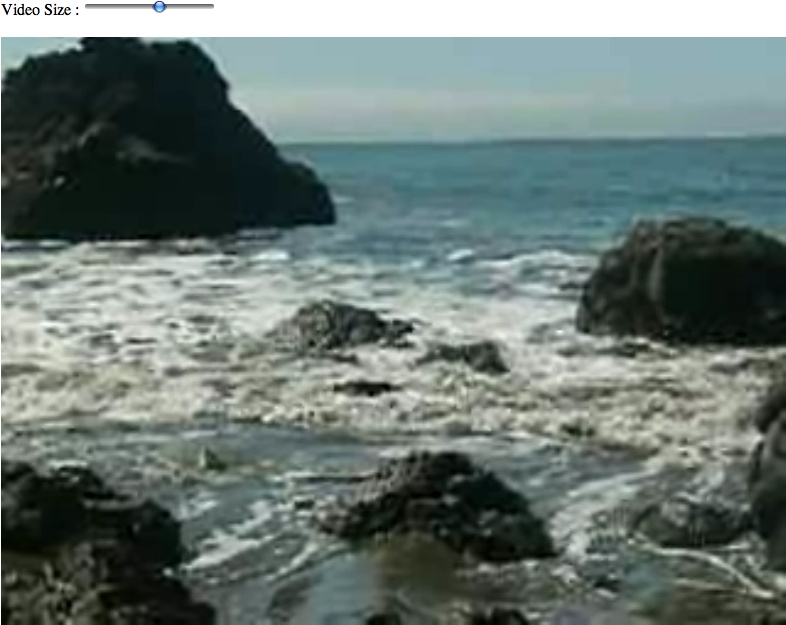
Dynamically scaling a video
Now it is time for a more elaborate (and we think more
effective) example of scaling a video. By changing the width and height attributes of the <video> tag, we can scale the video on
the fly. While there may be a few practical reasons you would do this
in a real-world situation, it is also an effective way to demonstrate
some of the power of the HTML5 <video> tag.
First, we need to add an HTML5 range control to the page:
<form>
 Video Size: <input type="range" id="videoSize"
       min="80"
       max="1280"
       step="1"
       value="320"/>
</form>
We discussed the details of the range control in Chapter 3, but just to refresh your
memory, range is a new form control
added to HTML5 that creates a slider of values. We are going to use
this slider to set the video size.
Note
If the browser does not support the range element, a text box will appear that
will allow the user to enter text directly.
To capture the change to the video size, we need to add some
JavaScript. We create an event listener for the load event that calls the eventWindowLoaded() function when the page
loads (this should look very familiar to you by now):
window.addEventListener('load', eventWindowLoaded, false);We need to set up a couple things in the eventWindowLoaded() function. First, we need
to add an event listener for a change to the videoSize form control we created in the
HTML page. A “change” to the control (e.g., someone slides it right or
left) will create an event handled by the videoSizeChanged() event handler:
var sizeElement = document.getElementById("videoSize")
sizeElement.addEventListener('change', videoSizeChanged, false);
Next, we need to create a value that can be used to set both the
width and the height of the video at once. This is because we want to
keep the proper aspect ratio of the video (the
ratio of width to height) when the video is resized. To do this, we
create the variable widthtoHeightRatio, which is simply the
width of the video divided by the height:
var widthtoHeightRatio = videoElement.width/videoElement.height;
Finally, when the user changes the videoSize range control, the videoSizeChanged() event handler is called.
This function sets the width
property of the video to the value of the range control (target.value), then sets the height of the video to the same value, and
divides by the widthtoHeightRatio
value we just created. The effect is that the video resizes while
playing. Figure 6-4
captures one moment of that:
function videoSizeChanged(e) {

      var target = e.target;
      var videoElement = document.getElementById("theVideo");
      videoElement.width = target.value;
      videoElement.height = target.value/widthtoHeightRatio;

   }
Example 6-4 offers the full code listing for this application.
<!doctype html>
<html lang="en">
<head>
<meta charset="UTF-8">
<title>CH6EX4: Basic HTML5 Video With Resize Range Control </title>
<script type="text/javascript">
window.addEventListener('load', eventWindowLoaded, false);
function eventWindowLoaded() {
   var sizeElement = document.getElementById("videoSize")
   sizeElement.addEventListener('change', videoSizeChanged, false);
   var videoElement = document.getElementById("theVideo");
   var widthtoHeightRatio = videoElement.width/videoElement.height;

function videoSizeChanged(e) {
      var target = e.target;
      var videoElement = document.getElementById("theVideo");
      videoElement.width = target.value;
      videoElement.height = target.value/widthtoHeightRatio;


   }

}

</script>
</head>
<body>
<div>
<form>
 Video Size: <input type="range" id="videoSize"
       min="80"
       max="1280"
       step="1"
       value="320"/>
</form>
  <br>
</div>
<div>
<video autoplay loop controls id="theVideo" width="320" height="240">
 <source src="muirbeach.mp4" type='video/mp4; codecs="avc1.42E01E, mp4a.40.2"' >
 <source src="muirbeach.webm"type='video/webm; codecs="vp8, vorbis"' >
 <source src="muirbeach.ogg" type='video/ogg; codecs="theora, vorbis"'>
</video>
</div>
</body>
</html>
Preloading Video in JavaScript
It is often necessary to preload a video before you do anything with it. This is especially true when using video with HTML5 Canvas because many times what you want to do goes beyond the simple act of playing the video.
We are going to leverage the DOM and JavaScript to create a preload architecture that can be reused and expanded upon. We are still not using Canvas, but this process will lead directly to it.
To do this, we must first embed the video in the HTML page in the
same way we have done previously in this chapter. However, this time, we
are going to add <div> with the
id of loadingStatus.
Note
In practice, you probably would not display the loading status on the HTML page.
This <div> will report the
percentage of the video that has loaded when we retrieve it through
JavaScript:
<div>
<video loop controls id="thevideo" width="320" height="240" preload="auto">
 <source src="muirbeach.mp4" type='video/mp4; codecs="avc1.42E01E, mp4a.40.2"' >
 <source src="muirbeach.webm"type='video/webm; codecs="vp8, vorbis"' >
 <source src="muirbeach.ogg" type='video/ogg; codecs="theora, vorbis"'>
</video>

<div>

<div id="loadingStatus">
0%
</div>
In JavaScript, we need to create the same type of eventWindowLoaded() function that we have
created many times previously in this book. This function is called when
the HTML page has finished loading. In eventWindowLoaded() we need to create two
listeners for two more events that are dispatched from the HTMLVideoElement object:
progressDispatched when the
videoobject has updated information about the loading progress of a video. We will use this event to update the percentage text in theloadingStatus <div>.canplaythroughDispatched when the video has loaded enough that it can play in its entirety. This event will let us know when to start playing the video.
Below is the code that creates the listeners for those events:
function eventWindowLoaded() {
   var videoElement = document.getElementById("thevideo");

   videoElement.addEventListener('progress',updateLoadingStatus,false);
   videoElement.addEventListener('canplaythrough',playVideo,false);

}
The updateLoadingStatus()
function is called when the progress
event is dispatched from the video
element. This function calculates the percent loaded by calculating the
ratio of the already-loaded bytes (videoElement.buffered.end(0)) by the total bytes
(videoElement.duration), and dividing
that value by 100. That value is then displayed by setting the innerHTML property of the loadingStatus <div>, as shown in Figure 6-5. Remember, this is only for
displaying the progress. We still need to do something once the video has
loaded.
Note
At the time of this writing, Firefox did not support the videobuffered property, but this was planned
for Firefox version 4.0.
function updateLoadingStatus() {

   var loadingStatus = document.getElementById("loadingStatus");
   var videoElement = document.getElementById("thevideo");
   var percentLoaded = parseInt(((videoElement.buffered.end(0) /
      videoElement.duration) * 100));
    document.getElementById("loadingStatus").innerHTML =   percentLoaded + '%';

}
The playVideo() function is
called when the video object dispatches
a canplaythrough event. playVideo() calls the play() function of the video object, and the video starts to
play:
function playVideo() {
   var videoElement = document.getElementById("thevideo");
   videoElement.play();

}
Example 6-5 gives the full code for preloading video.
<!doctype html>
<html lang="en">
<head>
<meta charset="UTF-8">
<title>CH6EX5: Basic HTML5 Preloading Video</title>
<script type="text/javascript">
window.addEventListener('load', eventWindowLoaded, false);
function eventWindowLoaded() {
   var videoElement = document.getElementById("thevideo");

   videoElement.addEventListener('progress',updateLoadingStatus,false);
   videoElement.addEventListener('canplaythrough',playVideo,false);

}

function updateLoadingStatus() {

   var loadingStatus = document.getElementById("loadingStatus");
   var videoElement = document.getElementById("thevideo");
   var percentLoaded = parseInt(((videoElement.buffered.end(0) /
      videoElement.duration) * 100));
    document.getElementById("loadingStatus").innerHTML =   percentLoaded + '%';

}

function playVideo() {
   var videoElement = document.getElementById("thevideo");
   videoElement.play();

}
</script>

</head>
<body>
<div>
<video loop controls id="thevideo" width="320" height="240" preload="auto">
 <source src="muirbeach.mp4" type='video/mp4; codecs="avc1.42E01E, mp4a.40.2"' >
 <source src="muirbeach.webm"type='video/webm; codecs="vp8, vorbis"' >
 <source src="muirbeach.ogg" type='video/ogg; codecs="theora, vorbis"'>

</video>

<div>

<div id="loadingStatus">
0%
</div>

</div>
</body>
</html>
A Problem with Events and Embedded Video in HTML5
Now that we have gone through this exercise, we have to give you some bad news. While the code we presented for CH6EX5.html works in most HTML5-compliant web browsers, the code stopped working in Google Chrome as we finished up the first draft of this book. This was upsetting because we used Chrome as our primary platform when developing and testing all the book’s examples.
With a bit of investigation, we discovered that Chrome was not
firing the canplaythrough or progress events. At the same time, Firefox
removed the load event. While these
were anecdotal occurrences, they lead to one common truth: the
HTML5 specification is not
finished. This is an obvious but important fact to note. If
you are developing for HTML5 or Canvas, you are developing with a moving
target.
Specifically in CH6EX5.html,
we found that the process of embedding the <video> tag in the HTML page was the
reason why the events weren’t firing in Chrome. In order to make this
example work in Chrome, you need to add a call to playVideo() in the eventWindowLoaded() function, like
this:
function eventWindowLoaded() {
   var videoElement = document.getElementById("thevideo");

   videoElement.addEventListener('progress',updateLoadingStatus,false);
   videoElement.addEventListener('canplaythrough',playVideo,false);
   playVideo()
}
However, this code will not solve the core problem: we need a reliable way to know when a video has finished loading so we can use it on the canvas. In Example 6-6, we will show you a way to make that happen.
Video and the Canvas
The HTML video object already has
a poster property for displaying an
image before the video starts to play, as well as functions to autoplay and loop. So why is it necessary to preload the
video? Well, as we alluded to in the previous section, simply playing a
video is one thing—manipulating it with HTML5 Canvas is quite another. If
you want to start manipulating video while it is displayed on the canvas,
you first need to make sure it is loaded.
In this section, we will load video and then manipulate it in various ways so you can see how powerful Canvas can be when it is mixed with other HTML5 elements.
Displaying a Video on HTML5 Canvas
First, we must learn the basics of displaying video on HTML5 Canvas. There are a few important things to note that are not immediately obvious when you start working with video and the canvas. We worked through them so you don’t have to do it yourself (you’re welcome).
Video must still be embedded in HTML
Even though the video is only displayed on HTML5 Canvas, you
still need a <video> tag in
HTML. The key is to put the video in a <div> (or a similar construct), and
set the display CSS style property
of that <div> to none in HTML. This will ensure that while
the video is loaded in the page, it is not displayed. If we wrote the
code in HTML, it might look like this:
<div style="position: absolute; top: 50px; left: 600px; display:none">
<video loop controls id="thevideo" width="320" height="240" preload="auto">
 <source src="muirbeach.mp4" type='video/mp4; codecs="avc1.42E01E, mp4a.40.2"' >
 <source src="muirbeach.webm"type='video/webm; codecs="vp8, vorbis"' >
 <source src="muirbeach.ogg" type='video/ogg; codecs="theora, vorbis"'>
</video>
However, we already know that we don’t want to use an HTML
embed. As we stated at the end of the last section, video events do not appear to fire reliably
when video elements are embedded in
the HTML page. For this reason, we need a new strategy to load video
dynamically—we’ll create the <div> and <video> elements in JavaScript.
The first thing we do in our JavaScript is add a couple
variables to hold references to the dynamic HTML elements we will
create. The videoElement variable
will hold the dynamically created <video> tag, while videoDiv will hold the dynamically created
<div>:
var videoElement;
var videoDiv;
Note
We use this method to create global variables throughout this chapter. There are many reasons not to use global variables, but for these simple applications, it’s the quickest way to get something on the canvas. If you want to learn a better way to handle loading assets, the last section of Chapter 7 employs a strategy to preload assets without the use of global variables.
Next, we create our dynamic form elements in the eventWindowLoaded() function. First, we use
the createElement() method of the
document DOM object to create a <video> element and a <div> element, placing references to
them in the variables we just created:
function eventWindowLoaded() {

   videoElement = document.createElement("video");
   videoDiv = document.createElement('div');
   document.body.appendChild(videoDiv);
Next, we add videoElement as
a child of videoDiv, essentially
putting it inside of that <div> on the HTML page. We then set
the style attribute of <div>
to display:none;, which will make
it invisible on the HTML page. We do this because although we want the
video to display on the canvas, we don’t want to show it on the HTML
page:
   videoDiv.appendChild(videoElement);
   videoDiv.setAttribute("style", "display:none;");
We then create another new variable named videoType that holds the results of a new
function we will create, supportedVideoFormat(). This function
returns the file extension of the supported video format for the
browser; otherwise, it returns “” (an empty
string), which means we alert the user that there is no video support
in the app for his browser:
   var videoType = supportedVideoFormat(videoElement);
   if (videoType == "") {
      alert("no video support");
      return;
   }
Finally, we set the src
property of the video element using
the file extension we just received from supportedVideoFormat(), and create the event
handler for the canplaythrough
event:
   videoElement.setAttribute("src", "muirbeach." + videoType);
   videoElement.addEventListener("canplaythrough",videoLoaded,false);

}
When the video has finished loading, the videoLoaded event handler is called, which
in turn calls the canvasApp()
function:
function videoLoaded(event) {

   canvasApp();

}
Before the code in the last section
will work, we need to define the supportedVideoFormat() function. The
reason for this function is simple: since we are adding video objects dynamically to the HTML page,
we do not have a way to define multiple <source> tags. Instead, we are going
to use the canPlayType() method of
the video object to tell us which
type of audio file to load.
The canPlayType() method
takes a single parameter, a MIME type. It returns a text string of
maybe, probably, or nothing (an empty
string).
“”(nothing)This is returned if the browser knows the type cannot be rendered.
maybeThis is returned if the browser does not confidently know that the type can be displayed.
probablyThis is returned if the browser knows the type can be displayed using an
audioorvideoelement.
We are going to use these values to determine which media type
to load and play. For the sake of this exercise, we will assume that
both maybe and probably equate to yes. If we encounter either result with any
of our three MIME types (video/webm,
video/mp4, video/ogg), we
will return the extension associated with that MIME type so the sound
file can be loaded.
In the function below, video
represents the instance of HTMLVideoElement that we are going to test.
The returnExtension variable
represents that valid extension for the first MIME type found that has
the value of maybe or probably returned from the call to canPlayType():
function supportedVideoFormat(video) {
   var returnExtension = "";
   if (video.canPlayType("video/webm") =="probably" ||
       video.canPlayType("video/webm") == "maybe") {
         returnExtension = "webm";
   } else if(video.canPlayType("video/mp4") == "probably" ||
       video.canPlayType("video/mp4") == "maybe") {
         returnExtension = "mp4";
   } else if(video.canPlayType("video/ogg") =="probably" ||
       video.canPlayType("video/ogg") == "maybe") {
         returnExtension = "ogg";
   }

   return returnExtension;

}
We do not check for a condition when no valid video format is
found and the return value is “”. If that is the case, the code that
has called this function might need to be written in a way to catch
that condition and alter the program execution. We did that with the
test of the return value and
alert(), which we described
previously.
Video is displayed like an image
When you write code to display a video on the canvas, you use
the context.drawImage() function,
as though you are displaying a static image. Don’t go looking for a
drawVideo() function in the HTML5
Canvas spec because you won’t find it. The following code will display
a video stored in a variable named videoElement, displayed at the x,y
position of 85,30:
context.drawImage(videoElement , 85, 30);
However, when you draw a video for the first time, you will notice that it will not move—it stays on the first frame. At first you might think you have done something wrong, but you have not. You just need to add one more thing to make it work.
Set an interval to update the display
Just like when we discussed animation in the previous chapters,
a video placed on HTML5 Canvas using drawImage() will not update itself. You need
to call drawImage() in some sort of
loop to continually update the image with new data from the playing
video in the HTML page (hidden or not). To do this, we call the
video’s play() method, and then use
setInterval() to call the drawScreen() function every 33 milliseconds.
This will give you about 30 frames per second (FPS). We put this code
in our canvasApp() function, which
is called after we know the video has loaded:
videoElement.play();
setInterval(drawScreen, 33);
In drawScreen(), we will call
drawImage() to display the video,
but since it will be called every 33 milliseconds, the video will be
updated and play on the canvas:
function  drawScreen () {

   context.drawImage(videoElement , 85, 30);

   }
Example 6-6 gives
the full code for displaying a video on the canvas and updating it
using setInterval(). Figure 6-6 shows this code in
the browser.
<!doctype html>
<html lang="en">
<head>
<meta charset="UTF-8">
<title>CH6EX6: Basic HTML5 Load Video Onto The Canvas</title>
<script src="modernizr-1.6.min.js"></script>
<script type="text/javascript">
window.addEventListener('load', eventWindowLoaded, false);
var videoElement;
var videoDiv;
function eventWindowLoaded() {

   videoElement = document.createElement("video");
   videoDiv = document.createElement('div');
   document.body.appendChild(videoDiv);
   videoDiv.appendChild(videoElement);
   videoDiv.setAttribute("style", "display:none;");
   var videoType = supportedVideoFormat(videoElement);
   if (videoType == "") {
      alert("no video support");
      return;
   }
   videoElement.setAttribute("src", "muirbeach." + videoType);
   videoElement.addEventListener("canplaythrough",videoLoaded,false);

}

function supportedVideoFormat(video) {
   var returnExtension = "";
   if (video.canPlayType("video/webm") =="probably" ||
       video.canPlayType("video/webm") == "maybe") {
         returnExtension = "webm";
   } else if(video.canPlayType("video/mp4") == "probably" ||
       video.canPlayType("video/mp4") == "maybe") {
         returnExtension = "mp4";
   } else if(video.canPlayType("video/ogg") =="probably" ||
       video.canPlayType("video/ogg") == "maybe") {
         returnExtension = "ogg";
   }

   return returnExtension;

}

function canvasSupport () {
     return Modernizr.canvas;
}

function videoLoaded(event) {

   canvasApp();

}

function canvasApp() {

   if (!canvasSupport()) {
          return;
        }

function  drawScreen () {

      //Background
      context.fillStyle = '#ffffaa';
      context.fillRect(0, 0, theCanvas.width, theCanvas.height);
      //Box
      context.strokeStyle = '#000000';
      context.strokeRect(5,  5, theCanvas.width−10, theCanvas.height−10);
      //video
      context.drawImage(videoElement , 85, 30);

   }

   var theCanvas = document.getElementById("canvasOne");
   var context = theCanvas.getContext("2d");
   videoElement.play();

   setInterval(drawScreen, 33);

}

</script>

</head>
<body>
<div style="position: absolute; top: 50px; left: 50px;">

<canvas id="canvasOne" width="500" height="300">
 Your browser does not support HTML5 Canvas.
</canvas>
</div>
</body>
</html>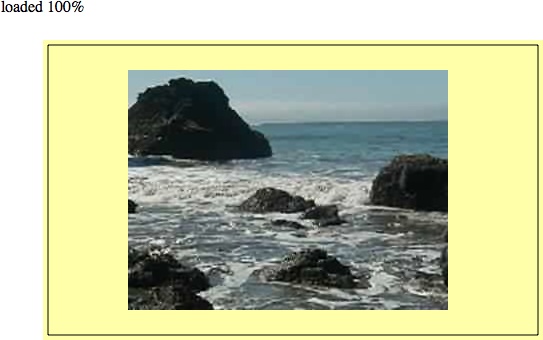
HTML5 Video Properties
We have already talked about some properties of HTMLVideoElement (inherited from HTMLMediaElement), but now that we have a
video loaded onto the canvas, it would be interesting to see them in
action.
In this example, we are going to display seven properties of a
playing video, taken from the HTMLVideoElement object: duration, currentTime, loop, autoplay, muted, controls, and volume. Of these, duration, loop, and autoplay will not update because they are set
when the video is embedded. Also, since we call the play() function of the video after it is
preloaded in JavaScript, autoplay may
be set to false, but the video will
play anyway. The other properties will update as the video is
played.
To display these values on the canvas, we will draw them as text
in the drawScreen() function called
by setInterval(). Below is the
drawScreen() that we have created to
display these values:
function drawScreen () {
//Background
context.fillStyle = '#ffffaa';
context.fillRect(0, 0, theCanvas.width, theCanvas.height);
//Box
context.strokeStyle = '#000000';
context.strokeRect(5, 5, theCanvas.width−10, theCanvas.height−10);
//video
context.drawImage(videoElement , 85, 30);
// Text
context.fillStyle = "#000000";
context.fillText ("Duration:" + videoElement.duration, 10 ,280);
context.fillText ("Current time:" + videoElement.currentTime, 260 ,280);
context.fillText ("Loop: " + videoElement.loop, 10 ,290);
context.fillText ("Autoplay: " + videoElement.autoplay, 100 ,290);
context.fillText ("Muted: " + videoElement.muted, 180 ,290);
context.fillText ("Controls: " + videoElement.controls, 260 ,290);
context.fillText ("Volume: " + videoElement.volume, 340 ,290);
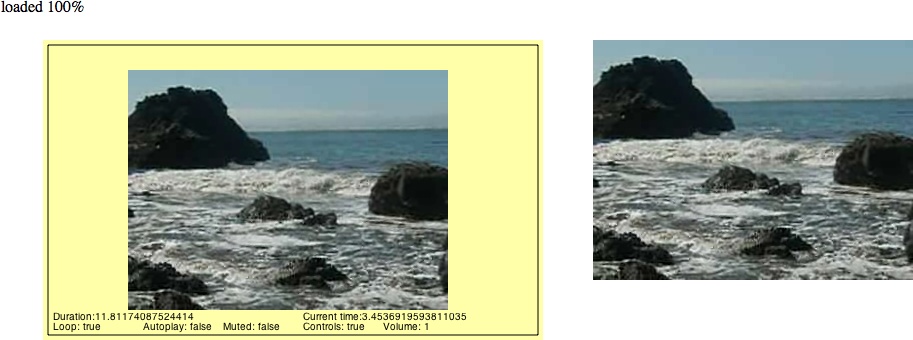
}Figure 6-7 shows
what the attributes look like when displayed on the canvas. Notice that
we have placed the <video>
embed next to the canvas, and we have not set the
CSS display style to none. We did
this to demonstrate the relationship between the video embedded in the
HTML page and the one playing on the canvas. If you roll over the video
in the HTML page, you can see the control panel. If you set the volume,
you will notice that the volume
attribute displayed on the canvas will change. If you pause the embedded
video, the video on the canvas will stop playing, and the currentTime value will stop.
This demo should give you a very good idea of the relationship
between the video on the canvas and the one embedded with the <video> tag. Even though they are
displayed using completely different methods, they are in fact one and
the same.
You can see Example 6-7 in action by executing CH6EX7.html from the code distribution.
<!doctype html>
<html lang="en">
<head>
<meta charset="UTF-8">
<title>CH6EX7: Video Properties</title>
<script src="modernizr-1.6.min.js"></script>
<script type="text/javascript">
window.addEventListener('load', eventWindowLoaded, false);
var videoElement;
var videoDiv;
function eventWindowLoaded() {

   videoElement = document.createElement("video");
   var videoDiv = document.createElement('div');
   document.body.appendChild(videoDiv);
   videoDiv.appendChild(videoElement);
   videoDiv.setAttribute("style", "position: absolute; top: 50px; left: 600px; ");
   var videoType = supportedVideoFormat(videoElement);
   if (videoType == "") {
      alert("no video support");
      return;
   }
   videoElement.setAttribute("src", "muirbeach." + videoType);
   videoElement.addEventListener("canplaythrough",videoLoaded,false);

}


function supportedVideoFormat(video) {
   var returnExtension = "";
   if (video.canPlayType("video/webm") =="probably" ||
       video.canPlayType("video/webm") == "maybe") {
         returnExtension = "webm";
   } else if(video.canPlayType("video/mp4") == "probably" ||
       video.canPlayType("video/mp4") == "maybe") {
         returnExtension = "mp4";
   } else if(video.canPlayType("video/ogg") =="probably" ||
       video.canPlayType("video/ogg") == "maybe") {
         returnExtension = "ogg";
   }

   return returnExtension;

}


function canvasSupport () {
     return Modernizr.canvas;
}

function videoLoaded() {
   canvasApp();

}

function canvasApp() {

  if (!canvasSupport()) {
          return;
        }

  function  drawScreen () {

      //Background
      context.fillStyle = '#ffffaa';
      context.fillRect(0, 0, theCanvas.width, theCanvas.height);
      //Box
      context.strokeStyle = '#000000';
      context.strokeRect(5,  5, theCanvas.width−10, theCanvas.height−10);
      //video
      context.drawImage(videoElement , 85, 30);
      // Text
      context.fillStyle = "#000000";
      context.fillText  ("Duration:" + videoElement.duration,  10 ,280);
      context.fillText  ("Current time:" + videoElement.currentTime,  260 ,280);
      context.fillText  ("Loop: " + videoElement.loop,  10 ,290);
      context.fillText  ("Autoplay: " + videoElement.autoplay,  100 ,290);
      context.fillText  ("Muted: " + videoElement.muted,  180 ,290);
      context.fillText  ("Controls: " + videoElement.controls,  260 ,290);
      context.fillText  ("Volume: " + videoElement.volume,  340 ,290);

   }

   var theCanvas = document.getElementById("canvasOne");
   var context = theCanvas.getContext("2d");
   videoElement.play();

   setInterval(drawScreen, 33);

}

</script>

</head>
<body>
<div style="position: absolute; top: 50px; left: 50px;">

<canvas id="canvasOne" width="500" height="300">
 Your browser does not support HTML5 Canvas.
</canvas>
</div>
</body>
</html>
Note
You can see all the events and properties for the HTMLVideoElement at http://www.w3.org/2010/05/video/mediaevents.html.
Video on the Canvas Examples
In the last section, we learned that the video playing on the canvas
and the video embedded with the <video> tag are, in fact, the same video.
It took a lot more code to play the video on the canvas than it did to
embed and play the video in JavaScript. So, this begs the question:
why load video onto the canvas at all?
Well, sometimes simply displaying a video and playing it is not enough. You might want events to occur as the video is playing, or perhaps you want to use transformations on it, use it in a game, create custom video controls, or animate it and move it on the canvas.
The following five examples will show you in very specific detail why the canvas can be an exciting way to display video.
Using the currentTime Property to Create Video Events
The first way we will use video in conjunction with Canvas is to
use the currentTime property of a
playing video to trigger events. Recall that the currentTime property is updated as the video
plays, and it shows the video’s elapsed running time.
For our example, we are going to create a dynamic object in JavaScript containing the following properties:
timeThe elapsed time to trigger the event
messageA text message to display on the canvas
xThe
xposition of the text messageyThe
yposition of the text message
First, we will create an array of these objects and place them
into a variable named messages. We
will then create four events (messages that will appear) that will take
place at the elapsed currentTime of
0, 1, 4, and
8 seconds:
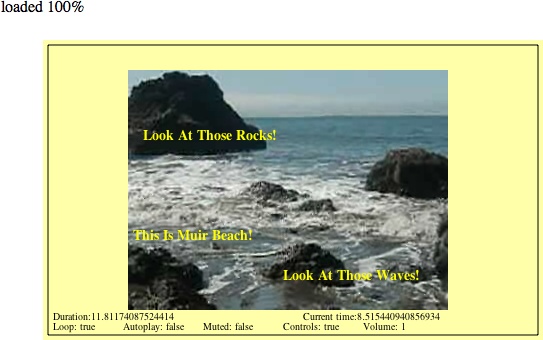
var messages = new Array();
   messages[0] = {time:0,message:"", x:0 ,y:0};
   messages[1] = {time:1,message:"This Is Muir Beach!", x:90 ,y:200};
   messages[2] = {time:4,message:"Look At Those Waves!", x:240 ,y:240};
   messages[3] = {time:8,message:"Look At Those Rocks!", x:100 ,y:100};
To display the messages, we will call a for:next loop inside our drawScreen() function. Inside the loop, we
test each message in the messages
array to see whether the currentTime
property of the video is greater than the time property of the message. If so, we know
that it is OK to display the message. We then display the message on the
canvas using the fillStyle property
and fillText() function of the Canvas
context, producing the results shown in Figure 6-8:
for (var i = 0; i < messages.length ; i++) {
         var tempMessage = messages[i];
         if (videoElement.currentTime > tempMessage.time) {
            context.font = "bold 14px sans";
            context.fillStyle = "#FFFF00";
            context.fillText  (tempMessage.message,  tempMessage.x ,tempMessage.y);
         }
      }
Of course, this is a very simple way to create events. The various text messages will not disappear after others are created, but that is just a small detail. The point of this exercise is that, with code like this, you could do almost anything with a running video. You could pause the video, show an animation, and then continue once the animation is done. Or you could pause to ask the user for input and then load a different video. Essentially, you can make the video completely interactive in any way you choose. The model for these events could be very similar to the one we just created.
Example 6-8 provides the full code listing for this application.
<!doctype html>
<html lang="en">
<head>
<meta charset="UTF-8">
<title>CH6EX8: Creating Simple Video Events</title>
<script src="modernizr-1.6.min.js"></script>
<script type="text/javascript">
window.addEventListener('load', eventWindowLoaded, false);
var videoElement;
var videoDiv;
function eventWindowLoaded() {
videoElement = document.createElement("video");
videoDiv = document.createElement('div');
document.body.appendChild(videoDiv);
videoDiv.appendChild(videoElement);
videoDiv.setAttribute("style", "display:none;");
var videoType = supportedVideoFormat(videoElement);
if (videoType == "") {
alert("no video support");
return;
}
videoElement.setAttribute("src", "muirbeach." + videoType);
videoElement.addEventListener("canplaythrough",videoLoaded,false);
}
function supportedVideoFormat(video) {
var returnExtension = "";
if (video.canPlayType("video/webm") =="probably" ||
video.canPlayType("video/webm") == "maybe") {
returnExtension = "webm";
} else if(video.canPlayType("video/mp4") == "probably" ||
video.canPlayType("video/mp4") == "maybe") {
returnExtension = "mp4";
} else if(video.canPlayType("video/ogg") =="probably" ||
video.canPlayType("video/ogg") == "maybe") {
returnExtension = "ogg";
}
return returnExtension;
}
function canvasSupport () {
return Modernizr.canvas;
}
function videoLoaded() {
canvasApp();
}
function canvasApp() {
if (!canvasSupport()) {
return;
}
function drawScreen () {
//Background
context.fillStyle = '#ffffaa';
context.fillRect(0, 0, theCanvas.width, theCanvas.height);
//Box
context.strokeStyle = '#000000';
context.strokeRect(5, 5, theCanvas.width−10, theCanvas.height−10);
//video
context.drawImage(videoElement , 85, 30);
// Text
context.fillStyle = "#000000";
context.font = "10px sans";
context.fillText ("Duration:" + videoElement.duration, 10 ,280);
context.fillText ("Current time:" + videoElement.currentTime, 260 ,280);
context.fillText ("Loop: " + videoElement.loop, 10 ,290);
context.fillText ("Autoplay: " + videoElement.autoplay, 80 ,290);
context.fillText ("Muted: " + videoElement.muted, 160 ,290);
context.fillText ("Controls: " + videoElement.controls, 240 ,290);
context.fillText ("Volume: " + videoElement.volume, 320 ,290);
//Display Message
for (var i =0; i < messages.length ; i++) {
var tempMessage = messages[i];
if (videoElement.currentTime > tempMessage.time) {
context.font = "bold 14px sans";
context.fillStyle = "#FFFF00";
context.fillText (tempMessage.message, tempMessage.x ,tempMessage.y);
}
}
}
var messages = new Array();
messages[0] = {time:0,message:"", x:0 ,y:0};
messages[1] = {time:1,message:"This Is Muir Beach!", x:90 ,y:200};
messages[2] = {time:4,message:"Look At Those Waves!", x:240 ,y:240};
messages[3] = {time:8,message:"Look At Those Rocks!", x:100 ,y:100};
var theCanvas = document.getElementById("canvasOne");
var context = theCanvas.getContext("2d");
videoElement.play();
setInterval(drawScreen, 33);
}
</script>
</head>
<body>
<div style="position: absolute; top: 50px; left: 50px;">
<canvas id="canvasOne" width="500" height="300">
Your browser does not support HTML5 Canvas.
</canvas>
</div>
</body>
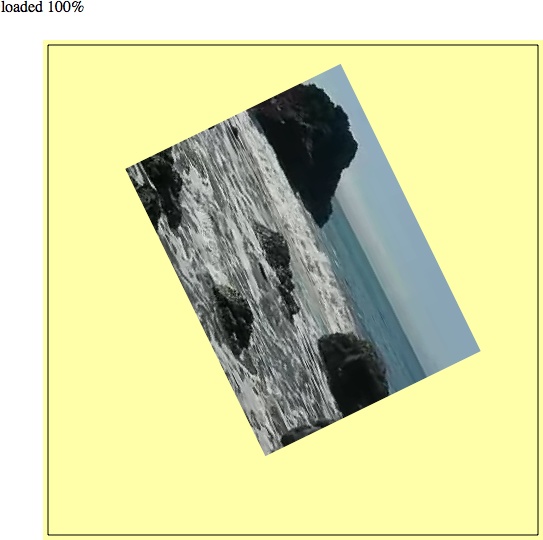
</html>Canvas Video Transformations: Rotation
Showing a static video on the screen is one thing, but transforming it on the screen using alpha transparency and rotations is quite another. These types of transformations can be easily applied to video on the canvas in much the same way as you would apply them to an image or a drawing object.
In this example, we will create a video that rotates clockwise. To
achieve this effect, we first create a variable, rotation, which we will use to hold the
current values of the rotation property that we will apply to the video.
We create this variable outside of the drawScreen() function, inside canvasApp():
var rotation = 0;
The drawScreen() function is
where all the real action takes place for this example. First, we need
to save the current canvas context so we can restore it after we perform
the transformation. We covered this in depth in Chapter 2, but here’s a quick refresher.
Transformations on the canvas are global in nature, which means they
affect everything. Since the canvas works in
immediate mode, there is no stack of objects to manipulate. Instead, we
need to save the canvas context before the transformation, apply the
transformation, and then restore the saved context afterward.
First, we save it:
context.save();
Next, we reset the context transformation to the identity, which clears anything that was set previously:
context.setTransform(1,0,0,1,0,0);
Then we need to set up some variables that will be used for the
rotation calculation. The x and
y variables set the upper-left
location of the video on the canvas. The videoWidth and videoHeight variables will be used to help
rotate the video from the center:
var x = 100;
var y = 100;
var videoWidth=320;
var videoHeight=240;
Now it is time to use the rotation variable, which represents the angle
that we rotated the video on the canvas. It starts at 0, and we will increase it every time drawScreen() is called. However, the context.rotate() method requires an angle to
be converted to radians when passed as its lone parameter. The following
line of code converts the value in the rotation variable to radians, and stores it in
a variable named angleInRadians:
var angleInRadians = rotation * Math.PI / 180;
We need to find the video’s center on the canvas so we can start
our rotation from that point. We find the x value by taking our videoX variable and adding half the width of
the video. We find the y value by
taking our videoY variable and adding
half the height of the video. We supply both of those values as
parameters to the context.translate()
function so the rotation will begin at that point. We need to do this
because we are not rotating the video object—we are rotating the entire
canvas in relation to the displayed video:
context.translate(x+.5*videoWidth, y+.5*videoHeight);
The rest of the code is really straightforward. First, we call the
rotate() function of the context,
passing our angle (converted to radians) to perform the rotation:
context.rotate(angleInRadians);
Then we call drawImage(),
passing the video object, and the x,y
positions of where we want the video to be displayed. This is a bit
tricky but should make sense. Since we used the context.translate() function to move to the
center of the video, we now need to place it in the upper-left corner.
To find that corner, we need to subtract half the width to find the
x position, and half the height to
find the y position:
context.drawImage(videoElement ,-.5*videoWidth, -.5*videoHeight);
Finally, we restore the canvas we saved before the transformation
started, and we update the rotation
variable so that we will have a new angle on the next call to drawScreen():
context.restore();
rotation++;
Now the video should rotate at 1 degree clockwise per call to drawScreen() while fading onto the canvas. You
can easily increase the speed of the rotation by changing the value that
you input for the rotation variable
in the last line in the drawScreen()
function.
Here is the code for the final drawScreen() function for this example:
function  drawScreen () {

      //Background
      context.fillStyle = '#ffffaa';
      context.fillRect(0, 0, theCanvas.width, theCanvas.height);
      //Box
      context.strokeStyle = '#000000';
      context.strokeRect(5,  5, theCanvas.width−10, theCanvas.height−10);
      //video
      //*** Start rotation calculation
      context.save();
      context.setTransform(1,0,0,1,0,0);

      var angleInRadians = rotation * Math.PI / 180;
      var x = 100;
      var y = 100;
      var videoWidth=320;
      var videoHeight=240;
      context.translate(x+.5*videoWidth, y+.5*videoHeight);
      context.rotate(angleInRadians);
      //****
      context.drawImage(videoElement ,-.5*videoWidth, -.5*videoHeight);
      //*** restore screen
      context.restore();
      rotation++;
      //***
}
Figure 6-9 shows what the video will look like when rotating on the canvas. You can see the full code for this in Example 6-9.
<!doctype html>
<html lang="en">
<head>
<meta charset="UTF-8">
<title>CH6EX9: Video Rotation Transform</title>
<script src="modernizr-1.6.min.js"></script>
<script type="text/javascript">
window.addEventListener('load', eventWindowLoaded, false);
var videoElement;
var videoDiv;
function eventWindowLoaded() {

   videoElement = document.createElement("video");
   videoDiv = document.createElement('div');
   document.body.appendChild(videoDiv);
   videoDiv.appendChild(videoElement);
   videoDiv.setAttribute("style", "display:none;");
   var videoType = supportedVideoFormat(videoElement);
   if (videoType == "") {
      alert("no video support");
      return;
   }
   videoElement.setAttribute("src", "muirbeach." + videoType);
   videoElement.addEventListener("canplaythrough",videoLoaded,false);

}

function supportedVideoFormat(video) {
   var returnExtension = "";
   if (video.canPlayType("video/webm") =="probably" ||
       video.canPlayType("video/webm") == "maybe") {
         returnExtension = "webm";
   } else if(video.canPlayType("video/mp4") == "probably" ||
       video.canPlayType("video/mp4") == "maybe") {
         returnExtension = "mp4";
   } else if(video.canPlayType("video/ogg") =="probably" ||
       video.canPlayType("video/ogg") == "maybe") {
         returnExtension = "ogg";
   }

   return returnExtension;

}

function canvasSupport () {
     return Modernizr.canvas;
}


function videoLoaded() {
   canvasApp();

}

function canvasApp() {

  if (!canvasSupport()) {
          return;
        }

   //*** set rotation value
   var rotation = 0;
   //***

  function  drawScreen () {

      //Background
      context.fillStyle = '#ffffaa';
      context.fillRect(0, 0, theCanvas.width, theCanvas.height);
      //Box
      context.strokeStyle = '#000000';
      context.strokeRect(5,  5, theCanvas.width-10, theCanvas.height-10);
      //video
      //*** Start rotation calculation
      context.save();
      context.setTransform(1,0,0,1,0,0);

      var angleInRadians = rotation * Math.PI / 180;
      var x = 100;
      var y = 100;
      var videoWidth=320;
      var videoHeight=240;
      context.translate(x+.5*videoWidth, y+.5*videoHeight);
      context.rotate(angleInRadians);
      //****
      context.drawImage(videoElement ,-.5*videoWidth, -.5*videoHeight);
      //*** restore screen
      context.restore();
      rotation++;
      //***

   }

   var theCanvas = document.getElementById("canvasOne");
   var context = theCanvas.getContext("2d");
   videoElement.setAttribute("loop", "true");     videoElement.play();
   setInterval(drawScreen, 33);

}

</script>

</head>
<body>
<div style="position: absolute; top: 50px; left: 50px;">

<canvas id="canvasOne" width="500" height="500">
 Your browser does not support HTML5 Canvas.
</canvas>
</div>
</body>
</html>
Canvas Video Puzzle
Now we arrive at the most involved example of this section. We are going to create a puzzle game based on the video we have displayed on the canvas, illustrated in Figure 6-10. Here are the steps showing how the game will operate:
We will load the video onto the canvas but not display it.
We will decide how many parts we want to be in our puzzle.
We will create a
boardarray that holds all the puzzle pieces.The pieces will be displayed in a 4×4 grid.
We will randomize the pieces on the board to mix up the puzzle.
We will add an event listener for the mouse button.
We will set an interval to call
drawScreen().We will wait for the user to click a puzzle piece.
While we are waiting, the various parts of the video will play just as though they were one video.
When a user clicks a puzzle piece, it will highlight in yellow.
If the user has selected two pieces, we will swap their positions.
The user will attempt to put the puzzle back together so she can see the video as it was created.
Setting up the game
To start, we are going to set up some variables that will define the game’s playfield. Here is a rundown of the variables and how they will be used:
rowsThe numbers of rows in the grid of puzzle pieces
colsThe number of columns in the grid of puzzle pieces
xPadThe space, in pixels, between each column
yPadThe space, in pixels, between each row
startXOffsetThe number of pixels from the left of the canvas to the location where we will start drawing the grid of puzzle pieces
startYOffsetThe number of pieces from the top of the canvas to the location where we will start drawing the grid of puzzle pieces
partWidthThe width of each puzzle piece
partHeightThe height of each puzzle piece
boardA two-dimensional array that holds the puzzle pieces
The following code includes values for each variable:
var rows = 4;
var cols = 4;
var xPad = 10;
var yPad = 10;
var startXOffset = 10;
var startYOffset = 10;
var partWidth = videoElement.width/cols;
var partHeight = videoElement.height/rows;
var board = new Array();
Next we need to initialize the board array and fill it with some dynamic
objects that represent each piece of the puzzle. We loop through the
number of cols in the board and
create rows amount of dynamic
objects in each one. The dynamic objects we are creating have these
properties:
finalColThe final column-resting place of the piece when the puzzle is complete. We use this value to figure out what part of the video cut out to make this piece.
finalRowThe final row-resting place of the piece when the puzzle is complete. We use this value to figure out what part of the video cut out to make this piece.
selectedA Boolean that is initially set to
false. We will use this to see whether we should highlight a piece or switch two pieces when the user clicks a piece.
Notice that we use two nested for:next loops to fill the board array with these objects. Familiarize
yourself with this construct because we use it many times in this
game. Two nested loops used like this are particularly useful for
games and apps that require a 2D grid in order to be displayed and
manipulated:
for (var i = 0; i < cols; i++) {
      board[i] = new Array();
      for (var j =0; j < rows; j++) {
         board[i][j] = { finalCol:i,finalRow:j,selected:false };
      }
}
Now that we have the board
array initialized, we call randomizeBoard() (we will discuss this
function shortly), which mixes up the puzzle by randomly placing the
pieces on the screen. We finish the setup section of the game by
adding an event listener for the mouseup event (when the user releases the
mouse button), and by setting an interval to call drawScreen() every 33 milliseconds:
board = randomizeBoard(board);

theCanvas.addEventListener("mouseup",eventMouseUp, false);

setInterval(drawScreen, 33);
Randomizing the puzzle pieces
The randomizeBoard() function
requires you to pass in the board
variable so we can operate on it. We’ve set up the function this way
so it will be portable to other applications.
To randomize the puzzle pieces, we first need to set up an array
named newBoard that will hold the
randomized puzzle pieces. newBoard
will be what we call a parallel array. Its
purpose is to become the original array—but randomized. We then create
a local cols variable and
initialize it to the length of the board array that was passed in to the
function, and a local rows
variable, initialized to the length of the first column—board[0]—in the array. This works because
all of our rows and columns are the same length, so the number of rows
in the first column is the same as all the others. We now have the
building blocks required to randomize the pieces:
function randomizeBoard(board) {
    var newBoard = new Array();
    var cols = board.length;
    var rows = board[0].length
Next, we loop through every column and row, randomly choosing a
piece from the board array and
moving it into newBoard:
for (var i = 0; i < cols; i++) {Note
We use two nested for:next
loops here once again.
Every time we come to an iteration of the outer nested loop, we
create a new array that we will fill up in the second nested loop.
Then we drop into that nested loop. The found variable will be set to true when we have found a random location to
place the piece in the newBoard
array. The rndRow and rndCol variables hold the random values we
will create to try and find a random location for the puzzle
pieces:
newBoard[i] = new Array();
         for (var j =0; j < rows; j++) {
            var found = false;
            var rndCol = 0;
            var rndRow = 0;
Now we need to find a location in newBoard in which to put the puzzle piece
from the board array. We use a
while() loop that continues to
iterate as long as the found
variable is false. To find a piece
to move, we randomly choose a row and column, and then use them to see
whether that space (board[rndCol][rndRow]) is set to false. If it is not false, we have found a piece to move to the
newBoard array. We then set
found equal to true so we can get out of the while() loop and move to the next space in
newBoard that we need to
fill:
            while (!found) {
               var rndCol = Math.floor(Math.random() * cols);
               var rndRow = Math.floor(Math.random() * rows);
               if (board[rndCol][rndRow] != false) {
                  found = true;
               }
            }
Finally, we move the piece we found in board to the current location we are filling
in newBoard. Then, we set the piece
in the board array to false so that when we test for the next
piece, we won’t try to use the same piece we just found. When we are
done filling up newBoard, we return
it as the newly randomized array of puzzle pieces:
            newBoard[i][j] = board[rndCol][rndRow];
            board[rndCol][rndRow] = false;
         }

      }

      return newBoard;

   }
Drawing the screen
The drawScreen() function is
the heart of this application. It is called on an interval, and then
used to update the video frames and to draw the puzzle pieces on the
screen. A good portion of drawScreen() looks like applications we have
built many times already in this book. When it begins, we draw the
background and a bounding box on the screen:
function drawScreen () {

      //Background
      context.fillStyle = '#303030';
      context.fillRect(0, 0, theCanvas.width, theCanvas.height);
      //Box
      context.strokeStyle = '#FFFFFF';
      context.strokeRect(5,  5, theCanvas.width−10, theCanvas.height−10);
However, the primary work of this function is—you guessed
it—another set of two nested for:next loops that draw the puzzle pieces
onto the canvas. This set needs to do three things:
Draw a grid of puzzle pieces on the canvas based on their placement in the
boardtwo-dimensional array.Find the correct part of the video to render for each piece based on the
finalColandfinalRowproperties we set in the dynamic object for each piece.Draw a yellow box around the piece that has its
selectedproperty set totrue.
We start our loop by finding the x and y
(imageX, imageY) locations to “cut” the puzzle piece
from the video object. We do this by taking the finalRow and finalCol properties of the dynamic piece
objects we created, and multiplying them by the partWidth and partHeight, respectively. We then have the
origin point (top-left x and
y locations) for the piece of the
video to display:
for (var c = 0; c < cols; c++) {
   for (var r = 0; r < rows; r++) {

      var tempPiece = board[c][r];
      var imageX = tempPiece.finalCol*partWidth;
      var imageY = tempPiece.finalRow*partHeight;
Now that we know the origin point of the video we will display
for a particular piece of the puzzle, we need to know where it will be
placed on the canvas. While the code below might look confusing, it’s
really just simple arithmetic. To find the x location (placeX) of a piece, multiply the partWidth times the current iterated column
(c), then add the current iterated
column multiplied by the xPad (the
number of pixels between each piece), and add the startXOffset, which is the x location of the upper-left corner of the
entire board of pieces. Finding placeY is very similar, but you use the
current row (r), yPad, and partHeight in the calculation:
var placeX = c*partWidth+c*xPad+startXOffset;
var placeY = r*partHeight+r*yPad+startYOffset;
Now it’s time to draw the piece on the canvas. We need to “cut”
out the part of the video that we will display for each piece of the
puzzle (we won’t actually cut anything though). We will again use the
drawImage() function, as we have
many other times already. However, now we use the version of drawImage() that accepts nine
parameters:
videoElementThe image that we are going to display; in this case, it is the video.
imageXThe
xlocation of the upper-right order of the part of the image to display.imageYThe
ylocation of the upper-right order of the part of the image to display.partWidthThe width from the
xlocation of the rectangle to display.partHeightThe height from the
ylocation of the rectangle to display.placeXThe
xlocation to place the image on the canvas.placeYThe
ylocation to place the image on the canvas.partWidthThe width of the image as displayed on the canvas.
partHeightThe height of the image as displayed on the canvas.
We’ve already discussed how we calculated most of these values,
so it is just a matter of knowing the drawImage() API function and plugging in the
variables:
context.drawImage(videoElement, imageX, imageY, partWidth, partHeight,
    placeX, placeY, partWidth, partHeight);
There is one last thing we are going to do in this function. If
a puzzle piece is marked as “selected” (the selected Boolean property is true), we will draw a yellow box around the
piece:
         if (tempPiece.selected) {

            context.strokeStyle = '#FFFF00';
            context.strokeRect( placeX,  placeY, partWidth, partHeight);

         }
      }
   }

}
Detecting mouse interactions and the canvas
Recall that back in the canvasApp() function, we set an event
listener for the mouseup action
with the event handler function set to eventMouseUp. We now need to create that
function:
theCanvas.addEventListener("mouseup",eventMouseUp, false);The first thing we do in the eventMouseUp() function is test to find the
x and y locations of the mouse pointer when the
button was pressed. We will use those coordinates to figure out
whether the user clicked on any of the puzzle pieces.
Since some browsers support the layerX/layerY properties of the event object, and
others support the offsetX/offsetY properties, we need to support both.
No matter which one is set, we will use those properties to set our
mouseX and mouseY variables to the x and y
locations of the mouse pointer:
function eventMouseUp(event) {

    var mouseX;
    var mouseY;
    var pieceX;
    var pieceY;
    if ( event.layerX ||  event.layerX == 0) { //Firefox
        mouseX = event.layerX ;
        mouseY = event.layerY;
      } else if (event.offsetX || event.offsetX == 0) { // Opera
        mouseX = event.offsetX;
        mouseY = event.offsetY;
      }
Creating hit test point-style collision detection
Now that we know where the user clicked, we need to test whether
that location “hits” any of the puzzle pieces. If so, we set the
selected property of that piece to
true. What we are going to perform
is a simple hit test point-style hit detection.
It will tell us whether the x,y
position (point) of the mouse is inside
(hits) any one of the puzzle pieces when the
mouse button is clicked.
First, we create a local variable named selectedList that we will use when we need
to swap the pieces in the board
array. Next, we will use a set of two nested for:next loops to traverse through all the
pieces in the board array. Inside
the for:next loops, the first thing
we do is find the top-left corner x
and y points of the current piece
pointed to by board[c][r]. We calculate those
values and put them into the placeX
and placeY variables:
      var selectedList= new Array();
      for (var c = 0; c < cols; c++) {

         for (var r =0; r < rows; r++) {
            pieceX = c*partWidth+c*xPad+startXOffset;
            pieceY = r*partHeight+r*yPad+startYOffset;
Next, we use those calculated values to test for a hit test
point collision. We do this with a semicomplicated if:then statement that tests the following
four conditions simultaneously:
mouseY >=
            pieceY
The mouse pointer lies lower than or equal to the top of the piece.
mouseY <=
            pieceY+partHeight
The mouse pointer lies above or equal to the bottom of the piece.
mouseX >=
            pieceX
The mouse pointer lies to the right or equal to the left side of the piece.
mouseX <=
            pieceX+partWidth
The mouse pointer lies to the left or equal to the right side of the piece.
All of the above conditions must evaluate to true for a hit to be registered on any one
piece on the board:
if ( (mouseY >= pieceY) && (mouseY <= pieceY+partHeight) && (mouseX >= pieceX) &&
     (mouseX <= pieceX+partWidth) ) {
If all these conditions are true, we set the selected property
of the piece object to true if it
was already false, or we set it to
false if it was already true. This allows the user to “deselect” the
selected piece if he has decided not to move it:
  if ( board[c][r].selected) {
        board[c][r].selected = false;

  } else {
        board[c][r].selected = true;

  }
}
At the end of the nested for:next loop, we make sure to test each
piece to see whether its selected
property is true. If so, we push it
into the selectedList local array
so we can perform the swap operation on the pieces:
  if (board[c][r].selected) {
        selectedList.push({col:c,row:r})
  }

  }

}
Swapping two elements in a two-dimensional array
Now we need to test to see whether two pieces have been marked
as selected. If so, we swap the
positions of those pieces. In this way, it appears that the player is
clicking on puzzle pieces and changing their locations to try to solve
the puzzle.
To achieve the swap, we use a classic three-way
swap programming construct utilizing a temporary variable,
tempPiece1, as a placeholder for
the values we are going to swap. First, we need to create a couple
variables to hold the selected pieces. We will use selected1 and selected2 for that purpose. Next, we move
the reference to the piece represented by selected1 into the tempPiece1 variable:
if (selectedList.length == 2) {
        var selected1 = selectedList[0];
        var selected2 = selectedList[1];
        var tempPiece1 = board[selected1.col][selected1.row];
        board[selected1.col][selected1.row] =
Next, we move the piece referenced by selected2 to the location in the board array of the piece represented by
selected1 (the first swap). Then we
apply the piece referenced in selected1 to the position represented by
selected2 (the second swap).
Finally, now that they are swapped, we make sure to set the selected properties of both pieces to
false:
 board[selected2.col][selected2.row];
         board[selected2.col][selected2.row] = tempPiece1;
         board[selected1.col][selected1.row].selected = false;
         board[selected2.col][selected2.row].selected = false;
      }

   }
Note
This part of the function works because we have limited the
number of pieces that can be selected to 2. For a game such as poker, which
requires the player to select five cards, you would use a slightly
different algorithm that tests for 5 cards instead of 2, and then calculate the value of the
hand.
Testing the game
Believe it or not, that is all the code we need to talk about—the rest you have seen many times before. Try running the game (CH6EX10.html). When it loads, you should see the video organized in a 16-piece grid. Each part of the video will be playing, just like one of those magic tricks where a woman appears to be separated into multiple boxes but her legs, arms, and head are still moving. In fact, this game is sort of like one of those magic tricks because, in reality, the video was never “cut” in any way. We simply display the parts of the video to make it appear to be cut into 16 independent, moving pieces that can be swapped to re-form the original video.
Example 6-10 shows the full code listing for the Video Puzzle application.
<!doctype html>
<html lang="en">
<head>
<meta charset="UTF-8">
<title>CH6EX10: Video Puzzle</title>
<script src="modernizr-1.6.min.js"></script>
<script type="text/javascript">
window.addEventListener('load', eventWindowLoaded, false);
var videoElement;
var videoDiv;
function eventWindowLoaded() {

   videoElement = document.createElement("video");
   videoDiv = document.createElement('div');
   document.body.appendChild(videoDiv);
   videoDiv.appendChild(videoElement);
   videoDiv.setAttribute("style", "display:none;");
   var videoType = supportedVideoFormat(videoElement);
   if (videoType == "") {
      alert("no video support");
      return;
   }
   videoElement.setAttribute("src", "muirbeach." + videoType);
   videoElement.addEventListener("canplaythrough",videoLoaded,false);

}

function supportedVideoFormat(video) {
   var returnExtension = "";
   if (video.canPlayType("video/webm") =="probably" ||
       video.canPlayType("video/webm") == "maybe") {
         returnExtension = "webm";
   } else if(video.canPlayType("video/mp4") == "probably" ||
       video.canPlayType("video/mp4") == "maybe") {
         returnExtension = "mp4";
   } else if(video.canPlayType("video/ogg") =="probably" ||
       video.canPlayType("video/ogg") == "maybe") {
         returnExtension = "ogg";
   }

   return returnExtension;

}

function canvasSupport () {
     return Modernizr.canvas;
}


function videoLoaded() {
   canvasApp();

}

function canvasApp() {

  if (!canvasSupport()) {
          return;
        }

  function  drawScreen () {

      //Background
      context.fillStyle = '#303030';
      context.fillRect(0, 0, theCanvas.width, theCanvas.height);
      //Box
      context.strokeStyle = '#FFFFFF';
      context.strokeRect(5,  5, theCanvas.width−10, theCanvas.height−10);

      for (var c = 0; c < cols; c++) {
         for (var r = 0; r < rows; r++) {

            var tempPiece = board[c][r];
            var imageX = tempPiece.finalCol*partWidth;
            var imageY = tempPiece.finalRow*partHeight;
            var placeX = c*partWidth+c*xPad+startXOffset;
            var placeY = r*partHeight+r*yPad+startYOffset;
            //context.drawImage(videoElement , imageX, imageY, partWidth, partHeight);
            context.drawImage(videoElement, imageX, imageY, partWidth, partHeight,
                placeX, placeY, partWidth, partHeight);
            if (tempPiece.selected) {

               context.strokeStyle = '#FFFF00';
               context.strokeRect( placeX,  placeY, partWidth, partHeight);

            }
         }
      }

   }

   function randomizeBoard(board) {
      var newBoard = new Array();
      var cols = board.length;
      var rows = board[0].length
      for (var i = 0; i < cols; i++) {
         newBoard[i] = new Array();
         for (var j =0; j < rows; j++) {
            var found = false;
            var rndCol = 0;
            var rndRow = 0;
            while (!found) {
               var rndCol = Math.floor(Math.random() * cols);
               var rndRow = Math.floor(Math.random() * rows);
               if (board[rndCol][rndRow] != false) {
                  found = true;
               }
            }

            newBoard[i][j] = board[rndCol][rndRow];
            board[rndCol][rndRow] = false;
         }

      }

      return newBoard;

   }

   function eventMouseUp(event) {

      var mouseX;
      var mouseY;
      var pieceX;
      var pieceY;
      if ( event.layerX ||  event.layerX == 0) { // Firefox
            mouseX = event.layerX ;
          mouseY = event.layerY;
        } else if (event.offsetX || event.offsetX == 0) { // Opera
          mouseX = event.offsetX;
          mouseY = event.offsetY;
        }
      var selectedList= new Array();
      for (var c = 0; c < cols; c++) {

         for (var r =0; r < rows; r++) {
            pieceX = c*partWidth+c*xPad+startXOffset;
            pieceY = r*partHeight+r*yPad+startYOffset;
            if ( (mouseY >= pieceY) && (mouseY <= pieceY+partHeight) &&
                 (mouseX >= pieceX) && (mouseX <= pieceX+partWidth) ) {

               if ( board[c][r].selected) {
                     board[c][r].selected = false;

               } else {
                     board[c][r].selected = true;

               }
            }
            if (board[c][r].selected) {
                  selectedList.push({col:c,row:r})
            }

         }

      }
      if (selectedList.length == 2) {
         var selected1 = selectedList[0];
         var selected2 = selectedList[1];
         var tempPiece1 = board[selected1.col][selected1.row];
         board[selected1.col][selected1.row] =  board[selected2.col][selected2.row];
         board[selected2.col][selected2.row] = tempPiece1;
         board[selected1.col][selected1.row].selected = false;
         board[selected2.col][selected2.row].selected = false;
      }

   }

   var theCanvas = document.getElementById("canvasOne");
   var context = theCanvas.getContext("2d");
   videoElement.play();

   //Puzzle Settings

   var rows = 4;
   var cols = 4;
   var xPad = 10;
   var yPad = 10;
   var startXOffset = 10;
   var startYOffset = 10;
   var partWidth = videoElement.width/cols;
   var partHeight = videoElement.height/rows;
   //320×240
   partWidth = 80;
   partHeight = 60;
   var board = new Array();

   //Initialize Board

   for (var i = 0; i < cols; i++) {
         board[i] = new Array();
         for (var j =0; j < rows; j++) {
            board[i][j] = { finalCol:i,finalRow:j,selected:false };
         }
   }

   board = randomizeBoard(board);

   theCanvas.addEventListener("mouseup",eventMouseUp, false);

   setInterval(drawScreen, 33);

}

</script>

</head>
<body>
<div style="position: absolute; top: 50px; left: 50px;">

<canvas id="canvasOne" width="370" height="300">
 Your browser does not support HTML5 Canvas.
</canvas>
</div>
</body>
</html>
Creating Video Controls on the Canvas
One obvious use of the HTML5 Canvas video display functionality is to create custom video controls to play, pause, stop, etc. You may have already noticed that when a video is rendered on the canvas, it does not retain any of the HTML5 video controls. If you want to create controls on the canvas, you need to make them yourself. Thankfully, we have already learned most everything we need to do this—now we just have to put it all together.
Creating video buttons
We are going to use some video control buttons that were created specifically for this example. Figure 6-11 shows a tile sheet that consists of off and on states for play, pause, and stop. The top row images are the on state; the bottom row images are the off state.

Note
We don’t use the off state of the stop button in this application, but we included it in case you—the amazing reader and programmer that you are—want to use it later.
We will load this image dynamically onto the canvas, and then place each 32×32 button onto the canvas individually. We use the width and height to calculate which part of the image to display as a control.
Preloading the buttons
The first thing we need to do is preload the button tile sheet.
Since we are already testing for the video to preload before we
display the canvas, we need a slightly new strategy to preload
multiple objects. For this example, we will use a counter variable
named loadCount that we will
increment each time we detect that an item has loaded. In conjunction
with that variable, we will create another named itemsToLoad, which will hold the number of
things we are preloading. For this app that number is two: the video
and the tile sheet. These two variables are created outside of all
functions at the top of our JavaScript:
var loadCount = 0;
var itemsToLoad = 2;
Along with videoElement and
videoDiv, we also create another
new variable, buttonSheet. This is
a reference to the image we load that holds the graphical buttons we
will use for the video player interface:
var videoElement;
var videoDiv;
var buttonSheet
We now must make some updates to our standard eventWindowLoaded() function that we have
used for most of this chapter. First, we are going to change the
canplay event handler for the video
to a new function, itemLoaded:
videoElement.addEventListener("canplay",itemLoaded,false);We used the canplay event
instead of canplaythrough because,
most of the time, a user wants to start watching a video as soon as
enough data has been buffered to play, and not after the entire video
has loaded.
Next, we need to load our tile sheet. We create a new Image object and set the src property to videobuttons.png, which is the file shown
in Figure 6-11. We also set its
onload event handler to itemLoaded, just like the video:
   buttonSheet = new Image();
   buttonSheet.src = "videobuttons.png";
   buttonSheet.onload = itemLoaded;
}
Finally, we create the itemLoaded() event handler function. When
this function is called, we increment the loadCount variable and test it against the
itemsToLoad variable.
Note
loadCount should never be
greater than itemsToLoad if your
application is running correctly. However, we find it safer to limit
the use of the strict == test if
possible. Why? Because if somehow, somewhere, something gets counted
twice, the app will never load properly.
If it is equal to or greater than itemsToLoad, we call canvasApp() to start the application:
function itemLoaded() {
   loadCount++;
   if (loadCount >= itemsToLoad) {
      canvasApp();
   }
}
Placing the buttons
We need to set some variables in canvasApp() that will represent the
locations of the three buttons we will display: play, pause, and stop.
We start by specifying the standard button width and height as the
variables bW and bH. All the images in the videobuttons.png tile sheet are 32×32
pixels, so we will set bW and
bH accordingly. Then, we proceed to
create variables that represent the x and y
locations of each button: playX,
playY, pauseX, pauseY, stopX, and stopY. We could use literal values; however,
these variables will make a couple of the more complicated
calculations easier to swallow:
var bW = 32;
var bH = 32;
var playX = 190;
var playY = 300;
var pauseX = 230;
var pauseY = 300;
var stopX = 270
var stopY = 300;
In the drawImage() function,
we need to test for the current state of the playing video and render
the buttons accordingly. For this application, we will use the
paused state of the video object’s
attribute to render the buttons properly in their “up” or “down”
states.
When a video first loads on the page and is not yet playing, its
paused attribute is set to true. When a video is playing, its paused attribute is set to false. Knowing this, we can create the
actions for these simple buttons.
First, if we know that the video is not in a paused state, it must be playing, so we
display the “down” version of the play button. The “down” position is
in the second row on the tile sheet in Figure 6-11. The third parameter of
the call to the drawImage()
function is 32 because that is
where the y position of the image
we want to display starts on the tile sheet. If paused is true, it means the video is not playing, so
we display the “up” version of the play button. It starts at y position 0:
if (!videoElement.paused) {
    context.drawImage(buttonSheet, 0,32,bW,bH,playX,playY,bW,bH); //Play Down

} else {
    context.drawImage(buttonSheet, 0,0,bW,bH,playX,playY,bW,bH); //Play up
}
Displaying the pause button is simply the opposite of play. If
the video paused property is
true, we display the “down” version
of the pause button. If the video is playing, it means the pause property is false, so we display the “up” version.
Notice that the second parameter is 32 because to display the pause buttons in
the tile sheet, we need to skip over the play button and start at the
x position of the pause
button:
if (videoElement.paused) {
    context.drawImage(buttonSheet,  32,32,bW,bH,pauseX,pauseY,bW,bH); //down
} else {
    context.drawImage(buttonSheet,  32,0,bW,bH,pauseX,pauseY,bW,bH); // up
}

context.drawImage(buttonSheet,  64,0,bW,bH,stopX,stopY,bW,bH); // Stop up
Listening for the button presses
We also need to listen for the mouse button click. This process
is very similar to how we accomplished much the same thing in the
Video Puzzle application. First, back in the canvasApp() function, we set an event
handler, eventMouseUp(), for the
mouseup event:
theCanvas.addEventListener("mouseup",eventMouseUp, false);The eventMouseUp() function
works very similar to the same function we created earlier for Video
Puzzle. First, we find the mouse pointer’s x and y
positions based on the way the browser tracks those values, and we put
those values into local mouseX and
mouseY variables:
function eventMouseUp(event) {

      var mouseX;
      var mouseY;
   if ( event.layerX ||  event.layerX == 0) { // Firefox
          mouseX = event.layerX ;
          mouseY = event.layerY;
        } else if (event.offsetX || event.offsetX == 0) { // Opera
          mouseX = event.offsetX;
          mouseY = event.offsetY;
        }
      //Hit Play
Next, we test for a hit test point inside each button by checking the bounds (right, left, top, bottom) on the canvas to see whether the mouse pointer was over any of our buttons when it was clicked. If so, we detect a hit.
First, we test the play button. Notice that those variables we
created to represent the upper-left x and y
locations of the button (playX and
playY) help us make this
calculation. They also help us because the names of the buttons
self-document what we are trying to accomplish in each test of this
function.
If the play button has been clicked, and the video paused property is true, we call the play() function of the video to start
playing:
//Hit Play
      if ( (mouseY >= playY) && (mouseY <= playY+bH) && (mouseX >= playX) &&
           (mouseX <= playX+bW) ) {
         if (videoElement.paused) {
            videoElement.play();

         }
If the stop button was clicked, we set the paused property of the video to true, and set the currentTime property to 0 so that the video will return to the first
frame:
//Hit Stop

      if ( (mouseY >= stopY) && (mouseY <= stopY+bH) && (mouseX >= stopX) &&
           (mouseX <= stopX+bW) ) {

         videoElement.pause();
         videoElement.currentTime = 0;
      }
If the pause button is clicked and the paused property of the video is false, we call the pause() function of the video to—you guessed
it—pause the video on the current frame. If the paused property is true, we call the play() function of the video so it will
resume playing:
//Hit Pause
      if ( (mouseY >= pauseY) && (mouseY <= pauseY+bH) && (mouseX >= pauseX) &&
           (mouseX <= pauseX+bW) ) {

         if (videoElement.paused == false) {
            videoElement.pause();
         } else {
            videoElement.play();
         }

      }
Figure 6-12 shows what the canvas looks like when the video is displayed with controls.
Note
You will notice an odd relationship between the play and pause
buttons. When one is “on,” the other is “off.” This is because we
have only one property to look at: paused. There is a property named playing that exists in the HTML5
specification, but it did not work in all browsers, so we only used
paused. In reality, you could
have only one button and swap out the play or paused graphic
depending on the paused state.
That would make these controls work more like the default HTML
video controls.

Example 6-11 shows the full source code for this application.
<!doctype html>
<html lang="en">
<head>
<meta charset="UTF-8">
<title>CH6EX11: Canvas Video With Controls</title>
<script src="modernizr-1.6.min.js"></script>
<script type="text/javascript">
window.addEventListener('load', eventWindowLoaded, false);
var loadCount= 0;
var itemsToLoad = 2;
var videoElement;
var videoDiv;
var buttonSheet

function eventWindowLoaded() {
   videoElement = document.createElement("video");
   videoDiv = document.createElement('div');
   document.body.appendChild(videoDiv);
   videoDiv.appendChild(videoElement);
   videoDiv.setAttribute("style", "display:none;");
   var videoType = supportedVideoFormat(videoElement);
   if (videoType == "") {
      alert("no video support");
      return;
   }
   videoElement.setAttribute("src", "muirbeach." + videoType);
   videoElement.addEventListener("canplay",itemLoaded,false);
   buttonSheet = new Image();
   buttonSheet.onload = itemLoaded;
   buttonSheet.src = "videobuttons.png";
}

function supportedVideoFormat(video) {
   var returnExtension = "";
   if (video.canPlayType("video/webm") =="probably" ||
       video.canPlayType("video/webm") == "maybe") {
         returnExtension = "webm";
   } else if(video.canPlayType("video/mp4") == "probably" ||
       video.canPlayType("video/mp4") == "maybe") {
         returnExtension = "mp4";
   } else if(video.canPlayType("video/ogg") =="probably" ||
       video.canPlayType("video/ogg") == "maybe") {
         returnExtension = "ogg";
   }

   return returnExtension;

}

function canvasSupport () {
     return Modernizr.canvas;
}
function itemLoaded() {
   loadCount++;
   if (loadCount >= itemsToLoad) {
      canvasApp();
   }

}
function canvasApp() {

   if (!canvasSupport()) {
          return;
        }

  function  drawScreen () {

      //Background
      context.fillStyle = '#ffffaa';
      context.fillRect(0, 0, theCanvas.width, theCanvas.height);
      //Box
      context.strokeStyle = '#000000';
      context.strokeRect(5,  5, theCanvas.width−10, theCanvas.height−10);
      //video
      context.drawImage(videoElement , 85, 30);
      //Draw Buttons
      //Play

      if (!videoElement.paused) {
         context.drawImage(buttonSheet, 0,32,bW,bH,playX,playY,bW,bH); //Play Down

      } else {
         context.drawImage(buttonSheet, 0,0,bW,bH,playX,playY,bW,bH); //Play up

      }

      if (videoElement.paused) {
         context.drawImage(buttonSheet,  32,32,bW,bH,pauseX,pauseY,bW,bH); // Pause down
      } else {
         context.drawImage(buttonSheet,  32,0,bW,bH,pauseX,pauseY,bW,bH); // Pause up
      }

      context.drawImage(buttonSheet,  64,0,bW,bH,stopX,stopY,bW,bH); // Stop up

   }

      function eventMouseUp(event) {

      var mouseX;
      var mouseY;

      if ( event.layerX ||  event.layerX == 0) { // Firefox
            mouseX = event.layerX ;
          mouseY = event.layerY;
        } else if (event.offsetX || event.offsetX == 0) { // Opera
          mouseX = event.offsetX;
          mouseY = event.offsetY;
        }

      //Hit Play
      if ( (mouseY >= playY) && (mouseY <= playY+bH) && (mouseX >= playX) &&
           (mouseX <= playX+bW) ) {
         if (videoElement.paused) {
            videoElement.play();

         }

      }

      //Hit Stop

      if ( (mouseY >= stopY) && (mouseY <= stopY+bH) && (mouseX >= stopX) &&
            (mouseX <= stopX+bW) ) {

         videoElement.pause();
         videoElement.currentTime = 0;
      }

      //Hit Pause
      if ( (mouseY >= pauseY) && (mouseY <= pauseY+bH) && (mouseX >= pauseX) &&
           (mouseX <= pauseX+bW) ) {

         if (videoElement.paused == false) {
            videoElement.pause();
         } else {
            videoElement.play();
         }

      }

   }

   var theCanvas = document.getElementById("canvasOne");
   var context = theCanvas.getContext("2d");

   var bW = 32;
   var bH = 32;
   var playX = 190;
   var playY = 300;
   var pauseX = 230;
   var pauseY = 300;
   var stopX = 270
   var stopY = 300;


   theCanvas.addEventListener("mouseup",eventMouseUp, false);

   setInterval(drawScreen, 33);
}

</script>

</head>
<body>
<div style="position: absolute; top: 50px; left: 50px;">

<canvas id="canvasOne" width="500" height="350">
 Your browser does not support HTML5 Canvas.
</canvas>
</div>
</body>
</html>
Animation Revisited: Moving Videos
Now we are going to revisit the bouncing balls demo from Chapter 5 to show you how you can achieve the same effect with images and videos. Since we covered this in detail in Example 5-5 (CH5EX5.html), we don’t need to examine all the code—just the changes that make the videos move.
Note
Remember that videos are drawn in much the same way as images, so with very few changes this application would work just as well with a static image.
While there are a few other changes, the most important is in the
drawScreen() function when we draw the
videos onto the canvas. Recall that in Chapter 5 we created an array
named balls and a dynamic object to
hold the properties of each ball that looked like this:
tempBall = {x:tempX,y:tempY,radius:tempRadius, speed:tempSpeed, angle:tempAngle,
    xunits:tempXunits, yunits:tempYunits}
For videos, we will create a similar array, named videos, but we will alter the dynamic
object:
tempvideo = {x:tempX,y:tempY,width:180, height:120, speed:tempSpeed, angle:tempAngle,
    xunits:tempXunits, yunits:tempYunits}
The big difference here is that we no longer need a radius that represents the size of the ball;
instead, we need the width and height so we can render the video to our desired
size in the drawScreen()
function.
Back in Chapter 5 we used the canvas drawing command to draw balls on the screen like this:
context.beginPath();
context.arc(ball.x,ball.y,ball.radius,0,Math.PI*2,true);
context.closePath();
context.fill();
To draw videos, we need to change the code:
context.drawImage(videoElement, video.x, video.y, video.width, video.height);
That is pretty much all you need to do! There are some others changes here (e.g., we start all the videos in the center of the screen before they start moving), but the items mentioned above are the main things you need to concentrate on to move video, not yellow balls, around the screen. Figure 6-13 shows what the example looks like with bouncing videos instead of balls. You can see the full code in Example 6-12.
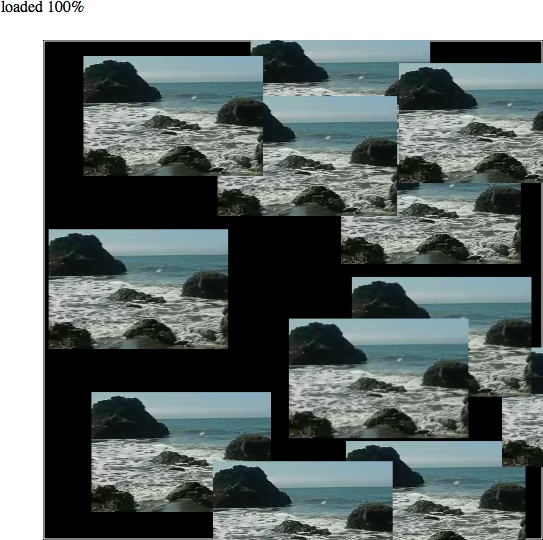
<!doctype html>
<html lang="en">
<head>
<meta charset="UTF-8">
<title>CH6EX12: Multiple Video Bounce</title>
<script src="modernizr-1.6.min.js"></script>
<script type="text/javascript">
window.addEventListener('load', eventWindowLoaded, false);

var videoElement;
var videoDiv;
function eventWindowLoaded() {

   videoElement = document.createElement("video");
   var videoDiv = document.createElement('div');
   document.body.appendChild(videoDiv);
   videoDiv.appendChild(videoElement);
   videoDiv.setAttribute("style", "display:none;");
   var videoType = supportedVideoFormat(videoElement);
   if (videoType == "") {
      alert("no video support");
      return;
   }
   videoElement.setAttribute("src", "muirbeach." + videoType);
   videoElement.addEventListener("canplaythrough",videoLoaded,false);

}

function supportedVideoFormat(video) {
   var returnExtension = "";
   if (video.canPlayType("video/webm") =="probably" ||
       video.canPlayType("video/webm") == "maybe") {
         returnExtension = "webm";
   } else if(video.canPlayType("video/mp4") == "probably" ||
       video.canPlayType("video/mp4") == "maybe") {
         returnExtension = "mp4";
   } else if(video.canPlayType("video/ogg") =="probably" ||
       video.canPlayType("video/ogg") == "maybe") {
         returnExtension = "ogg";
   }

   return returnExtension;

}

function canvasSupport () {
     return Modernizr.canvas;
}

function videoLoaded() {
   canvasApp();

}

function canvasApp() {

  if (!canvasSupport()) {
          return;
        }

  function  drawScreen () {

      context.fillStyle = '#000000';
      context.fillRect(0, 0, theCanvas.width, theCanvas.height);
      //Box
      context.strokeStyle = '#ffffff';
      context.strokeRect(1,  1, theCanvas.width-2, theCanvas.height-2);

      //Place videos
      context.fillStyle = "#FFFF00";
      var video;

      for (var i =0; i <videos.length; i++) {
         video = videos[i];
         video.x += video.xunits;
         video.y += video.yunits;

         context.drawImage(videoElement ,video.x, video.y, video.width, video.height);

         if (video.x > theCanvas.width-video.width || video.x < 0 ) {
            video.angle = 180 - video.angle;
            updatevideo(video);
         } else if (video.y > theCanvas.height-video.height || video.y < 0) {
            video.angle = 360 - video.angle;
            updatevideo(video);
         }
      }

   }

   function updatevideo(video) {

      video.radians = video.angle * Math.PI/ 180;
      video.xunits = Math.cos(video.radians) * video.speed;
      video.yunits = Math.sin(video.radians) * video.speed;

   }

   var numVideos = 12 ;
   var maxSpeed = 10;
   var videos = new Array();
   var tempvideo;
   var tempX;
   var tempY;
   var tempSpeed;
   var tempAngle;
   var tempRadians;
   var tempXunits;
   var tempYunits;

   var theCanvas = document.getElementById("canvasOne");
   var context = theCanvas.getContext("2d");
   videoElement.play();

   for (var i = 0; i < numVideos; i++) {

      tempX = 160 ;
      tempY = 190 ;
      tempSpeed = 5;
      tempAngle = Math.floor(Math.random()*360);
      tempRadians = tempAngle * Math.PI/ 180;
      tempXunits = Math.cos(tempRadians) * tempSpeed;
      tempYunits = Math.sin(tempRadians) * tempSpeed;

      tempvideo = {x:tempX,y:tempY,width:180, height:120, speed:tempSpeed, angle:tempAngle,
          xunits:tempXunits, yunits:tempYunits}
      videos.push(tempvideo);
   }

   setInterval(drawScreen, 33);

}

</script>

</head>
<body>
<div style="position: absolute; top: 50px; left: 50px;">

<canvas id="canvasOne" width="500" height="500">
 Your browser does not support HTML5 Canvas.
</canvas>
</div>
</body>
</html>
Note
The HTML5 video element
combined with the canvas is an exciting, emerging area that is being
explored on the Web as you read this. One great example of this is the
exploding 3D video at CraftyMind.com: http://www.craftymind.com/2010/04/20/blowing-up-html5-video-and-mapping-it-into-3d-space/.
What’s Next?
In this chapter we introduced the HTML <video> tag and showed some basic ways
that it could be used on an HTML page, including how to manipulate loaded
video in numerous ways. While we showed you how to do some pretty cool
stuff with the video and HTML5 Canvas, this is really just the tip of the
iceberg. We believe that these two very powerful and flexible new features
of HTML5 (video and the canvas) will prove to be a very potent combination
for web applications of the future. In the next chapter, we will dive into
HTML5 audio and how it can be used with applications created on the
canvas.
Get HTML5 Canvas now with the O’Reilly learning platform.
O’Reilly members experience books, live events, courses curated by job role, and more from O’Reilly and nearly 200 top publishers.

