Chapter 1. Swift 2.0, Xcode 7, and Interface Builder
In this chapter, we are going to have a look at some of the updates to Swift (Swift 2.0), Xcode, and Interface Builder. We will start with Swift and some of the really exciting features that have been added to it since you read the iOS 8 Swift Programming Cookbook.
1.1 Handling Errors in Swift
Discussion
Let’s say that you want to create a method that takes in a first name and last name as two arguments and returns a full name. The first name and the last name have to each at least be one character long for this method to work. If one or both have 0 lengths, we are going to want to throw an exception.
The first thing that we have to do is to define our errors of type ErrorType:
enumErrors:ErrorType{caseEmptyFirstNamecaseEmptyLastName}
And then we are going to define our method to take in a first and last name and join them together with a space in between:
funcfullNameFromFirstName(firstName:String,lastName:String)throws->String{iffirstName.characters.count==0{throwErrors.EmptyFirstName}iflastName.characters.count==0{throwErrors.EmptyLastName}returnfirstName+" "+lastName}
The interesting part is really how to call this method. We use the do statement like so:
do{letfullName=tryfullNameFromFirstName("Foo",lastName:"Bar")(fullName)}catch{("An error occurred")}
The catch clause of the do statement allows us to trap errors in a fine-grained manner. Let’s say that you want to trap errors in the Errors enum differently from instances of NSException. Separate your catch clauses like this:
do{letfullName=tryfullNameFromFirstName("Foo",lastName:"Bar")(fullName)}catchleterrasErrors{//handle this specific type of error here(err)}catchletexasNSException{//handle exceptions here(ex)}catch{//otherwise, do this}
See Also
1.2 Specifying Preconditions for Methods
Discussion
The guard syntax allows you to:
- Specify a set of conditions for your methods.
- Bind variables to optionals and use those variables in the rest of your method’s body.
Let’s have a look at a method that takes an optional piece of data as the NSData type and turns it into a String only if the string has some characters in it and is not empty:
funcstringFromData(data:NSData?)->String?{guardletdata=data,letstr=NSString(data:data,encoding:NSUTF8StringEncoding)wheredata.length>0else{returnnil}returnString(str)}
And then we are going to use it like so:
iflet_=stringFromData(nil){("Got the string")}else{("No string came back")}
We pass nil to this method for now and trigger the failure block (“No string came back”). What if we passed valid data? And to have more fun with this, let’s create our NSData instance this time with a guard. Because the NSString constructor we are about to use returns an optional value, we put a guard statement before it to ensure that the value that goes into the data variable is in fact a value, and not nil:
guardletdata=NSString(string:"Foo").dataUsingEncoding(NSUTF8StringEncoding)wheredata.length>0else{return}ifletstr=stringFromData(data){("Got the string \(str)")}else{("No string came back")}
So we can mix guard and where in the same statement. How about multiple let statements inside a guard? Can we do that? You betcha:
funcexample3(firstNamefirstName:String?,lastName:String?,age:UInt8?){guardletfirstName=firstName,letlastName=lastName,_=agewherefirstName.characters.count>0&&lastName.characters.count>0else{return}(firstName," ",lastName)}
See Also
1.3 Ensuring the Execution of Code Blocks Before Exiting Methods
Discussion
Anything that you put inside a defer block inside a method is guaranteed to get executed before your method returns to the caller. However, this block of code will get executed after the return call in your method. The code is also called when your method throws an exception.
Let’s say that you want to define a method that takes in a string and renders it inside a new image context with a given size. Now if the string is empty, you want to throw an exception. However, before you do that, we want to make sure that we have ended our image context. Let’s define our error first:
enumErrors:ErrorType{caseEmptyString}
Then we move onto our actual method that uses the defer syntax:
funcimageForString(str:String,size:CGSize)throws->UIImage{defer{UIGraphicsEndImageContext()}UIGraphicsBeginImageContextWithOptions(size,true,0)ifstr.characters.count==0{throwErrors.EmptyString}//draw the string here...returnUIGraphicsGetImageFromCurrentImageContext()}
I don’t want to put print() statements everywhere in the code because it makes the code really ugly. So to see whether this really works, I suggest that you paste this code into your Xcode—or even better, grab the source code for this book’s example code from GitHub, where I have already placed breakpoints in the defer and the return statements so that you can see that they are working properly.
You can of course then call this method like so:
    do{
      let i = try imageForString("Foo", size: CGSize(width: 100, height: 50))
      print(i)
    } catch let excep{
      print(excep)
    }
See Also
1.4 Checking for API Availability
Discussion
We’ve all been waiting for this for a very long time. The days of having to call the respondsToSelector: method are over (hopefully). Now we can just use the #available syntax to make sure a specific iOS version is available before making a call to a method.
Let’s say that we want to write a method that can read an array of bytes from an NSDataobject. NSData offers a handy getBytes: method to do this, but Apple decided to deprecate it in iOS 8.1 and replace it with the better getBytes:length: version that minimizes the risk of buffer overflows. So assuming that one of our deployment targets is iOS 8 or older, we want to ensure that we call this new method if we are on iOS 8.1 or higher and the older method if we are on iOS 8.0 or older:
enumErrors:ErrorType{caseEmptyData}funcbytesFromData(data:NSData)throws->[UInt8]{if(data.length==0){throwErrors.EmptyData}varbuffer=[UInt8](count:data.length,repeatedValue:0)if#available(iOS8.1,*){data.getBytes(&buffer,length:data.length)}else{data.getBytes(&buffer)}returnbuffer}
And then we go ahead and call this method:
funcexample1(){guardletdata="Foo".dataUsingEncoding(NSUTF8StringEncoding)else{return}do{letbytes=trybytesFromData(data)("Data = \(bytes)")}catch{("Failed to get bytes")}}
See Also
1.5 Categorizing and Downloading Assets to Get Smaller Binaries
Discussion
For this recipe, I will create three packs of assets, each with three images in them. One pack may run for x3 screen scales, another for iPhone 6, and the last for iPhone 6+, for instance. I am taking very tiny clips of screenshots of my desktop to create these images—nothing special. The first pack will be called “level1,” the second “level2,” and the third “level3.”
Note
Use the GitHub repo of this book for a quick download of the said resources. Also, for the sake of simplicity, I am assuming that we are going to run this only on x3 scale screens such as iPhone 6+.
Place all nine images (three packs of three images) inside your Assets.xcassets file and name them as shown in Figure 1-1. Then select all the images in your first asset pack and open the Attributes inspector. In the “On Demand Resource Tags” section of the inspector, enter level1 and do the same thing for other levels—but of course bump the number up for each pack.
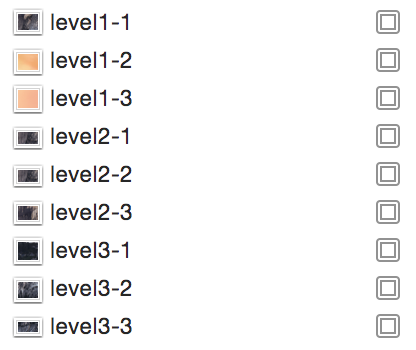
Figure 1-1. Name your assets as shown
Now, in your UI, place three buttons and three image views, hook the buttons’ actions to the code, and hook the image view references to the code:
@IBOutletvarimg1:UIImageView!@IBOutletvarimg2:UIImageView!@IBOutletvarimg3:UIImageView!varimageViews:[UIImageView]{return[self.img1,self.img2,self.img3]}
To find out whether the resource pack that you need has already been downloaded, call the conditionallyBeginAccessingResourcesWithCompletionHandler function on your resource request. Don’t blame me! I didn’t name this function. This will return a Boolean of true or false to tell you whether you have or don’t have access to the resource. If you don’t have access, you can simply download the resources with a call to the beginAccessingResourcesWithCompletionHandler function. This will return an error if one happens, or nil if everything goes well.
Note
We keep a reference to the request that we send for our asset pack so that the next time our buttons are tapped, we don’t have to check their availability again, but release the previously downloaded resources using the endAccessingResources function.
varcurrentResourcePack:NSBundleResourceRequest?funcdisplayImagesForResourceTag(tag:String){NSOperationQueue.mainQueue().addOperationWithBlock{fornin0..<self.imageViews.count{self.imageViews[n].image=UIImage(named:tag+"-\(n+1)")}}}funcuseLevel(lvl:UInt32){letimageViews=[img1,img2,img3]forimginimageViews{img.image=nil}lettag="level\(lvl)"ifletreq=currentResourcePack{req.endAccessingResources()}currentResourcePack=NSBundleResourceRequest(tags:[tag])guardletreq=currentResourcePackelse{return}req.conditionallyBeginAccessingResourcesWithCompletionHandler{availableinifavailable{self.displayImagesForResourceTag(tag)}else{req.beginAccessingResourcesWithCompletionHandler{erroringuarderror==nilelse{//TODO: you can handle the error herereturn}self.displayImagesForResourceTag(tag)}}}}@IBActionfuncuseLevel3(sender:AnyObject){useLevel(3)}@IBActionfuncuseLevel2(sender:AnyObject){useLevel(2)}@IBActionfuncuseLevel1(sender:AnyObject){useLevel(1)}
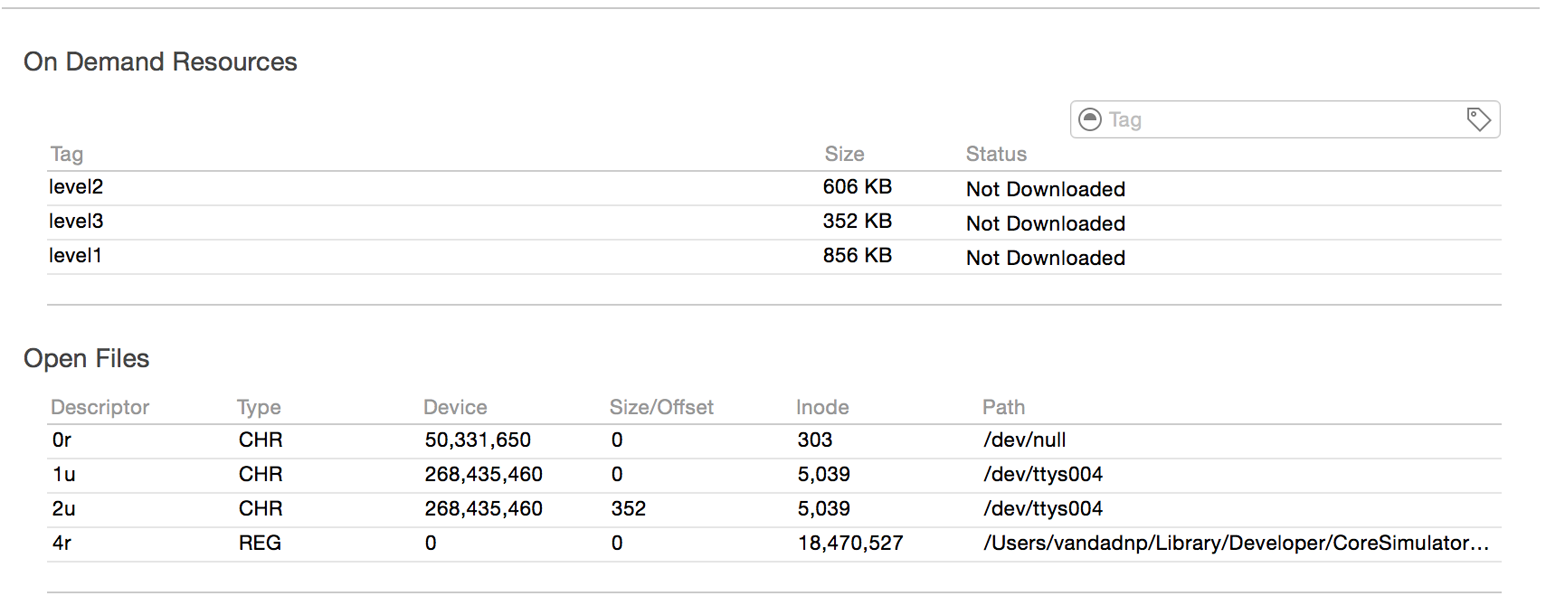
Run the code now in your simulator. When Xcode opens, go to the Debug Navigator (Command-6 key) and then click the Disk section. You will see something like that shown in Figure 1-2.
Note how none of the asset packs are in use. Now in your UI, click the first button to get the first asset pack and watch how the first asset pack’s status will change to “In Use.” Once you switch from that pack to another, the previously chosen pack will be set to “Downloaded” and be ready to be purged.
See Also
1.6 Exporting Device-Specific Binaries
Solution
- Archive your app in Xcode.
- In the Archives screen, click the Export button.
- Choose the “Save for Ad Hoc Deployment” option in the new screen and click Next.
- In the new window, choose “Export for specific device” and then choose your device from the list.
- Once you are done, click the Next button and save your file to disk.
Discussion
With iOS 9, Apple introduced bitcode. This is Apple’s way of specifying how the binary that you submit to the App Store will be downloaded on target devices. For instance, if you have an asset catalogue with some images for the iPad and iPhone and a second set of images for the iPhone 6 and 6+ specifically, users on iPhone 5 should not get the second set of assets. You don’t have to do anything really to enable this functionality in Xcode 7. It is enabled by default. If you are working on an old project, you can enable bitcode from Build Settings in Xcode.
If you are writing an app that has a lot of images and assets for various devices, I suggest that you use this method, before submitting your app to the store, to ensure that the required images and assets are indeed included in your final build. Remember, if bitcode is enabled in your project, Apple will detect the host device that is downloading your app from the store and will serve the right binary to that device. You don’t have to separate your binaries when submitting to Apple. You submit a big fat juicy binary and Apple will take care of the rest.
See Also
1.7 Linking Separate Storyboards Together
Discussion
I remember working on a project where we had a really messy storyboard and we had to separate the view controllers. What we ended up doing was putting the controllers on separate storyboards manually, after which we had to write code to link our buttons and other actions to the view controllers, instantiate them manually, and then show them. Well, none of that anymore. Apple has taken care of that for us!
As an exercise, create a single-view controller project in Xcode and then open your main storyboard. Then choose the Editor menu, then Embed In, and then Navigation Controller. Now your view controller has a navigation controller. Place a button on your view controller and then place another view controller on your storyboard. Select the button on the first view controller, hold down the Control button on your keyboard, drag the line over to the second view controller, and then choose the Show option. This will ensure that when the user taps your button, the system will push the second view controller onto the screen, as Figure 1-3 shows.
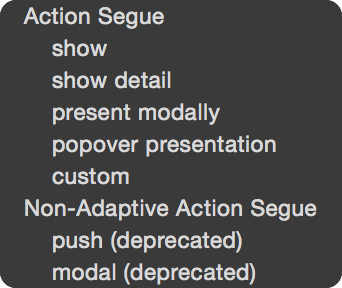
Figure 1-3. We need to create a show segue ensuring that pressing our button will show the second view controller
Now select your second view controller and then, from the Editor menu, choose the “Refactor to Storyboard” item. In the dialog, enter Second.storyboard as the file name and save. That’s really it. Now run your app and see the results if you want.
If you prefer to do some of this stuff manually instead of embedding things like this, you can always drag the new item called Storyboard Reference from the Object Library onto your storyboard and set up the name of the storyboard manually. Xcode will give you a drop-down box so that you don’t have to write the name of the storyboard all by yourself. You will also be able to specify an identifier for your storyboard. This identifier will then be useful when working with the segue. You of course have to set up this ID for your view controller in advance.
See Also
1.8 Adding Multiple Buttons to the Navigation Bar
Solution
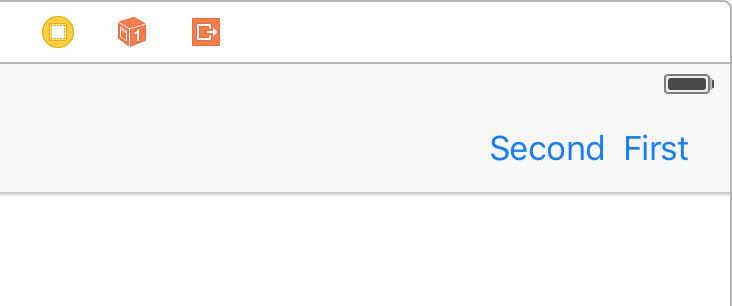
In Xcode 7, you can now add multiple bar button items to your navigation bar. Simply open the Object Library and search for “bar button.” Once you find the buttons, drag and drop them onto your navigation bar and then simply reference them in your code if you have to. For instance, Figure 1-4 shows two bar buttons on the right-hand side of the navigation bar. In previous versions of Xcode, we could add only one button to each side. If we wanted more buttons, we had to write code to add them.
Discussion
Prior to Xcode 7 you could not place multiple bar button items next to each other on your navigation bar. Well, now you can. You can also access these buttons just as you would expect, by creating a reference to them in your code. And you can always find them using the barButtonItems property of your navigation bar.
See Also
1.9 Optimizing Your Swift Code
Solution
- Enable whole module optimization on your code.
- Use value types (such as structs) instead of reference types where possible.
- Consider using
finalfor classes, methods, and variables that aren’t going to be overridden. - Use the
CFAbsoluteTimeGetCurrentfunction to profile your app inside your code. - Always use Instruments to profile your code and find bottlenecks.
Discussion
Let’s have a look at an example. Let’s say that we have a Person class like so:
classPerson{letname:Stringletage:Intinit(name:String,age:Int){self.name=nameself.age=age}}
Now we will write a method that will generate 100,000 instances of this class, place them inside a mutable array, and then enumerate the array. We will time this operation using the CFAbsoluteTimeGetCurrent function. We’ll then be able to tell how many milliseconds this took:
funcexample1(){varx=CFAbsoluteTimeGetCurrent()vararray=[Person]()for_in0..<100000{array.append(Person(name:"Foo",age:30))}//go through the items as wellfornin0..<array.count{let_=array[n]}x=(CFAbsoluteTimeGetCurrent()-x)*1000.0("Took \(x) milliseconds")}
When I ran this code, it took 41.28 milliseconds to complete; it will probably be different in your computer. Now let’s create a struct similar to the class we created before but without an initializer, because we get that for free. Then do the same that we did before and time it:
structPersonStruct{letname:Stringletage:Int}funcexample2(){varx=CFAbsoluteTimeGetCurrent()vararray=[PersonStruct]()for_in0..<100000{array.append(PersonStruct(name:"Foo",age:30))}//go through the items as wellfornin0..<array.count{let_=array[n]}x=(CFAbsoluteTimeGetCurrent()-x)*1000.0("Took \(x) milliseconds")}
Note
Don’t suffix your struct names with “Struct” like I did. This is for demo purposes only, to differentiate between the class and the struct.
When I run this code, it takes only 35.53 milliseconds. A simple optimization brought some good savings. Also notice that in the release version these times will be massively improved, because your binary will have no debug information. I have tested the same code without the debugging, and the times are more around 4 milliseconds. Also note that I am testing these on the simulator, not on a real device. The profiling will definitely report different times on a device, but the ratio should be quite the same.
Another thing that you will want to do is think about which parts of your code are final and mark them with the final keyword. This will tell the compiler that you are not intending to override those properties, classes, or methods and will help Swift optimize the dispatch process. For instance, let’s say we have this class hierarchy:
classAnimal{funcmove(){if"Foo".characters.count>0{//some code}}}classDog:Animal{}
And we create instances of the Dog class and then call the move function on them:
funcexample3(){varx=CFAbsoluteTimeGetCurrent()vararray=[Dog]()fornin0..<100000{array.append(Dog())array[n].move()}x=(CFAbsoluteTimeGetCurrent()-x)*1000.0("Took \(x) milliseconds")}
When we run this, the runtime will first have to detect whether the move function is on the super class or the subclass and then call the appropriate class based on this decision. This checking takes time. For instance, if you know that the move function won’t be overridden in the subclasses, mark it as final:
classAnimalOptimized{finalfuncmove(){if"Foo".characters.count>0{//some code}}}classDogOptimized:AnimalOptimized{}funcexample4(){varx=CFAbsoluteTimeGetCurrent()vararray=[DogOptimized]()fornin0..<100000{array.append(DogOptimized())array[n].move()}x=(CFAbsoluteTimeGetCurrent()-x)*1000.0("Took \(x) milliseconds")}
When I run these on the simulator, I get 90.26 milliseconds for the non-optimized version and 88.95 milliseconds for the optimized version. Not that bad.
I also recommend that you turn on whole module optimization for your release code. Just go to your Build Settings and under the optimization for your release builds (App Store scheme), simply choose “Fast” with Whole Module Optimization, and you are good to go.
See Also
Recipe 1.1 and Recipe 1.2
1.10 Showing the Header View of Your Swift Classes
Solution
Use Xcode’s new Generated Interface Assistant Editor. This is how you do it. Open your Swift file first and then, in Xcode, use Show Assistant Editor, which you can find in the Help menu if you just type that name. After you open the assistant, you will get a split screen of your current view. Then in the second editor that opened, on top, instead of Counterparts (which is the default selection), choose Generated Interface. You’ll see your code as shown in Figure 1-5.
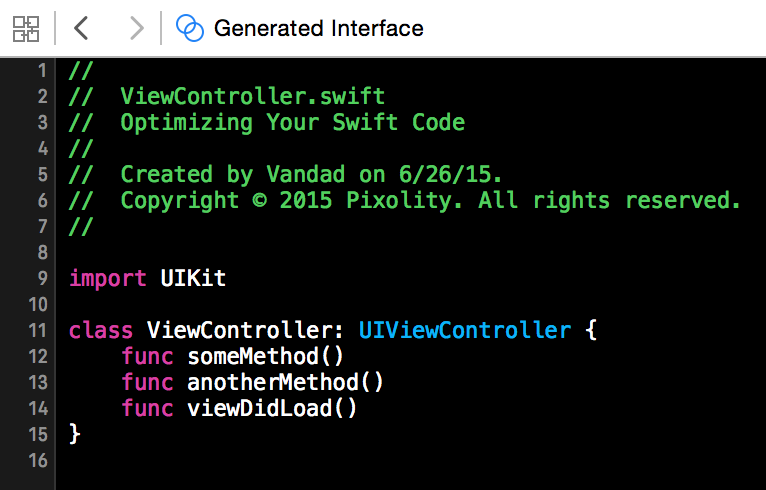
Figure 1-5. Code shown in Xcode assistant
Discussion
I find the Generated Interface functionality of the assistant editor quite handy if you want to get an overview of how clean your code is. It probably won’t be day-to-day functionality that you use all the time, but I cannot be sure. Maybe you will love it so much that you will dedicate a whole new monitor just to see your generated interface all the time. By the way, there is a shortcut to the assistant editor in Xcode 7: Command-Alt-Enter. To get rid of the editor, press Command-Enter.
See Also
1.11 Creating Your Own Set Types
Discussion
Let’s say that I have a structure that keeps track of iPhone models. I want to be able to create a set of this structure’s values so that I can say that I have an iPhone 6, iPhone 6+, and iPhone 5s (fancy me!). Here is the way I would do that:
structIphoneModels:OptionSetType,CustomDebugStringConvertible{letrawValue:Intinit(rawValue:Int){self.rawValue=rawValue}staticletSix=IphoneModels(rawValue:0)staticletSixPlus=IphoneModels(rawValue:1)staticletFive=IphoneModels(rawValue:2)staticletFiveS=IphoneModels(rawValue:3)vardebugDescription:String{switchself{caseIphoneModels.Six:return"iPhone 6"caseIphoneModels.SixPlus:return"iPhone 6+"caseIphoneModels.Five:return"iPhone 5"caseIphoneModels.FiveS:return"iPhone 5s"default:return"Unknown iPhone"}}}
And then I can use it like so:
funcexample1(){letmyIphones:[IphoneModels]=[.Six,.SixPlus]ifmyIphones.contains(.FiveS){("You own an iPhone 5s")}else{("You don't seem to have an iPhone 5s but you have these:")foriinmyIphones{(i)}}}
Note how I could create a set of my new type and then use the contains function on it just as I would on a normal set. Use your imagination—this is some really cool stuff.
See Also
Recipe 1.1, Recipe 1.2, and Recipe 1.3
1.12 Conditionally Extending a Type
Discussion
Let’s say that you want to add a method on any array in Swift where the items are integers. In your extension, you want to provide a method called canFind that can find a specific item in the array and return yes if it could be found. I know that we can do this with other system methods. I am offering this simple example to demonstrate how protocol extensions work:
extensionSequenceTypewhereGenerator.Element:IntegerArithmeticType{publicfunccanFind(value:Generator.Element)->Bool{for(_,v)inself.enumerate(){ifv==value{returntrue}}returnfalse}}
Then you can go ahead and use this method like so:
funcexample1(){if[1,3,5,7].canFind(5){("Found it")}else{("Could not find it")}}
As another example, let’s imagine that you want to extend all array types in Swift (SequenceType) that have items that are either double or floating point. It doesn’t matter which method you add to this extension. I am going to add an empty method for now:
extensionSequenceTypewhereGenerator.Element:FloatingPointType{//write your code herefuncdoSomething(){//TODO: code this}}
And you can, of course, use it like so:
funcexample2(){[1.1,2.2,3.3].doSomething()}
However, if you try to call this method on an array that contains non–floating-point data, you will get a compilation error.
Let me show you another example. Let’s say that you want to extend all arrays that contain only strings, and you want to add a method to this array that can find the longest string. This is how you would do that:
extensionSequenceTypewhereGenerator.Element:StringLiteralConvertible{funclongestString()->String{vars=""for(_,v)inself.enumerate(){iflettemp=vas?Stringwheretemp.characters.count>s.characters.count{s=temp}}returns}}
Calling it is as simple as:
funcexample3(){(["Foo","Bar","Vandad"].longestString())}
See Also
1.13 Building Equality Functionality into Your Own Types
Discussion
Let me give you an example. Let’s say that we have a protocol called Named:
protocolNamed{varname:String{get}}
We can build the equality functionality into this protocol. We can check the name property and if the name is the same on both sides, then we are equal:
func==(lhs:Named,rhs:Named)->Bool{returnlhs.name==rhs.name}
Now let’s define two types, a car and a motorcycle, and make them conform to this protocol:
structCar{}structMotorcycle{}extensionCar:Named{varname:String{return"Car"}}extensionMotorcycle:Named{varname:String{return"Motorcycle"}}
That was it, really. You can see that I didn’t have to build the equality functionality into Car and into Motorcycle separately. I built it into the protocol to which both types conform. And then we can use it like so:
funcexample1(){letv1:Named=Car()letv2:Named=Motorcycle()ifv1==v2{("They are equal")}else{("They are not equal")}}
This example will say that the two constants are not equal because one is a car and the other one is a motorcycle, but what if we compared two cars?
funcexample2(){letv1:Named=Car()letv2:Named=Car()ifv1==v2{("They are equal")}else{("They are not equal")}}
Bingo. Now they are equal. So instead of building the equality functionality into your types, build them into the protocols that your types conform to and you are good to go.
See Also
1.14 Looping Conditionally Through a Collection
Solution
Use the new for x in y where syntax, specifying a where clause right in your for loop. For instance, here I will go through all the keys and values inside a dictionary and only get the values that are integers:
    let dic = [
      "name" : "Foo",
      "lastName" : "Bar",
      "age" : 30,
      "sex" : 1,
    ]

    for (k, v) in dic where v is Int{
      print("The key \(k) contains an integer value of \(v)")
    }
Discussion
Prior to Swift 2.0, you’d have to create your conditions before you got to the loop statement—or even worse, if that wasn’t possible and your conditions depended on the items inside the array, you’d have to write the conditions inside the loop. Well, no more.
Here is another example. Let’s say that you want to find all the numbers that are divisible by 8, inside the range of 0 to 1000, inclusively:
    let nums = 0..<1000
    let divisibleBy8 = {$0 % 8 == 0}
    for n in nums where divisibleBy8(n){
      print("\(n) is divisible by 8")
    }
And of course you can have multiple conditions for a single loop:
    let dic = [
      "name" : "Foo",
      "lastName" : "Bar",
      "age" : 30,
      "sex" : 1,
    ]

    for (k, v) in dic where v is Int && v as! Int > 10{
      print("The key \(k) contains the value of \(v) that is larger than 10")
    }
See Also
1.15 Designing Interactive Interface Objects in Playgrounds
Discussion
Create a single-view app and add a new playground to your project, as shown in Figure 1-6.
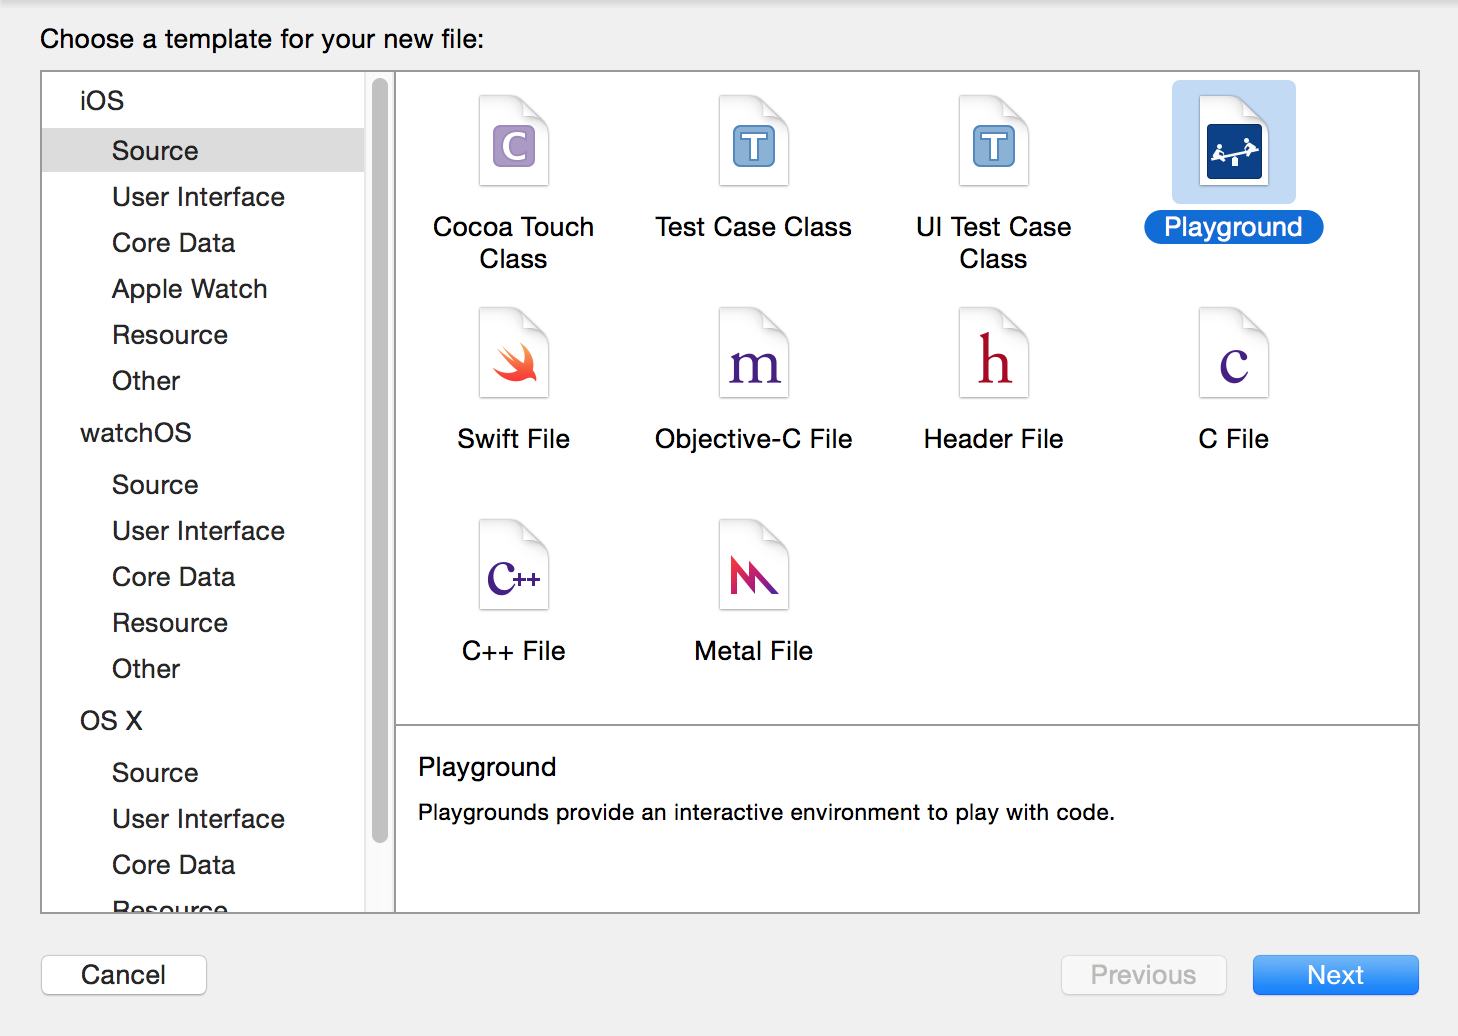
Figure 1-6. Add a new playground to your project
Write code similar to this to create your view:
importUIKitvarview=UIView(frame:CGRect(x:0,y:0,width:300,height:300))view.backgroundColor=UIColor.greenColor()
Now on the right hand side of the last line of code that you wrote, you should see a + button. Click that (see Figure 1-7).
By clicking that button, you will get a live preview of your view inside your playground. Now you can continue changing your view’s properties and once you are done, add a new preview of your view, so that you can compare the previous and the new states (see Figure 1-8). The first view shown has only the properties you assigned to it up to the point that view was drawn. The second view has more properties, such as the border width and color, even though it is the same view instance in memory. However, because it is drawn at a different time inside IB, it shows different results. This helps you compare how your views look before and after modifications.

Figure 1-8. Two versions of a view
See Also
1.16 Grouping Switch Statement Cases Together
Solution
Use the fallthrough syntax. Here is an example:
    let age = 30

    switch age{
    case 1...10:
      fallthrough
    case 20...30:
      print("Either 1 to 10 or 20 to 30")
    default:
      print(age)
    }
Note
This is just an example. There are better ways of writing this code than to use fallthrough. You can indeed batch these two cases together into one case statement.
Discussion
In Swift, if you want one case statement to fall through to the next, you have to explicitly state the fallthrough command. This is more for the programmers to look at than the compiler, because in many languages the compiler is able to fall through to the next case statement if you just leave out the break statement. However, this is a bit tricky because the developer might have just forgotten to place the break statement at the end of the case and all of a sudden her app will start behaving really strangely. Swift now makes you request fall-through explicity, which is safer.
1.17 Bundling and Reading Data in Your Apps
Solution
Follow these steps:
- In your asset catalogue, tap the + button and create a new Data Set (see Figure 1-9).

Figure 1-9. Data sets contain our raw device-specific data
- In the Attributes inspector of your data set, specify for which devices you want to provide data (see Figure 1-10).
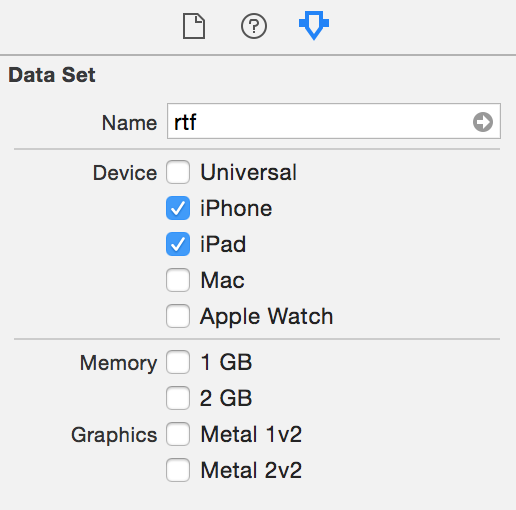
Figure 1-10. I have chosen to provide data for the iPad and iPhone in this example
- Drag and drop your actual raw data file into place in IB
- In your asset list, rename your asset to something that you wish to refer it to by later (see Figure 1-11).
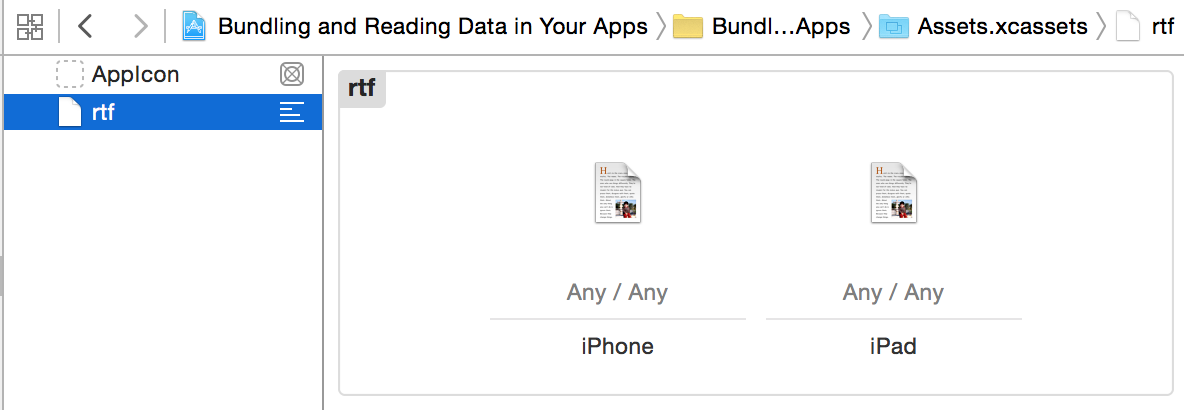
Figure 1-11. I have placed two RTF files into this data asset: one for iPhone and another for iPad
Note
In the iPhone RTF I’ve written “iPhone Says Hello,” and the iPad one says “iPad Says Hello”; the words iPhone and iPad are bold (attributed texts). I am then going to load these as attributed strings and show them on the user interface (see Figure 1-13).
- In your code, load the asset with the
NSDataAssetclass’s initializer. - Once done, use the
dataproperty of your asset to access the data.
Discussion
Place a label on your UI and hook it up to your code under the name lbl (see Figure 1-12).
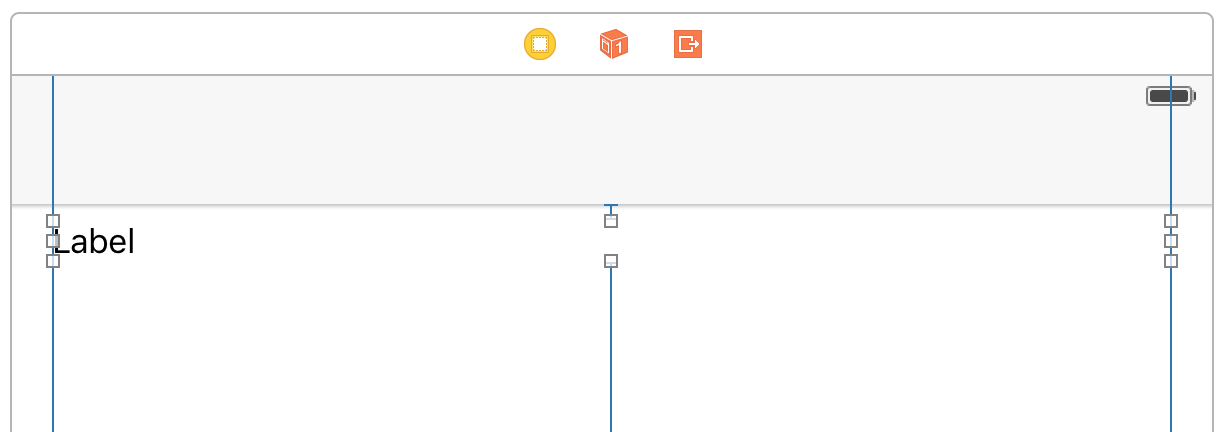
Figure 1-12. Place a label on your user interface and add all the constraints to it (Xcode can do this for you). Hook it up to your code as well.
Then create an intermediate property that can set your label’s text for you:
importUIKitclassViewController:UIViewController{@IBOutletvarlbl:UILabel!varstatus=""{didSet{lbl.text=status}}...
When the view is loaded, attempt to load the custom data set:
    guard let asset = NSDataAsset(name: "rtf") else {
      status = "Could not find the data"
      return
    }
Note
The name of the data asset is specified in the asset catalogue (see Figure 1-11).
Because data assets can be of any type (raw data, game levels, etc.), when loading an attributed string, we need to specify what type of data we are loading in. We do that using an options dictionary that we pass to NSAttributedString’s constructor. The important key in this dictionary is NSDocumentTypeDocumentAttribute, whose value in this case should be NSRTFTextDocumentType. We can also specify the encoding of our data with the NSCharacterEncodingDocumentAttribute key:
    let options = [
      NSDocumentTypeDocumentAttribute : NSRTFTextDocumentType,
      NSCharacterEncodingDocumentAttribute : NSUTF8StringEncoding
      ] as [String : AnyObject]
Last but not least, load the data into our string and show it (see Figure 1-13):
    do{
      let str = try NSAttributedString(data: asset.data, options: options,
        documentAttributes: nil)
      lbl.attributedText = str
    } catch let err{
      status = "Error = \(err)"
    }

Figure 1-13. This is how my string looked when I saved it in RTF format and now it is loaded into the user interface of my app
See Also
Get iOS 9 Swift Programming Cookbook now with the O’Reilly learning platform.
O’Reilly members experience books, live events, courses curated by job role, and more from O’Reilly and nearly 200 top publishers.
