Chapter 1. Laying Out a Game
Games are software, and the best software has had some thought put into it regarding how it’s going to work. When you’re writing a game, you need to keep in mind how you’re going to handle the individual tasks that the game needs to perform, such as rendering graphics, updating artificial intelligence (AI), handling input, and the hundreds of other small tasks that your game will need to deal with.
In this chapter, you’ll learn about ways you can lay out the structure of your game that will make development easier. You’ll also learn how to organize the contents of your game so that adding more content and gameplay elements is easier, and find out how to make your game do multiple things at once.
1.1 Laying Out Your Engine
Solution
The biggest thing to consider when you’re thinking about how to best lay out your game is how the game state will be updated. There are three main things that can cause the state of the game to change:
- Input from the user
-
The game may change state when the user provides some input, such as tapping a button or typing some text. Turn-based games are often driven by user input (e.g., in a game of chess, the game state might only be updated when the user finishes moving a piece).
- Timers
-
The game state may change every time a timer goes off. The delay between timer updates might be very long (some web-based strategy games have turns that update only once a day), or very short (such as going off every time the screen finishes drawing). Most real-time games, like shooters or real-time strategy games, use very short-duration timers.
- Input from outside
-
The game state may change when information from outside the game arrives. The most common example of this is some information arriving from the network, but it can also include data arriving from built-in sensors, such as the accelerometer.
Sometimes, this kind of updating is actually a specific type of timer-based update, because some networks or sensors need to be periodically checked to see if new information has arrived.
Discussion
None of these methods are mutually exclusive. You can, for example, run your game on a timer to animate content, and await user input to move from one state to the next.
Updating every frame is the least efficient option, but it lets you change state often, which makes the game look smooth.
1.2 Creating an Inheritance-Based Game Layout
Solution
First, define a class called GameObject:
classGameObject{funcupdate(deltaTime:Float){// 'deltaTime' is the number of seconds since// this was last called.// This method is overriden by subclasses to update// the object's state - position, direction, and so on.}}
When you want to create a new kind of game object, you create a subclass of the GameObject class, which inherits all of the behavior of its parent class and can be customized:
classMonster:GameObject{varhitPoints:Int=10// how much health we havevartarget:GameObject?// the game object we're attackingoverridefuncupdate(deltaTime:Float){super.update(deltaTime:deltaTime)// Do some monster-specific updating}}
Discussion
In an inheritance-based layout, as shown in Figure 1-1, you define a single base class for your game object (often called GameObject), which knows about general tasks like being updated, and then create subclasses for each specific type of game object. This hierarchy of subclasses can be multiple levels deep (e.g., you might subclass the GameObject class to make the Monster subclass, and then subclass that to create the Goblin and Dragon classes, each of which has its own different kinds of monster-like behavior).
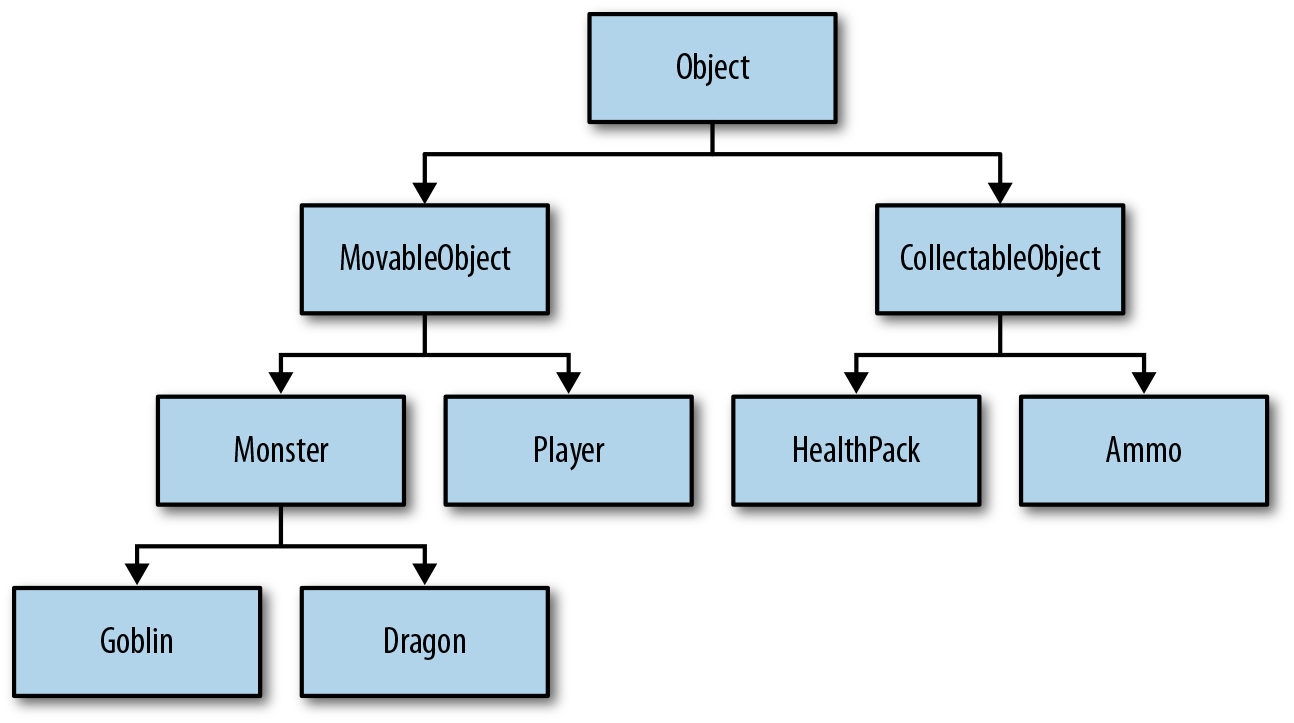
Figure 1-1. An inheritance-based layout
The advantage of a hierarchy-based layout is that each object is able to stand alone: if you have a Dragon object, you know that all of its behavior is contained inside that single object, and it doesn’t rely on other objects to work. The downside is that you can often end up with a very deep hierarchy of different game object types, which can be tricky to keep in your head as you program.
1.3 Creating a Component-Based Game Layout
Solution
Tip
This recipe walks you through how you’d construct your own entity-component system, which is something worth knowing. However, Apple’s GameplayKit framework provides a set of classes for you that do the same work. To get the most out of this particular recipe, read it for your own education, and then use the next recipe’s solution in your own projects.
First, define a Component class. This class represents components that are attached to game objects—it is a very simple class that, at least initially, only has a single method and a single property:
classComponent{// The game object this component is attached tovargameObject:GameObject?funcupdate(deltaTime:Float){// Update this component}}
Next, define a GameObject class. This class represents game objects:
classGameObject{// The collection of Component objects attached to usvarcomponents:[Component]=[]// Add a component to this gameobjectfuncadd(component:Component){components.append(component)component.gameObject=self}// Remove a component from this game object, if we have itfuncremove(component:Component){// Figure out the index at which this component exists// Note the use of the === (three equals) operator,// which checks to see if two variables refer to the same object// (as opposed to "==", which checks to see if two variables// have the same value, which means different things for// different types of data)ifletindex=components.index(where:{$0===component}){component.gameObject=nilcomponents.remove(at:index)}}// Update this object by updating all componentsfuncupdate(deltaTime:Float){forcomponentinself.components{component.update(deltaTime:deltaTime)}}// Returns the first component of type T attached to this// game objectfuncfindComponent<T:Component>()->T?{forcomponentinself.components{iflettheComponent=componentas?T{returntheComponent}}returnnil;}// Returns an array of all components of type T// (this returned array might be empty)funcfindComponents<T:Component>()->[T]{varfoundComponents:[T]=[]forcomponentinself.components{iflettheComponent=componentas?T{foundComponents.append(theComponent)}}returnfoundComponents}}
Using these objects looks like this:
// Define a type of componentclassDamageTaking:Component{varhitpoints:Int=10functakeDamage(amount:Int){hitpoints-=amount}}// Make an object - no need to subclass GameObject,// because its behavior is determined by which// components it hasletmonster=GameObject()// Add a new Damageable componentmonster.add(component:DamageTaking())// Get a reference to the first Damageable componentletdamage:DamageTaking?=monster.findComponent()damage?.takeDamage(amount:5)// When the game needs to update, send all game// objects the "update" message.// This makes all components run their update logic.monster.update(deltaTime:0.33)
Discussion
In a component-based architecture, as shown in Figure 1-2, each game object is made up of multiple components. Compare this to an inheritance-based architecture, where each game object is a subclass of some more general class (see Recipe 1.2).
A component-based layout means you can be more flexible with your design and not worry about inheritance issues. For example, if you’ve got a bunch of monsters, and you want one specific monster to have some new behavior (such as, say, exploding every five seconds), you just write a new component and add it to that monster. If you later decide that you want other monsters to also have that behavior, you can add that behavior to them, too.
In a component-based architecture, each game object has a list of components. When something happens to an object—for example, the game updates, or the object is added to or removed from the game—the object goes through all of its components and notifies them. This gives them the opportunity to respond in their own way.
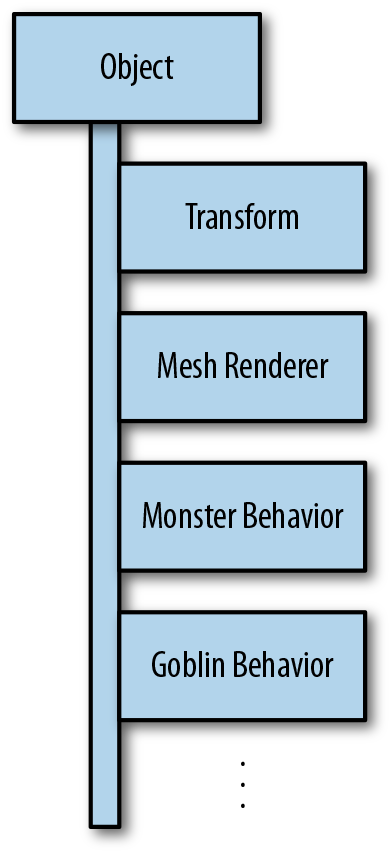
Figure 1-2. A component-based layout
The main problem with component-based architectures is that it’s more laborious to create multiple copies of an object, because you have to create and add the same set of components every time you want a new copy.
Note
The findComponent and findComponents methods are worth a little explanation. These functions are designed to let you get a reference to a component, or an array of components, attached to the game object. The functions use generics to make them return an array of the type of component you expect. This means that you don’t need to do any type casting in your code—you’re guaranteed to receive objects that are the right type.
1.4 Creating a Component-Based Game Layout Using GameplayKit
Problem
You want to use a component-based layout in your game (see Recipe 1.3), but you don’t want to have to write your own component system.
Solution
You can use the GameplayKit framework’s GKEntity and GKComponent classes to implement an entity-component based layout to your game.
To begin using these classes, you import the GameplayKit framework in your code:
importGameplayKit
Next, you subclass the GKComponent class, and implement the behavior needed for each type of component, such as its visual representation:
// Two example componentsclassGraphicsComponent:GKComponent{overridefuncupdate(deltaTimeseconds:TimeInterval){("Drawing graphics!")}}classPhysicsComponent:GKComponent{overridefuncupdate(deltaTimeseconds:TimeInterval){("Simulating physics!")}}
When you’ve defined your component types, you can construct entities and attach components to them. You typically don’t subclass GKEntity; instead, they just act as containers for your GKComponent subclasses:
// Create an entity, and attach some componentsletentity=GKEntity()entity.addComponent(GraphicsComponent())entity.addComponent(PhysicsComponent())
To update all of the components on an entity, call the entity’s update method, and provide the delta time—that is, the number of seconds since the last update was run:
// Update all components in each objectforentityinentities{entity.update(deltaTime:0.033)}
Discussion
Using the built-in GameplayKit classes for entities and components can save you having to write and debug your own systems.
In addition to calling update on your GKEntity objects, you can also group components together, and update them all at once. This can be useful when you want to ensure that, for example, all physics calculations for all objects have been performed before any rendering is done.
To do this, use the GKComponentSystem class. For each type of component you’re working with, define a GKComponentSystem and specify the type of component it should handle:
letgraphicsComponentSystem=GKComponentSystem(componentClass:GraphicsComponent.self)letphysicsComponentSystem=GKComponentSystem(componentClass:PhysicsComponent.self)
After you’ve created an instance of a GKEntity, you can add any components present on it by passing that entity to the system’s addComponent(foundIn:) method. Because component systems are configured to use a single class of component, they can be given an entity with multiple different kinds of components on them, and they’ll add only the type they’re looking for:
forentityinentities{graphicsComponentSystem.addComponent(foundIn:entity)physicsComponentSystem.addComponent(foundIn:entity)}
A component system, much like an entity, can be updated, using the update(deltaTime:) method:
// Update all of the graphics componentsgraphicsComponentSystem.update(deltaTime:0.033)// And then all of the physics componentsphysicsComponentSystem.update(deltaTime:0.033)
1.5 Calculating Delta Times
Solution
First, decide which object should be used to keep track of time. This may be a view controller, an SKScene, a GLKViewController, or something entirely custom.
Create an instance variable inside that object:
classTimeKeeper{varlastFrameTime:Double=0.0}
Then, each time your game is updated, get the current time in milliseconds, and subtract lastFrameTime from that. This gives you the amount of time that has elapsed since the last update.
When you want to make something happen at a certain rate—for example, moving at 3 meters per second—multiply the rate by the delta time:
funcupdate(currentTime:Double){// Calculate the time since this method was last calledletdeltaTime=currentTime-lastFrameTime// Move at 3 units per secondletmovementSpeed=3.0// Multiply by deltaTime to work out how far// an object needs to move this framesomeMovingObject.move(distance:movementSpeed*deltaTime)// Set last frame time to current time, so that// we can calculate the delta time when we're next// calledlastFrameTime=currentTime}
Discussion
“Delta time” means “change in time.” Delta times are useful for keeping track of how much time has elapsed from one point in time to another—in games, this means the time from one frame to the next. Because the game content changes frame by frame, the amount of time between frames becomes important.
Additionally, the amount of time between frames might change a little. You should always be aiming for a constant frame rate of 60 frames per second (i.e., a delta time of 16 milliseconds: 1÷60 ≈ 0.0166…); however, this may not always be achievable, depending on how much work needs to be done in each frame. This means that delta time might vary slightly, so calculating the delta time between each frame becomes necessary if you want rates of change to appear constant.
Some engines give you the delta time directly. For example, CADisplayLink gives you a duration property (see Recipe 1.8).
Some engines give you just the current time, from which you can calculate the delta time. For example, the SKScene class passes the currentTime parameter to the update: method (discussed further in Recipe 7.15).
In other cases (e.g., if you’re doing the main loop yourself), you won’t have easy access to either. In these cases, you need to get the current time yourself:
letcurrentTime=Date.timeIntervalSinceReferenceDateasDouble
1.6 Detecting When the User Enters and Exits Your Game
Solution
To get notified when the user enters and exits your game, you register to receive notifications from a NotificationCenter. The specific notifications that you want to receive are UIApplicationDidBecomeActive, UIApplicationWillEnterForeground, UIApplicationWillResignActive, and UIApplicationDidEnterBackground:
overridefuncviewDidLoad(){super.viewDidLoad()letcenter=NotificationCenter.defaultletdidBecomeActive=#selector(ViewController.applicationDidBecomeActive(notification:))letwillEnterForeground=#selector(ViewController.applicationWillEnterForeground(notification:))letwillResignActive=#selector(ViewController.applicationWillResignActive(notification:))letdidEnterBackground=#selector(ViewController.applicationDidEnterBackground(notification:))center.addObserver(self,selector:didBecomeActive,name:UIApplication.didBecomeActiveNotification,object:nil)center.addObserver(self,selector:willEnterForeground,name:UIApplication.willEnterForegroundNotification,object:nil)center.addObserver(self,selector:willResignActive,name:UIApplication.willResignActiveNotification,object:nil)center.addObserver(self,selector:didEnterBackground,name:UIApplication.didEnterBackgroundNotification,object:nil)}@objcfuncapplicationDidBecomeActive(notification:Notification){("Application became active")}@objcfuncapplicationDidEnterBackground(notification:Notification){("Application entered background - unload textures!")}@objcfuncapplicationWillEnterForeground(notification:Notification){("Application will enter foreground - reload "+"any textures that were unloaded")}@objcfuncapplicationWillResignActive(notification:Notification){("Application will resign active - pause the game now!")}deinit{// Remove this object from the notification centerNotificationCenter.default.removeObserver(self)}
Discussion
On iOS, only one app can be the “active” application (i.e., the app that is taking up the screen and that the user is interacting with). This means that apps need to know when they become the active one, and when they stop being active.
When your game is no longer the active application, the player can’t interact with it. This means that the game should pause (see Recipe 1.9). When the game resumes being the active application, the player should see a pause screen.
Note
Pausing, of course, only makes sense in real-time games, such as shooters, driving games, arcade games, and so on. In a turn-based game, like a strategy or puzzle game, you don’t really need to worry about the game being paused.
In addition to being the active application, an application can be in the foreground or the background. When an application is in the foreground, it’s being shown on the screen. When it’s in the background, it isn’t visible at all. Apps that are in the background become suspended after a short period of time to save battery power. Apps that enter the background should reduce their memory consumption as much as possible; if your app consumes a large amount of memory while it is in the background, it is more likely to be terminated by iOS.
1.7 Updating Based on a Timer
Solution
Use a Timer to receive a message after a certain amount of time, or to receive an update on a fixed schedule.
First, add an instance variable to your view controller:
vartimer:Timer?
Next, add a method that takes a Timer parameter:
@objcfuncupdateWithTimer(timer:Timer){// Timer went off; update the game("Timer went off!")}
Finally, when you want to start the timer:
// Start a timerself.timer=Timer.scheduledTimer(timeInterval:0.5,target:self,selector:#selector(ViewController.updateWithTimer(timer:)),userInfo:nil,repeats:true)
To stop the timer:
// Stop a timerself.timer?.invalidate()self.timer=nil
Discussion
A Timer waits for a specified number of seconds, and then calls a method on an object that you specify. You can change the number of seconds by changing the timeInterval parameter.
You can also make a timer either fire only once or repeat forever, by changing the repeats parameter to false or true, respectively.
1.8 Updating Based on When the Screen Updates
Solution
Use a CADisplayLink, which sends a message every time the screen is redrawn.
First, import the QuartzCore framework:
importQuartzCore
Next, add an instance variable to your view controller:
vardisplayLink:CADisplayLink?
Next, add a method that takes a single parameter (a CADisplayLink):
@objcfuncscreenUpdated(displayLink:CADisplayLink){// Update the game.}
Finally, add this code when you want to begin receiving updates:
// Get a reference to the method we want to run when the// display updatesletscreenUpdated=#selector(screenUpdated(displayLink:))// Create and schedule the display linkdisplayLink=CADisplayLink(target:self,selector:screenUpdated)displayLink?.add(to:RunLoop.main,forMode:RunLoop.Mode.common)
When you want to pause receiving updates, set the paused property of the CADisplayLink to true:
// Pause the display linkdisplayLink?.isPaused=true
When you want to stop receiving updates, call invalidate on the CADisplayLink:
// Remove the display link; once done, you need to// remove it from memory by setting all references to it to nildisplayLink?.invalidate()displayLink=nil
Discussion
When we talk about “real-time” games, what comes to mind are objects like the player, vehicles, and other things moving around the screen, looking like they’re in continuous motion. This isn’t actually what happens, however—what’s really going on is that the screen is redrawing itself every 1/60 of a second, and every time it does this, the locations of some or all of the objects on the screen change slightly. If this is done fast enough, the human eye is fooled into thinking that everything’s moving continuously.
Note
In fact, you don’t technically need to update as quickly as every 1/60 of a second—anything moving faster than 25 frames per second (in other words, one update every 1/25 of a second) will look like motion. However, faster updates yield smoother-looking movement, and you should always aim for 60 frames per second. In games where that’s not possible, 30 frames per second is generally acceptable.
You’ll get the best results if you update your game at the same rate as the screen. You can achieve this with a CADisplayLink, which uses the Core Animation system to figure out when the screen has updated. Every time this happens, the CADisplayLink sends its target a message, which you specify.
It’s worth mentioning that you can have as many CADisplayLink objects as you like, though they’ll all update at the same time.
1.9 Pausing a Game
Solution
Keep track of the game’s “paused” state in a Bool variable. Then, divide your game objects into two categories—ones that run while paused, and ones that don’t run while paused:
forgameObjectingameObjects{// Update it if we're not paused, or if this game object// ignores the paused stateifpaused==false||gameObject.canPause==false{gameObject.update(deltaTime:deltaTime)}}
Discussion
The simplest possible way to pause the game is to keep track of a pause state; every time the game updates, you check to see if the pause state is set to true, and if it is, you don’t update any game objects.
However, you often don’t want every single thing in the game to freeze. For example:
-
The user interface may need to continue to animate.
-
The network may need to keep communicating with other computers, rather than stopping entirely.
In these cases, having special objects that never get paused makes more sense.
1.10 Calculating Time Elapsed Since the Game Start
Solution
When the game starts, create a Date object and store it:
// Store the time when the game started as a propertyvargameStartDate:Date?
// When the game actually begins, store the current dateself.gameStartDate=Date()
When you want to find out how much time has elapsed since the game started, create a second Date and use the timeIntervalSince method to calculate the time:
letnow=Date()lettimeSinceGameStart=now.timeIntervalSince(self.gameStartDate!)NSLog("The game started\(timeSinceGameStart)seconds ago")
Discussion
Date objects represent moments in time. They’re the go-to object for representing any instant of time that you want to be able to refer to again later, such as when your game starts. Date objects can refer to practically any date in the past or future and are very precise.
When you create a Date with the Date() initializer, you get back a Date object that refers to the current time (i.e., the instant when the Date object was created).
To determine the interval between two dates, you use timeIntervalSince. This method returns a TimeInterval, which is actually another term for a floating-point number. These values are represented in seconds, so it’s up to your code to do things like determine the number of hours and minutes:
letformatter=DateComponentsFormatter()formatter.allowedUnits=[.hour,.minute,.second]formatter.unitsStyle=.positionalletformattedString=formatter.string(from:timeSinceGameStart)??""("Time elapsed:\(formattedString)")
1.11 Working with Closures
Solution
Closures are ideal for this:
classGameObject{// define a type of closure that takes a single GameObject// as a parameter and returns nothingvaronCollision:((GameObject)->Void)?}// Create two objects for this exampleletcar=GameObject()letbrickWall=GameObject()// Provide code to run when the car hits any another objectcar.onCollision={(objectWeHit)in("Car collided with\(objectWeHit)")}// later, when a character collides:car.onCollision?(brickWall)// note the ? - this means that// the code will only run if onCollision// is not nil
Discussion
Closures are a language feature in Swift that allow you to store chunks of code in variables, which can then be worked with like any other variable.
Here’s an example of a simple closure:
varmultiplyNumber:(Int)->IntmultiplyNumber={(number)->Intinreturnnumber*2}multiplyNumber(2)

This is how you define a variable that stores a closure. In this case, the closure returns an
Int, is namedmultiplyNumber, and accepts a singleIntparameter.
This is how you declare a closure. Just like any other variable, once a closure is defined, it needs to be given a value. In this case, we’re providing a closure that takes an
Intand returns anInt, just like the variable’s definition.
Calling a closure works just like calling any other function.
How closures work
So far, this just seems like a very roundabout way to call a function. However, the real power of closures comes from two facts:
-
Closures capture the state of any other variables their code references.
-
Closures are objects, just like everything else. They stay around until you need them. If you store a closure, you can call it however often you like.
This is extremely powerful, because it means that your game doesn’t need to carefully store values for later use; if a closure needs a value, it automatically keeps it.
You define a closure by describing the parameters it receives and the type of information it returns. To help protect against mistakes, you can also create a type alias for closures, which defines a specific type of closure. This allows you to declare variables with more easily understandable semantics:
typealiasErrorHandler=(Error)->VoidvarmyErrorHandler:ErrorHandlermyErrorHandler={(theError)in// do work with theError("i SPILL my DRINK!\(theError)")}
Closures and other objects
When a closure is created, the compiler looks at all of the variables that the closure is referencing. If a variable is a value type, like an int or a float, that value is simply copied. However, if the variable is a reference type, like an instance of a class, it can’t be copied because it could potentially be very large. Instead, the object is retained by the closure. When a closure is freed, any objects retained by the closure are released.
This means that if you have a closure that references another object, that closure will keep the other object around. This is usually what you want, because it would be annoying to have to remember to keep the variables referenced by closures in memory. However, sometimes that’s not what you want.
One example is when you want a closure to run in two seconds’ time that causes an enemy object to run an attack animation. However, between the time you schedule the closure and the time the closure runs, the enemy is removed from the game. If the closure has a strong reference to the enemy, the enemy isn’t actually removed from memory until the closure is scheduled to run, which could have unintended side effects.
To get around this problem, you use weak references. A weak reference is a reference that does not keep an object in memory; additionally, if the object that is being referred to is removed (because all owning references to it have gone away), the weak reference will automatically be set to nil. For more information on weak references, see The Swift Programming Language’s chapter on Automatic Reference Counting.
1.12 Writing a Method That Calls a Closure
Solution
To create a method that takes a closure as a parameter, you just do this:
funcmove(toposition:CGPoint,completion:(()->Void)?){// Do the actual work of moving to the location, which// might take place over several frames// Call the completion handler, if it existscompletion?()}letdestination=CGPoint(x:5,y:3)// Call the function and provide the closure as a parametermove(to:destination){("Arrived!")}
Discussion
Methods that take a closure as a parameter are useful for when you’re writing code that starts off a long-running process, and you want to run some code at the conclusion of that process but want to keep that conclusion code close to the original call itself.
Before closures were added to the Swift language, the usual technique was to write two methods: one where you started the long-running process, and one that would be called when the process completed. This separates the various parts of the code, which decreases the readability of your code; additionally, passing around variables between these two methods is more complicated (because you need to manually store them in a temporary variable at the start, and retrieve them at the end; with closures, you just use the variables without any additional work).
Note
If the last parameter that you pass to a function or method is a closure, you can place the closure outside the function call’s parentheses. It can look a little cleaner.
1.13 Working with Operation Queues
Solution
Use an OperationQueue to schedule closures to be run in the background without interfering with more time-critical tasks like rendering or accepting user input:
// Create a work queue to put tasks onletconcurrentQueue=OperationQueue()// This queue can run 10 operations at the same time, at mostconcurrentQueue.maxConcurrentOperationCount=10// Add some tasksconcurrentQueue.addOperation{UploadHighScores()}concurrentQueue.addOperation{SaveGame()}concurrentQueue.addOperation{DownloadMaps()}
Discussion
An operation queue is a tool for running chunks of work. Every application has an operation queue called the main queue. The main queue is the queue that normal application tasks (e.g., handling touches, redrawing the screen, etc.) are run on.
An operation queue runs as many operations as it can simultaneously. The number of concurrent operations that can be run depends on several conditions, including the number of processor cores available and the different priorities that other operations may have.
By default, an operation queue determines the number of operations that it can run at the same time on its own. However, you can specify a maximum number of concurrent operations by using the maxConcurrentOperationCount property.
1.14 Performing a Task in the Future
Solution
Use the DispatchQueue class’s asyncAfter method to schedule a closure of code to run in the future:
// Place a bomb, but make it explode in 10 secondsPlaceBomb()letdeadline=DispatchTime.now()+10DispatchQueue.main.asyncAfter(deadline:deadline,execute:{// Time's up. Kaboom.ExplodeBomb()})
Discussion
OperationQueue is actually a higher-level wrapper around the lower-level features provided by the C-based Grand Central Dispatch API. Grand Central Dispatch, or GCD, works mostly with objects called “dispatch queues,” which are basically OperationQueues. You do work with GCD by putting closures onto a queue, which runs the closures. Just as with OperationQueue, there can be many queues operating at the same time, and they can be serial or concurrent queues.
1.15 Making Operations Depend on Each Other
Solution
To make an operation wait for another operation to complete, store each individual operation in a variable, and then use the addDependency: method to indicate which operations need to complete before a given operation begins:
letfirstOperation=BlockOperation{()->Voidin("First operation")}letsecondOperation=BlockOperation{()->Voidin("Second operation")}letthirdOperation=BlockOperation{()->Voidin("Third operation")}// secondOperation will not run until firstOperation and// thirdOperation have finishedsecondOperation.addDependency(firstOperation)secondOperation.addDependency(thirdOperation)letoperations=[firstOperation,secondOperation,thirdOperation]backgroundQueue.addOperations(operations,waitUntilFinished:true)
Discussion
You can add an operation to another operation as a dependency. This is useful for cases where you want one closure to run only after one or more operations have completed.
To add a dependency to an operation, you use the addDependency: method. Doing this doesn’t run the operation, but just links the two together.
Once the operation dependencies have been set up, you can add the operations to the queue in any order that you like; operations will not run until all of their dependencies have finished running.
1.16 Filtering an Array with Closures
Solution
Use the filtered method to create an array that only contains objects that meet certain conditions:
letarray=["One","Two","Three","Four","Five"]("Original array:\(array)")letfilteredArray=array.filter{(element)->Boolinifelement.range(of:"e")!=nil{returntrue}else{returnfalse}}("Filtered array:\(filteredArray)")
Discussion
The closure that you provide to the filter method is called multiple times. Each time it’s called, it takes an item in the array as its single parameter, and returns true if that item should appear in the filtered array, and false if it shouldn’t.
1.17 Loading New Assets During Gameplay
Solution
For each resource that needs loading, run an operation that does the loading into memory, and do it in the background. Then run a subsequent operation when all of the loads have completed.
You can do this by scheduling load operations on a background queue, and also running an operation on the main queue that depends on all of the load operations. This means that all of your images will load in the background, and you’ll run code on the main queue when it’s complete:
letimagesToLoad=["Image 1.jpg","Image 2.jpg","Image 3.jpg"]letimageLoadingQueue=OperationQueue()// We want the main queue to run at close to regular speed, so mark this// background queue as running in the background// (Note: this is actually the default value, but it's good to know about// the qualityOfService property.)imageLoadingQueue.qualityOfService=QualityOfService.background// Allow loading multiple images at onceimageLoadingQueue.maxConcurrentOperationCount=10// Create an operation that will run when all images are loaded - you may want// to tweak thisletloadingComplete=BlockOperation{()->Voidin("Loading complete!")}// Create an array for storing our loading operationsvarloadingOperations:[Operation]=[]// Add a load operation for each imageforimageNameinimagesToLoad{letloadOperation=BlockOperation{()->Voidin("Loading\(imageName)")}loadingOperations.append(loadOperation)// Don't run the loading complete operation until// this load (and all other loads) are doneloadingComplete.addDependency(loadOperation)}imageLoadingQueue.addOperations(loadingOperations,waitUntilFinished:false)imageLoadingQueue.addOperation(loadingComplete)
Discussion
When you create an OperationQueue, you can control its quality of service. By default, operation queues you create have the background quality of service, which indicates to the operating system that it’s OK for higher-priority operations to take precedence. This is generally what you want for your asset-loading routines, because it’s important that you keep your application responsive to user input.
Depending on how much memory the rest of your game takes, you can also use this technique to load assets while the user is busy doing something else. For example, once the user reaches the main menu, you could start loading the resources needed for actual gameplay while you wait for the user to tap the New Game button.
1.18 Adding Unit Tests to Your Game
Solution
You can write code that tests different parts of your app in isolation using unit tests. By default, all newly created projects come with an empty set of unit tests, in which you can add isolated testing functions.
Note
If you’re working with an existing project, you can create a new set of unit tests by choosing File→New→Target and creating an iOS Unit Testing Bundle.
You’ll find your unit test files in a group whose name ends with Tests. For example, if your Xcode project is called MyAwesomeGame, your testing files will be in a group named MyAwesomeGameTests, and it will by default come with a file called MyAwesomeGameTests.swift.
When you want to add a test, open your test file (the .swift file) and add a method whose name begins with test:
functestDoingSomethingCool(){letobject=SomeAwesomeObject()letsucceeded=object.doSomethingCool()ifsucceeded==false{XCTFail("Failed to do something cool");}}
When you want to run the tests, choose Product→Test or press Command-U. All of the methods in your testing classes that begin with test will be run, one after the other.
You can also add additional collections of tests, by creating a new test suite. You do this by choosing File→New→File and creating a new Swift test case class. When you create this new class, don’t forget to make it belong to your testing target instead of your game target, or you’ll get compile errors.
Discussion
Unit testing is the practice of writing small tests that test specific features of your code. In normal use, your code is used in a variety of ways, and if there’s a bug, it can be difficult to track down exactly why your code isn’t behaving the way you want it to. By using unit tests, you can run multiple tests of your code and check each time to see if the results are what you expect. If a test fails, the parts of your game that use your code in that particular way will also fail.
Each test is actually a method in a test case. Test cases are subclasses of XCTestCase whose names begin with test. The XCTestCase objects in a testing bundle make up a test suite, which is what’s run when you tell Xcode to test your application.
When tests run, Xcode performs the following tasks for each test method, in each test case, in each test suite:
-
Call the test case’s
setUpmethod. -
Call the test method itself, and note if the test succeeds or fails.
-
Call the test case’s
tearDownmethod. -
Show a report showing which tests failed.
As you can see, the test case’s setUp and tearDown methods are called for each test method. The idea behind this is that you use setUp to create whatever conditions you want to run your test under (e.g., if you’re testing the behavior of an AI, you could use setUp to load the level in which the AI needs to operate). Conversely, the tearDown method is used to dismantle whatever resources are set up in setUp. This means that each time a test method is run, it’s operating under the same conditions.
The contents of each test method are entirely up to you. Typically, you create objects that you want to test, run methods, and then check to see if the outcomes were what you expected. The actual way that you check the outcomes is through a collection of dedicated assertion methods, which flag the test as failing if the condition you pass in evaluates to false. The assertion methods also take a string parameter, which is shown to the user if the test fails.
For example:
// Fails if X is not nilXCTAssertNil(X,"X should be nil")// Fails if X IS nilXCTAssertNotNil(X,"X should not be nil")// Fails if X is not trueXCTAssertTrue(1==1,"1 really should be equal to 1")// Fails if X is not falseXCTAssertFalse(2!=3,"In this universe, 2 equals 3 apparently")// Fails if X and Y are not equal (tested by calling X.equals(Y)])XCTAssertEqualObjects((2),(1+1),"Objects should be equal")// Fails if X and Y ARE equal (tested by calling X.equals(Y))XCTAssertNotEqualObjects("One","1","Objects should not be equal")// Fails, regardless of circumstancesXCTFail("Everything is broken")
There are several other assertion methods available for you to use that won’t fit in this book; for a comprehensive list, see the documentation for the XCTest framework.
1.19 2D Grids
Solution
Use a GKGridGraph to represent a grid of a fixed size. Subclass the GKGridGraphNode class to store custom objects, like the position of a game entity, on the graph.
The GKGridGraph represents a 2D grid of nodes, each of which has a coordinate that defines its position on the grid, as well as connections to other nodes on the grid.
For example, let’s define a subclass of GKGridGraphNode that allows you to store some additional information, like a string:
classGameNode:GKGridGraphNode{varname:Stringinit(name:String,gridPosition:vector_int2){self.name=namesuper.init(gridPosition:gridPosition)}overridevardescription:String{returnself.name}requiredinit?(coderaDecoder:NSCoder){fatalError("not implemented")}}
We can now create a grid using this node, like so:
letgraph=GKGridGraph<GameNode>(fromGridStartingAt:[0,0],width:6,height:6,diagonalsAllowed:false)
You can remove nodes from the grid, and add new nodes. Note that a node is not considered part of the grid unless it is attached to other nodes, which you can do using the connectToAdjacentNodes method:
funcadd<NodeType>(node:NodeType,tograph:GKGridGraph<NodeType>){// If there's a node at this position here already, remove itifletexistingNode=graph.node(atGridPosition:node.gridPosition){graph.remove([existingNode])}// Add the new node, and connect it to the other nodes on the graphgraph.connectToAdjacentNodes(node:node)}
When you add a node to the grid, you specify its position:
// Add twoletplayerNode=GameNode(name:"Player",gridPosition:[0,2])letexitNode=GameNode(name:"Exit",gridPosition:[0,3])add(node:playerNode,to:graph)add(node:exitNode,to:graph)
You can also retrieve a node from the grid by specifying a position:
graph.node(atGridPosition:[0,2])?.name// "Player"
Finally, you can get all nodes on the grid, and filter them based on whatever properties you desire:
// Get all GameNodes on the grid of a certain typeletallNodes=graph.nodes?.filter{$0isGameNode}
Discussion
Nodes on a GKGridGraph class can also be used for pathfinding, which is discussed in Recipe 9.10.
1.20 Using Randomization
Solution
Use a random number generator from GameplayKit. The framework offers several different types, each producing a different distribution of random numbers.
The GKRandomDistribution generator produces a sequence of numbers where every value has an equally likely chance of appearing:
// Random distributions generate a random value every timeletdice=GKRandomDistribution(forDieWithSideCount:6)// Getting values from a random sourcedice.nextBool()dice.nextUniform()dice.nextInt()
An example of a stream of random numbers from this generator looks like this:
4, 4, 6, 6, 4, 2, 3, 3, 6, 3
Note
As you can see, some numbers appear multiple times, and sometimes appear twice in a row. This is because each value’s probability in the stream is entirely independent of any other number.
The GKGaussianDistribution is a weighted random distribution. Numbers coming out of this random number generator are more likely to be in the center of the distribution, and will rarely be at the lowest or highest values in the range:
// Gaussian distributions produce values that tend to be around the middle,// and rarely produce values that tend to be at the edgesletgaussian=GKGaussianDistribution(forDieWithSideCount:20)
An example of a stream of random numbers coming from this generator is:
14, 10, 13, 8, 7, 14, 19, 15, 13, 11
Notice how the numbers in this example tend to be close to the 8-to-12 range, and it’s rare to see numbers near 1 or 20.
Finally, the GKShuffledDistribution generator produces a stream of values that tries to avoid repeating the same value:
// Shuffled distributions avoid repeating the same elementletshuffled=GKShuffledDistribution.d6()
An example of a stream of random numbers from this generator is:
2, 4, 3, 6, 1, 5, 1, 6, 4, 3
Discussion
True randomness, such as numbers coming from a GKRandomDistribution generator, can feel “unfair” to the player, since humans have trouble understanding probability. The gambler’s fallacy is a famous example, in which people playing a game of chance who notice a trend of losses keep playing, feeling that a win will happen “soon,” when in reality, each win and loss exists entirely independently of the others.
Two common types of dice are six-sided dice and twenty-sided dice. To quickly create a random number generator that produces numbers between zero and six or zero and twenty, use the d6 and d20 functions:
letd6=GKRandomDistribution.d6()letd20=GKRandomDistribution.d20()
1.21 Building a State Machine
Solution
State machines are systems in which you define multiple states that a system can be in. The system is always in one state at a time; additionally, each state has a list of other states that the system can transition to.
For example, imagine a system where there are three states: sitting, standing, and walking. You can transition from sitting to standing (and vice versa), and you can transition from standing to walking. However, you can’t transition directly from sitting to walking; you need to go via standing first.
Every time you transition to another state, you have the opportunity to run code. To continue this example, when you transition to the standing state, you might make your character display a standing up animation.
State machines are useful for managing the states that a system can be in, and in navigating between different states.
GameplayKit provides the GKStateMachine class, which you can use to manage and transition between different states. To work with GKStateMachine, you create subclasses of GKState, which handle the logic of entering, updating, and leaving a state.
For example, consider the following four states:
// The 'Building Up an Army' stateclassBuildUpState:GKState{overridefuncdidEnter(frompreviousState:GKState?){("Now building up!")}// Called every time the state machine is updatedoverridefuncupdate(deltaTimeseconds:TimeInterval){("Building in progress!")}// Called when we leave this stateoverridefuncwillExit(tonextState:GKState){("Stopping buildup!")}}// The 'Attacking with the Army' stateclassAttackState:GKState{overridefuncdidEnter(frompreviousState:GKState?){// Called when we enter this state("Now attacking the enemy!")}overridefuncupdate(deltaTimeseconds:TimeInterval){// Called every time the state machine is updated("Attack in progress!")}}// The 'Withdrawing the Army from Attack' stateclassWithdrawState:GKState{}// The 'Defeated' stateclassDefeatedState:GKState{overridefuncdidEnter(frompreviousState:GKState?){// Called when we enter this state("I'm defeated!")// Use 'previousState' to learn about the state we entered fromifpreviousStateisBuildUpState{("I was in the middle of building up, too!")}}}
To use these states in a state machine, you create an instance of each of the states, put them in an array, and then provide that array to the initializer of GKStateMachine:
// Create instances of the statesletstates=[BuildUpState(),AttackState(),WithdrawState(),DefeatedState()]letstateMachine=GKStateMachine(states:states)
You can then tell the state machine to transition between different states:
stateMachine.enter(BuildUpState.self)stateMachine.enter(AttackState.self)stateMachine.enter(BuildUpState.self)stateMachine.enter(DefeatedState.self)
When you transition between states, each state has an opportunity to run code when it enters and exits. In this example, telling the state machine to enter these states results in the following being printed:
Now building up!
Stopping buildup!
Now attacking the enemy!
Now building up!
Stopping buildup!
I'm defeated!
I was in the middle of building up, too!
You can also run the update method on a state machine’s current state by calling update on the state machine:
stateMachine.update(deltaTime:0.033)
You can also get the actual state object itself:
stateMachine.currentState
If you want to get the state object for a certain class of state, you can use the state(forClass:) method:
letstate=stateMachine.state(forClass:BuildUpState.self)
Finally, you can place restrictions on which states can transition to others by implementing the isValidNextState on your GKState subclass. This method receives a class as a parameter, and returns true if the state should transition to a state of this class, and false otherwise:
// Limiting which states we can proceed to from hereoverridefuncisValidNextState(_stateClass:AnyClass)->Bool{ifstateClass==AttackState.self||stateClass==DefeatedState.self{returntrue}else{returnfalse}}
You can then ask the state machine if it’s possible to transition from the current state to a class you specify:
stateMachine.enter(BuildUpState.self)stateMachine.canEnterState(WithdrawState.self)// = false
Tip
The enter function returns true if the state transition was allowed, and false otherwise.
Discussion
State machines are great for several problems, because they help to encapsulate a lot of the logic that comes up around objects that need to switch between modes. Additionally, by adding constraints on which states can transition to other states, you can reduce the number of bugs caused by invalid transitions.
Get iOS Swift Game Development Cookbook, 3rd Edition now with the O’Reilly learning platform.
O’Reilly members experience books, live events, courses curated by job role, and more from O’Reilly and nearly 200 top publishers.

