The main window for the Moon Travel Planner application you created in Chapter 3 is rather boring at this point. It shows nothing and is named Window. It will take a few chapters to whip this window into shape so it looks like the sketch in Chapter 2. In this section we’ll get started by doing the following:
The Interface Builder application is located in the /Developer/Applications folder. Although you can double-click the Interface Builder icon to open it, we’ll open Interface Builder from within Project Builder. Most of the time you’ll have both open and move between them as you modify the interface and add code.
To open Interface Builder from within Project Builder:
Open the Moon Travel Planner project if it is not already open.
Double-click the
main.nibfile, located in the Resources group.
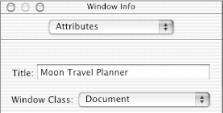
The window’s title is the text shown in the title bar (see Figure 4.6). You should change the title from Window to Moon Travel Planner:
Double-click the MainWindow icon in the Instances pane.
Choose Show Info from the Tools menu.
Type
Moon Travel Plannerin the Title text field, as shown in Figure 4.9 and press Return.
A window’s class, controls, and attributes taken together define the window’s behavior:
Use the Window Class pop-up menu to set the main window’s class to Document. See Table 4.1 for guidelines on when to use each window class. In the Window Info window, choose Document from the Window Class pop-up menu.
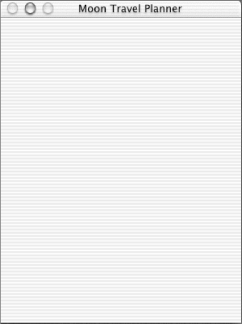
Use the Theme Brush pop-up menu to set to a gray striped background. In combination with the Document window class, Dialog causes a gray striped background to be displayed in the window. This is the type of background you should use for a document window that contains controls rather than the contents of a text file. Choose Dialog from the Theme Brush pop-up menu.
Specify a Collapse button as a control for our main window. The Moon Travel Planner window is our application’s main window. It should stay open until the user quits the application, so the window doesn’t need a Close button. Content can’t be added to or deleted from the window, so there’s no need for a Zoom button. The window does, however, need a Collapse button to allow the user to minimize the window. In the Controls group, make sure Collapse Box is the only control checked.
Specify the Standard Handler attribute for our main window. The user should not be allowed to resize the window, so the Resizable and Live Resize options don’t apply. In the Attributes group, make sure Standard Handler is the only option selected. This assures that any window activity (for example, moving the window) for which you do not write a handler gets taken care of by the operating system.
Look at the Receives options. You don’t need to change the Receives options; use the defaults, which cause your window to receive update and activation events.
The default window size is a bit different from what you’ll need for the Moon Travel Planner application. Let’s resize it so it’s 300 pixels wide and 400 pixels high:
Choose Size from the pop-up menu at the top of the Window Info window.
Choose Width/Height from the pop-up menu on the right side.
Type
300pixels for the width, and400for the height, then press Return.
Although you haven’t made a lot of alterations to the interface, it’s a good idea to check to see if the application behaves according to what you’ve done so far:
Choose Save from Interface Builder’s File menu.
Make Project Builder active by clicking its icon in the Dock.
Click the Build button in the upper-left corner of the project window.
Click the Run button in the upper-left corner of the project window.
Check the title shown in the window’s title bar. The title bar should display Moon Travel Planner and should look similar to what’s shown in Figure 4.10.
Make sure the window collapses into and expands from the Dock. Click the Minimize button. The window should collapse into the Dock. You should be able to expand the minimized window by clicking its icon in the Dock.
Choose Quit Moon Travel Planner from the Moon Travel Planner menu. Notice that the Moon Travel Planner menu and the Quit menu item were automatically added to your application.
You learned a little bit about Interface Builder nib files and Mac OS X windows, and were introduced to Info windows. You had an opportunity to use the Info window to revise a window’s title and set its class, size, controls, and other attributes. Now you’ll move on to Interface Builder’s palettes and other tools that you can use to add controls (buttons, text fields, and so forth) to a window.
Get Learning Carbon now with the O’Reilly learning platform.
O’Reilly members experience books, live events, courses curated by job role, and more from O’Reilly and nearly 200 top publishers.


