When you turn on a Mac with the latest version of Mac OS X, you’ll know right away you’re not in Kansas anymore. For the first time in the history of the Macintosh, no little smiling-Mac icon appears when you hit the power button. Instead, an Apple logo greets you, soon followed by an animated, liquidy blue progress bar.
What happens next depends on whether you are the Mac’s sole proprietor or have to share it with other people in an office, school, or household.
If it’s your own Mac, and you’ve already been through the Mac OS X setup process described in Appendix A, no big deal. You arrive at the Mac OS X desktop.
If it’s a shared Mac, you may encounter the Login dialog box, shown in Figure 1-1. Click your name in the list (or type it, if there’s no list). Type your password if you’re asked for it, and click Log In (or press Return). You arrive at the desktop. Chapter 11 offers much more on this business of user accounts and logging in.
Upon first starting up Mac OS X, most people emit (or manage to suppress) two successive gasps. The first is one of amazement, as the shimmering, three-dimensional Mac OS X desktop appears—a new world on an old machine (see Figure 1-2).
The second gasp is one of dismay, which comes upon closer examination of the strangely named folders and icons in the main hard drive window. Don’t panic.
Most of the objects on your screen are nothing more than updated versions of the elements made famous by the older Mac OS or Windows. The Mac OS X folder structure may be unfamiliar, but it’s not hard to grasp. Here’s a quick tour (see Figure 1-2).
Note
If your desktop looks absolutely nothing like this—no menus, no icons, almost nothing on the Dock—then somebody in charge of your Mac has turned on Simple Finder mode for you. Details in Section 11.5.
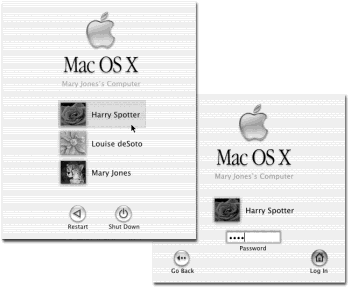
Figure 1-1. Left: On Macs configured to accommodate different people at different times, this is one of the first things you see upon turning on the computer. Click your name. (If the list is long, you may have to scroll to find your name—or just type the first couple of letters of it.) Right: At this point, you’re asked to type in your password. Type it and then click Log In (or press Return or Enter; pressing these keys always “clicks” the blue, pulsing button in a dialog box). If you’ve typed the wrong password, the entire dialog box vibrates, in effect shaking its little dialog-box head, suggesting that you guess again. (See Chapter 11.)
Here they are, just where they’ve always been: the icons of your hard drive and any other disks attached to your Mac. Double-click to open one, as always.
You may notice that icons in Mac OS X are much larger than they were in previous operating systems. You can make them almost any size you like (see Section 1.4), but Apple made them bigger for two reasons. First, in this era of monitors with ever larger resolution, the icons on our screens have been getting ever smaller and more difficult to see.
Second, Apple thinks its Mac OS X icons look really cool.
Note
The desktop also includes a folder alias called “Desktop (Mac OS 9).” It’s a side effect of the fact that you may be doing a lot of switching back and forth between Mac OS 9 and Mac OS X, at least at first. This folder contains whatever you left sitting out on the desktop when you were working in Mac OS 9. (If you’re sure there’s nothing important inside, you can throw it away.)
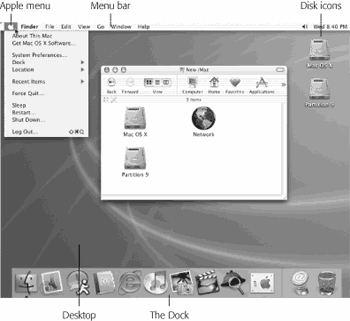
Figure 1-2. The Mac OS X landscape looks like a futuristic version of Windows or the Mac OS. This is just a starting point, however. You can dress it up with a different background picture, adjust your windows in a million ways, and of course fill the Dock with only the programs, disks, folders, and files you care about.
This ribbon of translucent, almost photographic icons is a launcher for the programs, files, folders, and disks you use often.
In principle, the Dock is very simple:
Programs go on the left side. Everything else goes on the right, including documents, folders, and disks. (Figure 1-2 shows the dividing line.)
You can add a new icon to the Dock by dragging it there. Rearrange Dock icons by dragging them like tiles on a puzzle. Remove a Dock icon by dragging it away from the Dock, and enjoy the animated puff of smoke that appears when you release the mouse button. (You can’t remove the icon of a program that’s currently open, however.)
Click something once to open it. A tiny triangle underneath a program’s icon lets you know that it’s open.
Each Dock icon sprouts a pop-up menu; a folder can show you what’s inside, for example. To see the menu, hold the mouse button down on a Dock icon, or Control-click it, or (if you have a two-button mouse) right-click it.
Because the Dock is such a critical component of Mac OS X, Apple has decked it out with enough customization controls to keep you busy experimenting for months. You can change its size, move it to the sides of your screen, hide it entirely, and so on. Chapter 3 contains complete instructions for using and understanding the Dock.
Though stripped of its stripes, you might say that the
menu has finally earned its stripes: It houses important Mac-wide commands that used to be scattered—sometimes illogically—in other menus. For example, the Sleep, Restart, and Shut Down commands now appear here, where they’re always available.
Some of the elements are traditional
menu items from Mac OS 9, including System Preferences (formerly Control Panels), Recent Items, and About This Mac. Others are new to Mac OS X, including Dock, Location, and Log Out. You’ll learn the functions of these commands later in the book. For now, the point is that you can no longer add your own icons to the
menu. In Mac OS X, this menu never changes— it looks the same on every Mac OS X computer in the world.
If you’re used to Mac OS 9, you’ll see a few new nuances in Mac OS X menus:
They’re translucent. You can actually see through an open menu to whatever window is beneath. This feature doesn’t particularly help you—in fact, critics claim that it makes the commands in the menu harder to read. But only an operating system with graphics software as powerful as Mac OS X’s could even pull off such a sophisticated graphics treat. Consider translucent menus a bit of showoff-ware.
They stay down. For years, Macintosh menus remained open for only 15 seconds before snapping closed again. That’s because when a menu was open, all other Macintosh activity stopped.
Mac OS X, however, is multithreaded, which means that it’s perfectly capable of carrying on with its background activities while you study its open, translucent menus. Therefore, Mac OS X menus stay open until you click the mouse, press a key, or buy a new computer, whichever comes first.
They’ve been rearranged. The first menu in every program is no longer called File. Like the Application menu that used to appear at the right end of the menu bar, its boldface name tells you at a glance what program you’re in. The commands in this new Application menu include About (which tells you what version of the program you’re using), Preferences, Quit, and commands like Hide Others and Show All (which help you control window clutter, as described in Section 4.2.3).
Note
Mac OS X offers a new keystroke for hiding the windows of the program you’re currently using:
-H. That’s a great tip when, for example, you’re browsing the Web but want to duck back to the desktop for some quick administrative task.
In short, the Application menu finally makes sense. All of its commands actually pertain to the application you’re using.
The File and Edit menus come next. As in the past, the File menu contains commands for opening, saving, and closing files (see the logic?). The Edit menu contains the Cut, Copy, and Paste commands.
The last menu is almost always Help. As in the past, it opens a miniature Web browser that lets you search the online Mac Help files for explanatory text (see Section 1.8).
You can operate them from the keyboard. For the first time in Macintosh history, you can now operate every menu in every program entirely from the keyboard. You’ll find the details in Section 4.4.
Otherwise, aside from the new typeface (Lucida Grande), the menu bar looks and works much like it has in operating systems past.
Get Mac OS X: The Missing Manual, Second Edition now with the O’Reilly learning platform.
O’Reilly members experience books, live events, courses curated by job role, and more from O’Reilly and nearly 200 top publishers.

