System Preferences breaks the different panels down into four categories, each of which appears as its own row of icons in the program’s main display window. The four categories are:
Personal
Hardware
Internet & Network
System
If you or another application needs to add panels to the System Preferences window (see Section 4.4), they appear in a separate category row called Other.
Tip
The changes you make to the various panels in the System Preferences
are saved as XML data in the form of a property
list, or plist. These plists can be
found in your ~/Library/Preferences directory,
and can be further tweaked and manipulated using a text editor or the
Property List Editor application if you’ve installed
the Xcode Tools. Look for filenames that begin with
com.apple.
something
.plist
in this directory.
The panels found in System Preferences are discussed in the sections that follow. Some System Preferences panels require administrator privileges. If you attempt to change a setting and are asked for a password, try using the password you used to log in to the computer. If that doesn’t work, contact your system administrator for assistance.
These panels allow you to configure various aspects of the Aqua “look and feel” of your system, such as the placement and behavior of the Dock, window appearance, language preferences, and the ability to customize some features of user accounts.
The panels included in the Personal section include:
Appearance
Desktop & Screen Saver
Dock
Exposé
International
Security
These Preference panels are explained further in the following sections.
The Appearance panel, seen in Figure 4-4, used to be the General panel in Jaguar. This panel lets you select the color to use for text highlighting, configure window scrollbar appearance and behavior, specify the number of entries the Apple Menu should keep under its Recent Items submenu, and control text smoothing (antialiasing) throughout the system.
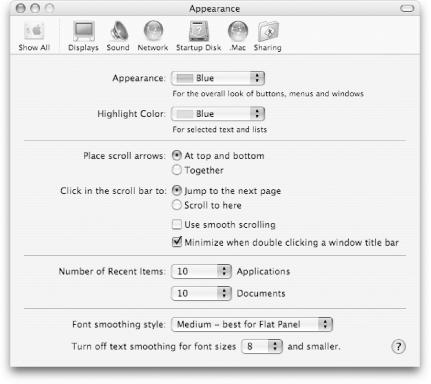
The Appearance pull-down menu lets you select from either Blue (the default) or Graphite as the color Mac OS X uses for its interface elements, such as buttons, scrollbars, and menus. Likewise, the Highlight Color pull-down menu lets you choose the background color the system uses when you select an item or double-click on some text in a document. The default is Blue, but you can choose from one of eight preset colors, or specify a custom color by selecting Other... from the pull-down menu.
You can also specify the number of recent items to be remembered and
listed in the ![]() →Recent Items menu for Applications and
Documents, as well as determine which font-smoothing style and size
is best for your type of display. For example, if you use an iBook or
PowerBook, you should set your “Font smoothing
style” to “Medium — best for
Flat Panel.”
→Recent Items menu for Applications and
Documents, as well as determine which font-smoothing style and size
is best for your type of display. For example, if you use an iBook or
PowerBook, you should set your “Font smoothing
style” to “Medium — best for
Flat Panel.”
This panel combines the Desktop and Screen Effects panels from Jaguar. It has two panes you can use to set the background image for your desktop and to select your screensaver.
The Desktop pane, shown in Figure 4-5, lets you
choose the background image that appears on your desktop. You can
choose from several preinstalled collections, an image
you’ve saved in your Pictures folder
(~/Pictures), and with Panther, the Desktop pane
includes quick access to iPhoto’s libraries.
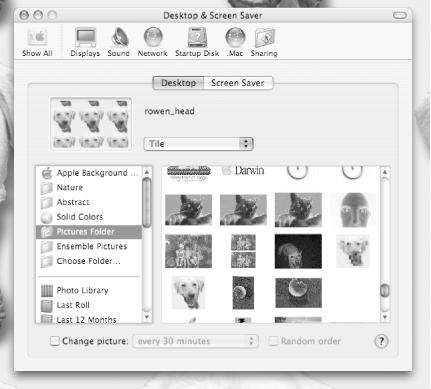
If you click on the checkbox next to “Change picture” at the bottom of the window, the desktop picture changes automatically based on the timing you select in the pull-down menu.
Additional features of the Desktop pane in Panther include:
A pull-down menu that allows you to specify whether an image will fill the screen, stretch to fill the screen (thus changing the proportional size of the original image), center the image on screen, or tile the image (if needed).
The ability to change the Desktop picture automatically. For example, if you have a bunch of JPEG images saved in your Pictures folder or an iPhoto library, you can specify that as the target source for your background image, and then select the checkbox at the bottom of the Desktop window. Clicking on the “Change picture” checkbox enables the pull-down menu, which lets you set the timing rotation of the images.
If you Control-click (or right-click) on the Desktop itself, a context menu will appear with an option to Change Desktop Background. Selecting this menu item opens the Desktop panel.
If you have more than one display connected to your system, selecting the Desktop panel opens a separate panel in each display, as shown in Figure 4-6. This panel allows you to set a separate Desktop picture for the other display. If you look closely at Figure 4-6, you’ll notice that the Desktop pane on the second display doesn’t have a toolbar. For more information on running a dual-headed system, see Section 4.2.2.2.
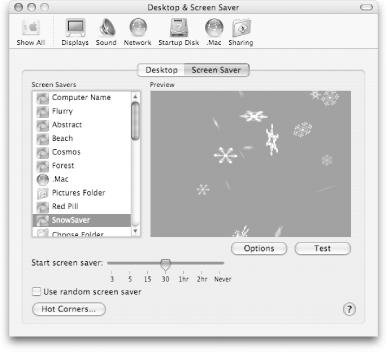
The Screen Saver pane, shown in Figure 4-7, lets you select one of Mac OS X’s default screensaver modules. Here, you can set the amount of time your system must be inactive before the screensaver kicks in, require a password to turn off the screensaver, and specify Hot Corners for enabling/disabling the screensaver.
If you have a .Mac account, you can also choose from the .Mac Screen
Effects or subscribe to another .Mac member’s public
slide show. To do this, click on the Configure button and enter the
members’ name (for example,
chuckdude).
If you click on the Hot Corners button (located at the lower-left corner of the pane), you can specify which corners of your screen to use to quickly enable/disable the screensaver, as shown in Figure 4-8. This is a handy feature because it allows you to immediately activate the screen saver, rather than wait for the time you’ve specified in the slider.
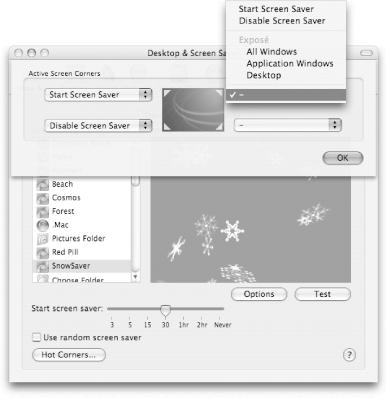
You can also specify Hot Corners to invoke the effects for Exposé (discussed later) or opt to leave a corner without any function at all.
Screensavers are essentially a collection of JPEG image files, bundled together and saved in /System/Library/Screen Savers. If you have a .Mac account, you can create a screensaver of your own from images in an iPhoto library. To create and publish your screensaver using iPhoto, follow these steps:
Make sure you’re connected to the Internet.
Launch iPhoto by either clicking on its icon in the Dock, or double-click its icon in the Finder (
/Applications).Select the images you’d like to use in the screensaver.
Click on the .Mac Slides button, located at the bottom of iPhoto’s window.
iPhoto creates the screensaver slides and publishes them to your
iDisk, saving them in the /Pictures/Slide Shows
folder. You can then opt to use the slide show you just
created as your own screensaver. Other .Mac users can use it as well,
as long as they know your username.
The Dock panel lets you control the Dock’s appearance and behavior, including its size, icon magnification, and screen position. As Figure 4-9 shows, you can also dictate the animation style used for minimizing windows (choose between the Genie Effect or the Scale Effect).
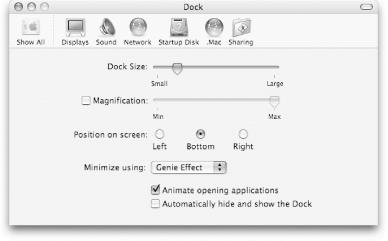
The checkbox next to “Animate opening applications” is checked by default. This option causes an application icon to bounce in the Dock as it starts up. If you uncheck this box, the icon won’t bounce, but the black triangle beneath the icon will pulse instead to indicate that the application is launching.
If you find that the Dock takes up too much space on your screen, you can check the box next to “Automatically hide and show the Dock” to make it hide when you don’t need it. When you need to launch an application, use the Finder, or unminimize a window, just move your mouse to where the Dock should be and it will reappear.
As Chapter 1 states, abbreviated versions of the Dock panel appear in the Apple Menu submenu, and the Dock divider’s Dock menu, shown in Figure 1-27.
Tip
Don’t forget that you can always quickly toggle the
Dock’s hidden/shown state by pressing
Option-![]() -D.
-D.
The plist file for Dock preferences is saved as
~/Library/Preferences/com.apple.dock.plist.
Hacking the Dock’s plist File
Suppose you want your Dock to
appear at the top of the screen, beneath the menu bar. While this
isn’t one of the positions available (as shown in
Figure 4-9), you can do this
by hacking the Dock’s plist
file. To do so, follow these steps:
Open the
com.apple.dock.plistfile (~/Library/Preferences) by double-clicking on its icon in the Finder. This opens the file using the Property List Editor if you have installed the Xcode Tools; otherwise, the file opens in TextEdit.Click on the Dump button.
Click on the disclosure triangle next to Root, and look for a key item named
orientation.Change the value of
orientationfrombottom(orleftorright, depending on where you have it placed) totop, hit Return to accept the change, then save the file and quit the Property List Editor.
When you log back in, the Dock appears at the top of the screen, just
below the menu bar. To move it back, you can edit the
plist file again or use the
Dock’s preferences panel to select Left, Right, or
Bottom as its location; you can also select ![]() →Locate at
(Bottom, Left, or Right) to change the position of the Dock.
→Locate at
(Bottom, Left, or Right) to change the position of the Dock.
What started out as a nifty little hack turned out to be one of the most talked-about features added to Mac OS X Panther. Exposé uses Quartz Extreme rendering to quickly give you access to all of the open windows for running applications or to scoot them out of the way so you can quickly see what’s on your Desktop.
Exposé lets users separate open windows on their system so they can quickly select a different window or view the items on their Desktop. All this is accomplished with the aid of keyboard shortcuts and Hot Corners, which you can configure through the Exposé preference panel, shown in Figure 4-10. You can also program the buttons of multibutton mice to invoke Exposé’s features through the Keyboard & Mouse preference panel.
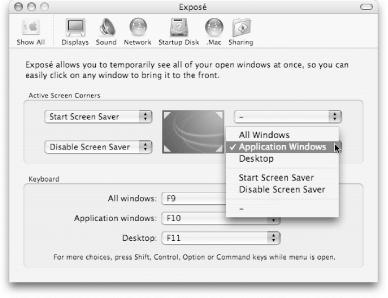
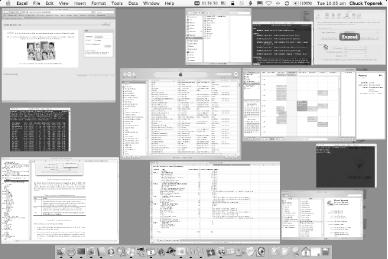
By default, Exposé’s keyboard shortcuts are mapped as listed in Table 4-1; Figure 4-11 shows what the desktop will look like if F9 (All windows) is pressed. However, the keyboard shortcuts can be mapped to other keyboard shortcuts using the pop-up menus in the Keyboard area at the bottom of the window.
Table 4-1. Exposé’s default keyboard shortcuts
|
Key |
Action |
|---|---|
|
F9 |
Separates and resizes all open windows; use the arrow keys to highlight individual windows and use the Return key to select that window and bring it to the front of the window stack. |
|
F10 |
Separates the windows for each application; use the Tab key to bring the next application’s windows to the front of the stack. |
|
F11 |
Scoots all open windows off to the side of the display so you can see the files on your Desktop. |
Here are some other tricks you can try with Exposé:
If you hold down the Shift key and press either of the F9, F10, or F11 keys, Exposé starts working in slow motion.
If you press F9 to separate the windows as shown in Figure 4-11, you can use the arrow keys on your keyboard to highlight a particular window. The window is shaded light blue, and its filename is superimposed on the window.
If you press F10 to separate the windows for the current application, you can hit the Tab key to switch to another application and bring its windows—again, separated by Exposé—to the front. Also, Shift-Tab cycles backwards through the window stack, so if you’ve gone too far with the Tab key, try hitting Shift-Tab to go back to the application you need.
If you’ve done the last trick, combine that with the previous and use the arrow keys to highlight a window; pressing Return brings that window to the front of the stack.
If you’ve used F11 to push the windows out of the way so you can see the Desktop, the window that previously had the focus is still active, even though it isn’t really visible. For example, if you have a Terminal window open and you hit F11, try issuing a simple command like
ls, then hit F11 to bring the windows back; you should see the output oflsin the Terminal window. (F9 and F10 take the focus away.)
If you have an additional display connected to your Mac, Exposé’s option for viewing the Desktop works a little differently. For example, if you have your second display configured so that it appears to the right of your main display, the windows on your main display will scoot off to the left edge of that display, while the windows in the second display will shift to the right edge of that display. For additional information on working with two displays, see Section 4.2.2.2 later in this chapter.
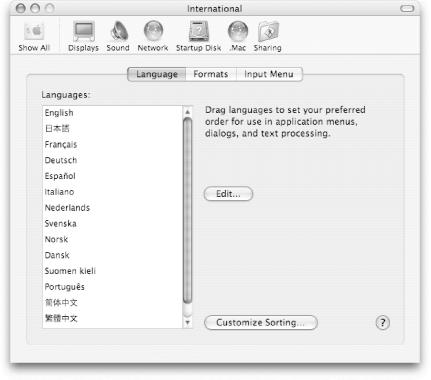
The international pane, shown in Figure 4-12, is Mac OS X’s user interface to its localization features. Through it, you can set your preferred language, as well as the date, time, and number formats most appropriate to the part of the world you live in.
Mac OS X uses a fairly elegant strategy for implementing systemwide localization, letting the system and its various applications modify their text and interfaces depending on the user’s native language. For example, a person from the United States would probably prefer to use an English-language system, whose controls and text flow from left to right and top to bottom. Likewise, a person from Saudi Arabia would benefit from applications with Arabic-language interfaces and a right-to-left flow of text and controls.
There are three panes to the International preferences panel, whose functions are as follows:
- Language
This pane, shown in Figure 4-12, is used to select the languages you prefer to use in your application menus and dialogs. The language at the top of the list is your default language, which is established when you install Mac OS X. To change your preferred language, click on another and drag it to the top of the list (the mouse pointer will change to a hand symbol).
If you don’t see a language in this list, or if you would like to make it shorter, click on the Edit button. A sheet will slide down, containing a checkbox list of the more than 90 languages supported by Mac OS X Panther. You can also use this listing to reduce the number of languages that appear in the Languages window by deselecting their checkboxes.
If you decide to switch languages (say from English to Polish), you will need to log out and log back in to your account for the change to take effect.
- Formats
This pane lists options for how the following items are displayed, based on the Region you’ve selected from the pop-up menu at the top of the panel:
- Dates
The Dates section lets you specify how the system date appears in the menu bar clock.
- Times
This section lets you specify the format for your clock.
- Numbers
The Numbers section lets you specify the Separators numbers (Decimal and Thousands), the symbol to be used for Currency, and whether your Measurement Units will be standard or metric. Typically, you won’t have to change the items under Separators, Currency, or Measurement System, as their defaults are based on the Region you select from the pull-down menu.
- Input Menu
This pane is used to select the keyboard layout for your system, based on the language you’ve specified as the default. Initially, you will have only one language selected here. However, if you select other languages by clicking on their checkboxes, the Input Menu will appear in your menu bar.
One item you’ll want to add to your Input Menu is the Character Palette, especially if you frequently need to add international characters or mathematical symbols to your documents. If you select the Character Palette from the Input Menu, the palette will open in a separate window. To add a character to a document, find the symbol you’re looking for and drag it to where you would like it inserted.
Clicking on the Options button opens a sheet with Input Menu Shortcuts (keyboard shortcuts for switching the default keyboard layout or input method), and an option to synchronize the font and keyboard scripts.
Mac OS X has the textual base covered by making
Unicode its native
text-encoding architecture. To make localized user interfaces,
application developers can build groups of interface widgets or text
strings to use depending on the user’s local
settings. These resources are built into
.lproj
folders found within the application’s
/Resources folder.
The Security panel, shown in Figure 4-13, is used to configure FileVault for setting up system- and user-specific passwords to protect the data on your computer.
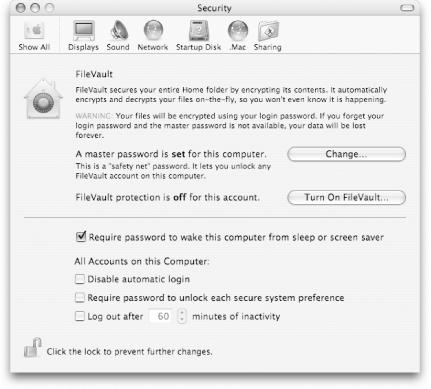
With FileVault enabled, the data in your Home folder will be encrypted in a single disk image that can be accessed only with the proper password, even if your Mac is mounted in target disk mode. The only exception to this rule is if you have set the Master Password for the computer. If the Master Password has been set, and if you have administrator privileges on the system, you can unlock any user’s FileVault account.
The lower portion of the window provides a series of checkboxes for added security, which include:
- Require password to wake this computer from sleep or screen saver
If your Mac is in sleep or screensaver mode, and someone tries to gain access to your computer, they will be challenged for your login password.
Selecting this option is a quick way to improve your account’s security, if your Mac is in an office or other setting where you’d rather not risk prying eyes, and you need to leave the keyboard for a little while.
- All Accounts on this Computer:
This section of the Security panel is available only to users with administrator privileges; it’s grayed out for normal users. The following options apply across the board to all user accounts on the system:
- Disable automatic login
If checked, this option makes it so users must use their account password to log in to the system.
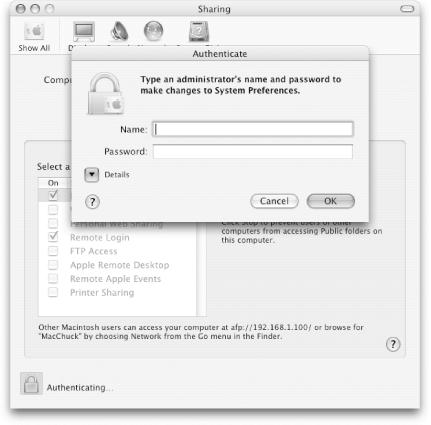
- Require password to unlock each secure system preference
If checked, this option disables secure system preference panels from being used without first authenticating with an administrator’s username and password, as shown in Figure 4-14.
Figure 4-14. Typical password challenge when “Require password to unlock each secure system preference” is enabled
- Log out after [60] minutes of inactivity
If checked, this option automatically logs other users out of their accounts if their account has been inactive for a specified amount of time. The default period of inactivity is 60 minutes.
Apple has used the term "digital hub” as a marketing slogan to describe its computers’ zero-configuration plug-and-play abilities with various devices. The Hardware preference panels let you control your Mac’s behavior when you connect or insert various kinds of media or devices (such as a digital camera or iPods), or insert a CD or DVD.
The standard set of panels in the Hardware section include:
CDs & DVDs
ColorSync
Displays
Energy Saver
Keyboard
Mouse
Sound
In addition to the standard set of Hardware preference panels, there are two more that you might find, depending on additional hardware or peripherals attached to your system. These are:
Bluetooth
Ink
The standard set of Hardware preference panels, along with Bluetooth and Ink are discussed in the following sections.
The CDs & DVDs preferences panel, shown in Figure 4-15, lets you determine what action (if any) will be taken when you insert a CD or DVD.
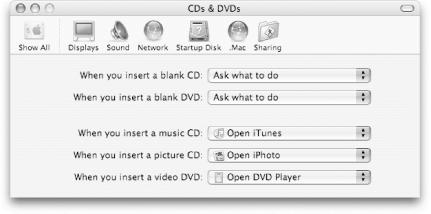
The items in the CDs & DVDs panel all share the same basic interface: a pull-down menu that lets you choose what the Mac does when it mounts various kinds of disks. You can choose to have it simply open the new media volume as a Finder window, launch an appropriate application (such as iTunes for music CDs and Disk Copy for blank discs), run a script, or prompt you for some other action to take. The pull-down menus ask you what action to take when you perform one of the following actions:
- Insert a blank CD
Specifies the Mac’s behavior when you insert a blank, recordable CD or DVD. By default, this is set to “Ask what to do”; however, you might want to change the action for this to “Open Finder”, “Open iTunes”, or select another application, such as Disk Utility (
/Applications/Utilities).- Insert a blank DVD
Specifies the Mac’s behavior when you insert a blank, recordable DVD or DVD. By default, this is set to “Ask what to do”; however, you might want to change the action for this to “Open Finder,” “Open iDVD” (if you have iLife `04 installed on your Mac), or another application.
- Insert a music CD
Specifies the Mac’s behavior when it mounts an audio CD (including an MP3 CD). The default is to open the CD with iTunes.
- Insert a picture CD
Specifies the Mac’s behavior when it mounts a picture CD; the default is to open the CD with iPhoto.
- Insert a video DVD
Specifies the Mac’s behavior when it mounts a DVD with a movie on it; the default is to open it with the DVD Player.
The Displays panel configures the resolution, color depth, and refresh rates available to the currently connected monitor (see Figure 4-16.)
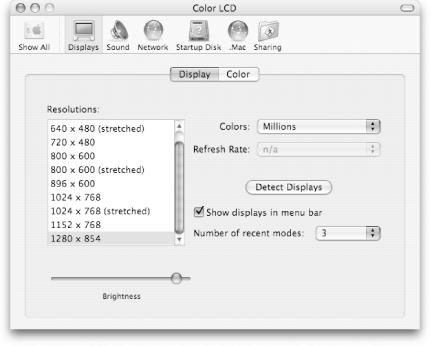
The Color tab contains controls for associating and calibrating a ColorSync profile with the current display. Clicking the Calibrate button launches the Display Calibrator application, which allows you to create a custom ColorSync calibration for your particular monitor and needs.
Tip
It’s wise to check the “Show profiles for this display only” item in the Color tab, because it will keep you from selecting a screen resolution that may not be supported by your monitor.
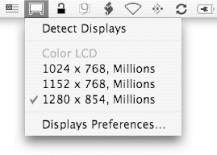
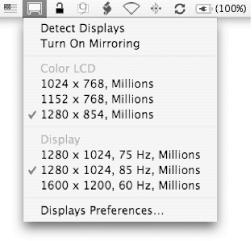
If you check the “Show displays in menu bar” checkbox, the Displays menu extra shown in Figure 4-17 will appear in the menu bar.
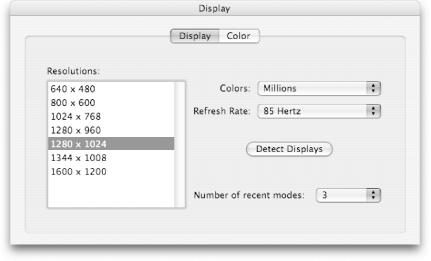
If you connect more than one display to your computer, you’ll notice some differences in the some of the System Preference panels, described in the next list.
An Arrangement tab, shown in Figure 4-18, is added to the Displays preferences panel. This tab allows you to select the placement of the second monitor in relation to the primary display.
Figure 4-18. The Arrangement tab; available only if more than one monitor is connected to your system
If you select the Mirror Displays checkbox, the second monitor will mirror the main display. This is particularly useful when you connect your computer to an overhead projector to give a presentation.
A watered-down version of the Displays panel appears on the second monitor, as shown in Figure 4-19.
To interact with this window, move your mouse over to the second monitor by moving the cursor in the direction you placed the second display in the Arrangement tab.
If you click on the Show All icon in the System Preferences toolbar on the main display, the Displays panel disappears from the second monitor.
You can set the Desktop pictures for both displays independent of each other. To do so, click on the Desktop & Screen Saver panel, go to the Desktop pane, and a similar pane (again, without the toolbar) appears on the second display. Select the Desktop pattern you would like to see on the second display, and then click on the Show All toolbar icon in the main display to make the window on the second display disappear.
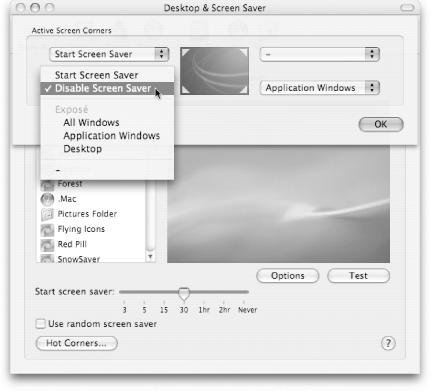
You can set Hot Corners for the second display in either the Desktop & Screen Saver or Exposé preference panels, as shown in Figure 4-20.
The only downside to this is that the Hot Corners are applied as if both displays are one big display. For example, if you have a second display arranged to the right of your primary display, the Hot Corners you set in the upper- and lower-left corners of these panels apply to the upper- and lower-left corners of the primary display; the ones on the right side apply to the second display. This can be confusing at first and is radically different from Jaguar (Mac OS X 10.2), which let you set Hot Corners for each display independently.
While at first glance this might seem like you can enable the screensaver on the second monitor independently from your main display, you can’t. If you move the mouse into the Hot Corner to enable the screensaver, both monitors will display the same screensaver simultaneously.
The Displays menu extra in the menu bar allows you to control both displays from the same menu, as shown in Figure 4-21.

When you minimize a window in the second display, you can watch as it’s whisked away to a place in the Dock on the primary display. Likewise, when you unminimize that window, it will spring back to its former placement on the second display.
The advantage of using two displays is that you have additional screen real estate to work with. For example, you can use the second display to have various Finder windows open so you can drag and drop text and image files into a dynamic web page builder (such as Dreamweaver MX) that you’re running on your main display.
The Energy Saver panel is used to specify the machine’s idle time before it enters sleep mode and to define special conditions (such as network or modem access) under which it awakens itself. Depending on which machine you have, the Energy Saver panel you see may be different. If you have a Desktop system such as an iMac or a desktop Mac (such as a G4 or G5 tower), the Energy Saver panel you’ll see is shown in Figure 4-22; if you have an iBook or PowerBook, the panel you’ll see is shown in Figure 4-23.
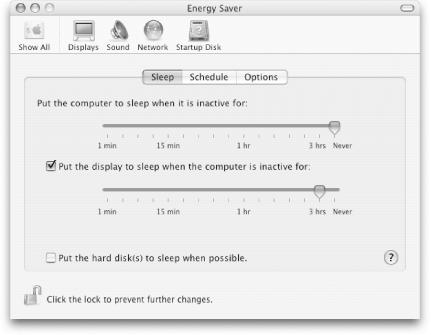
This panel allows you to specify the amount of time your system is inactive before your computer or monitor is put to sleep. If you want your monitor to go to sleep sooner than the computer, click on the checkbox next to “Use separate time to put the display to sleep.” Another option, “Put the hard disk to sleep when possible,” allows you to put your Mac into the ultimate Energy Saver mode, in which the hard disk spins itself down, reducing the power consumption even more.
Tip
Because the settings defined by the Energy Saver panel take effect for the entire system (and not just while your login is active, as with the Desktop & Screen Saver preferences panel), you must open the pane’s authentication lock before making any changes here.
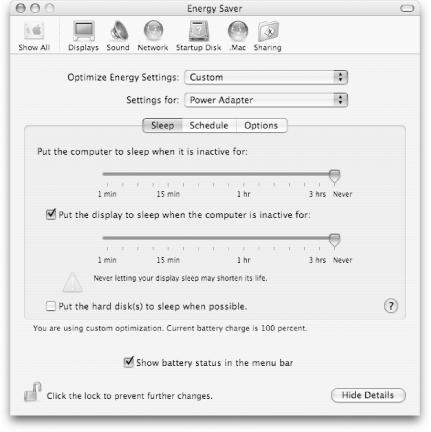
As noted earlier, iBook and PowerBook users will see the Energy Saver panel shown in Figure 4-23. The reason for this change is to give laptop users the ability to set the sleep time for when they’re plugged in or when they’re operating on battery power. Note the two pull-down menus at the top of the window:
Tip
At some point, Apple removed the ability to configure the hard drive
spindown time in Energy Saver: the value
is stuck at 10 minutes. This can be changed by editing
/var/db/SystemConfiguration/com.apple.PowerManagement.xml
or by using the command pmset -a spindown
n (where
n is a number in minutes) to write the
config value. See man pmset
for more information.
- Optimize Energy Settings
This menu allows you to select one of six settings: Automatic, Highest Performance, Longest Battery Life, DVD Playback, Presentations, or Custom. You can alter the sleep settings for each of these or go with their defaults, based on what Apple thinks will give you the most bang for your battery’s buck.
- Settings for
This menu lets you select from two options: Power Adapter or Battery Power. You can have separate, independent Energy Saver settings for when you’re plugged in or for when you’re unplugged and running on battery. It’s in your best interest to enter settings for both of these based on your own habits, although the presets, based on what you select in the “Optimize Energy Settings” pull-down menu, should work just fine for most people.
Additionally, if you have a laptop, you should check the box next to “Show battery status in the menu bar” so you can keep track of how much life your battery has. (Desktop systems don’t have this option in their Energy Saver panel.) The battery menu extra, shown in Figure 4-24, gives the information detailed in the following list.
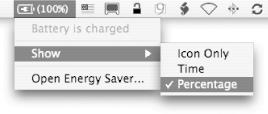
The icon in the menu bar shows whether the computer is plugged in, running on battery, or if the battery is charging:
If you are plugged in, the battery icon has a plug symbol inside.
The battery icon displays a progress meter to show the amount of life remaining in your battery. As the energy in the battery depletes, the indicator bar moves to the left.
The battery icon has a small lightning bolt inside it when the battery is charging.
When your battery is below 25 percent, the progress meter inside the battery turns red, prompting you to plug in somewhere (and soon).
You will receive one final warning when your battery hits 8 percent, telling you that you are running on reserve power. If you get this warning, and you fail to plug in soon, your computer will be put to sleep automatically to preserve the contents of memory.
The menu extra allows you to select how the time remaining on your battery will be displayed next to the battery icon in the menu bar. You can choose from Show Icon Only, Show Time, or Show Percentage; the menu also has an option to open the Energy Saver preferences panel. Show Icon Only displays a battery icon. Show Time displays the time remaining on your battery in hours and minutes (e.g., 2:36 is the equivalent of 2 hours and 36 minutes); Show Percentage displays the percent remaining of your battery’s life.
Depending on which item you select in the menu extra, Show Time or Show Percent, the opposite will be shown as gray text as the first item in the menu extra. For example, if you select Show Percent, the percentage will be shown in the menu bar, while the time remaining on your battery will be displayed as gray text at the top of the menu extra. If you select Show Neither, the time remaining will be shown as hours and minutes in gray text at the top of the menu extra.
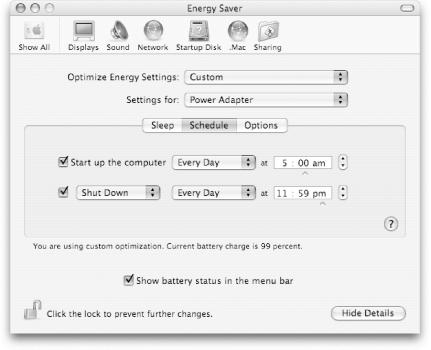
The Schedule pane, shown in Figure 4-25, allows you
to configure your Mac so it starts up or shuts down automatically at
a specified time. This is particularly useful if you want your Mac to
start up and shut down during the night for backups scheduled via
cron, or just so your Mac starts up before you
arrive at work.
The Options pane, shown in Figure 4-26, has two Wake Options and an option that automatically restarts your Mac if there is a power failure that forces it to shutdown prematurely. For iBook and PowerBook owners, though, the auto restart option is moot if your Mac is plugged in because your laptop will run on battery until the power connection is reestablished.

Another option available to iBook and PowerBook users is the Processor Performance pop-up menu located near the bottom of the Options pane. When you’re running on battery, you should set this option to Reduced because it will help your battery last a little longer (and will reduce the heat coming off your processor). If you’re plugged in, set this pop-up menu to Highest for peak performance.
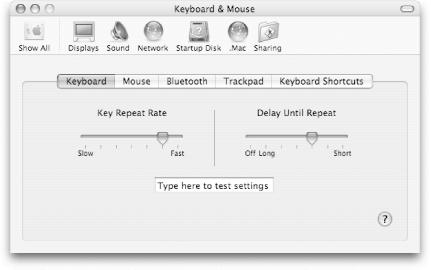
The Keyboard & Mouse panel combines the separate Keyboard and Mouse preference panels from Jaguar into one panel, shown in Figure 4-27. The Keyboard pane controls the repeat rate when you depress a key and hold it down. You can specify the speed of the repeat (from slow to fast) and the delay between the time the key is first depressed until the repeat option kicks in (from long to short). If you select the Off option for Delay Until Repeat, the repeat feature will be disabled entirely.
The Mouse panel, shown in Figure 4-28, lets you specify the speed of the mouse, as well as the delay between double-clicks.

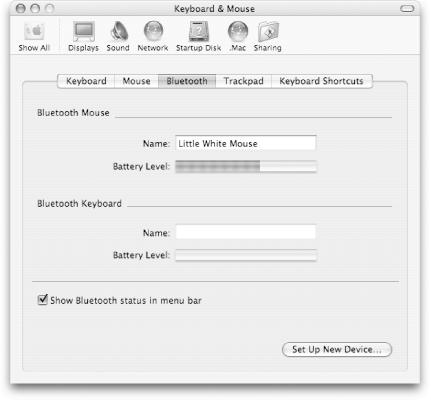
The Bluetooth pane, shown in Figure 4-29, monitors the battery life of the Apple Bluetooth Mouse and Keyboard, if you have one. You can also use this pane to assign a name to these devices. When the battery starts to run low, the Bluetooth menu extra (if you have it enabled) will flash repeatedly to warn you that the battery is low.
If you’re using an iBook or PowerBook, the Mouse preferences panel will have an added section for setting the controls for your trackpad, as shown in Figure 4-30.
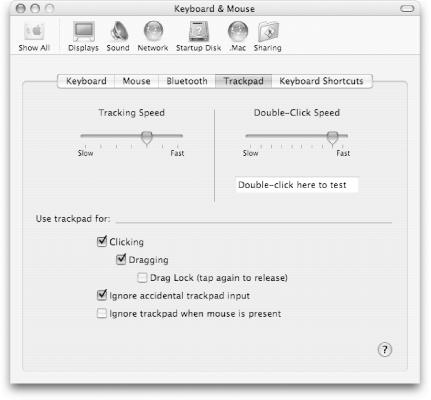
The options for use with a trackpad include:
- Clicking
Checking this box lets you use the trackpad to perform mouse clicks, instead of using the trackpad’s mouse button. To click with the trackpad, just tap your finger once for a single-click and twice for a double-click. If you select the Clicking option, you can opt to use the trackpad for Dragging and Drag Lock, which are explained here:
- Dragging
This option allows you to use the trackpad to drag-select items, either in the Finder or on your Desktop. To drag-select, tap twice with your finger, hold your finger down on the second tap. Then move your finger on the trackpad to select the items. To deselect the items, tap once to release.
- Drag Lock
This option allows you to drag-select (as with the Dragging option) and drag the files to another location (such as over the Trash icon in the Dock). To use Drag Lock, tap twice with your finger and hold down on the second tap and move your finger on the trackpad to select the items, and then tap once to end the selection. With the items selected, tap your finger on the trackpad twice to “grab” them, and then drag the items to where you want to move them. To release the items, tap your finger on the trackpad once; to deselect the items, move the pointer elsewhere, and tap the trackpad once.
- Ignore accidental trackpad input
Selecting this item disables input to the trackpad while you’re typing. This is particularly useful if you have a tendency to move or rest your hands next to the trackpad while typing.
- Ignore trackpad when mouse is present
Checking this box disables the trackpad if a mouse is connected to your laptop, forcing you to use the mouse instead of the trackpad.
The Keyboard Shortcuts pane, shown in Figure 4-31, lists the standard keyboard shortcuts available for Screen Capture, Universal Access, Keyboard Navigation, the Dock, and for other Application Keyboard Shortcuts.
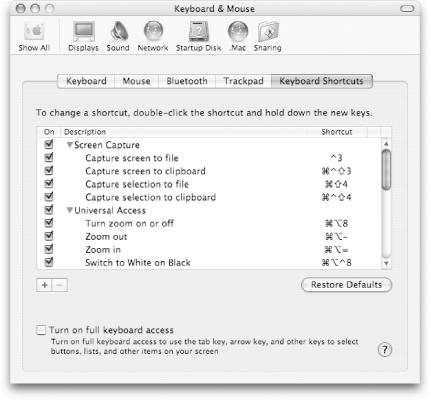
You can toggle the keyboard shortcuts off or on by clicking on their respective checkboxes in the On column. This is particularly useful for system administrators who might not want to let users take screenshots (for security purposes or otherwise). If you want to add a keyboard shortcut to a menu item that doesn’t have one, you can do so by clicking on the add button (the one with the plus sign, +, on it). This opens a sheet that lets you select the specific application (or All Applications) and the menu item, and assign a keyboard shortcut (as shown in Figure 4-32).
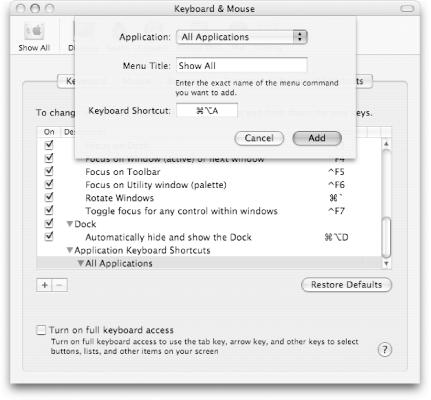
Figure 4-32. Click on the plus sign button (+) to add a keyboard shortcut and apply that to a specific or all applications on your Mac
If you click on the checkbox next to “Turn on full keyboard access” (at the bottom of Figure 4-32), you can use the Control key with either Function keys, Letter keys, or Custom keys instead of using the mouse. These key combinations and their functions are listed in Table 4-2.
Table 4-2. Keyboard access key combinations
|
Function keys |
Letter keys |
Description |
|---|---|---|
|
Control-F1 |
Enable/disable keyboard access | |
|
Control-F2 |
m |
Control the menu bar |
|
Control-F3 |
d |
Control the Dock |
|
Control-F4 |
w |
Activate the window or the window behind it |
|
Control-F5 |
t |
Control an application’s toolbar |
|
Control-F6 |
u |
Control an application’s utility window (or palette) |
|
Control-F7 |
Control-F7 |
Used for windows and dialogs to highlight either text input fields and lists, or for any window control |
|
Esc |
Esc |
Return control to the mouse, disabling the Control-F |
|
Spacebar |
Spacebar |
Perform the function of a mouse click |
If you use an iBook or PowerBook, you need to use Control plus the
fn key along with the Function or Letter key for
keyboard access—for example, Control-fn-F2 to access menus. The
fn key is at the bottom-left corner of your
keyboard, next to the Control key (and below the Shift key).
The fn key is used on laptop models to invoke
the actions of the function keys (F1-F12) instead of their
other functions, including brightness controls (F1 and F2), volume
controls (F3-F5), number lock (F6), display mirroring (F7),
Exposé (F9-F11, by default), and eject (F12).
If you wish to reverse this default behavior and have the function key actions invoked without using the fn key, check the “Use the F1-F12 keys for custom actions” checkbox. (This checkbox appears only in Mac OS X Version 10.3.3 and later.)
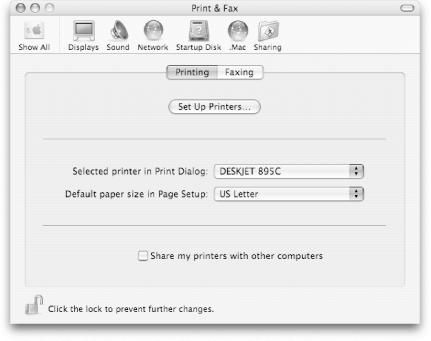
The Print & Fax preference panel is a new addition in Mac OS X
Panther. The Print pane, shown in Figure 4-33, is
used to select your default printer and paper size, and to enable
printer sharing. If you click on the Set Up Printers button, it
launches the Printer Setup Utility
(/Applications/Utilities). For more information
on using the Printer Setup Utility, see Chapter 9.
If you have an internal modem, the Faxing pane, shown in Figure 4-34, is used to configure your Mac for sending and receiving faxes.
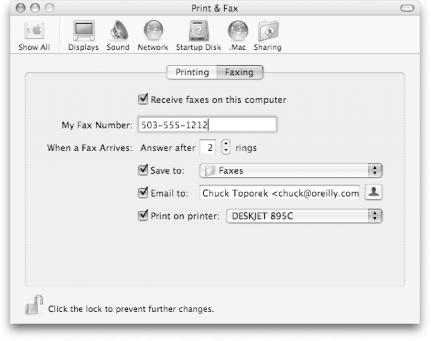
Here are some options you can configure on this pane:
Your fax number (i.e., the number for the phone line you’ve plugged in to your modem port)
What to do when a fax arrives, including:
The number of rings before your Mac answers the line to receive a fax
Where incoming faxes will be saved to (the default is the Faxes folder, located within your Home folder)
An option to redirect the incoming fax as an attachment via email
An option to print the fax automatically after it arrives
Incoming faxes are saved as PDF documents, with a filename that
reflects the phone number from which it came (e.g., Fax
from 503 555 1212.pdf). The only downside is that when a
fax arrives, there is no way, by default, that the system alerts you
to an incoming fax. To solve this oversight, you can download and
install the Fax Alert script, created by Rainer Brockerhoff
(http://www.brockerhoff.net/fai/index.html).
Once installed, this Folder Action script pops open a dialog window
to let you know when a fax is received in the folder you specify.
The Sound panel, shown in Figure 4-35, offers three panes: one for configuring Sound Effects (or alert sounds), one for sound Output (such as speakers), and one for sound Input.
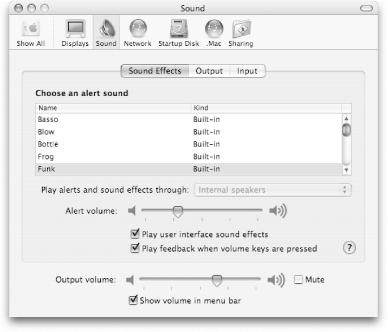
The three Sound preferences panes are described as follows:
- Sound Effects
The Sound Effects pane lets you select the alert sound your Mac emits when an error occurs. It also offers a slider control for setting the volume level for the alert sound.
- Output
The Output pane lets you choose a device for sound output (typically, the built-in audio controller) and includes a slider for controlling the left-right balance.
- Input
The Input pane lets you specify the sound input device, or microphone, for your computer. If you have a laptop, the internal microphone is selected by default. If you use an external microphone, you need to select the Line In option. You can even adjust the sound input level for an iSight camera from this panel as well.
All three panes include the same lower portion, with a slider control for setting your computer’s Output volume. The volume you set here applies to all sound output, including system sounds and the audio content you play via iTunes. There is also a checkbox for enabling a sound volume slider as a menu extra in the menu bar. The number of “sound waves” in the menu extra’s icon corresponds to the current system’s volume setting.
All newer Macs have sound controls on the keyboard that allow you to decrease, increase, or mute the sound level. On laptops, you can use F3 to mute the sound, F4 to decrease it, and F5 to increase the output sound level. If you’re using a Desktop system with an extended keyboard, the output sound controls are located across the top of the number pad.
Bluetooth is a short-range wireless technology for communicating with devices, such as cellular phones, PDAs, keyboards, mice, and other computers. The Bluetooth panel, has the following tabbed panes:
- Settings
This pane, shown in Figure 4-36, is used to control the settings for how your computer will be recognized via Bluetooth, whether authentication is required, if 128-bit encryption should be used for transmitting data over Bluetooth, and if your computer will support connections to older Bluetooth phones.
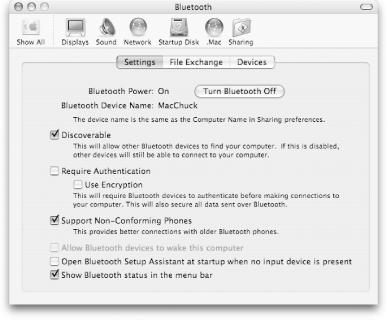
This pane also tells you that the Bluetooth Device Name is the same as the Computer Name set up in the Sharing preferences and offers an option to place a Bluetooth menu extra in the menu bar.
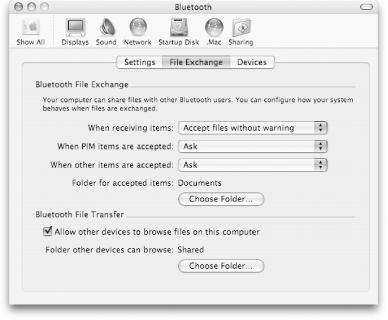
- File Exchange
This pane, shown in Figure 4-37, is used to configure what to do with the files you receive via Bluetooth and where to store them.
- Devices
If there are any Bluetooth devices within range of your computer, and you’re able to connect to them, they will appear in the Devices pane, as shown in Figure 4-38.
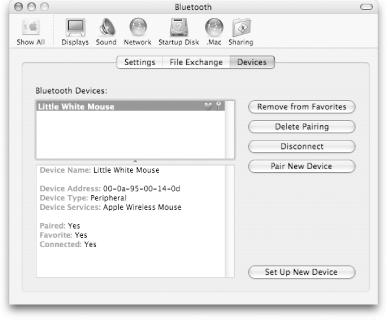
To see detailed information about a device, click on the device name in the Bluetooth Devices box; information about the device is displayed in the box below. Click on the “Set Up New Device” button to configure a new Bluetooth device with your Mac. Likewise, click on the “Delete Pairing” button to unpair a device.
One of the newer panels and features added to Mac OS X is an application called Inkwell, whose actions and controls are managed by the Ink preferences panel. Ink allows you to take input from a graphics pen and/or tablet (such as the Graphire 3 from Wacom), and either write directly into that application or to the InkPad, which is accessible through a small floating palette on your Desktop.
In order to use Ink (and Inkwell), you must first install the drivers and connect the tablet to your computer (typically via one of its USB ports).
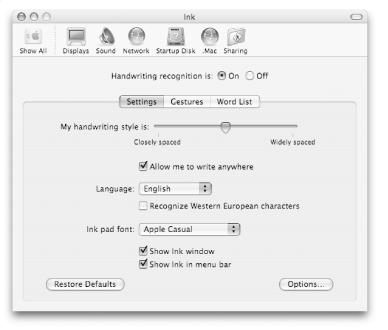
At the top of Ink’s panel is a radio button that allows you to turn handwriting recognition on or off. The three panels for Ink offer the following settings:
- Settings
The Settings pane, shown in Figure 4-39, is used to control how Inkwell will handle your handwriting. The panel has the following controls:
- My handwriting style is:
Here you have a slider control, which you can move left or right, depending on how closely or widely spaced your writing is, respectively.
- Allow me to write anywhere
If this option is checked, you can write anywhere onscreen into what looks like a yellow, lined sheet of paper, as well as to the InkPad, if you have that open. If unchecked, you can only write in the InkPad via its floating palette.
- Language
This pop-up menu lets you select the language that you will write with in InkPad; you can select from English, French, or German.
- Recognize Western European characters
When checked, this option allows you to use characters from languages such as Polish or Russian when using Ink.
- Ink pad font:
This menu lets you select the font to use when writing in the InkPad; the default is Apple Casual. (Next to this control is a checkbox, giving you the option to “Play sound while writing.”)
- Show Ink window
When enabled, this option displays Ink’s floating palette.
- Show Ink in menu bar
When enabled, this option places a menu extra for Ink in the menu bar, which has options for Write Anywhere, Hide Ink Window, and Ink Preferences (which opens Ink’s preference panel).
- Options...
Clicking this button reveals a sheet that gives you finer control over how your handwriting is recognized.
When you first start using Ink, this panel will be your friend. Here you can set the delay for how quickly recognition begins after you’ve stopped writing, how far the pen must move before the writing begins, and how long the pen must be still to be used as a mouse. We strongly encourage you to play around with these settings to tune Ink to your writing style.
- Gestures
The Gestures pane, shown in Figure 4-40, shows the handwriting gestures you can use to perform certain actions while writing, such as add a space, insert a carriage return (or “Vertical Space”), etc.

When you click on an Action to the left, the gesture will be drawn in the little box to the right to show you how you should enter that gesture while writing.
Tip
If you plan to use Ink often, you might want to take a screenshot of the Gestures tab and keep that handy until you have memorized the gestures.
- Word List
The Word List panel, shown in Figure 4-41, allows you to add common words to Ink’s dictionary.
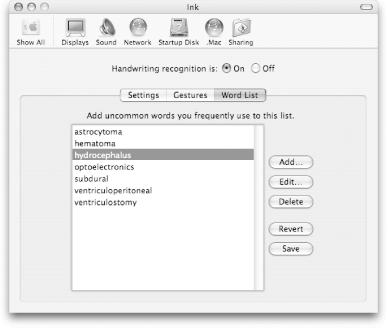
The button controls to the right of the text field are fairly self-explanatory; click Add to add a word, Edit to change the spelling of a word, Delete to remove a word, etc. If you try to add a word that’s already in Ink’s dictionary, you will be alerted as such.
The only downside to Ink is that it’s still a work in progress. For example, you can’t add your own gestures to the Gestures panel, and while you can add words to Ink’s repertoire, you can’t add a gesture for them. That said, the mere fact that Apple has continued to develop Ink since Jaguar shows that they have bigger and better things in mind for it someday.
Through these panes, users can set up and manage their .Mac accounts, set up their email account, select a default web browser, and configure how QuickTime handles incoming streaming media. System administrators can further use the Sharing panel to activate file sharing, web serving, and remote login services.
The standard set of panels in the Internet & Network section include:
.Mac
Network
QuickTime
Sharing
These panels are explained in the sections that follow.
The .Mac panel is where to configure your settings for your .Mac account and the applications you use to access the Internet. There are two tabbed panes to this preference panel.
- .Mac
The .Mac panel, shown in Figure 4-42, is where to set up your .Mac account.
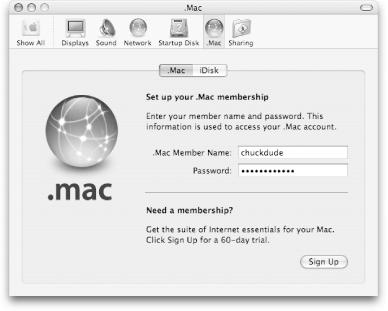
If you already have a .Mac account, you can just enter your .Mac member name and password; if you don’t, you can sign up for a .Mac account by clicking on the Sign Up button.
Tip
.Mac is Apple’s
subscriber service, with an annual cost of $99 (US). To learn how to
use the services included with a .Mac membership, see
Inside .Mac (O’Reilly), or go
to http://www.mac.com.
- iDisk
This pane, shown in Figure 4-43, gives you information about your iDisk, if you have a .Mac account.
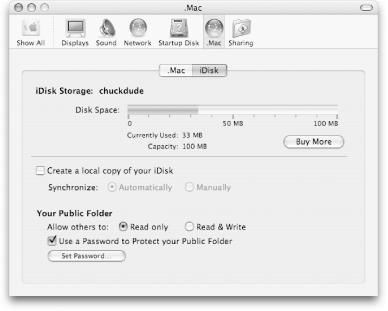
The top-half of the window shows how much space you’ve used on your iDisk. If you need more space and wish to purchase some, click on the Buy More button.
Tip
Clicking on the Buy More button takes you to .Mac’s Upgrade storage page, where you can purchase additional space for your iDisk and your .Mac email account, and additional mac.com email-only accounts.
If you select the checkbox next to “Create a local copy of your iDisk,” your iDisk will be mounted to your Mac, and a local copy will be created on your Desktop. Bare in mind, though, that you will need enough free hard-drive space to match the size of your iDisk (which is a minimum of 100 MB). You can also opt to synchronize your local iDisk either Automatically or Manually by selecting the appropriate radio button. If you select Automatically, the Finder will synchronize your iDisk with your local copy (and vice versa) any time a change is made. If you select Manually, you will need to click on the synchronize icon next to your iDisk in the upper portion of the Finder’s Sidebar.
The lower portion of this window allows you to specify the permissions for your iDisk’s Public folder. The three options for your Public folder include:
- Read only
Allows others to view and download the contents of your Public directory.
- Read & Write
Allows others to view, download, and save files to your Public directory.
- Use a Password to Protect your Public Folder
Allows you to set a password for your Public folder, which means that anyone who tries to access your Public folder has to supply a password before they’re given access. Note that the Read-Only and Read-Write options still apply, even if password protection is turned on.
The Network panel, shown in Figure 4-44, is the interface to the Mac’s basic network interfaces, including Ethernet, AirPort, and dialup modems. At least one of these interfaces has to be configured properly to get the Mac into a network environment or the Internet.
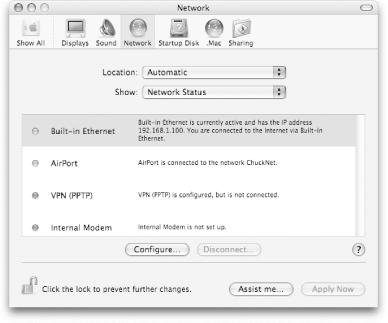
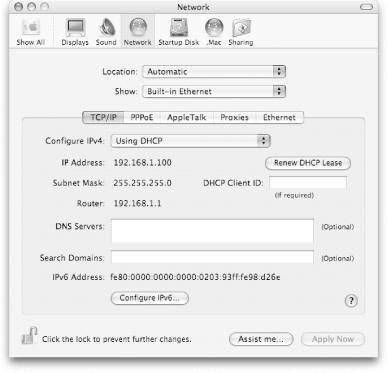
A green dot to the left of a network interface means that the service is up and available; a red dot indicates that the service isn’t in use or is unavailable. You will sometimes see a yellow dot appear as a network service, such as AirPort; it starts up by connecting from your laptop to a wireless base station. To view the detail about a network interface, double-clicking on an item in the list changes the window to reveal more options for configuring network settings, as shown in Figure 4-45.
The Network preferences panel is described in detail in Chapter 8.
The QuickTime panel, shown in Figure 4-46, lets you specify the preferences for the QuickTime Player, as well as how multimedia is handled on your system.
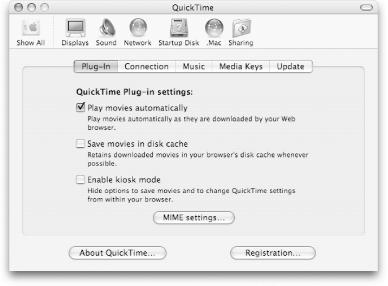
There are five tabbed panes to the QuickTime preferences panel:
- Plug-In
Configures the settings for the QuickTime plug-in for your web browser. Clicking on the MIME settings button reveals a sheet (shown in Figure 4-47) that changes how your browser will handle various file types, including streaming media, audio, MPEG movies, MP3 files, image files, and miscellaneous multimedia.
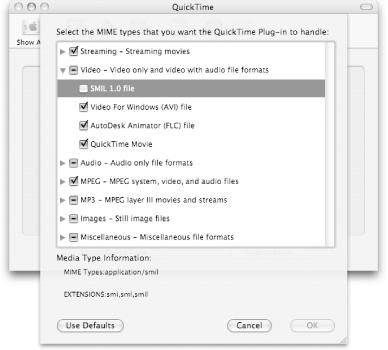
To select all the types for a category, click on the checkbox so a check appears. If a category box has a minus sign in it, it means that one of the options inside is unchecked. To reveal all the file types for a category, click on the disclosure triangle.
- Connection
This is where you specify the speed of your network connection. Clicking on the Instant-On button reveals a sheet that lets you choose whether streaming media is played automatically as it starts to download, and if so, you can choose whether to set the delay period. The Transport Setup button reveals a sheet for setting the transport protocol (UDP or HTTP) and their respective ports.
- Music
Specifies the default synthesizer for playing music and MIDI files. The QuickTime Music Synthesizer is selected by default.
- Media Keys
Authorizes access to secured or password-protected media files.
- Update
Checks for updates to QuickTime itself, as well as third-party QuickTime software.
At the bottom of the QuickTime panel are the following two buttons:
- About QuickTime
Clicking this button reveals a sheet that tells you which version of QuickTime is installed on your system.
- Registration
If you’ve purchased a registration key for QuickTime Pro, you need to click on this button to enter your registration number. For more information about QuickTime Pro, see Apple’s QuickTime web site (http://www.apple.com/quicktime).
The Sharing panel provides some simple controls to activate various network services (programs that other computers can connect to over a network or the Internet).
There are two text fields at the top of the Sharing panel for specifying your Computer Name and Rendezvous Name. By default, these are set to your username (e.g., Chuck Toporek’s Computer) after installation; however, you can change these to whatever you’d like (for instance, MacChuck).
Tip
The name you specify in the Computer Name field will be used as your machine’s hostname when your IP number does not resolve to a hostname in DNS.
In addition to these basic text fields, the Sharing panel has three tabbed panes, described as follows:
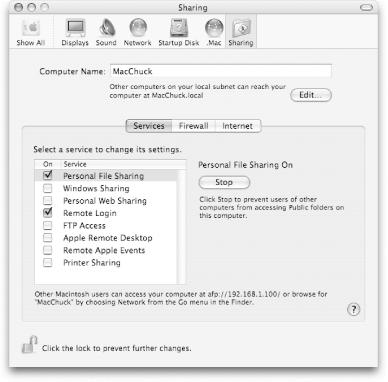
- Services
The Services pane, shown in Figure 4-48, allows others (including yourself from a remote machine) access to your computer. These services include:
- Personal File Sharing
When active, the Mac’s disks become available for mounting on other machines over the network.
- Windows Sharing
Lets you share folders on your computer with Windows users via SMB and CIFS.
- Personal Web Sharing
Turns on the Apache web server so people on the outside world can view web pages stored in your
~/Sitesdirectory.- Remote Login
Controls
sshd, which allows users to connect remotely to your Mac via the secure shell (SSH).- FTP Access
Controls the machine’s FTP server.
- Apple Remote Desktop
Allows others to access your Mac using Apple Remote Desktop (ARD). If you click on the Access Privileges button, you can specify which users can use ARD to access your Mac, as well as what they are allowed to do once connected. For example, if the “Control and observe” option is selected, an administrator can control your Mac remotely or watch what you are doing without your ever knowing.
- Remote Apple Events
Allows applications on other Mac OS X systems to send Apple Events to applications on your system via AppleScript.
- Printer Sharing
Activates USB printer sharing, letting other computers on the network use the printer connected to your Mac.
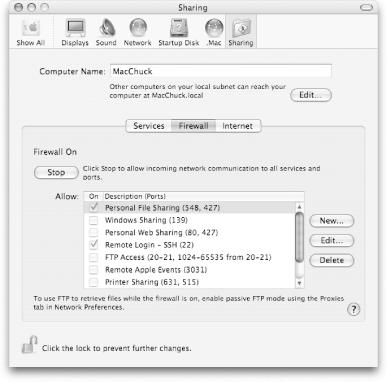
- Firewall
The Firewall pane, shown in Figure 4-49, lets you activate and configure the firewall on your Mac. For more information on the Firewall pane, see Chapter 13.
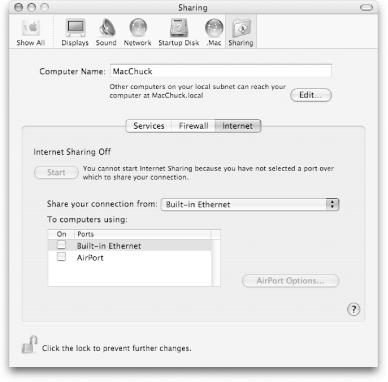
- Internet
The Internet pane, shown in Figure 4-50, lets you share your Internet connection with other Macs on the same network, even via AirPort. Enabling Internet sharing lets you turn your Mac OS X machine into a router.
This final category of preinstalled preference panes lets system administrators manage the machine’s user accounts, adjust the system clock, and set the Mac’s startup disk. It also serves as the main interface for obtaining system software updates from Apple. Some of these panes involve systemwide settings, and require administrator privileges.
The standard set of panels in the System section include:
Accounts
Classic
Date & Time
Software Update
Speech
Startup Disk
Universal Access
These panels are explained in the sections that follow.
The Accounts panel, shown in Figure 4-51, lets users with administrator privileges create and delete users from the system, as well as manage user accounts.
The column on the left displays the user accounts on the system, listing their full name and what type of user account they have. If a username has an orange circle with a checkmark inside next to their name, it means that the user is logged in to the system.
There are four types of user accounts on Mac OS X Panther: Admin, Standard, Managed, or Simplified. The user type is determined by how the account is configured in the Security or Limitations panes:
Admin users are allowed to do pretty much anything they want on the system, as long as they provide the proper administrator’s password when prompted. You can grant a user Admin privileges by selecting the checkbox next to “Allow user to administer this computer” near the bottom of the Security pane.
Standard users are restricted somewhat from installing and updating the system software, as well as from changing vital settings on their system. Standard users have the No Limits button selected in the Limitations pane.
Managed users have the Some Limits button selected in the Limitations pane, and may be restricted from performing certain tasks, such as burning CDs and DVDs, or using certain applications and utilities.
Simplified users have the Simple Finder button selected in the Limitations pane, and are at the bottom of the rung among the class of users. They are restricted from every angle; they can’t use all of the System Preferences and can use only the applications found in a My Applications folder in the Dock.
Tip
If you are an Admin user, you can’t alter the settings for another user account while that user is logged in.
To add a new user account on the system, click on the plus sign
button (+) at the bottom of the accounts column on the left. To
delete a user account from the system, select the username in the
Accounts column, and click on the minus sign button (-). When
deleting a user account from the system, you have two options: you
can opt to immediately delete the user account and all the
information in her Home directory or you can package the contents of
her Home directory and place it in /Users/Deleted
Users.
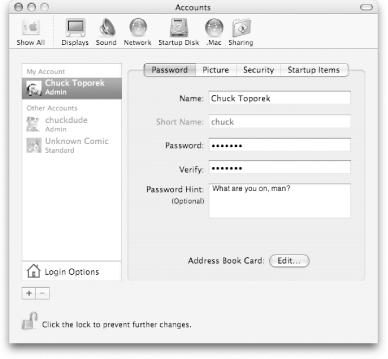
When a user is logged in, there are four tabbed panes he can select from to alter and change settings for his account:
- Password
This panel, shown in Figure 4-51, lists the user’s full name, short name, password, and password hint.
- Picture
This pane lets users select a picture that will be associated with the user account in the Login window; this picture is also attached to any emails they send with the Mail application. Users can select a picture from the collection Apple provides (stored in
/Library/User Pictures), or they can select one of their own by clicking on the Edit button.- Security
This pane lets users change the Master Password for the computer (if they have administrator privileges) and turn FileVault protection on or off for their Home directory.
- Startup Items
This pane lets users select applications to automatically launch at startup. For Mac OS 9 users, the Startup Items pane is similar to dragging an application alias to the
/System Folder/Startup Itemsfolder.The interface for the Startup Items pane is fairly self-explanatory. To add an item to launch or mount upon startup, you can drag an item from the Finder or click the plus sign button (+). To remove an item, select it with the mouse and click on the minus sign button (-). You can also specify the order in which the items will launch by dragging them up or down in the listing.
Clicking on the Login Options button at the bottom of the Accounts column on the left lets you manage login options for a multiuser Mac OS X system. The Login Options pane, shown in Figure 4-52, has the following options:
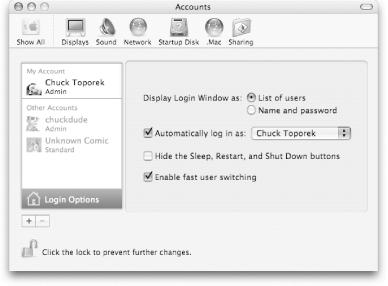
- Display Login Window as:
If you select “List of users,” users will see a list of the users for that system. All they need to do to log in is click on their name, enter their password, and press Return. If you select “Name and password,” users will be required to enter their username and password before they can log in.
- Automatically log in as:
If the checkbox next to this item is selected, the user whose name is selected in the pop-up menu is automatically logged in when the system starts up.
- Hide the Sleep, Restart, and Shut Down buttons
If this item is selected, these buttons will not show up in the login window.
- Enable fast user switching
If enabled, this option places the Accounts menu at the far right edge of the menu bar, which allows multiple users to log in to the same system without requiring another user to log off.
Tip
If your Mac supports Quartz Extreme, you will see the cube effect as you switch from one user’s Desktop to another; see Figure 10-5.
The Classic panel lets you manually start, stop, and configure the Classic environment that runs Mac OS 9 applications within Mac OS X. Use of the Classic panel is described in Chapter 3.
If you have administrator privileges, the Date & Time panel, shown in Figure 4-53, lets you set the system clock and time zone, as well as select an NTP (Network Time Protocol) server.
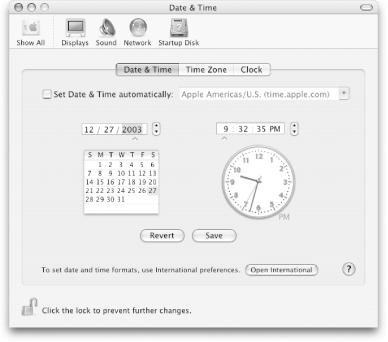
The Date & Time panel has four tabbed panes, described as follows:
- Date & Time
The Date & Time pane is where you set the date and time for your system. If you select the checkbox next to “Set Date & Time automatically,” you can use an NTP server to automatically set the date and time of your computer if it is connected to the Internet.
- Time Zone
The Time Zone pane provides you with a map of the continent you live in so you can select your time zone, either from the pull-down menu or by dragging the time-zone bar left or right.
- Clock
The Clock pane lets you determine whether the date and time will show up in the menu bar, as well as the manner they appear there. You can also opt to have your computer announce the time for you on the hour, half hour, and quarter hour.
The Software Update panel, shown in Figure 4-54, lets you contact servers at Apple to check for updates to Mac OS X system software, updates to security, and updates to the iApps.
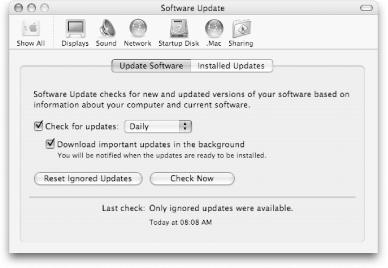
There are two tabbed panes for Software Update:
- Update Software
The Update Software pane checks for updates and configures your system to automatically check for updates (Daily, Weekly, or Monthly) when your system is connected to the Internet, and also to automatically download important updates (such as security patches) in the background. To check for available updates, click on the Check Now button.
- Installed Updates
The Installed Updates pane lists the updates you’ve installed on your system. This list is stored in
/Library/Logs/Software Update.log. You can view theSoftware Update.logfile by clicking on the Open as Log File button, which opens the log file in the Console application (/Applications/Utilities).
If Software Update detects an available update when you click on the Check Now button, a separate window pops up that shows the available updates (see Figure 4-55). To find more information about the update, click on its name; its description will appear in the text field below the listing of updates.
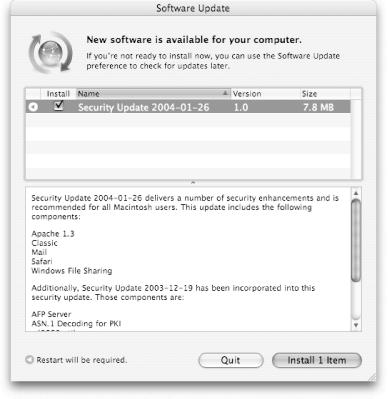
To install an available update, select the checkbox next to the package and click on the Install button (administrator privileges are required for most updates). Some other tips for using Software Update include the following:
If there is an update you want to install at a later time, unselect its checkbox and install the other updates (or quit Software Update with
 -Q). The next time you run Software Update, the
update you deferred will show up as an available update.
-Q). The next time you run Software Update, the
update you deferred will show up as an available update.If there is an update that you feel you will never install, such as a foreign language update, click on the update’s name and choose UpdateMake Inactive. The next time Software Update is run, that update won’t appear in the list of available updates. However, if you decide later that you do want to install it, you can do so by selecting UpdateMake Active.
To view a list of Inactive updates, go to UpdateShow Inactive Updates.
To save an update rather than install it (say, for archive purposes), place a checkmark in the box next to the update and then select UpdateDownload checked items to Desktop.
Apple maintains a listing of available updates for Mac OS X on their web site, http://www.apple.com/downloads/macosx/apple.
You can tell Software Update to immediately check for updates by holding down the Option key as you click its icon in the System Preferences window. Also, you can run
/usr/sbin/softwareupdatefrom the command line if you have a need (to apply an update remotely via SSH, for example).
The Speech panel lets you set the preferences regarding Apple’s speech recognition system, as well as the voice your Mac uses when reading text to you.
For more details about the Speech panel, see Section 4.3.
The Startup Disk panel lists the available icons for detected Mac OS X and Mac OS 9 system folders. This panel is used to select which operating system will boot when you start or restart your Mac.
Use of the Startup Disk panel is described in Chapter 3.
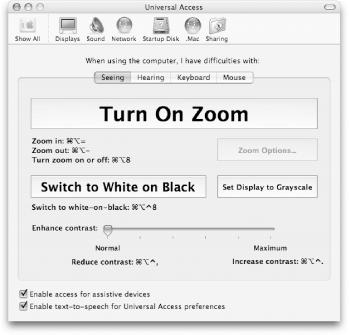
The Universal Access panel lets you activate and configure many options to make Mac OS X easier to use by persons with disabilities or physical limitations. There are four tabbed panes, described as follows:
- Seeing
The Seeing pane, shown in Figure 4-56, is used to control the display. It has three main functions, which are described in the following list.
Enable/disable the Zoom feature, which allows you to zoom in and out of the viewable display. When Zoom is enabled, clicking on the Zoom Options button gives you more control over the Zoom feature. There are slider controls for specifying the maximum and minimum zoom range, a checkbox for adding a preview rectangle to the display as a target area for zooming in, and an option for smoothing images.
The size of the preview rectangle is based on the Maximum Zoom setting, and takes the shape of your display. If you enable the preview rectangle, your mouse pointer is placed at the rectangle’s center. When you zoom in, the area defined by the preview rectangle is the focus of the display. The keyboard shortcuts for Zoom are shown in Table 4-3.
Switch the screen mode to White on Black, and vice versa (essentially giving the user a view that looks similar to a black-and-white film negative).
Set the display to grayscale (clicking the button a second time returns your display to full-color mode).
Increase or decrease the contrast of the display. Keyboard shortcuts for changing the contrast are Control-Option-
-. to
increase the contrast, and Control-Option--, to
decrease the contrast.
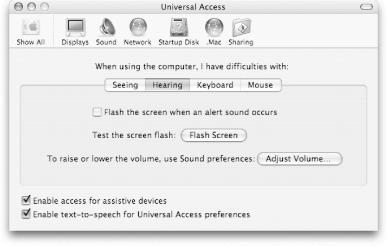
- Hearing
The Hearing pane, shown in Figure 4-57, offers a checkbox that, when activated, causes the screen to flash (with a single white pulse) instead of playing an alert sound.
Starting with Mac OS X 10.2.x, the display flashes (regardless of this setting) if the system tries to play an alert sound and the sound is muted, or if there is no sound output device connected to the Mac.
Clicking the Adjust Volume button changes the System Preferences window to the Sound panel, described earlier in this chapter in Section 4.2.2.
- Keyboard
The Keyboard pane, shown in Figure 4-58, assists users who have trouble pressing more than one key at a time, and/or have difficulty repeating keystrokes (e.g., if they tend to hold down on a key too long while pressing it).
There are two sections to the Keyboard pane: Sticky Keys and Slow Keys, described as follows:
- Sticky Keys
Switching on the Sticky Keys radio button causes Mac OS X to treat key combinations as individual key sequences. For example, the keyboard shortcut Option-
-W closes all open windows for
an application. Typically, these keys are pressed together, or you
can hold down Option- and then press W. However, with
Sticky Keys enabled, you can press these keys one at a time to invoke
the command.If you press a modifier key (Control, Shift, Option, or Command) twice, the key will be super-sticky, so that it remains active after you issue a key combination. This is useful when you want to use the same modifier key but invoke a different command; for example, when using Word, you might want to make some text bold (
-B) and italic (-I). Typing a modifier
key three times removes it from the current key
combination’s list of modifier keys. If you remove
all the modifier keys from the combination you are constructing, the
keyboard returns to its usual typing mode.- Slow Keys
These controls are an addendum to those found in the Keyboard & Mouse preferences panel (see Section 4.2.2). If you enable Slow Keys, the slider lets you set a delay between key presses. Using this feature along with the Keyboard preferences panel can reduce accidental letter repetition while typing.
Pressing the Set Key Repeat button opens the Keyboard preferences panel. In earlier versions of Mac OS X, this button was the only control available for Slow Keys.
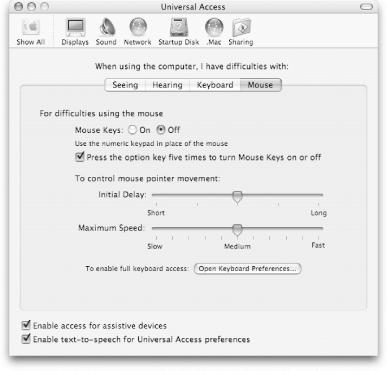
- Mouse
If you have trouble using the mouse, you can enable Mouse Keys via the Mouse pane (shown in Figure 4-59). Mouse Keys allows you to use your keyboard’s number pad instead of the mouse.
By holding down the number keys as detailed in Table 4-4, you can move the mouse pointer in eight different directions, and use the 5 and 0 (zero) keys as the mouse button. (Conversely, the keypad ceases to function as a device for typing numbers; you need to turn off Mouse Keys to enter numbers.)
Mouse Keys can come in handy if the Mac’s mouse breaks or goes missing. You may want to select the checkbox next to “Press the option key five times to turn Mouse Keys on or off”, even if you don’t normally use the Universal Access options regularly.
Get Mac OS X Panther in a Nutshell, 2nd Edition now with the O’Reilly learning platform.
O’Reilly members experience books, live events, courses curated by job role, and more from O’Reilly and nearly 200 top publishers.

