Chapter 2. Editing
This chapter describes several writing environments available for creating and modifying TeX documents. In practice, you can use almost any editing program you wish, but I'll focus on GNU emacs in this chapter. I've chosen GNU emacs for two reasons: it is a popular and very powerful editor available on many platforms (unix, NeXT, MS-DOS, OS/2, Macintosh, VMS, Amiga, $...$), and it has the most comprehensive TeX editing environment that I've ever seen. At the end of the chapter, I'll discuss several other editors for MS-DOS and OS/2 that also have TeX editing environments.
The sole requirement for a TeX editor is that it must save files in a flat, ASCII format without any additional formatting characters or special encodings. Word processors, such as Microsoft Word, usually add special formatting information to your document when they save it to disk. TeX will not understand this information, so you cannot use a word processor to edit TeX documents.[17]
A program that allows you to edit flat ASCII files is usually called an editor (as opposed to a word processor, for example). Choosing an editor is a remarkably personal decision. Computer programmers and other people who use editors every day frequently become very attached to a particular editor. This chapter explores a number of features that an editor can provide to make editing TeX documents easier. If possible, choose an editor that offers these features. In any event, make sure you choose an editor you will be comfortable using. You'll spend a lot of time using it.
Many editors have some sort of built-in programming language. The features described in this chapter rely on modifying the behavior of the editor with its programming language. This does not mean that you will have to do any programming. All of the editors discussed in this chapter have TeX editing environments already available. However, if you use another editor and it doesn't have a programming language, it's unlikely that these features will be available to you.
The next section explores some helpful editor features. All of the editors in this chapter provide some or all of the features discussed, and require little or no programming on your part.
What Can an Editor Do?
You will do most of your work with TeX in the editor. There are two ways that an editor can help you edit TeX documents. One is to provide typing shortcuts that are either intuitive replacements for cumbersome operations or quick ways of typing common TeX commands. The other way that an editor can help is by running TeX for you and automatically displaying the location of formatting errors in your document.
Quoting Automatically
Most typewriters and many word processors use the same symbol for opening and closing quotations. You are probably used to typing the double-quote key to insert quotation marks into your text. However, if you look carefully at TeX output (or any professionally typeset document) you will notice that the opening and closing quotation marks do not look the same. The proper way to type an opening quote (“) in TeX is with two single back-quotes in a row (``). A closing quote (”) is entered with two single quotes (apostrophes) in a row (''). This process is tedious and error-prone since you are used to typing something else.
If you accidentally use the double quote symbol in your input, you most frequently get text that looks like ”this.” The exact result is actually dependent upon the font you are using. This is explained in Chapter 5, Chapter 5. Most programmable editors can change the meaning of the double-quote key to insert the correct quotation marks.
If you are interested in programming your editor to do this, you can use the following algorithm to select the correct quotation marks most of the time: if the character to the immediate left of the cursor is a space, opening brace, parenthesis, or bracket, insert opening quotes; otherwise, insert closing quotes. As a further enhancement, double quotes should be inserted immediately following a backslash.
Matching Braces
Braces, as mentioned in Chapter 1, Chapter 1, are used by TeX to delimit sections of text; they appear often in TeX documents. GNU emacs, Multi-Edit, and Brief can all be programmed to highlight the matching open brace whenever you type a closing brace.
For example, if you have entered the text
\footnote{This is {\it not} the only case.}
and the next character that you type is }, the open brace immediately following the word \footnote is highlighted, or all of the text between that brace and the current cursor position is highlighted. This feature makes it easier to find places where you have forgotten to insert a closing brace.
If you usually work in “insert” mode, you may also find it convenient to have the editor insert braces in pairs and then insert text between them. This can be accomplished in almost any editor that can be programmed, even one that isn't equipped to handle brace matching.
Inserting Common Control Sequences
Most editors can be programmed to insert arbitrary text when a special key is pressed. This feature can be used to insert common control sequences. For example, you might have Alt-c insert the \chapter control sequence or Ctrl-e insert \begin{enumerate}.
Running TeX Automatically
One of the nicest features that an editor can provide is the ability to run TeX automatically without leaving the editor. This is a feature that programmers demand because it allows them to run compilers directly from the editor. Editors that provide this feature usually include some mechanism for programming the editor to locate the position of errors reported by the compiler. The editor searches for error messages in the output generated by the compiler, and it positions the cursor at the location of each error. This speeds up the traditional edit/compile/debug cycle of programming. You can take advantage of these features to shorten the edit/typeset/rewrite cycle of creating a TeX document.
All of the editors discussed in this chapter can easily be adapted to run TeX in this way. If you already have a favorite editor and want to add this functionality for TeX, see the section “the section called “Running TeX”” later in this chapter; it describes the process at a very general level.
GNU Emacs
This section describes the TeX modes distributed as part of GNU emacs. Emacs is one of the most popular and most powerful editors around. Distributed by the Free Software Foundation (FSF), GNU emacs is the de facto standard editor in many unix environments. Recently, GNU emacs has been ported to many other platforms, including MS-DOS (demacs), OS/2, Macintosh, VMS, Amiga, and NeXT.
This section and the following section on aucTeX assume that you are familiar with general emacs concepts. In particular, you should be familiar with the concepts of buffers, files, regions, command keys, editing modes, and prefix arguments. If you are unfamiliar with these concepts, you can learn about them in the online help, called Info pages, for GNU emacs. Info pages should be available by pressing Ctrl-H i in emacs. You can also consult a reference to GNU emacs, such as Learning GNU Emacs [or:emacs] for more information.
Customizing some of the features of GNU emacs requires familiarity with GNU emacs lisp, which is also described in the Info pages.
Starting TeX Mode
GNU emacs provides two similar TeX editing modes: one designed for editing Plain TeX documents (plain-tex-mode) and the other for editing LaTeX documents (latex-mode). The latex-mode is a superset of plain-tex-mode that provides additional shortcut keys for some LaTeX control sequences.
There are three ways to start TeX mode in GNU emacs:
| M-x tex-mode | Attempts to select the correct mode. |
| M-x plain-tex-mode | Always selects Plain TeX mode. |
| M-x latex-mode | Always selects LaTeX mode. |
If you use M-x tex-mode, emacs examines the top of the buffer in order to select the appropriate mode. If the control sequences \documentstyle or \begin{document} occur near the top of the buffer, latex-mode is selected; otherwise, the default mode is selected. The default mode is stored in the emacs lisp variable TeX-default-mode.
You can also tell emacs to invoke TeX mode automatically whenever you edit a file that has a name ending in .tex. To do so, add the following lines to your emacs startup file, usually called .emacs in your home directory:[18]
(setq auto-mode-alist (append '(("\\.tex$" . tex-mode))
                               auto-mode-alist))
Typing in Emacs
The emacs TeX modes change the meaning of several keys to provide features useful for editing TeX documents. These special key bindings apply only to buffers that you edit while emacs is in plain-tex-mode or latex-mode.
Automatic quotation, brace balancing in paragraphs, inserting brace pairs, skipping over unmatched braces, and closing open environments are supported.
Running TeX Automatically
When TeX typesets your document, it produces processing and error messages. By running TeX for you, emacs can capture these messages and display them in a window. You can use this feature to help locate and correct errors.
Functions that run TeX from inside the editor rely on emacs' ability to run a subshell. Some implementations of emacs, particularly implementations for MS-DOS, which is unable to run concurrent processes, cannot use this feature. aucTeX, a different editing environment for GNU emacs, does allow you to use these features with MS-DOS ports of GNU emacs. (aucTeX is described in the next section.)
GNU emacs supports processing of both buffers and regions. These modes don't locate errors for you automatically, but they do place the output from TeX in an emacs buffer so that you can find them yourself. Chapter 3, Chapter 3, describes how to interpret TeX output and find the location of errors.
aucTeX
This section provides an overview of aucTeX, a powerful emacs macro package for editing LaTeX documents. aucTeX is available on the CTAN archives in support/auctex. More detailed information about installing and customizing aucTeX can be found in the documentation distributed with the package.
aucTeX provides extensive support for editing TeX and LaTeX documents in emacs. It provides many more features than the ordinary GNU emacs TeX modes. Although useful for both Plain TeX and LaTeX documents, aucTeX is designed with the LaTeX user in mind.
aucTeX is a lot more complex than GNU emacs TeX mode. In fact, it is so complex that it may not be useful if you have a relatively slow computer.[19] On my machine,[20] aucTeX's performance leaves a lot to be desired. On the other hand, aucTeX is extensively configurable, and it is possible to streamline it quite a bit.
The descriptions that follow are for aucTeX version 8.0. The versions change frequently as new features are added. Consult the documentation which comes with aucTeX for a list of the new features that have been added since this book was published.
Starting aucTeX
The instructions provided with each release of aucTeX describe how to build and install the software so that aucTeX will automatically be invoked when you edit a file with a name ending in .tex.
If you think aucTeX is already installed on your system (because the emacs Info page for it is present, for example), ask your system administrator where it is installed. One common location is /usr/local/lib/emacs/site-lisp/auctex.
Adding the following line to your emacs startup file (typically .emacs in your home directory) will load aucTeX each time you start emacs:
(load-file "/path/for/auctex/tex-site.elc")
Typing in aucTeX
aucTeX provides a large number of typing shortcuts. Many of the keystroke shortcuts are designed specifically to aid in typing LaTeX documents. In addition to command keys, aucTeX provides another typing shortcut---command completion for LaTeX control sequences with C-c TAB.
If you type a backslash followed by the beginning of a control sequence name into a buffer and then type C-c TAB, aucTeX completes as much of the control sequence as possible. Every time aucTeX adds another letter to the control sequence name, it compares the resulting name to a configurable list of LaTeX control sequences. If it reaches a point where the control sequence could be continued in two different ways, it stops and displays all the possible completions. For example, there are two control sequences in standard LaTeX that begin with \re: \renewcommand and \renewenvironment.
If you type:
\re C-c TAB
aucTeX will insert new because that much of the control sequence name can be deduced from the known possibilities. This changes the text in your document to:
\renew
Because aucTeX cannot figure out which of the possibilities you want, it displays a list of the LaTeX commands that begin with \renew. You can complete the command by typing c or e and pressing C-c TAB again. If you want the \renewcommand function, type:
\renewcC-c TAB
Now, aucTeX will insert ommand and return to normal typing mode with the cursor positioned just after the control sequence name:
\renewcommand _
aucTeX has special support for LaTeX sectioning commands and environments, changing fonts, commenting out sections of a document, reformatting the input text, and entering mathematics.
TeX contains a lot of support for typesetting mathematics. In that spirit, aucTeX provides a minor mode[21] for entering mathematical formulae.
In mathematics minor mode, pressing ‘ changes the meaning of the next character you type. The next character is interpreted as an abbreviation for a mathematical symbol or function. For example, in aucTeX, typing
$ C-c ~ ‘ a ‘ < ‘ b $
inserts
$α \leq β$
into your document (which is typeset like this: α≤β).
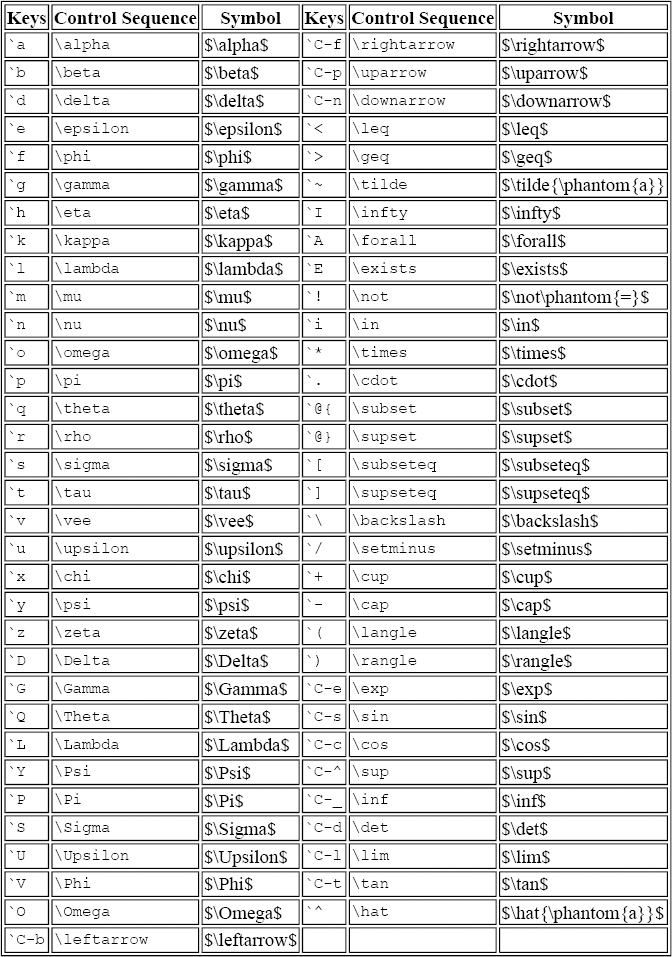
Table 2.1 lists all of the abbreviations. The first column of the table displays the shortcut keys. The second and third columns show the command inserted in your document and the typeset symbol, respectively.
Table 2.1. aucTeX Math Operators in Mathematics Minor-mode
Additional miscellaneous commands in aucTeX provide automatic quotation, completion of “items” in appropriate environments (itemize and enumeration environments, for example), and insertion of brace pairs and skeletal control sequences.
aucTeX Outline Mode
Outline mode is a convenient way to edit large documents. In outline mode, portions of the document that you are not editing are hidden from view. They aren't removed or deleted. Emacs indicates hidden text with ellipses.
For example, in a large document with many sections, you can use outline mode to hide all text except the section headings, and then selectively expand just the sections that you wish to edit.
Intelligent Paragraph Reformatting
aucTeX understands the TeX constructions for many kinds of environments (the list environments, for example) and performs paragraph reformatting within the restrictions of these environments. aucTeX won't concatenate a whole series of list items together into one huge paragraph, for example.
Multi-file Documents
It is often convenient to edit a large document in small pieces rather than in one huge file. For example, when writing a book, it is convenient to work on chapters independently and store them in different files. If you are working on a collaborative project, it may be absolutely necessary to separate the document into pieces.
The TeX \input command allows you to construct a driver file that automatically combines the individual files that make up your document when you run TeX. The driver file contains the document style options and other setup information for the whole document. Each chapter contains just the necessary text. When TeX encounters an \input command, it typesets all of the text in the specified file before continuing with the current document. Example 2.1 shows an example of a driver file.
Example 2.1. A Simple Driver File
\documentstyle[ora]{book}
\begin{document}
   \input{intro}
   \input{chap1}
   \input{chap2}
\end{document}
aucTeX provides seamless support for multi-file documents. In order to provide this support, aucTeX relies on the “file variables” feature of emacs, which allows you to associate editor variables with particular buffers. An editor variable is a named variable that is local to the current buffer and accessible by macro packages like aucTeX running under emacs. Look up file variables in your emacs reference for a more complete description. Example 2.2 shows some common local variables in aucTeX.
When you run TeX on a buffer, aucTeX looks for the editor variable TeX-master. If TeX-master is set to a filename, aucTeX runs TeX on that file instead of running it directly on the file you are editing. This is a tremendously useful feature because it means that you do not have to put macro definitions, document style options, and other setup information at the top of each chapter. Simply set the TeX-master variable in each chapter to name the driver file.
If you do not set the TeX-master variable, aucTeX will prompt you for it the first time you run a command. If the \documentstyle command occurs near the top of your document, aucTeX assumes that the current buffer is the master (because it contains setup information) and will not prompt you for a different master file.
Editor variables are defined by a “Local Variables” declaration at the bottom of your file. aucTeX inserts a Local Variables declaration automatically if it prompts you for a master file. Example 2.2 shows how local variables TeX-master and TeX-command-default can be set to driver.tex and LaTeX, respectively. Because these lines begin with a percent sign, they are considered comments by TeX and do not appear in the output. These should be the last lines in the file.
Example 2.2. Local Variables in an Emacs Buffer
% Local Variables:
% TeX-master: "driver.tex"
% TeX-command-default: "LaTeX"
% End:
Running TeX
Like GNU emacs TeX mode, aucTeX allows you to run TeX directly from within emacs as a subshell. Running a program inside emacs creates a process. You can have only one active process for each document, plus one process for TeXing a region. If you try to run two processes on the same document, aucTeX will ask for permission to kill the first before running the second. aucTeX supports the processing of both the documents and the regions of a document.
Finding Errors
No matter how much experience you have with TeX, some of the documents that you write will contain errors. aucTeX eases the burden of correcting these errors by locating them automatically in your document.
Multi-Edit
Multi-Edit is an editor for the MS-DOS environment. This section describes the text-based version of Multi-Edit. A Windows version is in the works, and it may exist by the time you read this.
Built to be a programmer's editor, Multi-Edit has a number of features designed to add language-specific intelligence to the editing environment. These features (template editing, a customizable spellchecker, and configurable brace matching) can be exploited for TeX as readily as for any programming language. For several years, at least since version 5.0, Multi-Edit has included support for TeX.
Setting Up TeX Support
Support for TeX is included as a language type in Multi-Edit. Language types are selected by filename extension; this means that you configure Multi-Edit to provide support for the “TeX language” whenever you edit files with the extension .tex (and other extensions if you choose).
Selecting the “Other/Install/Filename extensions...” menu displays a list of configured extensions. If TEX is not listed, press Insert to add it. You will see a screen like the one shown in Figure 2.1.
Figure 2.1. Extension setup in Multi-Edit
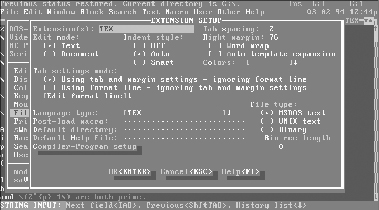
Customize the right margin, tab spacing, indent style, and colors to values that you find comfortable. The edit mode should be “text,” and the tab settings should be set to “use tab and margin settings, ignore format line.”
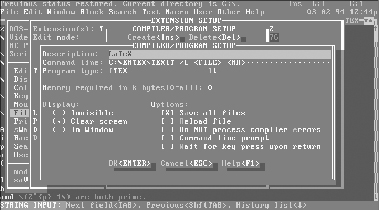
Select TEX as the language type, and add TeX as a compiler. One possible setting for TeX as a compiler (for LaTeX documents, in this case) is shown in Figure 2.2.
Figure 2.2. LaTeX as a compiler in Multi-Edit
Typing in Multi-Edit
Brace matching is provided automatically with Multi-Edit's template expansion support. Consult your Multi-Edit reference for more information about templates.
Multi-Edit language support does not include any TeX key bindings by default. However, the macros are provided, and you can install them with the “Other/Install/Key mapping...” menu. The following macros are available:
- tex^texquote inserts the appropriate quotation marks. This macro can be bound to ” to provide smart quoting.
- tex^texnquote inserts the literal double quote. It can be bound to Alt-, for example.
- tex^texreformat is a replacement for the reformat macro. If the filename extension is .tex, this macro reformats the paragraph with sensitivity to TeX macros. Otherwise it calls the default reformatting macro.
Running TeX
Running TeX within Multi-Edit is accomplished by specifying a compiler for TeX or LaTeX documents. In Figure 2.2, a batch file called TEXIT is being used as the compiler for documents with the extension .tex.
Automatic compilation and location of errors is provided by Multi-Edit language support when you have selected TEX as the language-type for .tex files.
Brief
Brief is a powerful programmer's editor recently acquired by Borland International. It is available for both DOS and OS/2 systems. Like the other editors discussed in this section, Brief offers a strong set of programming features, including the ability to run compilers automatically, and a flexible, C-like macro programming language that allows you to customize the editor.
There is a LaTeX editing environment for Brief in the CTAN archives. It includes multiple-language support (currently supporting Norwegian) and control-key shortcuts for many common LaTeX commands.
The installation and setup program includes instructions for defining program compilers. TeX can be defined to process files with particular extensions. Once again, it is a good idea to have the editor run a batch file so that the batch file can determine what format file to use when processing the document.
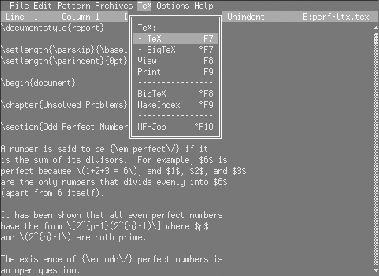
MicroEMACS
MicroEMACS is a powerful emacs-like editor for MS-DOS and Microsoft Windows.[22] Figure 2.3 shows an example of MicroEMACS editing a LaTeX document. In this case, the LaTeX extensions to MicroEMACS have been loaded, and “Help” is selected.
Figure 2.3. Editing a file with MicroEMACS

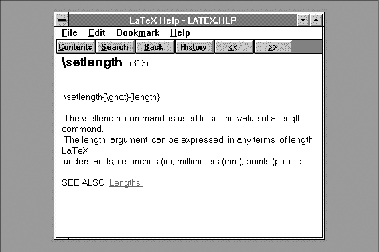
The online help for LaTeX is shown in Figure 2.4. This is a Microsoft Windows help file, available independently of MicroEMACS (although it is nicely integrated here).
Figure 2.4. Microsoft Windows online help for LaTeX
The MicroEMACS environment also has the ability to run other programs (including TeX to process documents) and process the error output to aid in locating errors.
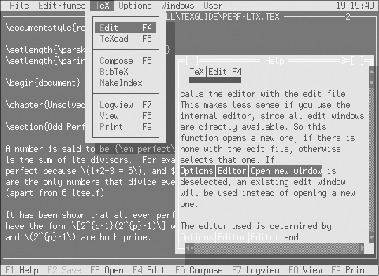
epm: OS/2's Enhanced Editor
epm, the enhanced editor for OS/2, can be used to edit TeX documents. The epmtex package adds a TeX item to the menu bar as shown in Figure 2.5.
Figure 2.5. Editing a TeX document with epm under OS/2
Other Tools
There are many other editors that can be effective tools for editing TeX documents. Some of the editors that you might want to consider are Jove, an emacs-like editor; Xnot, a Windows port of emacs; LSedit, the VMS language-sensitive editor; and Alpha and BBedit, two Macintosh editors described in Chapter 15, Chapter 15.
There are also a number of tools designed specifically for editing TeX documents. Scientific Word, a commercial environment, is described in Chapter 14, Chapter 14. Several free tools (MathPad, Doc, and XTeXShell, for example) also exist, although none were available[23] in time for review in this edition of Making TeX Work.
Another helpful tool is LaCheck, a LaTeX syntax checker. LaCheck attempts to find and identify problems with your document that will cause it to format incorrectly. It runs much more quickly than TeX over a long document and may identify some things (like
missing italic correction) that are potentially incorrect, even though they are not errors that will prevent the document from formatting.
TeX as a Compiler
This section discusses how to use TeX like a compiler from within your editor, and it is rather technical. You should read this section before you attempt to program your own editor to run TeX (if it doesn't already include support for TeX). You may not be interested in this material if you aren't planning to do that programming yourself. More details on the types of TeX output used in this section can be found in Chapter 3, Chapter 3.
Many editors can run a compiler, capture the error messages that the compiler produces, and walk through the source file highlighting each error. Most editors with this functionality can run TeX as a “compiler” for documents.
The discussion that follows is at a very abstract level. The details vary so much from one editor to the next that presenting more detail only confuses the issue further. To implement this feature, you'll need to read your editor reference carefully, and probably experiment on your own a little bit.
Processing a Document
Establish the TeX program as a compiler using whatever features your editor provides to set up a compiler. Experiment with your editor until you can process an error-free document.
After you have everything working, it may be desirable to modify the compiler to run a batch file or shell script instead of invoking the TeX program directly. This will allow you to program the shell script so that it can determine which format file to use.
Running TeX is only the first step. Next, you have to interpret the error messages that TeX produces. As a concrete example, Example 2.3 shows some contrived output which demonstrates an “undefined control sequence” error on line 6 of the file wilma.tex.
Example 2.3. A Contrived Error
This is TeX version 3.141...
** (flintstone.tex
some
messages [1]
(fred.tex [2]
some more
messages
[3] ) (wilma.tex [4]
! Undefined control sequence.
the dog \dino
              tipped over the car.
l.6 the dog \dino tipped over the car.
Here are some suggestions for attacking the problem of programming your favorite editor to process TeX error messages:
Using the log file
Don't worry about capturing the error messages that TeX produces. It is much easier to get the information from the log file. Log files are described in the section called “the section called “Log Files”” in Chapter 3, Chapter 3.
Finding error messages
Any line in the log file that begins with an exclamation point is an error message. In Example 2.3, the line that begins
! Undefined control sequence.
is an example of an error message.
Finding the source line
Following the error message, TeX shows the context in which the error occurred. After that, the line that begins with l.nnn (where nnn is some decimal number) identifies the line of the input file that TeX was processing when the error occurred (in Example 2.3, TeX was on line 6 when the error occurred).
Finding the source file
When processing a document that uses the \input command to include other files, there is no guaranteed method of finding out the name of the file TeX was processing when the error occurred. Whenever TeX starts processing a file, it prints an open parenthesis followed by the name of the file. When it finishes processing the document, it prints a close parenthesis.[24] So the following algorithm usually identifies what file the error occurred in:
Beginning at the line in the log file that announces the error message (the line beginning with “!”), search backwards for the first unmatched open parenthesis. The word following that open parenthesis is probably the name of the file TeX was processing when the error occurred.
Ignoring errors
When you run TeX “by hand,” you want TeX to stop and report errors to you as they occur in your document. But if your editor is going to handle any errors that occur, it is inconvenient to have TeX stop and ask questions. In fact, it may not be possible to run TeX from your editor in a way that makes it even feasible for TeX to stop and ask questions. You can use several built-in control sequences to control the way TeX responds to errors. They are summarized in Table 2.2.
Table 2.2. TeX Modes of Interaction
| Mode | TeX's Behavior |
| \errorstopmode | Stop on errors (the default behavior) |
| \scrollmode | Scroll errors, stop on missing files |
| \nonstopmode | Scroll errors and missing files |
| \batchmode | Scroll both and don't summarize on screen |
One common way of invoking TeX from an editor to process a document is to use the command:
tex \nonstopmode \input flintstone
This uses the features discussed in the section “the section called “The Command Line”” in Chapter 3 to pass a command to TeX on the command line. In this case, the command tells TeX not to stop on any kind of error.
Handling other errors
When searching for errors in the log file, you may find it helpful to search for lines that begin with the words “Overfull box” or “Underfull box” as well as lines that begin with an exclamation point. Because TeX does not print the l.nnn form of line-number message in this case, you will have to look for the line numbers in the warning message.
Overfull box messages have the form:
Overfull box (99.9pt too wide) in paragraph at lines n--m
The box will be either hbox, indicating that something is too wide, or vbox indicating that something is too tall or too deep. The distance, 99.9pt, indicates how badly the box is overfull, and n is the first line of the paragraph in which the error occurs. Underfull box messages are the same, except that they begin with the word “Underfull.”
There are several control sequences that you can use to control how sensitive TeX is to “bad” boxes. Any good TeX reference will discuss these parameters in detail.
Spellchecking
Checking for spelling mistakes is an important part of any document creation process. Checking TeX documents is difficult because these documents contain control sequences that aren't words in the traditional sense.
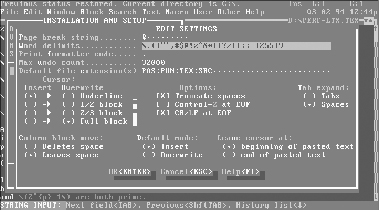
Some editors offer ways of customizing the spellchecker. Multi-Edit, for example, allows you to indicate that any word beginning with a backslash should be ignored for the purpose of spellchecking. Figure 2.6 shows the “Other/Install/Edit Settings...” dialog where word delimiters are controlled. This simple customization goes a long way towards making spellchecking tolerable.
External spellcheckers, such as the ones described here, can also frequently be customized to ignore TeX control sequences.
Figure 2.6. Edit settings control word delimiters
ispell
ispell is a common unix spellchecker. In addition to being available from the shell prompt, GNU emacs includes an ispell-mode that handles TeX documents intelligently.
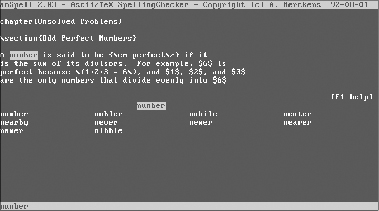
amSpell
amSpell is an MS-DOS spellchecker that includes special support for TeX documents. When spellchecking a TeX document, amSpell ignores all TeX control sequences, as well as mathematics and the arguments to reference and citation commands. The standard accent primitives are also recognized, and amSpell can identify and correct misspellings in words that use them.
An example of amSpell checking a document is shown in Figure 2.7.
Figure 2.7. Spellchecking a document with amSpell
Revision Control
Revision control allows you to track modifications to a file. It is frequently associated with programming where the ability to find and correct bugs relies on being able to recreate a problem exactly. It can be just as useful for writers wishing to keep track of changes to an evolving document. For example, I use revision control to keep track of which versions of each chapter my editor has seen.
One of the most common revision control systems is RCS, which was derived from SCCS, a commercial package. RCS is freely available under the GNU license. It is possible to use RCS under unix, MS-DOS, and OS/2.
The TeX macros shown in Example 2.4 can be used to include RCS information as marginal notes in a document. The marginal notes in this example are printed only when a draft is being produced.
These macros are my own, you will find others in the CTAN archives in the directory macros/latex/contrib/misc.
Example 2.4. Revision Control Macros for TeX Documents Using RCS}
%%%%%%%%%%%%%%%%%%%%%%%%%%%%%%%%%%%%%%%
% RCS definitions...
\newif\ifdraft
\def\RCSID$#1${
  \ifdraft{\tolerance=100000
           \hbadness=100000
           \raggedright
           \marginpar{\tiny Draft #1}}
           \typeout{Draft #1}
  \else\typeout{Production run #1}\fi
}

\def\RCSmargid$#1: #2 #3 #4 #5 #6 #7${
% #1 = "Id"
% #2 = filename
% #3 = vers
% #4 = date
% #5 = time
% #6 = author
% #7 = state [locker]
  \ifdraft
    \setbox0=\hbox to 0pt{
        \tolerance=100000
        \hbadness=100000
        \parbox{4in}{
          \rm\tiny #2\\ #3\\ #4}
        \hss}
    \marginpar{\box0}
    \typeout{Draft Id: #2 #3 #4 #5 #6 #7}
  \fi
}
TeX Shells
The iterative nature of TeX (edit, TeX, BibTeX, make indexes, preview, repeat) can be tedious to perform by hand. As a result, several TeX “shells” have been developed which provide a more automatic interface to many aspects of the TeX process. Several of these packages are described below. In everyday use, they make TeX much more user friendly.
TeXShell
TeXShell was designed as an add-on for emTeX (it installs directly into the emTeX directory hierarchy). This character-based interface is available for both MS-DOS and OS/2. TeXShell provides an editor, a complete help system, and fully customizable push-button access to TeX. An example of the TeXShell interface is shown in Figure 2.8. The default TeX menu and help windows are shown.
TeXPert
TeXPert is a character-based shell for TeX. MS-DOS and OS/2 versions of TeXPert are available in either German or English. The default configuration files for TeXPert are designed to work with emTeX, but TeXPert does not install directly into the emTeX directory heirarchy. The TeXPert interface is shown in Figure 2.9.
TeXPert provides an editor, an archive tool for speedy access to commonly used files, and an interface to grep for quickly scanning files. The exact look and feel of TeXPert can be customized.
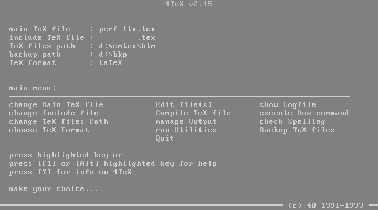
4TeX
The 4TeX system uses the 4DOS extended batch language and a number of utilities to integrate emTeX with a wide variety of free, shareware, and commercial tools. The system is well documented in a manual that describes installation, setup, use, and customization. The 4TeX interface is shown in Figure 2.10.
PMTeX
PMTeX is an OS/2 presentation manager program. Although it does not provide a built-in editor, it can control four independent DOS and OS/2 sessions, one each for editing, TeX processing, previewing, and printing. The options passed to each program can be controlled from the PMTeX Options menu.
PMTeX was designed to work with emTeX, but can be configured to use any TeX system. PMTeX was also designed to support two preprocessors for phonetic transcription: the TeuTeX-P and ALDTeX-P scanners. These scanners are useful in dialectology and are available separately from PMTeX's author.
A example of the PMTeX interface is shown in Figure 2.11. Note that the menu bar is very wide and does not fit in a standard 640x480 VGA window.

TeXit
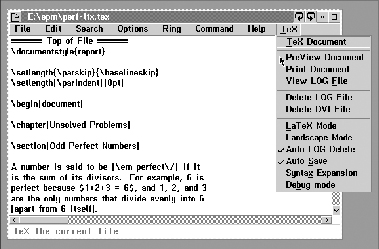
The TeXit shell (which I wrote) is much less ambitious in many ways. Written entirely in Perl, TeXit does not offer a full screen interface or an editor at all. Instead, it provides a simple menu of choices as shown in Figure 2.12 (all of the menu choices are completely customizable).
Processing: ./driver.tex
Again? [?]status, [T]eX & View, [b]ibtex, [c]leanup,
       [e]dit a file, [p]rint, [q]uery printer, [t]ex,
       [v]iew, e[x]it:
One of TeXit's strengths is its ability to parse the log file created by TeX and to determine when additional actions are required. For example, TeXit will recognize when a document contains unresolved references and citations and can automatically run BibTeX and repeatedly run TeX to resolve the references. With the addition of a few “user specified” rules in the document, TeXit can easily handle index construction and other more sophisticated relationships.
[17] Most word processors can be coerced into saving your document in plain text. If your word processor can do this, you may be able to edit TeX documents with it.
[18] On file systems that don't allow filenames to begin with a period, the name frequently begins with an underscore instead.
[19] That's one of the reasons that the regular GNU emacs TeX modes are described first.
[20] A 16MHz 386SX machine with only 8Mb of memory struggling to run GNU emacs under OS/2. ;-)
[21] A minor mode is a kind of editing environment provided by GNU emacs. If you are unfamiliar with minor modes, consult your emacs reference.
[22] There are two versions of the program; the one discussed here is the version for Windows.
[23] Or known to me, anyway.
[24] Unfortunately, parentheses can occur in the log file for other reasons.
Get Making TeX Work now with the O’Reilly learning platform.
O’Reilly members experience books, live events, courses curated by job role, and more from O’Reilly and nearly 200 top publishers.

