Chapter 6. Pictures and Figures
Pictures and figures are an important component of many documents. This chapter explores how they can be incorporated into your TeX documents. There are many ways to include pictures and figures in TeX. The most important considerations are the type of image, the type of printer you will be using, what platform you are using, and how portable the document must be.
Different Kinds of Images
Images come from many, many different sources, but they can be divided into two broad classes: bitmapped and scalable (or vector). Bitmapped images are produced whenever an image is scanned from a drawing, photograph, or other printed work. They are also produced by most simple paint programs. Scalable images are produced by some more sophisticated drawing programs, many commercial sources, and some other applications. Both classes have advantages and disadvantages.
Files that contain graphic images usually end with an extension that identifies the format of the image. The extension is a common and convenient nickname for the image format. In this chapter, I refer to graphic image formats by their extension (for example, GIF images or XBM images) without explanation. I do this partly because it is easy, but also because it is the most common way of referring to them, and you don't really need to know anything about the image formats to use them. If your DVI driver understands PCX images, you just need a PCX image; you don't have to have a detailed understanding of the format (thank goodness). If you want to know more, refer to the filename extension glossary in Appendix A, which will help you identify each of the formats discussed in this chapter.
Bitmapped Images
Photographs and images with a lot of subtle detail are almost always stored as bitmaps. Scanners always produce bitmapped images. Some bitmap images can be converted into scalable formats. High-end graphic packages like \product{CorelDRAW} and \product{\idx{Adobe Illustrator}} can do this, but most cannot. The exceptions are line drawings and other very high contrast images. Bitmaps are also “cheap” to print. Neither the computer nor the printer must do very much work to print a black-and-white bitmap image. (Color bitmap images must be dithered before they can be printed, but that's a separate consideration because it need be done only once, not every time the image is printed.) Bitmapped images are also easy to convert from one format to another.
Unfortunately, bitmap images are very device-dependent. They are stored as a two-dimensional array of dots, which gives them a fixed resolution. A $3\times5$-inch bitmap image that prints correctly on your 300dpi laser printer will only be a $\frac{3}{4}\times1\frac{1}{4}$-inch picture if you make your final copy on a 1200dpi photo-typesetter.
Bitmap images also require considerable memory and disk space to store. The $3\times5$ image described above requires more than 150Kb of memory (if it is uncompressed).
A final consideration is that bitmap images do not scale very well. Enlarging or reducing the image requires either removing some dots (causing a loss of detail) or inserting extra dots (frequently giving slanted lines a very jagged appearance). Rescaling images by exact integer amounts (doubling or tripling its size, for example, but not making it 2$\frac{1}{2}$ times as large) works reasonably well (except for jagged edges). Shaded regions, which are composed of a regular pattern of black and white dots, are frequently disrupted by irregular “blotching” if non-integral scaling is used.
Scalable Images
Many graphic images can be represented more compactly as a collection of lines, curves, and other discrete elements. Images of this type are called scalable or vector images. Instead of storing every pixel in a rectangular array, vector images store the encoded instructions for “drawing” the image. This provides a compact representation. A circle, no matter how large, can be represented with just a few data points: the position of the center, the radius, the width and color of the line that forms the circle, and the pattern that fills the circle. It is also easy to change the size of the image; if you halve every measurement, the image is drawn at one half the size with minimal loss of detail.
One drawback of scalable images is that they require considerable computational power to render. Every printer ultimately prints the page as a large bitmap; the print engine has to translate the lines, curves, and fills of a scalable image into a bitmap before this is possible.[79] Previewing scalable images requires translating them into bitmaps to display them. This can be a noticeably slow process unless you have a very fast computer.
The other significant drawback of scalable images is that they are difficult to translate from one format to another. For example, to translate a PostScript image into something that can be printed on a non-PostScript printer, you have to have a program that understands all of the commands in the PostScript file. A bitmap conversion, on the other hand, doesn't require any understanding of graphics commands; it simply has to know how to rearrange the bits in the array. What it boils down to is this: it's a lot easier to write a translation program to “reverse the order of all the bits in each byte in each row” than it is to write one that can “draw the bezier curve with these three control points using a dashed, light-blue line $\frac{1}{8}$ of an inch wide.”
Device Independence Revisited
Pictures and figures are a foreign concept to TeX. Remember, TeX cares only about building pages out of boxes and glue. TeX's notion of a picture is frequently nothing more than “something special goes here (I don't know what) and it's 5 inches wide, 2 inches high, and 1 inch deep.” This is device independence, of a sort, but many of the easiest ways to include pictures and figures in TeX do rely on features of a specific DVI driver or a specific kind of printer. If document portability is an issue, consider carefully before you select a particular way of including pictures and figures.
On the bright side, most DVI drivers provide some mechanism for incorporating pictures and figures. As long as it is possible to convert the images from the format originally used to a format that another DVI driver understands, document portability can be achieved. For example, it is possible to print PostScript figures on a non-PostScript device if they are first converted into another format with Ghostscript or some other PostScript interpreter. Unfortunately, it is usually inconvenient to convert pictures from one format to another, and some conversions may distort the images a little bit (or a lot).
Using Only TeX
This section describes picture and figure environments that don't use any external programs. Graphics created in this way are entirely device-independent and can be printed with any DVI driver.
Plain TeX
Plain TeX has no built-in provision for creating pictures or figures. It is possible to do simple diagrams and graphs by writing macros that place individual points on the page. Figure 6.1 shows several data points plotted in Plain TeX. The input was derived from macros presented in Appendix D of The TeXbook [kn:texbook]; it is shown in Example 6.1.
Figure 6.1. An example diagram in Plain TeX
FIXME:
Example 6.1. The Input for the Plain TeX Diagram
With special-purpose fonts, it is possible to make more complex figures in Plain TeX. However, LaTeX provides a picture environment which greatly simplifies the process.
LaTeX
The picture environment in LaTeX is implemented on top of the kinds of primitive operations shown in Example 6.1. Working in the picture environment is a lot like working on graph paper: you begin by specifing how big the graph paper is and the distance between lines on the paper (the lines aren't really there; they're just used for reference), and then inside the picture environment, you put picture elements down on the page at the intersections of the lines on the grid.
LaTeX provides picture elements for text, boxes, solid and empty circles, lines, and arrows. Lines and arrows can be drawn at angles, but they are formed by taking characters from a special set of fonts so there is a limited number of angles available. The advantage of using special fonts to draw the lines is that it is relatively efficient.
Figure 6.2 is a simple figure drawn with LaTeX's picture environment. The LaTeX input for this environment is shown in Example 6.2.
Figure 6.2. A parallelogram in LaTeX
Example 6.2. The LaTeX Input for Figure 6.2
The epic and eepic styles
Constructing diagrams using picture primitives is very tedious because each element of the picture has to be placed individually. The epic style extends LaTeX's picture environment by adding several higher-level commands for picture construction. These commands allow you to draw solid, dotted, and dashed lines with arbitrary slopes, create matrices and grids with a single command, join several independently placed elements together, and read a list of points from an external file.
The diagrams produced by epic.sty are still limited by the fonts available to LaTeX. The eepic.sty extends epic.sty by using \special commands to construct the more complex figure elements. The \special commands are the same as those used by tpic (see the “the section called “MetaFont”” section in this chapter) and are supported by many DVI drivers.
Figure 6.3 shows a figure constructed with the epic macros. Figure 6.3 (a) uses epic.sty, and (b) uses eepic.sty. Notice that eepic.sty provides circles of arbitrary size and smooth lines at any angle. The end points of the radial lines in this figure were calculated by another program and read from a data file by epic. The source for these figures is shown in Example 6.3 (both diagrams were created with the same source).
Example 6.3. The epic Input for Figure 6.3
Figure 6.3. A figure created with (a) epic, and (b) eepic
The bezier style
The bezier style allows you to construct curved lines in the LaTeX picture environment. An example is shown in Figure 6.4. Its source is shown in Example 6.4. The grid in this example was created with epic for convenience.
Example 6.4. The Input for Figure 6.4
Figure 6.4. Several bezier curves created with the LaTeX bezier style
Other styles
In addition to these styles, there are several other style files for doing particular types of drawing. Styles exist for drawing logical circuit diagrams, bar charts, trees, and more.
Other approaches
Because constructing LaTeX drawing by hand is tedious, several programs have been written that allow you to construct diagrams visually and then produce the appropriate picture environments automatically. The texcad program distributed with emTeX is one such program. A similar program called xtexcad runs under X11 on some platforms, and there is a Fig translator for the LaTeX picture environment. (For more information about Fig, see the “the section called “The epic and eepic styles”” section later in this chapter.)
PiCTeX
PiCTeX is a macro package that you can load on top of Plain TeX or LaTeX. [80] It does an amazing job of plotting mathematical functions and two-dimensional graphs directly in TeX. An example of PiCTeX (taken from The PiCTeX Manual [mw:pictex]) is shown in Figure 6.5. The source for this figure is shown in Example 6.5.
Figure 6.5. Sample diagrams using PiCTeX
Example 6.5. PiCTeX Input for Figure 6.5
The primary drawback of PiCTeX is that it requires a considerable amount of memory to use. Even relatively simple looking graphs require a big TeX to plot with PiCTeX. PiCTeX also produces very, very large DVI files (the graphs are drawn by interpreting and plotting each pixel individually). This usually results in very large output files from the DVI driver, and some printers may have difficulty printing your documents.
The PiCTeX macros are freely available, but the manual is not. You can purchase the manual directly from the author of PiCTeX or from the TeX User's Group.
XYPic
XYPic is another add-on macro package for TeX, LaTeX, and other formats. It provides considerably more flexibility than the LaTeX picture environment without resorting to the resource-expensive strategy of PiCTeX.
XYPic provides many more arrows than LaTeX (including curved and self-pointing forms), a wider variety of dashed and dotted lines, provision for lines that bend and go around \linebreak
other picture elements, and annotations for lines and arrows. It seems especially well suited to typesetting commutative diagrams, simple state-transition diagrams, and complex annotated matrices.
The syntax used in XYPic diagrams is not as straightforward as LaTeX's picture environment. An example of a complex XYPic diagram is shown in Figure 6.6. The corresponding source is shown in Example 6.6.
Example 6.6. The XYPic Input for Figure 6.6
DraTeX
DraTeX is a macro package that can be loaded on top of Plain TeX or LaTeX and provides many sophisticated drawing features. An example is shown in Figure 6.7. The source is in Example 6.7.
Example 6.7. The DraTeX Input for Figure 6.7
DraTeX offers a wide variety of low-level drawing commands: straight lines at arbitrary angles, circles of any size, bezier curves, rectangular or polar coordinate systems, perspective for three-dimensional figures, user-definable shading patterns, clipping, repetition, and user-definable drawing objects and commands. A supporting package, AlDraTeX, provides high-level drawing commands for pie charts, XY charts, bar charts, spread diagrams, grid diagrams, trees, and diagram annotations (arrows, edges, labels).
Although it is a flexible and portable solution, beware that complex figures may require considerable time to compute and will almost certainly require a big TeX. The resulting DVI files tend to be large as well.
DraTeX and AlDraTeX are described in TeX & LaTeX: Drawing and Literate Programming [eg:dratex].
Using a Little Help
On most platforms, if you have TeX, MetaFont is available. Because MetaFont was designed for drawing, it has much better support for pictures and figures than TeX. There are three utilities that allow you to combine TeX and MetaFont to create pictures: MFPic and Fig2MF.
MFPic
MFPic's picture environment and LaTeX's picture environment are implemented very differently. The commands in MFPic don't attempt to typeset your diagram with special fonts; instead, they write MetaFont commands to another file. This file must be processed with MetaFont before your document can be viewed.
Because MetaFont is used to draw the actual diagram, the MFPic macros are much more flexible than the LaTeX picture creation commands. MFPic macros provide lines (at any angle), rectangles, polygons, circles (of any size), ellipses, cyclic and acyclic curves, arcs, and wedges (all empty, shaded, or filled).
Unlike Fig2MF, described below, MFPic can plot user-specified functions (parametrically or directly, using polygonal or bezier interpolation).
Finally, because MFPic works so directly with TeX, it can include labels and captions in the figure as well as allowing “MetaFont hackers” to insert MetaFont code directly.
Fig2MF
The “Fig” in Fig2MF stands for the Fig graphics code (in this case, Fig version 2.1). Fig is a device-independent way of representing figures. Like TeX DVI files, Fig graphics are always translated into a device-dependent form before they are printed. Fig2MF translates Fig graphics into MetaFont code, which can be rendered into a font that is usable by TeX on any platform.
At present, there are a few limitations on Fig2MF: text objects are ignored, and arrowed and non-solid line styles are not supported. The advantage of Fig2MF is that very good interactive drawing programs, like xfig, can be used to create figures.
MetaFont
If the idea of programming directly in MetaFont is appealing to you, start by reading “Simple Drawings in MetaFont” [zw:simple]. This is a short document (freely available) that describes how simple drawings can easily be rendered directly in MetaFont.
In order to use MetaFont creatively, The \MF{}book [kn:mfbook] is really a necessity, but you can get a feel for the picture creation process in MetaFont without it.
Using a Little More Help
A couple of TeX macro packages combine the convenience of using only TeX commands to produce pictures and figures with the power of PostScript. Using these macros makes your documents less portable because they rely on a PostScript printer or PostScript interpreter to be printed.
PSTricks
The PSTricks macro package is a TeX-PostScript hybrid. The advantage of this approach is that PSTricks is able to provide much wider functionality than the preceding packages without leaving TeX. The disadvantage is that it makes your documents dependent on a PostScript printer.
One of the neatest features of PSTricks is the ability to interact with other TeX objects. You can add PostScript annotations (curved lines, labels, etc.) to the entries in a table, for example, or point to other elements on the page.
In addition to allowing you to insert essentially arbitrary PostScript commands directly into your document, PSTricks provides TeX macros for most common picture elements including: commands for curved and straight lines (at arbitrary angles), a wide variety of arrow heads and tails, pattern-filled regions, regular and irregular polygonal shapes, text scaling and rotation, and grids.
TeXdraw
TeXdraw, like \product{\PSTricks}, provides support for pictures and figures by relying on a PostScript back end.
TeXdraw is organized into a toolbox of simple routines from which more complex commands can be constructed. The TeXdraw manual [pk:texdraw] includes several examples of how complex commands can be built from toolbox routines.
tpic
The “pic” drawing language was designed for troff documents. The tpic program interprets pic drawings and produces TeX output to render them. The output relies on a set of \special commands, which must be implemented by the DVI driver to actually produce the output. The tpic \specials are implemented by many DVI drivers.
Using a Lot of Help
Although many nice effects can be achieved directly in TeX or with MetaFont, you will probably want to include some other form of image (e.g., an encapsulated PostScript figure or a scanned photograph) in a TeX document eventually.
There are a myriad of choices when this occurs. To a large extent, the options available depend on the kind of printer you have, which DVI drivers you use, and to what extent you are willing to sacrifice device independence.
Electronic Cut-and-paste
Documents that require complex graphics may be difficult to produce as a single TeX document. You may exceed the memory limitations of your version of TeX if you try to put too many figures on a given page, or you may wish to include graphics from incompatible macro packages (suppose you are using the Lollipop format for example, and you want to include a LaTeX picture).
You can always leave blank space in your document, print the graphic on a separate page, and then combine the two pages with scissors, glue, and a photocopy machine. However, there are many times when this is inappropriate (not to mention the aesthetic sensibilities it may disturb).
Another solution is to use a program that can perform cut-and-paste operations on the output files before they are printed. If you use Plain TeX or LamSTeX, one option is DVIpaste. DVIpaste can insert parts of one DVI file into another. It is part of the LamSTeX distribution. The documentation for DVIpaste contains a good example of its use. Unfortunately, DVIpaste relies on macros that are incompatible with most other macro packages.
Some DVI drivers like dvimsp, [81] which comes with emTeX, can translate DVI files into bitmapped images that can then be incorporated into your document directly. Figures Figure 4.11, Figure 4.13, and Figure 4.15 in Chapter 4, Chapter 4, were inserted into this book using dvidot.
Scalable Image Formats
Several of the most commonly encountered scalable image formats are PostScript (usually encapsulated), HPGL (Hewlett-Packard's Plotter language), DXF (Autocad's vector format), and the Fig graphics language. PostScript and HPGL are used by specific printers and plotters, DXF files are created by many computer-aided design programs, and Fig is a graphic language understood by several free editing tools---it is always converted into something else before it is printed. Many programs that can edit scalable images have their own vendor-specific formats. Luckily, these programs can usually produce PostScript or HPGL output as well.
PostScript images are the most commonly encountered scalable images. Drawing packages that output PostScript generally produce encapsulated PostScript (EPS). Similarly, most PostScript clip-art is distributed in EPS format. Encapsulated PostScript is a subset of the PostScript language. One of the most important features of EPS images is a bounding box. The bounding box identifies the size of the EPS image. This information is used to determine the scaling factor required to get an image of the correct size.
Generic PostScript can sometimes be converted into encapsulated PostScript. For example, the ps2epsi program that comes with Ghostscript attempts to convert generic PostScript into encapsulated PostScript.
Some software produces reasonable PostScript figures, but fails to include the bounding box. For those situations, the bbfig program that comes with dvips may help. bbfig uses the printer to calculate a bounding box that you can insert into the figure. After you have printed the figure, you can construct a bounding box by hand, if necessary (sometimes bbfig gets confused). Simply measure the height and width of the figure and its position on the page (measured from the bottom-left corner). The bounding box is a rectangle measured from the lower-left corner of the figure to the upper-right corner. An example is shown in Figure 6.8.
Figure 6.8. A PostScript bounding box example
The bounding box is measured in PostScript points. There are 72 PostScript points to the inch, so the image in Figure 6.8 has the following bounding box:
<!-- %BoundingBox: 115.2 180 468 626.4 -->
If you are printing your document on a PostScript printer, you will find that PostScript images are easy to handle; every PostScript DVI driver that I have seen allows you to incorporate encapsulated PostScript with one or more \special commands. The section “the section called “Bitmapped Image Formats”” later in this chapter describes two ways of incorporating encapsulated PostScript images into Plain TeX or LaTeX documents for printing on a PostScript printer.
PostScript output on non-PostScript devices is much more difficult, although it can be achieved with a PostScript interpreter like Ghostscript.[82] For a detailed description of how PostScript images can be converted into another format with Ghostscript, see the “the section called “Image Magick”” section later in this chapter.
Hewlett-Packard HPGL is the plotter language developed by HP for its line of pen-based plotting devices. Many computer-aided design and drafting programs can produce HPGL. In addition to plotters, the HP LaserJet III and more recent HP LaserJet printers also understand HPGL. On an HP LaserJet III or later model printer, you can print HPGL directly if your DVI driver allows you to include printer-specific data. This ability was introduced in version 1.4t of the emTeX dvihplj driver.
If your DVI driver does not support printer-specific files or your printer does not understand HPGL, there are at least two conversion programs (hp2xx and hp2ps) that may be able to convert your HPGL drawings into another form you can use.
The Fig graphics language was designed to represent pictures and figures in an easy to interpret and portable manner. The Fig and xfig drawing programs work with Fig graphics. Several other programs, like gnuplot, can also produce Fig graphics. See the “the section called “The epic and eepic styles”” section for more information.
Bitmapped Image Formats
Including bitmapped images is easier than including scalable images because no real interpretation of commands is necessary. Over the years, lots of different ways have been developed for including bitmapped images in TeX documents. Since the development of the bm2font program, most of these methods have become obsolete. As a result, this section examines only a few methods.
DVI driver {\ttbackslash special}
The first method is DVI driver-specific: if your DVI driver includes a \special command for including bitmapped graphic images, you can simply use that command. The disadvantage of using a DVI driver \special is that it makes the document less portable. Instead of being printable with any DVI driver, it now requires a DVI driver that recognizes a particular \special command. Note also that some DVI drivers do not handle color images very well; you may need to convert the image to black and white first. (Many programs described in the “the section called “Manipulating Images”” section later in this chapter can perform this operation.)
bm2font
On most platforms, bm2font provides an ideal solution for including bitmapped images. This program translates bitmapped images into PK fonts and produces a snippet of TeX code that can be used to print the image in your document. Because most DVI drivers can use PK fonts, a high degree of portability is maintained. Some portability is still lost since the bitmapped image has a fixed resolution, but that is a consequence of using the bitmapped image, not bm2font. All of the bitmap images in this book were included with the bm2font program.
This book is a good example of an instance where portability is required. I could easily have included the graphics with the \special command of the DVI driver that I use most frequently (dvihplj), but then I couldn't have produced pages suitable for final publication.
bm2font can read a number of common graphic image formats including GIF, Windows BMP, and PCX. It can translate color images into black and white using a number of dithering methods, and it can scale the image to a specific size (although scaling bitmap images is not usually very effective).
pbmtopk
The pbmtopk program provides a solution similar to bm2font. Because pbmtopk is a smaller program, it may be easier to port to other systems. The pbmtopk distribution includes pktopbm, which can translate PK files back into PBM bitmaps.
Inserting PostScript Images into TeX
If you are using Plain TeX or LaTeX and printing your documents on a PostScript printer, there are several (essentially equivalent) style files that you can use to include your figures.
One is epsfig.sty, which can be used as a LaTeX style option or be inserted directly into Plain TeX documents with \input.[83] The epsfig style option is supported by LaTeX2e as well.
After the style file is loaded, you can use the macro \epsfig to include your figure. The complete syntax for \epsfig is:
\epsfig{figure=, height=, width=, rheight=, rwidth=,
     bbllx=, bblly=, bburx=, bbury=,
     clip=, angle=, silent=}
In practice, only a few of these options are commonly used. Here is a description of each:
figure=
Identifies the name of the file containing the PostScript figure. This option is required.
height=, width=
Specify the height and width of the figure. If only one is specified, the other will be scaled automatically to keep the proportions of the original figure. If both are given, the figure will be scaled (anamorphically) to the requested size.
rheight=, rwidth=
Provide the “reserved” height and width of the figure. This is how big the TeX box that encloses the figure will be. By default, the box is as big as the figure.
bbllx=, bblly=, bburx=, bbury=
Specify the bounding box of the figure. If not specified (it usually isn't), the bounding box is read from the PostScript figure.
clip=
Indicates whether or not the figure should be “clipped” at its bounding box. Clipping prevents lines in the figure from extending beyond the bounding box.
angle=
Allows you to specify that the figure should be rotated. Always specify the angle of rotation in degrees. The figure is always rotated counter-clockwise.
silent=
Turns off informative messages printed by the macros as the figure is processed.
The parameters to the \epsfig macro have to obey TeX's strict parsing rules. In particular, you must not put spaces around the equal sign in any option. The clip= and silent= options have no values, but you must include the equal sign anyway.
For example, Figure 6.9 was inserted by \epsfig using the following commands:
\begin{figure}
 \epsfig{figure=figs/sample.eps}
 \caption{An example of an encapsulated figure.}
 \label{fig.psfigure}
\end{figure}
Figure 6.9. An example of an encapsulated figure
Figure 6.10 demonstrates a few of other epsfig options:
\begin{figure}
 \epsfig{figure=figs/sample.eps,width=6cm,angle=45}
 \caption{Another example of an encapsulated figure
   (resized and rotated)}
 \label{fig.psfigurerot}
\end{figure}
Figure 6.10. Another example of an encapsulated figure (resized and rotated)
Manipulating Images
There are literally dozens of software packages available for manipulating graphic images. The discussion that follows focuses on a small handful of these programs. The programs selected are representative of the kinds of tools available, but this is by no means an endorsement that these are the best tools. Table 6.1 summarizes the programs described in this section.
If you cannot find any way of converting a particular image, remember that you may be able to display the image and capture it with another program that can save the image in a more tractable format.
Table 6.1. Graphics Manipulation Packages
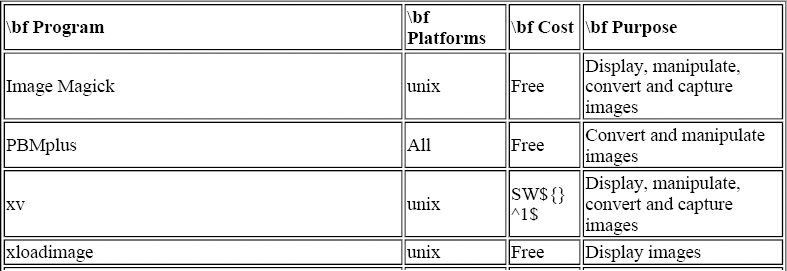
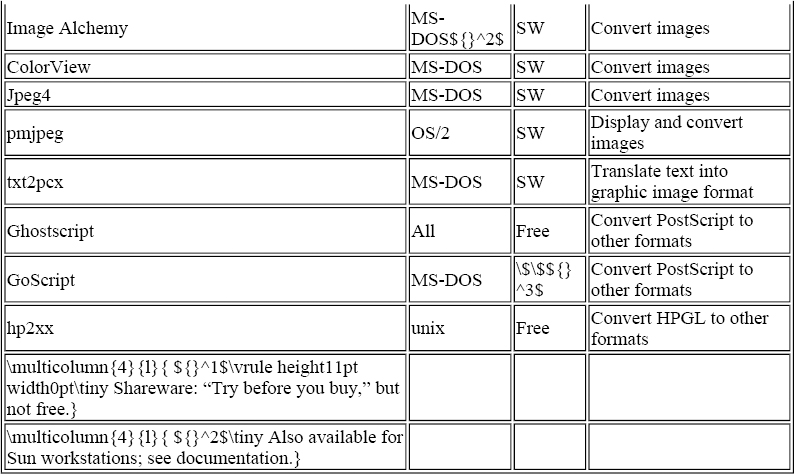
Image Magick
Image Magick is a collection of eight programs for manipulating images. These programs work with MIFF files by default. MIFF is the “machine-independent file format” developed by the package's author. If you are going to manipulate images with these tools, the author recommends converting them to MIFF format first. The convert program reads and writes a large number of image formats, so conversion to and from MIFF format is straightforward.
Image Magick requires the Independent JPEG Group's JPEG library in order to manipulate JPEG images. Similarly, Sam Leffler's TIFF software library is required to manipulate TIFF images. Both of these are compile-time options. If you did not build Image Magick, you may not be able to manipulate JPEG or TIFF images. To manipulate PostScript images, Ghostscript must be available.
The programs described below are the Image Magick tools that allow you to manipulate images in ways that may be necessary or useful for creating printable images. Other tools, like animate, included in the Image Magick distribution, aren't described here because they have no bearing on printability.
display
This program allows you to preview images on an X11 display. The number of colors in the image is reduced to match the number of colors of your display, if necessary. Program options allow you to specify a variety of image-processing operations on the image (noise reduction, scaling, manipulation of the color map, etc.).
Conversion to MIFF format, as recommended above, isn't necessary for simply displaying the image.
import
This program allows you to capture visible portions of an X11 display. You can capture any visible window, the entire display, or any rectangular portion of the display. import can save the image in any format recognized by convert.
convert
As the name implies, this utility converts images between graphics formats. The following standard formats are recognized:
MIFF BMP CMYK EPS FAX GIF IRIS JPEG PICT PNM
PS RGB RLE SUN TGA TEXT TIFF XBM XWD
Additionally, a few less-standard formats are recognized. A complete list is available in the manual page for convert.
combine
This program combines two images by blending them together. The result varies tremendously, depending on the kind of blending used. Simple overlaps, various kinds of cutouts, and more complex color blendings are possible.
montage
Unlike combine, montage combines multiple images by tiling. (The images are laid next to each other rather than on top of each other.) Optionally, the image name can appear below each tile.
mogrify
mogrify is used to transform an image (or series of images). You can specify alternate color maps in a variety of ways, as well as dithering and error correcting transformations. The images can also be rolled, rotated, rescaled, and sheared. (Shearing transforms a rectangle into a parallelogram by shifting the X or Y axis.)
PBMplus
The PBMplus package is a large collection of image translation programs. This package was written originally for unix, but has since been ported to MS-DOS and OS/2.
PBMplus defines three file formats:
- PBM---The Portable Bitmap format for black and white images
- PGM---The Portable Graymap format for grayscaled images
- PPM---The Portable Pixmap format for color images
Translation from one format to another is accomplished by translating into the appropriate portable format first, and then translating the portable bitmap into the destination format.
The following image formats are supported by the PBMPlus tools:
| Abekas YUV bytes | MGR bitmaps |
| Andrew Toolkit raster objects | MTV or PRT ray traced images |
| Atari Degas .pi1 images | MacPaint files |
| Atari Degas .pi3 files | Macintosh PICT files |
| Atari Spectrum files | PCX files |
| AutoCAD slides | PostScript “images” |
| Bennet Yee “faces” | QRT ray tracer files |
| CMU window manager bitmaps | Raw grayscale bytes |
| Doodle brush files | Raw RGB bytes |
| FITS files | Sun icons |
| GIF files | Sun rasterfiles |
| Gould scanner files | TIFF images |
| Group 3 faxes | TrueVision Targa files |
| HIPS files | Usenix FaceSaver(tm) images |
| HP PaintJet files | X10/X11 window dumps |
| IFF ILBM files | X11 pixmaps |
| IMG (GEM) images | XBM files |
| Img-whatnot files | Xim file |
| Lisp Machine bitmaps |
The PBMplus tools translate the image into the appropriate portable format (PBM, PGM, or PPM) depending on the nature of the image. Similarly, the tools can all work with “lower” formats. (PPM tools can work with PGM and PBM files, and PGM tools can work with PBM files.) For example, there is no “pbmtopcx,” however the ppmtopcx tool will create a black and white PCX file if you use a PBM file as the input. Once converted into a portable format, the image can be translated back into (almost) any of the supported formats.
In addition to image conversion, the PBMPlus tools include programs to perform a wide variety of image manipulations.
| Apply Conway's rules of life Create a blank image | |
| Create a mask bitmap | Reduce/enlarge an image |
| Convert text into a bitmap | Create a UPC bitmap |
| Bentleyize a greymap | Apply edge-detection |
| Apply edge-enhancement | Generate a histogram |
| Normalize contrast | Apply an “oil-painting” filter |
| Create a “ramp” | Generate textural features |
| Perform bitwise arithmetic | Perform MxN convolution |
| Crop an image | Cut/Paste rectangles |
| Color-reduce | Flip/rotate |
| Apply gamma-correction | Build a visual index |
| Invert an image | Add a border to an image |
| Scale an image | Shear an image |
| Smooth an image | Build a tiled image |
| Colorize a graymap | Dither color images |
| Create fractal terrain | Apply Laplacian-relief filter |
xv
xv is an interactive image viewing/converting tool that runs on X11 servers (including MS-DOS implementations of X11 such as Desqview/X).
You can view GIF, PBM, XBM, Sun rasterfile, JPEG, and TIFF images. You can save any image in one of those formats or in encapsulated PostScript. In addition, you can capture any visible portion of the X11 server window interactively with xv.
Like most of the tools described here, xv includes a number of image manipulation tools (cropping, scaling, editing the color map, etc.). If you try to view an image that is larger than your display, xv automatically scales it to fit. I find that xv's interactive nature makes it easier to use for image manipulation than the command-driven tools.
xloadimage
The xloadimage program is another X11 picture display tool. Like xv and Image Magick's display, it has a number of picture manipulation options (although they are not interactive).
One advantage of xloadimage is that it does not rescale images that are too large to fit within the display. Instead, it places them in a scrollable window. I find this behavior superior to xv's solution of rescaling a very large image even though you are interested only in a small section of it.
Image Alchemy
Image Alchemy is a shareware tool for converting graphic images between various formats. Although the manual mentions a version for Sun workstations, I have only seen the MS-DOS version.
Note that the unregistered shareware version of this program will only convert images which are 640$\times$480 pixels or smaller.
The following is a list of the graphic formats recognized by version 1.5 of Image Alchemy:
| ADEX | PCPAINT/Pictor Page Format |
| Autologic | PCX |
| Binary Information Files (BIF) | Portable BitMap (PBM) |
| Encapsulated PostScript (EPS) | Q0 |
| Erdas LAN/GIS | QDV |
| Freedom of the Press | QRT |
| GEM VDI Image File | Scodl |
| GIF | Silicon Graphics Image |
| HP Printer Command Language (PCL) | Stork |
| HP Raster Transfer Language (RTL) | Sun Raster |
| HSI JPEG | TIFF |
| HSI Palette | Targa |
| HSI Raw | Utah Raster Toolkit (RLE) |
| IFF/ILBM | Vivid |
| JPEG/JFIF | Windows Bitmap (BMP) |
| Jovian VI | WordPerfect Graphic File |
| Macintosh PICT/PICT2 | XBM |
| MTV Ray Tracer | XWD |
Image Alchemy can also perform a number of image manipulations like rescaling, cropping, and color map changes.
ColorView
ColorView is a shareware MS-DOS program for displaying and converting graphic images. Although designed to work with VESA SuperVGA adapters, ColorView can also work with plain VGA adapters. It does require a 80286 or a more powerful processor.
ColorView can read JPEG, GIF (87 and 89), BMP, and RLE images. It can write GIF (87), 8-bit BMP, 24-bit BMP, JPEG, and RLE images. It can perform image translation without displaying the images, so a VGA or SuperVGA adapter is not required for translation.
Jpeg4
This is the Independent JPEG Group's JPEG Software. The compression tool can convert GIF, PPM, and Targa (TGA) images into JPEG format. The decompression tool converts JPEG images into GIF, PPM (or PGM), or Targa formats.
pmjpeg
The pmjpeg program is an OS/2 2.x program that can read and display JPEG, TIFF, Targa, GIF, PCX, and Windows or OS/2 BMP images. In addition, pmjpeg can write images in any of these formats except Windows BMP. pmjpeg can also capture all or part of the desktop. Some of the other features of pmjpeg are color map editing, contrast enhancement, image cropping, scaling, rotation, batch translation of images into JPEG format, cyclic slideshow presentations, and the ability to reduce an image to the system palette colors.
txt2pcx
txt2pcx is a memory-resident MS-DOS utility that captures text-mode screens as PCX graphic images. See the discussion of screen capturing in the “the section called “GoScript”” section of this chapter for more information about why this is sometimes desirable.
Ghostscript
Ghostscript is distributed by the Free Software Foundation (FSF). It is one of the few freely available programs that can convert PostScript images into other formats.
Ghostscript is a (mostly) complete PostScript interpreter. Converting an entire page of PostScript into another format is straightforward with Ghostscript. The following example converts the PostScript file file.ps into a monochrome GIF image called image1.gif:
\$ gs -r300 -sDEVICE=gifmono -sOutputFile=image1.gif file.ps
The parameter -r300 indicates that Ghostscript should generate output at a resolution of 300dpi. This controls the size of the bitmap. If you plan to print the resulting bitmap, you should specify the same resolution as your printer. If file.ps contains more than one page, you can use a <!-- d in the output file's name to identify how multiple pages --> should be handled. For example, if file.ps contains three pages, the following command will extract the first page into image1.gif, the second page into image2.gif, and the third page into image3.gif:[84]
\$ gs -r300 -sDEVICE=gifmono -sOutputFile=image\%d.gif file.ps
\vskip-\baselineskip
For incorporating images into TeX, it is more common to convert an encapsulated PostScript (EPS) image into a bitmapped format than it is to convert entire pages. Encapsulated PostScript is described earlier in this chapter in the section “the section called “Using a Lot of Help”.” It is slightly more difficult to convert encapsulated PostScript because of the bounding box. To convert this into a bitmap of exactly the right size, you have to tell Ghostscript to move the image to the upper-left corner of the page (where Ghostscript always begins its conversion) and tell it how big the image is in pixels.
The following steps are necessary to produce exactly the right size bitmap of the encapsulated PostScript figure:
- Find the size of the bounding box. Examine the PostScript file using a text editor. Find the line that begins with <!-- % BoundingBox: --> followed by four numbers. Those numbers are the lower-left x-coordinate (llx), the lower-left y-coordinate (lly), the upper-right x-coordinate (urx), and the upper-right y-coordinate (ury), respectively.
- Create another file called trans.ps that contains the single line:
llx neg lly neg translate
- Calculate the width of the bounding box: $width_{bb} = urx - llx$.
- The width you have just calculated is the width at 72dpi. To convert this to the resolution that you will be using, multiply by the resolution and divide by 72. For example, if you will be printing at 300dpi and the width of the bounding box $width_{bb}$ is 216, the width at 300dpi, width, is $(216 \times 300)\div 72 = 900$.
- Calculate the corrected height in an analogous manner using $height_{bb} = ury - lly$ as a starting point. For example, if $height_{bb} = 360$, the height you get at 300dpi is 1500.
- Finally, run Ghostscript using the -g parameter to select the image size ($width \times height$). For example, to translate the EPS file card.ps into the GIF file card.gif at 300dpi assuming the height and width calculated above, run:
\$ {gs -r300 -g900x1500 -sDEVICE=gifmono {\bs}
 -sOutputFile=card.gif trans.ps card.ps}
The Perl script shown in Example 6.8 automates this process.
Example 6.8. Converting Encapsulated PostScript to a Bitmap with Ghostscript
The primary disadvantage of Ghostscript is that the selection of free PostScript fonts is quite limited. The only freely available fonts are: IBM Courier, Bitstream Courier, Bitstream Charter, Adobe Utopia, URW Antiqua, URW Grotesk Bold, Nimbus Roman No9, and Nimbus Sans. Unless you have the PostScript sources for other fonts used in your figures (PFA or PFB and AFM files), Ghostscript will use crude approximations of the desired font.
GoScript
GoScript is a commercial PostScript interpreter sold by LaserGo, Inc. GoScript is available for MS-DOS systems only. A special version is available for Microsoft Windows.
The primary advantage of a commercial interpreter is that it comes with more high-quality fonts. The GoScript program comes with “clones” of the 13 standard PostScript fonts:
| Times Roman | Times Italic |
| Times Bold | Times Bold Italic |
| Helvetica | Helvetica Oblique |
| Helvetica Bold | Helvetica Bold Oblique |
| Courier | Courier Oblique |
| Courier Bold | Courier Bold Oblique |
| Symbol |
The GoScript Plus program includes clones of all 35 standard fonts (the standard 13 plus AvantGarde, Bookman, Helvetica-Narrow, New Century Schoolbook, Palatino in four styles, Zapf Chancery Italic, and Zapf Dingbats). For MS-DOS users, this program has the additional advantage of being quite a bit faster than Ghostscript.
Although GoScript can use any PostScript Type 1 or Type 3 font, the fonts supplied with GoScript are not in a standard PostScript format, so they cannot be used with other applications.
On a 300dpi LaserJet printer, GoScript did not seem to align the baseline of bitmapped PostScript fonts with great accuracy. This is unfortunate, because the Computer Modern fonts created with MetaFont for TeX are bitmapped.
hp2xx
hp2xx converts scalable images in HPGL into other formats. HPGL is Hewlett-Packard's command language for controlling pen-based plotters. (HP's LaserJet series of printers, starting with the LaserJet III, also understand HPGL.)
Many computer-aided drafting packages can save diagrams in HPGL format. Other software that works with scalable images is likely to be able to save in HPGL format as well. Because HPGL support is uncommon in printers, you will probably have to convert HPGL diagrams into another format to include them in your TeX documents. hp2xx output comes in three flavors: scalable graphics, TeX commands, and bitmapped graphics.
Scalable graphics
The supported scalable graphics formats are encapsulated PostScript and MetaFont source code.
TeX commands
HPGL drawings composed of mostly straight lines can be rendered in TeX. hp2xx's TeX output is designed for either the emTeX DVI drivers (it relies on \special commands to draw lines at arbitrary angles) or the epic macros (which also use \special commands that must be supported by your DVI driver).
Bitmapped graphics
Bitmaps can be produced in PBM, PCX, or PCL (HP LaserJet bitmap) formats. You can select image size and resolution to produce a bitmap that will print at the correct size for your printer.
Image Editors
Although many images are available on the Net and commercially, it is very likely that you will want to create your own pictures and diagrams for some of the documents that you write. A few common drawing tools are described below. Table 6.2 summarizes the packages discussed here. There are many more commercial packages for image editing---so many, in fact, that I'm not going to make any effort to describe them here.
Table 6.2. Graphics Editing Packages


xfig
xfig is an editing tool for scalable images stored in the Fig format, described in the “the section called “The epic and eepic styles”” section of this chapter. An example of a drawing being constructed with xfig is shown in Figure 6.11.
Figure 6.11. Editing an image with xfig
The objects in Fig are arcs, circles, open and closed splines, ellipses, regular and irregular polygons, polylines, boxes, arc-boxes (boxes with rounded corners), text, and encapsulated PostScript. Compound objects can be constructed by binding these objects together.
As a consequence of Fig's device independence, it can be translated into a number of different output formats. A completed Fig drawing can be rendered in PostScript, PiCTeX, \linebreak
LaTeX's picture environment, MetaFont, or any of the pic, epic, eepic, box, eepicemu and \special environments. Figures can also be saved as X11 bitmaps. Not all of the output formats support all of the features of Fig. For example, arbitrarily sloped lines are not supported by the LaTeX picture environment, and encapsulated PostScript makes sense only for PostScript output.
xfig supports rotation, flipping, scaling, and duplication of objects. However, it imposes some limitations on the figures that you create. Objects that contain boxes, arc-boxes, circles, or ellipses can be rotated only in 90 degree increments. Text objects cannot be flipped over.
When objects are placed on the “canvas,” you can elect to have xfig restrict their placement to $\frac{1}{16}$, $\frac{1}{4}$, or $\frac{1}{2}$-inch intervals. Restricted placement makes alignment of a large number of objects easier. Unrestricted placement is also allowed, and there is an alignment operator that can center (vertically and horizontally) any number of objects. A nonprinting grid is available in several sizes, independent of the restriction on object placement. In a similar way, xfig can be instructed to draw sloped lines within specific limits (for example, only allowing lines at slopes supported by LaTeX's picture environment). Precise numeric-coordinate placement of individual objects is also supported.
xfig provides access to the standard 35 PostScript fonts as well as the standard LaTeX fonts. Eight-bit input, allowing access to international symbols, is also provided.
idraw
idraw, the InterViews drawing editor, is an X Windows application for editing encapsulated PostScript figures. Figure 6.12 shows a drawing constructed with idraw.
Figure 6.12. Editing an image with idraw
The objects in idraw are lines, ellipses, open and closed splines, irregular polygons, polylines, rectangles, and text. Compound objects can be constructed by gluing these objects together. Fonts, brushes, and patterns can be customized and extended with X-defaults. idraw supports the full complement of rotation, flip, scale, and duplicate operations with or without grid lines and optional gravity.
Unfortunately, the “gravity” option, which allows you to create horizontally and vertically aligned objects, is not preserved when a file is saved. It is very difficult to recover the alignment of a file when it has been saved and reloaded.
Graphics in TIFF, encapsulated PostScript, X11 bitmap format, and Unidraw format can be imported into idraw figures.
tgif
tgif, like xfig and idraw, is an editor for scalable drawings. The “gif\,” in tgif has nothing to do with the bitmap GIF format. The captured screen in Figure 6.13 shows a drawing being constructed with tgif.
Figure 6.13. Editing an image with tgif
tgif stores objects as a set of Prolog “facts.” Several programs are provided for interpretation of tgif objects outside of tgif. Only four output types are built into tgif: PostScript, encapsulated PostScript (EPS), X11 bitmaps, and X11 pixmaps.
tgif has a number of interesting features including the ability to design hierarchical drawings in either a “top down” or “bottom up” manner, and the separation of an object's representation from its instantiation. In addition, arbitrary text-based attributes can be attached to each object. tgif uses these attributes in a number of ways, such as the execution of system commands based upon object attributes.
The objects supported by tgif are arcs, ellipses, rectangles, rounded-corner rectangles, polylines, polygons, open and closed splines, text, X11 bitmaps, some forms of X11 pixmaps, and encapsulated PostScript. These objects can be grouped together.
tgif supports only five fonts (Times, Courier, Helvetica, New Century Schoolbook, and Symbol) at a few fixed sizes. The fill patterns, line styles, text-styles, and other attributes are similarly fixed (although more generous in number).
bitmap/pixmap
bitmap and pixmap are standard tools distributed with the X11 Window System. The pixmap tool provides a superset of the functions in bitmap, including support for color images. An example of the bitmap program editing a small X icon is shown in Figure 6.14.
Figure 6.14. An example of bitmap editing an icon
Other Bitmap Editors
Free or inexpensive bitmap editors are available for almost every computer system. The selection of a particular package depends in large part on what kinds of diagrams you need to create.
The primary disadvantage of bitmap editing is that it is difficult to create bitmaps large enough to be used at printer resolution. Even a “full screen” image on a high-resolution monitor is only a couple of inches across (at best) on a laser printer.
texcad/xtexcad
texcad is an MS-DOS program (distributed with emTeX) for editing LaTeX picture environments. xtexcad is a similar program that runs under the X11 Window system.
The LaTeX picture environment suffers from two limitations: it can only draw relatively simple diagrams, and it is very difficult to use. texcad and xtexcad remove the second limitation. With one of these programs, the LaTeX picture environment becomes a viable option for many diagrams.
Screen Dumps
If you are writing a document that describes a computer program, it is frequently desirable to include an image of the running program (a captured screen or screen dump) in the document. There are several ways that this can be accomplished:
- Screen Thief for MS-DOS
- GrabIt for Microsoft Windows
- xv, Image Magick, or xwd for X11 workstations
- PM-Cam, Nikon II, or pmjpeg for OS/2
The captured screen may be in a graphics format that is directly usable by your DVI driver or by bm2font. If not, one or more of the conversion programs described in “the section called “Manipulating Images”” earlier in this chapter will help you convert it into a usable format.
The most common output devices for TeX are laser printers with a resolution of 300dpi or higher. By contrast, the resolution of a typical display is around 80dpi. This discrepancy may require you to enlarge the bitmap image to make it legible in your document. For example, a 640x480 bitmap image is only about two inches wide when printed at 300dpi. In color images, dithering, which increases the number of dots used to represent each pixel in the original image, has a natural enlarging effect on the image, and this reduces the magnitude of the problem. However, some scaling may still be necessary.
If the screen you want to include is only text (this includes IBM's line-drawing characters and other symbols), you can include it as a special “verbatim” environment if you have an appropriate font. The advantages of this method are that the actual screen text can be incorporated directly into your document (making the document more portable and easier to distribute, if that is a concern), and that the resulting document is small and easy to print. The disadvantage of this approach is that information about color is lost. If parts of the on-screen text appear in different colors for highlighting, using a pure-text approach may not produce acceptable results. For example, compare Figure 6.15 with the results in Figure 2.2 in Chapter 2, Chapter 2.
Figure 6.15. A text mode screen dump.
\screendump{metext}
To insert pure-text screen captures, you have to have a font with exactly the same encoding as the text on the screen (for more information about font encodings, see the section “the section called “Declaring a family”” in Chapter 5, Chapter 5). On MS-DOS and OS/2 PCs, this is sometimes a problem because the IBM line drawing characters do not appear in most fonts. Several commercial fonts provide the appropriate character set, but so do the freely available IBM Courier fonts (distributed by IBM for the X11 Consortium). The IBM Courier fonts are PostScript Type 1 fonts. If you need TeX PK fonts, use the ps2pk program as described in the section called “the section called “Math Fonts in TeX”” in Chapter 5.
To use the IBM Courier fonts to print captured screens, you will need AFM files that have the correct encoding vector. AFM files with the IBM OEM character set encoding are available from the CTAN archives in the directory fonts/courier.
After the appropriate font is available, you are almost ready to reproduce a captured screen. One problem remains: TeX cannot \input binary files. Because screen dumps frequently contain characters from outside the normal ASCII range, they must be considered binary in this context. To overcome this difficulty, it is necessary to process the screen dump and convert it into a text file. The Perl script in Example D.8 in Appendix D, Appendix D, will perform this conversion.
After conversion, the TeX code shown in Example 6.9 will insert the screen. This code will work in both Plain TeX and LaTeX. Similar code can be written for other formats. Figure 6.15 was produced with this code.
Example 6.9. Script for Inserting a Captured Text Screen
[79] {Some devices, most notably plotters, don't work this way. They really draw lines and curves with physical pens.}
[80] And probably any other format derived from Plain TeX.
[81] {dvimsp has been replaced by dvidot in the beta test distributions.}
[82] {In fairness, the degree of difficulty depends on the platform you work on. Some systems, like the Amiga, have very good support for PostScript output, even on non-PostScript devices. Alternatively, if you have a fast computer, the extra translation through Ghostscript may be quite painless.}
[83] {The epsfig.sty style relies on epsf.tex to provide low-level support for including EPS images. The epsf.tex file is part of the dvips distribution.}
[84] {Under MS-DOS and OS/2, remember that the command processor performs variable substitution with the percent sign. Use two consecutive percent signs.}
Get Making TeX Work now with the O’Reilly learning platform.
O’Reilly members experience books, live events, courses curated by job role, and more from O’Reilly and nearly 200 top publishers.

