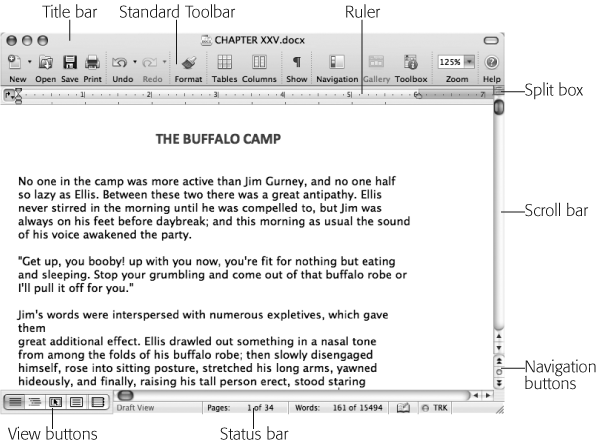
The tools you use most often—those for navigating your document and for basic formatting—are clustered around the main text window, as shown in Figure 1-4.
Word 2008’s title bar does all the usual Mac things—sends the window to the Dock when double-clicked, moves it when dragged, and so on—but it has a few unheralded powers, too. It also performs like a Mac OS X folder window in two key respects:
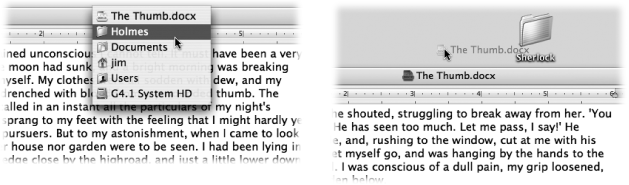
To find out which folder your document is nested in, ⌘-click the document’s title. As shown in Figure 1-5, a shortcut menu appears, identifying your document’s location on the hard drive. Click any folder or drive on the list to open it in a new Finder window.
See the small Word icon next to the document’s name in the title bar? That’s your document proxy icon, which works just like the folder proxy icon in every Finder window title bar. As shown at right in Figure 1-5, you can drag that icon just as you would any icon in the Finder. You might do so to move the current document to a different folder, to copy it to a different disk, or even to drag it directly to the Trash. In true Mac OS X fashion, you see a translucent ghost of the icon as you move it. (You have to hold the cursor down on this icon for about one second, making it turn dark, before you can drag it in this way. If you drag it too quickly, Word thinks you’re simply trying to move the window on the screen.)
Note
The document proxy icon appears faded out (turned off) whenever you’ve edited your document without saving the changes—and you can’t drag it to move, copy, or trash your document when you haven’t saved changes. (Need another clue that your document has unsaved changes? Glance at the red close button in the upper-left corner of any document window. If there’s a black dot in the center of the red button, you need to save.) Only when you choose File → Save (⌘-S) does the proxy icon spring to life, ready for dragging.
The ruler across the top of the page displays the current settings for margins, tabs, and indents. See Indentation for details on how to use these settings.
Figure 1-4 shows the Navigator buttons—double arrows flanking a little round button at the lower-right of the Word window. When you first open a document, these Navigator buttons act as Page Up/Page Down buttons. But once you’ve used the “Find and Replace” command (see Find), or in some other way changed the browse object, the double arrows act differently.
For instance, after you’ve used “Find and Replace”, clicking the Navigator buttons takes you from each occurrence of the word you’re trying to find to the next. For more detail on the Browse Object feature and Navigator buttons, see The Navigator Buttons.
Figure 1-4 also shows the small blue Split box at the upper-right of the window. When you point to it, the cursor changes to a double-pointing arrow. Dragging that arrow divides the window into two panes, each with its own, independent, vertical scroll bar. (Choosing Window → Split, or pressing Option-⌘-S, does the same thing.)
This arrangement is handy when you’re working at the end of a long document and need to refer to material earlier in the document. You can use the upper window to scroll through the entire document, while meanwhile back at the lower window, you can continue typing without losing your place.
Tip
It’s often faster to simply double-click the Split box. Doing so gives you two evenly split panes of the window. To adjust their relative proportions, just drag the resize bar (the gray dividing line between the panes) up or down.
Double-click this dividing line a second time to restore the window to its single-pane status. (The bottom half of the window disappears, even if it contained the insertion point—a potentially alarming behavior.)
Once you’ve split the window, you can drag the light gray bar between the two panes up or down to adjust their relative sizes. Like the scroll bars, the Page Up, Page Down, and arrow keys work as usual within each pane, meaning you can’t use them to travel from one pane to the next. To switch between panes, you can use the mouse, or just press F6, which acts as a toggle key to the other pane and back again.
To restore a split window back to a single one, drag the resize bar all the way to the top of the window, double-click the resize bar, or press Option-⌘-S again.
You can’t split a window into more than two panes—nor create vertical panes—using the Split box described above. However, you can get these effects using the Window menu (see Figure 1-6).
Choosing Window → New Window creates a clone of your document window, which you can scroll, position, or zoom independently. Each can be in a different Word view too (one in Outline view, one in Draft, and so on). The new windows are different peepholes into the same document —you haven’t created a new document. Therefore, any change you make in one window appears in both windows simultaneously. When you use File → Save, you save all the windows.
There’s almost no limit to the number of windows you can create in this way. You can place two windows side by side and work on the first and last pages of your document at the same time, or you can create five windows, each scrolled to a different region of your manuscript. The title bar identifies the windows as “Introduction:1,” “Introduction:2,” and so on. To reconstitute your document, just close the extra windows.
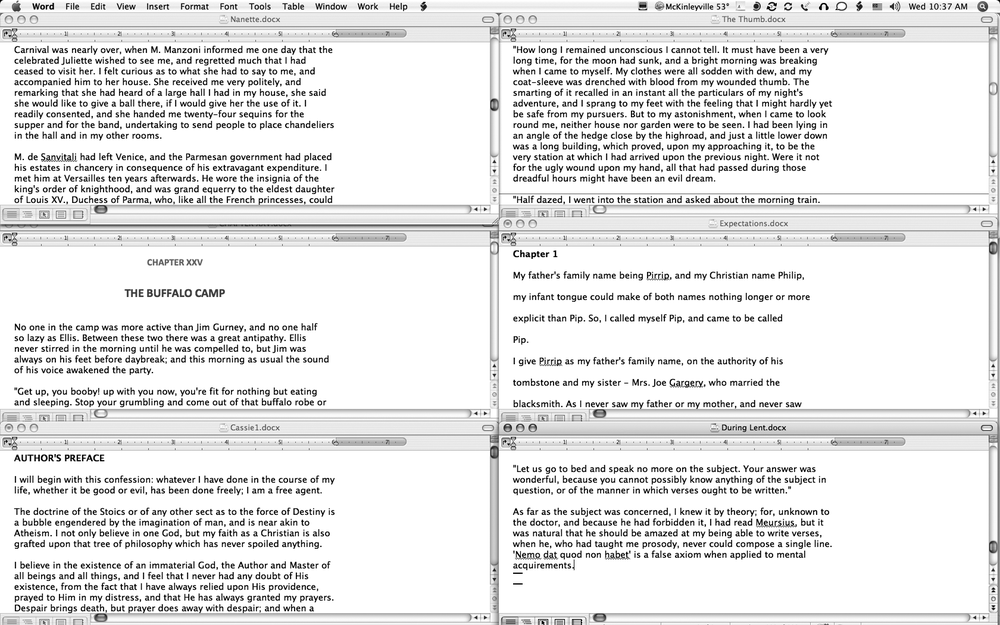
Figure 1-6. If your screen is cluttered with Word documents and duplicate windows, the Window → Arrange All command fills the screen with a patchwork of all your open windows. If you just need to find one of your document Windows instead of keeping them all open simultaneously, use Mac OS X’s Exposé feature instead. Press F10 to show all your Word document windows, and then click the one you want to see in the foreground.
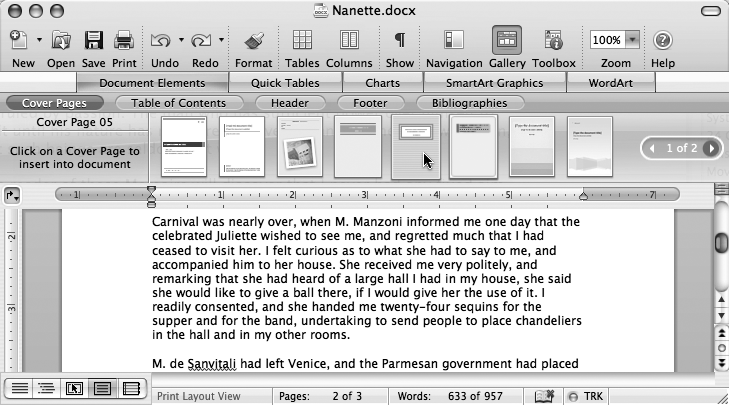
The light gray bar running across the bottom of the window (see Figure 1-4) is called the status bar. Divided into segments by etched vertical lines, the status bar presents a variety of statistics about your current location within the document.
View buttons. The status bar begins at the left with a group of buttons for changing your document view—the same as choosing one of the items at the top of the View menu. As you mouse over the buttons, the neighboring cell displays the view name, and when your mouse isn’t hovering over those buttons, it displays the currently selected view. Click one of the buttons to change the view.
Pages: 4 of 10. The third section shows the page number containing the insertion point (not necessarily the page you’re viewing) followed by the total pages. For instance, if you’re at the end of a three-page letter, this readout says 3 of 3.
Tip
Click anywhere in the Pages segment of the status bar to open the Go To tab of the “Find and Replace” dialog box, described on Find. The idea, of course, is to provide you with a quick way to jump to a different page of your document without scrolling.
Words: 244 of 3654. The second number shows the total number of words in your document, and the first indicates which word has your insertion point, as counted from the first word of the document. If you highlight some text in your document, the first number tells you how many words are in the selected passage.
If this part of the status bar is blank, it’s probably because your word count feature is turned off. To turn it on, choose Word → Preferences; in the Preferences dialog box, click the View button. Turn on Live Word Count (in the Window section) and click OK. Now, when you start typing, the word count number is revised after every few words you type; hence the name Live Word Count. With long documents, this feature can slow Word down considerably. In that case, leave it turned off in Preferences and check the word count as described in the following Tip.
The little book. This icon is the spelling and grammar–checking status indicator. As you type, a little pencil moves across the pages, indicating that Word is checking for spelling and grammar errors. Most of the time, when you’re at rest, a red X appears on the book icon, meaning that Word has found an error somewhere in your document. (That is, an error according to Word’s sense of spelling and grammar.) When you’ve just completed a spelling and grammar check and made no new errors, the icon shows a checkmark instead of an X.
To review Word’s spelling and grammar flags starting from the insertion point, click the book icon. At each error, a shortcut menu offers alternative spelling and punctuation choices and commands that lead you to relevant spelling and grammar dialog boxes (see Spelling and Grammar).
TRK corresponds to the Track Changes command (see Change Tracking). Click this segment of the status bar to turn track changes on, and illuminate the blue TRK indicator. Now your own edits show up in a different color, so that your colleagues can see exactly which changes you’ve made.
If you don’t find any of these status indicators particularly helpful—and you’d rather dedicate the screen space to your writing—just hide them. Choose Word → Preferences, click the View button, and turn off the "Status bar” checkbox near the bottom of the dialog box. Then click OK.
Word 2008 can slip in and out of many guises—a picture or movie editor, a database manager, or a Web browser, to name just a few. Each primary function comes complete with its own toolbar filled with icons relevant to that task.
If all these icons were available all the time, your screen would be filled with toolbars. As a result, you’d have to do all your typing in a leftover space the size of a Triscuit. Fortunately, Word 2008 is very considerate of your screen real estate. You can open, close, resize, reshape, or relocate toolbars at will, like so:
To open a toolbar, choose View → Toolbars and choose a toolbar from the submenu. Alternatively, carefully Control-click one of the dotted dividing lines on any open toolbar, choose Toolbar from the shortcut menu, and select a toolbar from the submenu.
Word comes with 12 toolbars, including the Standard toolbar; you can also design new toolbars of your own (see Chapter 20). There’s no limit to the number you can have open at once. To close a floating toolbar, click the tiny close button in the upper-left corner, just like any other Mac window, or choose its name a second time from the View → Toolbars command.
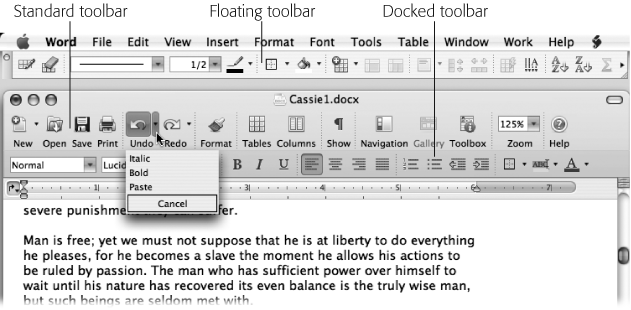
Each toolbar has a place where it likes to appear. The Drawing toolbar, for example, opens vertically at the far left of the screen the first time you use it. The standard toolbar only appears docked inside your document window. The other four toolbars in the top part of the menu—Formatting, Contact, Reviewing, and “Tables and Borders” (and Outlining when you’re in Outline View)—appear docked inside your document window the first time you use them. To turn them into floating toolbars, Control-click one of the dotted dividing lines in the toolbar, or the gray area to the right of the buttons, and choose “Dock Toolbar in Window” to remove the checkmark from this menu item and remove the toolbar from your document window. Repeat the process to park it back inside the document window.
You can move floating toolbars anywhere you like. To move a toolbar around onscreen, drag the shaded bar at the top (or left side), just as though it’s a shrunken version of a standard Mac title bar. As you drag a toolbar near one of the screen edges, or near another toolbar, it jumps neatly into place.
To resize a toolbar, drag the tiny, striped, lower-right corner. You can change most toolbars from a long, narrow bar (either horizontal or vertical), into a squarish palette.
If you forget the name of a button, just point to it without clicking and wait one second; a yellow screen tip appears.
The Standard toolbar (Figure 1-7) is the only one that opens automatically when you create a new Word document; it has icons for printing, saving, and other tasks you perform frequently. Each button on it instantly does something that would normally take two or more mouse clicks: opening a new blank document, opening an existing file, saving the document, and so on.
From left to right, the buttons on the Standard toolbar are:
New, Open, Save. These buttons correspond to the equivalent commands in the File menu.
Print. This button isn’t the same thing as the File → Print command; it’s a much more streamlined function. It prints the current document—all pages, one copy—on the currently selected printer. For more control over what Word prints (number of copies, which pages, which printer), use the File → Print command (⌘-P), which opens the Print dialog box (see Printing).
Undo. Clicking this curved arrow undoes your last bit of typing, pasting, or whatever. The tiny triangle next to it, however, is where the power of Undo is truly unleashed. Clicking the Undo triangle pulls down a list that displays, in reverse order, the last several steps you took in Word—from major style changes to single deletions. You can retrace your steps pages and pages into the past. As you drag down this pop-up menu, the button at the bottom of the list (see Figure 1-7) tells you how many things you’re about to undo. Letting go of the mouse button triggers Undo. If you change your mind, be sure to move the cursor off the Undo list until the button says Cancel before letting go. (Keyboard shortcut: ⌘-Z or F1, either of which only undoes one action at a time.)
Redo. This button and triangle let you redo whatever you’ve just undone. If you just undid your last 10 moves, for example, you can drag the Redo list as far as “Redo 10 Actions.” As with the Undo list, you can scroll up and down in this list to redo as much or as little as you like. (Keyboard shortcut: ⌘-Y or Option-Return, either of which only redoes one action at a time.)
Format Painter. Just as you can pour color onto a selected area in a painting program, you can also “pour” a set of formatting choices onto any number of words or an entire paragraph. See Tabs for details.
Insert Table. Another quick way to create a table is to click this button, whose pop-up menu is a small expanse of white squares. Drag over the squares to select the table size you want: 2 x 2 (two rows by two columns), 3 x 3, and so on. When you release the mouse button, a table of the size you selected appears in your document at the insertion point. See Charts and Spreadsheets for more on the Table tool.
Columns. This button’s pop-up menu lets you create columns; drag down and across to choose the number of columns you want. (You can drag beyond the borders of the pop-up menu if four columns across aren’t enough, you crazed designer, you.) When you release the mouse button, you find yourself in Print Layout view, with your entire document divided equally into the number of columns you chose. For details on using columns, see Working with Columns.
Show/Hide ¶. Clicking this button exposes paragraph markers (¶) and other nonprinting characters. This display is useful when, for example, you’re copying a paragraph and want to make sure you’re copying all the formatting. (Word stores formatting for each paragraph in the invisible ¶ mark that follows it.) Click this button a second time to render the characters invisible once again. (Keyboard shortcut: ⌘-8.)
Navigation Pane. Clicking this button displays or hides the Navigation Pane to the left side of your document. The pane is a big help when working with long documents. It lets you go to a page by quickly scrolling to it in the left pane, and then clicking it to view in the main pane. Select the view you want from the pop-up menu at the top of the pane. Thumbnail (small page pictures) or the old standby Document Map (outline of the document) are the choices.
Gallery. Clicking this button with your document in Print Layout view, Web Layout view, or Publishing Layout view, displays or hides the Elements Gallery thumbnails in the document window between the toolbar and your document—the same effect as choosing View menu → Elements Gallery or clicking one of the Elements Gallery tabs (see Figure 1-8).
Toolbox. Making its first appearance in Office 2004, the toolbox for 2008 absorbed the Formatting Palette—helping to reduce palette clutter, and making it the one-stop headquarters for some of the most powerful tools in Office. Click this button to reveal or conceal this multipurpose palette of tools. Here you can format text, tables, and document margins; manage your bibliography citations; access your Scrapbook text, clipart, and photos; and insert shapes and symbols (The Toolbox Redux). It’s also where you conduct compatibility reports (Compatibility Report) that troubleshoot documents from earlier versions of Word or on computers from the PC side. The Toolbox also provides a gateway into the world of the Office 2008 Project Center, which is covered in more detail in Chapter 10, and a window into Word 2008 reference tools, which presents itself in greater detail in Chapter 18.
Zoom. There are two ways to zoom (enlarge or shrink your document’s representation on the screen) from the toolbar. First, you can enter a number in the box and press Return. (100% is roughly life-size; 125% is a more comfortable size on high-resolution monitors.)
Second, you can select a magnification from the pop-up menu. Page Width magnifies or reduces your view so that it fills the document window, no matter how wide or narrow you’ve made it. Even if you make the window bigger or smaller, Word automatically adjusts the text so that it always neatly fills the window, with nothing chopped off and no extra space.
In Page Layout view and Publishing Layout View, you get a Whole Page command in this pop-up menu, too. It does the same thing as Page Width, but in both dimensions; in other words, Word scales the picture of your document so that the entire page fits within the window. Similarly, the Two Pages command (only in Page Layout View) forces two side-by-side pages to fit inside your window—a terrific option if you’re the proud owner of one of Apple’s gigantic flat-panel screens. (Make your window as wide as possible before choosing this option; otherwise, the font may become too small to read.) These and more zoom options are also available by choosing View → Zoom.
Help. Max, the hyperkinetic Mac Plus Help mascot really wanted to be helpful, though to many he came off as just plain annoying. No matter how you feel about Max, in Office 2008 the little fellow is no more, replaced by a new and improved—and completely without character—Help system. Also accessible via the Help key on your keyboard or the Help menu, Word Help now optionally links via the Internet (assuming you have an active Internet connection) back to Redmond to get you the most up-to-date help files from Microsoft.
Note
Not all of the buttons on the toolbar have keyboard shortcuts. In fact, two of them don’t even have menu equivalents: Format Painter and Show/Hide ¶. (Of course, you can always add these commands to your menus, as described in Chapter 20.)
Get Office 2008 for Macintosh: The Missing Manual now with the O’Reilly learning platform.
O’Reilly members experience books, live events, courses curated by job role, and more from O’Reilly and nearly 200 top publishers.

