Remember the last time you gave your walls a fresh coat of paint? You probably broke out a roll of masking tape and taped up the baseboards and molding so you wouldn’t get paint all over them. Sure, you could’ve have taken the baseboards off and put them back on once the paint had dried, but dadgum that’s a lot of work. Besides, masking tape covers everything just fine. Hiding and protecting is masking tape’s special purpose and—what luck!—you’ve got its digital equivalent right in Photoshop: layer masks.
By adding paint to a layer mask, you can hide the content of the layer it’s attached to, whether it’s a pixel-based Image layer, Smart Object, Shape layer, Fill layer or—in the case of Adjustment layers—a color or lighting change. Learning to use masks will keep you from having to erase parts of an image to produce the effect you want. Once you erase, there’s no going back, and if your hand isn’t steady enough to erase around detailed areas, you may accidentally erase bits you want to keep. So, for example, instead of deleting a background so you can swap it with another one, you can use a layer mask to hide it, as shown in Figure 4-29. (You’ll find all kinds of other uses for layer masks sprinkled throughout this book.) As long as you save the document as a PSD file, you can go back and edit the mask anytime.
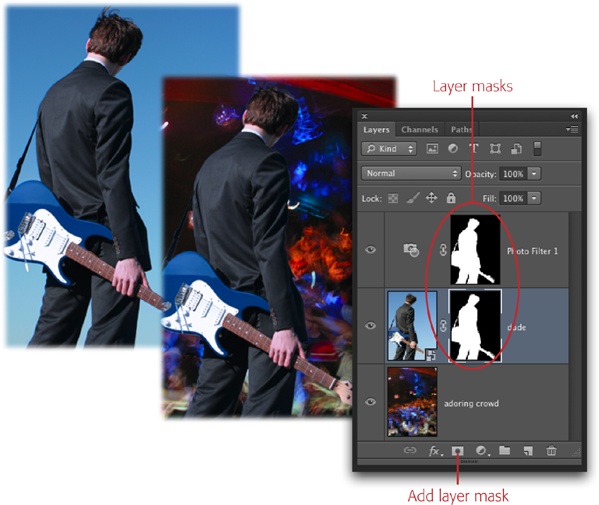
Figure 4-29. Left: Wanna be a rock star? No problem: A layer mask can make that happen. Here you can see the original, boring, blue background, as well as the new, exciting, clamoring crowd. Right: If you peek at the Layers panel, you can see that the original background wasn’t deleted—it was hidden with a mask instead. (To make the color of the guitarist and the crowd match a bit more, a Photo Filter Adjustment layer—page 336—was added that uses the same mask.) Like layer thumbnails, a mask’s thumbnail is an exact miniature of your document.
You can add a mask to any layer, though some layers—like Fill, Adjustment, and Shape layers—automatically come with their own masks. As you can see in Figure 4-29, the mask shows up in the Layers panel to the right of the layer’s thumbnail.
Note
These days, the Background layer is automatically converted to a regular layer when you add a layer mask, alleviating the need to double-click the layer first to unlock it. Hooray for change!
Layer masks are grayscale creatures, so when you’re dealing with them you work only in black, white, and shades of gray, depending on what you want to do. A black mask hides the layer completely, and a white mask reveals it completely. A gray mask falls somewhere in between—it’s partially transparent. All this is easy to remember if you memorize the rhyme, “Black conceals and white reveals.” Masks can be pixel- or vector-based. This section covers pixel-based masks; vector-based masks are covered on Using Vector Masks.
To add a layer mask, activate the layer you want to add it to, choose Layer→Layer Mask, and then pick one of the following:
Reveal All. Creates a solid white mask that shows everything on the layer, so it doesn’t change anything in your image. You can also add a white (empty) mask by clicking the Add Layer Mask button at the bottom of the Layers panel (it looks like a circle within a square, as shown in Figure 4-29). If you want to hide just a little bit of a layer, Reveal All is the way to go; after you add the mask, just paint the areas you want to hide with a black brush.
Hide All. Creates a solid black mask that conceals everything on the layer. (Option-clicking [Alt-clicking] the Add Layer Mask button does the same thing.) If you want to hide the majority of the layer, choose this option and then go back with a white brush to reveal specific areas.
Reveal Selection. Choose this option if you’ve created a selection and want to hide everything but the selection. Photoshop adds a mask in which the selected area is white and the rest is black. (You’ll learn all about selections in Chapter 5.)
Hide Selection. This command adds a mask in which the selected area is black and the rest is white.
Tip
You can also add a pixel- or vector-based layer mask by using the Properties panel (shown on Editing a Mask).
From Transparency. This command creates a layer mask from the transparent pixels in an Image layer (handy if you’re working with an Image layer that has no background, like a brushstroke). Just activate a partially transparent layer before choosing this command, and Photoshop adds a layer mask that’s black in the transparent (empty) areas, gray in the areas that are partially transparent, and white in the areas that contain info. (This command doesn’t work with Shape layers or Smart Objects.)
You can use any painting tool to add black, white, or gray paint to a layer mask, although the Brush tool is especially handy (Chapter 13 covers all your brush options), and the Gradient tool is great if you want to create a smooth transition from black to white (see the color-fade effect on Restacking Layers). Selection tools (Chapter 5) also work in masks, and once you create a selection, you can fill it with black, white, or shades of gray by choosing Edit→Fill.
One of the simplest uses for layer masks is to hide bits of text so the text looks like it’s behind a person or object in a photo, as shown in Figure 4-30. Here’s how to create that effect:
Open a photo and then press T to activate the Type tool.
Don’t worry about double-clicking the Background layer to unlock it; you don’t need to touch your original image in this technique.
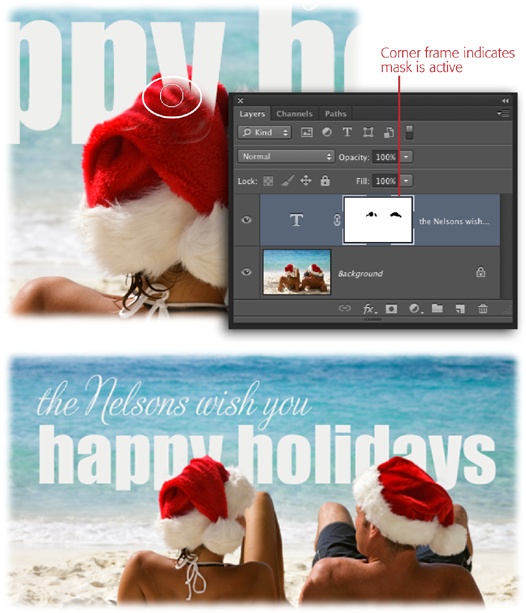
Figure 4-30. Top: Here you can see that this couple and the text live on different layers. If you add a layer mask to the text layer and then paint within the mask with a black brush (circled in white), you can hide parts of the text, revealing the couple’s cute hats. Over in the Layers panel, the corner frame lets you know which part of the document is active: the Type layer or its mask. Bottom: Magazines use this trick all the time on their covers to make text look like it’s behind people.
In the Options bar, pick a font, a size, and a color.
For this technique, select a thick font like Impact and set it to a fairly large size, like 70 points (for a high-resolution image, you’ll need an even bigger size). You’ll learn all about formatting text in Chapter 15.
Mouse over to your document, type some text, and then commit it.
Click where you want the text to begin and start typing. To move the text around, mouse away from the text until your cursor turns into a little arrow; then simply drag the text wherever you’d like. To let Photoshop know you’re finished, press Enter—not Return—or click the little checkmark in the Options bar.
Add a layer mask to your Type layer by clicking the circle-within-a-square button at the bottom of the Layers panel.
Photoshop adds an all-white layer mask to the Type layer, so that everything on that layer is visible. In the Layers panel, you’ll now see the mask’s thumbnail next to the Type layer thumbnail. See the thin border around the corners of the mask’s thumbnail (labeled in Figure 4-30)? That means the mask is active and you’re about to paint on it (good) instead of the photo (bad).
Press B to grab the Brush tool and pick a soft-edged brush set to black.
After you activate the Brush tool, head up to the left side of the Options bar and open the Brush Preset picker ((Re)Introducing the Brush Tool) by clicking the down-pointing triangle next to the little brush preview. Pick a soft-edged brush that’s about 60 pixels (or larger if you’re working with a high-resolution image). Since you want to hide bits of the text, you need to paint with black (remember, black conceals and white reveals). To do that, take a peek at the color chips at the bottom of the Tools panel and press D to set ’em to factory-fresh black and white, and then press X until black hops on top. Now you’re ready to start painting.
Mouse over to your document and paint the parts of the text you want to hide.
In the example in Figure 4-30, you’d position your cursor over one of the Santa hats and click to start painting (hiding). When you release the mouse button—you don’t have to do all your painting with one brushstroke—you’ll see black paint on the layer mask in the Layers panel, but not in your image.
If you accidentally hide too much of the text, press X to swap color chips so you’re painting with white, and then paint that area back in.
When you’re working with a layer mask, you’ll do tons of color-chip swapping (from black to white and vice versa). You’ll also use a variety of brush sizes to paint the fine details as well as large areas. To keep from going blind when you’re doing detailed work like this, zoom in or out of your document by pressing ⌘ and then the + or – key (Ctrl and then the + or – key on a PC).
Tip
You can change your brush cursor’s size and hardness by dragging, which is handy when it comes to painting on layer masks. To resize your brush, Control-Option-drag (Alt+right-click+drag on a PC) left to decrease brush size or right to increase it. The same keyboard shortcut also lets you change brush hardness: Drag up to soften the brush or down to harden it.
When you perform any of these keyboard shortcut+dragging maneuvers, inside your brush cursor, you’ll see a red preview of what the new brush will look like—if your computer supports OpenGL, that is (see the box on Understanding the GPU, OpenGL, and OpenCL). To change that preview color to something other than red, flip to Controlling the Brush Cursor’s Appearance. And if you’re a creature of habit, you can still decrease brush size by pressing the left bracket key ([) and increase it by pressing the right bracket key (]).
That wasn’t too bad, was it? You just learned core Photoshop skills that you’ll use over and over. The more you use layer masks, the more natural this stuff will feel.
As you learned on Adding Layer Masks, a layer mask automatically tags along with each Adjustment layer you create, making it easy for you to hide that adjustment from certain areas in the image. For example, if you’ve got an over- or underexposed image (one that’s too light or too dark), you can fix it with an Adjustment layer and then use the included mask to hide the lightening or darkening from the parts of the image that don’t need changing. This particular exposure-fixing trick is important to have up your sleeve if you’re short on time, or if other lighting fixes (see Chapter 10) aren’t working. Here’s what you do:
Open an image and add a Brightness/Contrast Adjustment layer to it by clicking the half-black/half-white circle at the bottom of the Layers panel and then choosing Brightness/Contrast.
You’re not actually going to adjust the Brightness/Contrast sliders (Brightness/Contrast Adjustment Layers); you’re merely adding an empty Adjustment layer so you can swap blend modes and then use the mask that tags along with the Adjustment layer. Sure, you could duplicate your Image layer and then add a layer mask, but this method is faster and won’t bloat the document’s file size. The reason you’re using a Brightness/Contrast Adjustment layer is because that kind of layer doesn’t do anything to your image the second you add it.
Using the unlabeled drop-down menu at the top of the Layers panel, change the empty Adjustment layer’s blend mode from Normal to Multiply.
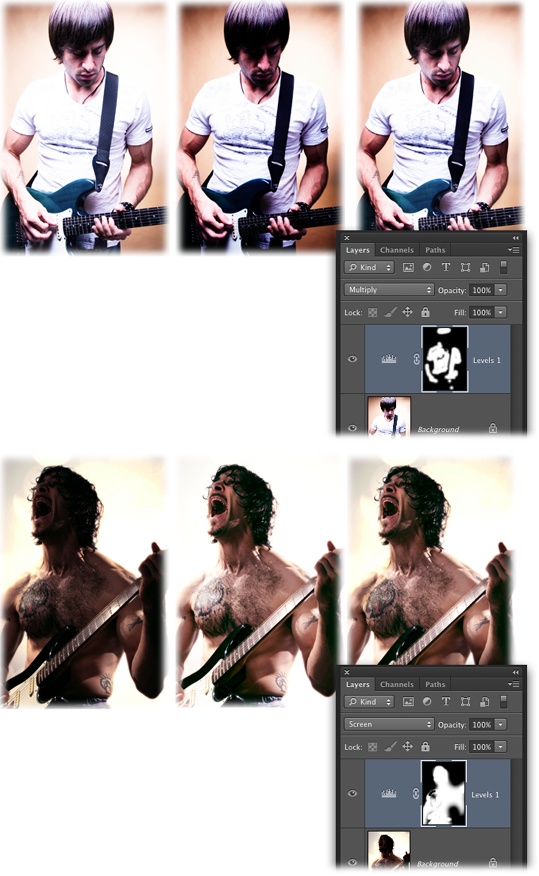
Blend modes control how colors on one layer interact with colors on other layers, which is terrific when it comes to combining images (you’ll learn all about blend modes in Chapter 8). For now, you’ll focus on two blend modes that you’ll use often because they let you quickly darken or lighten an image, respectively: Multiply and Screen (see Figure 4-31). For this exercise, pick Multiply from the menu at the top of the Layers panel to darken your image dramatically. You’ll hide the too-dark bits with the Adjustment layer’s mask in the next steps.
Figure 4-31. You can quickly darken or lighten an image by adding an empty Adjustment layer and changing its blend mode to Multiply or Screen (respectively). To control where the change is visible on the image, use a brush to fine-tune the Adjustment layer’s mask. Top: This guy’s shirt and arms are too light in the original image (left). If you change the Adjustment layer’s blend mode to Multiply, his face and guitar are too dark (middle). But if you then hide his face and guitar using the layer mask, he looks much better (right). Bottom: You can do the same thing to a photo that’s too dark. On the left is the super-dark original. The middle image shows what happens when you change the Adjustment layer’s blend mode to Screen. You can then use the accompanying layer mask to hide the over-lightened areas (mainly the background and his tattoo) as shown on the right. Now you can see the rocker dude’s face (though on second thought, maybe that isn’t such a good idea after all!).
Press B to grab the Brush tool and set your foreground color chip to black.
Check to make sure the Adjustment layer’s mask is active (it will be unless you clicked on another layer after adding it). To hide the over-darkened areas, you can paint them with black because—all together now!—black conceals and white reveals. Peek at your color chips, and if black isn’t on top, press X (if you don’t see black, press D to set your color chips to black and white first). Now you’re ready to paint.
With a big soft brush, paint the areas that are too dark.
Those keyboard shortcuts for resizing and changing brush hardness come in handy here (see the Tip on Tip). Remember, if you mess up and hide too much of the darkened part of the image, simply flip-flop your color chips by pressing X and then reveal the dark part again by painting it with white.
If your image is still a little too dark, lower the empty Adjustment layer’s opacity (Tweaking a Layer’s Opacity and Fill).
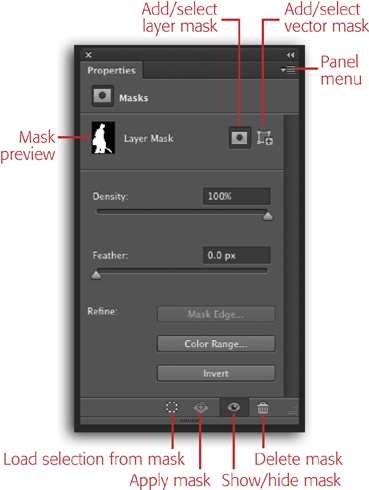
Once you’ve gotten your hands on a layer mask, you’ll undoubtedly need to fine-tune it, turn it off or on, and so on. In pre-CS4 versions of the program, you had to mouse all over the Photoshop workspace to do that stuff. Thankfully, these days all of your mask tasks are consolidated in the Properties panel (Figure 4-32).
You’ll find the following controls in the Properties panel (Window→Properties) when a mask is active in the Layers panel:
Density. If you’ve hidden an adjustment or effect with a mask and then want to make the mask semi-transparent so the adjustment or effect shows through just a little, drag this slider to the left (dragging it all the way left makes your mask completely transparent).
Feather. This slider lets you soften the edges of the mask so that it blends into the background a little better. (New layer masks don’t have any feathering, so their edges are sharp.) Drag it right to soften the mask’s edges or left to sharpen them. You’ll also use this slider when making a soft-oval vignette collage, as shown on The Single Row and Column Marquee Tools.
Mask Edge. When you click this button, Photoshop opens the Refine Mask dialog box, where you can smooth the mask’s edges, make the mask smaller or larger, add feathering to it, and so on. Creating Selections with Channels has the details on this dialog box (which is also called Refine Edge).
Color Range. This button opens the Color Range dialog box, where you can add to or subtract from the mask based on the colors in your image. You can also use this dialog box to help create a selection that you can then make a mask from; Expanding Your Selection has more info.
Invert. This button lets you flip-flop the mask so what was masked isn’t and what wasn’t masked is (you’re gonna use this button a lot). Alternatively, you can activate a mask and then press ⌘-I (Ctrl+I) to do the same thing.
Load Selection from Mask. Once you’ve created a layer mask, you can click this button to load it as a selection that you can then use somewhere else, like in another Fill or Adjustment layer’s mask.
Figure 4-32. The Properties panel is your one-stop shop for working with layer masks and Adjustment layers (whether they’re pixel- or vector-based). Heck, you can even add a layer mask right from this panel! Back in Photoshop CS5, these mask options lived in the Masks panel. The Density slider controls mask opacity, which makes one wonder why it’s not named the Opacity slider instead.
Apply Mask. Once you get the mask just right, you can permanently (eek!) apply it to the layer by clicking this button. Applying a mask permanently alters the layer and limits the changes you can make later, so don’t use this option unless you’re certain you won’t need to change the mask down the road. If you click this button by accident, use the History panel or the Undo command (⌘-Z or Ctrl+Z) to get the mask back or you won’t be able to edit it ever again.
Disable/Enable Mask. This visibility eye works just like the one in the Layers panel (Adding New Layers): Click it to turn the mask off or on.
Delete Mask. If you decide you don’t want the mask, you can kick it to the curb by clicking this little trash can at the bottom of the Properties panel.
Add or Select Layer Mask, Add or Select Vector Mask. The two buttons at the top right of the Properties panel let you add or select (activate) a layer mask or vector mask (see Using Vector Masks), depending on whether the active layer already has one or the other—if it does, these buttons let you activate the mask; if not, they let you add one. If you opened the Properties panel by double-clicking a mask, the appropriate mask button is darkened as if it’s depressed.
Tip
To copy a mask to another layer, press and hold Option (Alt on a PC), click the mask in the Layers panel, and then drag it to another layer. (You have to press Option or Alt before you click the mask or you’ll merely move it from one layer to the other.) When you start to drag, your cursor turns into a double black-and-white arrowhead and you see a ghosted image of the mask.
When a layer mask is active, the Properties panel’s menu (labeled in Figure 4-32) contains these goodies:
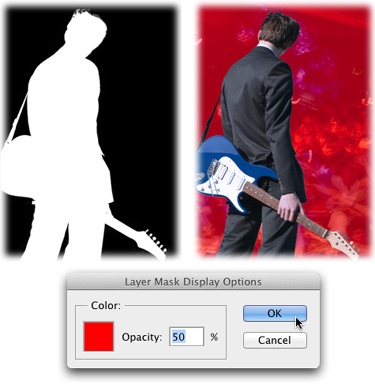
Mask Options. When you’re editing layer masks, you’ve got a few different viewing options. In the masking examples discussed earlier, the mask was edited while the image was viewed in full color. However, as Figure 4-33 explains, you can also work on a mask while you’re looking at a grayscale version of the mask itself (meaning it fills your document window), or you can turn the mask into a color overlay. Which one you should choose depends on the colors in your image and the area you’re trying to select. If you go the color overlay route and Photoshop’s standard red isn’t doing it for you, choose this option and use the Layer Mask Display Options dialog box to pick another color that makes it easy to distinguish the mask from the unmasked parts of the image (Figure 4-33, bottom).
Add Mask To Selection. If you create a mask and then make a selection (see Chapter 5), you can choose this option to add the area you’ve masked to the selection. This is an easy way to expand the currently selected area to include the mask in one quick step.
Subtract Mask From Selection. This option deletes the shape of the mask from your selection.
Figure 4-33. Left: To get inside a layer mask and edit it in full grayscale glory—handy for ensuring your subject is fully revealed—Option-click (Alt-click on a PC) the mask’s thumbnail in the Layers panel. Once you’re inside the mask, you can then copy and paste pixels—including text—right into it. (Page 622 has a cool example involving snatching texture from a photo and pasting it inside a mask to add it to text.) When you’re finished editing the mask, click the layer’s thumbnail. Right: To edit the mask with a red overlay (like Quick Mask Mode; page 176), click to activate the mask and then press the backslash key (\). To change the overlay’s color, open the Masks panel’s menu and choose Mask Options. In the dialog box that appears (shown here), click the color square and then pick a new color from the resulting Color Picker. Press the backslash key again to send the overlay packin’.
Intersect Mask With Selection. To select only areas where your selection and the mask overlap (if you need to add a color or pattern to only those places, for example), choose this option.
Get Photoshop CC: The Missing Manual now with the O’Reilly learning platform.
O’Reilly members experience books, live events, courses curated by job role, and more from O’Reilly and nearly 200 top publishers.

