After all that hard work learning about layers, you’re probably ready for some fun. This section is all about layer styles: a set of 11 fully adjustable, ready-made special effects for layers that you can apply in all kinds of cool ways. Consider this section your reward for sticking with this chapter till the bitter end.
Layer styles are a lot of fun and, since they appear on their own layers, they’re nondestructive and they remain editable as long as you save the document as a PSD file. Layer styles are great for adding finishing touches to designs, and they can really make text and graphical elements pop off the page (see Figure 4-36). They also update automatically as your layer content changes.
Note
If you add a layer style to a path in Photoshop CC (Drawing Paths with the Pen Tool), its gray outline temporarily disappears while the Layer Style dialog box is open.
Here’s how to add The Lord of All Styles, the drop shadow, to a layer:
Activate the soon-to-be-shadowed layer or layer group in the Layers panel.
Photoshop limits you to activating a single layer when you’re adding a style. That said, you can add layers styles to layer groups (Grouping Layers into Folders).
Tip
If you apply a layer style to a layer group, Photoshop treats the group as if it were flattened so you get slightly different results than you do by adding the style to individual layers. For example, if you’ve got a slew of layers and you add a drop shadow to all of ’em, you end up with a shadow on top of a shadow on top of a shadow—yuck. The fix is to stuff those layers inside a layer group and then add the layer style to the group instead. That way you end up with one nice, subtle shadow instead of a big ol’ shadowy mess.
Click the “Add a layer style” button at the bottom of the Layers panel and choose Drop Shadow (see Figure 4-37, top).
The button looks like a tiny cursive fx that stands for “layer effects” (though this book refers to them as layer styles).
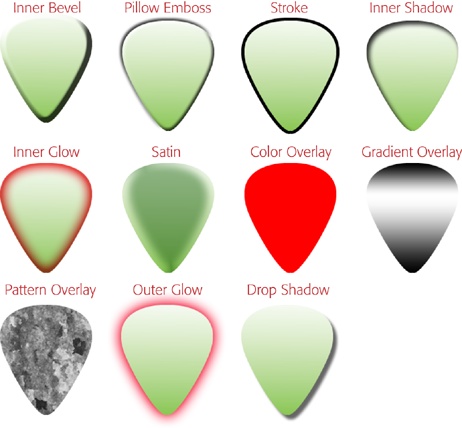
Figure 4-36. Here’s a peek at all the cool styles you can tack onto layers, be they Image, Shape, or Type layers, or Smart Objects. Adobe refers to ’em individually as “styles” and collectively as “effects,” but most folks just call ’em “layer styles.” Back in CS6, the menu order of these styles changed to reflect the order in which they’re applied to layer content. For example, Bevel & Emboss appears on top of any other styles you’ve applied to the same layer, while a drop shadow appears below other styles (which makes sense if you think about where these styles would physically appear on real objects).
In the Layer Style dialog box that appears, adjust the settings to produce a respectable (soft)—not gaudy (black and 10 feet away from the object)—drop shadow.
There are a bazillion options for each style in the Layer Style dialog box, as Figure 4-37 shows, and it’s a good idea to experiment with all of ’em so you know how they work.
Click OK when you’re satisfied with the effect and then marvel at your very first drop shadow.
Photoshop closes the Layer Style dialog box and adds a couple of things to the Layers panel: a category named Effects and, beneath it, an item named Drop Shadow. (If you add more layer styles, they stack up beneath the word “Effects.”) The program also adds a special badge to the right of the Image layer’s name (it looks like a cursive fx).
To edit the style later on, double-click it in the Layers panel. To move it to another layer, just grab it and drag (you’ll see a big fx as you drag). You can add as many different styles to a layer as you want, all from the Layer Style dialog box. Just turn on the checkboxes for the styles you want (they’re all in the Styles column on the left) and then click a style’s name to see its options. And remember the Fill setting discussed back on Tweaking a Layer’s Opacity and Fill? You can use it to make a layer’s contents see-through while its style remains 100 percent solid (great for creating hollow text).
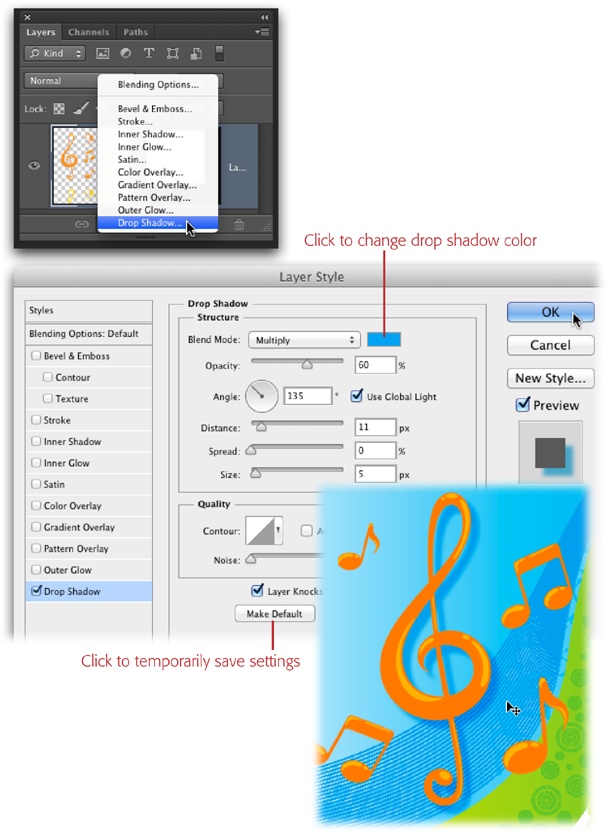
Figure 4-37. When it comes to drop shadows, the classiest ones are rarely black—instead, they pick up a darker color from the image. Just click the color swatch labeled here, and Photoshop summons the Color Picker (page 489). To snatch a color that already lives in the image, mouse over the image and, when your cursor turns into an eyedropper, click once; your shadow takes on that color. You’ll also likely need to lower the shadow’s opacity so it’s nice and soft, and use the Spread and Size sliders to make it wider. Don’t bother messing with the Angle dial or the Distance slider because you can change those settings visually by heading over to your document and dragging the shadow around—while the Layer Style dialog box is still open—as shown here (bottom). Once you get the drop shadow just right, click the Make Default button (labeled). The next time you need to add a drop shadow, Photoshop will use those same settings.
Once you’ve tacked on a layer style or two, you’ll undoubtedly want to apply them to other layers and turn them off or on. Here’s how:
To copy a style from one layer to another, head over to the Layers panel and Option-drag (Alt-drag on a PC) the style to the new layer. Your cursor turns into a double black-and-white arrowhead when you drag, and you see a big, ghosted fx.
To turn a style off, click the visibility eye to the left of the style’s name in the Layers panel.
FREQUENTLY ASKED QUESTION: Hiding Styles with Masks
Help! I have a mask on my layer and Photoshop is showing the styles through the darn mask! How do I hide those pesky styles?
Ah, you seek the elusive style cloak. To summon it, you must boil the stalk of a West Texas tumbleweed, season it with eye of toad, and drink it from the shell of an armadillo three days dead…
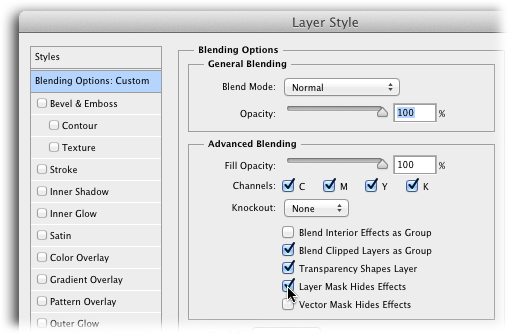
Just kidding. To hide styles with a layer mask, you’ve got to change the layer’s blending options. Double-click the word “Effects” in the Layers panel and Photoshop opens the Layer Style dialog box set to display the Blending Options settings.
In the Advanced Blending section in the center of the dialog box (shown here), you’ll see a list of checkboxes that includes Layer Mask Hides Effects and Vector Mask Hides Effects. Turn on the appropriate option for the kind of layer you’re working with (Vector Mask [Using Vector Masks] for vector-based layers, and Layer Mask for all other layers), and then click OK. Back in your document, the mask should hide any styles you’ve applied to that layer. In the Layers panel, a tiny icon that looks like two intersecting squares appears at the far right of the layer to indicate that its blending options have been changed.
Now, back to that magic potion…
If you Control-click (right-click) a layer style in the Layers panel, you see a shortcut menu with these options:
Disable Layer Effects turns off all the styles on that layer. To turn them back on, open the menu again and choose Enable Layer Effects. (Clicking the visibility eye to the left of the word “Effects” in the Layers panel does the same thing.)
Copy Layer Style copies all the styles you’ve applied to the active layer so you can apply them to other layers. After you choose this command, Shift- or ⌘-click (Ctrl-click) to activate the layer(s) you want to apply the styles to, and then Control-click (right-click) to open the shortcut menu again and choose Paste Layer Style.
Clear Layer Style deletes the style from the active layers. You can also drag a style to the trash can at the bottom of the Layers panel to remove it from a layer.
Global Light tells Photoshop to use the same lighting angle in every style you add, which is useful when you’re applying drop shadows or inner shadows. If you’ve got more than one drop shadow in your document, you probably want to turn on this option so the lighting stays consistent.
Create Layer takes the style applied to the active layer and converts that style into an Image layer, which means you lose the ability to edit the style later. Though it sounds limiting, you can use this option to further customize a layer style into your own personal vision; once it’s a regular layer, you can run filters on it, use the painting tools, and so on.
Hide All Effects turns off the styles applied to every layer. After you’ve hidden them, this menu item changes to read “Show Effects” so you can choose it to turn ’em back on.
Scale Effects lets you resize the style itself, independent of the layer’s contents, by entering a percentage. This option is useful if you want to fine-tune drop shadows and glows by making them slightly larger or smaller.
Last but not least, there may be a time when you want to rasterize a layer style so it’s part of the layer itself (though it’s tough to think of a reason why). You can do that by heading to the Layers panel, Control-clicking (right-clicking) to the right of the layer’s thumbnail, and then choosing Rasterize Layer Style. When you do, Photoshop permanently applies the layer style to the layer.
Photoshop comes with all kinds of layer-style presets made from some pretty psychedelic style combinations. You’ll find a couple of them useful, but most of them are just funky. To get at them, open the Styles panel by clicking its tab in the panel dock on the right side of your screen or by choosing Window→Styles (see Figure 4-38).
Admittedly, the preloaded styles aren’t anything to write home about, but if you open the Styles panel menu, you’ll see 10 more sets you can load: Abstract Styles, Buttons, and so on. To load another set, just choose it from the panel’s menu; Photoshop asks if you’d like to add them to the existing styles or replace the existing ones. If you’re a web designer, you may find the Glass Buttons and Web Styles sets useful for that clear, plastic look. Otherwise, you probably won’t find much use for many of these styles.
To apply one of the presets, simply activate the layer you want to use it on and then click the style’s thumbnail. You can tweak the style by double-clicking its layer in the Layers panel or by choosing its name from the left-hand list in the Layer Style dialog box. You can also drag and drop a style’s thumbnail from the Styles panel onto a layer in the Layers panel, but doing so makes that style replace any styles you’ve already added to that layer. To add a saved style on top of existing styles, hold down the Shift key as you drag and drop or as you click the style’s thumbnail.
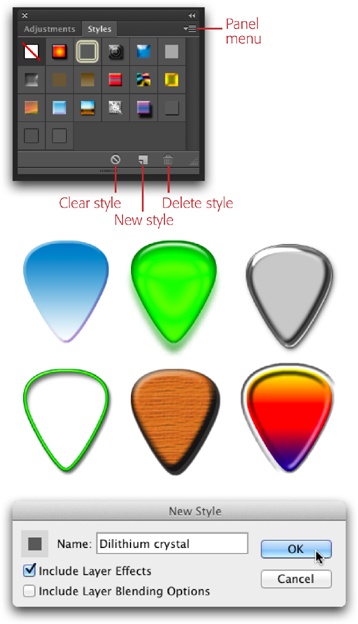
Figure 4-38. You’ll find all manner of weird and wacky presets in the Styles panel (top). (To make the style thumbnails larger or to view them in a list, open the Styles panel’s menu and choose Text Only, Small Thumbnail, Large Thumbnail, Small List, or Large List.) Some of them are more useful than others (middle). You can add your own creations to the mix, too. Just activate the layer your style is applied to and then click the New Style button labeled here or choose New Style from the Styles panel’s menu. In the resulting dialog box (bottom), give your style a name, turn on the Include Layer Effects checkbox to make sure you don’t lose any of your changes, and—if you’ve changed any layer blending options—turn on the Include Layer Blending Options checkbox, too. When you click OK, Photoshop saves your style for posterity and adds it to the Styles panel (though it’s a good idea to safeguard your presets, as online Appendix B explains). To bypass this dialog box next time you want to save a style, Option-click (Alt-click on a PC) the New Style button. You’ll get a new Style called “Style” that you can rename later, but you don’t get to change any other settings.
If you’re really proud of the styles you’ve created and want to share them with the masses (or at least load ’em onto another computer), here’s what to do: From the Styles panel’s menu, choose Save Styles, give your style a name, and tell Photoshop where to save it. You can then take the resulting file to another computer, launch Photoshop, and pick one of the following options from the Styles panel’s menu:
Load Styles adds the new style to the ones currently in your Styles panel.
Replace Styles zaps the ones you’ve got in favor of the new one.
Reset Styles returns your styles to the factory settings.
Get Photoshop CC: The Missing Manual now with the O’Reilly learning platform.
O’Reilly members experience books, live events, courses curated by job role, and more from O’Reilly and nearly 200 top publishers.

