The next step after building and installing a mod_perl-enabled Apache server is to configure it. This is done in two distinct steps: getting the server running with a standard Apache configuration, and then applying mod_perl-specific configuration directives to get the full benefit out of it.
For readers who haven’t previously been exposed to the Apache web server, our discussion begins with standard Apache directives and then continues with mod_perl-specific material.
The startup.pl file can be used in many ways to improve performance. We will talk about all these issues later in the book. In this chapter, we discuss the configuration possibilities that the startup.pl file gives us.
<Perl> sections are a great time saver if
you have complex configuration files. We’ll talk
about <Perl> sections in this chapter.
Another important issue we’ll cover in this chapter is how to validate the configuration file. This is especially important on a live production server. If we break something and don’t validate it, the server won’t restart. This chapter discusses techniques to prevent validation problems.
At the end of this chapter, we discuss various tips and tricks you may find useful for server configuration, talk about a few security concerns related to server configuration, and finally look at a few common pitfalls people encounter when they misconfigure their servers.
Apache configuration can be confusing. To minimize the number of things that can go wrong, it’s a good idea to first configure Apache itself without mod_perl. So before we go into mod_perl configuration, let’s look at the basics of Apache itself.
Prior to Version 1.3.4, the default Apache installation used three configuration files: httpd.conf, srm.conf, and access.conf. Although there were historical reasons for having three separate files (dating back to the NCSA server), it stopped mattering which file you used for what a long time ago, and the Apache team finally decided to combine them. Apache Versions 1.3.4 and later are distributed with the configuration directives in a single file, httpd.conf . Therefore, whenever we mention a configuration file, we are referring to httpd.conf.
By default, httpd.conf is installed in the conf directory under the server root directory. The default server root is /usr/local/apache/ on many Unix platforms, but it can be any directory of your choice (within reason). Users new to Apache and mod_perl will probably find it helpful to keep to the directory layouts we use in this book.
There is also a special file called .htaccess , used for per-directory configuration. When Apache tries to access a file on the filesystem, it will first search for .htaccess files in the requested file’s parent directories. If found, Apache scans .htaccess for further configuration directives, which it then applies only to that directory in which the file was found and its subdirectories. The name .htaccess is confusing, because it can contain almost any configuration directives, not just those related to resource access control. Note that if the following directive is in httpd.conf:
<Directory />
    AllowOverride None
</Directory>
Apache will not look for .htaccess at all unless
AllowOverride
is set to a value other than
None in a more specific
<Directory> section.
.htaccess can be renamed by using the
AccessFileName
directive. The following example
configures Apache to look in the target directory for a file called
.acl instead of .htaccess:
AccessFileName .acl
However, you must also make sure that this file can’t be accessed directly from the Web, or else you risk exposing your configuration. This is done automatically for .ht* files by Apache, but for other files you need to use:
<Files .acl>
    Order Allow,Deny
    Deny from all
</Files>
Another often-mentioned file is the startup file, usually named startup.pl . This file contains Perl code that will be executed at server startup. We’ll discuss the startup.pl file in greater detail later in this chapter, in Section 4.3.
Beware of editing httpd.conf without understanding all the implications. Modifying the configuration file and adding new directives can introduce security problems and have performance implications. If you are going to modify anything, read through the documentation beforehand. The Apache distribution comes with an extensive configuration manual. In addition, each section of the distributed configuration file includes helpful comments explaining how each directive should be configured and what the default values are.
If you haven’t moved Apache’s directories around, the installation program will configure everything for you. You can just start the server and test it. To start the server, use the apachectl utility bundled with the Apache distribution. It resides in the same directory as httpd, the Apache server itself. Execute:
panic% /usr/local/apache/bin/apachectl start
Now you can test the server, for example by accessing http://localhost/ from a browser running on the same host.
A basic setup requires little configuration. If you moved any directories after Apache was installed, they should be updated in httpd.conf. Here are just a couple of examples:
ServerRoot   "/usr/local/apache"
DocumentRoot "/usr/local/apache/docs"
You can change the port to which the server is bound by editing the
Port directive. This example sets the port to 8080
(the default for the HTTP protocol is 80):
Port 8080
You might want to change the user and group names under which the server will run. If Apache is started by the user root (which is generally the case), the parent process will continue to run as root, but its children will run as the user and group specified in the configuration, thereby avoiding many potential security problems. This example uses the httpd user and group:
User httpd
Group httpd
Make sure that the user and group httpd already exist. They can be created using useradd(1) and groupadd(1) or equivalent utilities.
Many other directives may need to be configured as well. In addition
to directives that take a single value, there are whole sections of
the configuration (such as the <Directory>
and <Location> sections) that apply to only
certain areas of the web space. The httpd.conf
file supplies a few examples, and these will be discussed shortly.
Let’s discuss the basics of the
<Directory>,
<Location>, and
<Files> sections. Remember that there is
more to know about them than what we list here, and the rest of the
information is available in the Apache documentation. The information
we’ll present here is just what is important for
understanding mod_perl configuration.
Apache considers directories and files on the machine it runs on as resources. A particular behavior can be specified for each resource; that behavior will apply to every request for information from that particular resource.
Directives in
<Directory>
sections apply to specific directories on the host machine, and those
in
<Files>
sections apply only to specific files (actually, groups of files with
names that have something in common).
<Location>
sections
apply to specific URIs. Locations are given relative to the document
root, whereas directories are given as absolute paths starting from
the filesystem root (/). For example, in the
default server directory layout where the server root is
/usr/local/apache and the document root is
/usr/local/apache/htdocs, files under the
/usr/local/apache/htdocs/pub directory can be
referred to as:
<Directory /usr/local/apache/htdocs/pub>
</Directory>
or alternatively (and preferably) as:
<Location /pub>
</Location>
Exercise caution when using <Location> under
Win32. The Windows family of operating systems are case-insensitive.
In the above example, configuration directives specified for the
location /pub on a case-sensitive Unix machine
will not be applied when the request URI is
/Pub. When URIs map to existing files, such as
Apache::Registry scripts, it is safer to use the
<Directory> or
<Files> directives, which correctly
canonicalize filenames according to local filesystem semantics.
It is up to you to decide which directories on your host machine are mapped to which locations. This should be done with care, because the security of the server may be at stake. In particular, essential system directories such as /etc/ shouldn’t be mapped to locations accessible through the web server. As a general rule, it might be best to organize everything accessed from the Web under your ServerRoot, so that it stays organized and you can keep track of which directories are actually accessible.
Locations do not necessarily have to refer to existing physical directories, but may refer to virtual resources that the server creates upon a browser request. As you will see, this is often the case for a mod_perl server.
When a client (browser) requests a resource (URI plus optional arguments) from the server, Apache determines from its configuration whether or not to serve the request, whether to pass the request on to another server, what (if any) authentication and authorization is required for access to the resource, and which module(s) should be invoked to generate the response.
For any given resource, the various sections in the configuration may
provide conflicting information. Consider, for example, a
<Directory> section that specifies that
authorization is required for access to the resource, and a
<Files> section that says that it is not. It
is not always obvious which directive takes precedence in such cases.
This can be a trap for the unwary.
Scope: Can appear in server and virtual host configurations.
<Directory>
and
</Directory> are used to enclose a group
of
directives that will apply to only the named directory and its
contents, including any subdirectories. Any directive that is allowed
in a directory context (see the Apache documentation) may be used.
The path given in the <Directory> directive
is either the full path to a directory, or a string containing
wildcard characters (also called globs). In the
latter case, ? matches any single character,
* matches any sequence of characters, and
[ ] matches character ranges. These are similar to
the wildcards used by sh and similar shells. For
example:
<Directory /home/httpd/docs/foo[1-2]>
    Options Indexes
</Directory>
will match /home/httpd/docs/foo1 and
/home/httpd/docs/foo2. None of the wildcards
will match a / character. For example:
<Directory /home/httpd/docs>
    Options Indexes
</Directory>
matches /home/httpd/docs and applies to all its subdirectories.
Matching a regular expression is done by using the
<DirectoryMatch regex> ...
</DirectoryMatch> or <Directory
~ regex> ... </Directory> syntax. For example:
<DirectoryMatch /home/www/.*/public>
    Options Indexes
</DirectoryMatch>
will match /home/www/foo/public but not
/home/www/foo/private. In a regular expression,
.* matches any character (represented by
.) zero or more times (represented by
*). This is entirely different from the
shell-style wildcards used by the
<Directory> directive. They make it easy to
apply a common configuration to a set of public directories. As
regular expressions are more flexible than globs, this method
provides more options to the experienced user.
If multiple (non-regular expression)
<Directory> sections match the directory (or
its parents) containing a document, the directives are applied in the
order of the shortest match first, interspersed with the directives
from any .htaccess files. Consider the following
configuration:
<Directory />
    AllowOverride None
</Directory>

<Directory /home/httpd/docs/>
    AllowOverride FileInfo
</Directory>
Let us detail the steps Apache goes through when it receives a request for the file /home/httpd/docs/index.html:
Apply the directive
AllowOverride None(disabling .htaccess files).Apply the directive
AllowOverride FileInfofor the directory /home/httpd/docs/ (which now enables .htaccess in /home/httpd/docs/ and its subdirectories).Apply any directives in the group
FileInfo, which control document types (AddEncoding,AddLanguage,AddType, etc.—see the Apache documentation for more information) found in /home/httpd/docs/.htaccess.
Scope: Can appear in server and virtual host configurations, as well as in .htaccess files.
The <Files>
directive provides access control by
filename and is comparable to the
<Directory> and
<Location> directives.
<Files> should be closed with the
corresponding </Files>. The directives
specified
within this section will be applied to any object with a basename
matching the specified filename. (A basename is the last component of
a path, generally the name of the file.)
<Files> sections are processed in the order
in which they appear in the configuration file, after the
<Directory> sections and
.htaccess files are read, but before
<Location> sections. Note that
<Files> can be nested inside
<Directory> sections to restrict the portion
of the filesystem to which they apply. However,
<Files> cannot be nested inside
<Location> sections.
The filename argument should include a filename or a wildcard string,
where ? matches any single character and
* matches any sequence of characters, just as with
<Directory> sections. Extended regular
expressions can also be used, placing a tilde character
(~) between the directive and the regular
expression. The regular expression should be in quotes. The dollar
symbol ($) refers to the end of the string. The
pipe character (|) indicates alternatives, and
parentheses (()) can be used for grouping. Special
characters in extended regular expressions must be escaped with
backslashes (\). For example:
<Files ~ "\.(pl|cgi)$">
    SetHandler perl-script
    PerlHandler Apache::Registry
    Options +ExecCGI
</Files>
would match all the files ending with the .pl or
.cgi extension (most likely Perl scripts).
Alternatively, the <FilesMatch regex> ...
</FilesMatch> syntax can be used.
Scope: Can appear in server and virtual host configurations.
The <Location>
directive
provides for directive scope limitation by URI. It is similar to the
<Directory> directive and starts a section
that is terminated with the </Location>
directive.
<Location> sections are processed in the
order in which they appear in the configuration file, after the
<Directory> sections,
.htaccess files, and
<Files> sections have been interpreted.
The <Location> section is the directive that
is used most often with mod_perl.
Note that URIs do not have to refer to real directories or files
within the filesystem at all; <Location>
operates completely outside the filesystem. Indeed, it may sometimes
be wise to ensure that <Location>s do not
match real paths, to avoid confusion.
The URI may use wildcards. In a wildcard string, ?
matches any single character, * matches any
sequences of characters, and [ ] groups characters
to match. For regular expression matches, use the
<LocationMatch regex> ...
</LocationMatch> syntax.
The <Location> functionality is especially
useful when combined with the SetHandler
directive. For example, to enable server status requests (via
mod_status) but allow them only from browsers at
*.example.com, you might use:
<Location /status>
    SetHandler server-status
    Order Deny,Allow
    Deny from all
    Allow from .example.com
</Location>
As you can see, the /status path does not exist on the filesystem, but that doesn’t matter because the filesystem isn’t consulted for this request—it’s passed on directly to mod_status.
When configuring the server, it’s important to understand the order in which the rules of each section are applied to requests. The order of merging is:
<Directory>(except for regular expressions) and .htaccess are processed simultaneously, with the directives in .htaccess overriding<Directory>.<DirectoryMatch>and<Directory ~ >with regular expressions are processed next.<Files>and<FilesMatch>are processed simultaneously.<Location>and<LocationMatch>are processed simultaneously.
Apart from <Directory>, each group is
processed in the order in which it appears in the configuration
files. <Directory>s (group 1 above) are
processed in order from the shortest directory component to the
longest (e.g., first / and only then
/home/www). If multiple
<Directory> sections apply to the same
directory, they are processed in the configuration file order.
Sections inside <VirtualHost> sections are
applied as if you were running several independent servers. The
directives inside one <VirtualHost> section
do not interact with directives in other
<VirtualHost> sections. They are applied
only after processing any sections outside the virtual host
definition. This allows virtual host configurations to override the
main server configuration.
If there is a conflict, sections found later in the configuration file override those that come earlier.
Let’s
say that you want all files to be
handled the same way, except for a few of the files in a specific
directory and its subdirectories. For example, say you want all the
files in /home/httpd/docs to be processed as
plain files, but any files ending with .html and
.txt to be processed by the content handler of
the Apache::Compress module (assuming that you are
already running a mod_perl server):
<Directory /home/httpd/docs>
    <FilesMatch "\.(html|txt)$">
        PerlHandler +Apache::Compress
    </FilesMatch>
</Directory>
The + before Apache::Compress
tells mod_perl to load the Apache::Compress module
before using it, as we will see later.
Using
<FilesMatch>,
it is possible to embed sections inside other sections to create
subgroups that have their own distinct behavior. Alternatively, you
could also use a <Files> section inside an
.htaccess file.
Note that you can’t put
<Files> or
<FilesMatch> sections inside a
<Location> section, but you can put them
inside a <Directory> section.
Normally, if
multiple Options
directives apply to a directory, the most specific one is taken
completely; the options are not merged.
However, if all the options on the Options
directive are preceded by either a + or
- symbol, the options are merged. Any options
preceded by + are added to the options currently
active, and any options preceded by - are removed.
For example, without any + or -
symbols:
<Directory /home/httpd/docs>
    Options Indexes FollowSymLinks
</Directory>
<Directory /home/httpd/docs/shtml>
    Options Includes
</Directory>
Indexes and FollowSymLinks will
be set for /home/httpd/docs/, but only
Includes will be set for the
/home/httpd/docs/shtml/ directory. However, if
the second Options directive uses the
+ and - symbols:
<Directory /home/httpd/docs>
    Options Indexes FollowSymLinks
</Directory>
<Directory /home/httpd/docs/shtml>
    Options +Includes -Indexes
</Directory>
then the options FollowSymLinks and
Includes will be set for the
/home/httpd/docs/shtml/ directory.
MinSpareServers
,
MaxSpareServers
,
StartServers
, and
MaxClients
are
standard Apache configuration
directives that control the number of servers being launched at
server startup and kept alive during the server’s
operation. When Apache starts, it spawns
StartServers child processes. Apache makes sure
that at any given time there will be at least
MinSpareServers but no more than
MaxSpareServers idle servers. However, the
MinSpareServers rule is completely satisfied only
if the total number of live servers is no bigger than
MaxClients.
MaxRequestsPerChild lets you specify the maximum
number of requests to be served by each child. When a process has
served MaxRequestsPerChild requests, the parent
kills it and replaces it with a new one. There may also be other
reasons why a child is killed, so each child will not necessarily
serve this many requests; however, each child will not be allowed to
serve more than this number of requests. This feature is handy to
gain more control of the server, and especially to avoid child
processes growing too big (RAM-wise) under mod_perl.
These five directives are very important for getting the best performance out of your server. The process of tuning these variables is described in great detail in Chapter 11.
When you have tested that the Apache server works on your machine, it’s time to configure the mod_perl part. Although some of the configuration directives are already familiar to you, mod_perl introduces a few new ones.
It’s a good idea to keep all mod_perl-related configuration at the end of the configuration file, after the native Apache configuration directives, thus avoiding any confusion.
To ease maintenance and to simplify multiple-server installations,
the mod_perl-enabled Apache server configuration system provides
several alternative ways to keep your configuration directives in
separate places. The
Include
directive in
httpd.conf lets you include the contents of
other files, just as if the information were all contained in
httpd.conf. This is a
feature of Apache itself. For example,
placing all mod_perl-related configuration in a separate file named
conf/mod_perl.conf can be done by adding the
following directive to httpd.conf:
Include conf/mod_perl.conf
If you want to include this configuration conditionally, depending on
whether your Apache has been compiled with mod_perl, you can use the
IfModule directive :
<IfModule mod_perl.c>
  Include conf/mod_perl.conf
</IfModule>
mod_perl adds two more directives.
<Perl>
sections allow you to execute Perl code from within any configuration
file at server startup time. Additionally, any file containing a Perl
program can be executed at server startup simply by using the
PerlRequire or PerlModule
directives, as we will show shortly.
For many reasons, a server can never allow access to its entire directory hierarchy. Although there is really no indication of this given to the web browser, every path given in a requested URI is therefore a virtual path; early in the processing of a request, the virtual path given in the request must be translated to a path relative to the filesystem root, so that Apache can determine what resource is really being requested. This path can be considered to be a physical path, although it may not physically exist.
For instance, in mod_perl systems, you may intend that the translated path does not physically exist, because your module responds when it sees a request for this non-existent path by sending a virtual document. It creates the document on the fly, specifically for that request, and the document then vanishes. Many of the documents you see on the Web (for example, most documents that change their appearance depending on what the browser asks for) do not physically exist. This is one of the most important features of the Web, and one of the great powers of mod_perl is that it allows you complete flexibility to create virtual documents.
The ScriptAlias
and Alias
directives provide a mapping of a URI to a filesystem directory. The
directive:
Alias /foo /home/httpd/foo
will map all requests starting with /foo to the files starting with /home/httpd/foo/. So when Apache receives a request to http://www.example.com/foo/test.pl, the server will map it to the file test.pl in the directory /home/httpd/foo/.
Additionally, ScriptAlias assigns all the requests
that match the specified URI (i.e., /cgi-bin) to
be executed by mod_cgi.
ScriptAlias /cgi-bin /home/httpd/cgi-bin
is actually the same as:
Alias /cgi-bin /home/httpd/cgi-bin
<Location /cgi-bin>
    SetHandler cgi-script
    Options +ExecCGI
</Location>
where the SetHandler
directive invokes mod_cgi. You
shouldn’t use the ScriptAlias
directive unless you want the request to be processed under mod_cgi.
Therefore, when configuring mod_perl sections, use
Alias instead.
Under mod_perl, the Alias directive will be
followed by a section with at least two directives. The first is the
SetHandler/perl-script
directive, which tells Apache to
invoke mod_perl to run the script. The second directive (for example,
PerlHandler) tells mod_perl which handler (Perl
module) the script should be run under, and hence for which phase of
the request. Later in this chapter, we discuss the available
Perl*Handlers[1] for
the various request phases. A typical mod_perl configuration that
will execute the Perl scripts under the
Apache::Registry handler looks like this:
Alias /perl/ /home/httpd/perl/
<Location /perl>
    SetHandler perl-script
    PerlHandler Apache::Registry
    Options +ExecCGI
</Location>
The last directive tells Apache to execute the file as a program, rather than return it as plain text.
When you have decided which methods to use to run your scripts and where you will keep them, you can add the configuration directive(s) to httpd.conf. They will look like those below, but they will of course reflect the locations of your scripts in your filesystem and the decisions you have made about how to run the scripts:
ScriptAlias /cgi-bin/ /home/httpd/cgi-bin/
Alias       /perl/    /home/httpd/perl/
<Location /perl>
    SetHandler perl-script
    PerlHandler Apache::Registry
    Options +ExecCGI
</Location>
In the examples above, all requests issued for URIs starting with /cgi-bin will be served from the directory /home/httpd/cgi-bin/, and those starting with /perl will be served from the directory /home/httpd/perl/.
Sometimes you will want to map the same directory to a few different locations and execute each file according to the way it was requested. For example, in the following configuration:
# Typical for plain cgi scripts:
ScriptAlias /cgi-bin/  /home/httpd/perl/

# Typical for Apache::Registry scripts:
Alias       /perl/     /home/httpd/perl/

# Typical for Apache::PerlRun scripts:
Alias       /cgi-perl/ /home/httpd/perl/

<Location /perl/>
    SetHandler perl-script
    PerlHandler Apache::Registry
    Options +ExecCGI
</Location>
<Location /cgi-perl/>
    SetHandler perl-script
    PerlHandler Apache::PerlRun
    Options +ExecCGI
</Location>
the following three URIs:
http://www.example.com/perl/test.pl
http://www.example.com/cgi-bin/test.pl
http://www.example.com/cgi-perl/test.pl
are all mapped to the same file,
/home/httpd/perl/test.pl. If
test.pl is invoked with the URI prefix
/perl, it will be executed under the
Apache::Registry handler. If the prefix is
/cgi-bin, it will be executed under mod_cgi, and
if the prefix is /cgi-perl, it will be executed
under the Apache::PerlRun handler.
This means that we can have all our CGI scripts located at the same place in the filesystem and call the script in any of three ways simply by changing one component of the URI (cgi-bin|perl|cgi-perl).
This technique makes it easy to migrate your scripts to mod_perl. If
your script does not seem to work while running under mod_perl, in
most cases you can easily call the script in straight mod_cgi mode or
under Apache::PerlRun without making any script
changes. Simply change the URL you use to invoke it.
Although in the configuration above we have configured all three
Aliases to point to the same directory within our
filesystem, you can of course have them point to different
directories if you prefer.
This should just be a migration strategy, though. In general, it’s a bad idea to run scripts in plain mod_cgi mode from a mod_perl-enabled server—the extra resource consumption is wasteful. It is better to run these on a plain Apache server.
The
<Location>
section assigns a number of rules that the server follows when the
request’s URI matches the location. Just as it is a
widely accepted convention to use /cgi-bin for
mod_cgi scripts, it is habitual to use /perl as
the base URI of the Perl scripts running under mod_perl.
Let’s review the following very widely used
<Location> section:
Alias /perl/ /home/httpd/perl/
PerlModule Apache::Registry
<Location /perl>
    SetHandler perl-script
    PerlHandler Apache::Registry
    Options +ExecCGI
    Allow from all
    PerlSendHeader On
</Location>
This configuration causes all requests for URIs starting with
/perl to be handled by the mod_perl Apache
module with the handler from the Apache::Registry
Perl module.
Remember the Alias from the previous section? We
use the same Alias here. If you use a
<Location> that does not have the same
Alias, the server will fail to locate the script
in the filesystem. You need the Alias setting only
if the code that should be executed is located in a file.
Alias just provides the URI-to-filepath
translation rule.
Sometimes there is no script to be executed. Instead, a method in a
module is being executed, as with /perl-status,
the code for which is stored in an Apache module. In such cases, you
don’t need Alias settings for
these <Location>s.
PerlModule is equivalent to
Perl’s native use( ) function
call. We use it to load the Apache::Registry
module, later used as a handler in the
<Location> section.
Now let’s go through the directives inside the
<Location> section:
-
SetHandler perl-script The
SetHandlerdirective assigns the mod_perl Apache module to handle the content generation phase.-
PerlHandler Apache::Registry The
PerlHandlerdirective tells mod_perl to use theApache::RegistryPerl module for the actual content generation.-
Options +ExecCGI Options +ExecCGIordinarily tells Apache that it’s OK for the directory to contain CGI scripts. In this case, the flag is required byApache::Registryto confirm that you really know what you’re doing. Additionally, all scripts located in directories handled byApache::Registrymust be executable, another check against wayward non-script files getting left in the directory accidentally. If you omit this option, the script either will be rendered as plain text or will trigger a Save As dialog, depending on the client. [2]-
Allow from all The
Allowdirective is used to set access control based on the client’s domain or IP adress. Thefrom allsetting allows any client to run the script.-
PerlSendHeader On The
PerlSendHeader Online tells mod_perl to intercept anything that looks like a header line (such asContent-Type: text/html) and automatically turn it into a correctly formatted HTTP header the way mod_cgi does. This lets you write scripts without bothering to call the request object’ssend_http_header( )method, but it adds a small overhead because of the special handling.
If you use CGI.pm’s
header( ) function to generate HTTP headers, you
do not need to activate this directive, because
CGI.pm detects that it’s running
under mod_perl and calls send_http_header( ) for
you.
You will want to set PerlSendHeader Off for
non-parsed headers (nph) scripts and generate
all the HTTP headers yourself. This is also true for mod_perl
handlers that send headers with the send_http_header(
) method, because having PerlSendHeader
On as a server-wide configuration option might be a
performance hit.
-
</Location> </Location>closes the<Location>section definition.
As we
saw earlier, a module should be loaded
before its handler can be used.
PerlModule
and
PerlRequire
are the two mod_perl directives that
are used to load modules and code. They are almost equivalent to
Perl’s use( ) and
require( ) functions (respectively) and are called
from the Apache configuration file. You can pass one or more module
names as arguments to PerlModule:
PerlModule Apache::DBI CGI DBD::Mysql
Generally, modules are preloaded from the startup script, which is
usually called startup.pl. This is a file
containing Perl code that is executed through the
PerlRequire directive. For example:
PerlRequire /home/httpd/perl/lib/startup.pl
A PerlRequire filename can be absolute or relative
to the ServerRoot or to a path in
@INC.
As with any file with Perl code that gets use( )d
or require( )d, it must return a true value. To
ensure that this happens, don’t forget to add
1; at the end of startup.pl.
As mentioned in Chapter 1, Apache specifies 11 phases of the request loop. In order of processing, they are: Post-read-request, URI translation, header parsing, access control, authentication, authorization, MIME type checking, fixup, response (also known as the content handling phase), logging, and finally cleanup. These are the stages of a request where the Apache API allows a module to step in and do something. mod_perl provides dedicated configuration directives for each of these stages:
PerlPostReadRequestHandler
PerlInitHandler
PerlTransHandler
PerlHeaderParserHandler
PerlAccessHandler
PerlAuthenHandler
PerlAuthzHandler
PerlTypeHandler
PerlFixupHandler
PerlHandler
PerlLogHandler
PerlCleanupHandler
These configuration directives usually are referred to as
Perl*Handler directives. The *
in Perl*Handler is a placeholder to be replaced by
something that identifies the phase to be handled. For example,
PerlLogHandler is the Perl handler that (fairly
obviously) handles the logging phase.
In addition, mod_perl adds a few more stages that happen outside the request loop:
-
PerlChildInitHandler Allows your modules to initialize data structures during the startup of the child process.
-
PerlChildExitHandler Allows your modules to clean up during the child process shutdown.
PerlChildInitHandlerandPerlChildExitHandlermight be used, for example, to allocate and deallocate system resources, pre-open and close database connections, etc. They do not refer to parts of the request loop.-
PerlRestartHandler Allows you to specify a routine that is called when the server is restarted. Since Apache always restarts itself immediately after it starts, this is a good phase for doing various initializations just before the child processes are spawned.
-
PerlDispatchHandler Can be used to take over the process of loading and executing handler code. Instead of processing the
Perl*Handlerdirectives directly, mod_perl will invoke the routine pointed to byPerlDispatchHandlerand pass it the Apache request object and a second argument indicating the handler that would ordinarily be invoked to process this phase. So for example, you can write aPerlDispatchHandlerhandler with a logic that will allow only specific code to be executed.
Since most mod_perl applications need to handle only the response
phase, in the default compilation, most of the
Perl*Handlers are disabled. During the
perl Makefile.PL mod_perl build stage, you must
specify whether or not you will want to handle parts of the request
loop other than the usual content generation phase. If this is the
case, you need to specify which phases, or build mod_perl with the
option EVERYTHING=1, which enables them all. All
the build options are covered in detail in Chapter 3.
Note that it is mod_perl that recognizes these directives, not Apache. They are mod_perl directives, and an ordinary Apache server will not recognize them. If you get error messages about these directives being “perhaps mis-spelled,” it is a sure sign that the appropriate part of mod_perl (or the entire mod_perl module!) is missing from your server.
All <Location>,
<Directory>, and
<Files> sections contain a physical path
specification. Like PerlChildInitHandler and
PerlChildExitHandler, the directives
PerlPostReadRequestHandler and
PerlTransHandler cannot be used in these sections,
nor in .htaccess files, because the path
translation isn’t completed and a physical path
isn’t known until the end of the translation
(PerlTransHandler) phase.
PerlInitHandler is more of an alias; its behavior
changes depending on where it is used. In any case, it is the first
handler to be invoked when serving a request. If found outside any
<Location>,
<Directory>, or
<Files> section, it is an alias for
PerlPostReadRequestHandler. When inside any such
section, it is an alias for
PerlHeaderParserHandler.
Starting with the header parsing phase, the
requested URI has been mapped to a physical server pathname, and thus
PerlHeaderParserHandler can be used to match a
<Location>,
<Directory>, or
<Files> configuration section, or to process
an .htaccess file if such a file exists in the
specified directory in the translated path.
PerlDispatchHandler,
PerlCleanupHandler, and
PerlRestartHandler do not correspond to parts of
the Apache API, but allow you to fine-tune the mod_perl API. They are
specified outside configuration sections.
The Apache documentation and the book Writing Apache Modules with Perl and C (O’Reilly) provide in-depth information on the request phases.
By default, the
mod_perl API expects a subroutine named
handler( ) to handle the request in the registered
Perl*Handler module. Thus, if your module
implements this subroutine, you can register the handler with
mod_perl by just specifying the module name. For example, to set the
PerlHandler to
Apache::Foo::handler, the following setting would
be sufficient:
PerlHandler Apache::Foo
mod_perl will load the specified module for you when it is first used. Please note that this approach will not preload the module at startup. To make sure it gets preloaded, you have three options:
You can explicitly preload it with the
PerlModuledirective:PerlModule Apache::Foo
You can preload it in the startup file:
use Apache::Foo ( );
You can use a nice shortcut provided by the
Perl*Handlersyntax:PerlHandler +Apache::Foo
Note the leading
+character. This directive is equivalent to:PerlModule Apache::Foo <Location ..> ... PerlHandler Apache::Foo </Location>
If you decide to give the handler routine a name other than
handler( ) (for example, my_handler(
)), you must preload the module and explicitly give the
name of the handler subroutine:
PerlModule Apache::Foo
<Location ..>
    ...
    PerlHandler Apache::Foo::my_handler
</Location>
This configuration will preload the module at server startup.
If a module needs to know which handler is currently being run, it
can find out with the current_callback( ) method.
This method is most useful to PerlDispatchHandlers
that take action for certain phases only.
if ($r->current_callback eq "PerlLogHandler") {
    $r->warn("Logging request");
}Imagine a complex server setup in which many
different Perl and non-Perl handlers participate in the request
processing, and one or more of these handlers misbehaves. A simple
example is one where one of the handlers alters the request record,
which breaks the functionality of other handlers. Or maybe a handler
invoked first for any given phase of the process returns an
unexpected OK status, thus preventing other
handlers from doing their job. You can’t just add
debug statements to trace the offender—there are too many
handlers involved.
The simplest solution is to get a trace of all registered handlers for each phase, stating whether they were invoked and what their return statuses were. Once such a trace is available, it’s much easier to look only at the players that actually participated, thus narrowing the search path down a potentially misbehaving module.
The
Apache::ShowRequest
module shows the phases the request goes through, displaying module
participation and response codes for each phase. The content response
phase is not run, but possible modules are listed as defined. To
configure it, just add this snippet to
httpd.conf:
<Location /showrequest>
    SetHandler perl-script
    PerlHandler +Apache::ShowRequest
</Location>
To see what happens when you access some URI, add the URI to
/showrequest.
Apache::ShowRequest uses
PATH_INFO to obtain the URI that should be
executed. So, to run /index.html with
Apache::ShowRequest, issue a request for
/showrequest/index.html. For
/perl/test.pl, issue a request for
/showrequest/perl/test.pl.
This module produces rather lengthy output, so we will show only one section from the report generated while requesting /showrequest/index.html:
Running request for /index.html
Request phase: post_read_request
  [snip]
Request phase: translate_handler
   mod_perl ....................DECLINED
   mod_setenvif ................undef
   mod_auth ....................undef
   mod_access ..................undef
   mod_alias ...................DECLINED
   mod_userdir .................DECLINED
   mod_actions .................undef
   mod_imap ....................undef
   mod_asis ....................undef
   mod_cgi .....................undef
   mod_dir .....................undef
   mod_autoindex ...............undef
   mod_include .................undef
   mod_info ....................undef
   mod_status ..................undef
   mod_negotiation .............undef
   mod_mime ....................undef
   mod_log_config ..............undef
   mod_env .....................undef
   http_core ...................OK
Request phase: header_parser
  [snip]
Request phase: access_checker
  [snip]
Request phase: check_user_id
  [snip]
Request phase: auth_checker
  [snip]
Request phase: type_checker
  [snip]
Request phase: fixer_upper
  [snip]
Request phase: response handler (type: text/html)
   mod_actions .................defined
   mod_include .................defined
   http_core ...................defined
Request phase: logger
  [snip]
For each stage, we get a report of what modules could participate in the processing and whether they took any action. As you can see, the content response phase is not run, but possible modules are listed as defined. If we run a mod_perl script, the response phase looks like:
Request phase: response handler (type: perl-script)
   mod_perl ....................defined
With the
mod_perl stacked
handlers mechanism, it is possible for more than one
Perl*Handler to be defined and executed during any
stage of a request.
Perl*Handler directives can define any number of
subroutines. For example:
PerlTransHandler Foo::foo Bar::bar
Foo::foo( ) will be executed first and
Bar::bar( ) second. As always, if the
subroutine’s name is handler( ),
you can omit it.
With the Apache->push_handlers( ) method,
callbacks (handlers) can be added to a stack at
runtime by mod_perl modules.
Apache->push_handlers( ) takes the callback
handler name as its first argument and a subroutine name or reference
as its second. For example, let’s add two handlers
called my_logger1( ) and my_logger2(
) to be executed during the logging phase:
use Apache::Constants qw(:common);
sub my_logger1 {
    #some code here
    return OK;
}
sub my_logger2 {
    #some other code here
    return OK;
}
Apache->push_handlers("PerlLogHandler", \&my_logger1);
Apache->push_handlers("PerlLogHandler", \&my_logger2);
You can also pass a reference to an anonymous subroutine. For example:
use Apache::Constants qw(:common);

Apache->push_handlers("PerlLogHandler", sub {
    print STDERR "_ _ANON_ _ called\n";
    return OK;
});
After each request, this stack is erased.
All handlers will be called in turn, unless a handler returns a
status other than OK or
DECLINED.
To enable this feature, build mod_perl with:
panic% perl Makefile.PL PERL_STACKED_HANDLERS=1 [ ... ]
or:
panic% perl Makefile.PL EVERYTHING=1 [ ... ]
To test whether the version of mod_perl you’re
running can stack handlers, use the
Apache->can_stack_handlers
method. This method will return a true
value if mod_perl was configured with
PERL_STACKED_HANDLERS=1, and a false value
otherwise.
Let’s look at a few real-world examples where this method is used:
The widely used
CGI.pmmodule maintains a global object for its plain function interface. Since the object is global, under mod_perl it does not go out of scope when the request is completed, and theDESTROYmethod is never called. Therefore,CGI->newarranges to call the following code if it detects that the module is used in the mod_perl environment:Apache->push_handlers("PerlCleanupHandler", \&CGI::_reset_globals);This function is called during the final stage of a request, resetting
CGI.pm’s globals before the next request arrives.Apache::DCELoginestablishes a DCE login context that must exist for the lifetime of a request, so theDCE::Loginobject is stored in a global variable. Without stacked handlers, users must set the following directive in the configuration file to destroy the context:PerlCleanupHandler Apache::DCELogin::purge
This is ugly. With stacked handlers,
Apache::DCELogin::handlercan call from within the code:Apache->push_handlers("PerlCleanupHandler", \&purge);Apache::DBI, the persistent database connection module, can pre-open the connection when the child process starts via itsconnect_on_init( )function. This function usespush_handlers( )to add aPerlChildInitHandler:Apache->push_handlers(PerlChildInitHandler => \&childinit);
Now when the new process gets the first request, it already has the database connection open.
Apache::DBIalso usespush_handlers( )to havePerlCleanupHandlerhandle rollbacks if itsAutoCommitattribute is turned off.PerlTransHandlers(e.g.,Apache::MsqlProxy) may decide, based on the URI or some arbitrary condition, whether or not to handle a request. Without stacked handlers, users must configure it themselves.PerlTransHandler Apache::MsqlProxy::translate PerlHandler Apache::MsqlProxy
PerlHandleris never actually invoked unlesstranslate( )sees that the request is a proxy request ($r->proxyreq). If it is a proxy request,translate( )sets$r->handler("perl-script"), and only then willPerlHandlerhandle the request. Now users do not have to specifyPerlHandler Apache::MsqlProxy, because thetranslate( )function can set it withpush_handlers( ).
Now let’s write our own example using stacked handlers. Imagine that you want to piece together a document that includes footers, headers, etc. without using SSI. The following example shows how to implement it. First we prepare the code as shown in Example 4-1.
Example 4-1. Book/Compose.pm
package Book::Compose;
use Apache::Constants qw(OK);

sub header {
    my $r = shift;
    $r->send_http_header("text/plain");
    $r->print("header text\n");
    return OK;
}
sub body   {
    shift->print("body text\n");
    return OK;
}
sub footer {
    shift->print("footer text\n");
    return OK;
}
1;
The code defines the package Book::Compose,
imports the OK constant, and defines three
subroutines: header( ) to send the header,
body( ) to create and send the actual content, and
finally footer( ) to add a standard footer to the
page. At the end of each handler we return OK, so
the next handler, if any, will be executed.
To enable the construction of the page, we now supply the following configuration:
PerlModule Book::Compose
<Location /compose>
    SetHandler perl-script
    PerlHandler Book::Compose::header Book::Compose::body Book::Compose::footer
 </Location>
We preload the Book::Compose module and construct
the PerlHandler directive by listing the handlers
in the order in which they should be invoked.[3]
Finally, let’s look at the technique that allows
parsing the output of another PerlHandler. For
example, suppose your module generates HTML responses, but you want
the same content to be delivered in plain text at a different
location. This is a little trickier, but consider the following:
<Location /perl>
    SetHandler perl-script
    PerlHandler Book::HTMLContentGenerator
</Location>
<Location /text>
    SetHandler perl-script
    PerlHandler Book::HTML2TextConvertor Book::HTMLContentGenerator
</Location>
Notice that Book::HTML2TextConvertor is listed
first. While its handler( ) will be called first,
the actual code that does the conversion will run last, as we will
explain in a moment. Now let’s look at the sample
code in Example 4-2.
Example 4-2. Book/HTML2TextConvertor.pm
package Book::HTML2TextConvertor;

sub handler {
    my $r = shift;
    untie *STDOUT;
    tie *STDOUT => _ _PACKAGE_ _, $r;
}

sub TIEHANDLE {
    my($class, $r) = @_;
    bless { r => $r}, $class;
}

sub PRINT {
    my $self = shift;
    for (@_) {
        # copy it so no 'read-only value modification' will happen
        my $line = $_;
        $line =~ s/<[^>]*>//g; # strip the html <tags>
        $self->{r}->print($line);
    }
}

1;
It untie( )s STDOUT and
re-tie( )s it to its own package, so that content
printed to STDOUT by the previous content
generator in the pipe goes through this module. In the
PRINT( ) method, we attempt to strip the HTML
tags. Of course, this is only an example; correct HTML stripping
actually requires more than one line of code and a quite complex
regular expression, but you get the
idea.
panic% perl Makefile.PL PERL_METHOD_HANDLERS=1 [ ... ]
or:
panic% perl Makefile.PL EVERYTHING=1 [ ... ]
it’s possible to write method handlers in addition
to function handlers. This is useful when you want to write code that
takes advantage of inheritance. To make the handler act as a method
under mod_perl, use the $$ function prototype in
the handler definition. When mod_perl sees that the handler function
is prototyped with $$, it’ll pass
two arguments to it: the calling object or a class, depending on how
it was called, and the Apache request object. So you can write the
handler as:
sub handler ($$) {
    my($self, $r) = @_;
    # ...
}
The configuration
is almost as usual. Just use the
class name if the default method name handler( )
is used:
PerlHandler Book::SubClass
However, if you choose to use a different method name, the object-oriented notation should be used:
PerlHandler Book::SubClass->my_handler
The my_handler( ) method will then be called as a
class (static) method.
Also, you can use objects created at startup to call methods. For example:
<Perl>
    use Book::SubClass;
    $Book::Global::object = Book::SubClass->new( );
</Perl>
...
PerlHandler $Book::Global::object->my_handler
In this example, the my_handler( ) method will be
called as an instance method on the global object
$Book::Global.
To reload
PerlRequire,
PerlModule, and other use( )d
modules, and to flush the Apache::Registry cache
on server restart, add this directive to
httpd.conf:
PerlFreshRestart On
You should be careful using this setting. It used to cause trouble in older versions of mod_perl, and some people still report problems using it. If you are not sure if it’s working properly, a full stop and restart of the server will suffice.
Starting with mod_perl Version 1.22,
PerlFreshRestart is ignored when mod_perl is
compiled as a DSO. But it almost doesn’t matter, as
mod_perl as a DSO will do a full tear-down (calling
perl_destruct( )).[4]
In addition to
Apache’s
SetEnv and PassEnv directives,
respectively setting and passing shell environment variables,
mod_perl provides its own directives:
PerlSetEnv
and
PerlPassEnv
.
If you want to globally set an environment variable for the server,
you can use the PerlSetEnv directive. For example,
to configure the mod_perl tracing mechanism (as discussed in Chapter 21), add this to httpd.conf:
PerlSetEnv MOD_PERL_TRACE all
This will enable full mod_perl tracing.
Normally, PATH is the only shell environment
variable available under mod_perl. If you need to rely on other
environment variables, you can have mod_perl make those available for
your code with PerlPassEnv.
For example, to forward the environment variable
HOME (which is usually set to the home of the user
who has invoked the server in httpd.conf), add:
PerlPassEnv HOME
Once you set the environment variable, it can be accessed via the
%ENV hash in Perl (e.g.,
$ENV{HOME}).
PerlSetEnv and PerlPassEnv work
just like the Apache equivalents, except that they take effect in the
first phase of the Apache request cycle. The standard Apache
directives SetEnv and PassEnv
don’t affect the environment until the fixup phase,
which happens much later, just before content generation. This works
for CGI scripts, which aren’t run before then, but
if you need to set some environment variables and access them in a
handler invoked before the response stage, you should use the
mod_perl directives. For example, handlers that want to use an Oracle
relational database during the authentication phase might need to set
the following environment variable (among others) in
httpd.conf:
PerlSetEnv ORACLE_HOME /share/lib/oracle/
Note that PerlSetEnv will override the environment
variables that were available earlier. For example, we have mentioned
that PATH is always supplied by Apache itself. But
if you explicitly set:
PerlSetEnv PATH /tmp
this setting will be used instead of the one set in the shell program.
As with other configuration scoping rules, if you place
PerlSetEnv or PerlPassEnv in
the scope of the configuration file, it will apply everywhere (unless
overridden). If placed into a <Location>
section, or another section in the same group, these directives will
influence only the handlers in that section.
PerlSetVar
is another directive introduced by
mod_perl. It is very similar to PerlSetEnv, but
the key/value pairs are stored in an Apache::Table
object and retrieved using the dir_config( )
method.
There are two ways to use PerlSetVar. The first is
the usual way, as a configuration directive. For example:
PerlSetVar foo bar
The other way is via Perl code in <Perl>
sections:
<Perl>
    push @{ $Location{"/"}->{PerlSetVar} }, [ foo => 'bar' ];
</Perl>
Now we can retrieve the value of foo using the
dir_config( ) method:
$foo = $r->dir_config('foo');Note that you cannot use the following code in
<Perl> sections, which we discuss later in
this chapter:
<Perl>
    my %foo = (a => 0, b => 1);
    push @{ $Location{"/"}->{PerlSetVar} }, [ foo => \%foo ];
</Perl>
All values are passed to Apache::Table as strings,
so you will get a stringified reference to a hash as a value (such as
"HASH(0x87a5108)“). This cannot be turned back
into the original hash upon retrieval.
However, you can use the
PerlAddVar
directive to push more values into
the variable, emulating arrays. For example:
PerlSetVar foo bar
PerlAddVar foo bar1
PerlAddVar foo bar2
or the equivalent:
PerlAddVar foo bar
PerlAddVar foo bar1
PerlAddVar foo bar2
To retrieve the values, use the $r->dir_config->get(
) method:
my @foo = $r->dir_config->get('foo');Obviously, you can always turn an array into a hash with Perl, so you can use this directive to pass hashes as well. Consider this example:
PerlAddVar foo key1
PerlAddVar foo value1
PerlAddVar foo key2
PerlAddVar foo value2
You can then retrieve the hash in this way:
my %foo = $r->dir_config->get('foo');Make sure that you use an even number of elements if you store the retrieved values in a hash.
Passing a list or a hash via the PerlAddVar
directive in a <Perl> section should be
coded in this way:
<Perl>
  my %foo = (a => 0, b => 1);
  for (%foo) {
      push @{ $Location{"/"}->{PerlAddVar} }, [ foo => $_ ];
  }
</Perl>
Now you get back the hash as before:
my %foo = $r->dir_config->get('foo');This might not seem very practical; if you have more complex needs, think about having dedicated configuration files.
Customized configuration directives can also be created for the specific needs of a Perl module. To learn how to create these, please refer to Chapter 8 of Writing Apache Modules with Perl and C (O’Reilly), which covers this topic in great detail.
Certain Perl modules used in CGI code (such as
CGI.pm) rely on a number of environment variables
that are normally set by mod_cgi. For example, many modules depend on
QUERY_STRING, SCRIPT_FILENAME,
and REQUEST_URI. When the
PerlSetupEnv
directive is turned on,
mod_perl provides these environment variables in the same fashion
that mod_cgi does. This directive is On by
default, which means that all the environment variables you are
accustomed to being available under mod_cgi are also available under
mod_perl.
The process of setting these environment variables adds overhead for each request, whether the variables are needed or not. If you don’t use modules that rely on this behavior, you can turn it off in the general configuration and then turn it on in sections that need it (such as legacy CGI scripts):
PerlSetupEnv Off
<Location /perl-run>
    SetHandler perl-script
    PerlHandler Apache::PerlRun
    Options +ExecCGI
    PerlSetupEnv On
</Location>
You can use mod_perl methods to access the information provided by
these environment variables (e.g.,
$r->path_info instead of
$ENV{PATH_INFO}). For more details, see the
explanation in Chapter 11.
PerlWarn
and
PerlTaintCheck
have two possible values,
On and Off.
PerlWarn turns warnings on and off globally to the
whole server, and PerlTaintCheck controls whether
the server is running with taint checking or not. These two variables
are also explained
in Chapter 6.
At server startup, before child processes are spawned, you can do much more than just preload modules. You might want to register code that will initialize a database connection for each child when it is forked, tie read-only DBM files, fill in shared caches, etc.
The startup.pl file is an ideal place to put
code that should be executed when the server starts. Once you have
prepared the code, load it in httpd.conf before
other mod_perl configuration directives with the
PerlRequire directive:
PerlRequire /home/httpd/perl/lib/startup.pl
Be careful with the startup file. Everything run at server
initialization is run with root privileges if
you start the server as root (which you have to
do unless you choose to run the server on an unprivileged port,
numbered 1024 or higher). This means that anyone who has write access
to a script or module that is loaded by
PerlModule, PerlRequire, or
<Perl> sections effectively has
root access to the system.
Let’s look at a real-world startup file. The elements of the file are shown here, followed by their descriptions.
use strict;
This pragma is worth using in every script longer than half a dozen lines. It will save a lot of time and debugging later.
use lib qw(/home/httpd/lib /home/httpd/extra-lib);
This permanently adds extra directories to @INC,
something that’s possible only during server
startup. At the end of each request’s processing,
mod_perl resets @INC to the value it had after the
server startup. Alternatively, you can use the
PERL5LIB environment variable to add extra
directories to @INC.
$ENV{MOD_PERL} or die "not running under mod_perl!";This is a sanity check. If mod_perl wasn’t properly built, the server startup is aborted.
use Apache::Registry ( );
use LWP::UserAgent ( );
use Apache::DBI ( );
use DBI ( );
Preload the
modules that get used by Perl code serving
requests. Unless you need the symbols (variables and subroutines)
exported by preloaded modules to accomplish something within the
startup file, don’t import
them—it’s just a waste of startup time and
memory. Instead, use the empty import list ( ) to
tell the import( )
function not to import anything.
use Carp ( );
$SIG{_ _WARN_ _} = \&Carp::cluck;
This is a useful snippet to enable extended warnings logged in the error_log file. In addition to basic warnings, a trace of calls is added. This makes tracking potential problems a much easier task, since you know who called what.
The only drawback of this method is that it globally overrides the
default warning handler behavior—thus, in some places it might
be desirable to change the settings locally (for example, with
local $^W=0, or no warnings
under Perl 5.6.0 and higher). Usually warnings are turned off on
production machines to prevent unnecessary clogging of the
error_log file if your code is not very clean.
Hence, this method is mostly useful in a development environment.
use CGI ( );
CGI->compile(':all');
Some modules, such as CGI.pm, create their
subroutines at runtime via AUTOLOAD to improve
their loading time. This helps when the module includes many
subroutines but only a few are actually used. (Also refer to the
AutoSplit manpage.) Since the module is loaded
only once with mod_perl, it might be a good idea to precompile all or
some of its methods at server startup. This avoids the overhead of
compilation at runtime. It also helps share more compiled code
between child processes.
CGI.pm’s compile(
)
method performs this task. Note that
compile( ) is specific to
CGI.pm; other
modules that implement this feature may use another name for the
compilation method.
As with all modules we preload in the startup file, we don’t import symbols from them because they will be lost when they go out of the file’s scope.
The following code snippet makes sure that when the child process is spawned, a connection to the database is opened automatically, avoiding this performance hit on the first request:
Apache::DBI->connect_on_init
  ("DBI:mysql:database=test;host=localhost",
   "user", "password", {
                        PrintError => 1, # warn( ) on errors
                        RaiseError => 0, # don't die on error
                        AutoCommit => 1, # commit executes immediately
                       }
  );
We discuss this method in detail in Chapter 20.
The file ends with 1; so it can be successfully
loaded by Perl.
The entire startup.pl file is shown in Example 4-3.
Example 4-3. startup.pl
use strict;

use lib qw(/home/httpd/lib /home/httpd/extra-lib);
$ENV{MOD_PERL} or die "not running under mod_perl!";

use Apache::Registry ( );
use LWP::UserAgent ( );
use Apache::DBI ( );
use DBI ( );

use Carp ( );
$SIG{_ _WARN_ _} = \&Carp::cluck;

use CGI ( );
CGI->compile(':all');

Apache::DBI->connect_on_init
  ("DBI:mysql:database=test;host=localhost",
   "user", "password", {
                        PrintError => 1, # warn( ) on errors
                        RaiseError => 0, # don't die on error
                        AutoCommit => 1, # commit executes immediately
                       }
  );
1;If the startup file doesn’t include any modules that require the mod_perl runtime environment during their loading, you can validate its syntax with:
panic% perl -cw /home/httpd/perl/lib/startup.pl
The -c switch tells Perl to validate only the file’s syntax, and the -w switch enables warnings.
Apache::DBI is an example of a module that cannot
be loaded outside of the mod_perl environment. If you try to load it,
you will get the following error message:
panic% perl -MApache::DBI -c -e 1
Can't locate object method "module" via package "Apache"
(perhaps you forgot to load "Apache"?) at
/usr/lib/perl5/site_perl/5.6.1/Apache/DBI.pm line 202.
Compilation failed in require.
BEGIN failed--compilation aborted.
However, Apache::DBI will work perfectly once
loaded from within mod_perl.
Every module loaded at server startup will be shared among the server children, saving a lot of RAM on your machine. Usually, we put most of the code we develop into modules and preload them.
You can even preload CGI scripts with
Apache::RegistryLoader, as explained in Chapter 10.
Some people
wonder why they need to duplicate use Modulename
in the startup file and in the script itself. The confusion arises
due to misunderstanding use( ).
Let’s take the POSIX module as an
example. When you write:
use POSIX qw(setsid);
use( ) internally performs two operations:
BEGIN {
    require POSIX;
    POSIX->import(qw(setsid));
}
The first operation loads and compiles the module. The second calls
the module’s import( ) method and
specifies to import the symbol setsid into the
caller’s namespace. The BEGIN
block makes sure that the code is executed as soon as possible,
before the rest of the code is even parsed. POSIX,
like many other modules, specifies a default export list. This is an
especially extensive list, so when you call:
use POSIX;
about 500 KB worth of symbols gets imported.
Usually, we don’t need POSIX or
its symbols in the startup file; all we want is to preload it.
Therefore, we use an empty list as an argument for use(
):
use POSIX ( );
so the POSIX::import( ) method
won’t be even called.
When we want to use the POSIX module in the code,
we use( ) it again, but this time no loading
overhead occurs because the module has been loaded already. If we
want to import something from the module, we supply the list of
symbols to load:
use POSIX qw(:flock_h);
This example loads constants used with the flock(
) function.
Technically, you aren’t required to supply the
use( ) statement in your handler code if the
module has already been loaded during server startup or elsewhere.
When writing your code, however, don’t assume that
the module code has been preloaded. Someday in the future, you or
someone else will revisit this code and will not understand how it is
possible to use a module’s methods without first
loading the module itself.
Please refer to the Exporter and
perlmod manpages, and to the section on
use( ) in the perlfunc
manpage for more information about import( ).
Remember that you can always use require( ) to
preload the files at server startup if you don’t add
( ), because:
require Data::Dumper;
is the same as:
use Data::Dumper ( );
except that it’s not executed at compile-time.
With <Perl> ...
</Perl> sections,
you
can
configure your server entirely in Perl. It’s
probably not worth it if you have simple configuration files, but if
you run many virtual hosts or have complicated setups for any other
reason, <Perl> sections become very handy.
With <Perl> sections you can easily create
the configuration on the fly, thus reducing duplication and easing
maintenance.[5]
To enable <Perl> sections, build mod_perl
with:
panic% perl Makefile.PL PERL_SECTIONS=1 [ ... ]
or with EVERYTHING=1.
<Perl> sections
can contain
any and as much Perl code as you wish.
<Perl> sections are compiled into a special
package called Apache::ReadConfig. mod_perl looks
through the symbol table for Apache::ReadConfig
for Perl variables and structures to grind through the Apache core
configuration gears. Most of the configuration directives can be
represented as scalars ($scalar) or arrays
(@array). A few directives become hashes.
How do you know which Perl global variables to use? Just take the
Apache directive name and prepend either $,
@, or % (as shown in the
following examples), depending on what the directive accepts. If you
misspell the directive, it is silently ignored, so
it’s a good idea to check your settings.
Since Apache directives are case-insensitive, their Perl equivalents are case-insensitive as well. The following statements are equivalent:
$User = 'stas';
$user = 'stas'; # the same
Let’s look at all possible cases we might encounter while configuring Apache in Perl:
Directives that accept zero or one argument are represented as scalars. For example,
CacheNegotiatedDocsis a directive with no arguments. In Perl, we just assign it an empty string:<Perl> $CacheNegotiatedDocs = ''; </Perl>Directives that accept a single value are simple to handle. For example, to configure Apache so that child processes run as user httpd and group httpd, use:
User  = httpd
Group = httpd
What if we don’t want user and group definitions to be hardcoded? Instead, what if we want to define them on the fly using the user and group with which the server is started? This is easily done with
<Perl>sections:<Perl> $User = getpwuid($>) || $>; $Group = getgrgid($)) || $); </Perl>We use the power of the Perl API to retrieve the data on the fly.
$Useris set to the name of the effective user ID with which the server was started or, if the name is not defined, the numeric user ID. Similarly,$Groupis set to either the symbolic value of the effective group ID or the numeric group ID.Notice that we’ve just taken the Apache directives and prepended a
$, as they represent scalars.Directives that accept more than one argument are represented as arrays or as a space-delimited string. For example, this directive:
PerlModule Mail::Send Devel::Peek
becomes:
<Perl> @PerlModule = qw(Mail::Send Devel::Peek); </Perl>@PerlModuleis an array variable, and we assign it a list of modules. Alternatively, we can use the scalar notation and pass all the arguments as a space-delimited string:<Perl> $PerlModule = "Mail::Send Devel::Peek"; </Perl>Directives that can be repeated more than once with different values are represented as arrays of arrays. For example, this configuration:
AddEncoding x-compress Z
AddEncoding x-gzip gz tgz
becomes:
<Perl>
    @AddEncoding = (
        ['x-compress' => qw(Z)],
        ['x-gzip'     => qw(gz tgz)],
    );
</Perl>
Directives that implement a container block, with beginning and ending delimiters such as
<Location>...</Location>, are represented as Perl hashes. In these hashes, the keys are the arguments of the opening directive, and the values are the contents of the block. For example:Alias /private /home/httpd/docs/private <Location /private> DirectoryIndex index.html index.htm AuthType Basic AuthName "Private Area" AuthUserFile /home/httpd/docs/private/.htpasswd Require valid-user </Location>These settings tell Apache that URIs starting with /private are mapped to the physical directory /home/httpd/docs/private/ and will be processed according to the following rules:
The users are to be authenticated using basic authentication.
PrivateArea will be used as the title of the pop-up box displaying the login and password entry form.
Only valid users listed in the password file /home/httpd/docs/private/.htpasswd and who provide a valid password may access the resources under /private/.
If the filename is not provided, Apache will attempt to respond with the index.html or index.htm directory index file, if found.
Now let’s see the equivalent
<Perl>section:<Perl> push @Alias, qw(/private /home/httpd/docs/private); $Location{"/private"} = { DirectoryIndex => [qw(index.html index.htm)], AuthType => 'Basic', AuthName => '"Private Area"', AuthUserFile => '/home/httpd/docs/private/.htpasswd', Require => 'valid-user', }; </Perl>First, we convert the
Aliasdirective into an array@Alias. Instead of assigning, however, we push the values at the end. We do this because it’s possible that we have assigned values earlier, and we don’t want to overwrite them. Alternatively, you may want to push references to lists, like this:push @Alias, [qw(/private /home/httpd/docs/private)];
Second, we convert the
Locationblock, using /private as a key to the hash%Locationand the rest of the block as its value. When the structures are nested, the normal Perl rules apply—that is, arrays and hashes turn into references. Therefore,DirectoryIndexpoints to an array reference. As shown earlier, we can always replace this array with a space-delimited string:$Location{"/private"} = { DirectoryIndex => 'index.html index.htm', ... };Also notice how we specify the value of the
AuthNameattribute:AuthName => '"Private Area"',
The value is quoted twice because Apache expects a single value for this argument, and if we write:
AuthName => 'Private Area',
<Perl>will pass two values to Apache, “Private” and “Area”, and Apache will refuse to start, with the following complaint:[Thu May 16 17:01:20 2002] [error] <Perl>: AuthName takes one argument, The authentication realm (e.g. "Members Only")
If a block section accepts two or more identical keys (as the
<VirtualHost>...</VirtualHost>section does), the same rules as in the previous case apply, but a reference to an array of hashes is used instead.In one company, we had to run an Intranet machine behind a NAT/firewall (using the 10.0.0.10 IP address). We decided up front to have two virtual hosts to make both the management and the programmers happy. We had the following simplistic setup:
NameVirtualHost 10.0.0.10

<VirtualHost 10.0.0.10>
    ServerName  tech.intranet
    DocumentRoot /home/httpd/docs/tech
    ServerAdmin webmaster@tech.intranet
</VirtualHost>

<VirtualHost 10.0.0.10>
    ServerName   suit.intranet
    DocumentRoot /home/httpd/docs/suit
    ServerAdmin  webmaster@suit.intranet
</VirtualHost>
In Perl, we wrote it as follows:
<Perl>
    $NameVirtualHost => '10.0.0.10';
    my $doc_root = "/home/httpd/docs";
    $VirtualHost{'10.0.0.10'} = [
        {
         ServerName   => 'tech.intranet',
         DocumentRoot => "$doc_root/tech",
         ServerAdmin  => 'webmaster@tech.intranet',
        },
        {
         ServerName   => 'suit.intranet',
         DocumentRoot => "$doc_root/suit",
         ServerAdmin  => 'webmaster@suit.intranet',
        },
    ];
</Perl>
Because normal Perl rules apply, more entries can be added as needed using
push( ).[6] Let’s say we want to create a special virtual host for the company’s president to show off to his golf partners, but his fancy vision doesn’t really fit the purpose of the Intranet site. We just let him handle his own site:push @{ $VirtualHost{'10.0.0.10'} }, { ServerName => 'president.intranet', DocumentRoot => "$doc_root/president", ServerAdmin => 'webmaster@president.intranet', };Nested block directives naturally become Perl nested data structures. Let’s extend an example from the previous section:
<Perl>
    my $doc_root = "/home/httpd/docs";
    push @{ $VirtualHost{'10.0.0.10'} },
        {
         ServerName   => 'president.intranet',
         DocumentRoot => "$doc_root/president",
         ServerAdmin  => 'webmaster@president.intranet',
         Location     => {
             "/private"    => {
                 Options       => 'Indexes',
                 AllowOverride => 'None',
                 AuthType      => 'Basic',
                 AuthName      => '"Do Not Enter"',
                 AuthUserFile  => 'private/.htpasswd',
                 Require       => 'valid-user',
             },
             "/perlrun" => {
                 SetHandler     => 'perl-script',
                 PerlHandler    => 'Apache::PerlRun',
                 PerlSendHeader => 'On',
                 Options        => '+ExecCGI',
             },
         },
        };
</Perl>
We have added two
Locationblocks. The first, /private, is for the juicy stuff and accessible only to users listed in the president’s password file. The second, /perlrun, is for running dirty Perl CGI scripts, to be handled by theApache::PerlRunhandler.<Perl>sections don’t provide equivalents for<IfModule>and<IfDefine>containers. Instead, you can use themodule( )anddefine( )methods from theApachepackage. For example:<IfModule mod_ssl.c> Include ssl.conf </IfModule>can be written as:
if (Apache->module("mod_ssl.c")) {
    push @Include, "ssl.conf";
}
And this configuration example:
<IfDefine SSL>
    Include ssl.conf
</IfDefine>
can be written as:
if (Apache->define("SSL")) {
    push @Include, "ssl.conf";
}
Now that you know how to convert the usual configuration directives to Perl code, there’s no limit to what you can do with it. For example, you can put environment variables in an array and then pass them all to the children with a single configuration directive, rather than listing each one via
PassEnvorPerlPassEnv:<Perl> my @env = qw(MYSQL_HOME CVS_RSH); push @PerlPassEnv, \@env; </Perl>Or suppose you have a cluster of machines with similar configurations and only small distinctions between them. Ideally, you would want to maintain a single configuration file, but because the configurations aren’t exactly the same (for example, the
ServerNamedirective will have to differ), it’s not quite that simple.<Perl>sections come to the rescue. Now you can have a single configuration file and use the full power of Perl to tweak the local configuration. For example, to solve the problem of theServerNamedirective, you might have this<Perl>section:<Perl> use Sys::Hostname; $ServerName = hostname( ); </Perl>and the right machine name will be assigned automatically.
Or, if you want to allow personal directories on all machines except the ones whose names start with secure, you can use:
<Perl>
    use Sys::Hostname;
    $ServerName = hostname( );
    if ($ServerName !~ /^secure/) {
        $UserDir = "public.html";
    }
</Perl>
Behind
the
scenes, mod_perl defines a package called
Apache::ReadConfig in which it keeps all the
variables that you define inside the <Perl>
sections. So <Perl> sections
aren’t the only way to use mod_perl to configure the
server: you can also place the Perl code in a separate file that will
be called during the configuration parsing with either
PerlModule or PerlRequire
directives, or from within the startup file. All you have to do is to
declare the package Apache::ReadConfig before
writing any code in this file.
Using the last example from the previous section, we place the code into a file named apache_config.pl, shown in Example 4-4 .
Example 4-4. apache_config.pl
package Apache::ReadConfig;

use Sys::Hostname;
$ServerName = hostname( );
if ($ServerName !~ /^secure/) {
    $UserDir = "public.html";
}
1;
Then we execute it either from httpd.conf:
PerlRequire /home/httpd/perl/lib/apache_config.pl
or from the startup.pl file:
require "/home/httpd/perl/lib/apache_config.pl";
In fact, you can create a complete configuration file in Perl. For example, instead of putting the following lines in httpd.conf:
NameVirtualHost         10.0.0.10

<VirtualHost 10.0.0.10>
    ServerName  tech.intranet
    DocumentRoot /home/httpd/httpd_perl/docs/tech
    ServerAdmin webmaster@tech.intranet
</VirtualHost>

<VirtualHost 10.0.0.10>
    ServerName   suit.intranet
    DocumentRoot /home/httpd/httpd_perl/docs/suit
    ServerAdmin webmaster@suit.intranet
</VirtualHost>
You can write it in Perl:
use Socket;
use Sys::Hostname;
my $hostname = hostname( );
(my $domain = $hostname) =~ s/[^.]+\.//;
my $ip = inet_ntoa(scalar gethostbyname($hostname || 'localhost'));
my $doc_root = '/home/httpd/docs';

Apache->httpd_conf(qq{
NameVirtualHost $ip

<VirtualHost $ip>
  ServerName  tech.$domain
  DocumentRoot $doc_root/tech
  ServerAdmin webmaster\@tech.$domain
</VirtualHost>

<VirtualHost $ip>
  ServerName   suit.$domain
  DocumentRoot $doc_root/suit
  ServerAdmin  webmaster\@suit.$domain
</VirtualHost>
 });
First, we prepare the data, such as deriving the domain name and IP address from the hostname. Next, we construct the configuration file in the “usual” way, but using the variables that were created on the fly. We can reuse this configuration file on many machines, and it will work anywhere without any need for adjustment.
Now consider that you have many more virtual hosts with a similar configuration. You have probably already guessed what we are going to do next:
use Socket;
use Sys::Hostname;
my $hostname = hostname( );
(my $domain = $hostname) =~ s/[^.]+\.//;
my $ip = inet_ntoa(scalar gethostbyname($hostname || 'localhost'));
my $doc_root = '/home/httpd/docs';
my @vhosts = qw(suit tech president);

Apache->httpd_conf("NameVirtualHost $ip");

for my $vh (@vhosts) {
  Apache->httpd_conf(qq{
<VirtualHost $ip>
  ServerName  $vh.$domain
  DocumentRoot $doc_root/$vh
  ServerAdmin webmaster\@$vh.$domain
</VirtualHost>
 });
}
In the loop, we create new virtual hosts. If we need to create 100
hosts, it doesn’t take a long time—just adjust
the @vhosts array.
Be careful when you
declare package names inside <Perl>
sections. For example, this code has a problem:
<Perl>
    package Book::Trans;
    use Apache::Constants qw(:common);
    sub handler { OK }

    $PerlTransHandler = "Book::Trans";
</Perl>
When you put code inside a <Perl> section,
by default it goes into the Apache::ReadConfig
package, which is already declared for you. This means that the
PerlTransHandler we tried to define will be
ignored, since it’s not a global variable in the
Apache::ReadConfig package.
If you define a different package name within a
<Perl> section, make sure to close the scope
of that package and return to the
Apache::ReadConfig package when you want to define
the configuration directives. You can do this by either explicitly
declaring the Apache::ReadConfig package:
<Perl>
    package Book::Trans;
    use Apache::Constants qw(:common);
    sub handler { OK }

    package Apache::ReadConfig;
    $PerlTransHandler = "Book::Trans";
</Perl>
or putting the code that resides in a different package into a block:
<Perl>
    {
        package Book::Trans;
        use Apache::Constants qw(:common);
        sub handler { OK }
    }

    $PerlTransHandler = "Book::Trans";
</Perl>
so that when the block is over, the Book::Trans
package’s scope is over, and you can use the
configuration variables again.
However, it’s probably a good idea to use
<Perl> sections only to create or adjust
configuration directives. If you need to run some other code not
related to configuration, it might be better to place it in the
startup file or in its own module. Your mileage may vary, of course.
How do we know whether the
configuration made inside <Perl> sections
was correct?
First we need to check the validity of the Perl syntax. To do that,
we should turn it into a Perl script, by adding
#!perl at the top of the section:
<Perl>
#!perl
# ... code here ...
_ _END_ _
</Perl>
Notice that #!perl and _ _END_
_ must start from the column zero. Also, the same rules as
we saw earlier with validation of the startup file apply: if the
<Perl> section includes some modules that
can be loaded only when mod_perl is running, this validation is not
applicable.
Now we may run:
perl -cx httpd.conf
If the Perl code doesn’t compile, the server
won’t start. If the Perl code is syntactically
correct, but the generated Apache configuration is invalid,
<Perl> sections will just log a warning and
carry on, since there might be globals in the section that are not
intended for the configuration at all.
If you have more than one <Perl> section,
you will have to repeat this procedure for each section, to make sure
they all work.
To check the Apache configuration syntax, you can use the variable
$Apache::Server::StrictPerlSections
,
added in mod_perl Version 1.22. If you set this variable to a true
value:
$Apache::Server::StrictPerlSections = 1;
then mod_perl will not tolerate invalid Apache configuration syntax
and will croak (die) if it encounters invalid
syntax. The default value is 0. If you
don’t set
$Apache::Server::StrictPerlSections to
1, you should localize variables unrelated to
configuration with my( ) to avoid errors.
If the syntax is correct, the next thing we need to look at is the parsed configuration as seen by Perl. There are two ways to see it. First, we can dump it at the end of the section:
<Perl>
use Apache::PerlSections ( );
# code goes here
print STDERR Apache::PerlSections->dump( );
</Perl>Here, we load the Apache::PerlSections module at
the beginning of the section, and at the end we can use its
dump( ) method to print out the configuration as
seen by Perl. Notice that only the configuration created in the
section will be seen in the dump. No plain Apache configuration can
be found there.
For example, if we adjust this section (parts of which we have seen before) to dump the parsed contents:
<Perl>
use Apache::PerlSections ( );
$User = getpwuid($>) || $>;
$Group = getgrgid($)) || $);
push @Alias, [qw(/private /home/httpd/docs/private)];
my $doc_root = "/home/httpd/docs";
push @{ $VirtualHost{'10.0.0.10'} },
{
ServerName => 'president.intranet',
DocumentRoot => "$doc_root/president",
ServerAdmin => 'webmaster@president.intranet',
Location => {
"/private" => {
Options => 'Indexes',
AllowOverride => 'None',
AuthType => 'Basic',
AuthName => '"Do Not Enter"',
AuthUserFile => 'private/.htpasswd',
Require => 'valid-user',
},
"/perlrun" => {
SetHandler => 'perl-script',
PerlHandler => 'Apache::PerlRun',
PerlSendHeader => 'On',
Options => '+ExecCGI',
},
},
};
print STDERR Apache::PerlSections->dump( );
</Perl>This is what we get as a dump:
package Apache::ReadConfig;
#hashes:
%VirtualHost = (
'10.0.0.10' => [
{
'Location' => {
'/private' => {
'AllowOverride' => 'None',
'AuthType' => 'Basic',
'Options' => 'Indexes',
'AuthUserFile' => 'private/.htpasswd',
'AuthName' => '"Do Not Enter"',
'Require' => 'valid-user'
},
'/perlrun' => {
'PerlHandler' => 'Apache::PerlRun',
'Options' => '+ExecCGI',
'PerlSendHeader' => 'On',
'SetHandler' => 'perl-script'
}
},
'DocumentRoot' => '/home/httpd/docs/president',
'ServerAdmin' => 'webmaster@president.intranet',
'ServerName' => 'president.intranet'
}
]
);
#arrays:
@Alias = (
[
'/private',
'/home/httpd/docs/private'
]
);
#scalars:
$Group = 'stas';
$User = 'stas';
1;
_ _END_ _You can see that the configuration was created properly. The dump
places the output into three groups: arrays, hashes, and scalars. The
server was started as user stas, so the
$User and $Group settings were
dynamically assigned to the user stas.
A different approach to seeing the dump at any time (not only during
startup) is to use the Apache::Status module (see
Chapter 9). First we store the Perl configuration:
<Perl>
    $Apache::Server::SaveConfig = 1;
    # the actual configuration code
</Perl>
Now the Apache::ReadConfig namespace (in which the
configuration data is stored) will not be flushed, making
configuration data available to Perl modules at request time. If the
Apache::Status module is configured, you can view
it by going to the /perl-status URI (or another
URI that you have chosen) in your browser and selecting
“Perl Section Configuration” from
the menu. The configuration data should look something like that
shown in Figure 4-1.
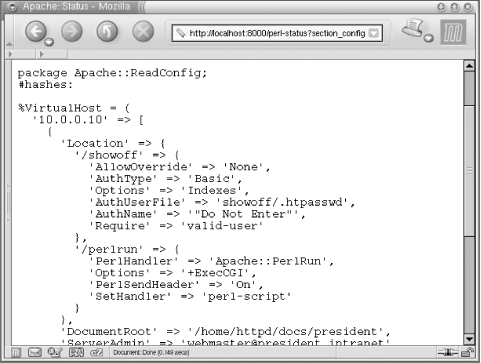
Since the Apache::ReadConfig namespace is not
flushed when the server is started, you can access the configuration
values from your code—the data resides in the
Apache::ReadConfig package. So if you had the
following Perl configuration:
<Perl>
    $Apache::Server::SaveConfig = 1;
    $DocumentRoot = "/home/httpd/docs/mine";
</Perl>
at request time, you could access the value of
$DocumentRoot with the fully qualified name
$Apache::ReadConfig::DocumentRoot. But usually you
don’t need to do this, because mod_perl provides you
with an API to access to the most interesting and useful server
configuration bits.
Instead of dumping the generated Perl configuration, you may decide to store it in a file. For example, if you want to store it in httpd_config.pl, you can do the following:
<Perl>
    use Apache::PerlSections ( );
    # code goes here
    Apache::PerlSections->store("httpd_config.pl");
</Perl>
You can then require( ) that file in some other
<Perl> section. If you have the whole server
configuration in Perl, you can start the server using the following
trick:
panic% httpd -C "PerlRequire httpd_config.pl"
Apache will fetch all the configuration directives from httpd_config.pl, so you don’t need httpd.conf at all.
If your configuration doesn’t seem to do what it’s supposed to do, you should debug it. First, build mod_perl with:
panic% perl Makefile.PL PERL_TRACE=1 [...]
Next, set the environment variable MOD_PERL_TRACE
to s (as explained in Chapter 21). Now you should be able to see how the
<Perl> section globals are converted into
directive string values. For example, suppose you have the following
Perl section:
<Perl>
    $DocumentRoot = "/home/httpd/docs/mine";
</Perl>
If you start the server in single-server mode (e.g., under bash):
panic% MOD_PERL_TRACE=s httpd -X
you will see these lines among the printed trace:
...
SVt_PV: $DocumentRoot = `/home/httpd/docs/mine'
handle_command (DocumentRoot /home/httpd/docs/mine): OK
...
But what if you mistype the directory name and pass two values instead of a single value? When you start the server, you’ll see the following error:
...
SVt_PV: $DocumentRoot = `/home/httpd/docs/ mine'
handle_command (DocumentRoot /home/httpd/docs/ mine):
DocumentRoot takes one argument,
Root directory of the document tree
...
and of course the error will be logged in the error_log file:
[Wed Dec 20 23:47:31 2000] [error]
(2)No such file or directory: <Perl>:
DocumentRoot takes one argument,
Root directory of the document tree
Before you restart a server on a live production machine after the configuration has been changed, it’s essential to validate that the configuration file is not broken. If the configuration is broken, the server won’t restart and users will find your server offline for the time it’ll take you to fix the configuration and start the server again.
You can use apachectl configtest or httpd -t to validate the configuration file without starting the server. You can safely validate the configuration file on a running production server, as long as you run this test before you restart the server with apachectl restart. Of course, it is not 100% perfect, but it will reveal any syntax errors you might have made while editing the file.
The validation procedure doesn’t just parse the code
in startup.pl, it executes it too.
<Perl> sections invoke the Perl interpreter
when reading the configuration files, and
PerlRequire and PerlModule do
so as well.
Of course, we assume that the code that gets called during this test
cannot cause any harm to your running production environment. If
you’re worried about that, you can prevent the code
in the startup script and in <Perl> sections
from being executed during the syntax check. If the server
configuration is tested with -Dsyntax_check:
panic% httpd -t -Dsyntax_check
you can check in your code whether syntax_check
was set with:
Apache->define('syntax_check')If, for example, you want to prevent the code in startup.pl from being executed, add the following at the top of the code:
return if Apache->define('syntax_check');Of course, there is nothing magical about using the string
'syntax_check' as a flag—you can use any
other string as well.
Table 4-1 depicts where the various mod_perl configuration directives can be used.
The first column represents directives that can appear in the global
configuration; that is, outside all sections. Note that
PerlTaintCheck, PerlWarn, and
PerlFreshRestart can be placed inside
<VirtualHost> sections. However, because
there’s only one Perl interpreter for all virtual
hosts and the main server, setting any of these values in one virtual
host affects all other servers. Therefore, it’s
probably a good idea to think of these variables as being allowed
only in the global configuration.
The second column represents directives that can appear inside the
<VirtualHost> sections.
The third column represents directives that can appear in the
<Directory>,
<Location>, and
<Files> sections and all their regex
variants. These mod_perl directives can also appear in
.htaccess files.
For example, PerlWarn cannot be used in
<Directory> and
<VirtualHost> sections. However,
PerlSetEnv can be used anywhere, which allows you
to provide different behavior in different sections:
PerlSetEnv ADMIN_EMAIL webmaster@example.com
<Location /bar/manage/>
    PerlSetEnv ADMIN_EMAIL bar@example.com
</Location>
In this example, a handler invoked from
/bar/manage/ will see the
ADMIN_EMAIL environment variable as
bar@example.com, while other handlers configured
elsewhere will see ADMIN_EMAIL as the default
value, webmaster@example.com.
When
the server is restarted, the
configuration and module initialization phases are called twice
before the children are forked. The second restart is done to test
that all modules can survive a restart (SIGHUP),
in order to ensure that future graceful restarts will work correctly.
This is very important if you are going to restart a production
server.
You can control what Perl code will be executed on the start or
restart by checking the values of
$Apache::Server::Starting and
$Apache::Server::ReStarting. The former variable
is true when the server is starting, and the latter is true when
it’s restarting.
For example, if you want to be notified when the server starts or restarts, you can do:
<Perl>
    email_notify("start")   if $Apache::Server::Starting;
    email_notify("restart") if $Apache::Server::ReStarting;
</Perl>
where the function email_notify( ) (that you have
to write) performs the notification. Since Apache restarts itself on
start, you will get both notifications when Apache is started, and
only one when it’s restarted.
The startup.pl file and similar files loaded via
PerlModule or PerlRequire are
compiled only once, because once the module is compiled, it enters
the special %INC hash. When Apache restarts, Perl
checks whether the module or script in question is already registered
in %INC and won’t try to compile
it again.
Thus, the only code that you might need to protect from running on
restart is the code in <Perl> sections. But
since <Perl> sections are primarily used for
creating on-the-fly configurations, it shouldn’t be
a problem to run the code more than once.
The nifty mod_info Apache module displays the complete server configuration in your browser. In order to use it, you have to compile it in or, if the server was compiled with DSO mode enabled, load it as an object. Then just uncomment the already prepared section in the httpd.conf file:
<Location /server-info>
    SetHandler server-info
    Order deny,allow
    Deny from all
    Allow from localhost
</Location>
Now restart the server and issue the request:
http://localhost/server-info
We won’t show a snapshot of the output here, as
it’s very lengthy. However, you should know that
mod_info is unaware of the configuration created or modified by
<Perl> sections or equivalent methods
discussed earlier in this chapter.
The following are miscellaneous tips and tricks that might save you lots of time when configuring mod_perl and Apache.
If you are using a dual-server setup, with a mod_perl server listening on a high port (e.g., 8080), don’t publish the high port number in URLs. Rather, use a proxying rewrite rule in the non-mod_perl server:
RewriteEngine      On
RewriteLogLevel    0
RewriteRule       ^/perl/(.*) http://localhost:8080/perl/$1 [P]
ProxyPassReverse   /          http://localhost/
In the above example, all the URLs starting with /perl are rewritten to the backend server, listening on port 8080. The backend server is not directly accessible; it can be reached only through the frontend server.
One of the problems with publishing high port numbers is that Microsoft Internet Explorer (IE) 4.x has a bug when re-posting data to a URL with a nonstandard port (i.e., anything but 80). It drops the port designator and uses port 80 anyway. Hence, your service will be unusable for IE 4.x users.
Another problem is that firewalls will probably have most of the high ports closed, and users behind them will be unable to reach your service if it is running on a blocked port.
When
running under a virtual host, Apache::Registry and
other registry family handlers will compile each script into a
separate package. The package name includes the name of the virtual
host if the variable
$Apache::Registry::NameWithVirtualHost is set to
1. This is the default behavior.
Under this setting, two virtual hosts can have two different scripts accessed via the same URI (e.g., /perl/guestbook.pl) without colliding with each other. Each virtual host will run its own version of the script.
However, if you run a big service and provide a set of identical
scripts to many virtual hosts, you will want to have only one copy of
each script compiled in memory. By default, each virtual host will
create its own copy, so if you have 100 virtual hosts, you may end up
with 100 copies of the same script compiled in memory, which is very
wasteful. If this is the case, you can override the default behavior
by setting the following directive in a startup file or in a
<Perl> section:
$Apache::Registry::NameWithVirtualHost = 0;
But be careful: this makes sense only if you are sure that there are no other scripts with identical URIs but different content on different virtual hosts.
Users of mod_perl v1.15 are encouraged to upgrade to the latest stable version if this problem is encountered—it was solved starting with mod_perl v1.16.
Any service open to the Internet at large must take security into
account. Large, complex software tends to expose subtle
vulnerabilities that attackers can exploit to gain unauthorized
access to the server host. Third-party modules or libraries can also
contain similarly exploitable bugs. Perl scripts
aren’t immune either: incorrect untainting and
sanitizing of user input can lead to disaster when this input is fed
to the open( ) or system( )
functions.
Also, if the same mod_perl server is shared by more than one user, you may need to protect users of the server from each other (see Appendix C).
The more modules you have enabled in your web server, the more complex the code and interaction between these modules will be. The more complex the code in your web server, the more chances for bugs there are. The more chances for bugs, the more chance there is that some of those bugs may involve security holes.
Before you put the server into production, review the server setup and disable any unused modules. As time goes by, the server enviroment may change and some modules may not be used anymore. Do periodical revisions of your setups and disable modules that aren’t in use.
Make sure to run the server with the following setting in the httpd.conf file:
PerlTaintCheck On
As discussed in Chapter 6, taint checking doesn’t ensure that your code is completely safe from external hacks, but it does force you to improve your code to prevent many potential security problems.
We
aren’t
completely sure why the default value
of the ServerTokens directive in Apache is
Full rather than Minimal. It
seems like Full is really useful only for
debugging purposes. A probable reason for using ServerTokens
Full is publicity: it means that Netcraft
(http://netcraft.com/) and other similar survey
services will count more Apache servers, which is good for all of us.
In general, though, you really want to reveal as little information
as possible to potential crackers.
Another approach is to modify the httpd sources
to not reveal any unwanted information, so that all responses return
an empty or phony Server: field.
Be aware, however, that there’s no security by obscurity (as the old saying goes). Any determined cracker will eventually figure out what version of Apache is running and what third-party modules are built in.
You can see what information is revealed by your server by telneting to it and issuing some request. For example:
panic% telnet localhost 8080 Trying 127.0.0.1 Connected to localhost Escape character is '^]'. HEAD / HTTP/1.0 HTTP/1.1 200 OK Date: Sun, 16 Apr 2000 11:06:25 GMT Server: Apache/1.3.24 (Unix) mod_perl/1.26 mod_ssl/2.8.8 OpenSSL/0.9.6 [more lines snipped]
As you can see, a lot of information is revealed when
ServerTokens Full has been specified.
It is best not to expose mod_perl to the outside world, as it creates a potential security risk by revealing which modules you use and which operating system you are running your web server on. In Chapter 12, we show how to make mod_perl inaccessible directly from the outside by listening only to the request coming from mod_proxy at the local host (127.0.0.1).
It’s a good idea to protect your various monitors, such as /perl-status, by password. The less information you provide for intruders, the harder it will be for them to break in. (One of the biggest helps you can provide for these bad guys is to show them all the scripts you use. If any of these are in the public domain, they can grab the source of the script from the Web, study it, and probably find a few or even many security holes in it.)
Security by obscurity may help to wave away some of the
less-determined malicious fellas, but it doesn’t
really work against a determined intruder. For example, consider the
old <Limit> container:
<Location /sys-monitor>
    SetHandler perl-script
    PerlHandler Apache::VMonitor
    AuthUserFile /home/httpd/perl/.htpasswd
    AuthGroupFile /dev/null
    AuthName "Server Admin"
    AuthType Basic
    <Limit GET POST>
        require user foo bar
    </Limit>
</Location>
Use of the <Limit> container is a leftover
from NCSA server days that is still visible in many configuration
examples today. In Apache, it will limit the scope of the
require directive to the GET
and POST request methods. Use of another method
will bypass authentication. Since most scripts don’t
bother checking the request method, content will be served to the
unauthenticated users.
For this reason, the
Limit
directive generally should not be
used. Instead, use this secure configuration:
<Location /sys-monitor>
    SetHandler perl-script
    PerlHandler Apache::VMonitor
    AuthUserFile /home/httpd/perl/.htpasswd
    AuthGroupFile /dev/null
    AuthName "Server Admin"
    AuthType Basic
    require user foo bar
</Location>
The contents of the password file (/home/httpd/perl/.htpasswd) are populated by the htpasswd utility, which comes bundled with Apache:
foo:1SA3h/d27mCp
bar:WbWQhZM3m4kl
The following are some of the mostly frequently asked questions related to mod_perl configuration issues (and the answers, of course).
- My CGI/Perl code is returned as plain text instead of being executed by the web server.
Check your configuration files and make sure that
+ExecCGIis turned on in your configurations.+adds an option without resetting any options that were previously set. So this is how the<Location>section might look:<Location /perl> SetHandler perl-script PerlHandler Apache::Registry Options +ExecCGI PerlSendHeader On </Location>- My script works under mod_cgi, but when called via mod_perl, I get a Save As prompt.
You probably sent the HTTP header via
print( ):print "Content-type: text/html\n\n";
If this is the case, you must make sure that you have:
PerlSendHeader On
in the configuration part of the
<Location>section:<Location /perl> ... PerlSendHeader On </Location>This adds a little overhead to the output generation, because when this configuration is enabled, mod_perl will parse the output and try to find where the header information ends so it can be converted into a proper HTTP header. It is meant only for mod_cgi emulation with regard to HTTP headers.
- Is there a way to provide a different startup.pl file for each individual virtual host?
No. Any virtual host will be able to see the routines from a startup.pl file loaded for any other virtual host.
To learn regular expressions for use in
<DirectoryMatch>or equivalent sections, the book Mastering Regular Expressions, by Jeffrey E. F. Friedl (O’Reilly), may prove to be an invaluable resource.Chapters 4 and 8 of Professional Apache, by Peter Wainwright (Wrox Press), explain how to configure Apache the way you want and improve Apache’s performance.
Chapter 3 of Apache: The Definitive Guide, by Ben Laurie and Peter Laurie (O’Reilly), talks extensively about the Apache configuration process.
Chapter 8 of Writing Apache Modules with Perl and C, by Lincoln Stein and Doug MacEachern (O’Reilly), talks extensively about configuration customization with mod_perl.
The extensive configuration manual at http://httpd.apache.org/docs/.
mod_macro is a module that allows the definition and use of macros within Apache runtime configuration files. The syntax is a natural extension to Apache HTML-like configuration style. It’s very useful if you have to configure many sections (e.g., when you have many virtual hosts) and haven’t learned about
<Perl>sections yet.mod_macro is available from http://www.cri.ensmp.fr/~coelho/mod_macro/.
[1] When we say
Perl*Handler, we mean the collection of all Perl
handler directives (PerlHandler,
PerlAccessHandler, etc.).
[2] You can use
Apache::RegistryBB to skip this and a few other
checks.
[3] It may not seem to make sense to use this example, as it would be much simpler to write a single handler to call all three subroutines. But what if the three reside in different modules that are maintained by different authors?
[4] The parent
process would leak several MB on each restart without calling
perl_destruct( ).
[5] You may also find that mod_macro is useful to simplify the configuration if you have to insert many repetitive configuration snippets.
[6] For complex
configurations with multiple entries, consider using the module
Tie::DxHash, which implements a hash that
preserves insertion order and allows duplicate keys.
Get Practical mod_perl now with the O’Reilly learning platform.
O’Reilly members experience books, live events, courses curated by job role, and more from O’Reilly and nearly 200 top publishers.

