You can create a brand-new company file by choosing File→New Company (or by clicking “Create a new company” from either the “Welcome to QuickBooks” screen or the No Company Open window). What Intuit considers an “easy” interview seems to change with every new version of QuickBooks, but the Interview covers the basics of creating and customizing a company file to fit your business. After you start the Interview, click Next or Back to move from screen to screen.
The Get Started screen assures you that you’ll be ready to start using QuickBooks in about 30 minutes. Start by clicking one of the following three buttons:
Convert Data. If you have existing records in Quicken or another accounting program, you’re in luck. Converting your books (Converting from Another Program to QuickBooks) is easier than starting from scratch.
Skip Interview. If you’re something of a QuickBooks expert, this option lets you set up a company file without a safety net. It opens the “Enter your company information” window, followed by a few screens of data entry. If you need help during the process, you can always click the “Get answers” link.
Start Interview. If you don’t fit into either of the previous categories, this one’s for you. The following sections take you through the process step by step, from start to finish. Keep in mind that, if you leave the interview before QuickBooks creates your company file, the program won’t save any of the information you entered. So make sure you have at least 10 minutes to complete the first set of steps.
After you click the Start Interview button, the first setup screen (Figure 1-2) asks you for the basic 411 about your company, such as its legal name and tax ID. (If any of the fields confuse you, try clicking the “Get answers” link in the upper-right corner.) Click Next when you’re done filling out the fields.
After you complete the basics, the EasyStep Interview walks you through several screens of questions. Here’s what QuickBooks’ EasyStep Interview wants to know before it creates your company file:
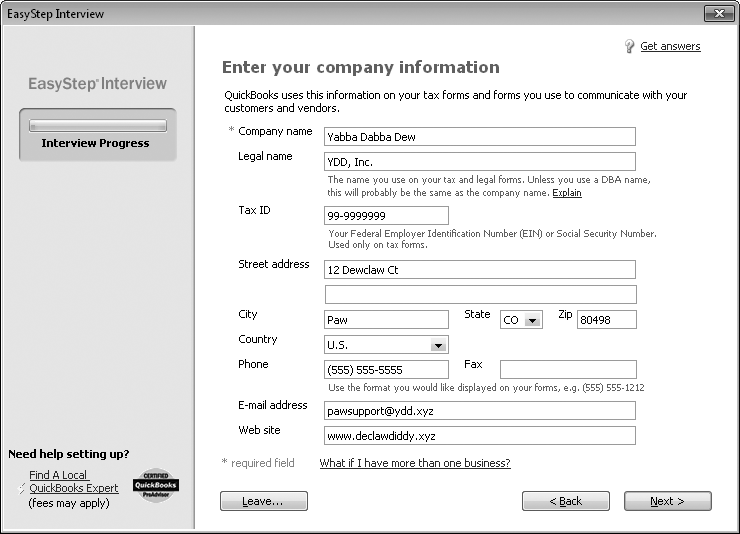
Figure 1-2. In the “Company name” field, type the name you want to appear on invoices, reports, and other forms. In the “Legal name” field, enter the company name as it should appear on contracts and other legal documents. These names are usually the same unless you use a DBA (doing business as) company name. If you own a corporation, the legal name is what appears on your Certificate of Incorporation. The Tax ID box is for the federal tax ID number you use when you file your taxes—your Social Security Number or Federal Employer Identification Number.
Your industry. Choose carefully on the “Select your industry” screen. The list of industries is robust, so chances are good you’ll find one that’s close to what your company does. Based on your choice, QuickBooks adjusts its settings and the chart of accounts it creates to match how your business operates. For example, the program creates income and expense accounts for your type of business and automatically turns on features like sales tax and inventory if your industry typically uses them. If QuickBooks makes assumptions you don’t like, you can select different options during the interview or alter your preferences (Deleting Downloaded Transactions) and accounts (Creating an Account) later.
If you don’t see an obvious choice in the Industry list, scroll to the bottom and choose either General Product-based Business or General Service-based Business.
The type of company. The tax form you use depends on the type of business entity you have. The “How is your company organized?” screen lists the most common types, from sole proprietorships and partnerships to corporations and nonprofits. When you select an option on this screen, QuickBooks assigns the corresponding tax form to your company file. After you finish the Interview, you can see the tax form it selected by choosing Company→Company Information, which brings up the Company Information window shown in Figure 1-5 (page 25). The Income Tax Form Used box at the bottom of this window lists the tax form for your company type.
The first month of your fiscal year. When you start your company, you choose a fiscal year. On the “Select the first month of your fiscal year” screen, QuickBooks automatically sets the “My fiscal year starts in” box to January because so many small businesses stick with the calendar year for simplicity. If you start your fiscal year in another month, choose it from the drop-down list.
The administrator password. The administrator can do absolutely anything in your company file: set up other users, log in as other users, and access any area of the company files. Surprisingly, setting an administrator password is optional. QuickBooks lets you click Next and skip right past the “Set up your administrator password” screen, but this is no time for shortcuts, as the box below explains. Type the password you want to use in both the “Administrator password” and “Retype password” boxes, and then keep the password in a safe but memorable place. (Setting Up the Administrator explains how to change the administrator name and password.)
After you set the administrator password and click Next, the “Create your company file” screen appears. If you’re new to QuickBooks, click the “Where should I save my company file?” link, which opens a QuickBooks Help window that explains the pros and cons of storing files in different places. When you’re done reading it, or if you’re a QuickBooks veteran, click Next to specify the filename and location.
QuickBooks opens the “Filename for New Company” dialog box, which is really just a Save As dialog box. Navigate to the folder where you want to store your company file. QuickBooks automatically sets the “File name” box to the company name you entered, and the “Save as type” box to “QuickBooks Files (*.QBW, *.QBA)”. Here are some guidelines for the name:
If you want to call the file something other than the company name you entered earlier in the Interview, simply type a new name in the “File name” box. For example, you may want one that’s shorter or that better identifies the company’s records within.
Consider storing your company file in a folder with the rest of your company data so that it gets backed up along with everything else. For example, you could create a Company Files folder inside your My Documents folder—if you’re the only person who uses QuickBooks. See Where to Store Your Company Files for more about choosing a location for your company files.
When you click Save in the “Filename for New Company” dialog box, QuickBooks may take a minute or so to create the new file. In the meantime, a message box with a progress bar appears. Go grab a coffee, because when the company file is ready, the EasyStep Interview displays the “Customizing QuickBooks for your business” screen. Click Next to dig in.
Tip
At this point, the progress bar in the left margin of the EasyStep Interview window is depressingly short because you still have to do the bulk of company file setup. If you need a break before continuing, click Leave. The next time you open that company file, the EasyStep Interview continues where you left off.
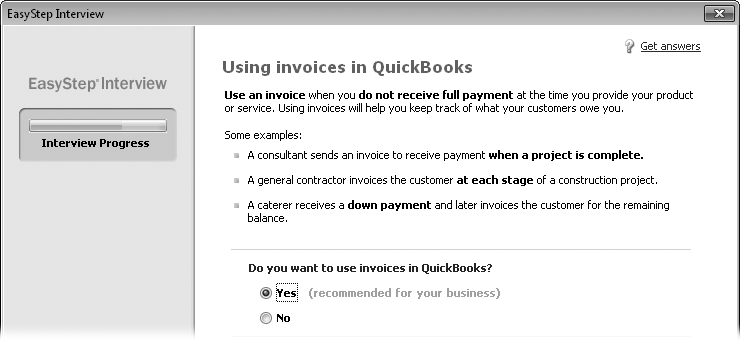
The next several screens in the EasyStep Interview ask questions about your business to help QuickBooks decide which features to turn on, what to include on your QuickBooks Home page, and so on. The Interview displays “(recommended for your business)” next to the options that are typical for a company in your industry, as you can see in Figure 1-3.
Here are some guidelines for answering the questions on the screens that follow:
The What do you sell? screen is where you tell QuickBooks whether you offer services, products, or both. When you choose one of these options, QuickBooks figures out which types of income accounts you need. If you select “Products only” or “Both services and products”, another screen later in the Interview asks whether you want to track inventory.
Figure 1-3. The Interview sticks to the basics, so you’ll have more setup to do later. As you step through the screens in this section, make a list of the features you’re turning on (and the corresponding page numbers in this book) for reference. If you decide to change any of these settings later, Chapter 23 tells you how. Happily, the QuickBooks 2011 interview skips the sales pitches its predecessors had for add-on features that cost extra like selling online, getting an Intuit credit card, or ordering Intuit checks.
The Do you charge sales tax? screen has only Yes or No options. If you’re one of the unfortunate souls who has to navigate the rocky shoals of sales tax, select Yes. If you don’t charge sales tax, select No. For detailed instructions on dealing with sales tax in QuickBooks, see Setting Up Sales Tax.
On the Do you want to create estimates in QuickBooks? screen, select Yes or No to turn the estimate feature on or off. If you prepare quotes, bids, or estimates for your customers and want to do so in QuickBooks (Estimating Jobs), select Yes.
Note
If you use QuickBooks Premier, the “Tracking customer orders in QuickBooks” screen asks whether you want to use sales orders to track backorders (Using Sales Orders for Backorders) or other orders that you plan to fill at a later date. QuickBooks Pro doesn’t include this sales order feature.
Using statements in QuickBooks is where you tell the program whether you generate statements to send to your customers (Generating Customer Statements). For example, your wine-of-the-month club might send monthly statements to its members. Or, a consultant could send invoices for work performed and then send a statement that summarizes the fees, payments, and outstanding balance.
On the Using invoices in QuickBooks screen, select Yes to tell the program that you want to use invoices, which you probably do because invoices are the most flexible sales forms (Choosing the Right Type of Form).
The Using progress invoicing screen asks whether you invoice customers based on the percentage you’ve completed on a job. To learn why (and how) you might use this feature, see Comparing Estimates to Actuals.
Managing bills you owe asks whether you plan to write checks to pay bills immediately (select No) or enter bills in QuickBooks and then pay them later (select Yes). You can read about bill preferences on Bills and payment preferences on Multiple Currencies.
Tracking inventory in QuickBooks is the screen where you tell QuickBooks whether you keep track of the products you have in stock. This screen provides a few examples of when to track or bypass inventory, and Should You Track Inventory with Items? has more about whether tracking inventory makes sense for your business.
If you bill by the hour, Tracking time in QuickBooks is ideal. Select Yes to track the hours people work and create invoices for their time. Chapter 8 explains how to set time tracking up properly.
Do you have employees? is where you specify whether you want to use QuickBooks’ payroll and 1099 features (select Yes). If you use non-Intuit services to run payroll or generate contractors’ 1099s, select No.
When you click Next on the “Do you have employees?” screen, you see the “Using accounts in QuickBooks” screen and the progress bar indicates that you’re almost done with the Interview. With a few more steps, you’ll have your start date and most of the accounts you want to use. Click Next to set up these final things:
The Select a date to start tracking your finances screen summarizes what you learned about start dates on Before You Create Your Company File. If you’ve already decided which start date to use, select the “Use today’s date or the first day of the quarter or month” option. You can then type or choose any date you want in the box, such as the last day of the previous fiscal period. To start at the beginning of this fiscal year (which QuickBooks can figure out using the current calendar year and the starting month you selected), select the “Beginning of this fiscal year: 01/01/11” option instead. (The year you see listed depends on the current calendar year.)
The Review income and expense accounts screen lists the accounts typically used by companies in your industry, as shown in Figure 1-4.
When you click Next, you’ll see a bright orange, but premature, “Congratulations!” You still have a few more steps to complete before you can open your company file. Click “Go to Setup” and read the next section.
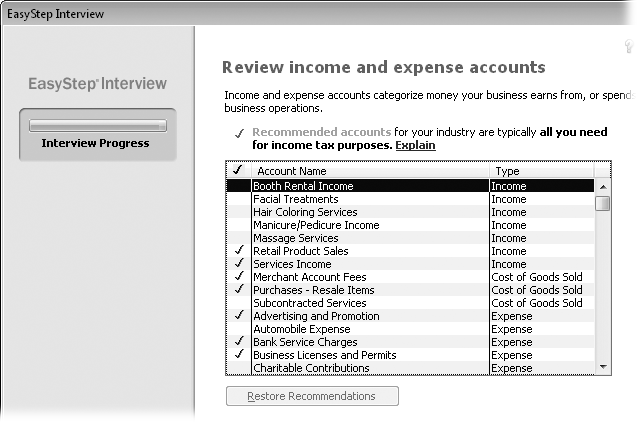
Figure 1-4. QuickBooks places a checkmark in front of the accounts that are typical for your industry. Click the checkmark cell for an account to add one that the program didn’t select, or click a cell with a checkmark to turn that account off. You can also drag your cursor over checkmark cells to turn several accounts on or off.
After you create a new company file and click “Go to Setup” in the EasyStep Interview window, the QuickBooks Setup window opens with additional steps you have to complete, such as adding bank accounts and items you sell. If you want step-by-step guidance through these processes, click one of the Add buttons. For example, to create items, you can fill in a service or product name, description, and price; QuickBooks takes care of the rest. You can even copy and paste information from an Excel spreadsheet.
After you finish the additional steps, click “Start working” to open the Start Center window. You can click commands to open the corresponding features, click “Go to setup” to return to the QuickBooks Setup window, or click the X at the top-right of the window to close it so you work directly in the program.
Tip
If you’d rather perform these tasks later on or want more control over setup, click the Close button (the X at the top-right corner of the QuickBooks Setup window). Modifying Company Info tells you where to go in this book for more detailed instructions on the rest of the setup you need.
After you close the QuickBooks Setup window, you see the QuickBooks Home page (The QuickBooks Home Page), which includes icons for the features you turned on during the EasyStep Interview.
Note
You may also see the QuickBooks Learning Center window (you can open this window anytime by choosing Help→Learning Center Tutorials) with links to tutorials and Help topics about new features (Other Kinds of Help). In the window, click a link to watch a video on a topic. To ask a question in the QuickBooks Live Community, choose Help→QuickBooks Help, and then click the Live Community tab. Live Community explains how to use this feature.
Get QuickBooks 2011: The Missing Manual now with the O’Reilly learning platform.
O’Reilly members experience books, live events, courses curated by job role, and more from O’Reilly and nearly 200 top publishers.

