Chapter 1. Setting Up Quicken
After you install Quicken (see Appendix C for instructions), you’re only a few steps away from reaping the pocketbook-plumping benefits of having the program serve as your personal bookkeeper. Quicken’s setup process is a whole lot easier than filling out the paperwork to open an account at your local bank. This chapter takes you through each step.
The first time you launch Quicken, the program offers to help set up your data file, an electronic filing cabinet that contains your financial records (the box on If You’re a Quicken Veteran explains what’s in this file). If you’ve used a previous version of Quicken, setup is a snap—a short conversion process preps your existing data file so Quicken 2009 can read it. If this is your first time using Quicken, the program’s Setup Center helps you create a new data file, asks a few questions about your finances, and spits out a data file tailored to your basic needs. Either way, you’ll have a working file in no time. You’ll also learn how to open a Quicken data file, which is helpful if you work with more than one file—for instance, your own and one for your parents.
Launching Quicken
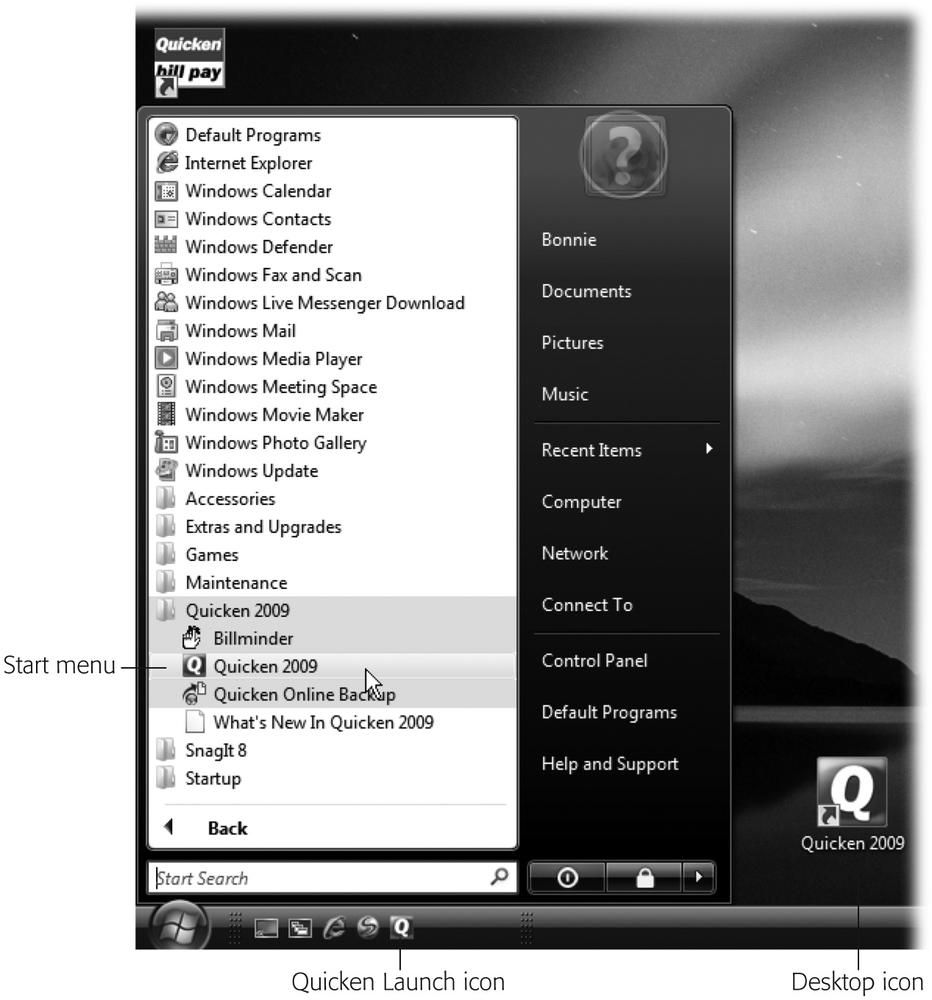
Launching Quicken works the same as pretty much any other program. Figure 1-1 shows the three ways to open Quicken:
Windows Quick Launch toolbar. This is the fastest way to get going. Click the Quicken icon in the lower-left corner of your screen, where Windows tucks a collection of instant-launch icons. (This book covers only Quicken for Windows.) The box on If You’re New to Quicken shows you how to add Quicken to this lineup.
Desktop shortcut. Double-click the Quicken 2009 desktop shortcut that Quicken added to your computer during installation.
Start menu. This tried-and-true approach is great for those who don’t use Quicken on a regular basis and want to keep their desktop free of shortcuts. On the Windows taskbar, click Start → All Programs → Quicken 2009 → Quicken 2009. (In Windows Vista, Start is a round button with the Windows logo inside.)
Setting Up Your Data File
The first time you launch Quicken, the “Get Started with Quicken 2009” window pops up and greets you. If you’re new to Quicken, the program guides you through creating and setting up your data file from scratch. If you’ve used Quicken before, you may not see the Get Started window but the program still helps convert your existing data file so that it works with the new version of the program. This section describes both options.
Tip
The “Get Started with Quicken 2009” window isn’t your only option when you want to set up or convert a file. If you’d rather create a new data file without the help of the Setup Center, click the Get Started window’s Close button and use the commands on the Quicken menu bar, as described on Creating a New Data File. Whenever you open a data file from an earlier version of the program, Quicken offers to convert the file (Converting Existing Data Files).
If You’re New to Quicken
For help creating and setting up a brand-new Quicken data file, in the “Get Started with Quicken 2009” window, select the “I am new to Quicken” option and then click Next. The first screen asks, “What do you want to call your data file?” You can let Quicken name your data file and choose its location or you can name the file something meaningful and tell the program where you want to store it. Here’s what your options look like:
I will use the default file name and location. Choose this option if you want Quicken to take care of naming and storing your data file. Quicken creates a folder called Quicken in your Documents folder in Windows Vista (My Documents in Windows XP) and puts your new data file in there, with the catchy name QDATA (which stands for “Quicken data”).
Note
Unless you like to hunt around your hard drive for obscurely named files, choose the second option (described next). If you’ve already let Quicken name and save a QDATA file and need help finding it, see the box on Telling Quicken which categories you want.
I want to choose a different file name and location. This option lets you give your Quicken data file a meaningful name, like MyMoney or Mom’s Finances, and store it in any folder you like. Personalized filenames are essential when you create more than one file—to track your parents’ finances, for instance, or manage the income from your child’s lawn-mowing sideline.
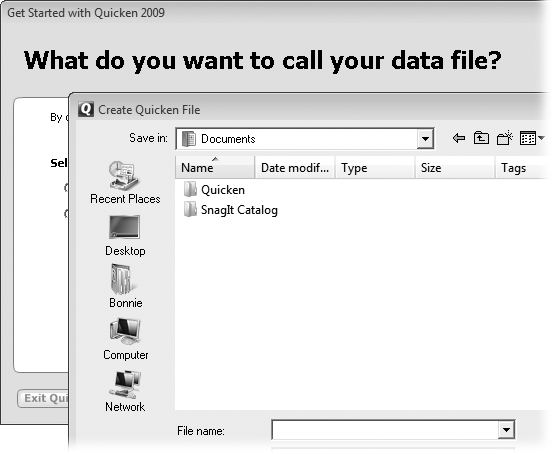
When you choose the second option and click Next, the Create Quicken File dialog box appears, as you can see in Figure 1-2. Navigate to the folder where you want to store your data file (it should be one you back up regularly). Then, in the “File name” box, type a meaningful name that works in Windows (letters, spaces, and apostrophes are fine). Click OK to create the file.
Quicken creates your data file and then opens the Setup tab to help you customize the file by creating accounts, categories, and other features for tracking your finances. See Using the Setup Center to learn what you do next.
If You’re a Quicken Veteran
If you have a data file from an earlier version of Quicken or you’ve just installed the program on a spiffy new computer, you can get started without all the hand-holding. In the “Get Started with Quicken 2009” window, select the “I am already a Quicken user” option and then click Next. The “Select your data file” screen that appears gives you three options:
Open a file located on this computer. If you already have a Quicken data file—for example, one you copied from another computer—choose this option and then click Next. In the Open Quicken File dialog box, navigate to the folder where your data file is saved, select the filename, and then click OK. If the data file is from an earlier version of Quicken, the program helps you convert the file to Quicken 2009, as you’ll learn in the section “Converting Existing Data Files” on Converting Existing Data Files. (If you’re converting an existing data file, you may want to print out parts of it, as described on Converting Existing Data Files.)
Restore a Quicken data file I’ve backed up to CD or disk. This option works only with files backed up with Quicken’s Backup command, as described in Chapter 15. When you choose this option and click Next, the Restore Quicken File dialog box appears. To restore the backup file, navigate to the folder or CD where the backup file is saved, select the filename, and then click OK. Once the program has reconstituted the backup file into a regular data file, you can choose File → Open to work with it.
Start over and create a new data file. If you’ve mangled or lost the only copy of your data file in a horrible soda-spilling accident, take a deep breath, make a mental note to back up your data from now on, and then choose this option to tell Quicken to create a brand new file. Click Next and, in the Create Quicken File dialog box that appears, navigate to the folder you use for Quicken data. In the “File name” box, type a name for the new file and then click OK. Quicken creates the data file and displays the Setup tab.
Using the Setup Center
You can’t miss Quicken’s Setup Center—the program opens the Setup tab as soon as you create a data file. If you know your way around Quicken, you can use menu commands to do everything in the Setup Center. If you’re new to Quicken, though, the Setup Center is handy because it pulls together all your options, lets you make your own financial choices, and adds everything you enter to your data file so you can start managing your finances.
Each version of Quicken seems to deliver a revamped setup tool. An earlier rendition was called Quicken Guided Setup, a lengthy process that included confessing your financial goals and spelling out your financial details. Quicken 2008’s Express Setup was a shorter step-by-step procedure, but stopping anywhere in the middle could induce feelings of guilt. Quicken 2009’s Setup Center places setup tools at your disposal so you can enter information whenever you’re ready, as you can see in Figure 1-3. In the Setup tab, you can create accounts, electronic twins of your real-world financial accounts. It can also create categories to help track the money you spend and organize your budget. For instance, if you tell the Setup Center you’re a homeowner, it adds a category for mortgage interest.
Telling Quicken About Yourself
The Setup Center’s Overview screen wants to know a little personal information. Don’t worry—it’s only to help figure out the categories you’ll use to track your finances and which financial features you see. In fact, if you leave the settings as they are, Quicken includes all of its features on tabs and menus and creates basic categories. See the box on Setting Up Bills, Deposits, and Paychecks for a quick introduction to categories and why they’re so handy. Later on, you can set up more categories (Creating a New Category).
Telling Quicken which categories you want
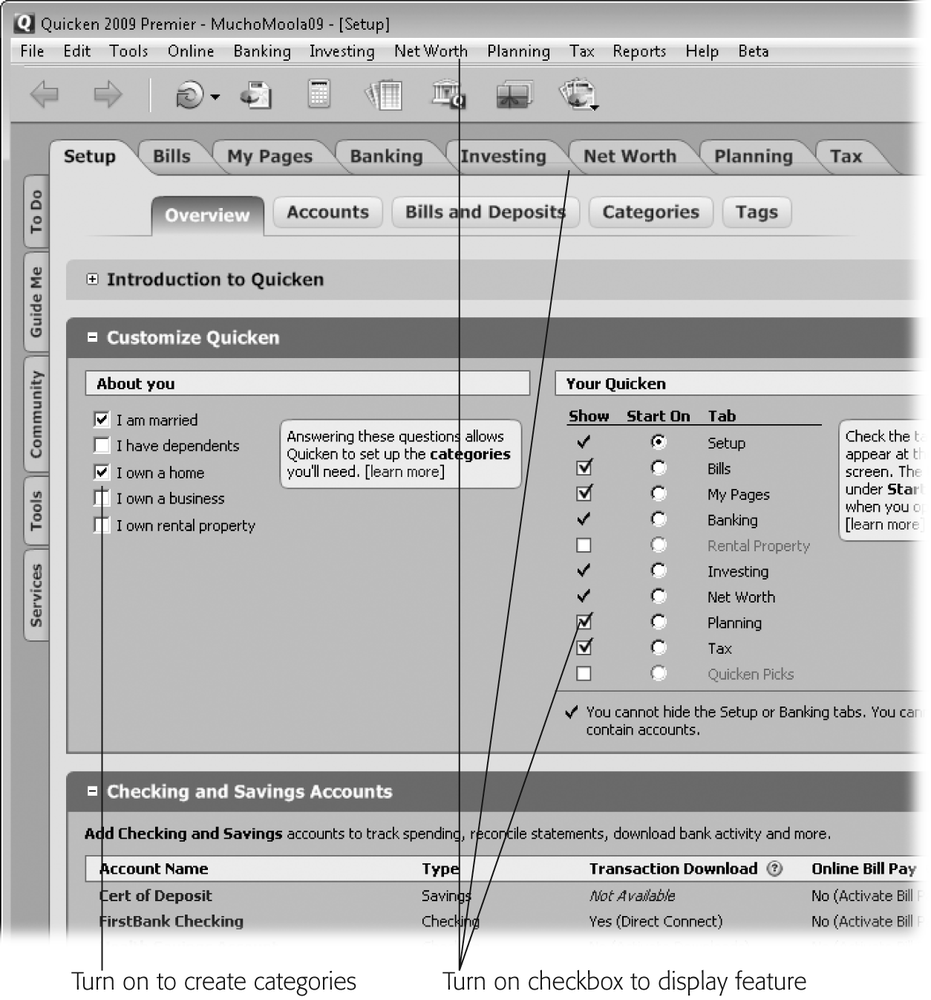
Quicken automatically adds the most popular categories to your data file without asking your permission. The “About you” checkboxes on the Overview screen tell Quicken to create categories for special financial situations, such as separate salary categories for you and your spouse. Here’s what each checkbox does:
I am married. If you’re married and want to track categories like income and 401(k) contributions for each spouse, turn on the “I am married” checkbox to set up those categories. (If you aren’t married but have a living arrangement that looks like married—say you bought a house together—go ahead and turn on the “I am married” checkbox.) Then, each of you will have categories for your own income and tax-related items like 401(k) contributions. For money that gets mingled in other ways like the expenses for the house you co-own, you can run a report at tax time to see the total tax deductions (Planning for Taxes) and split them in whatever percentages you want.
I have dependents. Turn on this checkbox if you have children, parents, or other folks you list as dependents on your tax returns. Quicken creates categories for dependent-related expenses, which you can use to fill out your tax return.
I own a home. Turn on this checkbox if you own a home and want categories for your house, like tax-deductible mortgage interest and home improvements.
I own a business. Although the Quicken Home & Business edition provides special features specific to running a business, you can tell other editions of Quicken to create a few business-related categories by turning on this checkbox.
I own rental property. If you turn on this checkbox, Quicken creates categories to help you track income and expenses for rental property.
Telling Quicken what features you want to use
The Your Quicken section on the right side of the Overview screen lets you turn financial features on and off. Here’s what you do:
Show. If you’re starting out by tracking your checking account in the program, you can turn off all the checkboxes in the Show column except for Bills and Banking. When you turn off a checkbox, Quicken removes that feature’s entry on the Quicken menu bar at the top of the main Quicken window and hides its tab along the top of the screen. Turn a checkbox on to see its menu entry and tab once more, as Figure 1-3 shows.
When you want to start using other features, click the Setup tab and turn on those features’ checkboxes: Investing, Planning, or Tax, for example.
Start On. To tell Quicken which tab you want to see whenever you launch the program, turn on its radio button in the Start On column. If you usually dive right into banking, for example, click the Banking option to make the Banking tab appear front and center when Quicken starts.
Setting Up Accounts
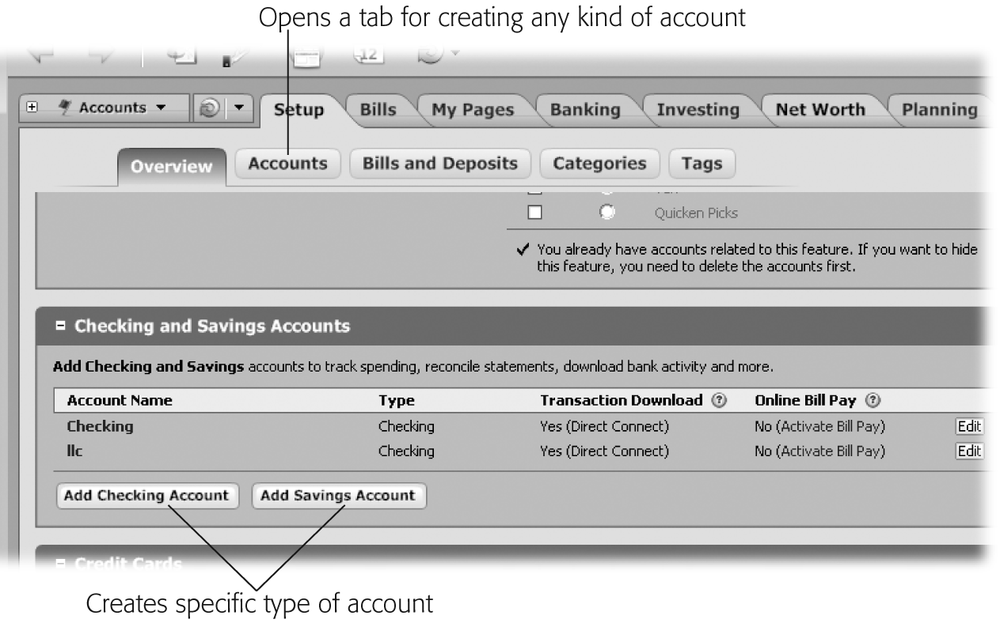
As you scroll down the Overview page, you reach sections for creating different types of accounts (such as checking and savings) and setting up reminders for bills, as well as places to record paychecks and transfers between accounts. The buttons on the Overview page create specific types of accounts: Add Checking Account, Add Savings Account, Add Credit Card, Add Investment Account, and Add Cash Account help you set up accounts in Quicken to mirror your real-world financial accounts (Figure 1-4).
The buttons for creating accounts in the Setup tab don’t have superpowers of any kind—they can’t magically fill in all your financial data for you. They simply open the Account Setup window and walk you through the same account creation process you use to create accounts anywhere else in Quicken. Chapter 3 explains where you can create accounts in Quicken and steps you through the entire process.
Setting Up Bills, Deposits, and Paychecks
Quicken can help keep you out of trouble by reminding you to pay bills before they’re due and deposit money so you have funds to cover the checks you write. If you pay bills—and who doesn’t—you can add them in the Setup Center and Quicken sets up scheduled transactions (with handy reminders) for credit card payments and other bills you pay. You can also set up your paycheck so the program takes care of your paycheck deposits and all your withholdings and deductions. The Setup tab’s Overview screen gives you a chance to cross these important tasks off your to-do list.
On the Overview screen, the Bill Reminders section and the “Income and Transfer Reminders” section have buttons you click to set up transaction reminders (which were called scheduled transactions in earlier versions of Quicken) that prompt you to enter info about bills and deposits in Quicken—what they’re for, how often you pay or receive them, and the account where you withdraw or deposit the money. You can also click the “Bills and Deposits” button (next to Overview and Accounts) to display a screen dedicated to creating transaction reminders and paychecks. Whether you click Add Paycheck on the Overview screen or Set Up Paycheck on the Bills and Deposits screen, Quicken opens the Paycheck Setup wizard (Automatically Recording Paycheck Deposits).
When you use the buttons in the Setup tab to add bills, deposits, and paychecks, Quicken launches the same tools you can find elsewhere in the program—the Setup Center just brings them all together to make ‘em easy to find. See Editing and Deleting Scheduled Transactions in Chapter 7 to learn how to set up transaction reminders for bills and deposits. To set up a paycheck, complete with automatic transfers and payments, see Automatically Recording Paycheck Deposits.
Converting Existing Data Files
The first time you open a data file created with an earlier version of Quicken, the program opens the Convert Your Data dialog box. Before you click OK to begin the conversion, it’s a good idea to gather key facts from your existing file so you can verify that Quicken converts it correctly. (Problems don’t happen that often, but better safe than sorry.)
Here’s the information you should have handy: your Account List (Closing Accounts), Scheduled Bills and Deposits (Setting Up a Scheduled Transaction), Online Payees (Setting Up Online Payees), Category List (Turning On Quicken’s Built-in Categories), and the information in your Password Vault (Storing Passwords). The easiest way to make this comparison is to print these items from the earlier version of Quicken. (It’s a good idea to keep the earlier version of Quicken on your computer until you’re sure you want to use the new version; the box on Upgrading Quicken explains how to juggle two versions of the program.) To print such a list, open the appropriate Quicken window—press Ctrl+A to open the Account List window, for example—and then click Print in the window’s menu bar.
When you’re ready to convert your old data file to Quicken 2009, here’s what you do:
In the Convert Your Data dialog box, click OK.
Behind the scenes, Quicken creates a subfolder in the folder that holds your old data file (such as Documents\Quicken) to store that original file. If you’re converting a Quicken 2008 data file, for example, the subfolder is called Q08Files, or Q06Files if you convert a Quicken 2006 file. Before Quicken begins converting, it copies your original data file to that subfolder.
A message box tells you Quicken is converting your file and shows how many items have been converted so far. As the numbers move into the thousands, congratulate yourself for all the Quicken work you’ve done over the years. After a few minutes, the conversion finishes and you’ll see your data file open in Quicken.
That’s it! Start working with your data file immediately.
If your data file has business transactions in it, Quicken opens a dialog box asking for information about your business. In the Tell Quicken About Your Business dialog box, click Add. In the Add Business dialog box, type the name of the business, choose the option for who owns it, and then type a name for a business tag (see Chapter 4 for more about tags).
After the file conversion, you’ll work with the updated Quicken 2009 copy of your data file. Review the Account Bar to make sure that all the accounts are still there and have the same balances they did before the conversion. Also confirm that all the scheduled transactions, online payees, and categories you printed are still present in the converted Quicken file. Should you decide to go back to the earlier version of Quicken, you can always retrieve your pre-conversion data file, saved in the subfolder named Q08Files that Quicken creates in the folder that contains the data file (or Q07Files if you’re converting from the 2007 version, and so on).
Opening a Quicken File
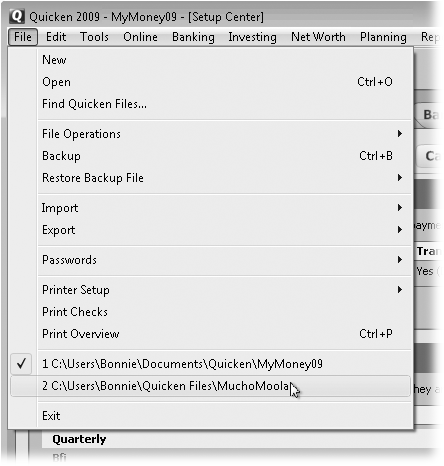
To open a data file in Quicken, simply go to File → Open or press Ctrl+O and then select the data file you want to open. After you’ve opened a data file manually, Quicken obligingly opens that file the next time you launch the program. If, like most people, you have only one Quicken data file, you may never have to choose File → Open again. Even if you jockey between several data files, the File menu makes it easy to open the one you want, as you can see in Figure 1-5.
Get Quicken 2009: The Missing Manual now with the O’Reilly learning platform.
O’Reilly members experience books, live events, courses curated by job role, and more from O’Reilly and nearly 200 top publishers.
