Chapter 4. Categories and Tags: Tracking Transactions
As you learned in Chapters Chapter 1 and Chapter 2, Quicken lets you assign categories to financial transactions to help you track what you’re spending your money on, prepare your tax returns, and so on. If you do a good job of categorizing each entry (and Quicken makes it dead simple), then you’re never more than a click or two away from generating reports that answer questions like, “How much did taxis cost me this year?” and “Do I spend more on my Chihuahua or my child?” When you create a new Quicken data file, the program automatically sets you up with a boatload of categories, based on what you tell it during setup (such as your marital status and whether you own a home).
For most of us, our financial needs change as time passes. That apartment you had when you first created your Quicken data file? Gone, replaced by your own home. Or perhaps you’re now even renting out condos. You can turn Quicken’s built-in categories on and off to track different types of income and spending as changes like these happen.
At the same time, everyone has a personal peccadillo or two. You may have a shoe fetish that warrants tracking how much you spend on footwear, whereas your best friend tracks horse shoes, hay, and vet bills. If Quicken doesn’t come with a category you want, creating new ones is easy. The program also includes another feature, called tags, to help you slice and dice your information in ways that categories only dream about.
This chapter starts by explaining what categories and tags can do. You’ll learn about the types of categories Quicken has, from broad groups for mandatory and discretionary spending to detailed subcategories. Then, if the category list Quicken sets up for you isn’t enough, you’ll learn how to add built-in Quicken categories to the list or create your own. If you decide to use tags to analyze your income and expenses, you’ll learn how to set them up, too.
Tip
Quicken’s built-in categories may well be all you need to track your finances. If that’s the case, you can safely skip this chapter. You can always come back later if you want to tweak the categories you use.
Understanding Categories and Tags
Quicken has two features to help you organize your financial information:
Categories are like Quicken’s own Dewey Decimal system—except a whole lot more intuitive. By assigning plain-English labels (Dining, Groceries, Salary, and so on) to all your transactions, you can use Quicken to easily track how you earn money and what you spend it on. You can apply only one category to each transaction.
Tags, on the other hand, are like keywords. They’re flexible enough to cut across categories, letting you track money in ways that would be tedious, if not impossible, with categories. For instance, you can apply the same tag to income and expense categories to determine net profit on a rental property. Or you can apply multiple tags—Ski Houses, Retirement Income, and Idaho—to those same rental property transactions.
Organizing Vertically with Categories
Some people organize their papers so meticulously they can pinpoint the eye doctor’s bill from 1997, the telephone bill from last August, or the pay stubs from their last job. For others, two shoeboxes labeled In and Out are enough. In Quicken, categories can support the most careful or cavalier of organizational schemes. Read this section to learn how categories work before you start modifying categories en masse. Then, as you think about how you want to track your financial information, you can set up custom categories to match your needs.
Categories break your finances down into ever smaller portions: from basic distinctions like income or expense; to high-level divisions like housing, utilities, and taxes; to subcategories for each utility company you pay. Here’s a breakdown of all the levels Quicken provides:
Income and expense. As you’ll learn shortly (Creating a New Category), when you create a category, you specify whether it represents income or an expense. Income categories are for the money that comes into your personal coffers, like salary, part-time income, and winnings from the gals’ bunko game. Expense categories represent the money you spend, including unavoidable expenses like electric service and discretionary expenses like the cost of your skydiving hobby.
Quicken automatically creates a third type of category, Transfers and Payments, which works a little differently: Quicken generates categories representing each of your accounts (checking, savings, IRA, and so on). Then, when you transfer money (Transferring Money Between Accounts) from checking to savings or make a mortgage payment, you use these Transfers and Payments categories to show which accounts the money is going into and out of.
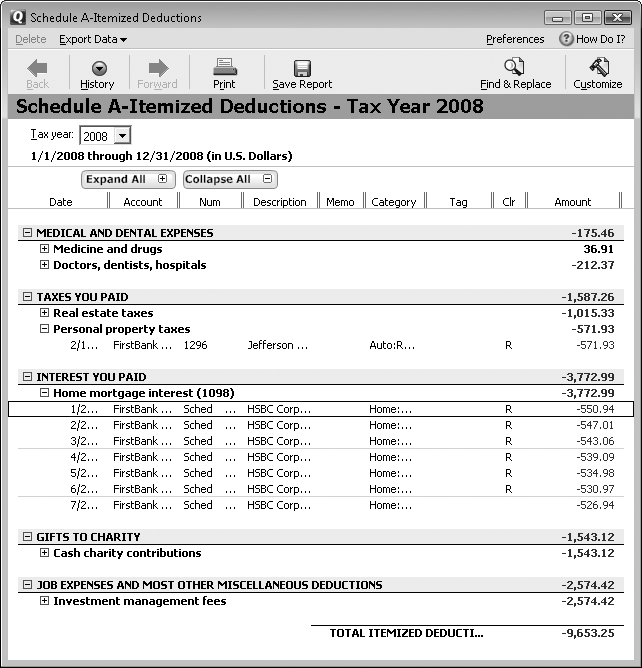
Category. Think about filling out an income tax return and you’ll quickly see the benefit of using Quicken categories. By categorizing your income and expenses, you can fill out those diabolical tax forms in minutes rather than days. (Chapter 10 explains techniques for making tax forms less, er, taxing.) You can associate categories with tax forms—the Salary category with the W-2 form’s “Salary and Wages” line, for example. Once you’ve applied categories to a year’s worth of transactions, Quicken can produce a report with the tax form totals you need (see Figure 4-1), or feed the data to TurboTax for even speedier tax preparation.
Figure 4-1. Quicken’s built-in Schedule A-Itemized Deductions report is only a few clicks away…if you keep up your end of the bargain and categorize your transactions properly. (Don’t fret—it’s really easy.) The Tax Summary report (Planning for Taxes) covers all tax-related categories, including those for Form 1040, Schedule A, Schedule B, Schedule C, and W-2.Subcategory. As its name implies, a subcategory is a category within a category. By lumping several subcategories under one top-level category (as Quicken does with its built-in subcategories for employee benefits), you have the option to look at your spending in detail or more generally. In addition to organizing your category list, subcategories are great for budgeting and tracking. Suppose you set up a category called Food, and then create subcategories for groceries, dining out, and lunch. When you realize you’re spending $200 a month on lunch at work (about $10 a day), brown bagging may be easier to swallow.
Tip
Although Quicken lets you create multiple subcategory levels, you usually won’t need more than one. If you find you’re creating subcategories within subcategories, take a look at your overall category structure. You may be making life too complicated. In some cases, using tags can eliminate additional subcategory levels, as you’ll learn in the next section.
Category Group. Quicken also provides category groups: high-level categories that encompass broad swaths of individual categories. You can use Quicken for years without needing to use category groups. However, power users find all sorts of uses for them. Out of the box, Quicken includes three category groups: Income, Discretionary, and Mandatory Expenses. If you want to determine how much money you need to cover expenses should you lose your job, for example, you can create a budget (Creating a Budget Automatically) for only the categories in the Mandatory Expenses group.
Organizing Flexibly with Tags
Categories obey the laws of nature: A dollar can be in only one place (one category) at a time. Tags are more flexible: You can apply the same tag to transactions in different categories, more than one tag to the same transaction, and a tag to both income and expense categories. Here are some examples of what tags can do:
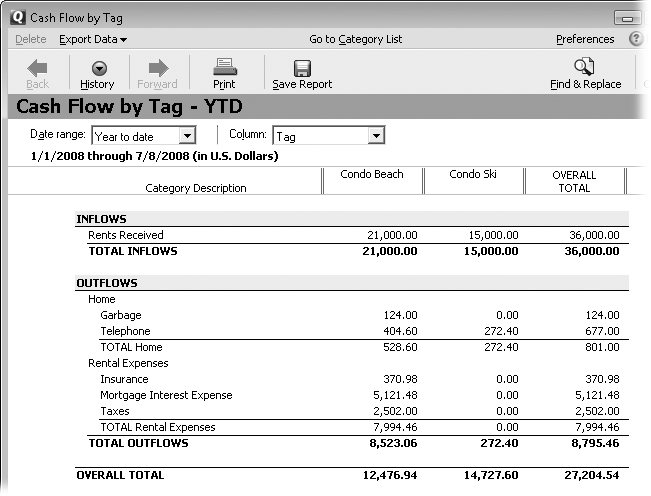
Track income and expense together. Suppose you want to see how much your pottery hobby costs after you deduct what you earn selling your wares. You can set up a tag called Pottery and assign it to any pottery-related transactions, whether they fall into an income or expense category. Then, you can run a report like the built-in “Cash Flow by Tag” report (Tracking spending) to see the net results. You can review income and expense categories together, but you have to customize a report (Customizing Reports) to specify the income and expense categories you want to include.
Track details with fewer categories. Tags make it easy to track fine details without creating zillions of categories. Suppose you want to know how much you spend on your kids in every category so you can see how much less you’ll spend when the little darlings have grown and (you hope) moved away. You can create two tags called Parents and Kids. Then, you can apply the Kids tag to kid-related checks and credit card charges, whether they’re for clothing, food, or fun. The built-in "Cash Flow by Tag” report includes a column for each tag, so tag totals are clear, as you can see in Figure 4-2.
Figure 4-2. The “Cash Flow by Tag” report includes a column for each tag you create. You can customize the report (Customizing Reports) to hide untagged transactions, as is the case with the report shown here. For example, you can hide untagged transactions to see only the income and expenses for rental properties without all the untagged transactions that represent the rest of your financial life.Note
You might think about creating subcategories to track spending for each family member, but that’s not the way to go. For instance, for the Clothing category, you could create subcategories (see Creating a New Category) for each member of the family to see the wardrobe costs for an executive mom, a work-at-home dad, and two au courant teenagers. With this approach, you’d have to create family-member subcategories within each category, and that leads to long category lists and lots of scrolling. It’s much easier to use tags instead.
Track money in multiple ways. Because you can apply more than one tag to a transaction, you can slice and dice your information in lots of different ways. For example, you can set up tags for each vacation so you can easily find out the total you spent on each one. You could also apply tags for you and your spouse’s respective vacation transactions to see how much each of you spent on your separate getaways. Similarly, multiple tags can help you analyze the profitability of rental properties in different ways. You could create tags for different types of rental properties—ski versus beach, for example. Then you can review profitability by type of rental property by customizing the “Cash Flow by Tag” report (Changing Applied Tags) to include the Condo Ski and Condo Beach tags, as shown in Figure 4-2.
Adding New Categories
The categories Quicken automatically includes in a newly created data file meet most needs for most people, but chances are you’ll want to make at least a few changes. As you experience life (buy a home, have kids, pay for college, and so on), you’ll probably want to track different types of income and spending. Quicken comes with built-in categories for the most common sources of income and expenses, which you can turn on and off as your needs evolve.
But you can also create your own categories from scratch (see Creating a New Category). You can even recategorize transactions if you decide to revamp the categories you use.
Whether you want to create one category or several, Quicken makes it easy. Just use one of these methods:
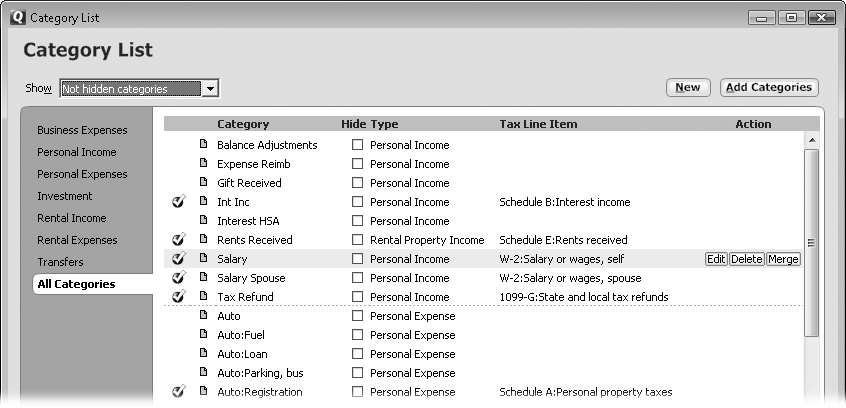
The Category List window (Figure 4-3) is the best place to make category changes en masse. To open this window, choose Tools → Category List or press Ctrl+C. (If you use the Windows mapping for Ctrl+C, as described on Keyboard mappings, press Shift+Ctrl+C.)
Alternatively, if you enter a transaction (say, a credit card charge) and can’t find the category you want, you can add a new category then and there: In an account register, when you click a transaction’s Category box, a mini-version of the Category List window appears. Click Add Category to open the Set Up Category dialog box, where you can define a brand-new category (Creating a New Category).
Tip
If you’re hooked on using Ctrl+X, Ctrl+C, and Ctrl+V to cut, copy, and paste, respectively—as is the case in so many Windows programs—don’t be alarmed if Quicken doesn’t respond the way you expect when you try those keyboard shortcuts. Quicken uses them for its own purposes: Ctrl+X for viewing where transferred money is heading to or coming from, Ctrl+C for opening the Category List window, and Ctrl+V for voiding a transaction. Fortunately, you can tell Quicken to interpret those commands the way you’re used to. To do so, choose Edit → Preferences → Quicken Program. In the Quicken Preferences dialog box’s “Select preference type” list, click Setup. Under Keyboard Mappings, select the “Windows standard (Undo/Cut/Copy/Paste)” option and then click OK.
Turning On Quicken’s Built-in Categories
The categories you initially see in the Category List window depend on what you told Quicken during setup. But if you have children, buy a house, or get married (not necessarily in that order) after you set up Quicken, you don’t have to create categories from scratch just because you don’t see them in the drop-down lists in transactions’ Category fields. Look through Quicken’s built-in categories first to see if the ones you want are there. Built-in categories are more convenient than creating your own because Quicken specifies the tax forms and line items to which they apply. Here’s how you find and add built-in categories to your Category List:
In the Category List window (which you open by going to Tools → Category List or pressing Ctrl+C), click Add Categories.
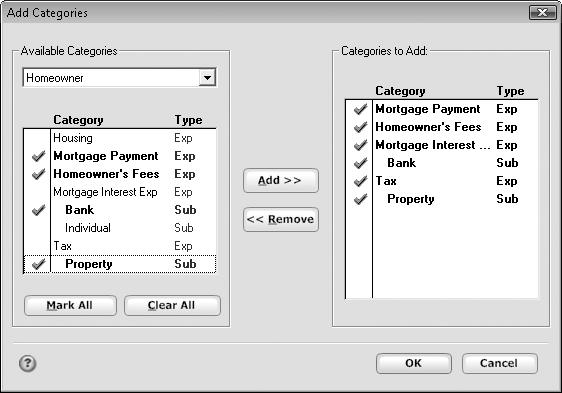
Quicken opens the Add Categories dialog box (Figure 4-4).
In the Available Categories drop-down menu on the left side of the dialog box, choose the collection of categories you want.
For example, if you’re the proud new owner of a home, choose Homeowner. In the Available Categories section, you’ll see the built-in categories related to the category collection you selected. Some collections correspond to life events, like Married or Children; others apply to special cases like Rentals & Royalties, for types of income and expenses that only some people have.
By looking at the Type column, you can see whether a category is for income (Inc shown in green) or expenses (Exp in red), or whether it’s a subcategory (Sub in the color of the parent category; subcategories are also indented beneath the associated parent category).
To select all the categories that appear, click Mark All.
Clicking Mark All is the best approach if you aren’t sure which categories you’ll need. However, if you want to select specific categories, you can Ctrl+click each category you want. You can also click the first category in a contiguous group and then Shift+click the last one. If you just want to add one category, simply click it.
Click Add to copy the categories over to the “Categories to Add” list.
Quicken copies the categories (and their parent categories, if you’ve selected subcategories) to the “Categories to Add” list, as you can see in Figure 4-4. If you change your mind, you can remove categories from the “Categories to Add” list by selecting them and then clicking Remove.
To actually add the selected categories to the Category List window, click OK.
You can remove categories from the Category List one at a time or by selecting several, as explained on Editing Categories. If you remove a parent category, Quicken removes all its subcategories as well.
Creating a New Category
If you want a category that isn’t built-in—Aardvark Care, for instance—you can create it in no time. If you add a transaction and the category you want doesn’t appear in the transaction’s Category drop-down list, you can add a new category without breaking stride. A transaction’s Category drop-down list is like a mini Category List window. Click Add Category to open the Set Up Category dialog box, where you can define a new category by following steps 3–7 in the following list.
Planning fans can identify all the new categories they want and create them in one satisfying session. Here’s how to create several categories at once:
Choose Tools → Category List or press Ctrl+C to open the Category List window.
In addition to creating categories, you can modify or delete categories in the Category list window.
Click New.
The Set Up Category dialog box shown in Figure 4-5 appears.
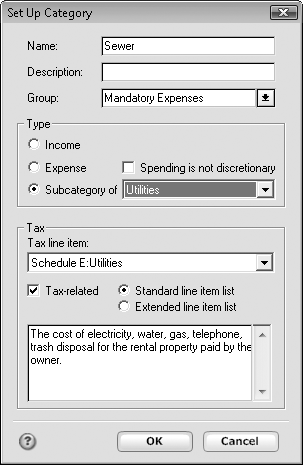
In the Name box, type a name for the new category.
Pick a name that identifies the purpose of the category—even if you’re creating a subcategory. A subcategory name like Fees makes sense when you can see the parent category, but could be obscure in a report or transaction, so use a more descriptive name, like Condo Fees.
You can fill in the Description box as a reminder of what the category represents, but if the category name says it all, feel free to skip this line.
If you want to assign the category to a high-level category group, in the Group drop-down menu, choose the appropriate group.
For example, most people would choose Discretionary for a category that tracks money spent on cappuccinos. But, if you can’t function without fancy coffee, choose Mandatory Expenses instead. You don’t have to assign a category group, but it takes so little time, there’s no reason not to.
Select the type of category.
You have three options to choose from. For top-level categories, select either the Income or Expense option—the two broadest categories of all. To create a subcategory, select the “Subcategory of” option, as shown in Figure 4-5.
If you select the Mandatory Expenses group, Quicken automatically turns on the “Spending is not discretionary” checkbox to indicate that the expense is something you need to live like food or rent. If you select the Discretionary group, Quicken turns off the “Spending is not discretionary” checkbox.
Tip
Subcategories come in handy when you want to look at your income or spending at different levels. For example, if you create a parent category called Entertainment with subcategories like Dining Out, Hobbies, and Sports, you can run reports that show your total spending on what you do for fun or drill down to what you spend on different types of entertainment.
If the category corresponds to an item on your tax return, turn on the “Tax-related” checkbox. In the “Tax line item” drop-down list, choose the entry that corresponds to the right tax form and the appropriate line on that form.
When you choose a tax line item, Quicken displays a description of that item, but it doesn’t guarantee your choice is correct. You can use last year’s income tax return to check your line item assignments, or to be sure, ask the IRS or your accountant. Chapter 10 has the full story on setting up Quicken to track taxes.
Click OK.
Quicken adds the category to the Category List window, meaning it’ll show up in transactions’ category drop-down lists. To add another category, simply start back at step 2.
When you’re done working on categories, click Done to close the Category List window (or click its Close button, the X at the top-right corner of the window).
Editing Categories
You can modify any aspect of an existing category. For example, you can give it a more meaningful name, change it into a subcategory, assign a tax line item for expenses you joyfully realized qualify for tax deductions, and so on. To change a category’s settings, start by opening the Category List window (Tools → Category List or Ctrl+C). Here’s what you do next:
Right-click the category you want to change, and then click Edit on the shortcut menu that appears.
Or, if your mouse hand needs more exercise, you can click a category and then, on the right end of the category row, click Edit.
The Edit Category dialog box that appears is identical to the Set Up Category dialog box (Creating a New Category)—except for its title and the fact that the fields are filled in with the category’s current settings.
Change the fields you want and then click OK to save your changes.
When you edit a category, the changes you make apply to all transactions in that category.
Removing Categories
You can remove categories from the Category List in two ways. Hiding is a temporary solution, and perfect if you think you’ll need the category again in the future; deleting is permanent, meaning you may have to recategorize some transactions. For example, if personal hygiene isn’t a priority, you can delete the Personal Care category, which removes the category from the Category List completely. If you own a home but worry about your spouse kicking you out, you may want to hide the Rent category, so you can restore it if you have to make alternative living arrangements. Here’s how to get categories out of your sight:
Hiding a category. In the Category List window, turn on the Hide checkbox for every category you want to hide. To show them again, turn off the same checkboxes.
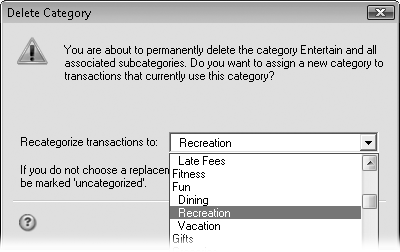
Deleting a category. In the Category List window, click the name of the category you want to delete and then, at the right end of the category row, click Delete. If there are transactions assigned to that category, Quicken asks you to recategorize them, as shown in Figure 4-6. If you don’t recategorize transactions, they become uncategorized and won’t show up in reports (for taxes or actual spending, for example). You can also delete several categories at once. In the Category List window, select all the categories you want to delete. Delete buttons appear at the right end of each selected category’s row. Click any one of these Delete buttons to get rid of the selected categories.
Organizing Categories
The Category List window gives you plenty of tools to help review and organize the categories you’re working with:
Show. To inspect a portion of the Category List (and filter out the others), in the Show drop-down menu, choose a type of category. For instance, choose “Tax-related categories” to check whether you’ve assigned your tax categories to tax line items correctly (see Editing Categories).
Category types. Quicken breaks income, expense, and transfer types into fine-grained classifications. For example, to see only personal expense categories, on the left side of the Category List window, click the Personal Expenses tab. (This hides expenses related to investments and rental property, for example.)
Options. Click Options at the bottom of the window to choose what you want to see in the window. For example, you can show or hide category descriptions, category groups, the type of category (income, expense, or sub), and the tax line assignment. To assign a category group, choose Options → “Assign category groups”. The Assign Category Groups dialog box is a one-stop shop for assigning category groups. The steps to assign a category group are helpfully located at the top of the dialog box. See Organizing Flexibly with Tags to learn more about category groups.
Tip
At some point, you may decide to organize your categories differently, for example, to map your medical expenses categories to specific line items on the Schedule A federal tax form. After you set up your new categories, you can reassign existing transactions to them (see Recategorizing Transactions) by going to the Quicken menu bar and choosing Edit → Find & Replace → Recategorize.
Setting Up Tags
With Quicken’s built-in categories and the custom ones you create, you may never need tags. However, if you want to take advantage of the special powers that tags have (Organizing Flexibly with Tags), they’re a cinch to set up. (You’ll learn how to apply tags on Assigning Tags to Transactions.)
Creating a Tag
Unlike categories, Quicken doesn’t create any tags automatically (unless you use Quicken Home & Business—What’s New in Quicken 2009—in which case the program sets up business tags to help you track your business income and expenses.) You have to create any tags you want to use. Here’s how:
Choose Tools → Tag List or press Ctrl+L.
The Tag List window opens.
Click the New button at the top of the Tag List window.
The New Tag dialog box opens.
In the Name box, type a name that clearly describes the tag, like Kids or Parents (for tracking your kids’ expenses versus your own), and then click OK.
If you want to describe the tag in more detail, type a description in the Description box. You fill in the “Copy number” box only in a few situations, as the box on Creating a Tag describes.
Click OK.
Quicken creates your new tag, and it appears in the Tag List window, ready for you to use.
Editing a Tag
If you want to edit a tag—to rename it, say—in the Tag List window (choose Tools → Tag List or press Ctrl+L), click the tag and then click Edit at the right end of the tag row. The Edit Tag dialog box that appears is almost identical to the New Tag dialog box, except the boxes are filled in with the tag’s current values. Make the changes you want and then click OK. Any transactions using the tag automatically reflect the changes you made.
Hiding and Deleting Tags
Like categories, tags are willing to hide or go away permanently. Hiding tags is perfect if you want to clean up your Tag List, but keep tags around if you might use them in the future. For example, if your kids have a habit of moving back home, you can hide the Kids tag until your empty nest fills up again. To hide a tag, in the Tag List window, turn on the tag’s Hide checkbox; restore it to view by turning off the same checkbox.
Deleting a tag is permanent. Quicken removes the tag from the Tag list and also deletes the tag in the Tag field of any transactions using it. If you delete the Kids tag and then decide you want to run one more report of children’s expenses, you’re out of luck. To delete a tag, in the Tag List window, select the tag, click Delete at the right end of the tag row, and then click OK.
Get Quicken 2009: The Missing Manual now with the O’Reilly learning platform.
O’Reilly members experience books, live events, courses curated by job role, and more from O’Reilly and nearly 200 top publishers.

