Chapter 4. Document Structure
We’ve casually mentioned that SVG lets you separate a document’s structure from its presentation. In this chapter, we’re going to compare and contrast the two, discuss the presentational aspects of a document in more detail, and then show some of the SVG elements that you can use to make your document’s structure clearer, more readable, and easier to maintain.
Structure and Presentation
As we mentioned in Chapter 1, in Section 1.4.2, one of XML’s goals is provide a way to structure data and separate this structure from its visual presentation. Consider the drawing of the cat from that chapter; you recognize it as a cat because of its structure — the position and size of the geometric shapes that make up the drawing. If we were to make structural changes, such as shortening the whiskers, rounding the nose, and making the ears longer and rounding their ends, the drawing would become one of a rabbit, no matter what the surface presentation might be. The structure, therefore, tells you what a graphic is.
This is not to say that information about visual style isn’t important; had we drawn the cat with thick purple lines and a gray interior, it would have been recognizable as a cat, but its appearance would have been far less pleasing. These differences are shown in Figure 4-1, albeit without the color differences. XML encourages you to separate structure and presentation; unfortunately, many discussions of XML emphasize structure at the expense of presentation. We’ll right this wrong by going into detail about how you specify presentation in SVG.
Using Styles with SVG
SVG lets you specify presentational aspects of a graphic in four ways; with inline styles, internal stylesheets, external stylesheets, and presentation attributes. Let’s examine each of these in turn.
Inline Styles
Example 4-1
uses inline styles. This is exactly the way we’ve been using
presentation information so far; we set the value of the style attribute to a series of visual
properties and their values as described in Appendix B, in Section B.1.
Internal Stylesheets
You don’t need to place your styles inside each SVG
element; you can create an internal stylesheet to collect
commonly-used styles that you can apply to all occurrences of a
particular element, or use as named classes to apply to individual
elements. Example 4-2 sets up
an internal stylesheet that will draw all circles in a blue
double-thick dashed line with a light yellow interior. We have placed
the stylesheet within a <defs> element, which we will discuss
later in this chapter.
The example then draws several circles. The circles in the second row of Figure 4-2 have inline styles that override the specification in the internal stylesheet.
<svg width="200px" height="200px" viewBox="0 0 200 200">
<defs>
<style type="text/css"><![CDATA[
    circle {
        fill: #ffc;
        stroke: blue;
        stroke-width: 2;
        stroke-dasharray: 5 3
    }
    ]]></style>
</defs>

<circle cx="20" cy="20" r="10"/>
<circle cx="60" cy="20" r="15"/>
<circle cx="20" cy="60" r="10" style="fill: #cfc"/>
<circle cx="60" cy="60" r="15" style="stroke-width: 1;
    stroke-dasharray: none;"/>
</svg>External Stylesheets
If you want to apply a set of styles to multiple SVG
documents, you could copy and paste the internal stylesheet into each
of them. This, of course, is impractical for a large volume of
documents if you ever need to make a global change to all the
documents. Instead, you should take all the information between the
beginning and ending <style>
tags (excluding the <![CDATA[
and ]]>) and save it in an
external file, which becomes an external stylesheet. Example 4-3 shows an external
stylesheet that has been saved in a file named ext_style.css This stylesheet uses a variety
of selectors, including *, which
sets a default for all elements that don’t have any other style, and
it, together with the SVG, produces Figure 4-3.
* { fill:none; stroke: black; } /* default for all elements */

rect { stroke-dasharray: 7 3; }

circle.yellow { fill: yellow; }

.thick { stroke-width: 5; }

.semiblue { fill:blue; fill-opacity: 0.5; }Example 4-4 shows a
complete SVG document (including <?xml ...?>, <?xml-stylesheet ...?>, and the <!DOCTYPE>) that references the
external stylesheet.
<?xml version="1.0"?>
<?xml-stylesheet href="ext_style.css" type="text/css"?>
<!DOCTYPE svg PUBLIC "-//W3C//DTD SVG 1.0//EN"
    "http://www.w3.org/TR/2001/REC-SVG-20010904/DTD/svg10.dtd">
<svg width="200px" height="200px" viewBox="0 0 200 200"
    preserveAspectRatio="xMinYMin meet">

<line x1="10" y1="10" x2="40" y2="10"/>
<rect x="10" y="20" width="40" height="30"/>
<circle class="yellow" cx="70" cy="20" r="10"/>
<polygon class="thick" points="60 50, 60 80,  90 80"/>
<polygon class="thick semiblue"
    points="100 30, 150 30, 150 50, 130 50"/>
</svg>
Note
Inline styles will almost always render more quickly than styles in an internal or external stylesheet; stylesheets and classes add rendering time due to look up and parsing.
Presentation Attributes
Although the overwhelming majority of your SVG documents will use styles for presentation information, SVG does permit you to specify this information in the form of presentation attributes. Instead of saying:
<circle cx="10" cy="10" r="5"
    style="fill: red; stroke:black; stroke-width: 2;"/>
You may write each of the properties as an attribute:
<circle cx="10" cy="10" r="5"
    fill="red" stroke="black" stroke-width="2"/>
If you are thinking that this is mixing structure and
presentation, you are right. Presentation attributes do come in handy,
though, when you are creating SVG documents by converting an XML data
source to SVG, as you will see in Chapter 12. In these cases it can be
easier to create individual attributes for each presentation property
than to create the contents of a single style attribute. You may also need to use
presentation attributes if the environment in which you will be
placing your SVG cannot support stylesheets.
Presentation attributes are at the very bottom of the priority list. Any style specification coming from an inline, internal, or external stylesheet will override a presentation attribute. In the following SVG document, the circle will be filled in red, not green.
<svg width="200" height="200">
    <defs>
    <style type="text/css"><![CDATA[
        circle { fill: red; }
    ]]></style>
    </defs>
    <circle cx="20" cy="20" r="15" fill="green"/>
</svg>
Again, we emphasize that using style attributes or stylesheets should
always be your first choice. Stylesheets let you apply a complex
series of fill and stroke characteristics to all occurrences of
certain elements within a document without having to duplicate the
information into each element, as presentation attributes would
require. The power and flexibility of stylesheets allow you to make
significant changes in the look and feel of multiple documents with a
minimum of effort.
Document Structure -- Grouping and Referencing Objects
While it is certainly possible to define any drawing as an undifferentiated list of shapes and lines, most non-abstract art consists of groups of shapes and lines that form recognizable named objects. SVG has elements that let you do this sort of grouping to make your documents more structured and understandable.
The g Element
The <g>
element gathers all of its child elements as a group, and often has an
id attribute to give that group a
unique name. Furthermore, each group may have its own <title> and <desc> to identify it for text-based
XML applications or to aid in accessibility for visually-impaired
users. In addition to the conceptual clarity that comes from the
ability to group and document objects, the <g> element also provides notational
convenience. Any styles you specify in the starting <g> tag will apply to all the child
elements in the group. In Example
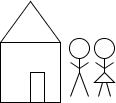
4-5, this saves us from having to duplicate the style="fill:none; stroke:black;" on every
element shown in Figure 4-4.
It is also possible to nest groups within one another, although we
won’t show any examples of this until Chapter 5.
You may think of the <g> element as analogous to the
Group Objects function in programs such as Adobe
Illustrator. It also serves a similar function to the concept of
layers in such programs; a layer is also a
grouping of related objects.
<svg width="240px" height="240px" viewBox="0 0 240 240">
<title>Grouped Drawing</title>
<desc>Stick-figure drawings of a house and people</desc>

<g id="house" style="fill: none; stroke: black;">
    <desc>House with door</desc>
    <rect x="6" y="50" width="60" height="60"/>
    <polyline points="6 50, 36 9, 66 50"/>
    <polyline points="36 110, 36 80, 50 80, 50 110"/>
</g>

<g id="man" style="fill: none; stroke: black;">
    <desc>Male human</desc>
    <circle cx="85" cy="56" r="10"/>
    <line x1="85" y1="66" x2="85" y2="80"/>
    <polyline points="76 104, 85 80, 94 104" />
    <polyline points="76 70, 85 76, 94 70" />
</g>

<g id="woman" style="fill: none; stroke: black;">
    <desc>Female human</desc>
    <circle cx="110" cy="56" r="10"/>
    <polyline points="110 66, 110 80, 100 90, 120 90, 110 80"/>
    <line x1="104" y1="104" x2="108" y2="90"/>
    <line x1="112" y1="90" x2="116" y2="104"/>
    <polyline points="101 70, 110 76, 119 70" />
</g>
</svg>The use Element
Complex graphics often have repeated elements. For
example, a product brochure may have the company logo at the upper
left and lower right of each page. If you were drawing the brochure
with a graphic design program, you’d draw the logo once, group all its
elements together, then copy and paste them to the other location. The
SVG <use> element gives you
an analogous copy-and-paste ability with a group that you’ve defined
with <g>.
Once you have defined a group of graphic objects, you can
display them again with the <use> tag. To specify the group you
wish to reuse, give its URI in an xlink:href attribute, and specify the
x and y location where the group’s (0, 0) point
should be moved to. (We will see another way to achieve this effect in
Chapter 5, in Section 5.1.) So, to create
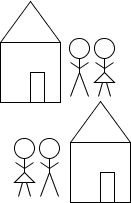
another house and set of people as shown in Figure 4-5, you’d put these lines
just before the closing </svg> tag:
<use xlink:href="#house" x="70" y="100"/>
<use xlink:href="#woman" x="-80" y="100"/>
<use xlink:href="#man" x="-30" y="100"/>
The defs Element
You may have noticed some drawbacks with the preceding example:
The math for deciding where to place the re-used man and woman requires you to know the positions of the originals and use that as your base, rather than using a simple number like zero.
The fill and stroke color for the house were established by the original, and can’t be overriden by the
<use>. This means you can’t make a row of multi-colored houses.The document draws all three groups: the woman, the man, and the house. You can’t “store them away” and draw only a set of houses or only a set of people.
The <defs> element
solves these problems. By putting the grouped objects between the
beginning and ending <defs>
tags, you instruct SVG to define them without displaying them. The SVG
specification, in fact, recommends that you put all objects that you
wish to re-use within a <defs> element so that SVG viewers
working in a streaming environment can process data more efficiently.
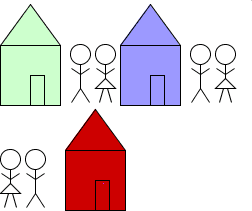
In Example 4-6, the house,
man, and woman are defined so that their upper left corner is at (0,
0), and the house is not given any fill color. Since the groups will
be within the <defs> element,
they will not be drawn on the screen right away, and will serve as a
“template” for future use. We have also constructed another group
named couple, which, in turn,
<use>s the man and woman groups. (Note that the bottom half of
Figure 4-6 can’t use
couple, since the woman is to the
left of the man.)
<svg width="240px" height="240px" viewBox="0 0 240 240">
<title>Grouped Drawing</title>
<desc>Stick-figure drawings of a house and people</desc>

<defs>
<g id="house" style="stroke: black;">
    <desc>House with door</desc>
    <rect x="0" y="41" width="60" height="60"/>
    <polyline points="0 41, 30 0, 60 41"/>
    <polyline points="30 101, 30 71, 44 71, 44 101"/>
</g>

<g id="man" style="fill: none; stroke: black;">
    <desc>Male human</desc>
    <circle cx="10" cy="10" r="10"/>
    <line x1="10" y1="20" x2="10" y2="44"/>
    <polyline points="1 58, 10 44, 19 58"/>
    <polyline points="1 24, 10 30, 19 24"/>
</g>

<g id="woman" style="fill: none; stroke: black;">
    <desc>Female human</desc>
    <circle cx="10" cy="10" r="10"/>
    <polyline points="10 20, 10 34, 0 44, 20 44, 10 34"/>
    <line x1="4" y1="58" x2="8" y2="44"/>
    <line x1="12" y1="44" x2="16" y2="58"/>
    <polyline points="1 24, 10 30, 19 24" />
</g>

<g id="couple">
    <desc>Male and female human</desc>
    <use xlink:href="#man" x="0" y="0"/>
    <use xlink:href="#woman" x="25" y="0"/>
</g>
</defs>

<!-- make use of the defined groups -->
<use xlink:href="#house" x="0" y="0" style="fill: #cfc;"/>
<use xlink:href="#couple" x="70" y="40"/>

<use xlink:href="#house" x="120" y="0" style="fill: #99f;"/>
<use xlink:href="#couple" x="190" y="40"/>

<use xlink:href="#woman" x="0" y="145"/>
<use xlink:href="#man" x="25" y="145"/>
<use xlink:href="#house" x="65" y="105" style="fill: #c00;"/>
</svg>The <use> element is
not restricted to using objects from the same file in which it occurs;
the xlink:href attribute may
specify any valid file or URI. This makes it possible to collect a set
of common elements in one SVG file and use them selectively from other
files. For example, you could create a file named identity.svg that contains all of the
identity graphics that your organization uses:
<g id="company_mascot">
   <!-- drawing of company mascot -->
</g>

<g id="company_logo" style="stroke: none;">
   <polygon points="0 20, 20 0, 40 20, 20 40"
      style="fill: #696;"/>
   <rect x="7" y="7" width="26" height="26"
      style="fill: #c9c;"/>
</g>

<g id="partner_logo">
    <!-- drawing of company partner's logo -->
</g>
and then refer to it with:
<use xlink:href="identity.svg#company_logo" x="200" y="200"/>
The symbol Element
The <symbol>
element provides another way of grouping elements. Unlike the <g> element, a <symbol> is never displayed, so you
don’t have to enclose it in a <defs> specification. However, it is
customary to do so, since a symbol really is something you’re defining
for later use. Additionally, symbols can specify viewBox and preserveAspectRatio attributes, so that a
symbol can fit into the viewport established by the use element. Example 4-7 shows that the width and height are ignored for a simple group (the
top two octagons), but are used when displaying a symbol. The edges of
the lower right octagon in Figure
4-7 are cut off because the preserveAspectRatio has been set to slice.
<svg width="200px" height="200px" viewBox="0 0 200 200">
<title>Symbols vs. groups</title>
<desc>Use</desc>

<defs>
<g id="octagon" style="stroke: black;">
    <desc>Octagon as group</desc>
    <polygon points="
        36 25, 25 36, 11 36, 0 25,
        0 11, 11 0, 25 0, 36 11"/>
</g>

<symbol id="sym-octagon" style="stroke: black;"
   preserveAspectRatio="xMidYMid slice" viewBox="0 0 40 40">
    <desc>Octagon as symbol</desc>
    <polygon points="
        36 25, 25 36, 11 36, 0 25,
        0 11, 11 0, 25 0, 36 11"/>
</symbol>
</defs>

<use xlink:href="#octagon" x="40" y="40" width="30" height="30"
	style="fill: #c00;"/>
<use xlink:href="#octagon" x="80" y="40" width="40" height="60"
	style="fill: #cc0;"/>
<use xlink:href="#sym-octagon" x="40" y="80" width="30" height="30"
    style="fill: #cfc;"/>
<use xlink:href="#sym-octagon" x="80" y="80" width="40" height="60"
    style="fill: #699;"/>
</svg>The image Element
While
<use> lets you re-use a
portion of an SVG file, the <image> element includes an entire SVG
or raster file. If you are including an SVG file, the x, y,
width, and height attributes establish the viewport in
which the referenced file will be drawn; if you’re including a raster
file, it will be scaled to fit the rectangle that the attributes
specify. You can currently include either JPEG or PNG raster files.
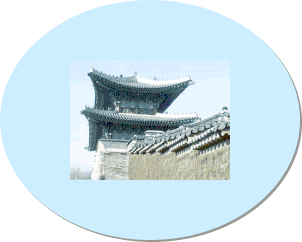
Example 4-8 shows how to
include a JPEG image with SVG; the result is in Figure 4-8.
<svg width="310px" height="310px" viewBox="0 0 310 310"> <ellipse cx="154" cy="154" rx="150" ry="120" style="fill: #999999;"/>[1]<ellipse cx="152" cy="152" rx="150" ry="120" style="fill: #cceeff;"/>[2]<image xlink:href="kwanghwamun.jpg"[3]x="72" y="92"[4]width="160" height="120"/>[5]</svg>
[1] Create a gray ellipse to simulate a drop
shadow.[4]
[2] Create the main blue
ellipse. Since it occurs after the gray ellipse, it is displayed above
that object.
[3] Specify the URI of
the file to include.
[4] Specify the upper
left corner of the image.
[5] Specify the width and
height to which the image should be scaled. If these aren’t in the
same aspect ratio as the original picture, it will appear stretched or
squashed.
Get SVG Essentials now with the O’Reilly learning platform.
O’Reilly members experience books, live events, courses curated by job role, and more from O’Reilly and nearly 200 top publishers.


