Chapter 4. SEARCHING AND ORGANIZING YOUR FILES
Every disk, folder, file, application, printer, and networked computer is represented on your screen by an icon. To avoid spraying your screen with thousands of overlapping icons seething like snakes in a pit, Windows organizes icons into folders, puts those folders into other folders, and so on. This folder-in-a-folder-in-a-folder scheme works beautifully at reducing screen clutter, but it means that you’ve got some hunting to do whenever you want to open a particular icon.
Helping you find, navigate, and manage your files, folders, and disks with less stress and greater speed was one of the primary design goals of Windows Vista—and of this chapter. The following pages cover Vista Search, plus icon-management life skills like selecting them, renaming them, moving them, copying them, making shortcuts of them, assigning them to keystrokes, deleting them, and burning them to CD or DVD.
Tip
To create a new folder to hold your icons, right-click where you want the folder to appear (on the desktop, or in any desktop window except Computer), and choose New→Folder from the shortcut menu. The new folder appears with its temporary “New Folder” name highlighted. Type a new name for the folder and then press Enter.
Meet Vista Search
Every computer offers a way to find files. And every system offers several different ways to open them. But Search, a star feature of Vista, combines these two functions in a way that’s so fast, so efficient, and so spectacular, it reduces much of what you’ve read in the previous chapters to irrelevance.
It’s important to note, though, that you can search for files on your PC using the superfast Search box in two different places:
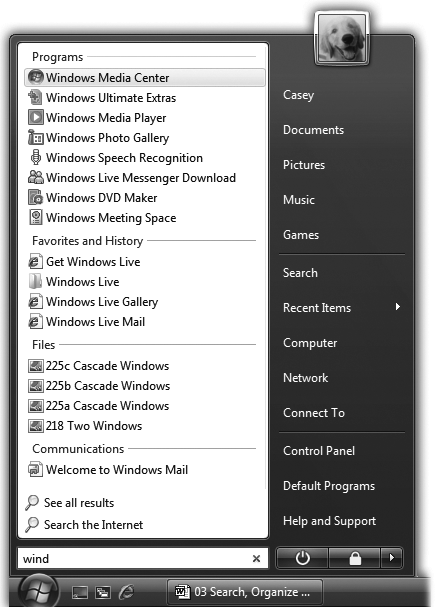
▸ The Start menu. The Start Search box at the bottom of the Start menu searches everywhere on your computer (see Figure 4-1).
Figure 4-1. Press , or click the Start-menu icon, to see the Search box. As you type, Vista builds the list of every match it can find, neatly arranged in four categories: Programs, Favorites and History, Files, and Communications (which means email and chat transcripts). You don’t have to type an entire word. Typing kumq will find documents containing the word “kumquat.” However, it’s worth noting that Vista recognizes only the beginnings of words. Typing umquat won’t find a document containing—or even named—Kumquat. Press the up/down arrow keys to walk through the list one item at a time.
▸ Explorer windows. The Search box at the top of every desktop window searches only that window (including folders within it). You can expand it, too, into something called the Search pane—a way to limit the scope of your search to certain file types or date ranges, for example.
Search boxes also appear in the Control Panel window, Internet Explorer, Windows Mail, Windows Media Player, and other spots where it’s useful to perform small-time, limited searches. The following pages, however, cover the two main Search boxes, the ones that hunt down files and folders.
Search from the Start Menu
Start by opening the Start menu, either by clicking the Start button or by pressing the
key.
The Start Search text box appears at the bottom of the Start menu; you can immediately begin typing to identify what you want to find and open (Figure 4-1). For example, if you’re trying to find a file called “Pokémon Fantasy League.doc,” typing just pok or leag will probably work.
As you type, the familiar Start menu items disappear, and are soon replaced by search results. This is a live, interactive search; Vista modifies the menu of search results as you type—don’t press Enter after entering your search phrase.
The results menu lists every file, folder, program, email message, address book entry, calendar appointment, picture, movie, PDF document, music file, Web bookmark, and Microsoft Office document (Word, PowerPoint, and Excel) that contains what you typed, regardless of its name or folder location.
Vista isn’t just searching icon names. It’s also searching their contents—the words inside your documents—as well as all your files’ properties. (That’s descriptive text information, usually invisible, about what’s in a file, like its height, width, size, creator, copyright holder, title, editor, created date, and last modification date.)
If you see the icon you were hoping to dig up, double-click it to open it. If you choose a program (programs are listed first in the results menu), well, that program pops onto the screen. Selecting an email message opens that message in your email program. And so on.
As you’ll soon learn, Vista Search is an enhancement that’s so deep, convenient, and powerful, it threatens to make all that folders-in-folders business nearly pointless. Why burrow around in folders when you can open any file or program with a couple of keystrokes?
Results Menu Tips
It should be no surprise that a feature as important as Vista Search comes loaded with options, tips, and tricks. Here it is—the official, unexpurgated Search Tip-O-Rama:
▸ You can open anything in the results menu by highlighting it and then pressing Enter to open it.
It’s incredibly convenient to open a program using this technique, because the whole thing happens very quickly and you never have to take your hands off the keyboard. That is, you might hit
to open the Start menu, type cale (to search for Windows Calendar), and press Enter.
Why does pressing Enter open Windows Calendar? Because it’s the first item in the list of results, and its name is highlighted.
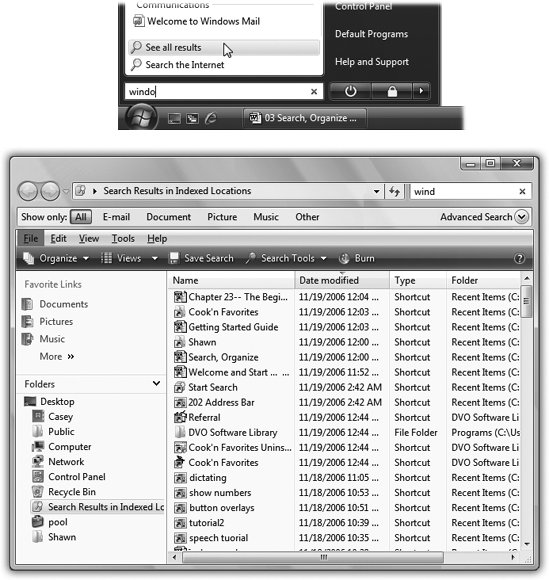
▸ Vista’s menu shows you only 20 of the most likely suspects. They appear grouped into four categories: Programs (including Control Panel applets), Favorites and History (that is, Web sites), Files (which includes documents, folders, and shortcuts), and Communications (email and chat transcripts).
To see the complete list, you have to open the Search results window by clicking “See all results” (Figure 4-2).
▸ The Esc key (top left corner of your keyboard) is a quick “back out of this” keystroke. Tap it to close the results menu and restore the Start menu to its original form.
▸ To clear the Search box—either to try a different search, or just to get the regularly scheduled Start menu back—click the little x at the right end of the Search box.
▸ If you point to an item in the results menu without clicking, a little tooltip box appears. It tells you the item’s actual name and its folder path (that is, where it is on your hard drive).
▸ You can drag the name of a found item directly out of the menu and onto the desktop, into a folder or window, or—what the heck—into the Recycle Bin.
▸ At the bottom of the results menu, the “Search the Internet,” of course, opens up your Web browser and searches the Web for your search term, using Google or whatever search site you’ve designated as your favorite.
Explorer-Window Searches
See the Search text box at the top of every Explorer window? This, too, is a piece of the Vista Search empire. But there’s a big difference: The Search box in the Start menu searches your entire computer. The Search box in an Explorer window searches only this window (and folders within it).
As you type, the window changes to show search results as you type into the Search box, much the way the Start menu changes. Once the results appear, you can sort, filter, group, and stack them just like the icons in any other Explorer window.
The Search Pane
As described in Chapter 3, you can adorn every Explorer window with up to four different panes—inch-wide strips at the left, right, top, and bottom of a window. One of them is the Search pane.
You can get to it in several ways:
▸ Press
+F, which is the keyboard shortcut for the Search window (for find, get it?).
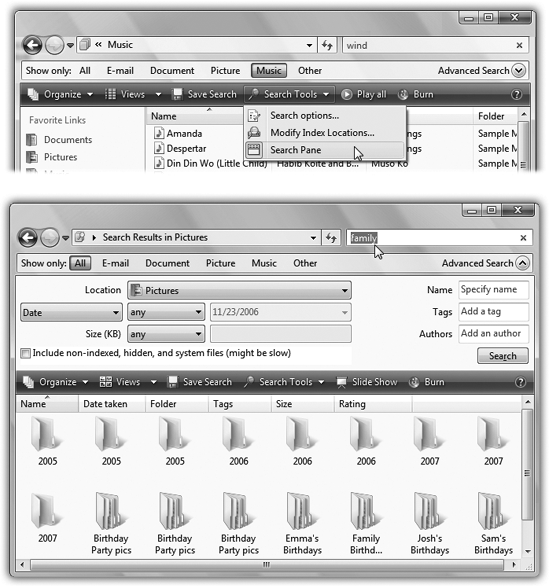
▸ After a regular Explorer-window search, open the Search Tools menu that now appears in the task toolbar. Choose Search Pane.
▸ After a regular Explorer-window search, click Advanced Search at the bottom of the results list (Figure 4-3).
As you can see in Figure 4-3, the Search pane lets you fine-tune the search by adding controls like these:
▸ Show only. If you know what you’re looking for is an email message, document, picture, or music file, click the corresponding button. Your search will reveal only the kind of file you asked for. For example, when you’re trying to free up some space on your drive, you could round up all your gigantic photo files. (“Other,” here, means everything except email, documents, pictures, or music.)
▸ Location. The choices in this pop-up menu—Everywhere, Indexed Locations, Computer, Local Hard Drives, and so on—affect the scope of your search. Ordinarily, searching in an Explorer window finds icons only within the open window, including what’s in its subfolders. But using this pop-up menu, you can make an Explorer-window search do what a Start-menu search always does: search your entire computer. Or only your main hard drive. Or all hard drives. Whatever.
In fact, if you choose “Choose search locations” from this pop-up menu, you get a collapsible, flippy-triangle list of every disk and folder associated with your PC). Checkboxes give you complete freedom to specify any crazy, mixed-up assortment of random folders you’d like to search at once.
▸ Date modified/created. When you choose one of these options from the first pop-up menu, the second and third pop-up menus let you isolate files, programs, and folders according to the last time you changed them or when they were created.
▸ Name. Vista can find text anywhere in your files, no matter what their names are. But when you do want to search for an icon only by the text that’s in its name, this is your ticket. Capitalization doesn’t matter.
▸ Tags. If you’re in the practice of assigning tags (keywords) to your documents, using the Properties dialog box or the Details pane (Section 3.3.2), you can use the tag search feature to round up all icons that have a certain tag. They might be all files pertaining to a certain project, for example, or that you wrote during your dry spell of ’06.
▸ Size. Using this control, and its “equals/is less than/is greater than” pop-up menu, you can restrict your search to files of a certain size. Use the text box to specify the file’s size, in kilobytes. If you want to round up files larger than 5 gigabytes, for example, you’ll have to type 5242880, or, if “close enough” is close enough, 5000000.
A key feature of the Advanced Search pane is that it lets you combine criteria. Using these controls, you can set up a search for email messages created last week with file sizes over 200 K, for example, or pictures under 500K that are at least two months old and bear the tag Detroit Coffee-Table Book Project.
The Search Window
If you’ve slogged through this chapter up to this point, you’re probably under the impression that searching all your stuff (not just one window) requires using the Start menu.
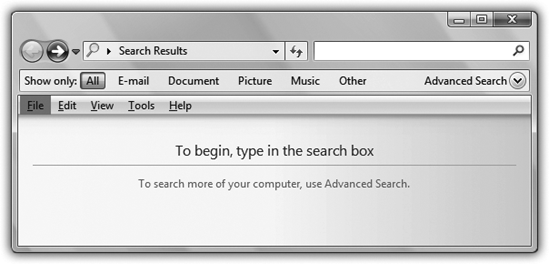
Technically, however, that’s not quite true. Vista also offers a Search window, a sort of hybrid of the Search and Explorer methods. Figure 4-4 explains; for now, just note that you can open the Search window by pressing F3 or
+F.
The Folders of Windows Vista
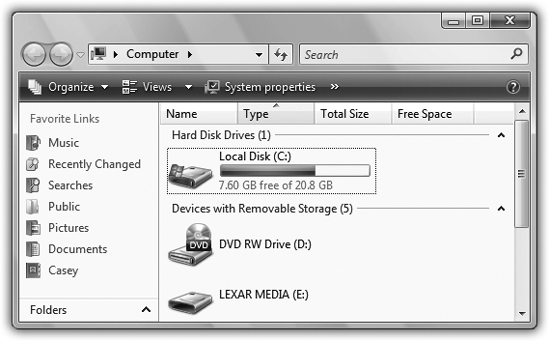
The top-level, all-encompassing, mother-ship window of your PC is the Computer window. From within this window, you have access to every disk, folder, and file on your computer. Its slogan might well be, “If it’s not in here, it’s not on your PC.”
To see it, choose Start→Computer, or double-click its icon on the desktop, if you’ve put it there (Section 5.5).
No matter how you open the Computer window (Figure 4-5), you wind up face-to-face with the icons of every storage gizmo connected to your PC: hard drives, CD and DVD drives, USB flash drives, digital cameras, and so on.
Most people, most of the time, are most concerned with the Local Disk (C:), which represents the internal hard drive preinstalled in your computer. (You’re welcome to rename this icon, by the way, just as you would any icon.)
Tip
The drive letters, such as C: for your main hard drive, are an ancient convention that doesn’t offer much relevance these days. (Back at the dawn of computing, the A: and B: drives were floppy drives, which is why you rarely see them any more.)
What’s in the Local Disk (C:) Window
If you double-click the Local Disk (C:) icon in Computer—that is, your primary hard drive—you’ll find these standard folders:
Users
Windows’ accounts feature is ideal for situations where different family members, students, or workers use the same machine at different times (Chapter 15.)
That’s the importance of the Users folder. Inside are folders—the Personal folders, described in a moment—named for the different people who use this PC. In general, standard account holders (Section 15.2.1) aren’t allowed to open anybody else’s folder.
Program Files
This folder contains all of your applications—Word, Excel, Internet Explorer, your games, and so on.
Windows
Here’s a folder that Microsoft hopes you’ll simply ignore. This most hallowed folder contains Windows itself, the thousands of little files that make Windows, well, Windows. Most of these folders and files have cryptic names that appeal to cryptic people.
In general, the healthiest PC is one whose Windows folder has been left alone. (One exception: the Fonts folder contains the icons that represent the various typefaces installed on your machine. You’re free to add or remove icons from this folder.)
Your Personal Folder
Everything that makes your Vista experience your own sits inside the Users→[your name] folder. This is your Personal folder, where Windows stores your preferences, documents, email, address book, pictures, music, Web favorites, and so on. You can get to it more directly by choosing your name from the top right of the Start menu.
Life with Icons
Windows Explorer, the program that runs automatically when you turn on your PC, has only one purpose in life: to help you manage your file, folder, and disk icons. You could spend your entire workday just mastering the techniques of naming, copying, moving, and deleting these icons—and plenty of people do.
Here’s the crash course.
Renaming Your Icons
To rename a file, folder, printer, or disk icon, you need to open up its “renaming rectangle.” You can do so with any of the following methods:
▸ Highlight the icon and then press the F2 key at the top of your keyboard.
▸ Click carefully, just once, on a previously highlighted icon’s name.
▸ Right-click the icon and choose Rename from the shortcut menu.
In any case, once the renaming rectangle has appeared around the current name, simply type the new name you want, and then press Enter. Feel free to use all the standard text-editing tricks while you’re typing: Press Backspace to fix a typo, press the left and right arrow keys to position the insertion point, and so on. When you’re finished editing the name, press Enter to make it stick. (If another icon in the folder has the same name, Windows beeps and makes you choose another name.)
Tip
If you highlight a bunch of icons at once and then open the renaming rectangle for any one of them, you wind up renaming all of them. For example, if you’ve highlighted folders called Cats, Dogs, and Fish, renaming one of them Animals changes the original set of names to Animals (1), Animals (2), and Animals (3).
If that’s not what you want, press Ctrl+Z repeatedly (that’s the keystroke for Undo) until you’ve restored all the original names.
Windows doesn’t let you use any of these symbols in a file name: \ / : * ? " < > |
You can give more than one file or folder the same name, as long as they’re not in the same folder.
Icon Properties
Properties are a big deal in Windows. Properties are preference settings that you can change independently for every icon on your machine.
To view the properties for an icon, choose from these techniques—the first three open the Properties dialog box:
▸ Right-click the icon; choose Properties from the shortcut menu.
▸ While pressing Alt, double-click the icon.
▸ Highlight the icon; press Alt+Enter.
▸ Open the Details pane (Section 3.3.2), and then click an icon.
Tip
You can also see some basic info about any icon (type, size, and so on) by pointing to it without clicking. A little info balloon pops up, saving you the trouble of opening the Properties box or even the Details pane.
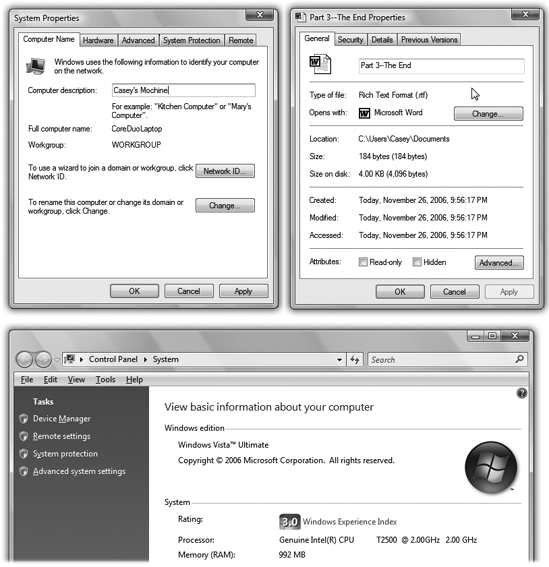
These settings aren’t the same for every kind of icon, however. Here’s what you can expect when opening the Properties dialog boxes of various icons (Figure 4-6).
Computer
There are about 500 different ways to open the Properties dialog box for your Computer icon. The quickest is to right-click the word Computer right in the Start menu.
The System Properties window is packed with useful information about your machine: what kind of processor is inside, how much memory (RAM) your PC has, its overall “Experience Index” (horsepower score), and what version of Windows you’ve got.
Disks
In a disk’s Properties dialog box, you can see all kinds of information about the disk itself, like its name (which you can change), its capacity (which you can’t change), and how much of it is full.
Data files and Folders
The Properties for plain old documents and folders may vary. You always see a General tab, but other tabs may also appear (especially for Microsoft Office files). These tabs show things like a file’s name, size, modification date, author name, and so on.
Selecting Icons
Before you can delete, rename, move, copy, or otherwise tamper with any icon, you have to be able to select it somehow. By highlighting it, you’re essentially telling Windows what you want to operate on.
Use the Mouse
To select one icon, just click it once. To select multiple icons at once—in preparation for moving, copying, renaming, or deleting them en masse, for example—use one of these techniques:
▸ Select all. Highlight all of the icons in a window by choosing Organize→Select All. (Or press Ctrl+A, its keyboard equivalent.)
▸ Highlight several consecutive icons. Start with your cursor above and to one side of the icons, and then drag diagonally. As you drag, you create a temporary dotted-line rectangle. Any icon that falls within this rectangle darkens to indicate that it’s been selected.
Alternatively, click the first icon you want to highlight, and then Shift-click the last file. All the files in between are automatically selected, along with the two icons you clicked. (These techniques work in any folder view: Details, Icon, Thumbnails, or whatever.)
▸ Highlight non-consecutive icons. Suppose you want to highlight only the first, third, and seventh icons in the list. Start by clicking icon No. 1; then Ctrl-click each of the others. (If you Ctrl-click a selected icon again, you deselect it. A good time to use this trick is when you highlight an icon by accident.)
Use the Keyboard
You can also highlight one icon, plucking it out of a sea of pretenders, by typing the first couple letters of its name. Type nak, for example, to select an icon called “Naked Chef Broadcast Schedule.”
Checkbox Selection
It’s great that you can select random icons by holding down a key and clicking—if you can remember which key must be pressed.
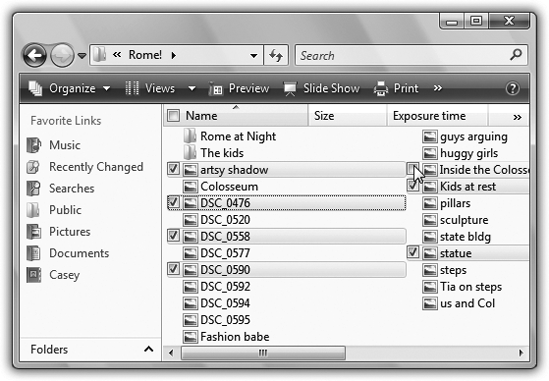
Fortunately, there’s an easier way: checkbox mode. In this mode, any icon you point to temporarily sprouts a little checkbox that you can click to select (Figure 4-7).
To turn this feature on, open any Explorer window, and then choose Organize→Folder and Search Options. Click the View tab, scroll down in the list of settings, and then turn on “Use check boxes to select items.” Click OK.
With the checkboxes visible, no secret keystrokes are necessary; it’s painfully obvious how you’re supposed to choose only a few icons out of a gaggle.
Copying and Moving Folders and Files
Windows offers two different techniques for moving files and folders from one place to another: dragging them, and using the Copy and Paste commands.
Whichever method you choose, you must start by showing Windows which icons you want to copy or move—by highlighting them, as described on the previous pages. Then proceed as follows.
Copying by Dragging Icons
You can drag icons from one folder to another, from one drive to another, from a drive to a folder on another drive, and so on. (When you’ve selected several icons, drag any one of them and the others will go along for the ride.)
Here’s what happens when you drag icons in the usual way (using the left mouse button):
▸ Dragging to another folder on the same disk moves the folder or file.
▸ Dragging from one disk to another copies the folder or file.
▸ Holding down the Ctrl key while dragging to another folder on the same disk copies the icon. (If you do so within a single window, a duplicate of the file called “[File name] - Copy” is created.)
▸ Pressing Shift while dragging from one disk to another moves the folder or file (without leaving a copy behind).
Tip
You can move or copy icons by dragging them either into an open window or directly onto a disk or folder icon.
The right mouse button trick
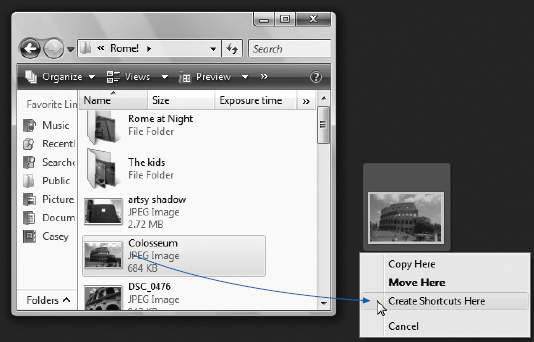
Think you’ll remember all of those possibilities every time you drag an icon? Probably not. Fortunately, you never have to. One of the most important tricks you can learn is to use the right mouse button as you drag. When you release the button, the menu shown in Figure 4-8 appears, letting you either copy or move the selected icons.
Dragging icons into the Navigation pane
You may find it easier to copy or move icons using the Navigation pane (Section 3.3.4), since the two-pane display format makes it easier to see where your files are and where they’re going.
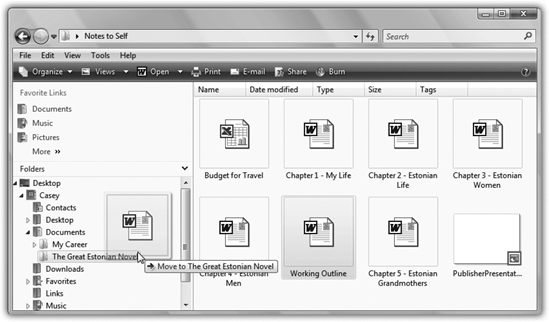
Just expand the flippy triangles of the Navigation pane until you can see the destination folder. Then locate the icon you want to move in the right pane and drag it to the appropriate folder in the left pane (Figure 4-9). Windows copies the icon.
Copying with Copy and Paste
Dragging icons to copy or move them feels good because it’s so direct; you actually see your arrow cursor pushing the icons into the new location.
But you also pay a price for this satisfying illusion. That is, you may have to spend a moment or two fiddling with your windows, or clicking in the Explorer folder hierarchy, so that you have a clear “line of drag” between the icon to be moved and the destination folder.
Fortunately, there’s a better way. You can use the Cut, Copy, and Paste commands to move icons from one window into another. The routine goes like this:
Highlight the icon or icons you want to move.
Use any of the tricks described on Section 4.6.
Right-click one of the icons. From the shortcut menu, choose Cut or Copy.
Alternatively, you can choose Organize→Cut or Organize→Copy, using the task toolbar at the top of the window. (Eventually, you may want to learn the keyboard shortcuts for these commands: Ctrl+C for Copy, Ctrl+X for Cut.)
The Cut command makes the highlighted icons appear dimmed; you’ve now stashed them on the invisible Windows Clipboard. (They don’t actually disappear from their original nesting place until you paste them somewhere else.)
Copy also puts copies of the files on the Clipboard without disturbing the originals.
Right-click the window, folder icon, or disk icon where you want to put the icons. Choose Paste from the shortcut menu.
Once again, you may prefer to use the appropriate menu bar option, Organize→Paste. Keyboard equivalent: Ctrl+V.
Either way, you’ve successfully transferred the icons. If you pasted into an open window, the icons appear there. If you pasted onto a closed folder or disk icon, you need to open its window to see the results. And if you pasted right back into the same window, you get a duplicate of the file called “[File name] - Copy.”
The Recycle Bin
The Recycle Bin is your desktop trash basket. This is where files and folders go when they’ve outlived their usefulness. Basically, the Recycle Bin is a waiting room for data oblivion, in that your files stay here until you empty it—or until you rescue the files by dragging them out again.
While you can certainly drag files or folders onto the Recycle Bin icon, it’s usually faster to highlight them and then perform one of the following options:
▸ Press the Delete key.
▸ Choose File→Delete.
▸ Right-click a highlighted icon and choose Delete from the shortcut menu.
Windows asks if you’re sure you want to send the item to the Recycle Bin. (You don’t lose much by clicking Yes, since it’s easy enough to change your mind, as noted below.) Now the Recycle Bin icon looks like it’s brimming over with paper.
Tip
To turn off the “Are you sure?” message that appears when you send something Bin-ward, right-click the Recycle Bin. From the shortcut menu, choose Properties, and turn off “Display delete confirmation dialog.” Turning off the warning isn’t much of a safety risk; after all, files aren’t really being removed from your drive when you put them in the Recycle Bin.
You can put unwanted files and folders into the Recycle Bin from any folder window or even inside the Open File dialog box of many applications (see Chapter 6).
Restoring Deleted Files and Folders
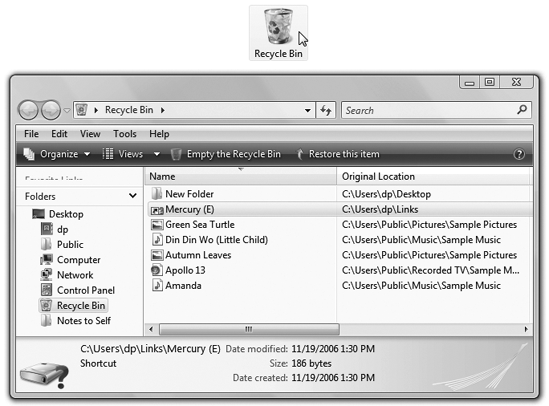
If you change your mind about sending something to the software graveyard, simply open the Recycle Bin by double-clicking. A window like the one in Figure 4-10 opens.
To restore a selected file or a folder—or a bunch of them—click the “Restore this item” link on the task toolbar. Or right-click any one of the selected icons and choose Restore from the shortcut menu.
Restored means returned to the folder from whence it came—wherever it was on your hard drive when deleted. If you restore an icon whose original folder has been deleted in the meantime, Windows even recreates that folder to hold the restored file(s).
Emptying the Recycle Bin
While there’s an advantage to the Recycle Bin (you get to undo your mistakes), there’s also a downside: the files in the Recycle Bin occupy as much disk space as they did when they were stored in folders. Deleting files doesn’t gain you additional disk space until you empty the Recycle Bin.
That’s why most people, sooner or later, follow up an icon’s journey to the Recycle Bin with one of these cleanup operations:
▸ Right-click the Recycle Bin icon, or a blank spot in the Recycle Bin window, and choose Empty Recycle Bin from the shortcut menu.
▸ Click “Empty the Recycle Bin” on the toolbar in the Recycle Bin window.
▸ In the Recycle Bin window, highlight only the icons you want to eliminate, and then press the Delete key. (Use this method when you want to nuke only some of the Recycle Bin’s contents.)
▸ Wait. When the Recycle Bin accumulates so much stuff that it occupies a significant percentage of your hard drive space, Windows empties it automatically, as described in the next section.
The first three of these procedures produce an “Are you sure?” message.
Shortcut Icons
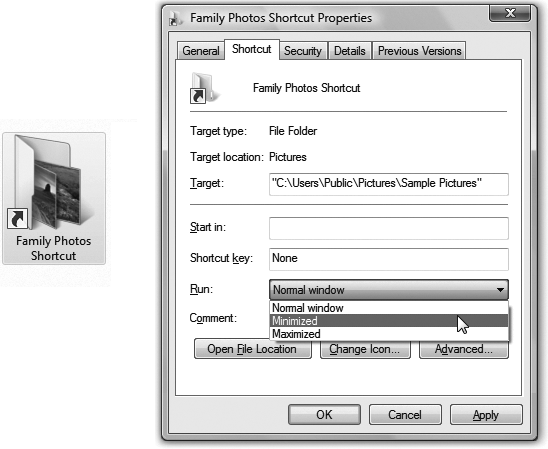
A shortcut is a link to a file, folder, disk, or program (see Figure 4-11). You might think of it as a duplicate of the thing’s icon—but not a duplicate of the thing itself. (A shortcut occupies almost no disk space.) When you double-click the shortcut icon, the original folder, disk, program, or document opens. You can also set up a keystroke for a shortcut icon, so that you can open any program or document just by pressing a certain key combination.
Shortcuts provide quick access to the items you use most often. And because you can make as many shortcuts of a file as you want, and put them anywhere on your PC, you can, in effect, keep an important program or document in more than one folder. Just create a shortcut of each to leave on the desktop in plain sight, or drag their icons onto the Start button or the Quick Launch toolbar. In fact, everything listed in the Start→All Programs menu is a shortcut. So is every link in the top part of your Navigation pane.
Tip
Don’t confuse the term shortcut, which refers to one of these duplicate-icon pointers, with shortcut menu, the context-sensitive menu that appears when you right-click almost anything in Windows. The shortcut menu has nothing to do with the shortcut icons feature; maybe that’s why it’s sometimes called the context menu.
Creating and Deleting Shortcuts
To create a shortcut, right-drag an icon from its current location to the desktop. When you release the mouse button, choose Create Shortcuts Here from the menu that appears.
Tip
If you’re not in the mood for using a shortcut menu, just left-drag an icon while pressing Alt. A shortcut appears instantly. (And if your keyboard lacks an Alt key—yeah, right—drag while pressing Ctrl+Shift instead.)
You can delete a shortcut the same as any icon, as described in the Recycle Bin discussion earlier in this chapter. (Of course, deleting a shortcut doesn’t delete the file it points to.)
Burning CDs and DVDs from the Desktop
Burning a CD or DVD is great for backing stuff up, transferring stuff to another computer, mailing to somebody, or archiving older files to free up hard drive space. These days, you can buy blank CDs and DVDs very inexpensively in bulk via the Web or discount store.
In ancient times—you know, like 2002—every PC came with a CD-ROM drive. Nowadays, new PCs come with either a combo drive (a drive that can burn blank CDs and play DVDs) or a drive that burns both CDs and DVDs.
Before you dig in, however, here’s a brief chalk talk about CD data formats.
A Tale of Two Formats
Turns out Windows Vista can burn blank CDs and DVDs using your choice of two formats.
▸ Mastered. This is what most of the world is used to. It’s what everybody burned before Windows Vista came along.
You insert the blank disc and then drag files and folders into its window. Then you burn all the files and folders at once.
The Mastered format’s virtue is compatibility. These discs play in just about any computer, including Macs and older PCs.
▸ Live File System. This newer, more modern format—Vista’s new factory setting—is light-years more convenient. It lets you use a blank CD or DVD exactly as though it’s a floppy disk or USB flash drive. You can drag files and folders onto it, move icons around on it, rename them, and so on. There’s no momentous Moment of Burn; files are copied to the CD in real time, whenever you put them there. You can leave a disc in your drive, dragging stuff onto it throughout the week as it’s convenient—without every having to click a Burn button.
What’s more, you can the eject the CD, store it or share it—and then, later, put it back into your PC and burn more stuff onto it. That’s right—you can burn a single CD as many times as you like. And we’re talking regular, cheapie CD-R discs, not the CD-RW (rewritable) kind.
The downside is that discs you burn this way generally work only in Windows XP and Windows Vista computers.
Burning, Step by Step
Now that, with luck, you understand the difference between the two formats, you’re ready to proceed.
Insert a blank disc into your PC.
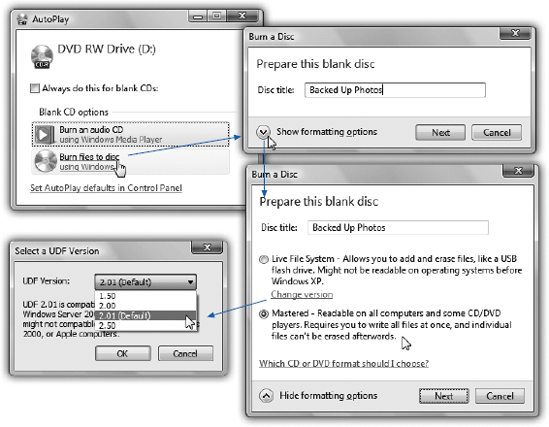
The AutoPlay dialog box appears, asking whether you intend for this CD or DVD to hold computer files or music (Figure 4-12, top left). If you want to burn a music CD, skip ahead to Chapter 7. Otherwise, continue to step 2.
Figure 4-12. Top: First, you’re asked what you want to do with the blank. Click “Burn files to disc.” Top right: Name your disc. If you want to change the burn format, click “Show formatting options.” Lower right: Your Big Two options: the new, super-convenient Live File System format (UDF), and the older, highly compatible Mastered format (ISO). If you click Change Version (lower left), you can even specify a version of UDF.Click the “Burn files to disc” link.
Windows asks you to name the CD or DVD.
Type a name for the disc.
But don’t click Next yet. This crucial moment is your only chance to change the disc’s format.
If you’re OK with burning in the delicious, newfangled UDF format described above, never mind; skip to step 4.
If you want this disc to be usable by a Macintosh, a CD or DVD player, or somebody using a version of Windows before Windows XP, though, take this moment to change the format. Figure 4-12 shows the full life cycle of a disk you’re burning.
Once that’s done, you can go on to step 4.
Click Next.
Your PC takes a moment—a long one—to format the blank disc.
When it’s finished, it opens a special disc-burning window, which will be the temporary waiting room for files that you want to copy. (If you can’t find the window, choose Start→Computer and double-click the name of your CD/DVD drive.)
Begin putting files and folders into the disc’s window.
You can use any combination of these three methods:
First, you can scurry about your hard drive, locating the files and folders you want on the CD. Drag their icons into the open CD/DVD window, or onto the disc burner’s icon in the Computer window.
Second, you can highlight the files and folders you want burned onto the CD. Choose Organize→Copy. Click in the CD or DVD’s window, and then choose Organize→Paste to copy the material there.
Finally, you can explore your hard drive. Whenever you find a file or folder you’d like backed up, right-click it. From the shortcut menu, choose Send To→DVD/CD-RW Drive (or whatever your burner’s name is).
To finish the job, see “The final steps,” below, for the kind of disc you’re burning.
The final steps: Mastered format
When you put files and folders into the disc’s window, Windows actually copies them into a temporary, invisible holding-tank folder. In other words, you need plenty of disk space before you begin burning a CD—at least double the size of the CD files themselves.
Tip
Remember that a standard CD can hold only about 650 MB of files. To ensure that your files and folders will fit, periodically highlight all the icons in the Computer→CD window (choose Organize→Select All). Then inspect the Details pane to confirm that the size is within the legal limit.
What you see in the disc’s window, meanwhile, is nothing but shortcuts (denoted by the downward arrows on their icons). The little down arrows mean, “This icon hasn’t been burned to the disc yet. I’m just waiting my turn.”
At last, when everything looks ready to go, click the “Burn to disc” link in the task toolbar. Or right-click the burner’s icon, or any blank spot in its window, and, from the shortcut menu, choose “Burn to disc.”
The CD Writing Wizard appears, to guide you through the process of naming and burning the disc. The PC’s laser proceeds to record the CD or DVD, which can take some time. Feel free to switch into another program and continue working.
When the burning is over, the disc pops out, and you have a freshly minted CD or DVD, whose files and folders you can open on any PC or even Macintosh.
The final steps: Live File System format
If you’ve been dragging files and folders into the window of a Live File System-formatted disc, the truth is, you can stop here. You can keep that CD or DVD in your drive, or eject it and store it—whatever. Whenever you put it back into your PC, you can pick up right where you left off, adding and erasing files as though it’s a big flash drive.
To eject the disc, right-click your burner’s icon; from the shortcut menu, choose Eject.
Final Notes
Here are a few final notes on burning CDs and DVDs at the desktop:
▸ Not sure what kinds of disks your PC can burn? Choose Start→Computer. Study the name of the burner. There it is, plain as day: a list of the formats your machine can read and write (that is, burn). If you have a combo drive (can burn and play CDs, but can only play DVDs), for example, you’ll see something like: “DVD/CD-RW Drive.” If your burner can both play and record both CDs and DVDs, it will say “DVD-RW/CD-RW Drive.”
▸ To erase a —RW type disc (rewritable, like CD-RW or DVD-RW), open your Computer window. Right-click the burner’s icon; from the shortcut menu, choose Format. Authenticate yourself (Section 6.3), if necessary, change the file-system format if you like, and then turn on Quick Format. Finally, click Start to erase the disc.
▸ If you do a lot of disc burning, a full-fledged burning program like Nero adds myriad additional options. Only with a commercial CD-burning program can you burn MP3 music CDs, create mixed-mode CDs (containing both music and files), create Video CDs (low-quality video discs that play on DVD players), and so on.
Get Windows Vista for Starters: The Missing Manual now with the O’Reilly learning platform.
O’Reilly members experience books, live events, courses curated by job role, and more from O’Reilly and nearly 200 top publishers.
