In Chapter 2, you built your first HTML page with nothing but a plain text editor and a lot of nerve. This is how all Web page gurus begin their careers. In order to really understand HTML (and establish your HTML street cred), you need to start from scratch.
However, very few Web authors stick with plain text editors or use them to create anything other than simple test pages. That’s because the average HTML page is filled with tedious details. If you’re forced to write every paragraph, line break, and formatting tag by hand, you’ll probably make a mistake somewhere along the way. Even if you don’t, it’s hard to visualize what the end result will look like when you spend all day staring at angle brackets. This is especially true when you start to tackle more complex pages, such as those that introduce a slew of graphics or organize the layout of a page with tables.
There’s a definite downside to outgrowing Notepad or TextEdit—namely, it can get expensive. Professional Web design tools can cost hundreds of dollars. At one point, software companies planned to include basic Web editors in common operating systems like Windows and Mac OS. In fact, some older versions of Windows shipped with a scaled-down version of FrontPage called FrontPage Express. That’s not the case today, so if you want an HTML editor, you’ll have to find one on your own. Fortunately, there are free alternatives for even the most cash-strapped Web designer.
In this chapter, you’ll learn how HTML editors work, and how to evaluate them to find the one that’s right for you. You’ll also tour some of the better free and shareware offerings that are currently out there. When it comes to the basics, most Web page editors are surprisingly similar. That means you’ll learn how to get started with your tool of choice, whether it’s FrontPage, Dreamweaver, or a nice piece of freeware called Nvu.
Tools like Notepad and TextEdit aren’t all that bad for starting out. They keep it simple, and they don’t mess with your HTML (unlike a word processing program). Seeing the result of your work is just a browser refresh away. So why are you destined to outgrow your favorite text editor?
Nobody’s perfect. With a text editor, it’s just a matter of time before you make a mistake, like typing <b> instead of </b>. Unfortunately, you might not realize your mistake even when you view your page in your browser. (Remember, some browsers compensate for some types of mistakes; other browsers don’t.) A good HTML editor can highlight problems and help you get rid of faulty HTML.
Edit-Save-Refresh. Repeat 1,000 times. Text editors are convenient for small pages. But what if you’re trying to size a graphic perfectly, or line up a table column? You need to jump back and forth between your text editor and your Web browser (saving and refreshing each time). This process can literally take hours. With a good HTML editor, you get conveniences like drag-and-drop editing to fine tune your Web page. You make a few adjustments, and your editor tweaks your HTML appropriately.
Help, I’m drowning in HTML! One of the nicest little frills in an HTML editor is color coding. Color coding helps make sure those pesky HTML tags stand out against a sea of text. Without this feature, you’ll be cross-eyed in hours.
Just type <ul><li></li></ul>. To create a bulleted list, of course. You haven’t forgotten already, have you? The truth is, most Web authors don’t memorize every tag there is. With a Web editor, you don’t need to. If you forget something, there’s usually a help link or a menu command to fill it in. Without a tool to guide you, you’re on your own.
Of course, there are also risks to using a graphical HTML editor. That’s why you started out with a simple text editor, and why you’ll spend a good portion of this book learning more about HTML. If you don’t understand HTML properly, there are a number of traps waiting for you.
For example, you might use a slick HTML editor to apply fancy fonts to your text. Imagine your surprise when you take a look at your page on another computer (where the same fonts aren’t installed) and your page reverts to an ugly or illegible typeface. (Chapter 6 has more about this problem.) Similarly, your editor can unwittingly lead you to insert HTML that’s not supported by all browsers, or graphics that won’t display properly on other computers. Finally, even with the best HTML editor you’ll spend a significant amount of time looking at raw HTML to see exactly what’s going on, clean up a mess, or copy and paste useful bits to other pages.
There’s a wide range of different HTML editors, but they all tend to fall into one of three categories.
Text-based editors require you to work with the text and tags of raw HTML. The difference between an ordinary text editor and a text-based HTML editor is convenience. Unlike Notepad or TextEdit, text-based HTML editors usually include buttons to quickly insert common tags or tag combinations, and a one-click way to save your file and open it in a separate browser window. Essentially, text-based HTML editors are text editors with some useful Web features stapled on.
Split window editors also make you write HTML by hand. The difference is that a separate window shows the results of your work as you type. In other words, you get a live preview, which means you don’t need to keep stopping to see what you’ve accomplished.
WYSIWYG (What You See Is What You Get) editors work more like word processors. That means you don’t need to write the HTML tags. Instead, you type in some text, format it, and insert pictures just like you would in a word-processing program. Behind the scenes, the editor generates the HTML markup you need.
Any of these types of HTML editors makes a good replacement to a simple text editor. The type you choose depends mainly on how many features you want, how you prefer to work, and how much money you’re willing to shell out. The best HTML editors blur the lines between these different types, and give you the freedom to switch back and forth between different views.
It’s important to understand that no matter what type of HTML editor you use, you still need to know a fair bit about HTML to get the result you want. Even if you have a WYSIWYG editor, you’ll almost always want to fine-tune the HTML by hand. Also, understanding the quirks of HTML will help you determine what you can and can’t do—and what strategies you need to get the most sophisticated results. Even in a WYSIWYG editor, you’ll inevitably use a code view to look at the HTML underbelly of your Web pages.
Unless you’re one of the lucky few who already has a copy of a cutting-edge Web editor like FrontPage or Dreamweaver, you’re probably wondering how you can find a good HTML editor for as little money as possible. After all, the Web’s all about getting goodies for free. And while you can’t find an industrial strength FrontPage-killer for free, you can get a good basic editor without opening your wallet.
Note
Shareware, as you no doubt already know, is software that’s free to try, play with, and pass along to friends. If you like it, you’re politely asked to pay for it (or not-so-politely locked out when the trial period expires). Freeware is software that has no cost at all—if you like it, it’s yours! Usually, you won’t get niceties like technical support. Some freeware is supported by donations.
If you’d like to do your own research (always a good idea), and don’t mind installing several dozen programs onto your computer until you find what you like, head to one of the following shareware Web sites to look for HTML editors (Figure 4-1):
http://downloads-zdnet.com. This leading computer publisher has provided a vast catalog of shareware since before the Internet existed. You can search, browse through thoughtfully organized category listings, or read editor reviews. It’s highly recommended.www.download.com. Another high-tech media company—CNET—provides this top-tier Web site for shareware.www.tucows.com. This fan favorite is cluttered with ads, but still boasts a solid shareware collection
You’ll quickly find out that there’s a sea of free HTML editors out there. Many have awkward and clunky button and menu arrangements. Some have outright errors. Finding one that’s right for you might take a little time.
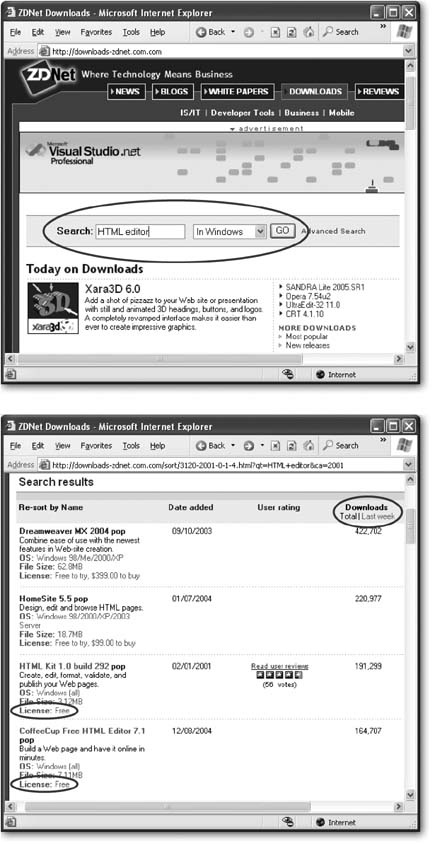
Figure 4-1. Top: ZDNet has a rich catalog of shareware. Start by typing “HTML editor” in the search box and click GO.(If you’re looking for Mac software, you should also change the list selection from “In Windows” to “In Downloads” and add the word “Mac” to your search.) Bottom: In the table of lists, click the heading “Downloads.” This sorts the results so the most sure you read the license details next to each item to find out whether its trialware (like Dreamweaver and HomeSite) or completely free (like HTML-Kit and CoffeeCup). Then, select the item and follow the instructions to download and install it on your computer.
Here are three worthwhile candidates:
Nvu is a newcomer that’s already shaping up as the best free HTML editor around, and the only one with versions for Windows, Mac, and Linux. It lets you edit HTML documents using a WYSIWYG mode or a text-only mode.
HTML-Kit is a popular—but slightly eccentric—free HTML editor for Windows. It lets you use a text-only mode or a split-preview mode.
CoffeeCup Free HTML Editor is a scaled-down version of the full-blown Windows product CoffeCup HTML Editor 2005. The full-blown version offers both a text-only mode and a WYSIWYG mode, but the WYSIWYG mode is switched off in the free version.
In the following sections, you’ll take a quick look at each of these free editors.
Nvu (pronounced “n-view,” as in “new view”) is the only free HTML editor in this roundup that works on Windows, Mac, and Linux. It’s also the most current (providing regular releases), and it boasts an easy-to-understand layout and a set of nifty features. Nvu is a new kid on the block—its first official release took place in June 2005 (before then, it had been available as a beta, or test, release).
Nvu was created using some of the pieces from the Mozilla browser (godfather to the increasingly popular Firefox browser), with features that were copied from FrontPage shamelessly grafted on. It’s an open source project, which means that not only is it free to download and copy, but if you’re a programmer type, you’re welcome to browse through the source code and even submit your own improvements. As a Web-head, you’re most likely to fall in love with Nvu’s multiple views, which give you several useful ways to look at your HTML, including a color-coded HTML tag view and a WYSIWYG preview (see Figure 4-2). Nvu’s biggest limitation is that it doesn’t give you any way to see more than one view at once, which means that if you want to edit in Source view, you won’t see the results of your work until you switch to one of the other views.
Nvu is packed full of common-sense features that you get in most professional programs, like last-action undo (select Edit → Undo), a spell checker (Edit → Check), an option for inserting special characters (Insert → Characters and Symbols), and a helpful tip of the day. To download Nvu, surf to www.nvu.com.
Note
Since Nvu works so well, and is growing ever more popular, you’ll find occasional tips on how to use it throughout this book.
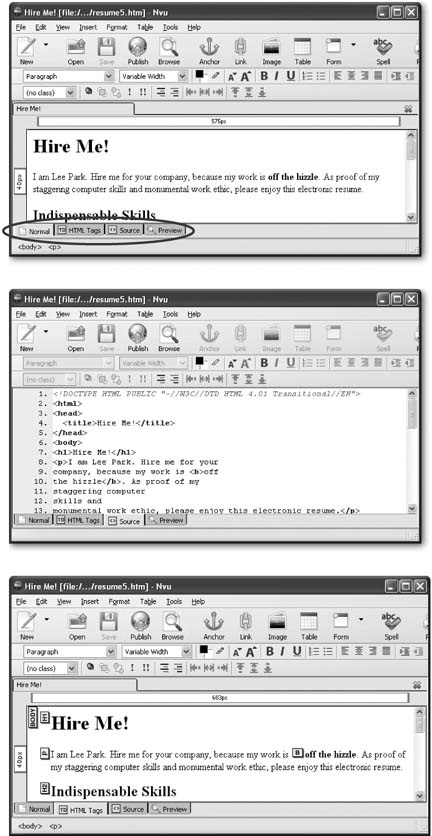
Figure 4-2. Top: Nvu’s normal view lets you edit formatted text instead of the raw HTML, just like in a word processor. You begin in normal view when you start Nvu and open a file. To switch from one view to another, use the tabs at the bottom of the window. Middle: If you need to fine-tune your HTML markup, just switch to the Source view. You’ll get handy line numbers and color-coded tags. Bottom: Need something in between? The HTML Tags view lets you edit formatted text, but shows you what the tags are with floating yellow boxes. That way, if you find something amiss, you can switch to the Source view to clean it up.
HTML-Kit has an interface only a programmer could love. It’s unusual, cluttered, and more than a little confusing. But on the good side, HTML-Kit is 100 percent free, relatively reliable, and ridiculously customizable.
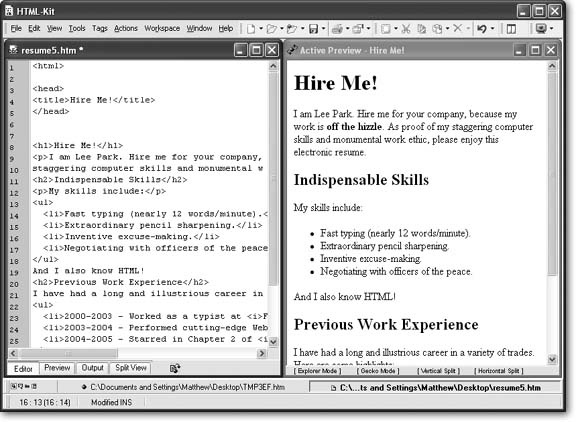
HTML-Kit (www.html-kit.com) is a split-preview editor, which means you can see a live preview of your HTML document as you code it. However, HTML-Kit doesn’t make this behavior immediately obvious. Instead, you need to coax HTML-Kit into showing both at the same time. Here’s how to do it:
Start HTML-Kit. (Choose Programs → HTML-Kit → HTML-Kit from the Start menu.)
The Open File dialog box appears, giving you a choice to create a new document or open an existing file.
Select the “Open an existing file” option and click OK.
A typical Open dialog box appears.
Browse to one of the résumé files that you used in Chapter 2 (also available for download from the “Missing CD” page at
www.missingmanuals.com), select it, and click OK.The HTML for the document appears in a tabbed window. You can click the Preview tab to see a graphical representation of your document, and the Editor tab to jump back to the HTML tag view. You can also use the Split View tab to take a look at both at the same time. However, for most people this feature is mysteriously broken, providing a blank page instead of an HTML preview. If that’s what you encounter, continue on to the next step.
Select View → Preview → Active Preview Window (or just press Ctrl+F8).
A separate preview window appears above the tabbed HTML view.
Select Window → Tile Horizontally (if you want to stack the two windows one above the other) or Window → Tile Vertically (if you’d prefer to see them side by side).
The windows are rearranged so you can comfortably view both the HTML document and the preview window at the same time (see Figure 4-3).
Periodically, HTML-Kit refreshes the preview window to show your latest edits. To trigger an immediate refresh, just press Ctrl+F8 at any time.
The most significant drawback to HTML-Kit (other than its charmingly baroque program layout) is the lack of handy buttons to quickly insert common HTML tags. If you love shortcut keys, you can browse the menu to find ways to insert angle brackets and jump from one tag to another. However, they’re only useful if you think it’s easy to remember odd keystrokes like Ctrl+, (the shortcut for jumping to the previous tag) and Ctrl+period (the shortcut for jumping to the next tag).
For more HTML-Kit fun, check out the wide array of HTML-Kit plug-ins at www.html-kit.com, as long as you’re not scared off by perplexing names like avwEncodeEmail and hkMakeOptionsList. (Slightly more helpful descriptions are provided at the Web site.) One interesting plug-in is the HTML reference found at www.chami.com/html-kit/plugins/info/hkh_w3c_offline. Once you install this plugin, you can get technical help about any HTML element in HTML-Kit. Just move your cursor over the tag in your document (using the arrow keys) and press F1.
CoffeeCup Free HTML Editor is a scaled-down version of the full-blown CoffeeCup HTML Editor 2005. It boasts a streamlined arrangement of buttons and menu options (see Figure 4-4), complete with an integrated file list (which shows you a list of all the HTML files you have in the current folder), and quick buttons for inserting common HTML tags.
CoffeeCup Free HTML Editor does come with a few drawbacks. In order to see an HTML preview, you need to constantly switch from the Code Editor tab to the Preview tab—there’s no way to see both at once. Even more annoying is the Visual Editor tab, which offers to give you WYSIWYG editing abilities, but is disabled in the free version. If you accidentally click it, you’ll receive a message asking you to upgrade. As a result, this product works best as a text-based HTML editor. It’s effective, but not fantastic.
To download CoffeeCup Free HTML Editor, surf to this web page: http://coffeecup.com.
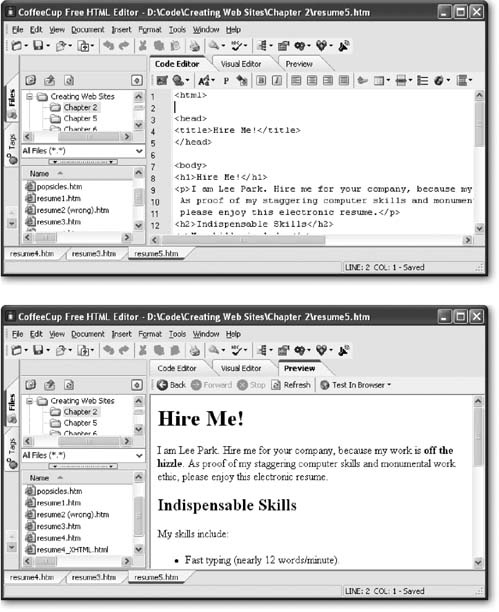
Figure 4-4. Top: The best part about the HTML Code Editor view in CoffeeCup is that you can click several handy toolbar buttons to insert common HTML tags. Bottom: Click the Preview tab to see a preview of what your HTML document will look like in a browser. Stay away from the Visual Editor tab, though—it’s reserved for paying customers only.
Fed up with settling for a low-powered HTML editor and an editing environment that seems like it was designed by M. C. Escher? If you’re ready to move on to a professional Web design package, take heart—your choice is surprisingly simple. That’s because there are really only two top-tier HTML editors on the market today.
Macromedia Dreamweaver is the favorite of graphic designers and hard-core HTML gurus. It’s packed with features and gives you fine-grained control of every HTML ingredient.
Microsoft FrontPage is a Microsoft powerhouse. Start typing, and you’ll immediately see why FrontPage is popular with HTML novices. Its WYSIWYG mode is so seamless that it’s hard to tell you aren’t using a word processor. The menus, toolbars, and automatic spell check carefully duplicate what you find in Word.
One of the reasons that these products are so much better than their competitors is that they include a lot of other tools that you’re sure to need when you start designing Web pages. For example, both let you create style sheets (an advanced feature you’ll learn about in Chapter 6), resize images and drag them around your Web pages, and manage an entire Web site. FrontPage even includes a tool for generating fancy buttons. Another reason is that they’re just so darned easy to use. Even though both are packed with sophisticated features, editing a simple HTML file couldn’t be easier.
In the past, Dreamweaver had a reputation for being complicated enough to scare away HTML novices. On the other hand, FrontPage was known for being easy to use but having a few bad habits—like inserting unnecessary tags or relying on frills that only work when your Web site is hosted on a Web server that supports the FrontPage server extensions (see “FrontPage Folders” for more information). However, recent versions of both programs have tackled their weaknesses. Now, Dreamweaver is virtually as easy to use as FrontPage, and FrontSection 7.2.53 is almost as mature and well-rounded as Dreamweaver. In fact, common tasks in these two programs are surprisingly similar. The bottom line? You can’t go wrong with either tool.
If you’re still itching to be convinced, you can try a free 30-day trial of either product. Surf to www.microsoft.com/office/frontpage/prodinfo/trial.mspx to order a free trial version of FrontPage, or www.macromedia.com/go/trydreamweaver to download a working Dreamweaver demo.
Note
For an in-depth exploration of every Dreamweaver feature, check out Dreamweaver MX 2004: The Missing Manual. For the low-down on FrontPage, pick up a copy of FrontSection 7.2.53: The Missing Manual.
Once you’ve chosen an HTML editor, the next step is to take it for a spin. In this section, you’ll learn how to create a sample HTML document and get it online, all without leaving the comfort of your editor.
Software companies have spent the last decade copying features from their competitors and as a result, common tasks in FrontPage, Dreamweaver, and Nvu are startlingly similar. That means that no matter which program you use, the following sections will teach you the basics. Once you’re comfortable with your editor, you can move on to the rest of the book and learn more about how HTML works.
Tip
Although future chapters won’t lead you step by step through any of these HTML editors, look for sidebars and tips to point out occasional shortcuts, tricks, and techniques for your favorite editor.
Here’s what you need to get started with your editor of choice:
The first step is to launch your program by double-clicking the appropriate icon or making a quick trip to the Start menu.
Your HTML editor appears.
Some HTML editors start you off with a tip of the day (Nvu) or a start page (Dreamweaver). Close these windows to get to the main program window.
You may also need to remove a few more distractions. In FrontPage, you’ll see a pesky Getting Started panel on the right-hand side—close this by clicking the X in the top-right corner. In Dreamweaver, you may want to shunt the panels out of the way (see Figure 4-5).
Now, choose File → Open and select one of the HTML file samples you worked on in Chapter 2 (also available on the “Missing CD” page at
www.missingmanuals.com).This step is easy—opening a document in an HTML editor is exactly the same as opening a document in any other self-respecting program.
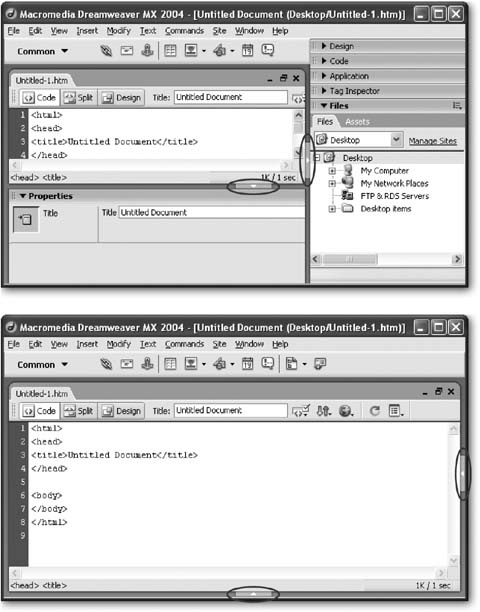
Figure 4-5. Top: Dreamweaver is packed with features, many of which sit at your fingertips in specialized panels, which latch on to the right side and bottom of the main window. In this figure, you see the view that appears automatically when you open Dreamweaver. But until you’ve learned the basics, it’s easiest to push the clutter out of the way by clicking the arrows circled here. Bottom: You can also hide all panels at once by choosing View → Hide Panels. (Just choose View → Show Panels when you’re psychologically ready for them to return.) In this figure, the special features are hidden, enlarging your main window view.
As you’ve already learned, there are several different ways to look at an HTML document, depending on whether you want the convenience of a word processor or the complete control of working directly with HTML code. Most HTML editors give you a choice of how you want to work, and let you switch rapidly from one view to another. To switch views, you need to find a small series of buttons, which are usually displayed just above or just below the document you’re working on. Figure 4-6 helps you spot these buttons.
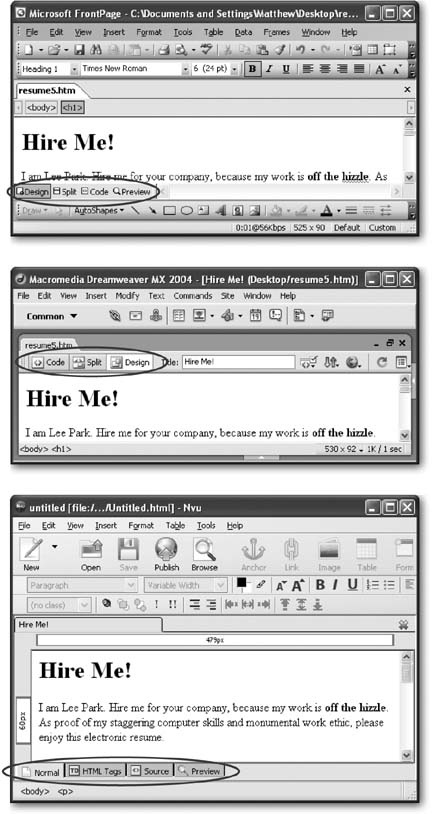
Figure 4-6. They may give them different names or put them in a different order, but most HTML editors use similar buttons to let you switch views, including FrontPage (top), Dreamweaver (middle), and Nvu (bottom). In this example, all three windows are in the WYSIWYG design view. (See Section 4.1.1 for a description of WYSIWYG design view.)
Most HTML editors start you out in a WYSIWYG view that shows the formatted HTML—in other words, an approximation of what the page will look like in a Web browser. When you switch to the HTML code view, you’ll see the real story— the familiar text-only display of color-coded tags and text. These views are the two staples of HTML editing. However, the most useful choice just might be split view, which shows both views at once (see Figure 4-7).
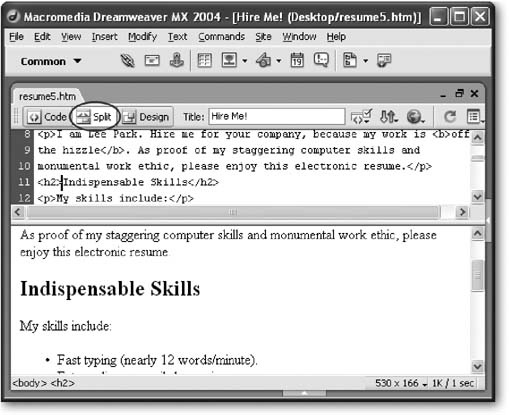
Figure 4-7. One handy option is the split view, which splits the window into two panes. This figure shows a Dreamweaver screen after the Split button (circled) has been clicked. Most commonly, you’ll use this view so you can edit the HTML tags and see a preview that’s updated as you type. However, you could also work the other way, by editing the WYSYWIG preview, and seeing what HTML tags are inserted (which is a great way to learn HTML). Both Dreamweaver and FrontPage provide a split view option, but Nvu doesn’t.
Some HTML editors also give you an interesting hybrid view that shows a WYSIWYG preview with extra tag information. In Nvu, this is the HTML Tags view, which shows a formatted preview window with the corresponding tags shown in floating yellow boxes (see Figure 4-2, bottom). You can achieve a similar look in FrontPage by choosing View → Reveal Tags.
The best way to understand how your HTML editor works is to create a new HTML document.
Use HTML view, as described above, so that you can have complete control over the HTML markup. Just enter all the tags and text content from beginning to end, just as though you were using Notepad or TextEdit (pop back to Chapter 2 for a refresher on HTML code writing basics). Along the way, you’ll notice a few shortcuts. For example, when you start to type a tag in FrontPage or Dreamweaver, a drop-down menu appears with suggestions. You can choose a valid HTML tag from the list, or just keep typing. Also, when you add the start tag for a container element (like <h1> for a heading), FrontPage (or Dreamweaver) automatically inserts the end tag (like </h1>) so you won’t forget it.
Creating and formatting a page in WYSIWYG view is a more interesting challenge, because you need to a know where to find the various formatting options in your editor.
FrontPage, Dreamweaver, and Nvu help you out by packing a fair bit of HTML smarts right into their toolbars. To add a tag in the WYSYWIG view, you first select a piece of text you want to format, and then click the appropriate toolbar button. You can then switch to the HTML tag view to verify that you got the result you expected. For example, to make text bold, select it and look for a toolbar button with the letter B. Clicking this button inserts the <b> tag just before your selection and the </b> tag just after it. Figure 4-8 shows you the most useful toolbar buttons in Nvu.
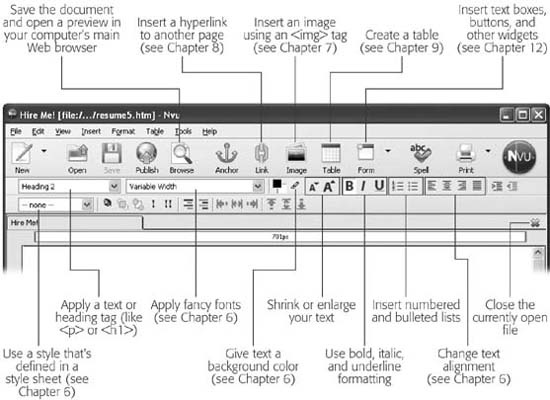
Figure 4-8. Nvu gives you one-stop shopping for lots of HTML goodies. But remember, there’s a difference between finding a feature on a toolbar and really knowing how to use it. If you want to know the tricks and traps you’ll run into when using images, fonts, and tables, you’ll need to keep reading.
Tip
It’s up to you whether you want to write your Web pages in HTML view or using the WYSIWYG preview mode. The WYSIWYG view is always quicker and more convenient at first, but it can leave you with a lot of HTML to check and review, adding to future complications.
To practice your WYSIWYG editing, you can re-create one of the examples from Chapter 2 (the mini-résumé you see on Section 2.3.4 works well). But instead of entering the tags by hand, just enter the text and format it using the toolbar and menu options in your editor. Here are a few steps to get you started on this challenge:
Start by choosing File → New to create the Web page.
Your editor asks you what type of file you want to create.
In FrontPage, just click the “Blank page” link to start from scratch. In Dreamweaver, choose Basic page as your category, and HTML as the subcategory. In Nvu, choose the option “A blank document,” and then click Create.
A blank document appears, showing the bare HTML skeleton. If you take a look at your new document in the HTML code view, you’ll see the basic <html>, <head>, and <body> tags.
Tip
Some HTML editors, like FrontPage, include all sorts of templates for quickly creating various site designs. The options in Dreamweaver aren’t bad, but they’re quite complex, and require styles, which are introduced in Chapter 6. The options in FrontPage are fairly limiting—although they look nice, there isn’t much room for diversity. You’re best off to avoid them until you’ve learned enough to create your own unique designs.
Switch to WYSIWYG design view, and type the title “Hire Me!”
The text appears at regular size.
Select the text, and find a toolbar or menu option that can convert your text to a heading by adding the <h1> and </h1> tags.
In FrontPage, the quickest approach is to select Heading 1 from the drop-down Style list. In Dreamweaver, there are several worthwhile choices. You can choose Text → Paragraph Format → Heading 1 for a fairly labor-intensive approach, or use the shortcut key Ctrl+1 for instant gratification. You can also use the toolbar, as explained in Figure 4-9, or the Properties window (choose Window → Properties if it isn’t visible). In Nvu, your only option is to choose Format → Paragraph → Heading 1. This tag didn’t make it into the toolbar.
Hit the Enter key to move to the next paragraph.
Your typeface reverts to normal, and you can begin typing the rest of the document. The next challenge is creating the bulleted list. FrontPage, Dreamweaver, and Nvu all let you do so by using buttons on their toolbars.
It’s easy to lose yourself in a thicket of tags. To make it easier to orient yourself, FrontPage, Dreamweaver, and Nvu all include a quick tag selector bar at the top or bottom of your document (Figure 4-10).
For a change of pace, try inserting a picture.
Nvu provides easy access with an Image button on the toolbar. FrontPage and Dreamweaver have similar buttons, but it’s easier to head straight to the menu (choose Insert → Picture → From File in Front Page or Insert → Image in Dreamweaver).
Note
For this test, the picture should be in the same directory as your Web page. Otherwise, some editors may add an <img> tag that’s linked to a specific location on your hard drive. This is a problem, because Web surfers can’t access your hard drive, and so they won’t see the picture. To double-check that everything’s in order, look at the <img> tag in HTML view, and make sure the src attribute doesn’t start with file:///. If it does, edit it by hand so it looks like the <img> tag you used in Chapter 2 (Section 2.3.3).
Figure 4-9. The Dreamweaver toolbar is actually eight toolbars in one. Top: To get to the toolbar you want, click the toolbar name on the left (indicated here by the arrow). Middle: Next, choose the new toolbar you want to see. In this figure, it’s the text toolbar. Bottom: The Text toolbar has a button for applying the HTML tags for a level 1 heading (the h1 button that the arrow is pointing to in this image).
When you’re prompted to pick an image file, browse to the leepark.jpg sample, and select it. (You can download this image from the “Missing CD” page at
www.missingmanuals.com.)The program inserts the appropriate <img> tag. Once the picture is inserted into your document, you’ll really start to appreciate the benefits of the WYSIWYG view. In all of the HTML editors covered here, you can drag the edges of the picture to move or resize it.
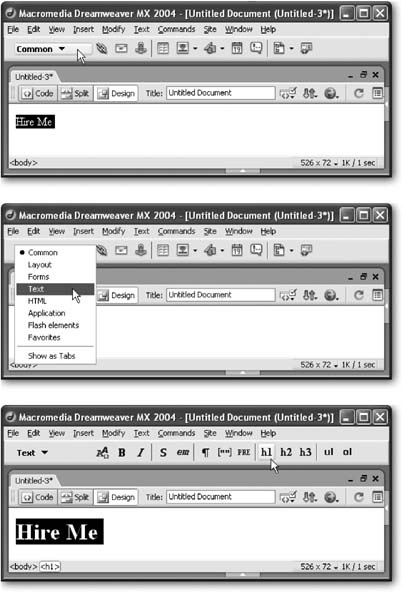
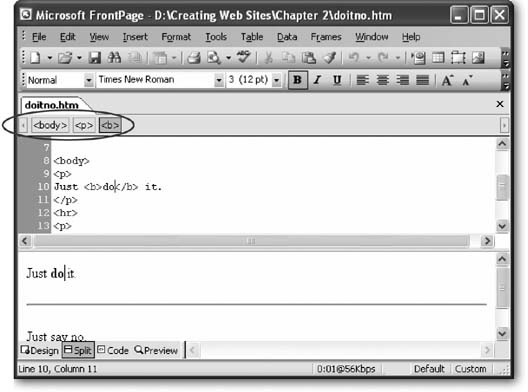
Figure 4-10. The tag selector (circled) is handy if you’re looking for a specific section of a Web page you need to edit. Once you’ve scrolled to the right place, double-check the tag selector to see if you’re where you think you are. The tag selector lists all the tags that are in action at your current location. In this example, the cursor is positioned inside the <b> tag (for bold formatting), which itself is placed inside a <p> (paragraph) tag, which is nested inside the <body> tag that wraps the complete HTML document. You can quickly select any one of these tags by clicking it in the bar.
HTML editors aren’t limited to viewing a single Web page at a time. They almost always give you the ability to look at more than one document at once. In FrontPage, Dreamweaver, and Nvu, multiple open files are represented in the same way—the program adds tabs at the top of the document window. Figure 4-11 shows an example with FrontPage.
Along with the ability to edit more than one Web page at once, many HTML editors also let you manage an entire Web site.
Note
A Web site is simply a collection of one or more Web pages, along with any related files (like pictures). It’s often useful to manage all these files together in an HTML editor. This way, it’s easier to add links from one page to another (see Chapter 8) and keep things consistent. You also get the ability to upload all your Web pages with just a couple of clicks.

Figure 4-11. In FrontPage, you can use File → Open to open as many documents at once as you want. You’ll see one tab for each open document (in this example, there are two). To move from one document to the next, just click the appropriate tab. To close a document, click the X on the right side of the tabs.
To create a Web site in FrontPage, follow these steps:
Select File → Open Site.
The Open Site dialog box appears. It looks like an ordinary Open File dialog box, except that for one difference—it doesn’t show any files. Instead, you can only see folders.
Browse to the folder you want to open, select it, and then click Open. For example, you could use the Chapter 2 folder that’s included with the downloadable samples to see all the different résumé files.
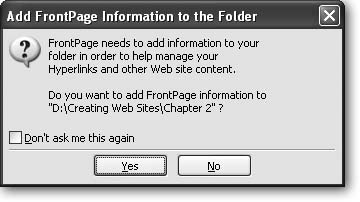
A dialog box appears asking if you want to add FrontPage information to your Web site (see Figure 4-12).
Figure 4-12. In order to use FrontPage’s Web site management features, you need to let it add specialized subfolders to your Web site folder. You can see these subfolders in Windows Explorer—they have names like _private, _vti_cnf, and _vti_pvt. FrontPage also adds a subfolder named images that you can use to store pictures you want to use in your Web site. This figure shows the dialog box that appears when you first open a new folder in FrontPage as a Web site.
Click Yes to add FrontPage information.
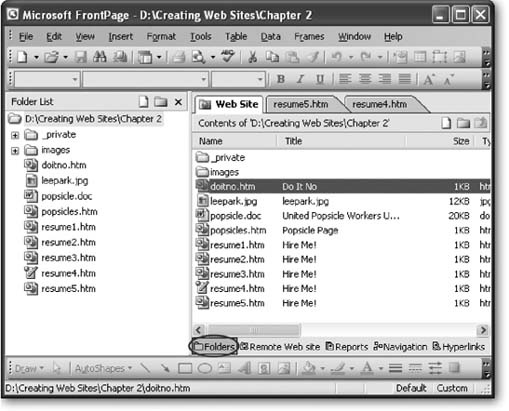
Once FrontPage adds the subfolders, a Folder List panel appears on the right site of the window with a list of all the files in your Web site (see Figure 4-13).
One of FrontPage’s most popular features is its support for updating a Web site without needing to use a separate FTP program (see Section 3.4.2 for the rundown on what FTP programs do). To take advantage of this support, you need to follow the steps described above to make sure FrontPage understands your folder is part of a complete Web site. Then, you can upload your Web site by following these steps:
Choose File → Publish Site.
The first time you publish your site, a Remote Web Site Properties dialog box appears. You use this window to set your connection options, like the name of your FTP server (see Figure 4-14).
Figure 4-14. Your Web hosting company should tell you the exact choices to make in the Remote Web Site Properties dialog box. Typically, you’ll need the name of your FTP server, the directory (folder) on the server used for your Web site, and your FTP account and password. You only need to complete this step once. If you’re successful, FrontPage will use this information the next time you choose to publish your Web site.
Fill in the information about how you want to connect to your Web server, and then click OK.
You can also set some advanced options using the Publishing tab of this dialog box. Most usefully, you can set whether FrontPage uploads only changed or new pages (which is the standard setting), or always uploads everything in the copy of the Web site stored on your PC.
At this point, FrontPage may prompt you for a user name and password to connect to your FTP server. Enter the correct information and then click OK.
FrontPage stores the user name you enter for future use, but it’s up to you to remember the password and supply it each time you connect.
Once you’re connected, FrontPage shows a side-by-side file list that compares the contents of your Web site as stored on your PC with the contents that’s located on the Web server.
To bring your Web server up to date, select the “Local to remote” option and click the Publish Web Site button. This starts the publishing process (see Figure 4-15).
The “Remote to local” option is handy if a file on the Web server is more recent than the copy on your own computer. This might happen if you’re editing the same Web site on more than one computer. The Synchronize option is like the “Remote to local” and “Local to remote” operations rolled into one. It examines each file, and makes sure any old versions on your computer or the Web server are updated.
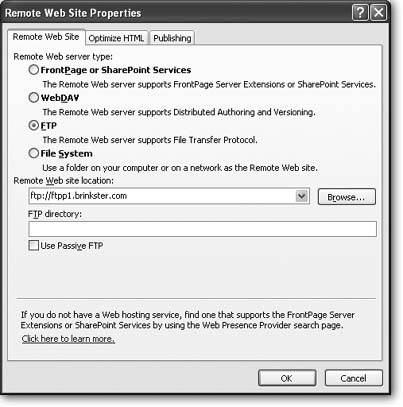
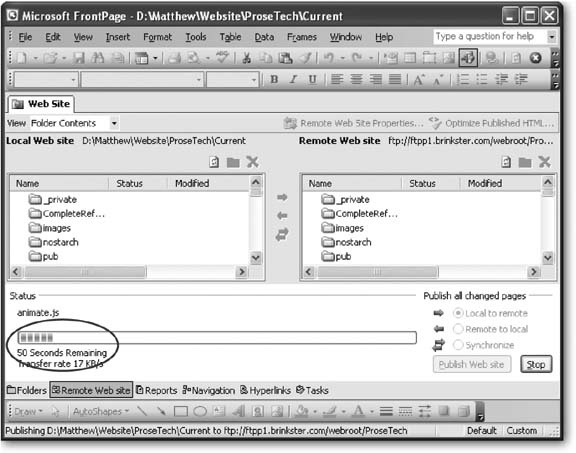
Figure 4-15. When you publish a Web site, FrontPage scans your files and copies over ones that’ve been added or changed since the last time you published your Web site. A progress indicator (circled) shows you what file is currently being copied, and estimates how much longer the whole operation will take.
Tip
You may have trouble uploading a Web site using FrontPage if you’ve already copied some of the files manually using an FTP program. To fix this problem, delete the files from your Web server, and use FrontPage to transfer the whole Web site. FrontPage will then copy every file from your local Web site folder to your Web server.
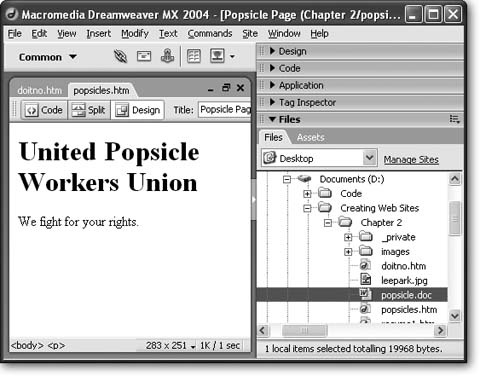
Dreamweaver gives you two different ways to work with a Web site. The simplest approach is to use the integrated file browser to look at the files in any folder on your computer (see Figure 4-16).
Although using the Files panel is convenient, it’s also limiting. The problem is that Dreamweaver doesn’t have any way to tell what file and folders make up your Web site. In order to support Web site uploading and a few other tools, you may want to define your folder as a Web site. To do this, follow these steps:
Click the Manage Sites link in the Files panel, or just select Site → Manage Sites.
The Manage Sites dialog box appears, with a list of all the Web sites you’ve configured so far. Initially, this list is empty.
To define a new Web site, click the New button and choose Site.
Dreamweaver walks you through a Site Definition wizard that asks you several questions.
Enter a descriptive Web site name and click Next.
The site name is just the name you use to keep track of your Web site. It also appears in the Files panel.
Choose “No, I do not want to use a server technology” and then click Next.
A server technology is the framework on a Web server that runs complex Web applications like database searches. Because you aren’t creating a full-blown application (just ordinary HTML files), you don’t need this support.
Choose “Edit local copies directly on my machine.”
Some Web servers give you the ability to modify files stored on the server. However, even if you have this specialized support, it’s probably better to edit your files on your local computer, and only update them on the live Web server when you’re ready. This gives you several advantages. First, you won’t derail your Web site if you make a minor mistake. Second, you have a valuable backup if anything happens to your Web server. And third, you have the ability to experiment with changes and different designs that may take days to finish, without affecting the live version of your Web site.
In the “Where on your computer do you want to store your files” text box, type in the full file path for your Web site folder (usually something like C:\Creating Web Sites\ Chapter 2), and then click Next.
If you aren’t sure where your Web site folder is, you can click the folder icon next to the text box to browse for it.
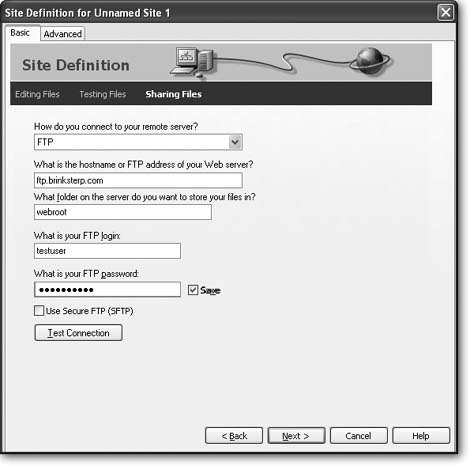
The next step asks how you want to connect to your Web server. Fill in your connection information, and then click Next.
The option you choose depends on the support offered by your Web hosting company, but FTP is a common choice (see Figure 4-17). Depending on what option you choose, there are a number of extra settings you have to supply.
Figure 4-17. In the “Sharing files” step of the Wizard, you choose how you want to transfer your files to the remote Web Server. Your remote server is the location where you plan to publish your Web site. Typically, this is a Web site that you’ll communicate with using a communication method like FTP, but it could also be an ordinary directory on a local network.
Choose “Do not allow check in and check out” and then click Next.
Check in and check out features allow you to collaborate with a group of coworkers to edit different parts of a Web site simultaneously. For information about this and other advanced Dreamweaver features, check out Dreamweaver MX 2004: The Missing Manual.
The last step summarizes the information you’ve entered. Click Done.
You return to the Manage Sites dialog box.
Click Done.
Once you’ve defined your Web site, you’ll see it in the Files panel. You can then browse your remote Web server, or transfer files back and forth. Dreamweaver doesn’t make things quite as intuitive as FrontPage, but it’s still pretty convenient.
To transfer files from your local computer to the Web server, you use an operation that Dreamweaver jargon calls a put. It works like this:
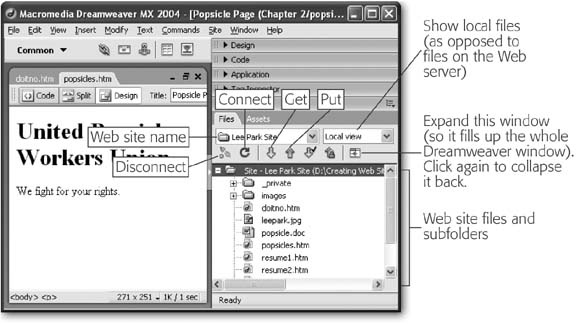
In the Files panel, choose your Web site from the drop-down menu at the top left.
Now, choose “Local view” from the drop-down menu at the top right.
The Files panel shows a list of the files on your computer (see Figure 4-18).
Select the files you want to transfer to the Web server.
You can select multiple files by holding down Ctrl while you click each file’s icon.
Once you’ve selected the files, click the Put arrow (a blue arrow icon pointing up), or right-click the files and then choose Put from the shortcut drop-down menu.
Dreamweaver asks if you want to copy dependent files.
Choose Yes if you want to copy linked files. For example, if you’re copying a Web page that uses the <img> tag to show graphics, you should click Yes to make sure the graphics are also uploaded. If there aren’t any dependent files, your choice has no effect.
Dreamweaver connects to your Web server and transfers the files.
To perform the reverse trick, and transfer files from your Web server to your computer, you need to use a get operation. Follow these steps:
In the Files panel, choose your Web site from the drop-down menu at the top left.
Next, choose “Remote view” from the drop-down menu at the top right.
Dreamweaver doesn’t automatically show a list of files on the Web server, because getting that list could take a little time. So you need to specifically ask Dreamweaver for an updated view of the files on your Web server, which you’ll learn how to do in the next step.
Click the refresh button, which looks like a circular arrow icon.
Dreamweaver connects to the Web server, retrieves the list of files in your Web site, and displays it.
Select the files you want to transfer to your computer.
You can select multiple files by holding down Ctrl while you click each file’s name.
Once you’ve selected the files, click the Get arrow (a green arrow icon pointing down), or right-click the files and choose Get from the shortcut drop-down menu.
Dreamweaver asks if you want to copy dependent files.
Choose Yes if you want to copy linked files. For example, if you’re copying a Web page that uses the <img> tag to show graphics, you should click Yes to make sure the graphics are also downloaded. If there aren’t any dependent files, your choice has no effect.
Dreamweaver connects to your Web server and copies the files to the folder on your computer that contains your Web site.
Get Creating Web Sites: The Missing Manual now with the O’Reilly learning platform.
O’Reilly members experience books, live events, courses curated by job role, and more from O’Reilly and nearly 200 top publishers.

