In this tutorial, you’ll practice the basic techniques required to create and edit styles. Make sure you grasp the fundamentals covered in the following pages: You’ll be building lots of style sheets in the other tutorials in this book using these same methods. For this tutorial, you’ll create an external style sheet for formatting pages on the Chia Vet website.
Note
Before getting started, download the tutorial files from www.sawmac.com/dwCS5/. See the Note on Note for more details.
Once you download the tutorial files and opened Dreamweaver, you need to set up a site for this tutorial. You learned how to do this in the first chapter, but we’ll step through the few basic steps as a quick recap—practice makes perfect!
Choose Site→New Site.
For the Site Name, type CSS Tutorial.
The only other step required to set up a site is to tell Dreamweaver where it can find the site’s files.
To the right of the Local site folder box, click the folder icon.
The Choose Root Folder window appears (see Figure 1-13). This is just a window onto your computer’s file system; navigate to the proper folder just as you would when working with other programs.
Navigate to and select the Chapter04 folder located in the MM_DWCS5 folder. Click the Select button (Choose on Macs) to select this folder, and then, in the Site Setup window, click OK to complete the process of defining a site.
You should see two files—about.html and services.html—in the Files panel. (If you don’t see the Files panel, choose Window→Files to open it.)
In this example, you’ll create a collection of styles for the Chia Vet website.
In the files panel, double-click the file named services.html.
The web page contains a listing of services Chia Vet offers. The page has a few headline tags and a bunch of paragraphs. The page’s text is plain, boring-looking HTML, so you’ll use CSS to spiff it up.
To start, you’ll create a style for the first headline.
Triple-click the headline “Chia Vet Services”.
This selects the entire headline. You’ll now use the Property inspector to select a font.
Make sure you have the CSS button pressed in the Property inspector (see Figure 4-3), and then, from the Font menu, choose “Palatino Linotype, Book Antiqua, Palatino, serif”.
Because the headline had no style applied it, Dreamweaver opens the New CSS Rule window (see Figure 4-17). You’ll first pick the type of style you wish to create.
From the Selector Type menu at the top of the window, select Tag.
This step lets you create a style for a particular HTML tag, in this case, the <h1> tag. In other words, you’re going to create a formatting rule that automatically applies to every heading 1 paragraph.
The Selector Name field should have “h1” listed, but if it doesn’t, use the middle drop-down menu to select “h1”.
Next you’ll choose where to store the CSS code for this new style—in this case, in an external style sheet.
From the bottom menu, choose New Style Sheet File, as pictured in Figure 4-17. Click OK.
The Save Style Sheet File As dialog box appears. You’re about to create the file—an external style sheet—that stores the styles for this page.
Figure 4-17. The New CSS Rule window has changed a lot since the last version of Dreamweaver, but the three basic tasks it requires are the same: Pick the type of style you want to create; name the style; and pick where Dreamweaver should store the CSS code. Notice how the large text box explains what web page elements the style will apply to—in this case all <h1> tags.
Click the Site Root button (top of the dialog box on Windows, bottom right on Macs).
The Site Root button is a handy shortcut. It automatically takes you to the local site folder for the site you’re currently working on, saving you the effort of manually navigating there. (OK, in this example, you’re already in the local site folder, but you should know about this button and what it does—it really does come in handy for getting you to the top level folder of the current site after you open files from other sites located elsewhere on your hard drive, or folders deeply nested inside the current site.)
In the File Name box (the Save As field on the Mac), type global.css, and then click Save.
Cascading Style Sheet files always end in .css; that’s how web servers and browsers can tell what kind of files they are.
Notice how the headline now uses the new font. You created a style and added an external style sheet to your site in just a couple steps. Now, you’ll add some color.
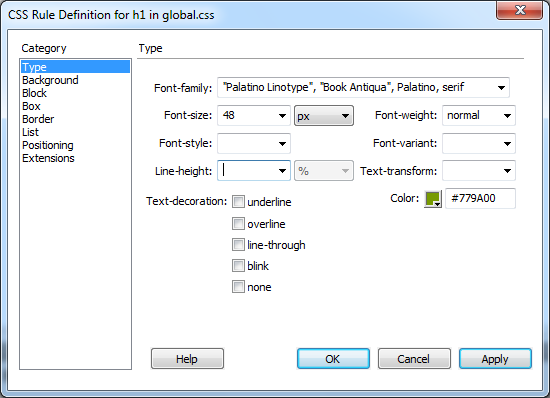
Make sure you still have the headline selected, and then, in the Property inspector’s Color field, type #779A00 (see Figure 4-18).
You can use the color box to select another color if you prefer.
The New CSS Rule window doesn’t appear this time, because now you’re editing the h1 tag style you created previously. Time to change the size of the font.
Figure 4-18. Choosing properties for an element that already has a style applied to it—like the h1 tag style here—updates that style.
Note
If the New CSS Rule window appears again at either steps 9 or 10, something went wrong. Click the Cancel button. You must have accidentally selected some other text—maybe just part of the headline—before using the Property inspector. To get back on track, triple-click the top headline again, and then repeat step 9 or 10.
In the Property inspector’s Size box, type 48.
The Property inspector should now look like Figure 4-18. You just set the font size to 48 pixels tall. You’ve pretty much reached the limit of what the Property inspector is capable of, but you’ve barely scratched the surface of Cascading Styles Sheets. In the next part of this tutorial, you’ll learn how to edit a style and access the wide range of formatting options that CSS offers.


Make sure you have the CSS Styles panel open (Window→CSS Styles), and make sure you have the All button selected at the top of the panel.
This displays all the style sheets attached to this page (in this case, just global.css).
If it isn’t already, expand the list of styles in the global.css style sheet by clicking the + icon (arrow on the Mac) to the left of “global.css”.
This lists all the styles you’ve added to the external style sheet—just the one h1 tag style at this point.
In the list, double-click “h1”.
This action opens the CSS Rule Definition window, where you can access a range of CSS properties (see Figure 4-19). First, you’ll remove the bold formatting from the headline.
Figure 4-19. The CSS Rule Definition window provides access to many more CSS properties than the Property inspector. In addition, you have to use the Font-weight menu to remove bold formatting from a heading tag—no matter how many times you click the B button on the Property inspector, you can’t remove bold from headlines.
From the Font-Weight menu, choose “normal”, and then click the Apply button.
You can preview the look of a tag style without closing the CSS Rule Definition window by clicking the Apply button—just drag the window out of the way of the headline.
When formatting text, you can use many other non-text related CSS properties. For example, you can add border lines to any element on a page.
In the category list, click Border.
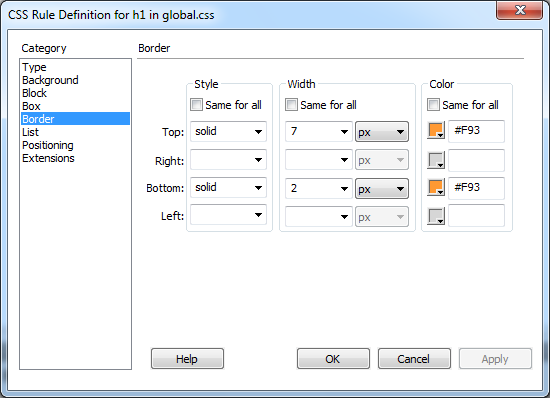
The CSS Rule Definition window now displays all the properties that add a border around a style. You can control each border individually, or use the same line style for all four edges. In this case, you’ll add lines to just the top and bottom of the headline.
Click to turn off all three “Same for all” checkboxes. For the Top border, choose “solid” from the top Style menu, type 7 in the top Width box, and type #F93 in the top Color box. For the Bottom border, choose “solid” from the Style menu, type 2 in the Width box, and type #F93 in the color box.
The window should now look like Figure 4-20. As mentioned on Phase 4: Adding Images and Text, #F93 is shorthand for #FF9933. If you click the Apply button now, you may notice that the top border is a little too close to the top of the headline. You can add a little breathing room using the CSS Padding property.
In the Rule Definition window, click the Box category. Uncheck the “Same for all” box underneath Padding, and then, in the “Top padding” box, type 5.
Padding is the space between the edge of an element (where the border appears) and the stuff inside the element (like text). In this case, adding 5 pixels of top padding adds 5 pixels of space between the top border line and the headline’s text. You’ll learn more about padding on Understanding the Box Model.
Click OK to close the window and complete editing the style.
Now you have a distinctive-looking headline. But you’ve just started building styles for this page.
Choose File→Save All Related Files.
The Save All Related Files command can be a real lifesaver when you work with external style sheets. Even though you’re looking at and working on a web page (services.html here), each time you add a style, Dreamweaver updates the external style sheet file (global.css). So most of the work you’ve done so far has gone into updating the global.css file. Unfortunately, the regular keyboard shortcut to save a file, Ctrl+S (⌘S), saves only changes to the file you can see—in this case, the web page. Make sure you invoke the Save All Related Files command frequently, otherwise you could lose all the changes you made to an external style sheet if Dreamweaver or your computer crashes. (You can even set your own keyboard command for the Save All Related Files command. See Keyboard Shortcuts for details.)
Tip
The File→Save All command is also useful. It saves every file you have open with unsaved changes. Feel free to use this command frequently even if you might want to undo some of those changes—Dreamweaver’s smart enough to let you undo changes you made to a file even after you save those changes (but only if don’t close the file in the meantime).
The Property inspector isn’t the only way to create a style—in fact, since it offers a limited number of formatting options, it isn’t even the best way to create a style. The CSS Styles panel provides a faster method with more comprehensive choices.
At the bottom of the CSS Styles panel, click the New CSS Rule button (the + button pictured in Figure 4-1).
The New CSS Rule window appears. You’ll create another tag style for the Heading 2 tag.
From the top menu, choose Tag; in the Selector Name field, type h2 (or select “h2” from the menu); and, in the bottom menu, make sure you have “global.css” selected. Click OK.
This action adds a new tag style to the global.css style sheet. You’ll set a few text properties next.
From the Font-family menu, choose “Palatino Linotype, Book Antiqua, Palatino, serif”.
You’ll use the same font as in Heading 1, but you’ll change its size and color.
In the Size box, type 24 and, in the Color box, type #EC6206.
This creates medium-sized, orange text. To make the headline stand out a bit, you’ll make all the text uppercase. Fortunately, you don’t have to hold down the caps-lock button and retype each headline to do so—there’s a CSS property that can do it for you.
From the Text-transform menu, choose “uppercase”.
One problem with this design is the large gap between the subheads and the paragraphs following them. The Heading 2 paragraphs (“Preventative Care”, for example) introduce the paragraph that follows. Removing the gap that appears between the heading and the following paragraph would visually tie the two together better. To make this change, you must first remove the margin below each headline.
In the left-hand list of CSS categories, select Box. In the Margin area, turn off the “Same for all” checkbox; in the Bottom box, type 0.
This should remove any space that appears below the Heading 2 tags.
Click OK to close the Rule Definition window and finish editing the style.
The space between the headlines and the paragraphs hasn’t changed a bit. What gives? Paragraphs and headlines have space both above and below. The space you’re seeing is actually the top margin of the paragraph tag.
Top and bottom margins have a peculiar feature: They don’t add up like 1+1=2. In other words, a web browser doesn’t add the bottom margin of Heading 2 to the top margin of the paragraph to calculate the total space between the two blocks of text. Instead, a web browser uses the margin with the largest value to determine the space between paragraphs (a lot of text layout programs, including word processors, share this behavior).
For example, say the <h2> tag has a bottom margin of 12 pixels, while the paragraph following has a top margin of 10 pixels. The total space between the two isn’t 22 pixels (10+12)—it’s 12 pixels (the value of the larger margin). So, if you remove the bottom margin of the headline, the gap between the two blocks of text isn’t gone—it’s now 10 pixels, the top margin value for the paragraph. That’s the situation here: you need to modify the paragraphs’ top margin as well. You can do that by creating another style.
In the CSS Styles Panel, click the New CSS Rule button.
The New CSS Rule window appears. You’ll create a tag style to control how browsers will format paragraphs.
From the top menu, choose Tag; in the Selector Name box, type p, and then, in the bottom menu, make sure you have “global.css” selected. Click OK to create the style.
Before getting to that pesky margin, first set some basic type options.
From the Font-family menu, choose “Trebuchet MS, Arial, Helvetica, sans-serif”, and then, in the Font-size box, type 14.
CSS provides a lot of control over type, including the ability to adjust the leading, or space between, lines in a paragraph.
In the Line-height box, type 150, and then, from the pop-up menu to the right, choose %.
The line-height property controls the space between lines of text. In this case, you’ve set that space to 150%, which means that each line will be 150% (or 1.5 times) the size of the font. A setting of 150% adds more space than usual between each line of text in a paragraph—the result is more white space and a more luxurious feel.
Now back to that margin problem.
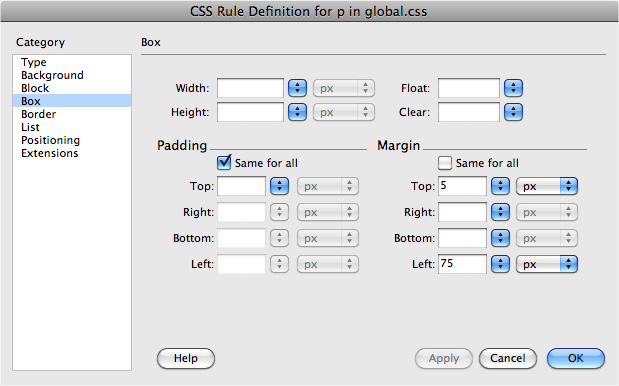
Click the Box category; in the Margin section, uncheck the “Same for all” box. Type 5 in the Top box, and 75 in the Left box.
The window should now look like Figure 4-21. The 5-pixel top margin adds just a small amount of space between the paragraph and the <h2> tag above it—completely removing all space between the two would make them seem crowded together. The 75-pixel left margin is just for fun. This margin indents the paragraphs from the left edge of the page by 75 pixels, creating a distinctive look that makes the Heading 2 paragraphs stand out even more.
Click OK; choose File→Save All Related Files.
The page is nearly complete. Just one more style to create.
Now you’ll create a style to format the copyright notice at the bottom of the page. It’s inside a regular paragraph (<p> tag), so it’s getting all its formatting from the p tag style. Here’s an instance where you’d like to style a single paragraph without affecting the other paragraphs on the page. A class style is perfect for this kind of specific styling task.
On the CSS Styles panel, click the New CSS Rule button (+).
The New CSS Rule window opens. This time, you’ll create a class style rather than an HTML tag style.
From the top menu, select Class. In the Selector Name box, type .copyright (with a period before it).
Class styles always begin with a period—however, if you leave it out, Dreamweaver puts it in.
Note
Some beginners think that whenever you create a new style, you also need to create a new external Style Sheet. On the contrary, you can—and should—store more than one style in a single external style sheet. In fact, if you’re creating a set of styles for an entire site, put them all in the same external style sheet.
Make sure you have “global.css” selected in the bottom menu, and then click OK.
You’re adding yet another style to the external style sheet you created at the beginning of this tutorial. The CSS Rule Definition window appears. You’ll add a few new properties to make this style look different from the rest of the text on the page.
In the Size box, type 12; from the Font-weight menu, choose “bold”; and for the Color, type #666666 or use the Color box to select a gray color.
The smaller text and lighter gray color make the copyright notice less prominent on the page; the bold setting makes it stand out from the other paragraphs. Finally, you’ll add a line above the copyright to separate it from the page.
In the category list, click Border.
The CSS Rule Definition window now displays all the properties used to put a border around a style. In this case, you’ll add a line above the copyright notice.
Click to turn off all three “Same for all” checkboxes. For the Top border, choose “dashed” from the Style menu, type 1 in the Width box, and type #93BD00 in the color box.
You have several different styles of borderlines to choose from, including dashed (see Adding Borders for the different types of borders). Lastly, you’ll add a little space between the border and the text.
In the left-hand list of CSS categories, click the Box category. Uncheck the “Same for all” box in the Padding area, and then, type 5 in the Top box.
While margins control the space between elements (like the gap between paragraphs), padding controls the space between the content and the content’s border. In other words, adding padding pushes a border further away from the text (or other content) you’re styling.
You’ll change the copyright notice’s margin settings as well.
In the Margin area, uncheck the “Same for all” box, and then type 25 in the Top box and 0 in the Left box.
The window should look like Figure 4-22. The 25 pixels of top margin pushes the copyright notice away from the bottom of the paragraph of text above it. In addition, since Dreamweaver indents all the paragraphs 75 pixels from the left edge, you need to set the left margin of the copyright notice to 0. This essentially overrides the 75-pixel margin from the p tag style and lets the copyright notice hug the left edge of the page.
Figure 4-22. The difference between padding and margin is subtle, but important. Both properties add space around content you’re styling. And if you don’t have a background color, image, or border, both properties pretty much act the same. However, when you do have a background color, image, or border, padding adds space between the content and the edge of the backgrounds and borders. Margins add space outside the border and background.
Click OK.
The Rule Definition window closes, but this time, nothing’s changed in the document window. Unlike HTML tag styles, class styles don’t show up anywhere until you apply them by hand.
Scroll to the bottom of the page, and select the last paragraph with the copyright notice.
This action sets you up for applying the style. You can also just click anywhere inside the paragraph (without selecting any text) to apply a class style to it.
In the Property inspector, click the HTML button, and then, from the Class menu, choose “copyright” (see Figure 4-23).
Boom—the copyright notice suddenly changes size, color, and grows a line above it. Magic. You may also notice that the copyright still uses the same font as the other paragraphs. In fact, it has “inherited” that font type from the p tag style—you’ll learn about inheritance, an advanced CSS concept, on More about CSS.
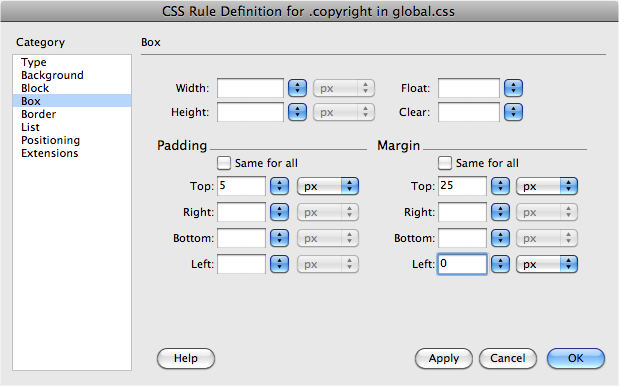
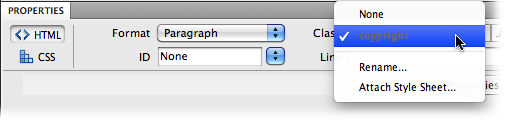
Figure 4-23. The Class menu in the HTML mode of the Property inspector lists all class styles. It also displays the style name using the style’s text formatting—in this case, bold, gray text. Notice that the menu lists only class styles; tag styles don’t appear in this menu, since you don’t apply them manually. You can also apply a class using the Property inspector’s CSS Mode, as described on page 119.
Now that you’ve created these styles, you may wonder how you can use them on other pages—after all, that’s the beauty of external style sheets. Once created, it’s a simple process to add a style sheet to other pages in the site.
Choose File→Save All Related Files; close the services.html page.
You’ll open a new web page to attach the external style sheet to it.
Choose File→Open. In the Files panel, double-click the file about.html to open it.
This file is another page for the Chia Vet website. It has no formatting yet, so you’ll attach the external style sheet you just created.
On the CSS Styles panel, click the Attach Style Sheet button (see Figure 4-1).
The Link External Style Sheet window appears.
Click the Browse button.
The Select Style Sheet dialog box appears.
Navigate to the Chapter04 folder (or click the Site Root button), and then double-click the global.css file.
Don’t forget the Site Root button. It appears on every window in which you need to save, open, or select a file. It’s a great shortcut to make sure you’re working in the correct folder for your site.
You can ignore the other settings in the Attach External Style Sheet window for now (they’re described on Applying IDs to a Tag).
Click OK to attach the style sheet to the page.
Dreamweaver instantly formats the headlines and main text of the story. Pretty cool—and very efficient. You need to apply the .copyright class style only to the last paragraph on the page.
Scroll to the bottom of the page, and then click anywhere inside the paragraph with the copyright notice.
Next you’ll add a style to the tag.
From the Class menu on the Property inspector, select “copyright” (see Figure 4-23).
This page is done. Time to view it.
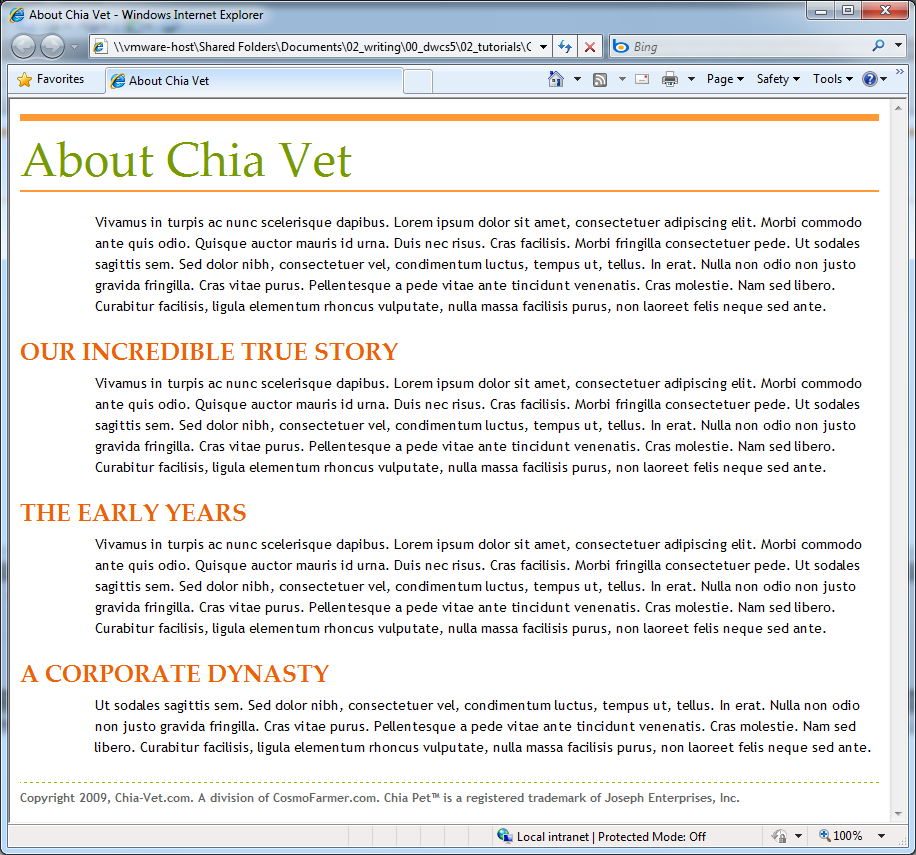
Press F12 (Option-F12 on Mac) to preview the page.
Dreamweaver probably prompts you to save your files; go ahead and do that. The finished page should look something like Figure 4-24. If you’d like to compare your finished product to the completed version, you’ll find those pages in the Chapter04_finished folder in the tutorials folder.
Note
You may need to hit your browser’s refresh button to see the most recent changes you made to the style sheet. This is one problem you’ll encounter when you design pages with external style sheets—web browsers often cache them (see Download Statistics). Normally that’s a good thing—it means visitors to your site have to wait only once for the file to download. But when you’re in the midst of a design, frantically switching back and forth between Dreamweaver and a web browser preview, the browser might retrieve the older version of the external style sheet that it saved in its cache rather than the newly updated file on your computer. (The Safari browser is particularly aggressive at holding onto cached files, so if you preview in that browser, make sure to reload the page when you do.)
You can work around this problem: Open the Preferences window (Edit→Preferences [Dreamweaver→Preferences on Mac]); select the “Preview in Browser” category, and then turn on the “Preview using temporary file” box. Now, when you preview the page, Dreamweaver actually makes a temporary file on your computer that incorporates both the CSS and HTML of the page. This defeats a browser’s cache so that now you’re seeing the very latest changes. This setting has the added benefit of stopping Dreamweaver’s annoying “You must save your file before previewing” dialog box each time you preview a page.
Get Dreamweaver CS5: The Missing Manual now with the O’Reilly learning platform.
O’Reilly members experience books, live events, courses curated by job role, and more from O’Reilly and nearly 200 top publishers.

