FileMaker Pro databases can be as simple as a list of things you need to pack for a camping trip (complete with pictures) or as complex as a company-wide system for purchasing, sales, inventory, invoicing, shipping, and customer tracking. But all of them essentially work the same way. This chapter gives you a tour of FileMaker’s major features and gets you ready to use your very first database.
FileMaker’s vast assortment of tools and options can make the program’s window as intimidating as an Airbus cockpit. But the program’s menu commands, dialog boxes, keyboard shortcuts, and other options stay largely consistent across all databases, so everything you learn in the next few pages will apply to almost every database you’ll ever use.
Tip
Because a database usually solves a problem of some kind, some FileMaker experts call a database a solution, as in, “I can create an inventory solution for your bakery, but it’s going to cost you some dough.” Usually, database and solution mean the same thing, although the term solution sometimes implies a system of several connected databases.
Every FileMaker Pro database has two major parts. First, there’s the information (data) you’re storing. And second are the tools that help you view and manage this data. Since data changes from file to file, you’ll start this tour focusing on the tools you find in nearly every FileMaker database. These buttons, pop-up menus, and other controls help you put information into your database or manage the information that’s already there.
Every database window has the same basic structure. The content area in the middle is where the data goes, and as you can see in Figure 1-1, a handful of special items appear at the top and bottom.
Note
To follow along in this chapter, you’ll find it helpful to download the sample databases from this book’s Missing CD page at www.missingmanuals.com/cds/fmp14mm.
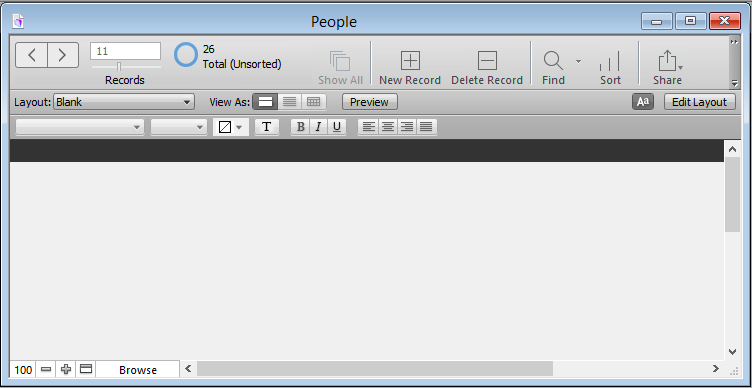
Figure 1-1. Every database window has the same tools around the edges—what’s inside the window is up to you. Compare this window with the one shown in Figure 1-2. Both windows have a Status toolbar, zoom controls, and a Mode pop-up menu. The content area is the only difference.
Note
The figures in this chapter were all created in the desktop version of FileMaker Pro Advanced. If you have the non-Advanced version, your window may look a little different. You’ll also see a different rendition of the window in the mobile versions of FileMaker 14 (Moving Among Records), or if you’re viewing the database in a web browser (Disconnecting from WebDirect).
The content area is where you put the information that makes your database work for you. When you create a new FileMaker database, the standard view looks like Figure 1-2. It’s plain, with just a few boxes for storing data and some buttons and stuff at the top and bottom. That’s because you haven’t added any content yet, and you haven’t started arranging your data in a way that mirrors your needs. In Figure 1-3, you can see that data has been entered, and the fields are arranged so that they look more like information the way it’s normally used. For example, the address fields look like addresses on envelopes. (In Chapter 4, you’ll learn more about changing the way your data looks.)
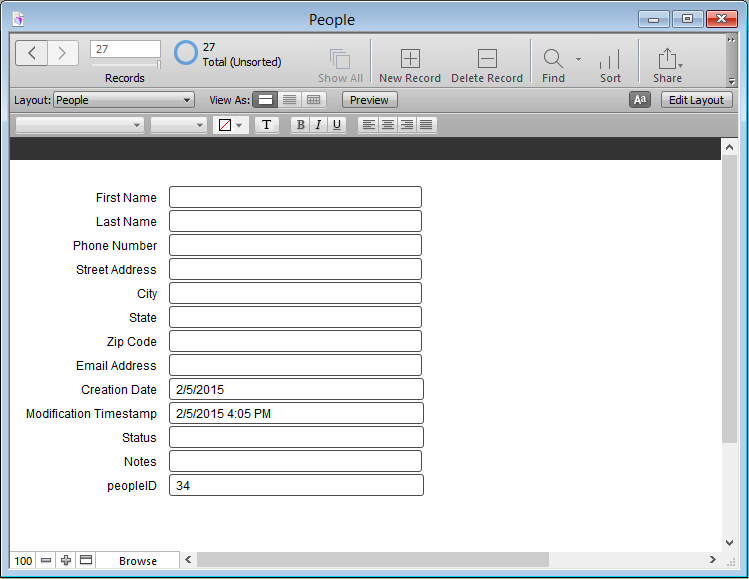
Figure 1-2. Unlike the stark emptiness shown in Figure 1-1, this view of the database has fields for entering information, and some fields even have something in them before you start to type (see page 245 for more information on auto-enter fields). The fields are arranged in a column, the way FileMaker throws them on the screen when you first create them. Compare this screen with Figure 1-3, where the fields are resized and rearranged to create a more pleasing interface to showcase your data.
As with most windows on your computer, you can resize FileMaker’s windows. And if you make your window too small to display all the data in the content area, scroll bars appear so you can see the stuff outside the current window size.
Drag the scroll bars to reveal any areas of the screen that aren’t visible. Use the Page Up and Page Down keys to scroll by keyboard.
If your mouse has a scroll wheel or similar feature, it scrolls differently based on where you put your mouse cursor. That’s FileMaker’s contextual scrolling. The scroll wheel:
Scrolls through the window when the cursor is inside the window’s content area.
Scrolls through the records in your database when you run the cursor over the arrow buttons in the Status toolbar.
Scrolls through the text in the field when you put your cursor over a field that has a scroll bar (like the Notes field in your sample database).
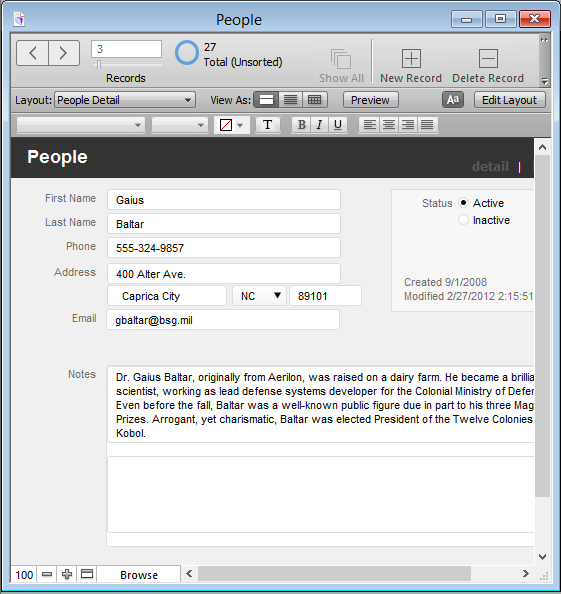
Figure 1-3. You can’t see everything in this window, as evidenced by the thin, light-gray scroll bar along the bottom edge. You’ve got three options for viewing more information. You can reduce the zoom level so everything fits in the window, make the window larger (if your display is big enough), or drag the scroll bar to scan across the screen.
For when resizing the window isn’t enough, FileMaker gives you a zoom control to magnify or shrink what you’re seeing onscreen. Click the Zoom In and Zoom Out buttons to make everything bigger and smaller incrementally, from 400 percent all the way down to 25 percent. The Zoom Level shows your current level, and clicking it takes you back to 100 percent. Clicking Zoom Level a second time returns you to the last zoom level you were viewing.
Note
Since you probably don’t need to examine the words and numbers in your database on a microscopic level, you’ll probably use the zoom control mostly in Preview mode to fit the whole page on the screen, or to adjust the contents of your FileMaker window to the most easily readable size (depending on your screen’s resolution). You may notice, though, that some fonts don’t enlarge well, so they’re actually most legible at 100 percent.
Each of FileMaker’s four modes is a work environment specially designed to help you view, edit, organize, or present your information in a specific way.
Browse mode is the one you see when you first open a database, since it’s the one you use most often. In this mode, you add, change, and view your data. Browse mode is the view shown in all the figures so far, and it’s where you’ll spend most of this chapter.
When you have a lot of data, looking through it all for a particular bit of information can be tedious. Use Find mode to let FileMaker do the looking for you. You tell FileMaker what you’re looking for; when it’s done looking, FileMaker returns you to Browse mode and shows what it found. (For more details on finding specific records, see Finding Records.)
In addition to using databases (viewing, finding, sorting, adding, and changing data), you can use FileMaker to build databases (in fact, that’s what most of this book is about). Layout mode is where you design the screens (called layouts in FileMaker parlance) that present your database information to best advantage. Part Two of this book is all about Layout mode.
Once you’ve put all that information into your database, eventually you’ll want to print something out, like a set of mailing labels or a batch of invoices. If you’re ever curious about how something will look when printed, switch to Preview mode. It shows a one-page-at-a-time view of your data exactly as it’ll appear when printed. Get more info on Preview Mode and Printing.
The Mode pop-up menu is the easiest way to change modes. It appears near the bottom-left corner of Figure 1-1, displaying Browse mode. Click it and choose one of the four modes. Your FileMaker window instantly switches to the new mode. You can also glance at the Mode pop-up menu to see which mode you’re currently in. (The Mode pop-up menu is the most popular way to mode-hop, but you have plenty more options; see the box on Changing Modes.)
Note
Don’t be alarmed when the menus across the top of your screen change a bit when you switch modes. That’s just FileMaker being smart. Some commands aren’t useful in some modes, so the program doesn’t clutter up your screen—or your brain space—with menus when you don’t need them. For example, the Arrange menu appears only when you’re in Layout mode, and the Records menu changes to Requests in Find mode and to Layouts in Layout mode.
Changing modes may be confusing when you’re getting started, but the Status toolbar gives you constant feedback about the features available in your current mode. So as you switch modes, you see the tools in the Status toolbar changing, too. In fact, the Status toolbar changes so much, you’ll soon find that you barely have to glance at the Mode pop-up menu anymore, because you can see the tools you need for the job at hand.
Figure 1-4 shows the Status toolbar in each of its four modes. If your sample database isn’t showing all the tools you expect, try widening the window: Some buttons and commands disappear when the window is too narrow.
Each database you create with FileMaker Pro is stored as a file on your hard drive—just like your documents and spreadsheets. This file contains all the information about how the database is structured, plus all the information stored inside it, which means you can open, close, copy, or back up a database as you would any other file. This section explains those tasks in detail, along with some quirks that are particular to FileMaker files.
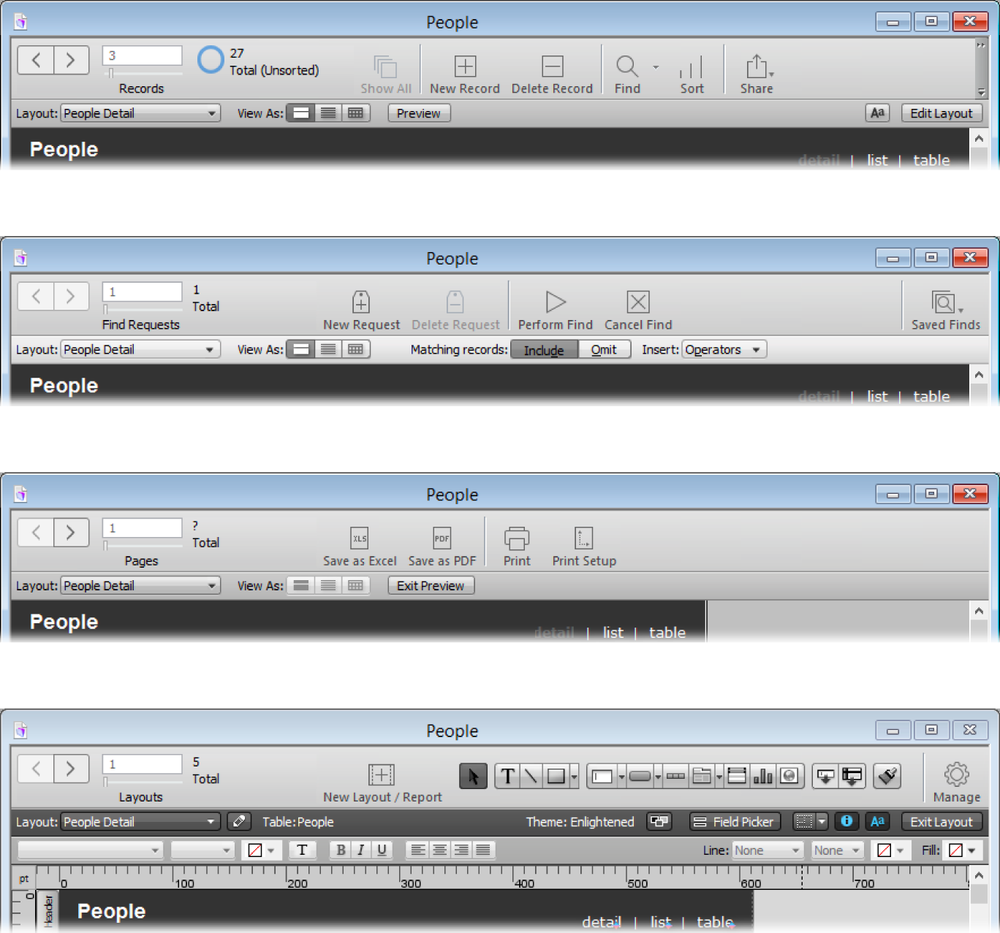
Figure 1-4. In Browse mode (top), you can click the New Record button and then start entering information. Find mode (second from top) lets you look for records with all the tools you need to create new Find requests or to select a recent or Saved Find. And if you inspect a report by clicking the Preview button before you print it (third from top), you get tools for saving the report as a PDF, exporting the data to Excel, and plain old printing. Layout mode lets you change the appearance of your database with tools for text, field, and object formatting (bottom).
To open a database, open FileMaker Pro and then choose File→Open. The Launch Center opens (Figure 1-5), displaying recently opened files or those you’ve marked as favorites. If you don’t see what you’re looking for, click the Browse button in the lower left to pull up the Open File dialog box. Select the file you want to work with and then click Open. If you prefer, you can find the file by using Windows Explorer (Windows) or the Finder (Mac) and then double-clicking its icon.
When you open a database, you see one or more windows on your screen. If you open the People database that you downloaded at the beginning of this chapter, you see one database window.
To close a database, choose File→Close or press Ctrl+W (⌘-W). If your database has only one open window, the Close Window command closes the whole database. But you can open more than one window into a single database (Viewing a Table), and if you do, you need to close each window individually to close the file. To complicate things further, when you have more than one database open, you can’t always easily tell which windows go with which database.
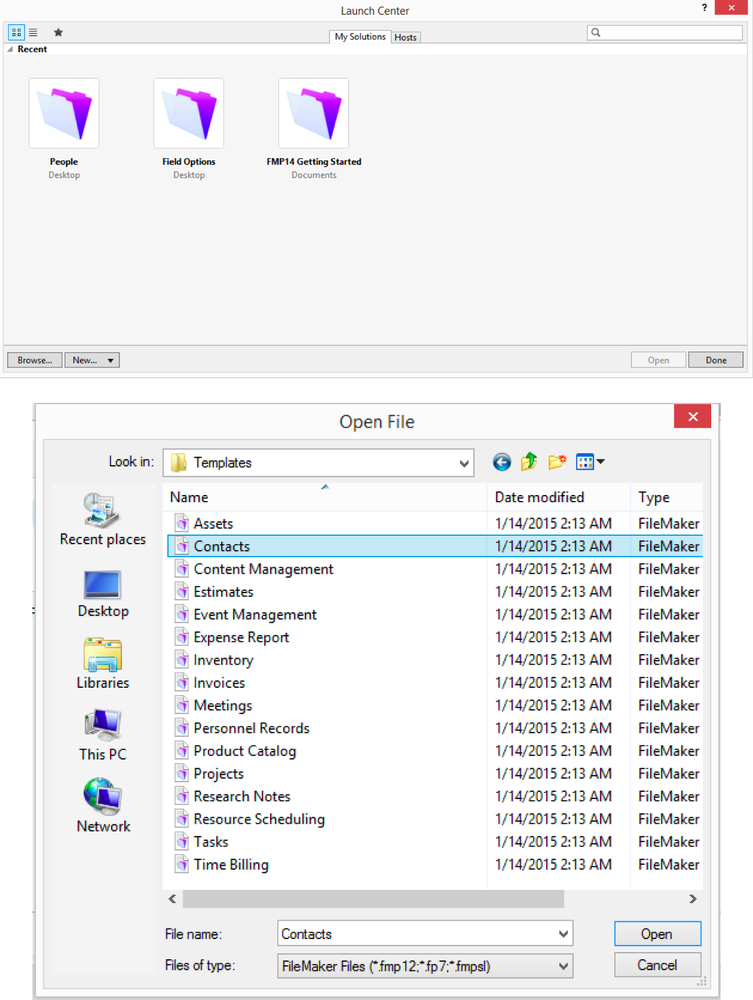
Figure 1-5. Top: The Launch Center gives you quick access to frequently used files. The Hosts button at top is where you find databases shared by FileMaker Server (Chapter 20). Bottom: FileMaker’s Open File dialog box is pretty standard stuff, but notice the pop-up menu near the bottom that helps you find specific kinds of files on your hard drive. If you choose FileMaker Files as shown here, then all non-FileMaker files in the window are grayed out, so you can easily ignore them as you’re looking for the database you want to open.
To close all the windows in all the databases you currently have open, simply press Alt (Windows) or Option (Mac) and then click the File menu. In Windows, the menu command doesn’t look any different, but as long as you’re holding down Alt when you choose Close, you close all open FileMaker windows. On a Mac, the Close command is replaced by Close All. Choose it, and FileMaker closes all its windows, which also saves and closes all your open databases.
Now that you understand the basic components of a FileMaker database, it’s time to start adding your own information. Whether your database contains information about individual people, eBay auctions, products you sell, student grades, or whatever, FileMaker always thinks of that information in individual chunks called records. Each record contains everything the database knows about that person, auction, product, or student.
Since you store many smaller pieces of information in each record (like a person’s phone number, address, birthday, and so on), FileMaker lets you give each record an almost infinite number of fields—the specific bits of data that define each record.
For example, each person in a database of magazine subscribers gets her own record. First name, last name, phone number, street address, city, state, Zip code, and her subscription’s expiration date are all examples of fields each record can include.
The techniques in this section work the same way whether you’re creating a new database or adding to an existing one.
Note
All records in a database have to have the same fields, but that doesn’t mean you have to fill them all in. For instance, in your saltshaker collection database, you may not know the year a particular shaker was manufactured, so you can leave that field blank.
Adding a new record is simple: Choose Records→New Record or press Ctrl+N (⌘-N). (Since you’ll be creating lots of records in your FileMaker career, memorize this keyboard shortcut.)
Once you create a new record, you can enter information about the person you want to keep track of—that’s where those fields come in handy. To enter information in any field in a record, just click it and then type. What to type? As Figure 1-6 shows, most fields in this database have a label at left indicating the type of information the field contains. Field borders have turned to dotted lines—a confirmation that you’re doing data entry.
Note
A label is just a bit of text that appears near a field. It’s meant to help you figure out what kind of data belongs in the field. See the box on The Many Faces of a Field for more on recognizing fields and labels.
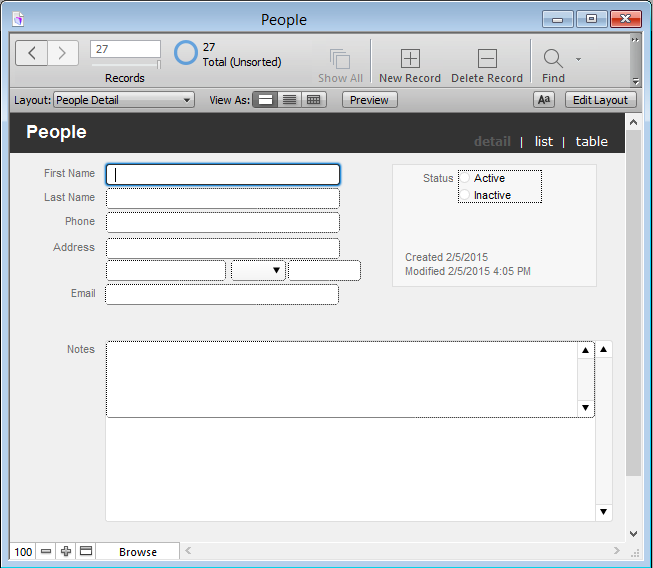
Figure 1-6. Fields can look like just about anything, but in the People database, they’re pretty simple. When you click in a field, dotted borders indicate the fields you can edit. The field you’re currently editing gets a solid border. With the miracle of In Focus formatting, the fields in the People database are shaded as you type in them, which helps keep you oriented when you’re entering information in a screen full of fields.
Efficient data entry means typing something in a field and then moving right along to the next field. You can use the mouse to click the next field, but using the Tab key is faster:
Press the Tab key to move to the next field. If you’re not in any field, the Tab key puts you in the first field.
Press Shift-Tab to move to the previous field. This time, if you’re not in any field, FileMaker puts you in the last field.
Note
Who decides which field is next or previous? You do. When you design a database, you get to set the tab order. That’s the order FileMaker follows when you press Tab or Shift-Tab to move among fields (Tab Order).
You’re not stuck with the data you enter in a record if something changes. For example, when people move, you can change their address data. Just click in the field to be updated, select the data, and start typing the new information.
Note
If you try this on the sample People file provided on the Missing CD page, you’ll notice that a field called “Modified” changes when you click out of the record. You’ll learn what that field is used for on Modification Values.
As you edit a record, you may decide you’ve made a mistake and wish you could put things back the way they were before. That’s no problem for the Revert Record command: When you choose Records→Revert Record, FileMaker throws away any changes you made since you began editing the record. This trick comes in handy when you accidentally modify a field by bumping into the keyboard, or realize you accidentally entered Kathy Griffin’s address in Carol Burnett’s record. Just revert the record, and you can be confident that whatever you did has been forgotten.
The Revert Record command is available only when you’re in a record (see the box on Commitment, or On the Record) and you’ve made changes. If you don’t have the record open, or you haven’t made any changes since you last committed the record, then the Revert Record command is grayed out.
Note
One of the easiest ways to commit a record is to simply click some empty space (not in a field) in the content area. FileMaker dutifully saves the record for you. Once you’ve committed a record, you can no longer choose the Revert Record command. (How’s that for commitment?) If you want a little more control, visit Layout Setup to learn how you can set FileMaker to ask for confirmation before committing a record.
While no two people are alike, it may not always seem that way from their contact information. For instance, if you want to include three people from the same household in your database, the data in the Address, City, State, Zip, and probably Last Name fields will all be the same for each person.
The Email and Phone fields probably won’t be the same, but they might be close. It’s time for a little organized laziness: Instead of making new blank records and retyping all that stuff, just choose Records→Duplicate Record or press Ctrl+D (⌘-D). FileMaker copies everything from the first record into a new one for you. Now you can edit just the information that needs to be changed—just be sure you don’t accidentally leave in the first person’s email address or phone number, lest a message or phone call get misdirected later.
Getting rid of a record you don’t need is a breeze. FileMaker Pro gives you three commands that let you delete one record, a group of records, or even all the records in your database.
Note
You can’t undo deleting a record, because FileMaker saves changes automatically. So when you delete a record (or all the records in a database), make sure you’re ready to part with the information. Consider saving a backup copy of your file first (Saving a Copy of Your Database).
One record. Choose Records→Delete Record or press Ctrl+E (⌘-E) to delete the record you’re currently on. FileMaker shows you a message box with a handy Cancel button that asks if you’re sure you want to delete the record. That way, you won’t accidentally send, say, your best client’s address to the trash bin. But if you’ve indeed written him out of your life, then click Delete to complete the purge.
Multiple records. FileMaker has a helpful command that trashes any group of records of your choosing. Before you use this command, you have to tell FileMaker which records to delete. You do that with the Find command (Finding Records). Once you have the found set of records to be deleted, choose Records→Delete Found Records. Again, FileMaker gives you a chance to change your mind with a message box that tells you how many records you have in your found set and asks you to click either the Delete All or the Cancel button.
All records. In some cases, you may want to delete all the records in a database. Maybe a colleague wants an empty copy of your database for his own use. Or perhaps your database holds data you just don’t need anymore, like test results you’re about to reproduce. You can easily accomplish complete record elimination with two menu commands: Just choose Records→Show All Records and then choose Records→Delete All Records. (But if you just want an empty copy of your database, cloning is easier; see Saving a Clone of Your Database.)
Note
In reality, the Delete Found Records and Delete All Records commands are one and the same. But FileMaker knows whether you’re in a subset of your database or looking at all the records, and changes the wording of the menu command accordingly. It’s just another bit of smart feedback.
Once you get used to deleting records, you may get tired of FileMaker nagging you about being sure you want to delete. You can bypass the dialog box, and the chance to click the Cancel button, by holding down the Shift (Windows) or Option (Mac) key when you choose Records→Delete Record. Or, if you’re a fan of keyboard shortcuts, you can type Shift+Ctrl+E (Option-⌘-E) to get the same results.
FileMaker fields can hold a lot of text. Technically, each field is limited to 2 GB of data per record, which is a technical way of saying, “Way more than you’ll ever need.”
To see for yourself, in the People database, click in the Notes field. When you do, a scroll bar appears at the right side of the field. If you type lots of notes, then you can scroll through them. (When you design a database, you get to decide which fields have scroll bars, as discussed on Scroll Bars.) Even if a field doesn’t have scroll bars, you can still add lots of text. As you type, FileMaker just makes the field grow to hold whatever you type. When you leave the field, it shrinks back to its normal size, hiding anything that goes outside the edges. Don’t worry, though; the text reappears when you click back into the field.
You can enter text into a field in all the usual ways, like typing on your keyboard or pasting text you copied from another field or another program.
Note
That second scroll bar you see right next to the Notes field lets you see if there are lots of notes for a record. That scroll bar controls a portal, and you’ll learn what it’s for on Creating and Using Portals.
If you’ve been looking at the Status toolbar during the last few sections, you may have noticed that it contains some handy buttons, like New Record and Delete Record. If you’re a mouse fan, you can use those buttons instead of the menu or keyboard shortcuts. But what about Duplicate Record? That sounds pretty handy, but there’s no sign of a Duplicate Record button (Figure 1-7, top).
Fortunately, you can add the Duplicate button to your toolbar. Choose View→Customize Status Toolbar. You’ll see the dialog box that lets you make the Toolbar your own (Figure 1-7, bottom). You can add buttons for other commonly used commands, or delete buttons that you’ll never use. The top section of the dialog box shows all the buttons you can add to the toolbar. Don’t worry about messing up: To undo your customization, in Windows, choose Toolbars, then highlight Status Toolbar, and then click Reset. On a Mac, the middle section gives you a pristine copy of the default toolbar that you can drag into place to put things back to normal.
The toolbar’s default is to show buttons and a bit of helpful text below them. (On a Mac, you can make a selection from the Show pop-up menu to show Icon Only or Text Only instead.)
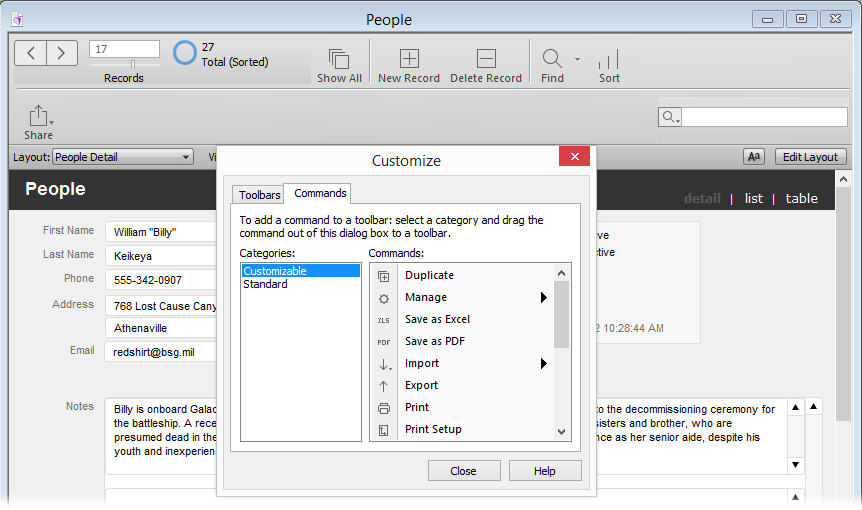
Figure 1-7. Here’s FileMaker’s default toolbar. If you don’t see all of these buttons, make the window wider. If that’s not enough, click the >> button at the right edge of the toolbar to get a pop-up menu showing the missing buttons. If you still don’t see them, your toolbar may have been customized using the dialog box shown here.
As you just learned in the section on deleting records, FileMaker gives you frequent feedback about what you’re doing. The program isn’t being a control freak (although after the umpteenth dialog box it’s understandable if you feel that way). FileMaker is just trying to keep you informed so you can make good choices. So you sometimes see dialog boxes that FileMaker calls error messages. Unlike the Delete warning, you only get once choice: to click OK. That’s not a real choice, but you usually have to take some kind of action after you’ve dismissed the error message.
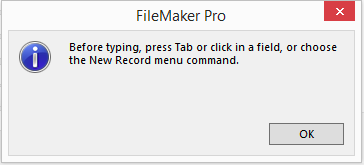
If you try typing something before you’ve clicked in a field, FileMaker warns you with the box shown in Figure 1-8. You’ll see this same message if you try to type into a database with no records in the found set, or indeed no records at all. It may seem overly protective to warn you that you’re not actually entering data, but in this day of multitasking and distractions, it’s helpful to know that FileMaker doesn’t let your information vanish as you type it.
You’ll have to dismiss an error message every time you accidentally bump a key, and you can’t get rid of the error message for good. Just remember that you must be viewing an actual record and have your cursor in a field before you can start typing. (And take that book off your keyboard, eh?)
Once you’ve entered a few dozen—or a few hundred—records into your database, the next challenge is to get back to a specific record. But first, you need to learn how to navigate through the records in the database. Hint: It’s not called Browse mode for nothing, you know. The Status toolbar gives you several tools that help you get where you need to go.
Note
As you go through this section on navigating, it helps to have a database open in front of you so you can follow along and try some of these techniques. You can download a sample on this book’s Missing CD page at www.missingmanuals.com/cds/fmp14mm—CH01 People.fmp12.
In the People database, or indeed any FileMaker database, you can add as many records as you want. To tell FileMaker which record you want to look at, you have three options:
The arrow buttons let you flip from record to record one at a time. Pretend your database is a number line, and each record is numbered. To get to the next record, click the right arrow. To go back, click the left arrow. If you can’t go any further in one direction, the appearance of the button changes, as shown in Figure 1-9.
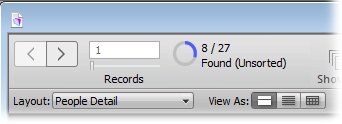
Figure 1-9. In addition to displaying the controls for switching records, the Status toolbar indicates where you are in the database. You’re looking at the first record in the found set of records. And the pie chart tool tells you that your current found set is showing 8 of the 27 total records in the database. If you click the pie chart, the found set switches to show you the 19 records that aren’t in the current found set.
The slider is kind of a turbocharged version of the arrow buttons. Instead of clicking once for each record, you can advance through a bunch of records by dragging the slider. If you know approximately where you want to go (like “around halfway” or “about one-third from the end”), the slider is the quickest way to get there. The slider is most handy when you want to get to the beginning or the end of a database. In that case, just drag the slider as far as it will go in either direction.
The Current Record indicator (above the slider) serves two purposes. First, it shows you which record you’re on. Second, if you know which record you want to be on, then you can simply type the record number to jump to it. Beside the Current Record, the Found Set display shows you how many records you have in your database.
Note
All navigation methods let you move within what FileMaker calls a found set, which lets you look at a specific set of records at one time. Learn more about finds and found sets on Advanced Find Techniques.
FileMaker also has a few keyboard shortcuts to make record navigation painless. If you haven’t used a database program before, you’ll notice that some keys act in ways you may not expect—like the Enter key. Spending a little time getting used to using these keystrokes saves you hours of time down the road:
To go to the next record, press Ctrl+down arrow.
To move to the previous record, press Ctrl+up arrow.
To activate the Current Record indicator without using the mouse, press Esc. Now type a record number and then press Enter to go to that record. (This shortcut works only when you’re not in the record; see the box on Commitment, or On the Record.)
Pressing Enter on your keyboard’s numeric keypad automatically commits the record, rather than inserting a new line in a field, as you may expect based on what the Enter key does in other programs. To insert a new line in FileMaker, press Return.
Note
Some keyboards don’t have a Return key—instead, two keys are labeled Enter. In this case, the Enter key that’s near the number keypad commits the record, while the other (normal) Enter key enters a blank line in the field. If you don’t have a numeric keyboard—if you’re on a laptop or mini keyboard—look for a Function key (labeled “func” or “fn”). Press and hold it while you press the Enter key to commit the record. Apple laptops and compact keyboards have a single Return key. On these devices, hold the fn key while pressing Return.
Pressing Tab moves you from one field to another. (To indent a line, you have to type a tab character into a field, by pressing Ctrl+Tab [Option-Tab].)
Finally, bear in mind that you can change which key moves the cursor on a field-by-field basis, as you’ll learn in Chapter 8. For instance, FileMaker lets you decide if Enter—not Tab—should move from field to field. If you make that choice, then Tab types a tab into a field, and Enter doesn’t commit the record. Unfortunately, you can’t tell which key does what by looking at a field; you just have to try some of these keys to find out.
When your database really gains some size, you realize that even keyboard shortcuts aren’t the fastest way to get to the record you want. You need to tell FileMaker to pull up the record for you. For example, you have a season ticket holder whose last name is Adama, who just renewed his subscription for a year. You need to find his record and make the update, and you don’t have all day.
If you have hundreds of records in your People database, it could take ages to find the one you want by clicking the arrow buttons. Instead, switch to Find mode, tell FileMaker what you’re looking for, and the program finds it for you. This section explains how to use Find mode to search for a record or group of records, and how to edit your search if you don’t get the results you anticipated. (If you downloaded the example file discussed on Content Area, you can open it and try out Find mode now.)
You can get to Find mode in four ways:
The Mode pop-up menu and View menu indicate which mode you’re currently in. Once you’re in Find mode, your window should look like Figure 1-10. In Find mode, even though it may look like you’re editing records, you’re actually not—you’re editing requests instead. Requests are descriptions of data you’re looking for, so FileMaker can find them for you.
To make a request, enter enough information to tell FileMaker what you want. It will show you records that have the same information you entered, much like searches you conduct using other programs, like a Google or Bing search.
To find every person in your People database whose last name is Adama, do the following:
In the sample database CH01 People.fmp12, choose View→Find Mode (or use any of the other methods described above to get to Find mode).
Magnifying glass icons show up in all the fields you can use for searching, indicating that you’re in Find mode.
In the Last Name field, type Adama.
This part works just as in Browse mode: Click the field and then type. (Remember, you aren’t editing a record—you’re editing a request.)
In the Status toolbar, click Perform Find. (Or choose Requests→Perform Find, or press the Enter key.)
FileMaker finds all records that have “Adama” in the Last Name field and then puts you back in Browse mode so you can scroll through the found set.

Figure 1-10. Because Find mode looks so much like Browse mode, FileMaker gives you lots of feedback about the mode change. Instead of data, the fields show magnifying glass icons to remind you that you’re typing search criteria, not new information. The Status toolbar now has a Perform Find button, and even better, a Saved Finds tool that lets you store frequently used find criteria. That way, you don’t have to recreate complicated finds.
You can see how many records you found by looking at the count in the Status toolbar, as shown in Figure 1-11.

Figure 1-11. After a find, the Status toolbar shows how many records match your request. Here, FileMaker found two records with the last name Adama. You can flip between these two records to your heart’s content, but you can’t see any records not in your found set. To see the other records, click the blue ring or choose Records→Show Omitted Only. FileMaker swaps your found set and shows you the other records in your database. Then, when you’re ready to look at all your records again, click the Show All button.
Tip
If your find didn’t come out exactly the way you wanted, don’t go right back to Find mode. If you do, then you get an empty request and you have to start all over again. Instead, choose Records→Modify Last Find, which takes you to Find mode and then displays your most recent request. Now you can make any necessary modifications and perform the find again.
In the previous find examples, you had FileMaker search for records by telling it what to look for. But sometimes you’re already looking at a record that has the right information in it—you just want to find more records that match.
Say you need a list of everybody in the People file who lives in Caprica City. Flip to any record with the phrase “Caprica City” in the City field. The field is set to automatically select all its data when you click in it, but if you accidentally double-click you could deselect the data instead. If this happens, drag to select “Caprica City.” Right-click the highlighted text.
From the shortcut menu that pops up, select Find Matching Records (see Figure 1-12). FileMaker shows you a found set of all your sci-fi contacts.
If Fast Match isn’t flexible enough for you, try Quick Find. Quick Find is a text box residing in the Status toolbar that automatically searches every field on the layout you’re currently browsing. If you don’t see it on the right-hand side of your toolbar, you may need to make the window a bit wider. If it still doesn’t show up, see Adding a New Button to the Toolbar to learn how to customize your toolbar. Using Quick Find couldn’t be easier—click in the box, type a word or phrase, and then press Enter (Return). FileMaker displays a found set of records that contain your search term in any visible field. Click the magnifying glass in the Quick Find box for a list of recent finds. Choose one to perform that find again.
After you’ve performed a find, your found set stays intact until you take some action that changes the found set, like performing another find, or using one of the techniques for omitting records (Refining a Found Set with Omit Commands). To view all your records, choose Records→Show All or click the Show All button in the Status toolbar.
Note
Each time you perform a Find, FileMaker searches all your records. So there’s no need to choose Show All before you do a new find. But you can change FileMaker’s native behavior and search within a found set. See Constraining and Extending the Found Set to learn how.
Just as it does in Browse mode, FileMaker warns you if something goes wrong when you’re trying to find specific records. There are three main types of errors. Read on to see why each one occurs and what you need to do to correct the error.
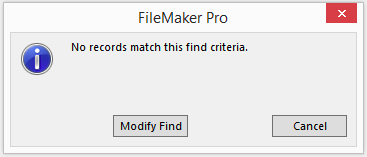
If FileMaker can’t find any records that match your request, you see the message pictured in Figure 1-13. You might see this error if you’re looking for a record that doesn’t exist in your database, or maybe you’ve misspelled the search criteria. Click the Cancel button to return to Browse mode, or Modify Find to try again. If you click Modify Find, you end up back in Find mode, with your original search terms showing so you can check your typing or enter new search terms.
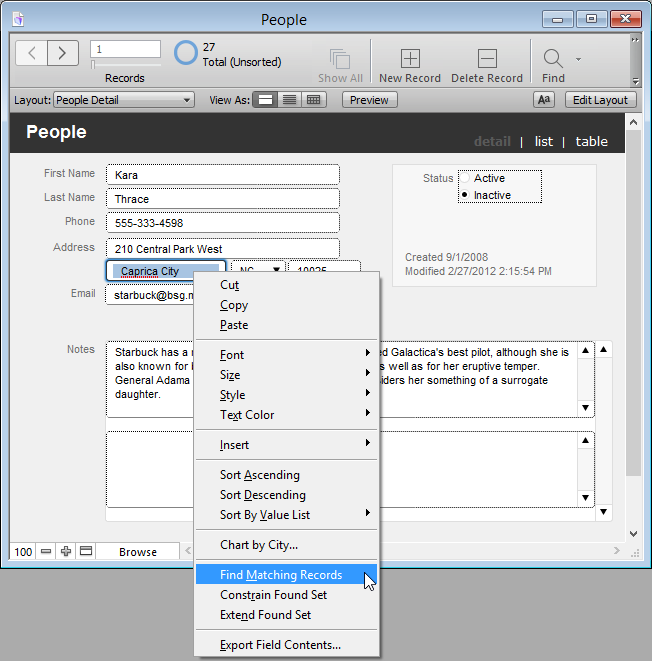
Figure 1-12. Fast Match lets you select a piece of information from the record you’re viewing (in this case, it’s “Caprica City” from the City field) and find all other records that match it without the rigamarole of switching to Find mode. Right-click the selection and then, from the shortcut menu, choose Find Matching Records.
If you don’t type anything into any of the fields before you click Perform Find, FileMaker doesn’t try to find records with all empty fields. Instead, it warns you that you didn’t enter any search terms. You’ll see the message shown in Figure 1-14. Just as with the No Records Match error, you can click Cancel to return to Browse mode, or you can click Modify Find to try again.
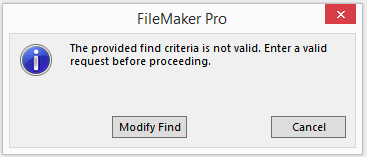
Figure 1-14. You see this message if you don’t enter search terms in at least one field before you click the Perform Find button. Sometimes, though, you may really want to find records that don’t have data in them. In that case, you can enter = in a field. FileMaker finds blank fields, and now you can start entering the missing data in those records. Chapter 2 gives you lots more detail on special search symbols and other tricky finds.
Find mode looks so much like Browse mode that you can easily forget which mode you’re in. It’s a real drag if you think you’re in Browse mode and you start entering data. You can make quite a bit of progress entering records and never realize your mistake. When you finally do figure it out, it’s a rude awakening: None of the requests you’ve just entered can be turned into real records; you have to re-enter them all in Browse mode.
FileMaker gives you a warning if it thinks you’re entering data in Find mode. If you create more than 10 find requests while in Find mode, then FileMaker shows the message in Figure 1-15. (At least you’re finding out now, not after you’ve typed for 3 hours.) If you’ve been entering data in Find mode by mistake, just click No, switch to Browse mode, and then start over with your data entry. If you know you’re in Find mode, and you really want to add all these requests, then just click Yes. FileMaker doesn’t bother you again.
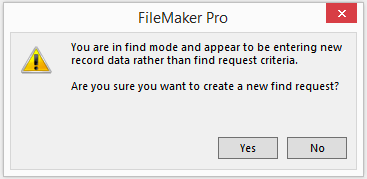
Figure 1-15. If you create more than 10 requests in Find Mode, then FileMaker wonders if you’re actually trying to enter data. If you’re setting up a magnificently complex find, you may be annoyed. Just click Yes and keep up the good work. But if you just forgot to switch back to Browse mode, this warning can save you more lost keystrokes.
Alphabetical order is probably the most common way to sort things, but FileMaker is by no means limited to the good ol’ ABCs. You can sort the records in any order you want, as often as you want. You can even do a sort within a sort, as you’ll see later in this section.
Don’t confuse sorting with finding. When you sort, FileMaker doesn’t change the records included in your found set. Instead, it rearranges the records you’re viewing into a new order. For example, if you need a short-term loan, you might sort your contacts by annual income. FileMaker still shows the same found set of contacts, but with Uncle Moneybags at the very top of the list.
The process always begins the same way: First, choose Records→Sort Records or click the Sort button in the Status toolbar. You see the Sort Records dialog box shown in Figure 1-16, with all available fields listed on the left. You tell FileMaker how to sort by moving a field to the list on the right.
Note
FileMaker starts out by listing the fields shown on the Current Layout. If the field you want to sort by isn’t in the list, then from the pop-up menu above the list, choose the second option. Instead of Current Layout, that option starts with Current Table. (Learn more about tables in Chapter 6.)

Figure 1-16. The Sort Records dialog box has a lot of options, but the two lists on top and the first two radio buttons are critical to every sort you’ll ever do in FileMaker. You pick the fields you want to sort by and the order in which they should be sorted and then click Sort. That’s the essence of any sort, from the simplest to the most complex.
Here’s how to sort your found set of records by Last Name:
In the Status toolbar, click Sort. Or choose Records→Sort Records, or press Ctrl+S (⌘-S).
The Sort Records dialog box (Figure 1-16) appears.
From the list on the left, select the Last Name field and then click Move. (Or double-click the field name.)
The field name appears in the Sort Order list on the right.
Click Sort.
FileMaker sorts the records in the traditional alphabetical-by-last-name order.
You can browse the sorted found set by using any of your favorite navigation methods.
FileMaker figures that if you’ve sorted your data once, you’ll probably want to sort it the same way again, so once you’ve done a sort, the dialog box retains the last sort order you set up. That’s a nice shortcut if you want to repeat the last sort or refine it by adding more fields. But if you want something new, just click Clear All and then start with a clean slate.
Each sort field has an order associated with it. Most of the time, you’ll choose either “Ascending order” or “Descending order.” For numbers, Ascending means from smallest to largest and for text, that’s A to Z. The Descending option is the reverse (largest to smallest or Z to A). Once you’ve selected a field on the left, you can turn on one of these radio buttons before you click Move, and the field has the setting by the time it makes it to the Sort Order list. It’s OK, though, if you move the field over before you think about the order. In this case, from the Sort Order list, just click to select the field and then pick the order. Each field in the Sort Order list shows a bar chart icon representing the order assigned to it, which matches the icons next to each radio button.
If you change your mind and don’t want to sort after all, click Cancel, and FileMaker forgets everything you’ve done in this window.
The Status toolbar lets you know if your records are sorted (no surprise there). Below the Record Count, it says Sorted if you’ve done a sort, and Unsorted otherwise.
FileMaker lets you pick more than one field to sort by, which comes in handy when you have lots of records with the same data in some fields. For example, you might often have several people in your database with the same last name. If you just sort by last name, there’s no telling in which order the like-named people will fall. In this case, it would be ideal to sort by last name first and then, when the last names are the same, break the tie using the first name.
To set up this scheme, open the Sort dialog box using Records→Sort Records or Ctrl+S (⌘-S) and then add the First Name field to the Sort Order list after the Last Name field. The order in which you list the fields is important: The first field you want to sort by (called the primary sort field) has to be at the top of the list, followed by each subsort field in order. In this example, the Last Name field is the primary sort field, followed by First Name. You can see the results of this multiple sort in Figure 1-17. If your sort fields don’t appear in the desired order in the Sort dialog box, fret not. FileMaker provides a convenient way to shuffle them around. Drag the double arrow immediately to the left of any field in the sort list to rearrange it as needed.
Note
If you change your mind about one of the fields in the Sort Order list, click it. The Move button changes to Clear, and a click removes the selected field from the list.
Multifield sorts can get as complicated as you like. Sometimes, they’re a little tricky to get right, particularly if you’re sorting by more than two or three fields (Figure 1-17 shows a report that uses multiple sorts).
Note
Sorting records when you’re creating a report can change the way FileMaker tallies data. See Report for info on creating layout parts that use sorted data to make sophisticated reports.
If you do a multifield sort and then discover you didn’t get quite what you expected (because you had the fields in the wrong order), just choose Records→Sort Records again, move the fields in the Sort Order list to the right places, and then click Sort.

Figure 1-17. The records in this window are sorted by Last Name and then First Name. The last names are in alphabetical order, and when several people have the same last name, they appear together, alphabetized by First Name. Check out the first two records, Pete Campbell and Boyd Crowder. The Status toolbar shows you’re viewing Sorted (as opposed to Unsorted) records. And a series of custom buttons, labeled First, Last, City, State, and Status, perform two functions. They’re a quick way to re-sort your found set, and their display shows you which sort is in effect.
So far, you’ve spent all your time in one People window, where you can see either a single record or a list, but not both at the same time. With only one window, you can’t compare two records or found sets side by side. This section will show you how to open and manage multiple windows.
In the People file, you’ve probably noticed the word “list” near the content area’s upper right. Turns out, that’s giving you feedback about the data you’re currently viewing. If you click the word “detail” (it’s written in lowercase letters, because the database developers like it that way), then the scene switches to a detail view of the current record shown in Figure 1-18.
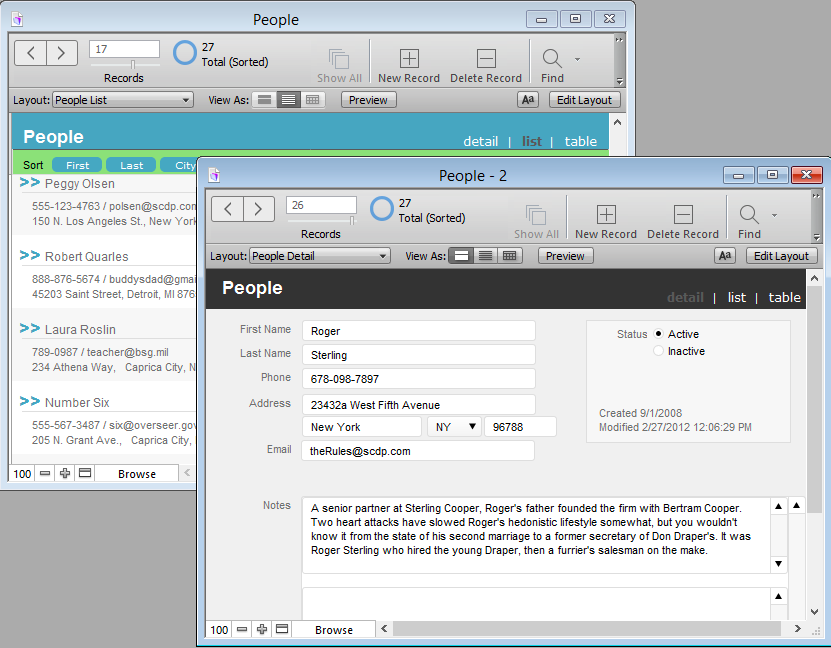
Figure 1-18. The back window shows several records in the People database’s List View layout. But the window in the front shows one record in detail view. You can also tell that the front window was spawned from the back window because its name has a “–2” added to it. You can flip through records in the front window in their detailed glory and leave your list intact in the background.
Note
The word you’re clicking is called a “button,” which is just a tool that you can configure yourself. See Creating a Button to learn how you can create custom buttons for your database. You can also see the View menu for the menu commands that switch views of your data.
Since it’s a database, FileMaker has lots of power that spreadsheets don’t have. But lots of people prefer to see their data in columns and rows that look like a spreadsheet. That’s what the “table” button does. Click the button to view your found set in FileMaker’s Table view—and see Modifying Table View for more information on how you can customize this view of your data.
You can make another window by choosing Window→New Window. A second window doesn’t mean you have a second database—you just have a new view into the one you’re already looking at. Your new window is the same size and shape as the original, just offset a little down and to the right. It has the exact same set of records you were browsing, along with the same current record. Now you can switch to another record or do something completely different in the new window, without affecting what’s displayed in the first one.
Note
If your original window is maximized, the new window lands right on top of it, not to the lower right.
Multiple windows are useful when you’re working with one set of found records and you need to do another search. You can perform a find in a new window without losing your found set in the original window. Say you’ve been working with a list of all your contacts who don’t have email addresses and then suddenly get the paperwork you need to edit the detail on another record. Although you can enter data on the list layout, all the fields you need may not be on that layout. Just create a new window, switch to the detail layout, and then look up the record you want to edit (see Figure 1-18). Your missing email group is safe and sound in the first window. (See the box on Record Locking to see what problems can happen when you edit the same record in multiple windows.)
If you have a window just the way you want it (for example, showing a list of ad campaigns copywriter Paul Kinsey was assigned to), but it’s in your way onscreen, then you can hide it instead of closing it. When you close a window after using the Find command, your results disappear. Hiding a window makes it disappear from your screen, but FileMaker remembers everything about the window and can pop it back into view instantly. It’s a great timesaver when your screen is crowded—or when you want to keep prying eyes away from your information.
To hide the current window (that’s the one displayed at the front of your screen), choose Window→Hide Window. To bring it back again, choose Window→Show Window and then, from the list, pick the window you want. If you have several windows open, you’ll need to remember the name of the window you hid (its name appears in the title bar, across the top of the window).
Note
Take care if you use your operating system’s built-in features for dealing with windows, like minimizing them to the OS X Dock. These techniques work just fine in FileMaker, but they can play havoc when a FileMaker script needs to control the same window. If you’re using FileMaker Scripts to automate tasks, as you’ll learn about in Chapter 12, it’s best to stick to FileMaker’s own window commands.
Closing Hidden Windows
You learned earlier in this chapter to close a database by closing all its windows. As with most rules, there’s an exception: Even if you close all visible windows, the database itself may still be open—in a hidden window.
The easiest way to close all of FileMaker’s open windows, hidden ones included, is to press Alt (Option) and then choose File→Close (File→Close All on Mac). The ordinary Close command closes every window, hidden or not, when you press this key.
Since FileMaker lets you create dozens of windows on your screen at one time, it also provides some commands to help you manage them. From the Window menu, you can choose one of four commands: Tile Horizontally, Tile Vertically, Cascade Windows, or Bring All To Front (Mac only). Each of these commands works on all visible windows (hidden or minimized ones are not affected). You get a lot of action from these commands, but they may not save you a lot of time, as discussed in Figure 1-19.
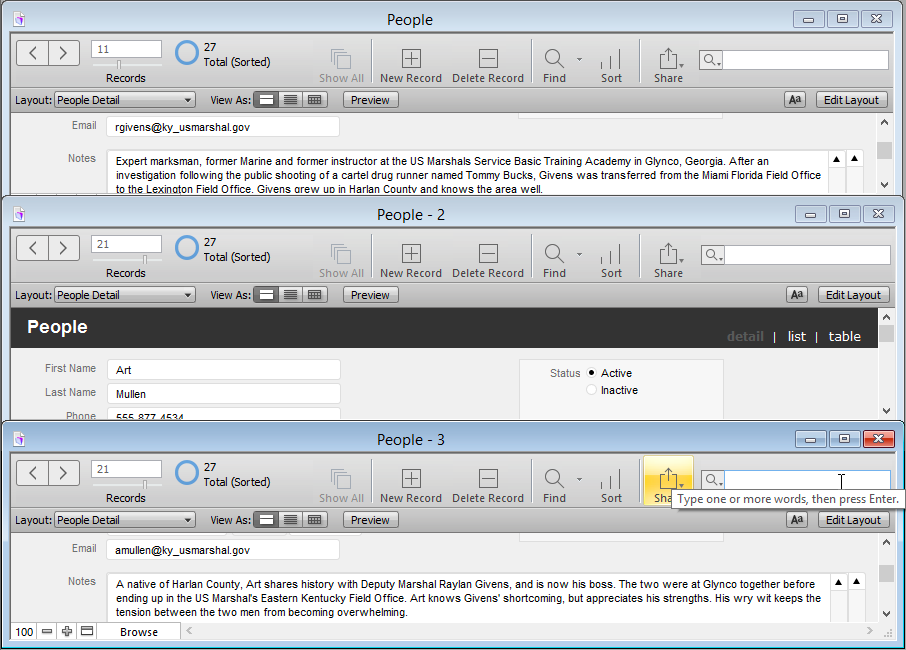
Figure 1-19. Each of FileMaker’s automatic window arrangements has its limitations. Each uses all available space to decide how to arrange your visible windows. For example, horizontally tiled windows aren’t the best use of space, but they can be useful if you have so many windows (shown here) open that you can’t remember which one is which (those numbers at the end of the window name tell you what order you created them in).
Auto-arranging is a blunt tool, however, and will move and resize your windows without any regard for a window’s content. So use these commands with the understanding that you’ll still have to do some rearranging yourself. Manually resize your windows or use the square Maximize button (Windows) or the green Zoom button (Mac) to return your windows to their proper size once you’ve found the one you need.
Everybody knows it’s important to save files early and often. So you’re working along in FileMaker entering information about your office birthday roster, and as good habit dictates, you type the keyboard shortcut that saves in practically every program in the known universe (Ctrl+S in Windows and ⌘-S on the Mac). Up pops the wrong dialog box. This one’s asking you how you want to sort your data! What’s going on?
What’s going on is FileMaker doesn’t need a keyboard shortcut to save your changes, because every time you commit a record, the program automatically saves all your work in a cache, which is part of your computer’s RAM (random access memory). Then, periodically, FileMaker transfers the information from the cache to your hard drive, where it’s less likely to be lost in case of a crash.
You can control how much work is held in cache before it’s saved to your hard drive, as described in Figure 1-20. In Windows, choose Edit→Preferences and then click the Memory tab. On the Mac, choose FileMaker Pro→FileMaker Pro Preferences and then click the Memory tab.
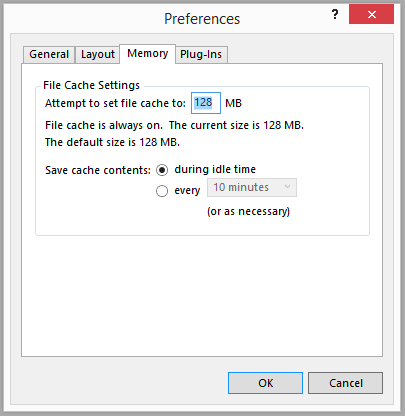
Figure 1-20. Specify the size of FileMaker’s cache and how often your work is moved from the cache to your hard drive. (Nerds call that “flushing the cache.”) A larger cache yields better performance but leaves more data in RAM. If you’re working on a laptop, you can conserve battery power by saving cache contents less frequently. But infrequent cache saving comes with some risk: In case of a power outage or other catastrophe, the work that’s in the cache is lost for good.
Although FileMaker automatically saves your work as you go, what if the database file itself gets lost or suffers some digital harm? It’s in your best interest to back up your database periodically. You can perform a backup by closing all your database’s windows and then simply copying the database file. For example, you can copy it to cloud storage, email it to a friend, or duplicate it and tuck the copy away in another folder. When your database is open, the easiest way to make a backup is to choose File→Save a Copy As. In the dialog box that appears, make sure that “copy of current file” is selected as the Type option. When you click Save, FileMaker makes your copy in the background, and you can continue working in the original file.
But if you want to start working in the copy you’ve just made, select the “Automatically open file” option before you click Save. FileMaker makes the copy of your file and then opens it for you. FileMaker doesn’t close the original file, so if you’re finished with the original, choose it from the Window menu and then close it to avoid confusion. Now only your new copy of the file is open.
If you want to make a copy of your database to email to an associate, choose the “Create email with file as attachment” option. FileMaker copies your file, launches your email program, creates a new email, and then attaches your newly minted file copy to it. All you have to do is provide an email address, type your message, and then click Send. See Save/Send Records As to see how you can use similar options if you want to send data to your associate in another format, like a PDF file.
Note
Always make sure a database is closed before you copy its file by using any of the desktop methods (like Edit→Copy in Windows Explorer or the Mac’s Finder). If you copy a database file while it’s open in FileMaker, both the original and the copy may be damaged, lose information, or in the most serious cases, be rendered totally unusable! If you have any doubt about whether your file is still open, check your Window menu for hidden files, or for the ultimate in safety choose Exit (PC) or Quit (Mac) FileMaker.
Clones are clean copies of your database, but without the data. Clones are really useful, like when you’ve designed a killer database for running sales in your dart and billiards supply shop, and you want to send the files to all your franchisees without giving away your store’s sales data. Just make clones of your files and then give them to your proud new owners. To make a clone, choose File→Save a Copy As, and then make sure “clone (no records)” is selected as the Type option.
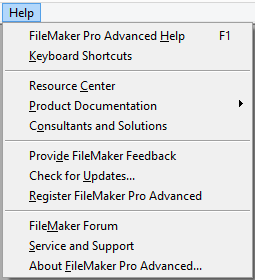
As helpful as this introduction to databases has been, you may want to use FileMaker’s onboard help to get more information (Figure 1-21). There you’ll find commands for FileMaker’s Help application and for online help at FileMaker’s website. See Appendix D for more information from those sources, plus help from third parties.
The quickest way to get help, outside of sitting beside a willing guru, is to use the handy search field at the top of the Help menu. To get help, just start typing the subject you need help with. As you type each letter, the Help application changes its menu items to display topics it thinks you may need. When you see the item you need, select it from the menu, and Help appears, showing the page for the term or topic you chose.
Get FileMaker Pro 14: The Missing Manual now with the O’Reilly learning platform.
O’Reilly members experience books, live events, courses curated by job role, and more from O’Reilly and nearly 200 top publishers.

