In Part One, you learned that you can work organically, flowing smoothly from finding to sorting and then to editing data as your needs dictate. In Part Two, you’ll learn that FileMaker lets you create databases in a natural order, too. For starters, you’ll create some fields for storing data about your property leasing business, and then you’ll learn how to control layouts so they display data the way you want to see it.
Note
The tutorials in Part Two serve as a general introduction to database creation. You’ll go through the basics of all the major tasks associated with creating databases. Later sections go into more detail on the bigger topics, but you’ll get a solid foundation by reading Chapter 4 and Chapter 5 straight through.
When you create a database from scratch, you’ll see both familiar territory and some brand-new concepts right away. For example, when you launch a word processing program and then open a new document, you can type a lot of text before you get around to saving your document. But when you create a database, you need to give your document a name and some basic structure before you can enter any data. That’s partly because of the automatic saving feature you learned about on Automatically Arranging Windows. Another reason is that you have to tell FileMaker about the fields you’re going to use to store your data.
Here’s how to create a new database file:
Launch FileMaker Pro.
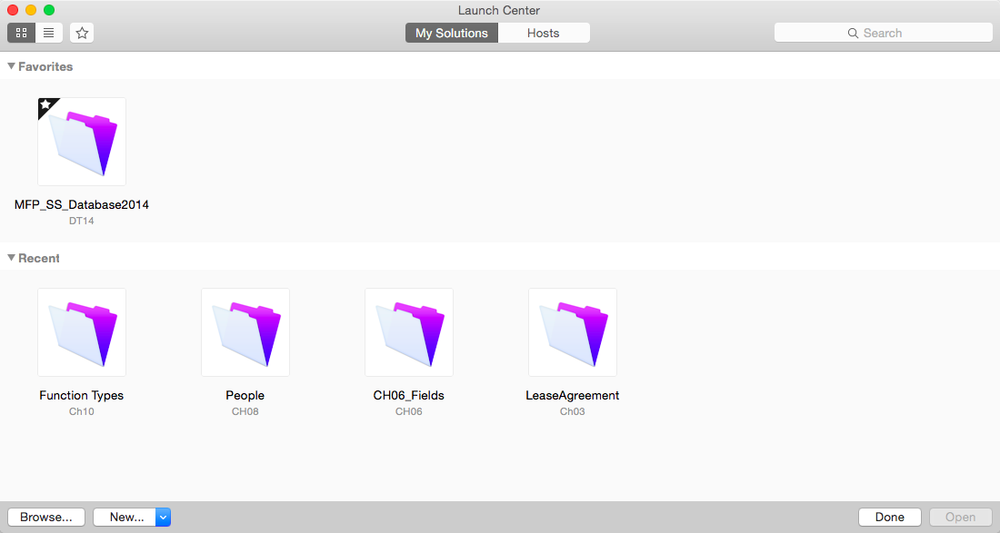
The Launch Center screen appears. It lets you open existing databases or start a new one (Figure 4-1).
Figure 4-1. The Launch Center presents your favorite and recently used databases. If you’re opening a database for the very first time, you have to click Browse in the bottom-left corner. This opens a standard Windows or Macintosh dialog box for navigating to the file you wish to open. For more detail on using the Launch Center, see the box on page 97.
At bottom left, click the New button and choose New Solution. In the Save As field, type Lease Agreement and then choose a location to save your file.
The New File dialog box is very similar to a Save dialog box. You can name your new file and navigate through your folders to find your favorite storage spot.
Click Save when you’re done.
A new database window appears in Form view ready for you to start creating fields.
Note
It may seem odd to name the file “Lease Agreement” (singular) and not “Lease Agreements” (plural). After all, the file is meant to store many agreements. True enough, and for that reason many developers always use plural for their file and table names. But at the record level, you’d never put two peoples’ first names in one field, so it doesn’t make sense to name the field “First Names.” It’s easier to remember never to use plural than it is to remember different rules for different database parts, so in this chapter, you’ll stick to singular.
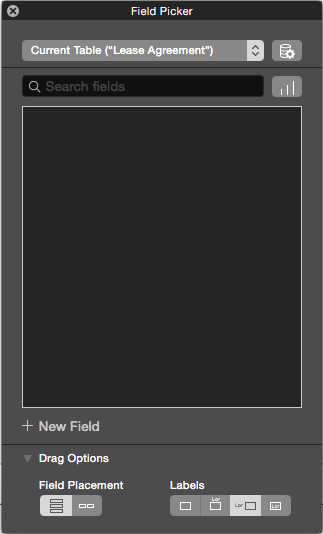
When you create a new database in FileMaker Pro 14, the file starts out in Form view and Layout mode. Since the file has no fields or records, FileMaker opens the Field Picker, shown in Figure 4-2, which lets you get right to the business of creating your initial fields.
When FileMaker created your blank layout, it made it a fixed height and width. The sample database you’ll create in this chapter will only have a few fields in it, so the next step is to reduce the layout to a more compact, manageable size. This is how you resize the layout:
Choose View→Rulers.
The rulers appear at the window’s top and left edges. The default measurement system for a new file is inches.
Click anywhere in the gray area outside the Field Picker.
The layout area becomes active, so you can change it.
Expand the window or scroll right to view the layout’s right edge.
When you first create a layout, the Header section is solid black. The edge of the layout is where the Header section ends; the area to the right of the layout is a darker gray.
Grab the right edge of the layout and move it left to the 8-inch mark on the top ruler.
Your mouse pointer changes to a double arrow when it’s directly over the layout’s edge.
You’re almost ready to start making fields. But first, you need to think about the fields the database needs for storing data in a logical manner. The box on the next page has some suggestions.
Figure 4-2. The Field Picker lets you create a batch of new fields (or just one) and then drag them onto your layout. Click the + symbol to add new fields. Click the Drag Option triangle at bottom to see two choices that determine how FileMaker arranges the new fields and labels when you drag them to your layout. Because the two options work together, you have good control over how your fields appear when they land on the layout.
Note
To follow along in this chapter, you’ll find it helpful to download the sample database CH04 Lease Agreement.fmp12 from this book’s Missing CD page at www.missingmanuals.com/cds/fmp14mm. You’ll also find PDFs and other files that you can use as you work through the steps.
The Lease Agreement database will track the names of people to whom you lease houses and record how much money you can expect to receive for rental fees over the life of each lease. Your first task is to create the fields you need to run your growing empire. Here’s the list of fields:
First Name
Last Name
Rental Fee
Lease Duration
Date Signed
Lease Document
Creating fields with the Field Picker is quick and easy.
Click the + button labeled New Field.
A field—labeled Field—appears in the list.
Type First Name and then press Enter.
The field’s name is accepted.
Repeat the process to create the Last Name and Rental Fee fields. See the box below for more information on how to decide which fields your database needs.
People’s names are considered text, because they’re made up of alphabetical characters. When you created fields using the simple technique in the previous section, you didn’t have to do anything special to create a field that’s ideal for storing text. FileMaker automatically creates text fields unless you tell it otherwise. When you need to store numbers, dates, or times, you should create fields meant to store those types of data.
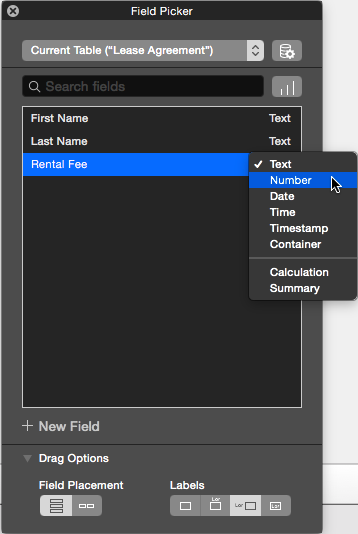
In the Field Picker, click the word Text to the right of the Rental Fee field name to view the Field Type menu (Figure 4-3). The Rental Fee field will hold a monetary amount, which is a number. So select Number from the menu.
Now create your remaining fields and set their field types. Here’s a list of the fields you need and the field type for each:
Lease Duration: number
Date Signed: date
Lease Document: container
As you add new fields with the Field Picker, it remembers the type of field you created previously and gives each new field you add the same type. You can change the field types as you go along or go back and assign all the proper field types at the end.
Figure 4-3. This menu lets you select among the various field types as you create them in the Field Picker. You can also change a field’s type after you create it.
Now that you’ve created all of your fields, you need to place them on the layout. Select all the items on the list (using standard list selection techniques) and drag them into the layout. You’re creating a Form view, so it makes sense to arrange the fields in the order you created them, with labels to the left of each field. The Field Picker is also useful later on in the creation process. As you create new fields, they’ll all appear in the field list, where you can drag them—individually or as a group—onto any new layout you create.
Tip
While FileMaker’s default Drag Option settings—fields in columns with labels on the left—work for the current example, it’s not the only choice. Click Drag Options triangle to choose how fields are arranged when you drag them in. These options also let you determine where the labels go or skip labels altogether.
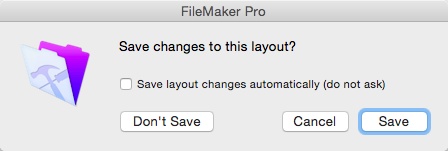
The Field Picker is a handy way to create fields and set their types. But it’s not the only way. To view one alternative, click the Exit Layout button on the right side of the Status toolbar. FileMaker asks if you want to save the changes you made to your layout (Figure 4-4). After you click Save, choose View→”View as Table” to switch to Table view, where your data is presented like a spreadsheet.
Spreadsheets have rows, which are equivalent to the records in your table, and they have columns, which are equivalent to the table’s fields.
Figure 4-4. Once you feel comfortable editing layouts, you can tell FileMaker to stop asking you about layout changes by turning on “Save layout changes automatically (do not ask).” An option in FileMaker’s preferences lets you turn the Save dialog box back on if you decide you need it. In Windows, choose Edit→Preferences, on a Mac, choose FileMaker Pro→Preferences, and then click the Layout tab.
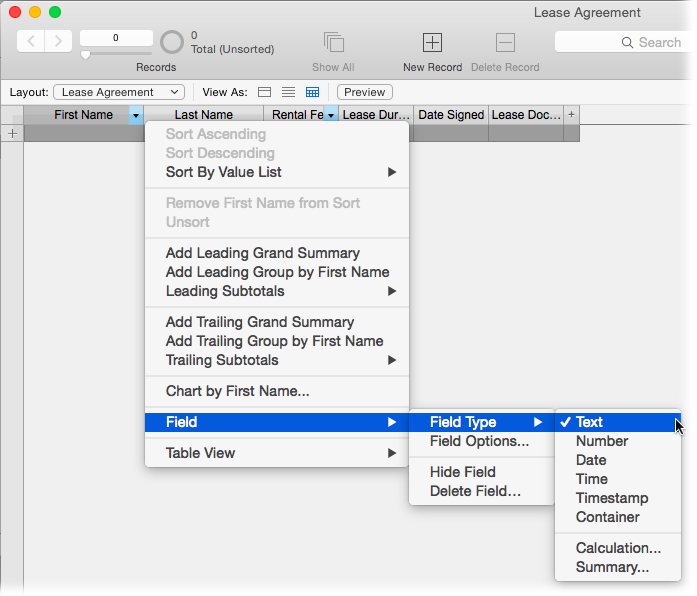
In Table view, all your fields are shown in the same order as they appeared in Form view. At the right side is a + sign, which you can use to create a new field. To change a field’s type, click the tiny triangle to the right of the field’s name. A hierarchical menu appears that lets you change the field’s type (Figure 4-5).
You can even change a field’s type after you’ve started entering data in your database. But since some field types have stringent data entry requirements, some of your data may change if you do. For example, text fields can hold more data than number fields, so if you change a text field that contains a lot of data to a number field, some of that data could be lost. So it’s definitely safer to make sure you’ve chosen the right field type before you enter any information. See Understanding Field Types for details on other field types and how to decide which field type is right for your data.
Figure 4-5. This menu appears only when you’re in Table view. The menu lets you sort the records you’re viewing (page 25), manage the fields you’re creating, and change the design of your data screen (page 41). You can also hide a field from view or even delete it from the database. Because deleting a field also deletes the data it contains, FileMaker gives you a chance to cancel when you choose this command.
Now that you’ve created your fields, your first database is ready to use. Entering data in Table view isn’t much different from entering it in Form view. Get started by clicking in the First Name column heading. As soon as you click, FileMaker creates a place for your next new record, and the gray row moves down a place.
Be careful, though. That gray row is just a placeholder. While it looks like a new record has been created, the record count in your Status toolbar tells you that the number of records in your database hasn’t increased. The record doesn’t get created until you actually click in that gray space. It might seem confusing at first, but this process keeps you from creating blank records in your database.
Tip
That new second row has a + sign to its left. This button comes in handy if you know you’ll need a specific number of records. You can click the + button until you have a set number of records and then start entering data if you want to. But if you don’t like loose ends (and empty records) cluttering up your database, it’s usually safest to create one record at the time.
Type this information into your first record:
First Name: Antoine
Last Name: Batiste
Rental Fee: 985
Lease Duration: 12
Date Signed: 9/22/2015
Notice that you can use the Tab key to move from field to field. But unlike a spreadsheet, where you might expect to go to a new row after you get to the last field in that row, the cursor cycles back to the first field of the record’s row instead. To move down, click in the gray row. When you click, FileMaker again creates space for the next record.
When you first created your database, you made a container field called Lease Agreement. Container fields can hold pictures, audio clips, videos, or even other files. In this case, you’ll use the field to store a digital copy of each renter’s lease agreement for quick reference. It’s time to learn how to place a PDF file in your container field.
Note
You can use any PDF file on your hard drive for the next tutorial, or you can download sample PDFs from this book’s Missing CD page at www.missingmanuals.com/cds/fmp14mm.
Click in the Lease Document field.
The field’s borders have a blue outline, showing that the field is active.
Choose Insert→File.
The Insert File dialog box appears. It looks like a standard Open dialog box.
Go to where you downloaded the sample files for this chapter, and select the one called aBatiste.pdf.
Alternatively, you can use any PDF file on your hard drive.
Click Open (Windows) or Insert (Mac).
A small icon and filename appear in the Lease Document field.
The PDF file is now stored inside your database, and better yet, it’s linked to a specific record. See Adding a Popover Button for a way to view the PDF from inside FileMaker. And on Managing External File Access, you’ll learn how to let FileMaker manage externally stored files you insert into container fields.
Using container fields for storing your files gets you a little closer to the paperless office. But when you embed files in your database, you’re increasing the database file’s size by the size of the file you’ve embedded. Text files aren’t very large, so embedding them isn’t too much of a problem. But if you’re storing graphics files, PDFs, or videos, you know those files can be enormous. And in some solutions, like a database that stores your photographs and keeps track of the clients who’ve bought the rights to use those photos, you could easily end up with a multiple-gigabyte file. But container fields let you link to a file without embedding it in the database and swelling its size. All you have to do is choose the “Store only a reference to the file” option when you insert the file into the container field. It’ll look and behave just like an embedded graphic, but it won’t make your database into a lumbering ox that clogs up your computer or network.
Note
Since you’re storing a link to the file instead of placing it inside the database, FileMaker will lose track of the document if you move or rename it after you create the link in the container field. Instead, you’ll see a message that says, “The file cannot be found:” followed by the file’s name. So make sure that you have a file organization system in place before you start storing your files as references.
If you ever need a copy of the original PDF file, you can open the CH04 Lease Agreement.fmp12 file, find the record containing the document you need (you’d probably search by first and last name), and then export the record. When you do, FileMaker creates a new copy of the file, outside of your database. Here’s how it works:
Click in the Lease Document field to select it.
You have to tell FileMaker which field contains the file you need.
Choose Edit→Export Field Contents.
The “Export Field to File” dialog box appears.
Navigate to the folder into which you want to save the file and then click Save.
You don’t even need to type a new file name. FileMaker knows the file’s original name and is ready to recreate it exactly as it was. Of course, you’re free to change the name if you want.
It doesn’t matter whether your container field contains embedded or linked files (as long as a linked file was never moved or renamed). Either way, your file will be exported. See the box on Getting the Most Out of Your Fields for information on the handy options at the bottom of the “Export Field to File” dialog box.
Tables help you organize and store your data, but layouts determine how that data appears. Layouts determine the text formatting of your data and even where each field appears onscreen. Layouts are so critical to the way your database performs that FileMaker automatically creates a layout to go with each table you create. When you created the Lease Agreement file at the beginning of this chapter, FileMaker made a layout to hold the fields you created.
You already know one way that layouts give your data visual structure. For example, when you switch from Table view to Form view, the data changes from a spreadsheet-like list to a record-by-record version of your data. But a more powerful way to change your data’s appearance is to use Layout mode. There you get access to graphics and designing tools that let you change fonts, add color, paste in your logo, or move your fields around so that your database can match your company’s branding. Many of FileMaker’s most powerful features are set up in Layout mode, so it’s not just about making your database pretty.
One database file can contain as many layouts as you want. So you can create one layout for data entry and another for printing. Indeed, it often makes sense to create one List layout for an onscreen report and a separate report layout meant for printing that same information.
Note
Layout mode has so many features that this book devotes two entire chapters to designing layouts (Chapter 8 and Chapter 9). In your real working life, you’ll switch frequently between Browse and Layout modes, so this first section begins by helping you identify the basic tools and commands you’ll use for layouts.
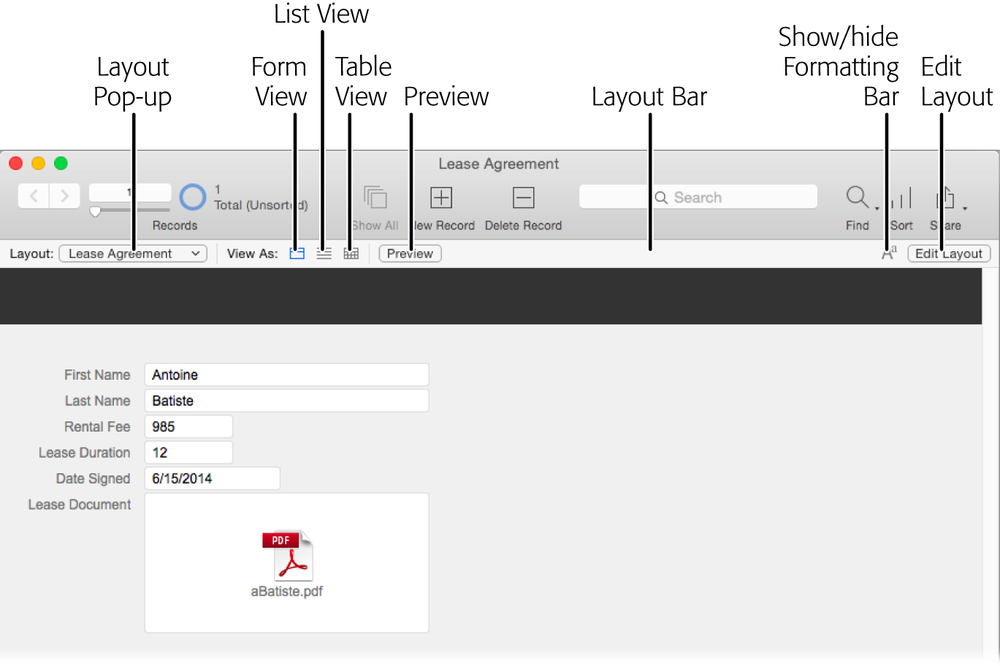
The Layout bar is tucked between the Status toolbar and the content area of your window (Figure 4-6). At the left of the Layout bar is a Layout pop-up menu so you can switch between your layouts (once you get more than one layout, that is). Form, List, and Table view buttons are to the right of the Layout pop-up menu. Click the Edit Layout button to switch from Browse mode to Layout mode. (Or you can use the View menu commands, or the Mode pop-up menu near the bottom-left edge of the window.)
Tip
If you can’t see the Layout bar, it may be because the Status toolbar is hidden. Click the Status toolbar control button at the bottom of your window to show it (look between the Zoom controls and the Mode pop-up menu).
Figure 4-6. The Layout bar helps you manage layouts even while you’re in Browse mode. Over at the right edge is the Edit Layout button (Form and List views), which changes to a Modify button when you’re in Table view. In the middle there’s a Preview button to see how the layout would look if you printed it.
When you switch to Layout mode, the Layout and Status toolbars change to show the tools you need to customize your layout. Even the menu choices and available commands have changed. Two new menus (Layouts and Arrange) have appeared, the Records menu is gone, and if you scroll through the other menus, you’ll see that they have many new commands in them.
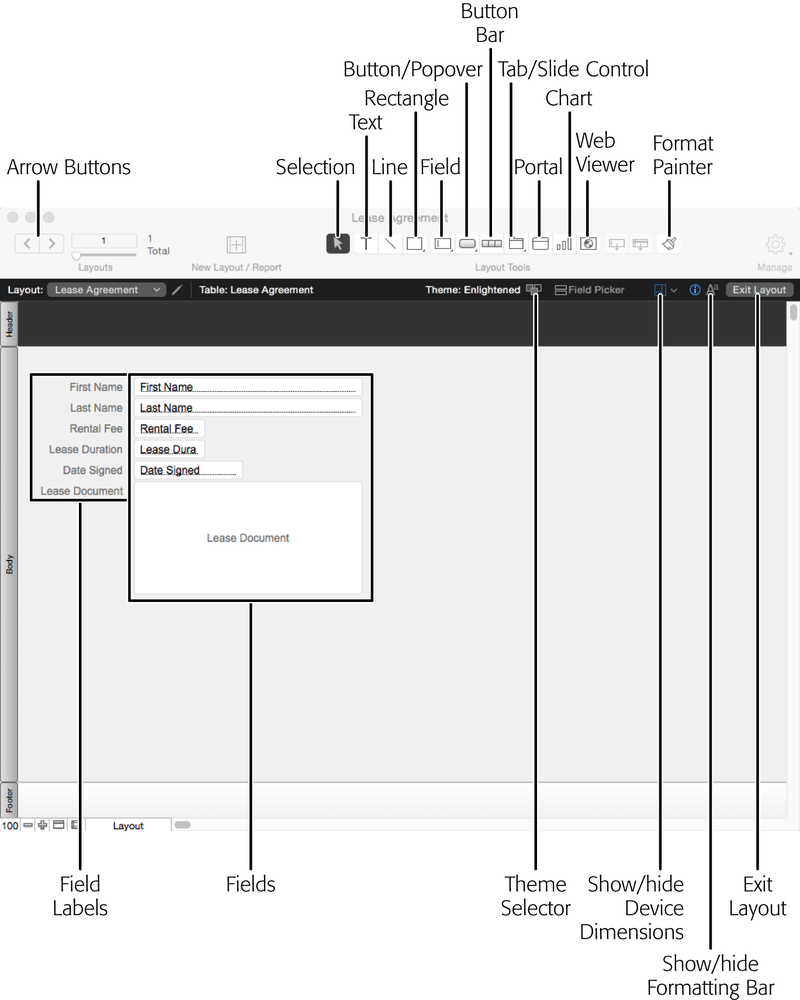
Before you start designing, it makes sense to get familiar with these new tools. Figure 4-7 shows what your database looks like in Layout mode and points out the tools and objects you need to identify when you’re doing basic layout design.
Tip
Since the tools in Layout mode are different from those in Browse mode, you can customize each toolbar separately. Choose View→Customize Status Toolbar to see the collection of buttons and tools available in each mode.
Figure 4-7. The tools in the Status toolbar change when you switch to Layout mode. The number next to the arrow buttons now counts layouts instead of records as it does in Browse mode. In place of the New Record button, you now see a New Layout/Report button. The gray background and dark bars at the top and bottom of the content area appear by default. Learn about layout themes on page 331.
The items you see in the content area of a layout are called objects, and they’re the basic building blocks for all layouts. You can click individual objects to move, resize, or format them. You can use your favorite technique for selecting multiple objects (see the box on Selecting Lots of Objects) and apply formatting to groups of objects at one time. There’s even a Format Painter tool to copy formatting from one object to other objects of the same type.
A layout features nine types of objects, and each has its own specific uses and behaviors. Here’s an introduction to each type:
Text objects. Text objects appear on nearly every FileMaker layout. Field labels are text objects that can be moved and formatted separately from the fields they identify. All the formatting you learned about in Chapter 2 can be applied to text objects. The spell checker even works in Layout mode, except it checks text objects instead of data inside fields. And if you’re using the visual spell-checking feature (Spell Checking as You Type), you’ll see dotted red underlines if you make a typo or misspell a word.
Lines and Shapes. FileMaker has some tools for creating basic lines and shapes. You can create a colored box and place it behind a group of fields to help your database’s users understand which bits of information belong together, or add lines to reports to make them easier to read.
Images. For more graphic power than FileMaker provides, use a program like Photoshop, Illustrator, or GIMP to create your graphics, and then place them on your layout. You can place your company’s logo on a layout created to print invoices, or you can use a tiny icon next to an Email field and turn it into a button for sending email.
Tip
Don’t get carried away importing too many graphics onto a layout, though. If you’re sharing a database to a mobile device or over the Internet (Server Hardware) your database can slow down.
Fields. Fields are the heart and soul of your database, so expect to put them on every layout you create. You can easily tell the difference between fields and text objects, because fields have solid borders around them to show their shape and dimensions (unless someone has turned them off). Each field’s name appears inside the borders, so you can tell which is which. Just as with text objects, you can apply text and paragraph formatting to fields; the formatting you choose will apply to all the data that appears in your formatted field.
Tip
Fields are so important that FileMaker’s normal behavior is to add any new field you create to the current (active) layout without even asking you. That’s helpful in the beginning stages of creating a database, but it can become annoying after you’ve honed your layouts to look just so. You can turn off this behavior by choosing Edit→Preferences (Windows) or FileMaker Pro→Preferences (Mac). Click the Layout tab and then click “Add newly defined fields to current layout” to deselect it.
Buttons. Buttons can run automated tasks for you. You’ll learn about them on Creating a Button.
Tab Controls and Slide Controls. Both of these objects help you make use of the limited space on your layouts. Tab Controls are discussed on Performing Finds with Related Data; Slide Controls are examined on Slide Controls.
Portals. Portals are like miniature list layouts within a layout. They display records from other related tables. Find out how they work on Creating and Using Portals.
Charts. Charts let you convert your dry data to visual form. See Basic Charting to learn how to create and manage them.
Web Viewers. Web viewers are simple web browsers you place right on a FileMaker layout. See Web Viewer Objects for more information.
FileMaker gives you so many tools for customizing layouts that you can while away hours making each layout look just the way you want it to. Don’t mistake this time as wasted effort. The principles of good design and software usability apply to even the most basic database. After all, if you’re going to be staring at your database for hours every day, it should look and feel polished. And few databases have just one user (see Chapter 20 to learn how to share your database), so when you’re customizing layouts, you have to keep other people’s needs in mind, not just your own.
Good design isn’t just about how things look. It’s also about helping people figure out how the database works. For example, when you’re storing data for contact management, you want to arrange objects like address fields in forms that people are familiar with. Most U.S. addresses are shown in a standard form like this:
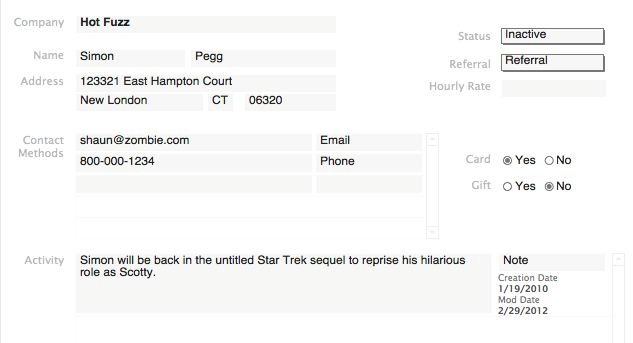
To make other people—your database’s users—feel at home in your database, you should arrange your fields as close to that standard arrangement as possible. So a good arrangement of basic fields on a layout for your Contacts would be to have your First Name and Last Name fields on the same line, with the Street Address on the second line, and the City, State, and Zip fields arranged on the third line and resized to the relative widths each bit of data usually takes up. That is, state names are almost always stored as two-letter abbreviations, so the State field can be very narrow compared with the City field. Finally, you’d group the name and address fields together in a “chunk” and add a little space between the name/address chunk and other chunks of data on your layout (Figure 4-8).
Figure 4-8. This sample layout shows data grouped in related “chunks” to help orient users to the layout’s purpose. The company name is bolded and slightly separated from everything else. The name and address fields are grouped together and arranged in a familiar pattern. Phone and email are chunked together. Metadata (information about the record itself) is chunked near the lower right.
The principles for good software design have filled many books and websites. Despite their massive usefulness, most of those principles are beyond the scope of this book. However, as you’re trying to decide how to arrange your layouts for maximum efficiency and impact, you can take a look at FileMaker’s Starter files. See the box on Explore Starter Solutions for more information. The sample files for this book aim to keep good design principles in mind, too.
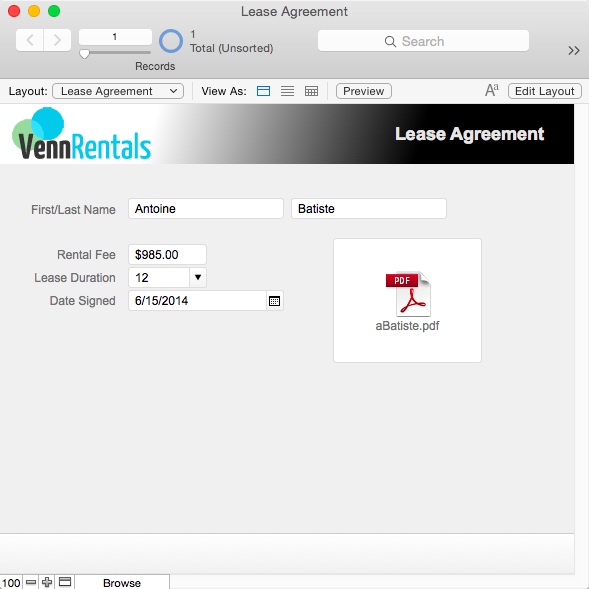
Looking at your Lease Agreement layout, you can see that FileMaker placed all your fields in a column when it created your layout. It’s up to you to arrange the objects so they make sense. You need to learn how to move, resize, edit, and delete objects to chunk your name fields and labels. You also need to learn how to import a logo to brand your database and add a splash of color. Before you get started, take a look at Figure 4-9 to see the end result you’re shooting for.
Figure 4-9. Here’s a preview of your finished layout in Form view. The layout features a logo and title, and the data has been chunked together to help make visual sense. The Lease Document container field is larger, and you can see a thumbnail version of the file itself. The Rental Fee field has been formatted for currency, and the Lease Duration and Date Signed fields have field controls that make data entry quick and consistent.
To chunk your data on the Lease Agreement layout, put the First Name and Last Name fields on the same line. To save space and be more helpful, you can change the field label for the First Name field to read “First/Last Name.” Here’s how:
Switch to Layout mode.
Use the Edit Layout button, the View menu, or the Mode pop-up menu.
Click the First Name field to select it. Then press Shift as you click the Last Name field to add it to your selection.
A single set of handles appears around all your selected objects.
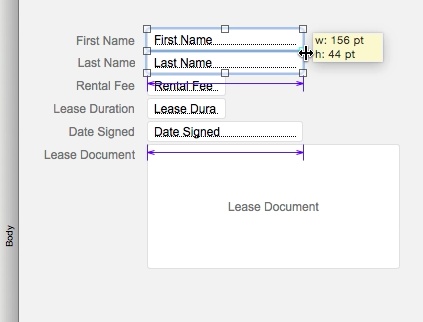
Click the handle in the middle of the right edge of your selected fields and then drag toward the left side of the layout to shorten the fields.
As you drag, a tooltip shows you the fields’ new measurement, and dynamic guides help you resize objects. See Figure 4-10 for more info.
Shift-click the First Name field to deselect it.
You want to leave just the Last Name field selected.
Drag the Last Name field up so it’s in line with and a bit to the right of the First Name field.
The dynamic guides come into play again: As you drag, FileMaker shows a baseline indicator on the Last Name field to help you line it up with the First Name field.
Tip
Pressing Shift as you move an object constrains it so it moves in one direction only—either horizontally or vertically. You determine which direction when you drag. Remember this handy tip to keep your objects nicely lined up when you want to create a little space between your data chunks.
Switch to Browse mode to see your changes. If FileMaker asks whether you want to save changes to the layout, click Save. You can select and move or resize any object on a layout; only fields and text objects have the handy baseline indicator line, though. Later in this section, you’ll learn about the Inspector, which has other tools for aligning objects.
The dynamic guides were helpful as you aligned the Last Name field with the First Name field. But the grid has more ways of helping you—giving you visual feedback for aligning objects and providing a magnetic pull that snaps objects into alignment as you drag them near the gridlines. Reveal the grid by choosing View→Grid→Show Grid. Turn on the magnetic pull by choosing View→Grid→“Snap to Grid.” You don’t have to use the snap-to feature if you just want to use the grid for eyeballing alignment. But the grid must be visible for the snap-to feature to work.
You can also show or hide the grid, toggle the snap feature, and specify the grid’s spacing on the Inspector, at the bottom of the Position panel. The grid is divided into 1-inch squares, but you can change this measurement in the Major Grid Spacing box. Each large square is divided into eight parts horizontally and vertically—the Minor Grid Steps. If you don’t like inches, you can change the measurement system by clicking on the “in” label to the right of the Major Grid Spacing field. It toggles through inches, centimeters, and points.
Tip
If you don’t want to see all those tiny lines between each large grid square, type 0 in the Minor Grid Steps box.
The grid is a big timesaver, unless you don’t want an object to align with it. But you can work around the grids in several ways:
To skirt the grid temporarily, press Ctrl (⌘) as you drag the object. As long as the key is down, you can drag the object smoothly to any spot on the layout.
Choose View→Grid→Snap to Grid to turn the grid off (or use the Inspector, as described earlier). (You can always turn it on again any time you want by repeating this menu command.)
Press any arrow key to move the selected object (or objects) one point in any direction. You can press an arrow repeatedly to carefully nudge an object into place.
If you make a field too narrow, the data inside it will appear cut off or truncated when viewed in Browse mode. Don’t worry—the data is there, it just doesn’t all show up. So to help you figure out how wide a field needs to be to show its data comfortably, choose View→Show→Sample Data. The field names are replaced with data from the record that was active when you switched to Layout mode. If some of the fields were blank at the time you switched to Layout mode, FileMaker will make up some data (possibly in Latin!) to display. When you want to see the field names again, choose the same command to turn the feature off.
Note
Even if the field is too narrow to display all its data, you can still type lots of text into the field. When you’re in Browse mode, the field expands as you type, but once you leave the field, it snaps back to size. It can’t display all that lovely data at once (unless you widen the field, or make it multiple lines high). See Show vertical scroll bar to learn how to add a scroll bar to a field.
The text objects you’re concerned about now are field labels. They’re usually created along with the fields they describe. But they’re separate objects, so you can apply one font and size to a field and a different font/size combo to its label.
Here’s how to edit a text object:
In Layout Mode, click the Text tool to select it. It’s a button with a capital T on it (Figure 4-7).
The pointer turns to an insertion point as you move across your layout’s content area.
Click in the text label, between “First” and “Name.”
A dotted outline appears around the text object to show you’ve hit the mark. The cursor will blink where you clicked.
Edit the label to read First/Last Name.
The slash indicates to the user that there are two separate fields provided for data entry.
Click any other layout object or onto the blank space of the content area to switch back to your pointer tool.
You’ve just edited your text label.
There’s a shortcut for selecting the Text tool and clicking into a text object—just double-click the object. Double-click where you want the insertion point to appear. If it’s off by a character or so, just use your arrow keys to move it and then start typing. A triple-click selects a whole word within a text object.
After you’ve edited a text object with the Text tool, the Selection tool (the arrow) is automatically reactivated. FileMaker assumes you wanted to work with just one text object and saves you the trouble of switching back to the Selection tool. If you need to edit several text fields in a row, give the tool icon a double-click instead of a single-click. The icon on the button turns a slightly darker shade of gray to let you know the tool is locked. With a locked Text tool, you can create as many text objects as you want: Click to create the text box, type the text, click again for another text box, and so forth. When you’re finished, click the Selection tool again to make it active, or just press Esc. This trick works for the other drawing tools, too.
Note
If you never edit a field label, the label will stay in sync with the field name if the field name is changed. But once you edit the field label, that connection is broken, and you’ll need to edit it manually if you change the field name.
On your layout, the name fields are in place and their label reads correctly. But now there’s a stray field label taking up valuable real estate.
To delete any object on a layout, select it and then press the Delete (or Backspace) key. Now that the Last Name field label is a solo act, select it and then delete it. If you prefer using the mouse, you can select an object and then choose the Edit→Clear command, but that’s extra steps.
Text objects serve more purposes than just field labels. Even relatively simple databases can have many layouts, so it’s helpful to put a title at the top of each layout to help you remember what the layout is for. Or you can add helpful hints, like “use the format mm-dd-yyyy” beside a date field to remind data entry folks to enter dates with a four-digit year. Here’s how to add a descriptive title to your layout.
In Layout mode, select the Text tool and then click near the top-right side of the layout, where the title should appear.
A dotted outline with a blinking insertion point appears where you clicked.
In the text box, type Lease Agreement.
The text appears as you type, and the dotted line expands to fit.
Click the selection tool (arrow) and then click the text block to select it. Choose Format→Text Color and then choose the lightest gray block from the color swatch that appears.
The text color changes to match your selection.
Choose Format→Size→18 Point.
The text size increases. If the text block is too close to the right edge of the layout, it may disappear off the screen. To fix that problem, just drag it back toward the left.
Drag the text block into place using Figure 4-9 as a reference.
The dynamic guides appear as you’re moving the text, and if you have “Snap to Grid” turned on, it snaps into place as you drag.
For short bits of text, like a title for your layout or a completely custom field label, just click and then start typing. But if you want to add a block of text that might need paragraph-style formatting (like automatic line breaks and alignment), then you should drag to define the height and width of the text block before you start typing in the new text object.
Note
You can choose any font you want from your computer’s system, but every font you choose has to be installed on the computer where your database is used. If FileMaker can’t find the font you choose, it’ll substitute a plain one instead. So unless you’re the only person who’ll ever use your database, it’s best to stick with the old standbys most folks are likely to have, such as Helvetica, Times, and Verdana.
In the last section, you changed the font size and color of a text block to make it useful as an orienting headline on your new layout. If you create another layout in the same file (as you will later in this chapter), you can create consistency by making the layout titles look the same. To do so, you could try to remember the font, size, and color you used on the form layout’s title. But it’s a lot easier to let the Inspector do this work for you, by creating a style that you can apply to other text blocks.
If the Inspector isn’t showing, choose View→Inspector. Select the Styles tab. Then follow these steps:
Click the Lease Agreement text block to select it (select the object, not the text itself).
The Inspector’s style options change to show available text styles. The Default style is selected, and at the right side you see a circle with a red triangle.
Click the circle with the red triangle.
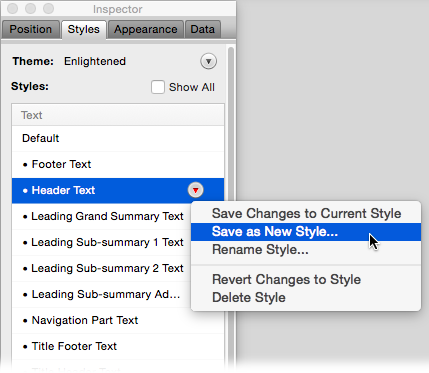
A pop-up menu appears (Figure 4-11).
From the pop-up menu, choose “Save as New Style.”
The Specify Style Name dialog box appears.
Type Layout Title into the field and then click OK.
The Layout Title style is added to the Inspector’s list of styles. The circle with the triangle at the top of the Style panel turns red to show you’ve made changes to the file’s theme.
Click the circle with the red triangle beside the theme’s name and then choose “Save Changes to Theme.”
The triangle turns black to show that the changes are saved. However, FileMaker doesn’t actually save changes to its default themes; instead it creates a new Custom theme with the same name. To avoid confusion, you should change your Custom theme’s name.
Click the circle with the black triangle beside the theme’s name and then choose Rename Theme.
The Specify Theme Name dialog box appears.
Type Venn Enlightened into the field and then click OK.
The theme’s new name appears on the Styles palette and in the Layout Bar. Your custom theme contains all the styles from the default, plus the edited style you’ve just made.
Note
You can explore FileMaker’s default themes by choosing Layouts→Change Theme. The Venn Enlightened theme appears at the top in the Custom section. FileMaker’s default themes are grouped below. See Layout Themes for more details.
You’ve just created a style for a text block, but you can create or edit a style for any layout object. Explore by clicking on objects on your layout while the Inspector’s Styles panel is active. The list of styles changes based on the object that’s selected. Read on to learn more about the Inspector, which is FileMaker’s most important layout tool.
The Inspector is the central clearinghouse for controlling nearly every property of your layout objects (Figure 4-12). Since it deals with layout objects, the Inspector is only available when you’re in Layout mode. There’s so much information on the Inspector that it’s broken down into four tabs’ worth of information. Each tab is also divided into sections that you can display or hide by clicking the white triangle to the left of the section’s title. When you hide or show a section, the Inspector shrinks or grows to fit the appropriate options. And since those options change based on the object (or objects) selected, don’t be alarmed if your Inspector seems to have a life of its own.
You can even open multiple Inspector panels, each displaying a different tab. Choose View→New Inspector to get a second, or even a third Inspector, and then click the tab you want to see on each one. All Inspectors show information about the same object (or group of objects), so any changes you make to any Inspector will affect every selected object. Multi-Inspectors are meant to let you view all of an object’s properties at once, without needing to switch tabs.
Figure 4-12. The Inspector shows the properties of the active object. If many options on the Inspector read 0 or if the buttons are grayed out, you probably don’t have anything selected. Or if you have a group of objects selected, you may see some options dimmed because they can’t be applied to some of the objects in the group. If you don’t see what you need, just change what you’ve selected on your layout.
If the Inspector isn’t showing on your layout, make sure you’re in Layout mode, and then choose View→Inspector. If no information is showing in the Inspector when it appears, make sure you have at least one object selected.
The Inspector doesn’t just show you an object’s properties; it lets you change them, too. For example, the layout title you created in the last tutorial may not have enough space around it. You can give the title a little breathing room by making the layout’s Header a little taller. Here’s how:
In Layout mode, click the Header label to select it (the label is sideways on the left edge of the Header).
The Header label turns a darker gray to show that it’s selected.
If the Inspector isn’t showing, choose View→Inspector.
The Inspector appears, and it’s showing the Header’s properties. (If the Inspector is in the way of the objects you’re focusing on, move it out of the way by dragging its title bar.)
If the Position tab isn’t active, click it.
The fields you need for changing the Header’s height are on the Position tab. Measurement systems are shown to the right of each position and size field.
Click any measurement label to change the measurement system to points.
You may have to click a few times to get to the system you want. All the labels change when you click any one. The measurement choices are inches (in), centimeters (cm), and points (pt). Since font sizes are measured in points, it makes sense to use it as a screen measurement system. (Plus, a point is roughly the same as an onscreen pixel.)
In the Size section of the Position tab, click in the Height field. Type 60 in the Height field and then tab or click out of the field to make the change.
The Header increases in height.
Alternatively, you can drag the dividing line between the Header and Body to resize it. Keep your eye on the Inspector’s display to see when you get to the right height. Either way is fine. Use the method you find easier.
You may need to move the layout title’s text block now that the Header height has changed. Make sure that the text block fits completely within the Header. If it overlaps the Body part by even 1 point, you may get unintended display problems. You’ll learn more about Layout Parts on Report.
You’ve already seen how to insert a file into a container field, but that’s not the only way to use outside resources in FileMaker. You can put your company’s logo on your layouts to make them look more customized and professional. Use any common graphic file format: .jpeg, .gif, .png, .eps, .tiff, .bmp, or .wmf. For a complete list of supported formats, see FileMaker Pro Help (Saving a Clone of Your Database) for details.
Note
If you downloaded the sample files earlier in this chapter, you have a sample logo file you can use for this tutorial. If not, go to this book’s Missing CD page at www.missingmanuals.com/cds/fmp14mm.
Here’s how to place a graphic on a layout:
In Layout mode, click Insert→Picture and then navigate to the folder where you’ve stored the sample files from this chapter.
If you didn’t download the files earlier, you can place any GIF, JPEG, or PNG file, but your results won’t be the same as Figure 4-9.
Select the Venn Logo.png file and then click Open (Windows) or Insert (Mac).
The logo appears on your layout, but it’s not in the right spot. Luckily, though, it’s already selected.
In the Inspector’s Left Position field, type 10 and then press Tab. Then type 0 in the Top Position field and press Tab.
The logo graphic moves into place.
Alternatively, you can use your computer’s Copy and Paste commands to place a graphic onto a layout. Most of the time, they work just fine. But for some file formats, you may get unexpected results. If you do, delete the funky graphic and then use Insert→Picture.
You’ve got a nice logo in the header, but it gets a little lost in that black background. You can switch the solid background to a gradient that fades to white—perfect for making your logo pop off the screen. As usual, make sure you’re in Layout Mode and you can see the Inspector.
Click the Header label to select it.
The Header’s label turns darker gray to show that it’s selected.
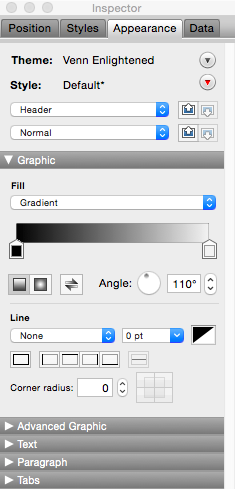
Click the Inspector’s Appearance tab. In the Graphic area, use the Fill pop-up menu and choose Gradient.
When you change a solid-colored item to a gradient, you’ll see a slider with two color swatches (Figure 4-13). The swatches tell FileMaker how to make the color change you want. Initially, both swatches will be white.
Click the color swatch on the left.
When the Color palette appears, click on the black square. Should you desire a color that isn’t in the palette, you can click the Other Color button to open your OS’s color picker.
The color swatch changes to match the color you selected. In the Angle field, type 110 and press Tab.
The gradient’s angle changes so that the gradient fades to white near the logo.
Click the Inspector’s Styles tab.
You’ve made changes to the Header’s style, so you need to save those changes to the style. Then you can apply it to headers on other layouts.
Figure 4-13. You can use the Gradient to fill any object you create. But with great power comes great responsibility, so use this effect with restraint. FileMaker gives you lots of tools for creating beautiful effects on your layouts. But your data is the most important thing in your database, so each time you add a new object or effect, switch back to Browse mode and cast a critical eye over your changes. If the layout’s design makes it hard to make things out, then start removing nonessential details that take focus away from your information.
Click the circle with the red triangle beside the style’s name and then choose “Save Changes to Current Style.”
The default Header style for this layout has been changed.
Click the circle with the red triangle beside the theme’s name and then choose “Save Changes to Theme.”
The new style is now saved inside the file’s theme. It will be available in the Inspector when you need to apply it to another header on another layout.
For most layout objects, the Inspector’s Data tab is a dim, gray dud. But when a field is at stake, that fourth tab comes into its own (Figure 4-14). There you can set up data formatting controls that display currency, percents, and negative numbers the way you want to see them. You can also give a field a pop-up menu, drop-down list, or drop-down calendar, or assign a checkbox or radio button set to the field. Chapter 8 gives details about all the Data tab’s options, but you’ll meet a few of them here.
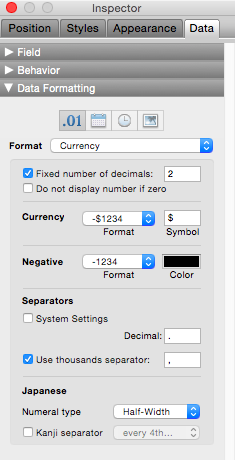
Figure 4-14. The Inspector’s Data tab as it appears when the Rental Fee field is selected. The Field and Behavior sections have been closed to focus on Data Formatting. Since this section is at the bottom of the Data tab, it’s helpful to collapse the sections you’re not focused on if you have a smaller monitor or are working on a laptop. The options in the Data Formatting section change depending on the type of the selected field. You can use options here to add currency signs, thousands separators, and colored negative numbers. The Japanese section is useful if you’re using a copy of FileMaker that’s localized for Japan and you’re using Japanese fonts for data display. Otherwise, you can ignore those options.
The Rental Fee field contains the amount of rent each Lease Document specifies. Because it will contain numbers, you made it a number field when you created it. Now it’s time to learn about the Inspector’s suite of formatting options for number fields.
Since a Rental Fee is currency data, that’s the format you’ll apply. Number formatting doesn’t change the value in the field, it just changes the display of that data. By applying a format, you can save keystrokes and make the data more consistent. Here’s how to apply the currency format to a number field:
In Layout mode, click the Rental Fee field to select it and then click the Inspector’s Data tab.
If the Inspector has disappeared, choose View→Inspector. Once the Data tab is selected, you’ll see all the options you can apply to the Rental Fee field. Data Formatting is down near the bottom.
Choose Currency from the Format pop-up menu.
The Data Formatting section changes to show all the options for the Currency format.
Choose the “Fixed number of decimals” option.
The number 2 is the unsurprising automatic setting. That means you’ll get two places to the right of the currency’s decimal point.
Tip
The most common reason to change this option is to suppress the display of numbers to the right of the decimal place, even if you enter those characters. So if the entry in the field is “985.99,” the field will show “986” instead. FileMaker uses normal rounding rules to display the formatted data. Enter 0 in the “Fixed number of decimals” field to get this format.
Choose the “Use thousands separator” option.
The standard character for a thousands separator is a comma, but you can use any other character you’d prefer. Another common choice is a period, which is used in some European countries.
Switch to Browse mode to view your handiwork. Click Save if FileMaker asks whether you want to “Save the changes to the layout.”
You can tell FileMaker to stop asking you about layout changes by choosing the “Save layout changes automatically (do not ask)” option.
Click in the Rental Fee field. You can see that the data appears just as you entered it. But when you’re not clicked in the field, the display changes according to the formatting options you just set.
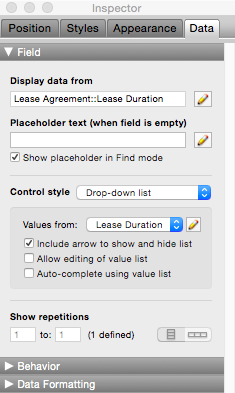
Consistent data entry is critical to a well-behaved database. If you’re tracking students for your school district, and the best half of your data entry folks type a school’s name as “Glenwood Elementary School,” and the mediocre half type “Glenwood School,” and the lazy third half barely manage to peck out “Glnwod,” you’re going to have a mess on your hands. But you can control what users put into fields that should contain only specific bits of data. Figure 4-15 shows the Inspector’s Field panel, where you control how fields look and behave.
Figure 4-15. Options like checkbox sets and pop-up menus are called Control styles. Fields that don’t have a control style are edit boxes, and that’s what you’ll see selected when you first create a field. There are two parts to adding a Control style to a field. First you select the type of control you want. Then you have to choose or create a value list containing the choices available for the field when you’re doing data entry.
Your database doesn’t store school names, but you do limit your properties’ leases to durations of 1, 2, or 3 years, and you want the data entered in months only. Here’s how to create a value list that lets your data entry people know what values belong in the Lease Duration field:
In Layout mode, click the Lease Duration field to select it and then click the Inspector’s Data tab.
If the whole Inspector has disappeared, choose View→Inspector.
In the Field section of the Inspector, choose “Drop-down list” from the “Control style” pop-up menu.
The “Values from” pop-up menu appears, but there’s nothing in it. You have to create a value list for the field to display.
Click the pencil icon next to the “Values from” pop-up menu.
The “Manage Value Lists for ‘Lease Agreement’” dialog box appears.
Click the New button.
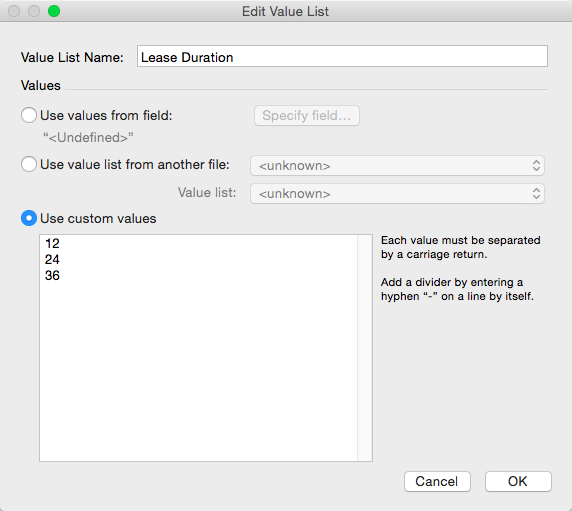
The Edit Value List dialog box appears.
In the Value List Name field, type Lease Duration.
A simple descriptive name is the best policy for database elements. In this case, you’re matching the value list’s name to the field you’ll be assigning it to.
Click in the “Use custom values” field and then type the numbers 12, 24, and 36, without any commas, and press Enter (Return) after 12 and 24, so each number is on its own line. (Figure 4-16).
You’re typing the number of months in 1, 2, and 3 years, and each has to be on a separate line. Each line represents one item in the drop-down list you’re creating.
Figure 4-16. When you name elements in your database, it helps to give them descriptive names. In this case, the new value list will be used to limit the data entry in the Lease Duration field, so even though it’s the same name as the field itself, that’s the best name to give the value list. Notice that each value is on its own line. Take care not to accidentally type an extra return at the end of your list. If you do, you’ll get a blank line in your value list. That’s not a big deal for a drop-down list, but it’s pretty confusing if you choose a radio button or a checkbox set.
Click the OK button until you’re back on the layout.
The Lease Duration value list now shows in the Inspector’s “Values from” pop-up.
Click the “Include arrow to show and hide list” option.
The arrow gives users a visual clue that the field contains a drop-down list.
Switch to Browse mode to see the new drop-down list in action. Click its arrow to see the drop-down list and then make a selection to see how data is entered into the field.
If your business rules change and you need to change the values that display in the value list, it’s easy to edit. Select the field your value list is attached to (Lease Duration, in this case), open up the Inspector to the Data tab, and then click the pencil icon next to the value list’s name. Click Edit and then make the appropriate changes. Click OK until you’re back on your layout. Finally, switch to Browse mode to see the new values.
FileMaker is picky about how you store dates in date fields. To make data entry easy, you can add a handy visual calendar to your date fields. Here’s how:
In Layout mode, click the Date Signed field to select it, and then click the Inspector’s Data tab, if it isn’t already the front tab.
If the whole Inspector has disappeared, choose View→Inspector.
In the Field section of the Inspector, choose “Drop-down calendar” from the Control Style pop-up menu.
It’s the last item on the list.
Choose the “Include icon to show and hide calendar” option.
The calendar will drop down even if you don’t choose this option, but this way your users can tell it’s there.
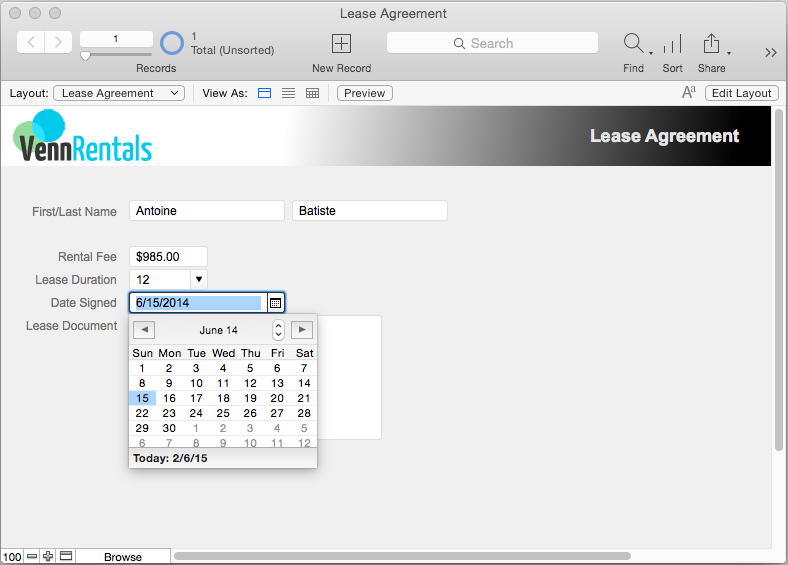
Switch to Browse mode. You’ll see the calendar icon at the right edge of the Date Signed field (Figure 4-17). Click the icon to view the calendar pop-up menu. If there’s data in your field, the calendar will be set to show that date. The calendar’s left and right arrows move the display to the previous and next month. Its up and down arrows go to the next and previous year on the Mac, or click the Month/Year title to change years in Windows. Your keyboard arrow keys move through the calendar’s dates. To enter the current date, just click the Today line at the bottom of the calendar.
After all your refinements, this layout is starting to look and behave like something you can use to make your property leasing business hum. But it’s the rare database that can function with a single layout. Find out how a list layout can help you in the next section.
Figure 4-17. A drop-down calendar ensures that dates are entered according to FileMaker’s rules. In Windows, drop-down lists or calendars may pop up instead, if the window isn’t big enough to contain all their glory. You don’t have to use the calendar to enter data even if a field has been formatted to show one. Just click in the field and type away, but be sure to enter a FileMaker-approved format (7/21/2014, 7.21.2014, or 7-21-2014, for example).
Your first layout gives you a detail view of each Lease Document record. It’s a good place for doing your basic data entry and viewing a thumbnail of the document’s PDF. Once you have lots of data in the file, it’d be nice to have a list of all your lease documents. But the List view button isn’t very useful because of all that blank space below your fields. What you need is a new layout that’s designed with a list in mind. FileMaker has a Layout Assistant that walks you through the process. Here’s how it works:
In Layout mode, choose Layouts→New Layout/Report.
The New Layout/Report window of the Layout Assistant appears.
Type Lease Agreement List in the Layout Name field.
Because most databases end up with lots of layouts, it’s helpful to give them descriptive names.
When the assistant asks you for device options, select Computer. From the layout options, select List.
Back in Layout mode, on the Layout bar, click the Field Picker. Select all the available fields in the list, except the Lease Document field.
Since a list is meant to be a compact display of your records, it doesn’t make a lot of sense to show a large container field on the new list. You can drag the field names to rearrange the list.
In the Drag Options, select horizontal orientation for field placement and choose the icon that puts labels above the fields. Drag the fields into the body area of the layout.
FileMaker has created a layout that’s suitable for a screen list. The fields are in columns, based on the order you chose in step 5. Switch to Browse mode to see how your layout looks.
Note
If you can’t see more than one record on the list layout, first make sure you have entered data for multiple records. If you have, click the “List view” button. The finished sample file for this chapter has several records, so you don’t have to worry about spending time on data entry.
To make your new layout fit in stylistically with the custom form view you made earlier, you’ll need to add the layout title (“Lease Agreement List”) in the header and apply the Layout Title style to it, adjust field widths, format the Rental Fee with currency, and add your field control styles (Drop-down list and Calendar). Make the control style changes only if you’ll be using the List view for adding records and/or editing data. (Check out Field Behavior to learn how to change field behavior to keep data in those fields from being edited.)
Your database will be more polished if your layouts look alike. Whenever possible, put some of the same elements in exactly the same place on each layout. That way, people can use those familiar objects to get oriented as they switch from one layout to another. The logo and layout title are perfect candidates for creating a sense of consistency among your layouts. You can use the Insert→Picture command to put your logo on the List layout, or just copy and paste it between layouts.
Making the two layout titles look the same is easy because you already saved the style back on Creating a New Style. Now you just need to apply your saved style to the text block. Make sure the Inspector is visible and select the Styles tab. Click the Lease Agreement List text block to select it and then choose Layout Title from the list of styles in the Inspector. The text block’s formatting changes.
Warning
If you’re familiar with the Format Painter from previous versions of FileMaker Pro, you’ll be tempted to use it to make your layouts match. It’s still there for old times’ sake, but you should rarely use it in your new databases. If you use the Format Painter instead of applying styles, your database may increase drastically in file size and become inefficient. This is especially important if you’ll share your database on iOS or on the Web (Server Hardware).
This text block has more text in it than the one you copied the style from, so you may need to resize it after the new formats are applied.
Now that you’ve formatted two layouts—Lease Agreement and Lease Agreement List—switch back to Browse mode and then switch between layouts. Although the text blocks are now the same font and point size, you can see that they’re not in exactly the same spot on the two layouts. Making sure objects look alike and are in the same location is another way to make your database more polished. When objects are in nearly the same location on different layouts, but are off by a few pixels, you’ll notice an annoying flash in that spot when you switch between layouts. But if they are in exactly the same spot, that flash goes away and you’ll have a seamless transition as you switch.
Use the Inspector to find the Left and Top positions of the logo on one layout, and then switch to the other layout to apply those position measurements to the second logo. Use the same technique for matching the title text blocks—except that for the title blocks, you’ll match up the right and top edges. Make the new layout’s Header part 95 points high. That’s a lot taller than the other layout’s header, but this one needs to have room for your column heads. Select the Field labels and move them down near the bottom of the Header part.
Back on Inserting a Picture on a Layout, you customized the header part to make your logo stand out from the background. That process required several steps, including a trip to the Color palette. If you followed the tutorial and saved the changes to the header’s style and the file’s theme, your header part will already have the customized style. But if you’ve forgotten to save changes to a style you’ll have to get that style some other way. One fix is to go back to the layout that has the changes and then save style and theme changes. But there’s a pair of buttons on the Inspector that can easily move a style onto a new layout for you. Make sure you’re in Layout mode and that your Inspector is visible.
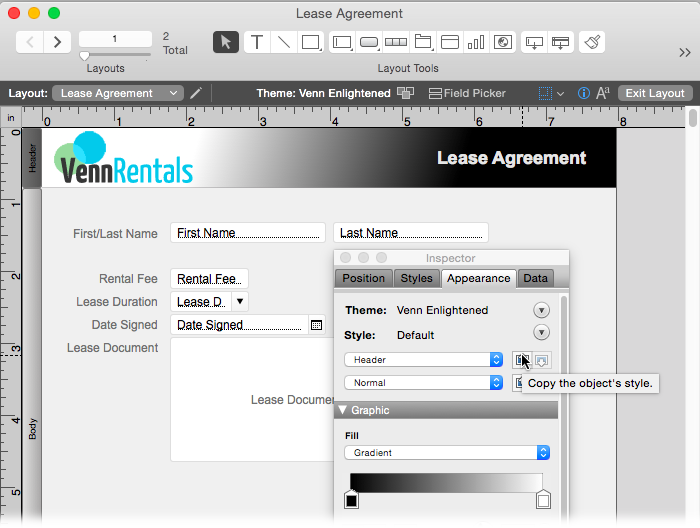
On the Lease Agreement layout, click the Header label to select it. On the Inspector’s Appearance tab, click the blue button with the up arrow (Figure 4-18).
This button copies the style of the selected object, or in this case, the selected layout part.
Switch to the Lease Agreement List layout and then select its Header part.
The blue button with the down arrow is highlighted, telling you that the style is ready to be copied to the selected object.
Click the blue button with the down arrow.
It sure would be easier if this button had a name. But your styles are safely copied to the new layout’s Header.
Click the circle with the red triangle beside the style’s name and choose “Save Changes to Current Style.”
The changes to the default Header style are now saved.
Click the circle with the red triangle beside the theme’s name and then choose “Save Changes to Theme.”
The new style is now saved inside the file’s theme and will be available in the Inspector when you need to apply it to another text block. The Header and its logo look great, but those gray field labels on the left get lost as the gradient turns to white. Draw a rectangle in the header the width of your layout that’s about quarter of an inch tall. Then use the Alignment tools (see next section) to send the object behind your field labels to help them stand out from the gradient. If you want to enter data on the list layout, you’ll need to add field control styles to the Rental Fee (Formatting a Number Field) and Date Signed fields (Editing a Value List). See Field Behavior for a way to keep folks from clicking in fields and entering data.
Note
All objects, not just text blocks, have styles. Applying them consistently is important, especially when you’ll be sharing your database using FileMaker Go or on the Web. See Theme Families for details.
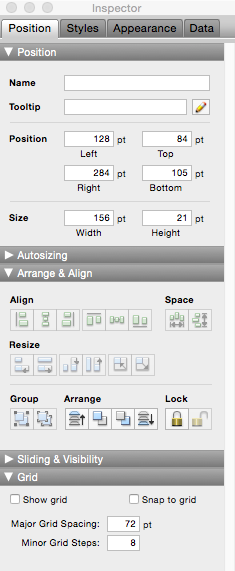
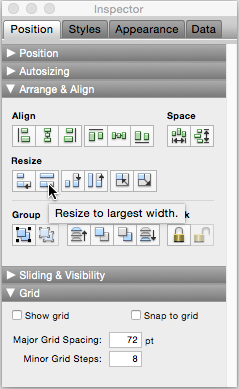
Designing custom layouts requires lots of moving and resizing layout objects. It’s such a frequent task that FileMaker dedicates an entire menu to helping you arrange and align the objects on a layout. You can find the same commands in a slightly different form on the Inspector’s Position tab, in the Arrange & Align section (Figure 4-19). Finally, right-click (Control-click) an object for the contextual menu, where you’ll find an Arrange command. Its hierarchical menu contains the Arrange and Align tools.
Your database will look more organized and professional if you line objects up with one another. When you have fields arranged in multiple columns on a layout, take care to align the fields neatly. How you align them depends on your layout. For example, in Figure 4-19, the tops of the First Name and Last Name fields are aligned, and the left edges of the First Name, Rental Fee, Lease Duration, and Date Signed fields are aligned.
All layout objects have tops and bottoms, left and right edges, and horizontal and vertical centers. A suite of six commands (shown in Figure 4-19 or on the Arrange→Align submenu) helps you align multiple selected objects on any of their edges or centers. When you align objects on an edge, all the objects move to align with the object that’s farthest in the direction you chose. When you align objects on their centers, they line up on an invisible line through the center of every object.
If the spaces between objects are uneven, use the Distribute commands. Distribute works by measuring the space between the two outermost objects and then distributing the rest of the objects between those first two. For this command to work, you have to select at least three objects. Then click the appropriate Space button shown in Figure 4-19, or choose Arrange→Distribute Horizontally or Arrange→Distribute Vertically.
Back on Editing Text Objects and Fields, you learned how to “chunk” data into related bits and to align edges for better organization. A related concept is to make fields that are near one another, or in the same chunk, the same height and/or width.
You can resize any layout object manually by dragging one of its handles, or by using the Inspector to type a measurement into a size field. But FileMaker gives you a set of menu commands and Inspector tools that make the task more efficient and consistent. You can select multiple objects and resize them to match either the smallest or the largest object’s height or width. There’s even a command to resize objects to match both width and height. No matter where they are on the layout, selected objects aren’t moved with this command; they’re only resized.
Figure 4-19. The Inspector’s Arrange and Align tools have icons that indicate their purpose. If you’re not sure which tool to use, point to a tool to see the tool’s pop-up tooltip. Here the mouse is pointing to the “Resize to largest width” tool. If you get unexpected results, just choose the Edit→Undo Resize command, and all your objects return to their original sizes.
Tip
See Autosizing to learn how to let objects resize automatically when you resize a window.
These commands are often used when you have lots of objects on a layout. By grouping objects, you can control many objects as one. Locking objects makes it harder to add an unintentional format change to them. You can see the Inspector’s buttons in Figure 4-19 (they’re the padlock symbols), or find them on the Arrange menu.
Group. Select multiple objects and then group them so you can work with them as a single object. You can copy and paste grouped objects as one item, and you can align them to another object or a group of objects. You can group objects in series. That is, you can add new objects to a grouped set to create subsets of groupings. You can also group objects to control which objects appear in front of or behind other objects. See the section on Arranging for more information on moving objects from back to front.
Ungroup. Choose a grouped object and then select the Ungroup command to work with the objects or subgroups individually. If you’ve grouped objects in subsets, they’ll ungroup in those same layers.
Lock. Choose an object or objects and then choose the Lock command so that the objects can’t be moved, resized, reformatted, or deleted. This is helpful when you have objects stacked on top of one another, like with a rectangle behind a group of fields to chunk them together.
Unlock. Choose a locked object or a group of locked objects and then choose the Unlock command so you can move, change, or ungroup them.
When you create objects on a layout, each new item appears in front of the older objects in an invisible stacking order. You can change this stacking order with the stacking commands.
Arrange→Bring to Front moves the selected object on top of everything else on the layout.
Arrange→Bring Forward moves the selected object up one level in the stacking order. You may have to issue this command a few times to get the effect you want.
Arrange→Send to Back moves the selected object behind all other objects.
Arrange→Send Backward moves the selected object down one level in the stacking order.
You can rotate most layout objects using the Arrange→Rotate command. Each time you choose the command, the selected object rotates 90 degrees clockwise. So to rotate a text block so it reads from bottom to top instead of left to right, issue the command three times. It’s most common to rotate field blocks when you’re trying to make a lot of labels fit into a tight space.
You can edit rotated text blocks in Layout mode. Just click the block and it flips to normal orientation while you’re editing. Then when you deselect the block, it flips back to the orientation you set. Oddly enough, fields do the same thing in Browse mode. But unless you’re trying to confuse your users, it’s usually best to leave fields in their normal orientation.
Get FileMaker Pro 14: The Missing Manual now with the O’Reilly learning platform.
O’Reilly members experience books, live events, courses curated by job role, and more from O’Reilly and nearly 200 top publishers.
