Chapter 1. IPHONE AND IPOD TOUCH HACKING BASICS
There are a lot of reasons to hack your iPhone or iPod touch.
There’s this myth that hacking will go away “once Apple adds that one killer feature.” But it’s unlikely, because the iPhone is unlike the earlier iPods or any phone on the market before it. It is a full-featured personal computer.
The iPhone is a global device that uses the international standard GSM protocol. Unlocking the phone so that it can use SIM cards anywhere is a major industry, and will probably continue to be so even after Apple’s exclusive contracts with mobile carriers are gone.
The iPod touch is the heir apparent of the iPod, and once flash memory sizes surpass hard drives, the iPod touch will be the iPod. But this iPod surfs the Web, gets email, and maps your location, and new applications are constantly being developed for it. The impulse to get the iPod—already the de facto standard MP3 player—to do even more is irresistible.
No matter what Apple adds to its Software Development Kit (SDK), there will always be something important that they left out. It might just be the future killer application. And thus, the hacking community will continue to push the boundaries of what can be done with the phone.
It’s important to realize that the iPhone is as powerful as a top-of-the-line late-’90s computer. Late-’90s computers were fast enough to use broadband and to fuel the first Internet boom.
But this computer fits in a shirt pocket, and can be controlled with one finger.
Now imagine a world where everyone is holding a broadband-connected, Unix-based personal computer in their hand.
Can you think of anything that Apple just might not have thought of?
We can.
Learn the Language of iPhone Hacking
Bypass the iPhone learning curve with this quick tutorial.
It’s easy to get overwhelmed with a flood of new terminology when learning a new topic, especially when it comes to computers and hacking. The iPhone has an unusually steep learning curve. This hack will quickly get you “talking the talk” so you can get past the n00b (“newbie”) phase quickly and make sense of the online discussions.
The iPhone Cellular Standard
Apple’s iPhone was originally released in the United States exclusively on the AT&T network. There are a number of different cellular phone standards, but the technology in widest use around the world and standard in Europe is called GSM (Global System for Mobile communications). GSM describes the technology for providing voice services, but the GSM system includes several levels of wireless data service as well. GPRS (General Packet Radio Service) is the slowest of these protocols, providing speeds up to 40Kbps’similar to a dial-up modem. EDGE (Enhanced Data rates for GSM Evolution) is a data transmission protocol capable of speeds up to 180Kbps, with a theoretical maximum of 230Kbps, like the now painfully slow broadband Internet from the late ’90s. Generally, this speed makes EDGE a 2.5G (between second- and third-generation) wireless protocol, as contrasted with the 3G phones, which use HSDPA (High-Speed Downlink Packet Access, the fastest current data standard used with GSM networks), which is comparable to a slow DSL connection. GSM phones are characterized by their use of a SIM (Subscriber Identity Module) card, and the ability for users to switch phones by simply moving a SIM card from one phone to another (Figure 1-1). Once Apple’s exclusive contract with AT&T has run out, they may create an iPhone that runs on other mobile standards such as the CDMA (Code Division Multiple Access) and EVDO (Evolution-Data Optimized) standards used by Verizon and Sprint in the United States.

iPhone Applications
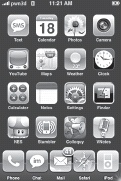
The iPhone runs an embedded (for a device, not a computer) form of Mac OS X for its system software, a thinned-down version of the same code that runs on Macintosh computers. Native applications are programs that are installed on the iPhone, as opposed to web applications, or iPhone-optimized web pages, that run in the Mobile Safari web browser, using technologies such as AJAX (Asynchronous JavaScript and XML), and which require a working Internet connection to operate. The many built-in applications on the iPhone, such as Calendar, Photos, YouTube, and Safari, are native applications; there are also native third-party applications. The applications on the iPhone are all launched by SpringBoard, an application that controls the home screen. Figure 1-2 shows a jailbroken (hacked to be freed from restrictions) phone with some third-party apps.
The iPhone’s Unix Heritage
Unix is a cross-platform, multiuser, server operating system with a long history. It was first developed at AT&T in 1969. It was one of the first open source operating systems. It has heavily influenced every operating system since then. Over the last 40 years, it has split into a large family tree with dozens of competing versions and several prominent clones, such as Linux. It has long been a programmer’s operating system (OS) as well as the ancestral home of computer hackers. Unix and Unix-like servers such as Linux represent a substantial portion of the servers on the Internet. Mac OS X is a Unix operating system.
One of the interesting things about the iPhone—and an interesting full circle for AT&T—is that upwards of 10 million people are now running a Unix-based operating system on their iPhone.
Chroot, Jails, and Jailbreaking
As we just mentioned, Unix is a multiuser system. Different accounts (login names) can be given different privileges. For instance, the superuser administrator named root can change any file on the system. The iPhone normally runs applications as a user named mobile, who has more limited access.
The word “root” in Unix systems is also used to describe the top of a hard drive hierarchy, in which the uppermost folder is the “root” directory (like the root of a plant or tree). If you see the slash symbol (/), this signifies the root of the hard drive.
One method of enforcing security on Unix systems is called chroot(). Normally, any user on Unix can potentially see the whole hard drive. What chroot() does is change the root directory so that a user can access only his or her own home directory. For instance, if Joe’s home directory is /Users/joe, chroot makes it so that / points to /Users/joe on the hard drive. Now Joe can’t access parts of the system that he shouldn’t. This security measure puts Joe in what is called a chroot() jail.
The term jail has come to encompass any metaphorical padded cell or “jail” that restricts access to certain directories and limits which programs can be run.
On the iPhone, the flash drive has two partitions—about 300 megabytes (MB) for the OS (operating system) and Applications (partition /dev/disk0s1), and the rest of the phone’s total storage for user data such as pictures, music, and movies (partition /dev/disk0s2). As shipped, there are two major restrictions: the user can’t write to the OS partition, and the iPhone won’t run (execute) any programs stored on the data partition. If you install an App Store application, it can run because it is stored on the OS partition.
On the iPhone, the process of jailbreaking removes both of these restrictions. By changing the file /etc/fstab, you:
Make the OS partition writable
Enable execution of programs on the data partition
The iPhone ships with many software and hardware security features to ensure that it is not easily cracked by malicious interlopers, and to create a chain of accountability so that an insidious or destructive program can be traced to its creator if it does manage to get onto the phone. Because of this thick layer of security, it is necessary to jailbreak the iPhone Open Your iPhone or iPod touch to Customization by Jailbreaking to install programs and access features that aren’t available through the App Store.
Most software for jailbreaking adds package management for installing new applications directly to the device. Jailbreaking adds a wide variety of common Unix/Linux tools, including Secure Shell (SSH), so that you can connect to your iPhone with a terminal program and configure it.
Significantly, because a jailbroken iPhone is a full-featured Unix server, just about every major Internet service and development technology—MySQL, Apache web servers, PHP, Python, Perl, Ruby, and Java, to name just a few—are available for the iPhone. That means that porting existing code—especially open source code—to the iPhone is trivially easy. Thus, many of the hacks in this book depend on jailbreaking the phone.
The SDK and the App Store
In February 2008, Apple announced a Software Development Kit (SDK), allowing the creation of third-party applications that could be installed on the phone. For the eight months prior to that date, creating native iPhone applications required a reverse-engineered development environment commonly referred to as the toolchain (a set of software tools used to create new applications). This is because SDK applications run in a sandbox (another word for “jail”) that limits their ability to do harm, but also limits their ability to do good. Thus, there are SDK applications (developed with Apple’s Mac-based development tools, sold in Apple’s App Store, and complying with Apple’s restrictions and distribution policies), and toolchain applications, developed using these reverse-engineered software development kits. Toolchain apps can use any feature on the phone that is available. In contrast, the SDK is limited to the features that Apple has exposed in its SDK. For instance, an SDK application cannot take pictures without the user’s permission, and cannot dial a phone number or send a text message without the user being notified, and generally cannot keep running in the background when the user switches to another program. Toolchain applications have none of these restrictions. For extensive information on programming toolchain applications, see iPhone Open Application Development, 2nd Edition (O’Reilly, 2008) by Jonathan Zdziarski.
Unlocking
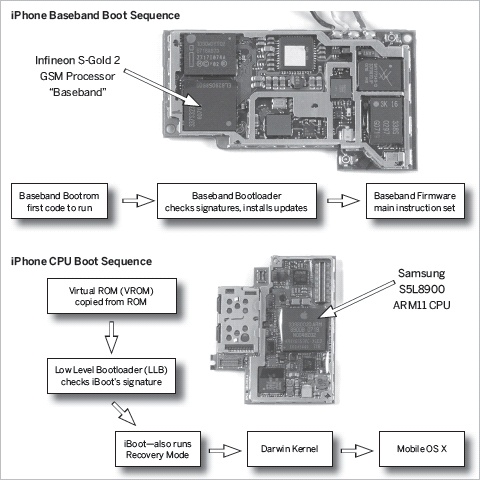
Understanding the various methods of hacking the iPhone depends on an understanding of its different parts. As mentioned earlier, the iPhone is very similar to a conventional desktop PC, with computing power easily comparable to systems from the late 1990s. Its main CPU runs around 400Mhz, and it has a screen, an onscreen virtual keyboard, a touch screen that functions as a mouse, and 4GB or more of flash storage for its filesystem (file storage). It runs an operating system—which is actually Mac OS X. Unlike most personal computers, however, the iPhone has two “brains”—one is the ARM processor (ARM11 specifically), the CPU that runs the Mac OS X system software and the GUI (graphical user interface), and the other is a chip that handles communication with the cellular network, called the baseband chip (an Infineon GSM processor).
Every mobile phone in the market has a baseband chip. On most phones (non-"smart” phones) this baseband chip is the only processor for the phone. This chip contains a simple central processing unit, as well as a wireless modem, and is responsible for all GSM/EDGE/HSDPA cellular communication. Jailbreaking an iPhone hacks only the Mac OS X that runs on the ARM processor. The iPhone’s baseband chip is a “second brain” that must be reprogrammed—often against its will—if you want to unlock the phone.
Some people wonder why the phone chip is called a “baseband.” The name is related to the more familiar term broadband, which describes a wired or wireless transmission carrying many different channels (bands or frequencies), such as a cable modem connection shared by everyone in a given neighborhood. By contrast, baseband is when a wired or wireless transmission has one base (low) band that transmits only one signal, such as a single wireless phone call.
One of the most popular terms that you will run into in hacking the iPhone is bricking, which means rendering your iPhone as useless as a brick because of hacking gone awry. Example: “Oh, no! I think I bricked my iPhone trying to unlock it.” To be precise, bricking should describe a state that is permanent and irreversible, but the iPhone community often uses this term loosely for a temporary state that is relatively easy to reverse. And some users have even had “hard” (seemingly permanently) bricked phones come back to life with later iPhone firmware—new versions of Apple’s firmware resurrected a lot of previously “bricked” phones. Typically, there are many options (such as forcing a full restore on your iPhone) that can fix the many seemingly incurable ills of carelessly hacked phones. (See Chapter 2, “Troubleshoot Your iPhone or iPod touch.”) Hardware hacking (that is, opening up the phone, as described in Chapter 12, “Hardware”) creates the highest risk of bricking phones. Next to that, trying to do a SIM unlock (modifying the phone to use a different mobile carrier than it was designed to use) is the most fruitful source of bricks (see Chapter 7, “Unlocking and Activation”). Easy-to-use one-click SIM unlocking applications Buy an Unlocked iPhone from Apple became popular because they ran a lower risk of bricking an iPhone for novice users.
iPhone OS and Firmware
Whereas PCs run software, the preferred term for embedded software—that is, software that runs on devices instead of computers—is firmware. When used in iPhone-speak, “firmware” is used loosely to describe each successive version (1.1.1, 1.1.2, 1.1.3, 1.1.4, 2.0, 2.1, 3.0, and so on) of new software for the iPhone. These files usually come in the form of an IPSW (iPhone software) file, such as iPhone1,1_2.0_5A347_Custom_Restore.ipsw. These files usually contain an update for Mac OS X as well as the baseband firmware, the software that runs the modem, which is independent of the version of system software on the phone. The baseband firmware is essential for the proper functioning of EDGE, HSDPA, Wi-Fi, Bluetooth, and phone calls. When you activate an iPhone for the first time in iTunes, or when you unlock the phone for use on any GSM service provider, you are modifying the baseband firmware.
Just like a conventional computer has a BIOS (which is in control of the computer before Windows, Linux, or Mac OS X is loaded, and is built into the hardware of the machine), the iPhone has a bootloader, or bit of software that runs before the operating system and determines which software to use during bootup. In fact, the iPhone has two of them. The main CPU has a bootloader called iBoot, also known as the recovery bootloader. This software tries to load the system software. If it cannot, or if the phone is in recovery mode Restore and Recover Your iPhone, then it asks to be connected to iTunes. The baseband bootloader is the software that runs on the baseband and loads the baseband firmware. Figure 1-3 shows the different operating software on the iPhone.
OOB or OOTB means out-of-box or out-of-the-box; it describes a phone that is brand new, not activated, jailbroken, unlocked, or otherwise molested. The term is used to describe models of phones that ship with particular software version. For instance, “OOB 1.1.2” phones shipped with a baseband bootloader (Version 4.6) that was more resistive to baseband firmware updates than earlier versions. Thus, some earlier phones were coveted because of their flexibility in downgrading and upgrading to different system versions and unlocking.
Apple’s iTunes program frequently prompts users to upgrade their phone to the latest software. Upgrading your iPhone upgrades the software to Apple’s current version but keeps the user data (leaving the user partition of the flash drive intact), whereas restoring Restore and Recover Your iPhone your iPhone’s software erases user data and reinstalls the system software. However, restoring does not reset any baseband (firmware) alterations. Virginizing your iPhone Enter DFU Mode puts it in the exact same software state that it was in when you bought it, including resetting your baseband firmware back to factory settings by relocking it. Virginizing is a prudent choice for those returning their phones under warranty, as phones that are serviced in a hacked state may be denied warranty service.
Discover Your iPhone’s Hackability
Which hacks you can do? It depends on what software version your iPhone is running.
The brief history of iPhone hacking is a game of cat-and-mouse between Apple’s patches and the iPhone user community’s cracks.
A software update from Apple can include a number of things: updates to the operating system (Mobile OS X), new baseband firmware, and updates to the iBoot bootloader Learn the Language of iPhone Hacking. Each update brings new features, bug fixes, and—in some cases—a little more resistance toward the hacks you’ll find in this book. So, before you can make your iPhone do new tricks, you need to know your firmware version and whether the hack you intend to apply will work with that version.
The most common first hack after opening your iPhone is jailbreaking, which lets you reconfigure the iPhone operating system and install unsigned third-party applications. However, some people may want to unlock their phone so that they can use it with any GSM carrier. These two hacks, jailbreaking and unlocking, depend on the firmware and the baseband, respectively. As time goes by, each new version will close some doors to hacking and open some others. Trying to hack one version with a procedure that was designed for a different version will result in an unsuccessful hacking attempt. In the worst case, this mistake could cause technical difficulties that require a full restore Restore and Recover Your iPhone and/or virginization Enter DFU Mode.
When Apple releases a firmware update, it’s often to add or update a feature—such as the iTunes Music Store app—or to fix a security issue, like a vulnerability in the web browser. Chances are good that the upgrade will, intentionally or unintentionally, temporarily render various hacks inoperable. So don’t rush to install each new update; instead, give the hacking community time to catch up so that you won’t have to struggle with the inevitable incompatibilities that arise with new firmware. And once it’s safe to proceed, perform a restore before you update to prevent any possible conflicts between your hacked iPhone and the new version.
Taking Inventory
Here’s what you should know about your device:
Step 1: Identify your phone model.
As of this writing, there are four models: the original iPhone (released June 2007) and iPod touch (released September 2007), the iPhone 3G (released July 2008), and the second-generation iPod touch (released September 2008).
This information is the easiest thing to identify.
Look at the back of the device and see whether it says iPod or iPhone. That’s your first clue.
The original iPhone has a mostly aluminum backing with a small black plastic area. The iPhone 3G has a shiny black or white plastic back.
The original iPod touch has no volume controls on the top left (facing the device). The second-generation iPod touch has volume controls.
Step 2: Identify your firmware and baseband version.
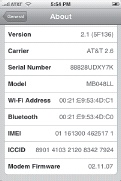
The firmware version can be found either using iTunes or directly on your iPhone. In iTunes (with your iPhone connected to your computer), go to your iPhone’s summary tab and locate “Version.” To right of it is the firmware version, listed as a version number such as 2.1, followed by a hexadecimal number in parentheses. On your iPhone, open the Settings menu and scroll down until you see General. Tap on General and select About from the top of the list. On the About screen, about halfway down the list, you will see your firmware version number, as well as your “Modem Firmware” (a.k.a. baseband version), as shown in Figure 1-4.
The easiest way to do this is by selecting Settings→General→About. The Version field will give the version of your software (i.e., Mobile OS X), and the baseband (labeled “Modem Firmware”).
A comprehensive list of firmware and baseband versions can be found at www.theiphonewiki.com/wiki/index.php?title=System. You can see some of these in the tables on the following pages.
Step 3: Identify your bootloaders.
As mentioned in Learn the Language of iPhone Hacking, there are actually two bootloaders: one is iBoot, which boots Mobile OS X. The other is the baseband bootloader that runs before the baseband firmware; it is responsible for security checking and updating the baseband. Because the iPod touch doesn’t include the EDGE, Bluetooth, and phone features of the iPhone, it does not use baseband firmware, so this hack applies only to the iPhone. Programs such as BootNeuter Buy an Unlocked iPhone from Apple unlock the iPhone by hacking the baseband firmware. Programs such as Pwnage Open Your iPhone or iPod touch to Customization by Jailbreaking hack the iPhone’s OS bootloader. The main reason to identify your bootloader is for situations where you need to virginize your phone and return it to factory condition. Table 1-1 shows several of the factory bootloader versions.
|
3.9 |
Original iPhones phones that came out of the box with Version 1.1.1 and older had this bootloader. |
|
4.6 |
Original iPhones with OTB Version 1.1.2 and later iPhones prevented former unlock methods from working. |
|
5.8 |
iPhone 3G comes with this bootloader. |
Generally, the tools that modify your bootloader will tell you what version you have. If you get a secondhand phone and you need to take inventory of your versions, however, there are several utilities that will tell you what you have. Finding out your bootloader version is slightly more complex than finding your firmware or baseband version. It requires use of SSH Connect to Your iPhone with a Secure Shell (SSH) Terminal Program. Using techniques gleaned from that hack and others in the same chapter, find the program called bbupdater through Google or other sources and upload it to the /usr/bin/ directory on your device. Next, using either Mobile Terminal Administer Remote Servers with a Terminal Program or an SSH terminal program, run bbupdater with an argument of -v. You should receive output like this:
Resetting target...
pinging the baseband...
issuing +xgendata...
firmware: DEV_ICE_MODEM_04.02.13_G
eep version: EEP_VERSION:208
eep revision: EEP_REVISION:1
bootloader: BOOTLOADER_VERSION:4.6_M3S2
As you might have gathered already, the entry for BOOTLOADER_VERSION is your bootloader version.
An alternative and slightly easier method to determine your bootloader involves using the BBinfo from www.trejan.com/projects/ipod/#BASEBANDFIRM. You download the application from www.trejan.com/projects/ipod/bbinfo-1.1.zip and copy it over to the /Applications/ folder on your phone Manipulate Your iPhone’s Filesystem. Alternately, add www.trejan.com/irepo as an Installer.app source Install Third-Party Apps.
Tables Table 1-2 and Table 1-3 show some of the iPhone firmware and baseband versions throughout the ages.
|
1.0 |
This was the first iPhone firmware version. When the iPhone was first made available to U.S. consumers on June 29, 2007, Version 1.0 was preinstalled on every unit. |
|
1.0.1 |
This update was released on July 31, 2007. It aimed to fix a security vulnerability in of the Safari web browser, which allowed a malicious breed of hackers to take complete control of someone else’s iPhone via its Wi-Fi connection. These hackers were able to exploit this vulnerability to make phone calls and even view the personal data on the victim’s iPhone. Although this update was designed to increase security against outside hackers, ironically it opened up new doors to the benevolent hacking of the type you’ll find in this book. New iPhone hacks and ideas began appearing everywhere on the Web, giving owners myriad ways to customize their iPhones beyond what its factory settings had to offer. |
|
1.0.2 |
This update was released on August 21, 2007. It provided a few minor bug fixes to help the iPhone function a little better. Luckily, 1.0.2 did not put a damper on the hacking opportunities offered by 1.0.1. New hacks began emerging at a jaw-dropping rate as more and more computer-savvy owners took interest in unleashing the full potential of the iPhone. As a result, 1.0.2 became one of the most popular firmware versions to hack, and when 1.1.1 hit the scene, unlocked phones running 1.0.2 proved to be a hot commodity. |
|
1.1.1 |
Apple’s first full update was released on September 27, 2007. A wide array of new features and improvements was offered in this update. The most notable new feature was the iTunes Wi-Fi Music Store application, which allowed users to purchase new songs from iTunes right from their iPhones. Other improvements included better interaction with Bluetooth headsets, support for TV output, and the ability to turn EDGE/GPRS data service on and off when roaming internationally. However, these improvements came with a price. Upon updating to 1.1.1, iPhones that had previously been unlocked to work with other service providers were hit with a software conflict that crippled many functions, including the ability to make and receive calls. Fear that the damage was permanent sent the iPhone hacking community into a panic. Fortunately, a solution was devised by the collaborative efforts of a number of brilliant hackers, and crisis was averted. Although this success brought a glimmer of hope for hackers, there was still one big problem with the 1.1.1 update—it was extremely difficult to hack. A temporary stalemate was in effect between Apple and the hacking community. Nevertheless, this hindrance just forced hackers to come up with more clever approaches. A way to jailbreak was found by using a vulnerability in how the iPhone processed .tiff images, allowing the phone to be taken over and to grant full filesystem access. The pinnacle of this effort was the iconic www.jailbreakme.com, which allowed most iPhone owners to hack their phones in less than 30 seconds. |
|
1.1.2 |
November 12, 2007 saw the official release of Apple’s next firmware version. This update fixed a few “issues”—most notably 1.1.1’s aforementioned .tiff vulnerability. This fix built yet another brick wall in the development community’s path. In addition, unlocked iPhones experienced the same difficulties as they did with the previous update. Despite the inconveniences caused by 1.1.2, the hacking community experienced only a brief hiccup in its progress, because dealing with 1.1.1’s problems had prepared them for just about anything. In the following months, a way was found to preserve jailbreaks performed on a 1.1.1 iPhone and allow them to survive the firmware upgrade process. |
|
1.1.3 |
To kick off the new year, Apple released yet another update on January 15, 2008. As with Versions 1.1.1 and 1.1.2, this new update caused a headache for users with hacked iPhones. Aside from this expected inconvenience, this update added a number of useful new features. |
|
1.1.4 |
Released February 26, 2008, this update added a few subtle things to the 1.1.3 version. The Bluetooth and camera features were slightly improved. Unlike many of the previous firmware versions, 1.1.4 didn’t really cause too much trouble in the iPhone hacking community. Most of the hacks used on previous versions still worked on 1.1.4. |
|
2.0 |
Accompanying the release of the new 3G iPhone on July 11, 2008, this new firmware version added many useful features. One of the most notable was the highly anticipated iTunes App Store, which allowed users to add third-party apps Install Third-Party Apps to their iPhones without having to perform a jailbreak Open Your iPhone or iPod touch to Customization by Jailbreaking. Other features included Microsoft Exchange email support as well as support for Apple’s new MobileMe calendar, contact, and email services. However, this version also basically reset the jailbreaking progress—the hacked Installer.app no longer worked with 2.0, and all the third-party applications written before the Apple SDK no longer ran on this version of the iPhone/iPod operating system. |
|
2.0.1 |
Apple released this update on August 4, 2008. This new update fixed some minor bugs and sped up the software. |
|
2.0.2 |
Apple released this update on August 18, 2008. Like its predecessor, 2.0.2 targeted a number of minor software bugs. |
|
2.1 |
Released September 12, 2008, this release required and was released with iTunes 8. It added features like Genius (automatic smart playlists) and increased speed and stability of applications across the board. |
|
2.2 |
Released November 21, 2008, this added bug fixes, Google Street View, and over-the-air podcast downloads. |
|
2.2.1 |
Released January 27, 2009, this update made Safari more stable, fixed some Mail bugs, and upgraded the firmware to resist YellowSn0w, the 3G unlock application. |
|
03.11.08_G through 03.14.08_G |
These baseband versions were for the most part unnoticed, as they were released before an unlock was reached. It was with 1.0.2/03.14.08_G that SIM-unlocking was achieved. |
|
04.01.13_G |
When this version came, alongside firmware 1.1.1, it disabled many phones that had been unlocked on firmware 1.0.2. Furthermore, this new version added extra dependencies on a portion of the baseband called the seczone, which prior unlocking methods had simply erased to perform the unlock. This change made the hacking community realize that there was more than the iPhone’s firmware version working against them with each update. |
|
04.02.13_G |
Firmware 1.1.2 brought with it another version of the baseband, which disabled unlocks. As time went by, this obstacle was overcome, too. Unfortunately, new-in-box 1.1.2 iPhones with the 4.6 bootloader (Table 1-1) could not be unlocked. |
|
04.03.13_G |
Firmware 1.1.3 added some interesting features, including support for the “locate me” feature in Google Maps (a fairly effective GPS alternative). On new phones, this firmware was combined with bootloader 4.6, creating a double-strength wall against unlocking efforts. |
|
04.04.05_G |
Accompanying 1.1.4 firmware was yet another baseband version. As always, it thwarted unlocking techniques for previous baseband versions. |
|
04.05.04_G |
This new baseband version was designed for first-generation iPhones (which were non-3G) to run alongside firmware Versions 2.0, 2.0.1, and 2.0.2. |
|
01.45.00 |
This was the first baseband version designed to run on the 3G iPhone. It was used only with the 2.0 firmware. |
|
01.48.02 |
Like the Version 01.45.00 baseband update, this version worked only with the 3G iPhone. It was used with firmware Version 2.0.1. |
|
2.04.03 |
Accompanied firmware 2.1. |
|
2.08.01 |
Accompanied firmware 2.0.2 |
|
2.11.07 |
Accompanied firmware 2.1 |
|
2.28.00 |
Accompanied firmware 2.2 |
|
2.30.03 |
Accompanied firmware 2.2.1; disabled YellowSn0w SIM unlock. |
Anxious to update the firmware on your hacked phone to Apple’s latest and greatest release? Just follow these simple guidelines:
Wait before you update the firmware.
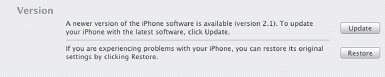
When Apple releases a new firmware version, you should wait to update until you have more information about it. Knowing how the update will affect the hacks that you’ve already done to your iPhone, as well as the hacks you still plan to do, could help you avoid catastrophe. Updating erases any hacks you’ve already performed, which should provide you with plenty of motivation to wait. To help prevent any unwanted updates while you’re still waiting, when iTunes shows you a window like the one shown in Figure 1-5, check the “Do not ask me again” box before you hit Cancel, so that iTunes will leave you alone until you explicitly tell it to update by pressing Update on the iTunes iPhone information screen.
Step back to a previous firmware version.
If you’ve already updated your firmware and can’t get your favorite hacks to work, you can sometimes reverse the update. Read the documentation for your jailbreaking program.
Warning
The ramifications of a misapplied hack are rarely fatal, but some are irreversible and many of them can be difficult and time-consuming to repair. Thus, the method by which you can hack your iPhone is very specifically dictated by the software version currently installed. So, just say “No!” to unsolicited firmware upgrades until the iPhone hacking community says they’re ready. Caveat hax0r.
Open Your iPhone or iPod touch to Customization by Jailbreaking
![]() Free your iPhone or iPod touch from the shackles of its proprietary prison.
Free your iPhone or iPod touch from the shackles of its proprietary prison.
The iPhone is very closed when it comes out of the box. Unlike a personal computer, the filesystem is not designed to be visible to the end user, and end users are not free to install any program they choose. Although it has a number of great built-in applications, and although many third-party applications are available through the App Store, there will always be customizations and new applications that cannot be implemented through Apple’s sanctioned methods. These features are possible only when the iPhone is freed from its shackles, and the process of opening up the iPhone in this way is called jailbreaking.
Why Jailbreak?
Jailbreaking a phone is like logging in as “Administrator” or “root” on a Windows or Unix machine. It gives the user complete control—and of course, complete responsibility if something goes wrong. A jailbroken phone can run any application developed for the iPhone—including badly written applications or even viruses. Your jailbroken iPhone is unprotected and it’s now your job—not Apple’s—to keep it from getting hurt or sick.
When we speak about “hacking an iPhone,” jailbreaking is the basis of most hacks. After jailbreaking, you’ve taken your first step into a larger world.
The benefits of jailbreaking are numerous. Just a few examples are:
Perform system-wide skinning of the phone Skin Your iPhone and Change System Sounds
Run community and third-party applications from outside the App Store Install Third-Party Apps
Run background applications Run Applications in the Background
Run your iPhone as a web server Make Your iPhone or iPod touch a Web Server or file server Mount the iPhone Filesystem on Your Mac with AppleTalk or SSH
Develop iPhone applications on the phone itself Restart Your SpringBoard to Reveal Newly Installed Applications
Carrier-unlock your phone (Chapter 7)
Use your iPhone as a general-purpose computer Use Your iPhone to Go Back in Time
Note
As time goes by and firmware updates come, certain paths to unlocking may be blocked, or new options opened. As such, the procedures listed in this hack may change or become outdated, and your mileage may vary. You can always check forums and the community Get Quality Support with iPhone Hacking to learn the most up-to-date method.
A Brief History of Jailbreaking Applications
Due to unprecedented, fervent passion for the iPhone platform, combined with the opportunity for tremendous profits from unlocking iPhones for use with alternate GSM carriers, there have been a number of competing unlocking applications. Because jailbreaking is the first step of running any third-party software to perform an unlock, most unlocking applications have jailbreak as their primary feature.
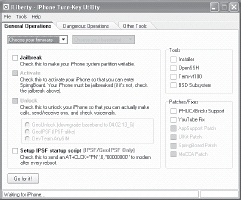
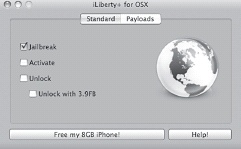
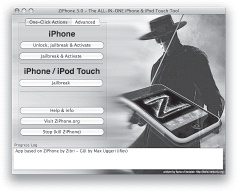
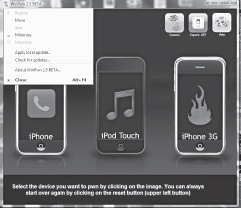
Numerous applications have come and gone in the fast-paced game of one-upmanship that is iPhone hacking. iBrickr, iFuntastic, iLiberty (shown in Figures Figure 1-6 and Figure 1-7), ZiPhone (Figure 1-8), and iPHUC are just a few examples. What may not be obvious to the end user is that each of these applications relied on the same basic code—and cracks—mostly discovered and developed by members of the iPhone Dev Team (http://wikee.iphwn.org) or GeoHot (http://iphonejtag.blogspot.com). Each time Apple released new firmware, they tended to patch all the publicly known cracks, rendering all existing hacking software useless for the new phones and software. Thus, there would be a period of days or weeks when the hacking community would pore over the new firmware, looking for new, unexploited cracks. As soon as they were found, a new version of complex command-line tools and dissertation-length step-by-step tutorials would be posted, showing how to manually jailbreak or unlock the new versions, followed by a slew of cute, end-user-oriented GUI applications to do the same thing.
These applications differed mostly in their fee model (most of the good ones being free), their ease of use, and how well they dealt with the numerous combinations of firmware and software. Also, because some versions of these apps implemented the hacks in an inconsistent or outright buggy way, and because Apple’s own updates would often scramble previously hacked phones into an unstable state, even more features had to be developed to repair these ravages.
Through these applications, perhaps millions of people have had their 1.x.x firmware phones successfully hacked and their phones unlocked. However, there were still problems:
People who unlocked their phones—for instance, to run them on T-Mobile in the United States—were generally stuck on the firmware version they had upon unlocking (such as 1.1.1), afraid to mess up their unlock through further hacking.
People would blindly update their phones when iTunes suggested it and wind up with temporarily “bricked” phones—and would swear off hacking because of the bad experience.
People got tired of erasing their phone over and over and having to wait every time Apple released new firmware.
Many of these programs, in their race to market, were buggy, and unwittingly performed (at the time) irreversible changes, such as changing bootloaders.
Some of the programs might have contained copyrighted software not owned by the authors. Although this rarely deterred end users, who knew they were in a sort of a digital “back alley” anyway, it violated the spirit of the iPhone hacking community, who were trying to use completely legitimate, legal, and moral means to hack the iPhone.
For a while, iLiberty and ZiPhone were all the rage, and these applications—though effective for the vast majority of users—left a few casualties in their wake. Specifically, ZiPhone downgraded the firmware on phones in such a way that it was difficult to “virginize” them Enter DFU Mode if they needed to be taken to an Apple store for hardware warranty service. And a major blow was dealt to the first-generation unlocking applications when Apple released its 2.0 firmware and its own App Store, replacing (and for a while, effectively disabling) the popular 1.x firmware Installer.app store. As usual, there was no immediately effective jailbreak for the new firmware.
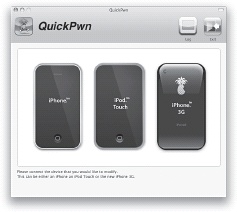
However, a culmination of efforts by the iPhone dev team came up with an elegant, consistent, and very stable solution to both 2.x firmware jailbreaking and unlocking. By consolidating all the still-working exploits from the 1.x era, and adding a discovered exploit that could not be disabled by any Apple software patch, the Pwnage (expert) and QuickPwn (quick and easy) applications were created. Part of their elegance lies in how they do not directly jailbreak the phone. Rather, they patch Apple’s own firmware packages—adding jailbreaking and unlocking code as needed—and then the user simply patches their phone using iTunes.
Note
As of this writing, these programs are the best way to jailbreak an iPhone. To learn about the latest methods, you can follow developments in the hacking community Get Quality Support with iPhone Hacking.
Jailbreaking with Pwnage and QuickPwn
Developed by or in coordination with the iPhone dev team, Pwnage can be downloaded from http://wikee.iphwn.org or http://blog.iphone-dev.org. Both Mac (Figure 1-9), and Windows (Figure 1-10) versions are available. Along with the Pwnage tool, you’ll need to download the correct restore image for your phone and the appropriate bootloader files—but Pwnage will assist you with this.
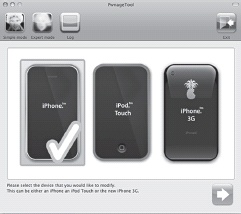
Select your device, then select the firmware (.ipsw file) that you (or Pwnage) downloaded. For both platforms, select the appropriate bootloader files when prompted. For first-generation iPhones, these files will be called BL-39.bin and BL-46.bin, and can be found through a Google search on the iPhone. Once you have selected all the options you want, build your custom .ipsw. If you’re also unlocking, be sure to choose “NO” when Pwnage asks if you are a legit user, make sure that the options Activate Phone, Enable Baseband Update, Neuter Bootloader, Unlock Baseband, and Autodelete Bootneuter.app are all checked. If you’ve already unlocked your phone, you shouldn’t have to unlock it again, but it also won’t hurt anything if you do. Once your custom .ipsw file has been built, you’re almost done! If you’re running winpwn, go back to the main screen and click “iPwner,” then select the custom .ipsw file that you just built. On both systems, you will need to enter DFU mode at this point Enter DFU Mode to allow iTunes to install the .ipsw file on your phone. Once again, the application will guide you through this process.
Launch iTunes. If you’re on Mac OS X, hold down the Option key while you press the Restore button in iTunes. On Windows, hold down the Shift key as you click Restore. Select the custom .ipsw file that you made, and wait for the restore to finish. Congratulations—you’re done!
Pwnage has a number of conditional steps—and uses iTunes to do the deed. If you want an even simpler jailbreaking experience and you have a fresh iPhone with no complicated prehacking history, then QuickPwn (Figure 1-11) is a good choice (www.quickpwn.com).
Jailbreaking the Latest Firmware
With your iPhone jailbroken, you are now free to manipulate it as you see fit. Or, as iFuntastic says, to make your iPhone your iPhone.
Apple’s intent to lock down its phone is strong. But an army of curious hackers seems to be able to keep finding exploits that give it control over the iPhone. Because any code made by man can be broken by man, and because software is very complex and always seems to have some bugs in it, it stands to reason that any new firmware will eventually be broken.
When no exploits could be easily found for later firmware versions, a clever approach was found—simply roll back the version. Apple then patched the firmware so that users couldn’t roll back the firmware—at least, not yet. So even if at some point in the future, it seems that all hope is lost for software jailbreaking methods, it’s probably just a matter of time before the hack is found. And if the iPhone ever gets really, really impenetrably secure, there’s always the hardware approach—such as the famous hardware hack by GeoHot (http://iphonejtag.blogspot.com/2007_08_01_archive.html) and methods derived from it.
The iPhone dev team has been the most consistent and reliable force for responsible iPhone hacking since the iPhone’s release, so before you download a payware application from some glossy site, seek out the iPhone dev team sites http://wikee.iphwn.org and http://blog.iphone-dev.org to see what they have to say.
Install Third-Party Apps
![]() Open your iPhone to a whole new world of applications!
Open your iPhone to a whole new world of applications!
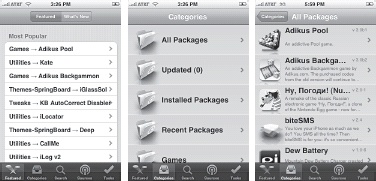
Although Apple’s App Store is certainly the easiest out-of-the-box way to get new applications, things weren’t always this easy. In the beginning, there were no third-party applications. Then there were ways to copy applications manually to the iPhone over SSH/SCP, SMB, or AppleTalk. A format called "PXL” (Package and eXtension Library) for downloading applications through web downloads briefly appeared and then fell into disuse. But then the company NullRiver brought out Installer.app (Figure 1-12). This application—which set an example for Apple to follow—allowed for incredibly easy discovery and instant installation of new programs. The best part about it is that it runs directly from your iPhone and downloads new applications over Wi-Fi or EDGE, which is great for people who are always on the go and don’t always have access to a computer. iPod touch owners could use Installer.app as well via Wi-Fi.
Enter Installer.app
Since its introduction shortly after the iPhone’s initial release, Installer.app has become the most popular way to install third-party apps and utilities. Thousands of third-party applications existed before Apple had even announced their App Store efforts. And for those original iPhone users still running a pre-2.0 firmware, Installer.app is still their only source of applications.
When Apple’s 2.0 firmware came out—in conjunction with the App Store and around the time of the iPhone 3G—most of the third-party “toolchain” applications would not work on the new firmware. This was not so much an intentional result from Apple, but simply the side effect of Apple completely revising its SDK. (The same thing happens with new versions of Mac OS X or Windows; the tools to develop software changes frequently.) But none of the applications on Installer.app had a polite “Sorry, I don’t support the 2.0 firmware” message and thus there was general confusion.
The Install tab takes lists of apps from various privately operated sources and sorts them into a list that you can choose from. From the Install screen, tap an app to get a basic description of the app. On this page there is also an Install button, which will download and install this package on your iPhone, and a More Info button, which sends you to a website with more information on the app.
After you install a package, if it’s an application, it will simply appear on your home screen, and if it’s something else, like a skin pack or theme or ringtone, it should appear in the appropriate place. If not, try restarting your iPhone.
The Update tab shows whether there are any newer versions of apps that you have already installed through Installer.app. If there are, you can read about them and install them through the same procedure for installing apps.
The Uninstall tab shows all of the packages that you’ve installed through Installer.app. Selecting one and tapping “Uninstall” will get rid of it.
The Sources tab shows where your list of packages is coming from. You can tap any of the sources to get more information about them, including contact information for the maintainer. You can get additional sources through packages in the Install tab.
Nonetheless, when the 2.0 firmware was released, and people started to port their 1.x toolchain applications to the 2.0 SDK, NullRiver came out with a new version of Installer and that version remains the de facto Installer solution for third-party application installation on jailbroken phones.
Enter Cydia
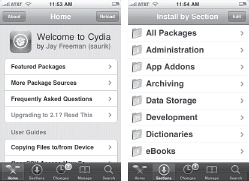
There were several major critiques of the NullRiver Installer application. First and foremost was that it was closed source and operated by a private company—thus, whenever it had trouble there was little recourse (of course Apple’s App Store is also closed source and proprietary, but they also happen to make the iPhone, so there’s some chance that they’ll be responsive to change requests). And one of the noted problems was the immature installer/uninstaller management provided in NullRiver’s Installer. Thus, Jay Freeman (known online as saurik) ported APT, the extremely well-supported open source package manager from Debian Linux. The project is here: www.telesphoreo.org. Cydia is a GUI front end for the Telesphoreo port of APT created by saurik.
To quote the author: “In order to provide some relief for these issues, I have decided to start a project called Telesphoreo with the goal of creating a distribution of GNU and BSD’s userspace for the iPhone as a collaborative, open source project. The name is an ancient Greek word meaning “to bring fruit to perfection or maturity,” which I feel is what needs to be done to Apple’s product: it’s passable as a phone, but as a portable workstation it is almost unmatched…with the right software.”
The Cydia application, shown in Figure 1-13, accesses these new, well-documented installation sources, and has become the alternative to Installer.app for application installation; many of the same applications are available from both Cydia and Installer.app (Figure 1-14).
Repositories
Both Installer.app and Cydia share the concept of repositories, which are additional sources of programs. Apple’s App Store can be considered one large repository—there’s only the App Store, and only Apple can decide whether a program goes on the list. In contrast, Installer and Cydia allow you to add any sources you want. Some companies that provide a number of iPhone applications maintain their own sources. More often, developers submit their applications to another popular repository. If you develop your own iPhone applications, you may want to create your own source repository.
A repository is included by adding its URL, such as "http://installer.iclarified.com“, to the sources page, as shown in Figures Figure 1-15 and Figure 1-16.

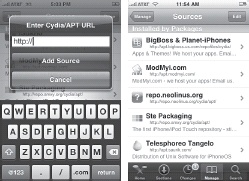
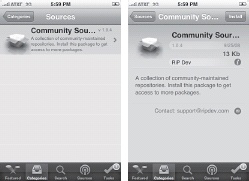
You can also install additional repositories by searching for them in the Sources category, which in turn will add them to the source list. For instance, to get a larger selection of applications to chose from, locate Community Sources in the Community section of the list and install it. With Community Sources installed, the list of applications becomes much longer, offering you more choices to customize your iPhone. Figure 1-17 shows the procedure.
Trusting Sources
Two reasons Apple has carefully controlled the App Store—besides any financial, business, and brand protection reasons—are quality control and trust. By vetting applications and ensuring that they look good, work well, and have no viruses, spyware, or unrevealed side effects, Apple provides a meaningful service.
It’s important to note that by jailbreaking your phone and then running Installer or Cydia, you’re leaving the walled garden of the Apple App Store, and entering a large and potentially—but not usually—cruel world. However, people download and install applications all the time for Windows, Mac OS X, and Unix platforms, and intelligent users generally know how to detect bad software. So if an application—or app source—seems fishy, ask around before you install it on your phone.
You’re not on completely your own, as there is a lively community that may be able to help you. And the more you participate, the larger that community becomes Get Quality Support with iPhone Hacking.
Manipulate Your iPhone’s Filesystem
![]() Now that your iPhone or iPod touch has been jailbroken and freed from the shackles of conformity Open Your iPhone or iPod touch to Customization by Jailbreaking, it’s time to learn how to navigate the files and folders of its file directory. Being able to find your way around the iPhone’s filesystem is absolutely mandatory for mastering the full customization capability of your iPhone or iPod touch.
Now that your iPhone or iPod touch has been jailbroken and freed from the shackles of conformity Open Your iPhone or iPod touch to Customization by Jailbreaking, it’s time to learn how to navigate the files and folders of its file directory. Being able to find your way around the iPhone’s filesystem is absolutely mandatory for mastering the full customization capability of your iPhone or iPod touch.
If you’re familiar with the hierarchical storage system on hard drives, where files are sorted into nested containers called folders or directories, then you’ll find that underneath the glossy user interface, the iPhone is no different. And if you’re familiar with the directory structure of Unix-like operating systems such as Linux, BSD, and Mac OS X, you’ll have an even better sense of where things are stored on the iPhone.
There are as many ways to look at iPhone files as there are ways to access any computer. Depending on what server software you install on the iPhone, you can use FTP, HTTP, AFP (Apple file sharing), or techniques like the Unix SCP (secure copy protocol). But most of these techniques use the wireless network connection on the iPhone. But if you want to move files the quickest, you can use a copy utility that works over the iPhone’s USB connection.
The first step of familiarizing yourself with the file directory is to get good browsing software for your computer. DiskAid is an excellent choice. The user-friendly interface of this program makes it perfect for beginners. Yet the ability to modify files and folders in the iPhone’s file directory makes this same program highly useful for even the most advanced hackers as well.
Access iPhone Files from Your Computer
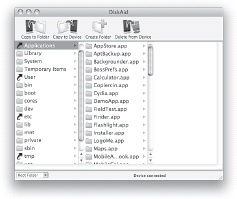
As mentioned earlier, the ideal file-management software for both Mac and PC is DiskAid, available from www.digidna.net/diskaid. It’s free, and it can be used with or without jailbreaking. Once your file-management software has been installed, start it up while the iPhone is connected to your computer. Figure 1-18 shows the interface of DiskAid. Once the software is loaded, you’ll see the basic, “safe” media directory. The drop-down menu in the lower left will allow you to access the root directory, which has the guts of the device.
Understand the Hierarchy
Try opening up each folder and taking a look around. However, be careful not to modify any of the files until you know what they are, as you could do unnecessary damage to your phone. Of the folders, the main ones to spend some time browsing through are Applications, System, and /var/mobile. Remember that your root directory, /, is the origin of the main folders.
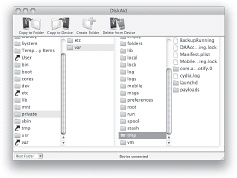
An important lesson in iPhone file directory browsing is to understand folder path addresses. When you see the phrase /private/var/tmp, it will help you to know that this phrase actually means to look in your / (root) directory for the private folder. Once you find the private folder, open it to be greeted by another group of folders. Look down this list to find the var folder, and open it up to see even more folders. Look through this new list to find the tmp folder, and open it. You’ve now arrived at your destination, as in Figure 1-19. All the mysterious phrase /private/var/tmp was trying to say was to just look inside the tmp folder by following the path from /private, through var, and into tmp.
Also note that in Unix, there is a feature called “symbolic links,” which is similar to aliases on Mac OS X or shortcuts on Windows. On Unix filesystems you can refer to the folder by any of its symbolic links, so /private/var and /var are effectively synonymous. In DiskAid these are symbolized by the “curved arrow” icon for directories.
Here are some brief explanations for each of the main folders in the Home or (root) directory.
- /
This “slash” symbolizes the top of your filesystem, the root directory, simply called "root.” Pathnames (folder/directory paths) are symbolized with this forward slash, such as /var/mobile.
- Applications
Contains—you guessed it—applications. In addition to the stock iPhone applications, some of the third-party applications that you may install will be placed in this folder. This is where you’ll typically go for such things as customizing application icons or even modifying the program code. User-installed applications from the App Store will be installed in /var/mobile/Applications/.
- Library
Contains various preferences and frameworks, as well as the ringtone and wallpaper folders.
- System
This is where a lot of the Mobile OS X system files can be found. The programs that customize your phone with custom graphics, carrier logos, and skins change many graphics files in this folder.
- bin
bin is short for binary, meaning simply a program you can run, usually command-line based. On an iPhone, you’ll find the various essential shell utilities and command-line programs here.
- cores
This is where core dumps are stored. When a program crashes, the OS sometimes writes a file to disk showing the memory state of the program just before it crashed, for the purposes of debugging.
- dev
dev stands for device. In Unix, almost everything is treated as a file from the programmer’s perspective—the hard disk, network cards, and Bluetooth can all be accessed with files such as /dev/disk0.
- etc
A shortcut to /private/etc, the etc directory is traditionally where configuration files—the text files that define settings for programs—are stored.
- private
Contains a lot of important files, including music, photos, and some email data.
- sbin
This is the place for superuser binaries—programs for system administration.
- tmp
The tmp directory is where temporary files used by programs are written. The expectation is that the contents of this directory are frequently deleted, like a “trash can.”
- usr
usr is intended to be for shareable, read-only data. Folders such as /usr/sbin and /usr/bin contain additional commands, and /usr/lib contains libraries of software code shared by the whole system.
- var
A shortcut to /private/var, var stands for variable and is intended to contain variable data, such as logs, news, mail spool files and so on, which is constantly being modified by various programs running on your system. On the iPhone, it also happens to be the directory that contains much user data, originally in the /var/root directory but now stored in the /var/mobile directory.
- /var/mobile
A lot of the iPhone user’s personal data is stored here, including music, pictures, and more.
- /var/root
Prior to firmware 1.1.3, user data was stored here. It has moved to /var/mobile.
As you gain more experience navigating through your directory, you can begin using the other main ability offered by your browser software: modification of files and folders. DiskAid allows you to add, replace, or delete any file or folder in your directory. These abilities open your iPhone up to an all-new breed of customization options, from changing icons and backgrounds Skin Your iPhone and Change System Sounds to modifying the files that an application is based on.
Browse Your iPhone Directory on the iPhone Itself
Because your iPhone is probably with you far more than your personal computer, you will probably want to be able to access the filesystem on the go. There are a few utilities that make this easy as well.
MobileFinder
You can find MobileFinder in Cydia. Once installed, you’ll see the icon for MobileFinder on your SpringBoard. Just tap it to start the application (Figure 1-20). Once the application starts, you’ll be greeted by a screen like that in Figure 1-21.
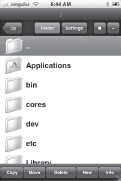
MobileFinder has started you at your root directory. To open a folder, just tap it. If you need to go back to the previous list of folders, just hit the Up button at the top left of the screen. MobileFinder displays the folder you’re currently in at the top of the screen to help prevent you from getting lost. These convenient features can be seen in Figure 1-22.
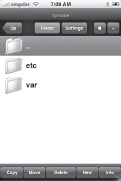
If you ever find yourself lost in a sea of folders, and wish to return to the root directory, just repeatedly press the Up button at the top left of the screen until you get back. Alternatively, you can press the folder icon with trailing dots at the top of the folder list, which serves the same function as the Up button.
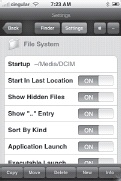
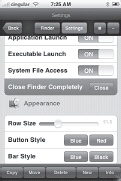
To customize your MobileFinder experience, press the Settings button at the top of the screen. You’ll be able to change numerous attributes affecting the file directory and its appearance, as shown in Figures Figure 1-23 and Figure 1-24. When you are done with the Settings screen, press the Finder button to resume browsing.
The bottom five buttons on the MobileFinder screen help you with file operations: you can copy, move, and delete files with the three buttons on the left. The New button creates a new file, folder, or bookmark. The Info button provides any available information about a selected file. In addition to modifying files, MobileFinder can launch applications. Just tap an Application, and it will launch.
Although MobileFinder may not be as easy to use as DiskAid, it makes up for this by eliminating the need for a computer to do this type of work. For more information about MobileFinder, simply read the release notes for the app in Cydia. Note that there’s a version of MobileFinder on the App Store—but it lacks the features of the jailbroken version.
Mobile Safari
Did you know that most web browsers can also be used to browse your filesystem? For example, if you type File:///C:/ into Windows Explorer on a PC, you can browse your hard drive.
Unfortunately, this behavior is stripped out of Mobile Safari, but you can set up a web server on the device to solve the problem.
On a jailbroken device, install lighttpd Make Your iPhone or iPod touch a Web Server. Also, make sure that OpenSSH is installed (preferably with Cydia).
Once lighttpd is installed, you’ll need to create a configuration file before it will run. SSH to your phone Connect to Your iPhone with a Secure Shell (SSH) Terminal Program. Navigate to /etc and type nano lighttpd.conf, then press Enter. This step opens up a new file in the nano editor.
Enter the following lines:
dir-listing.activate = "enable"
server.document-root = "/"
The document root in the second line, inside the quotes, can be any directory you want. We’re using "/" or the root directory, so that everything on the phone can be viewed. There are plenty of other options that you can set for your web server as well. We’ll just add one more for security:
server.bind = "127.0.0.1"
This line makes sure that only the phone browser can view our files. You can also add your home network prefix to allow other computers on your network to see the files, or you can leave the line out altogether.
To start up your web server, type lighttpd -f /etc/lighttpd.conf and make sure that there are no error messages. Go to Safari, and navigate to localhost or 127.0.0.1 (Figure 1-25).
Now you can browse the files on your iPhone! This hack has the added benefit that any file that Mobile Safari can handle—such as audio/video files, PDFs, and so on—can be accessed and viewed.
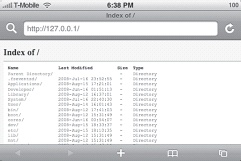
There are thousands of files on your iPhone that might hold the key to the hack you wish to accomplish, so getting to know your filesystem is a good first step.
Back Up Your iPhone’s Files
You’ll kick yourself later if you don’t!
Your iPhone most likely contains valuable information that would be tragic to lose. In fact, many people rarely connect their iPhones—or iPods, for that matter—to their computer—once they do the initial load of contacts, music, and pictures. Plus, with the iPhone’s own 3G/Wi-Fi connectivity, integrated iTunes and App Store, and now, push email features, there’s almost no reason to plug the iPhone back into the computer.
Except for one reason: backups.
Unlike in a corporate IT environment, you probably don’t have a system administrator backing up your phone each night. And if you’re like millions of iPhone users, your techie friend helped you unlock it so that you could use T-Mobile about six months ago and you’ve been afraid to mess with it, but you want to make sure you don’t lose your chat history and your pictures.
The moral of this story is this: it’s never too late to back up.
Actually, that’s wrong! It’s often too late to back up. So keep reading.
There are several major ways to back up the files on your iPhone:
- iTunes
Apple provides a thorough backup procedure for all the Apple-sanctioned features of your phone. However, it’s currently an all-or-nothing proposition: there’s no way to selectively back up certain features more frequently, so you often have to wait several minutes for it to go through all its different backups. And if the sync fails or stops working for any reason, you may think that you’ve backed up when you haven’t.
- The cloud
With Apple’s new push email and push contacts, you really won’t have to worry about losing any important emails, calendars, or contacts. (Getting duplicate entries might be a new problem, however.) And simply by using Exchange, or Gmail, or any IMAP-based email server, you’ll ensure that your email stays unharmed in the event of iPhone damage or replacement.
- Manual copies
On a jailbroken phone, you can browse the filesystem Manipulate Your iPhone’s Filesystem and copy the most important files back.
You can easily back up your files on your computer using iTunes so that if disaster strikes, all will not be lost. The problem is, what do you back up? The simplest solution is everything—but just like a full PC or Mac backup, you’ll still need an expert to help you sift through those 16 MB of who-knows-what to find the exact file you need to get your chat logs or address book back.
Fortunately, there are solutions to most of these problems. We’ll detail them here.
Strategy 1: Use iTunes
The simplest solution for any phone, jailbroken or not, is to back it up with iTunes. The bacon-saving feature of iTunes allows you to protect all these files:
Text messages
Notes
Call history
Contact favorites
Sound settings
Widget settings
Certain network settings
App Store settings
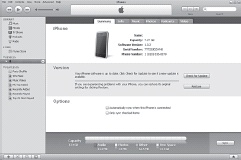
To back up your files, first start iTunes with your iPhone connected to your computer. From the Devices section, click on your iPhone so that it’s highlighted and its information is displayed in the main iTunes pane, as shown in Figure 1-26. Finally, click the sync button at the bottom right of the iTunes window. Your files will be backed up on your computer.
Note
Technically, syncing and backing up are not the same, but if you sync the iPhone, it will also back it up. The Apple article at http://support.apple.com/kb/HT1766 explains the difference. Basically, a full sync or an update will trigger a backup. During a restore, you’ll be offered the chance to back up the iPhone as well.
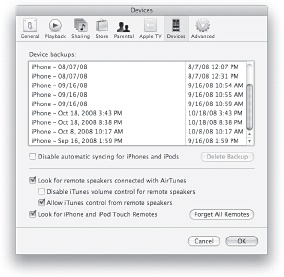
To verify that files have been backed up on your computer (or just to find the date on which it was last backed up), go to the iTunes Preferences menu. After the Preferences window appears, click on the Devices tab. You’ll see your iPhone’s preferences, as shown in Figure 1-27. On the Devices tab, locate your iPhone in the box that says “The following iPhones are backed up on this computer.” The date on the right is the last time it was backed up.
To set iTunes so that it will back up your iPhone every time you connect it to your computer, just check the box next to “Automatically sync when this iPhone is connected” in the Options section at the bottom of the iTunes window. Now, whenever you start iTunes with your iPhone connected to your computer, it will automatically sync and back up your files. (However, if your phone is jailbroken, make sure that you choose “No” when it offers you a firmware update.)
Backing up your important iPhone files on your computer will save you a great deal of frustration if you ever have to restore your iPhone Restore and Recover Your iPhone. With the simplicity of iTunes syncing function to back up your files, you’ll be up and running much more quickly with your global iPhone settings fundamentally intact.
On the Mac, these backups are actually stored in ~/Library/Application Support/MobileSync/Backup/ (where ~ is your home directory: /Users/you). Erica Sadun has created an extremely useful command-line program called mdhelper (available from http://ericasadun.com/ftp/Macintosh/mdhelper-universal.zip) that can be used to crack open these backups and get the goodies out of them. Sometimes, for a variety of reasons, iTunes doesn’t offer you to restore your iPhone to an earlier backup, or you want only part of the backup. With mdhelper, you can extract just the parts you need. To use it, run Applications→Utilities→Terminal and change to the directory where mdhelper resides. Run it using this command:
./mdhelper
and you’ll get these options:
Usage: mdhelper options
-h        Print this message and exit
-d        Show the backup directory
-l        List contents for each platform
-L        List the summary for each platform
-f        List all files and mdbackup names for each platform
-m        Extract all available manifests
-X phrase Extract all files where the device name starts with the match phrase
-C phrase Extract all files containing the phrase in the original filename
-M phrase Extract all mdbackups whose name contains the match phrase
-x files  Extract each mdbackup file listed by path
Here are some example usages. To extract databases for SMS (to be placed back in /var/mobile/Library/SMS/sms.db) and notes (/var/mobile/Library/Notes):
./mdhelper -C sms.db
The following commands extracts all the property lists, which contain bookmarks (/var/mobile/Library/Safari/Bookmarks.plist) and map bookmarks.
./mdhelper -C .plist
The following command extracts SQLite databases, which contain Address Book (/var/mobile/Library/AddressBook/AddressBook.sqlitedb) and Calendar (/var/mobile/Library/Calendar/Calendar.sqlitedb) data:
./mdhelper -C .sqlitedb
There are dozens of other settings; if you explore /var/mobile and /var/mobile/Library, you should be able to see what is what.
Strategy 2: Use the Cloud
There are several core features—namely email, contacts, and calendars—that have been pushed into what is called “the cloud.” The cloud is a cute way of describing servers that are somewhere on the Internet. If you’re using Gmail or another IMAP-based email server, or Exchange, you’re already using the cloud. Thus, if you (gasp) had to get a new iPhone, your email would be intact—it’s not only on the iPhone—it’s also on a remote server.
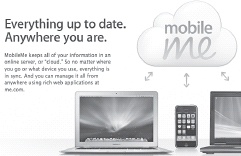
Another feature with cloud data storage is the push feature. With push, changes made on the Web or on computers to calendars, contacts, and email are instantly pushed over the EDGE or 3G or Wi-Fi Internet connection to your iPhone. This feature ensures that there is a copy of all this data securely stored on Apple’s servers, as well as on your Phone, and probably on your computers that are syncing to MobileMe as well (Figure 1-28).
Many of the iPhone applications that accessorize existing online services—eBay, Amazon, PayPal, WordPress, Jott—rely on accounts that you already have online. So saving data to the cloud is built into these applications, and all you need to do to get running on a new phone is reinstall the applications and reenter your login information.
Turn Command-Line Scripts into iPhone Apps and Create Periodic Tasks that Run in the Background show you how you can create scripts and applications to back up anything not covered here to the cloud.
Strategy 3: Manually Back Up
Some files can be manually backed up with no jailbreaking funny business. For instance, the iPhone shows up in Windows and on the Mac as a digital camera, in addition to being a phone.
Photos
To back up photos, you can simply drag the pictures off the phone on Windows or slurp them off using iPhoto or Image Capture on the Mac. If you leave them on the iPhone or iPod touch (assuming that you have room) then you’ll have two copies—one on the computer, one on the device—and thus you’ll have options if one or the other of those machines eventually crashes.
Music and photos
But what if, Jobs forbid, you should lose your desktop computer, and some of your movies, music, and photos are now only on your iPhone or iPod touch? If you’ve jailbroken it, you should have no problem pulling them out of /var/mobile/Media using Manipulate Your iPhone’s Filesystem.
Desktop files
Now that your iPhone has become your primary computer, and your desktop is falling into disuse, you’d better back up your critical files onto your phone. An App Store application called Air Sharing makes this easy and smooth, even if you haven’t jailbroken your phone. If you have a Mac see Mount the iPhone Filesystem on Your Mac with AppleTalk or SSH to learn how to mount the iPhone filesystem using AppleTalk or SSH.
App Store applications
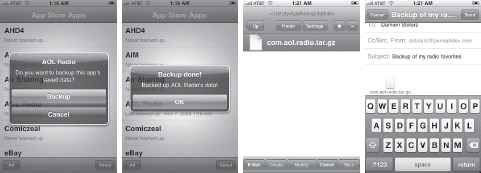
Even if you use App Store applications, you may not sync to iTunes that frequently. And if you’re concerned that iTunes isn’t backing up some really important data for you, or you want to make a backup on a different computer, then AppBackup (www.scott-wallace.net/iphone/appbackup) is for you. Ironically, AppBackup requires jailbreaking, even though its purpose is to back up App Store apps. Each App Store app has its own sandbox, a private file area where its data is stored. AppBackup can zip up these data files—on an app-by-app basis, or for all applications—and then store them in /var/mobile/Library/AppBackup/tarballs (Figure 1-29). You can find AppBackup on Cydia, under Utilities, in the “BigBoss” repository.
If you use MobileFinder Manipulate Your iPhone’s Filesystem, you can actually back up all the app data without using a computer. Navigate to the /var/mobile/Library/AppBackup/tarballs folder and click Send→E-Mail. Then send the file to yourself—you now have an online backup of that data. To restore it later, copy the file back into the same directory, run AppBackup, and restore.
Jailbroken applications
Sometimes the data that you want to back up just isn’t backed up by iTunes or the cloud, and you’re going to have to go hunting for it. For instance, a fantastic application by saurik called Cycorder Record and Upload Videos with Your iPhone allows you to record great, high-quality video on your iPhone. Unfortunately, the files aren’t automatically backed up by iPhoto or iTunes. Luckily, the video is stored in /var/mobile/Media/Videos. Using any of the techniques in Manipulate Your iPhone’s Filesystem or Mount the iPhone Filesystem on Your Mac with AppleTalk or SSH, you can copy these files to your desktop, or email them to yourself one by one using MobileFinder.
Fortunately, many jailbroken applications do sensible things, such as storing user data in /var/mobile, like many of Apple’s native applications do. Thus, a full backup of the /var/mobile directory may not capture every custom setting and all user data on the phone, but it will get most of it.
Note
Each time you upgrade the firmware on your jailbroken iPhone, you have to reinstall all your applications. Back Up Your Jailbroken Apps shows how to back up those applications as well.
If you have an iPhone with numerous App Store and jailbroken applications and lots of custom data, you owe it to yourself to back them up.
Get iPhone Hacks now with the O’Reilly learning platform.
O’Reilly members experience books, live events, courses curated by job role, and more from O’Reilly and nearly 200 top publishers.

