A Smart Object is a very special, container-like layer into which you can plop all kinds of stuff, such as raw files (Working with Raw Files), vectors (drawings) from programs like Adobe Illustrator (Chapter 14), other layers, and even whole PSD files. Smart Objects are smart because Photoshop protects what you put into them by applying your edits to the container instead of what’s inside of the container. This lets you do the following:
Transform or resize it without losing quality. Instead of resizing the instance (a copy) of the content that you inserted into your document, Photoshop remembers info about the original, resizes that, and then places that information back into your image (without altering the original file). In the blink of an eye, Photoshop updates your document with the newly resized content without making it look blocky (so long as you don’t exceed the file’s original dimensions too much—unless it’s vector-based, of course). You can also use the full range of transform tools (Simple Rotations) on Smart Objects.
Compress a bunch of layers into a single layer nondestructively. Unlike merging layers (Merging Layers), converting several layers into a single Smart Object preserves the original layers. This ability is super helpful if you want to edit several layers as if they were one, which is great for masking several layers at once, applying filters to a composite image, applying layer styles (Layer Styles), or using tools that work on only one layer at a time.
Run filters nondestructively. When you run a filter on a Smart Object, Photoshop automatically adds a mask to the Smart Object (labeled in Figure 4-34), plus the filtering happens on its own layer (similar to layer styles) so you can tweak, hide, or undo the filter’s effects. See The Joy of Smart Filters to learn how to run filters on Smart Objects (and in Photoshop CC, more filters are Smart Object–happy than ever before).
Update multiple instances of the same content. When you duplicate a Smart Object, the duplicate is linked to the original so it functions like an exact clone. So, for example, if you’ve placed the same content in several places in your document—like a large version of a logo, shape, or image in one spot and a smaller version of it somewhere else—and you make changes to the original Smart Object in Photoshop or you edit the contents of the original Smart Object in another program (like Camera Raw or Illustrator), Photoshop automatically updates that content wherever it appears in your document.
Swap content. Once you’ve formatted a Smart Object just right, you can swap its contents for another image, and the new image takes on the original’s attributes. This content swapping is powerful magic when it comes to making creative templates that you can use over and over with different images (photographers love this kind of thing). Figure 4-34 has the details.
For designers, the ability to swap content is helpful when you’ve got several pieces of art that need to be placed at the same size within a design (think multiple album covers in a concert ad or book covers in an author-signing event poster). You can swap the contents of one Smart Object without changing the others by creating an unlinked copy, as explained on Managing Smart Objects.
Note
Smart Objects are especially useful when you’re working with raw files because you can double-click them in Photoshop to open them in Camera Raw (Correcting Images in Camera Raw). However, placing multiple Smart Objects in a single document—especially one that contains raw files—will bloat your file’s size in a hurry and could cause Photoshop to run out of memory and run…as fast…as molasses.
The following sections teach you how to create and manage Smart Objects.
How you create a Smart Object depends on two things: where the original content lives and which document you want to put it in. Here are your options:
To create a new document containing a file that lives on your hard drive, choose File→“Open as Smart Object.” In the resulting Open dialog box, navigate to the file and then click Open to make Photoshop create a new document containing a single Smart Object (without a Background layer). The image you’ve opened appears at its original size, and you’ll see the Smart Object badge on its layer thumbnail (circled in Figure 4-34).
Tip
You can Shift-click multiple files in the Open dialog box to open more than one file as a Smart Object. Each file opens as its own document with a single Smart Object layer.
Figure 4-34. You can create some pretty amazing templates using Smart Objects. Just open an image as a Smart Object (as described later in this section) and then make all the changes you want, like giving it a sepia tint, adding a dark-edge vignette, and sharpening it, as shown here. The little badge at the bottom right of the layer thumbnail (circled) indicates that the layer is a Smart Object. Then, to swap the original photo for another one, activate the Smart Object layer and then choose Layer→Smart Objects→Replace Contents (or Control-click [right-click] near the layer’s corner in the Layers panel name and choose Replace Contents from the resulting shortcut menu). Navigate to another photo on your hard drive, click Open, and it’ll take on the same characteristics automatically! Thank ya, thank ya very much.
To import a file into a document that’s currently open, choose File→Place. You get the same Open dialog box so you can navigate to the file, but this time the file opens as a Smart Object inside the current document, and Photoshop also puts little handles around the object so you can resize it. When you press Return (Enter on a PC) to accept the object, you’ll see the Smart Object badge appear on the new layer’s thumbnail. Unfortunately, you can’t place multiple files using this command though you can do that using the Mini Bridge panel, as shown on Using Mini Bridge. (In CC, Mini Bridge is installed separately from Photoshop; see Chapter 23 for more.)
Note
Photoshop includes a preference setting that makes the program automatically open dragged or placed files as Smart Objects (see Opening Multiple Files within a Single Document). This setting is turned on initially, and it’s the only way to roll. If you’ve got a document open, the Smart Object appears on a new layer inside that document; if you don’t, it opens as a Smart Object in a new document.
Copy and paste an Adobe Illustrator file. If you copy Illustrator art into your computer’s memory, you can paste it into an open Photoshop document using ⌘-V (Ctrl+V). Photoshop will then ask whether you want to paste it as a Smart Object, pixels, path, or Shape layer (the last three are covered in Chapter 14).
In Bridge, choose File→Place→In Photoshop. If you’re using Bridge to peruse files, this command pops ’em open as Smart Objects in Photoshop (see Chapter 23 for more on Bridge).
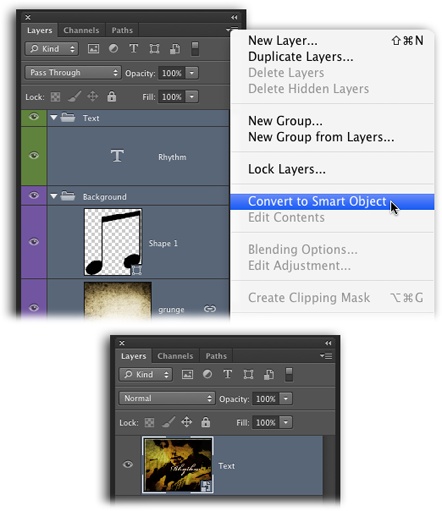
To turn existing layers into a Smart Object in the current document, activate the layer(s) and then choose “Convert to Smart Object” from the Layers panel’s menu. If you’re working with an image that has a bunch of Adjustment layers associated with it (to change stuff like color and lighting), you can use this command to group the whole mess into a single Smart Object. That way, you can apply additional changes to all those layers at once with tools that work only on individual layers (like filters and layer styles). Figure 4-35 has the details.
![You can create some pretty amazing templates using Smart Objects. Just open an image as a Smart Object (as described later in this section) and then make all the changes you want, like giving it a sepia tint, adding a dark-edge vignette, and sharpening it, as shown here. The little badge at the bottom right of the layer thumbnail (circled) indicates that the layer is a Smart Object.Then, to swap the original photo for another one, activate the Smart Object layer and then choose Layer→Smart Objects→Replace Contents (or Control-click [right-click] near the layer’s corner in the Layers panel name and choose Replace Contents from the resulting shortcut menu). Navigate to another photo on your hard drive, click Open, and it’ll take on the same characteristics automatically!Thank ya, thank ya very much.](/api/v2/epubs/9781449342401/files/httpatomoreillycomsourceoreillyimages2073315.png.jpg)
Note
You can add a mask to Smart Objects just like you can to any other layer. Photoshop automatically links the mask to the layer so you can move ’em around together. To unlink them, just click the little chain icon between their thumbnails in the Layers panel. (See the box on Unlinking a Layer from Its Mask for more on linked masks.)
Once you’ve created a Smart Object, you can duplicate it, edit it, and export its contents. You’ll find the following options in the Layer→Smart Objects submenu and most of ’em in the shortcut menu you get by Control-clicking (right-clicking) near the layer’s name in the Layers panel:
New Smart Object via Copy. When you choose this command, Photoshop makes a duplicate of your Smart Object that’s not linked to the original, so if you edit the content of the original Smart Object, the duplicate won’t change. An unlinked copy is helpful if you want to place several pieces of art at the same size in your design; place the first piece of art as a Smart Object and size it just right, then make an unlinked copy of the Smart Object and swap its contents.
You can also run this command by mousing over to the Layers panel and Control-clicking (right-clicking) near—but not on—the existing Smart Object’s name and then choosing “New Smart Object via Copy” from the drop-down menu.
Figure 4-35. Top: To convert multiple layers into a Smart Object, activate them in the Layers panel and then choose “Convert to Smart Object” from the panel’s menu or from the shortcut menu you get by Control-clicking (right-clicking) near a layer’s name (it doesn’t matter which one). Alternatively, you can choose Layer→Smart Objects→“Convert to Smart Object,” or choose Filter→“Convert for Smart Filters.” All these commands do the same thing. Bottom: Photoshop converts all those layers into a single Smart Object that you can run filters on nondestructively. To edit the Smart Object’s contents, choose Edit Contents from the Layers panel’s menu and Photoshop opens a new temporary document containing the original layers. When you’re finished editing, press ⌘-S (Ctrl+S) to save your changes and then close the document; Photoshop automatically updates your Smart Object in the original document. How cool is that?
Tip
To create a duplicate Smart Object that is linked to the original, drag the Smart Object onto the “Create a new layer” button at the bottom of the Layers panel, or just activate the Smart Object in the Layers panel and then duplicate it by pressing ⌘-J (Ctrl+J).
This is handy when you repeat graphical element in your design—if you edit that element in the original Smart Object, Photoshop updates all the copies of that Smart Object in your document. For example, if you create a document that includes several sizes of the same image for printing (like the picture packages you got in grade school), using linked Smart Objects lets you swap all the images for a different one in two seconds flat.
Edit Contents. Choose this option or double-click the Smart Object’s thumbnail in the Layers panel if you want to edit the original file in the program that created it (for example, Camera Raw or Adobe Illustrator). Once you save the file in the other program (or you click Done in Camera Raw), it gets updated in your Photoshop document automatically. For this to happen, you must use Photoshop to open the original file for editing; it won’t work if you edit the file behind Photoshop’s back.
Export Contents. This command pulls the contents of the active Smart Object out of the current document and puts it into a new file that’s the same format as the original. If the content began life as a raw file, for example, Photoshop will save the Smart Object’s contents in raw format; if the content is a pixel-based image or Photoshop layers, you get a new Photoshop document that contains the image or layers; and so on. When you choose this command, Photoshop displays a dialog box where you can name the new file and choose where to save it.
Replace Contents. As you learned back in Figure 4-34, you can use this command to swap the contents of a Smart Object so the new image takes on the editing treatment you gave the original one.
Stack Mode. This option, which lives only in the Layer→Smart Object submenu and was previously available only in Photoshop Extended, contains a slew of processing options that you can apply to a Smart Object composed of a series of similar images (called an image stack) in order to produce a perfect image that’s free of noise or other accidental elements that snuck into the shot (like birds flying across the sky, a car passing in front of the subject, and so on).
Rasterize. As you learned on Using Smart Objects, when you edit a Smart Object, you’re editing the container, not its contents. That’s why you can’t use any of Photoshop’s painting, healing, fill, or eraser tools on a Smart Object (though if the Smart Object contains other pixel-based layers, you can double-click to expand the Smart Object into a temporary document and edit that instead). However, if you’re ready to give up all the goodness that comes with using a Smart Object, choose this option to rasterize it and make it behave like any other layer.
Get Photoshop CC: The Missing Manual now with the O’Reilly learning platform.
O’Reilly members experience books, live events, courses curated by job role, and more from O’Reilly and nearly 200 top publishers.

