In this tutorial, you’ll see a new article created from scratch. If you want to practice creating your own new article as you follow along with the tutorial, you can do one of two things:
Find a real topic (for example, using the information in the box on Ideas for New Articles, concerning articles that are needed or requested).
Write a pretend article, and don’t do the very last few steps, which involve moving the article into mainspace, where real Wikipedia articles exist.
Before you start the tutorial, you might want to review Chapter 1 through Chapter 3, or take a look at Wikipedia:Your first article (shortcut: WP:YFA) to reinforce what you need to know about choosing new articles to write, and working in Wikipedia’s edit window.
Choose a name for the article.
In general, use the topic’s most commonly used name. Using a search engine to compare the total number of hits for each version of the name is a good way to determine which name is the most popular. Once you have a couple of ideas, check the rules: Wikipedia has lots and lots of details about proper naming of articles. You’ll find these at Wikipedia:Naming conventions (shortcut: WP:NC).
In this tutorial, the new article is a biography, Sam Wyly. A search engine check shows that this is much more common than “Samuel Wyly.”
Do a search (or several) to find out what Wikipedia already has on the topic.
You can read about search techniques in the box on Chapter 4. Don’t search for “Sam Wyly”; that Wikipedia article was already created as an example for this book. Rather, search for the name of the real article that you want to create, or use one of the topics identified as missing in Wikipedia (see Ideas for New Articles).
If you find an existing Wikipedia article that contains a mention of the topic you searched for, do two things:
Change that mention into an internal link (wikilink), if it’s not already, by editing the page, by adding two square brackets on each side: “[[Sam Wyly]]”. After you save your change to that article, you see that the link you created is a red link, since it points to an article that doesn’t yet exist. Adding such wikilinks is called, in Wikipedia, building the web.
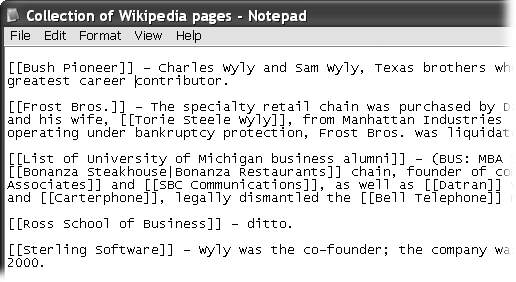
Copy the name of the page, and possibly useful details about the topic that are on the page, to a temporary place (for example, Windows Notepad). Figure 4-3 lists the Wikipedia articles that mentioned Sam Wyly before the Sam Wyly article was created.
Figure 4-3. Five articles that mentioned Sam Wyly were found during the process of creating a new article about him. Information from those articles was copied (in this illustration, to the Windows Notepad) because it’ll be used in the article. Part of building the web is creating outgoing links from a new article, pointing to existing Wikipedia articles.
As shown in the steps starting on Creating Your Personal Sandbox, create a user subpage for the article.
Typically, you give the this user subpage the same name that the article will have. In this tutorial, though, the subpage is just called “New article.”
Find independent, reliable sources. Add them to the subpage.
Note
You can read about finding copyright-free sources on Don’t Repeat Someone Else’s Words at Length. Also, Resources for Writing Articles has a discussion about finding reliable sources from which you can take facts and limited amounts of text in accordance with fair use laws.
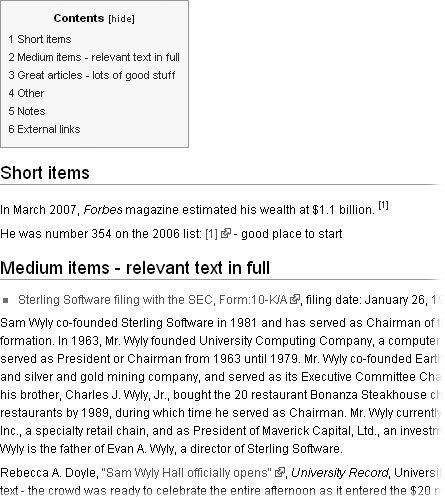
Figure 4-4 shows the results of searching for sources for “Sam Wyly.” If you use a search engine, a lot of results are going to be links to bloggers, forums, or other unacceptable sources. Don’t ignore these—they may have a link to a reliable source or ideas for keywords you can use to search for good sources.
Figure 4-4. Here are a number of reliable sources for the planned article. There isn’t any standard way to put them on the subpage (the top of which is shown here), but it’s a good idea to start building the format for full citations (The Three Ways to Cite Sources). On the other hand, don’t put the full text of long articles on the page—that’s a copyright violation the moment you save the page with all the text on it, even though you’re doing the work on a user subpage, rather than on an article page.
Note
If you’re coming up dry in Web searches for reliable sources, you may have picked a non-notable topic for a new article. Or it may mean that you need to tap into other resources (see Resources for Writing Articles).
Create a first draft of the article, with section headings and footnotes for every sentence (or, at minimum, every paragraph, if everything in the paragraph came from a single source).
Whatever writing approach works for you, use it. Regardless of how you create the article, keep three points in mind:
Work from the sources to the article, rather than writing the text of the article and then looking for sources.
Don’t copy and paste large chunks of text; that’s a copyright violation.
When you add text to the article, add the source of that information, right then, as a footnote.
You can work offline, if you want to, writing a rough draft in your favorite word processor, with notes about where each sentence or paragraph came from. You can also do your work iteratively within Wikipedia: Edit the article draft in your user subpage, preview, edit some more, preview, and so on.
Note
As discussed on Dealing with an Edit Conflict, if you keep an article open in edit mode too long, you risk an edit conflict when you try to save it, because another editor has done and saved an edit in the meantime. You don’t have to worry about this with your own user subpage, so you can be leisurely about saving your changes. Just save your work every hour or so; computers have been known to crash.
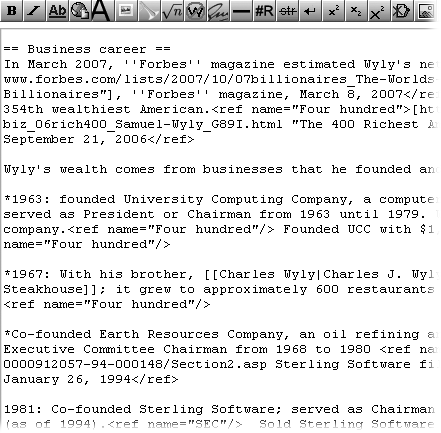
Figure 4-5 shows the wikitext for one section of the Sam Wyly article, partway through the process of creating a final draft. The article-building method illustrated here first starts out with less-detailed sources (typically, short articles) to construct a set of points that you or other editors can fill out later with more general sources and additional sources. Ideally, editors will replace the initial footnotes with others that better support lengthier information in each part of this section. Your approach can be different, but remember that your goal is to footnote every sentence (or, at the very least, every paragraph).
Figure 4-5. A section of the Sam Wyly article in rough draft form. Sections in the body of articles normally consist of prose paragraphs, not bullet points or lists as shown here, but that’s because the article is still in very rough form. You should at least turn the bulleted sentences into bulleted paragraphs.
Do your final edits to the lead section.
It’s okay to do a draft of the lead section early on, but it’s best to wait to finalize it until the article is pretty close to done. The lead section, after all, is supposed to be a relatively brief summary that just touches on the highlights of why the topic is notable.
Build the web: Go through the article and create internal links (wikilinks) that point to other articles (this is part of what is called wikification).
Now’s the time to review the list of articles you put together earlier—the ones that that’ll link to the new article (see Figure 4-3). You want your new article to contain internal (wiki)links pointing back to those articles, whenever mentioning the topics of those articles in your new article makes sense.
Don’t limit yourself, however, to this list. Almost certainly your new article should link to more than just the articles you found earlier. Add more wikilinks and check their validity (but don’t overlink; see the box on How to Create Internal Links).
Note
The fastest way to check new wikilinks is to put the double brackets around the words or phrases to be linked, and then do a preview and see if the links are red or blue. Follow each blue link via a new browser tab or page. If it leads (via a redirect or disambiguation page) to an article with a different name than you thought was the case, change the wikilink to point directly to the article of interest (using a piped wikilink if you want). For each red link, either change the wording and try again, or do a search from a separate window. You can leave a red link in the article if you decide that there’s no article to link to but that Wikipedia should have an article on that topic.
Save the subpage one last time. Now it’s time for you to move the article from your personal user space (as a subpage) to Wikipedia mainspace (where the real articles are):
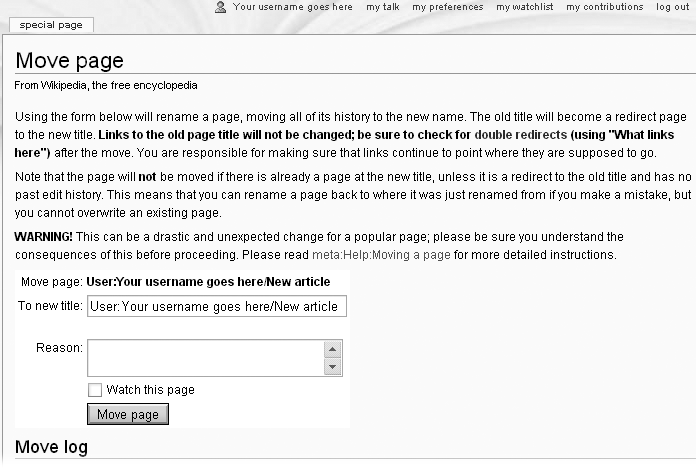
At the top of the article, click the “move” tab. (If you can’t see the tab, you’re not in normal/reading mode.) You’ll see something like Figure 4-6.
Figure 4-6. The standard page for moving (renaming) a page gives you information and warnings. Use the “Measure twice, cut once” rule: Check your spelling and capitalization carefully before you move your article to its new home. It’s not the end of the world if you misspell or otherwise err with the title of your new article (you can always move the page again), but it’s embarrassing.
In the “To new title” box, change the old name of the page (in this case, “User:Your username goes here/New article”) to the new name of the page (in this case, “Sam Wyly”); enter a reason (typically, “Creating new article”); and click the “Watch this page” box (more on watching pages on Adding Pages to Your Watchlist).
Click the “Move page” button.
Warning
Don’t move the page if you have a conflict of interest in publishing the article. If you do, or aren’t sure whether you do, read the box on The Right Motivation for advice on how to handle such conflicts. Basically, you should get help from non-conflicted editors to create the article.
You should now see a page that says the move was successful (Figure 4-7).
Moving a page always leaves a redirect in place—that way, anyone clicking on a link to the old location of the page will end up at the new location. (Redirects are covered in detail in Chapter 16.) Now you just have to check for, and fix, any double redirects—where one redirect sends the reader to a second redirect rather than to a final destination. You’ll check for these in the final step.
Click the bolded link that says “check” (it’s in the second sentence in Figure 4-7) to see if there are any double redirects.
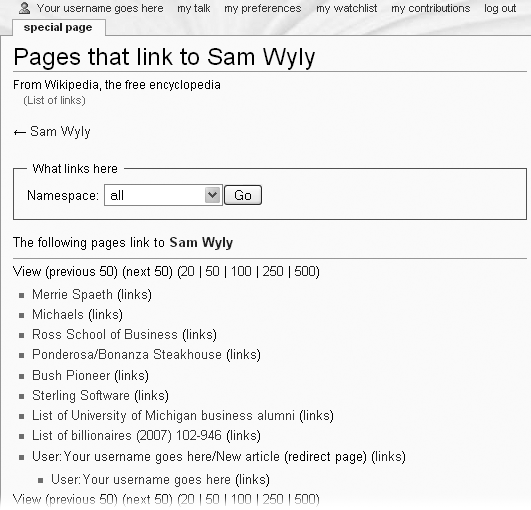
Double redirects for new articles are exceedingly rare. Still, you want to get into the habit of checking whenever you move a page. When you click “check”, the result is Figure 4-8, which shows all the pages that link to the article.
Figure 4-8. There are nine direct links to the new Sam Wyly article. The last of the nine is a redirect (which is fine). If there were any double redirects; you’d see a double indentation underneath the redirect. (For more information on redirects, including fixing them, see Fixing Double Redirects.)
Congratulations! You now know how to create new articles, and how to do it right.
Get Wikipedia: The Missing Manual now with the O’Reilly learning platform.
O’Reilly members experience books, live events, courses curated by job role, and more from O’Reilly and nearly 200 top publishers.
