- Admin Console
- User Management
- Group Management
- Insights
- Reports
- Resources
- Integrations
- Account Details
- Settings
Admin Console
The Admin Console is your go-to place to view and download reporting data, manage your users, and find helpful resources for employee engagement, integrations, and more.
To access the Admin Console, start by logging in to your O’Reilly account. Once you’ve logged in, click Admin in the top navigation and select Insights, Reports, User Management, Group Management, Resources, Integrations, Account Details, or Settings.
User Management
The User Management page is where you can add members to your account and change your users’ platform access status. To find this page, click User management in the top right of your dashboard or select Admin in the top navigation and click User management.
To add users,* select Invite Members, then add their names, email addresses, and any groups they belong to. Once you send the invite, they’ll get a welcome email prompting them to set up their accounts.
To activate or deactivate users, simply click the activation toggle. (If the toggle is blue, the user is active.) You can deactivate users to open up seats and invite new users. If your account uses no-touch reactivation and has open seats, deactivated users will automatically regain access when they attempt to log in.
To revoke users, select Revoke Access and their accounts will be removed from the list of members (but not permanently deleted). If your account uses no-touch reactivation, revoked users will not regain access when they attempt to log in. To restore users, click Restore Access on the top right-hand side of your member list. You’ll be taken to a list of all users with revoked access, from which you can reactivate their accounts.
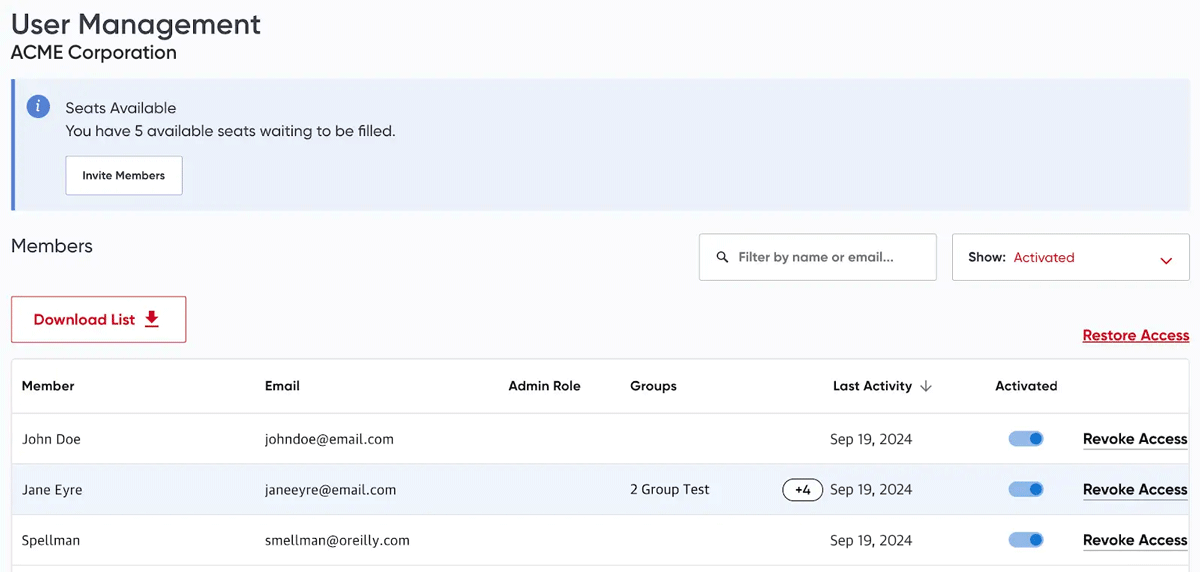
*Note for single sign-on (SSO) accounts: We recommend that admins of SSO accounts not add new users via the User Management page. Instead, new users will be autoprovisioned upon logging in through the SSO process. This will ensure that users are correctly linked to the SSO profile of the account. Admins of SSO accounts can, however, use the User Management page to revoke access from users who have left the company and reactivate users when needed.
Group Management
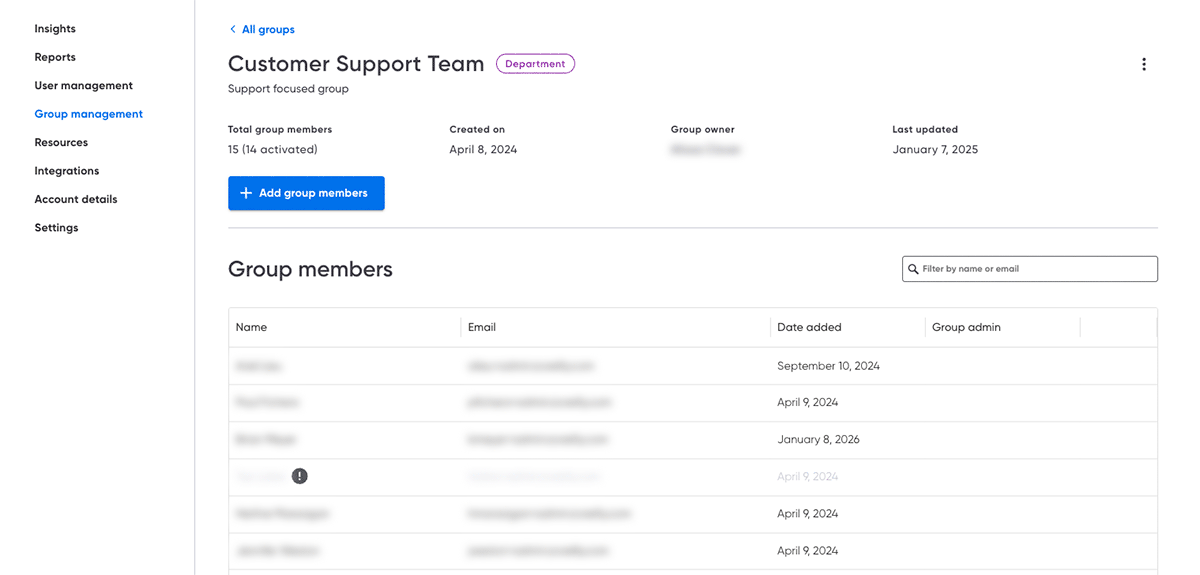
The Group Management page is where you can create and update groups of users. To find this page, click Group management in the left navigation of your Admin Console or select Admin in the top navigation and click Group management.
Creating groups
To create a group, select the “Create a group” button at the top of the page, then add a group name, group type, and learning objectives as well as an external identifier if you’re using SSO.
We recommend establishing a naming convention for your group names and group types to help keep things organized. This is especially important if you plan to put members in multiple groups.
For example, if you plan to have groups for each department and division, as well as groups for specific locations, you could use group types such as department, division, and location, as seen below.
| Group name | Group type |
|---|---|
| Cloud Engineering | Department |
| Product | Department |
| Product Management | Team |
| Consumer Electronics | Division |
| Device Solutions | Division |
| Germany | Location |
| United States | Location |
You can also add more information to the name of your group—it may be helpful for your reporting or when managing seats to see more details. For example, you might call a group “Frontend Engineering (Cost Center 1)” so you can more easily identify it at a glance. If you have a use case that you aren’t sure how to handle, please contact your customer success manager.
Adding and removing group members
To add group members, select the “+ Add group members” button at the top of your group page. You can then add users by their name or email address, or simply upload a spreadsheet of email addresses.
Once members are successfully added, you can view their names, email addresses, and the dates they were added. If you’re looking for a specific user, type their name or email address into the search bar on the right-hand side.
Members who have been deactivated and no longer have access to O’Reilly will still appear in group member lists, but they’ll be grayed out. If they’re later reactivated, they’ll remain in the groups they were previously added to. However, if a user’s access has been revoked, they’ll be removed from all groups.
To remove a group member, hover over the row for that user and click the X that appears on the far right.
Editing and deleting groups
To edit a group, select the three dots on the right side of your screen and click Edit group. You can then change the group name, type, learning objectives, or external identifier. Be sure to click Save when you’re finished. To delete a group, select the three dots on the right side of your screen and click Delete group. Then confirm in the prompt that you’d like to permanently delete the group.
Assigning group admins
To assign a group admin, find the person in the list of group members and click the toggle in the Group Admin column next to their name. To remove a group admin, click the toggle again.
Group admins have access to edit group details, add and remove users from the group, assign other group admins, and view reporting for the group. Unlike account admins, group admins do not have access to create or delete groups, or view other groups in the account.
Connecting groups to SSO
You can connect groups to SSO so that users who sign into the platform are automatically added to the correct groups. When creating a group in the Admin Console, you’ll need to provide the external identifier to send group attributes through SSO. If you’re unsure of a group’s external identifier, check in with your local IT department or the team in your organization that manages your identity provider for a list of these values. Once your group is connected to SSO, you can still manage group members through the Admin Console to bulk-upload users and remove users from the group.
Please see our SSO documentation for more technical information.
Group reporting
You can see group reporting in your report downloads from the Insights Dashboard and through the Insights API.
If you’re using the Insights Dashboard, generate a report from the Report Downloads module and scroll over to the right-hand side of the report to see the Groups field. If you’re using the Insights API, you’ll see a Groups field whenever you access an endpoint that reports on data at the user level. Both of these fields provide a comma-separated list of all groups the user belongs to.
Accounts versus groups (new accounts)
When setting up a new account, you have the option of separating members at the account level or the group level. We recommend thinking about the following features to determine whether setting up multiple accounts or one account with groups is the best option for your organization.
| Multiple accounts | One account with groups | |
|---|---|---|
| Separate seat management | Yes | No |
| Reporting across all groups | No | Yes |
| Separate reporting per group | Yes | Yes |
| Single sign-on | Yes | Yes |
| Separate invoicing | Yes | No |
| Managers can view reporting for their group | Yes | Yes |
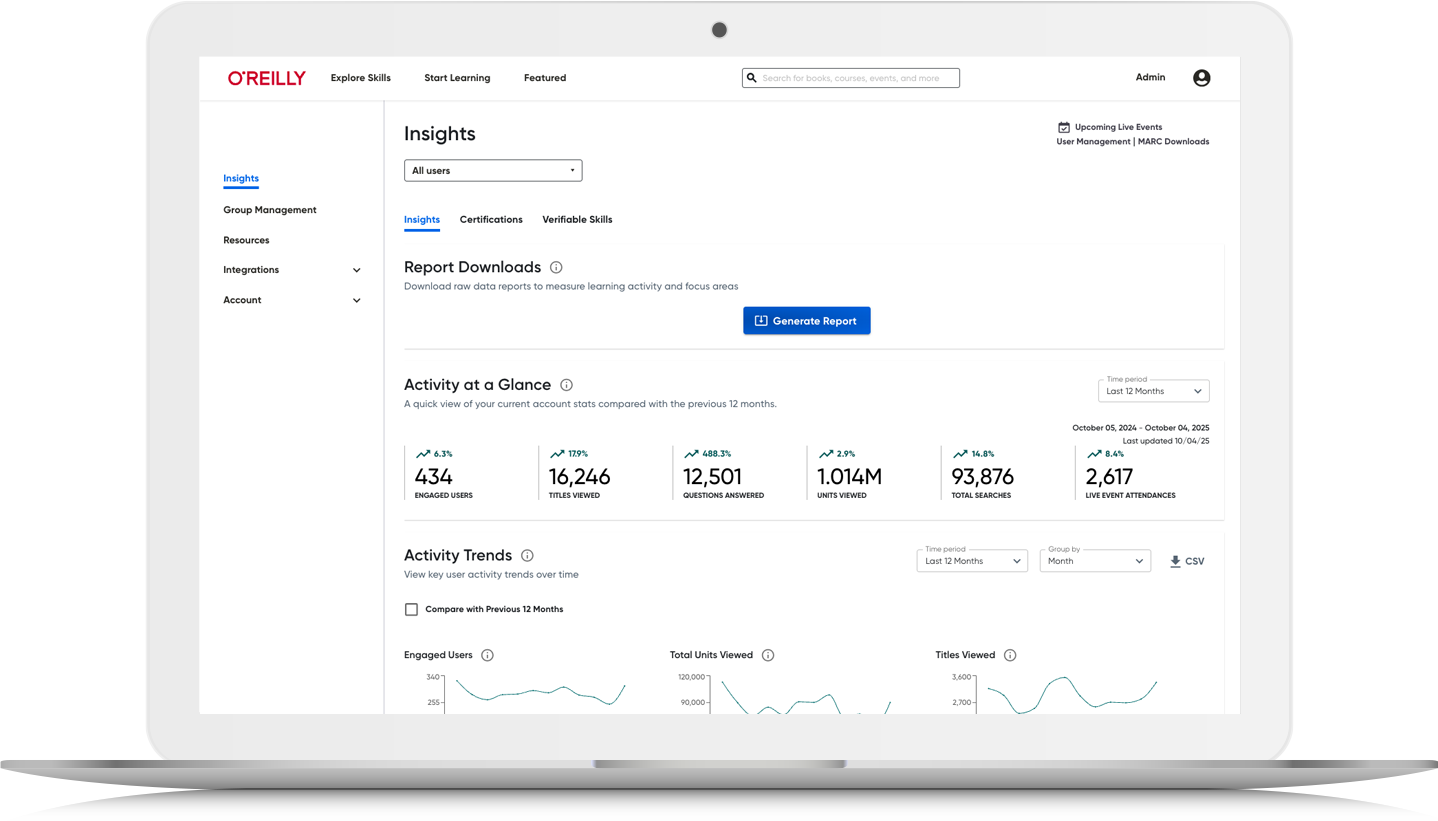
Insights Dashboard
The Insights Dashboard provides a detailed view of your organization’s usage and shows trends across your learners through streamlined reporting modules that include the most requested data. You can select the time frame you’d like to view, and you can export raw data to a CSV file.
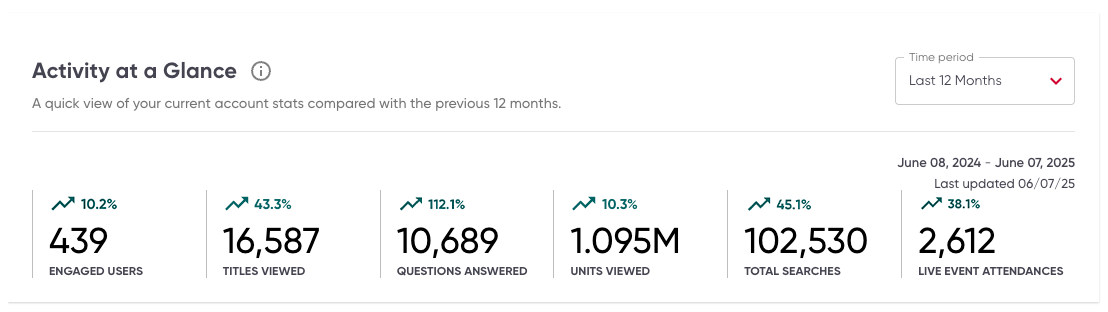
Activity metrics
The Activity at a Glance module provides a quick view of the account-level data that helps you see how your users are engaging with the platform in aggregate and how their usage is trending over time. These metrics include engaged users, titles viewed, questions answered, units viewed, total searches, and live events attended.
The Activity Trends module offers insight into five key user activity trends (engaged users, total units viewed, titles viewed, searches conducted, and questions answered), which you can monitor and compare over time. To maximize awareness and user activity, try reaching out to your teams with these prewritten emails.

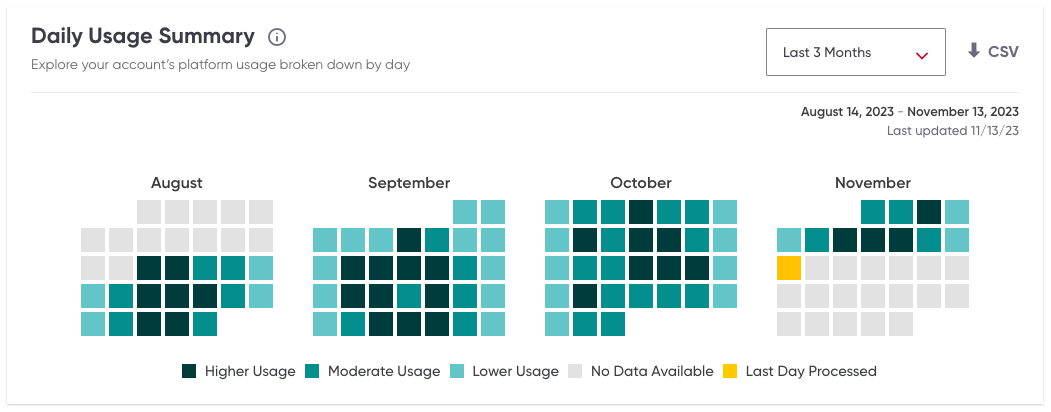
The Daily Usage Summary module shows how much content your users have consumed per day throughout a selected time period so you can easily spot spikes and see trends in usage. The darker the color, the more usage there was on that day.
Learning behaviors
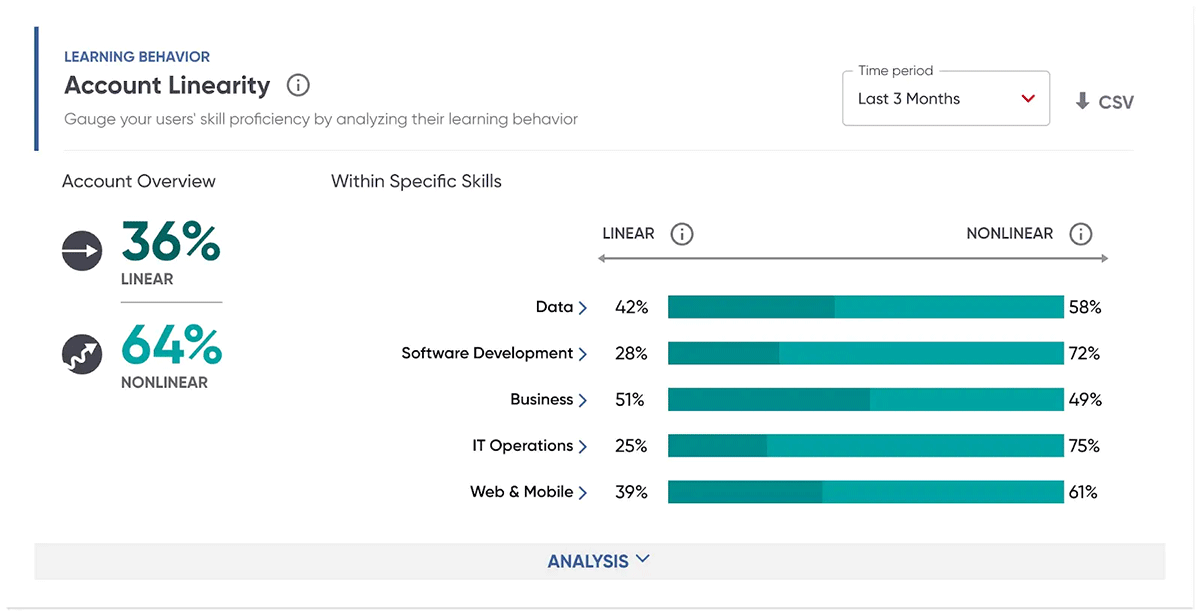
The Account Linearity module shows how much of your account’s overall usage within top skill areas follows either a linear or nonlinear learning pattern. These two learning patterns represent the distinct learning behaviors we’ve identified to help you better understand exactly how your users are engaging with O’Reilly. This view will indicate how users prefer to consume content from a specific skill area in order to achieve their current learning goals.
While each pattern can be observed at all stages of learning, in general, users tend to follow linear learning patterns when they’re building new skills through structured or immersive learning and follow nonlinear learning patterns when they’re solving problems as they go—getting the info they need and returning to work.
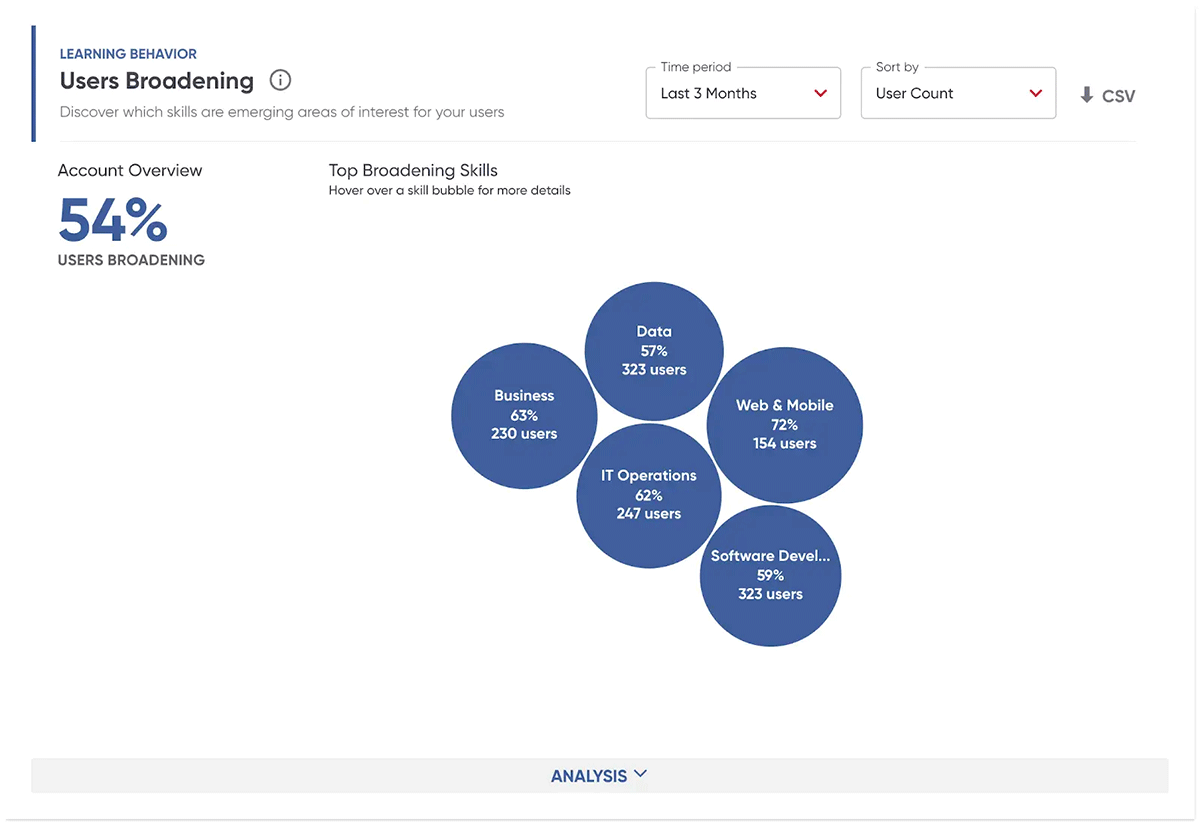
The Users Broadening module also provides an analysis of skill engagement by measuring and classifying the extent to which users have focused on a given skill. We classify a user’s engagement as “broadening” once they’ve indicated a skill is a new area of interest through consumption of content across multiple titles that goes beyond browsing but haven’t yet consumed enough content to be considered deepening behavior.
You may find that learners are branching out to skills related to their core focus areas or jumping from one distinct skill to another without any obvious connection. Analyzing their engagement allows you to see skills of interest that may be emerging in your workforce. Over time and with additional exploration, broadening trends may help you identify skills your workplace needs to learn next to more quickly achieve business goals.
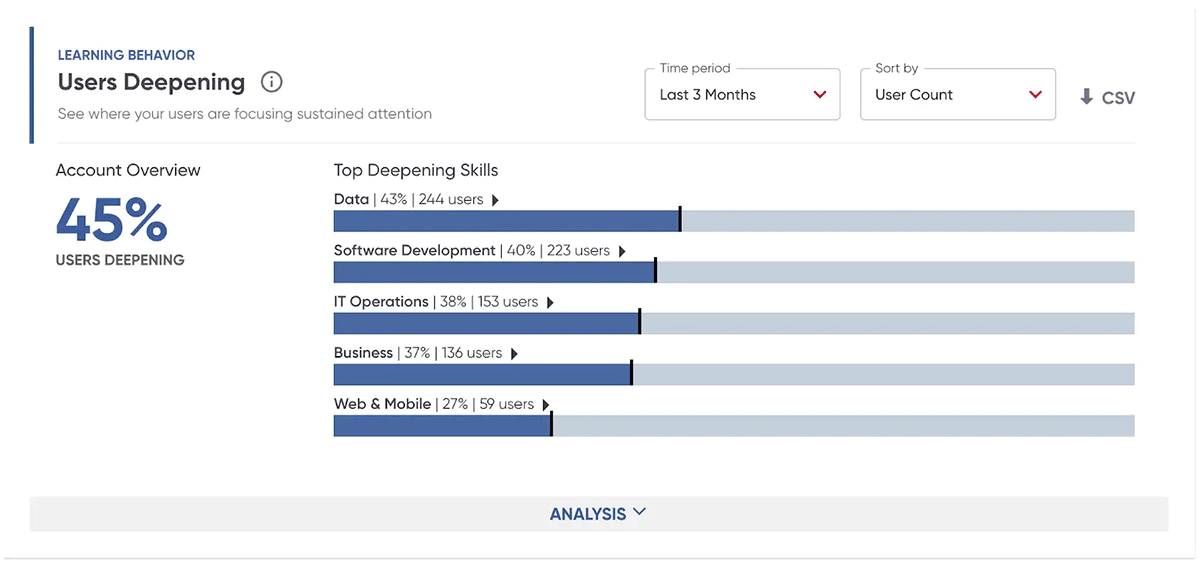
The Users Deepening module provides an analysis of skill engagement by measuring and classifying the extent to which users have focused on a given skill. We classify a user’s engagement as “deepening” once they’ve indicated a skill is a core focus area through consumption of a significant amount of content across multiple titles.
When learners are deepening, they’re focusing on a particular skill—applying themselves to that area with consistency. This is a good way to understand which skills are most important or relevant to your learners, allowing you to drive better alignment between your learning strategy and the needs of your organization.
Skill metrics
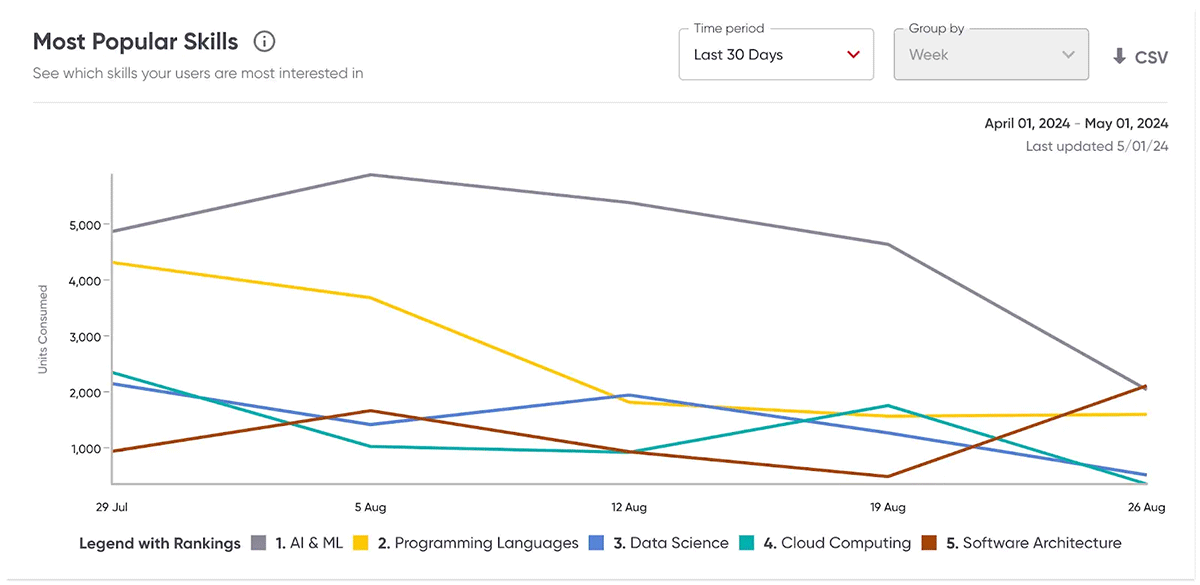
The Most Popular Skills module shows your organization’s top five skills, measured by the total units consumed by your users within a selected time period. You can also see trends for the top 25 skills by downloading the CSV report.
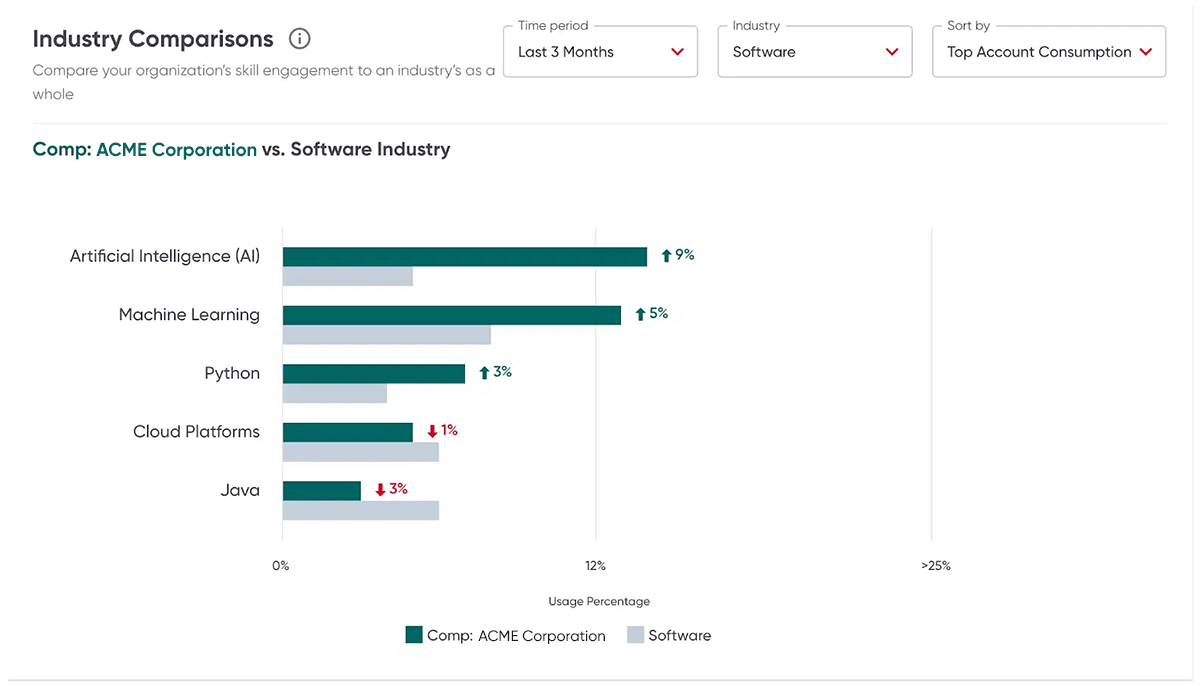
The Industry Comparisons module allows you to weigh the amount of content your users consumed within the top most-engaged-with skills against that of all other O’Reilly customer accounts in a specified industry.
Content metrics
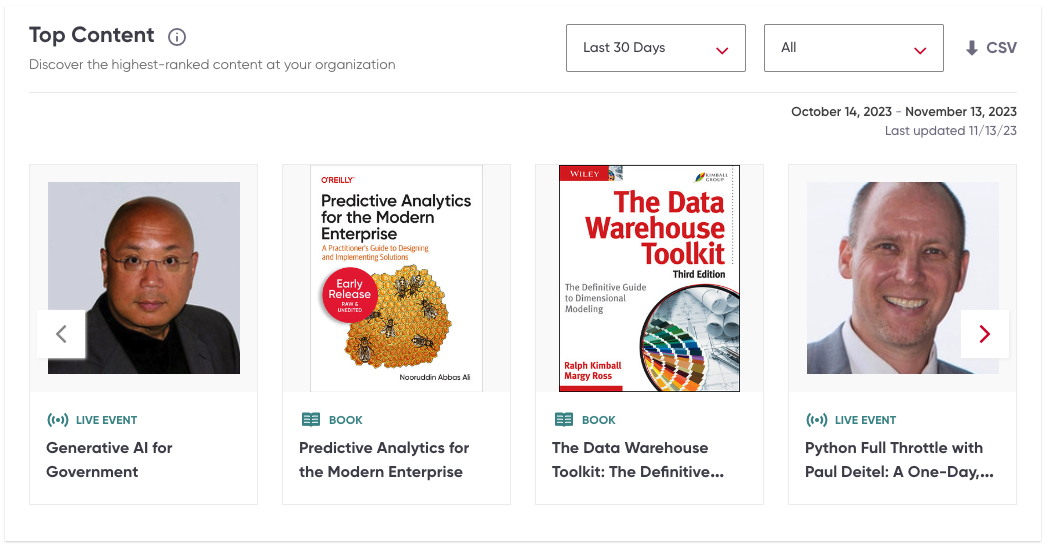
The Top Content module shows you the most-viewed content during a selected time period. Formats include books, audiobooks, videos, live events, interactive learning (labs and sandboxes), and practice exams.
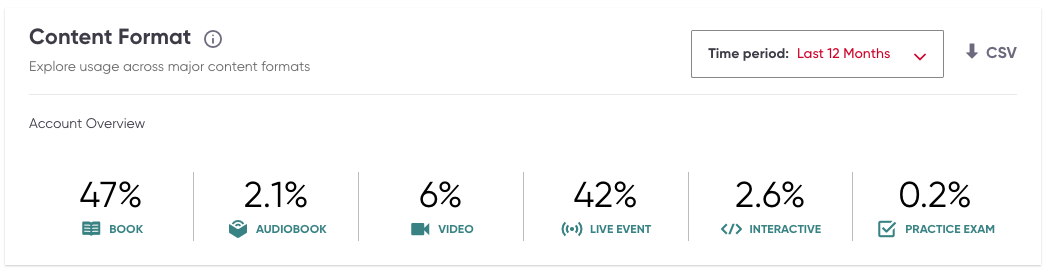
The Content Format module shows how your users’ total content consumption is distributed across major content formats during a selected time period. Formats include books, audiobooks, videos, live events, interactive learning (labs and sandboxes), and practice exams.
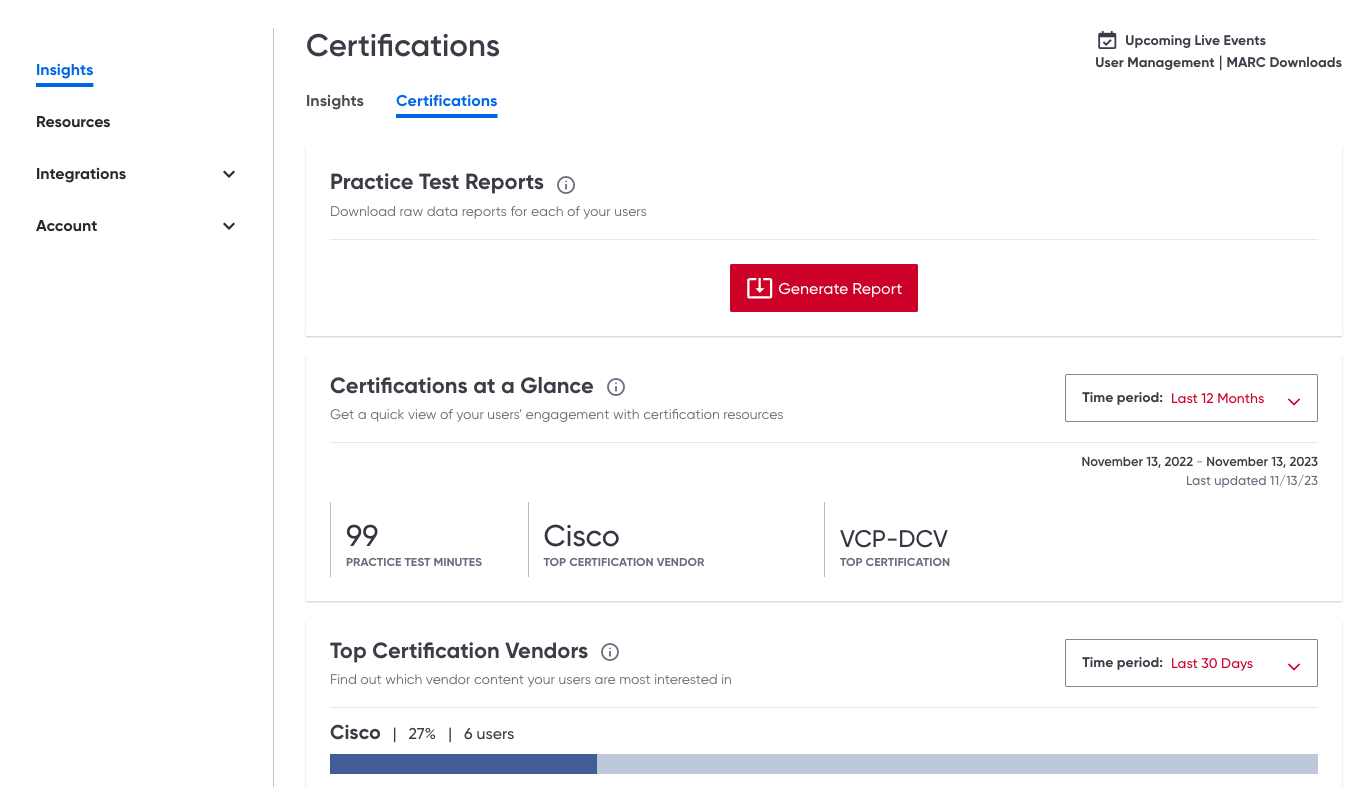
Certifications
On the Certifications tab, you can download a report with individual-level data on practice test usage at your organization. The Certifications at a Glance module shows you how your users are engaging with certification prep content in aggregate. The Top Certification Vendors module provides a breakdown of the number and percentage of your users who have consumed content from each vendor out of the total number of users who have consumed certification content. And the Top Certifications module shows which specific certifications your users have consumed the most content prep materials for during a selected time period.
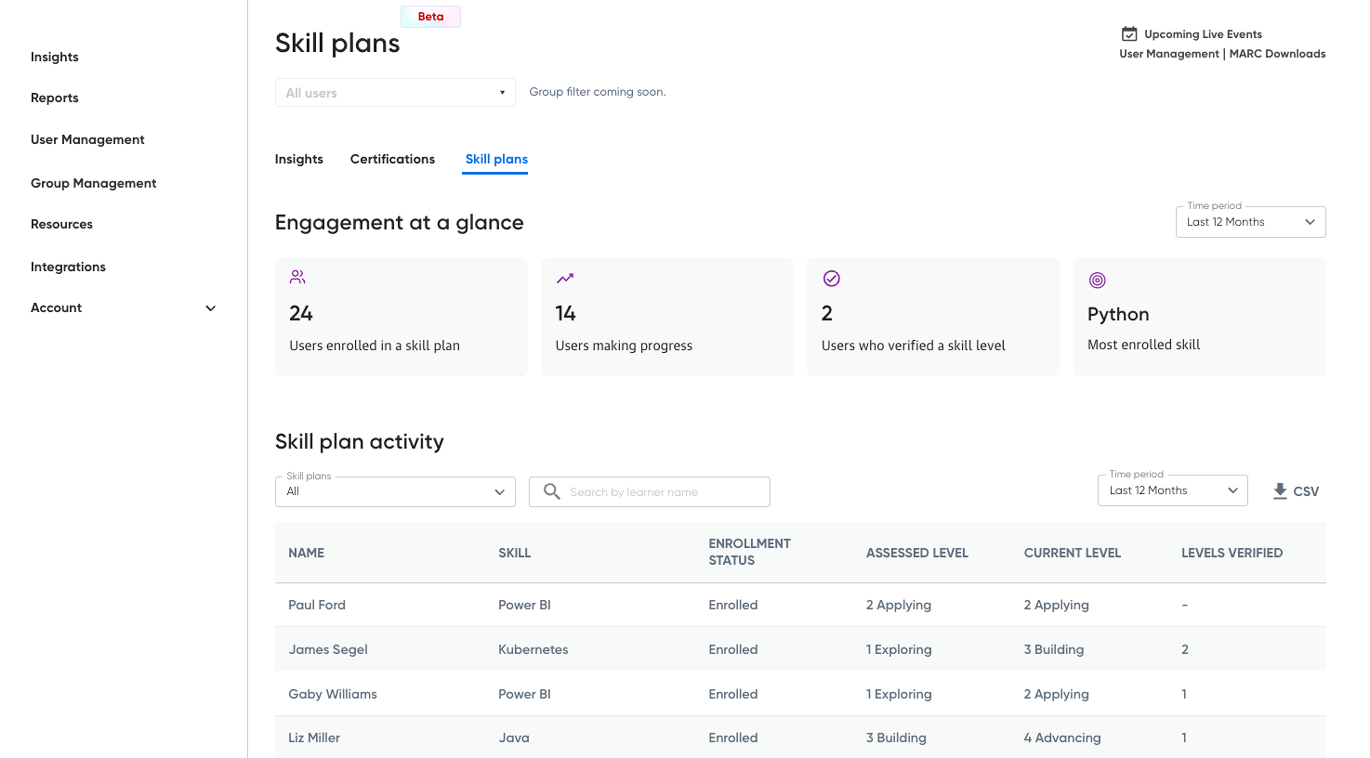
Skill plans
On the Skill plans tab, you’ll find metrics that show real progress in skill development at your organization.
The Engagement at a glance module shows the number of users enrolled in a skill plan, how many users are making progress, how many users have advanced at least one level in a skill, and which skill has the most user enrollments.
The Skill plan activity module displays skill plan metrics at the individual level. It shows the learner’s name (if PII is enabled) and their enrolled skill plan, assessed level, current level, and number of levels verified.
At the bottom of this page, you can share skill plans with users to set them on the path to building skills quickly and confidently.
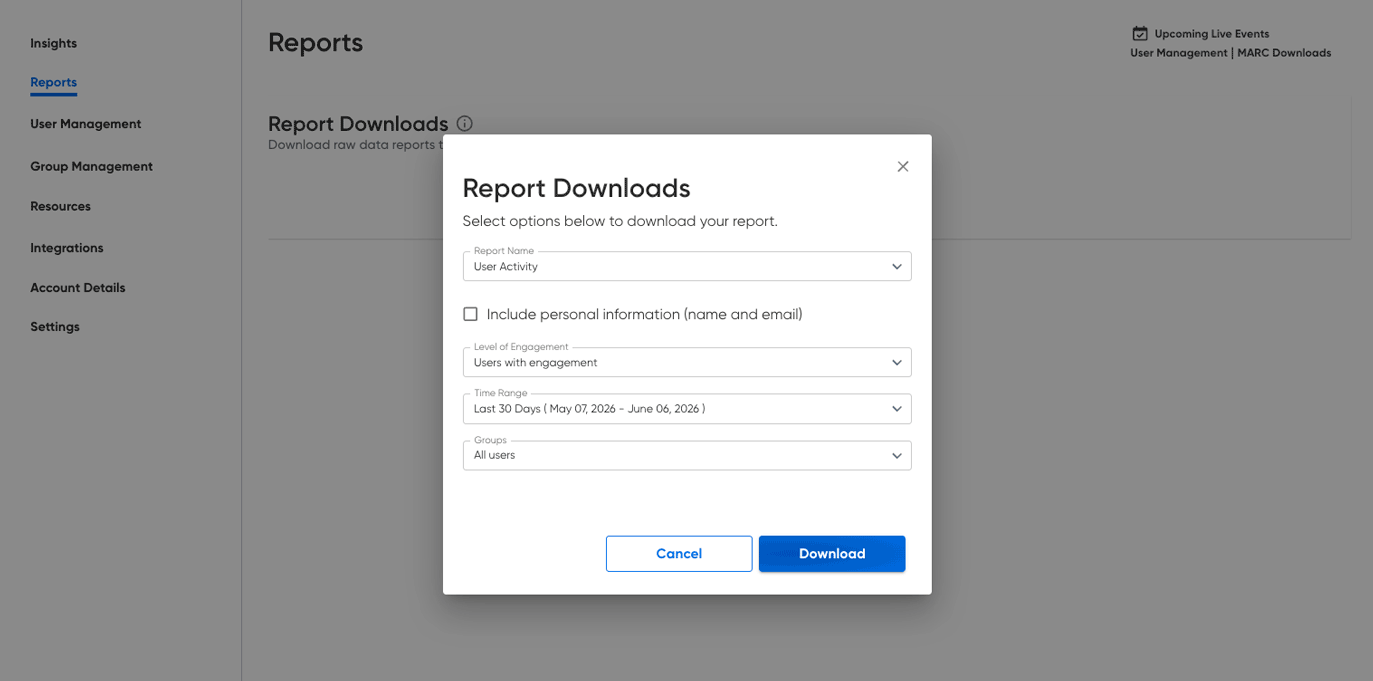
Reports
The Report Downloads module allows you to download data reports showing your users’ skill engagement, platform activity, titles viewed, course progress and completion, academy track progress and completion, and practice test results. You can select the time range and choose whether or not to include personal information.
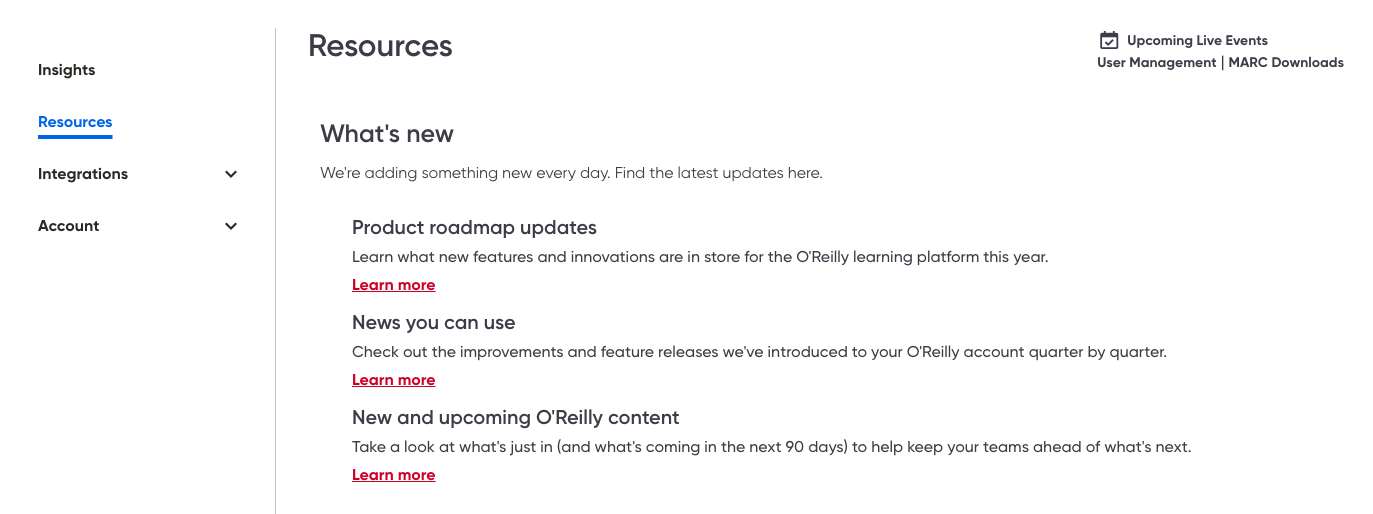
Resources
The Resources tab gives you the latest O’Reilly updates and the resources you need to onboard your teams, raise awareness of the learning platform, and drive engagement with our key features and content. You’ll find our product roadmap, quarterly platform updates, and new and upcoming content—plus your admin launch kit, getting started videos, live webcasts, engagement emails, and more.
Integrations
The Integrations tab provides the documentation your technical teams need to set up integrations with the O’Reilly learning platform. You’ll find information on SCIM and SSO for platform access, our Content API and MCP server to help users find content, our apps for O’Reilly Answers in Slack and Microsoft Teams, and our Insights API for reporting. Plus, you can generate API tokens to quickly get started on your Insights, SCIM, Content API, and MCP integrations.
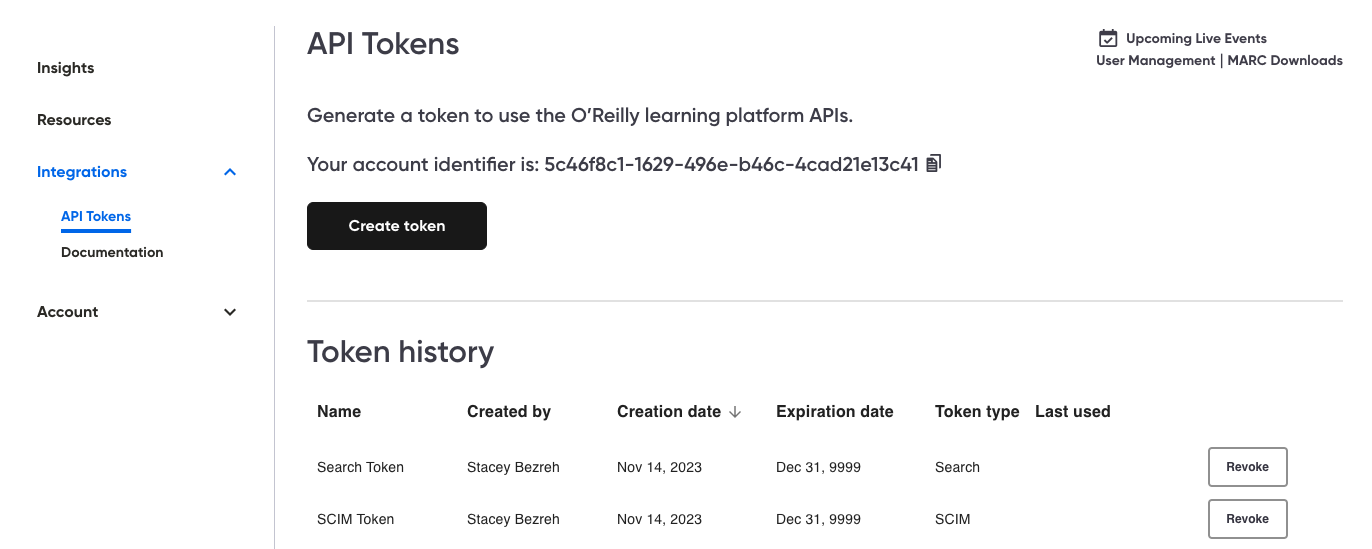
API token creator
Before you begin your integration, you’ll need to secure an API token. Under API tokens, click “Create token” and select an API (Insights, SCIM, Content, or Content MCP). Then give your token a name and expiration date, and click Continue. You’ll receive your API key in a pop-up message prompting you to store a copy of it in a secure place. Once you’ve saved a copy of your key, click the checkbox and Continue.
Under Token history, you can see the details of all tokens generated through the token creator. This is also where you can revoke any tokens by selecting Revoke on the right-hand side and acknowledging that revoking the token may disrupt related connections.
Integration user guides
There are a lot of learning resources in LMSs and LXPs, so it’s not always easy to find O’Reilly content. These guides help you (and your users) easily discover our books, courses, live events, and more.
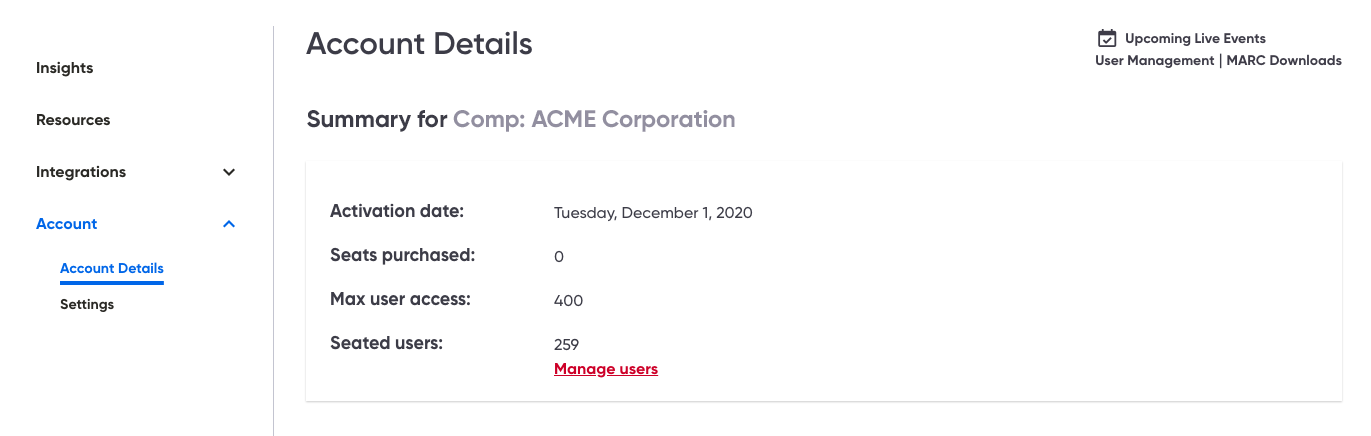
Account Details
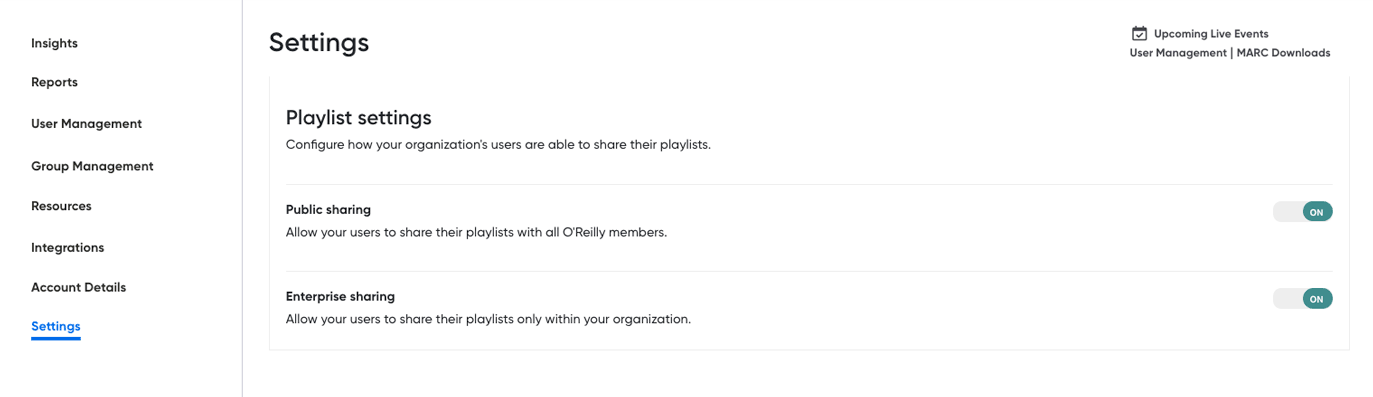
The Account Details tab provides a basic snapshot of your account details, such as your account activation date and number of seats purchased. And in the Settings tab, you can toggle on or off your users’ ability to share playlists they create, either publicly to all O’Reilly members or to users only within your organization.
Settings
The Settings tab allows you to toggle on or off your users’ ability to share playlists they create, either publicly to all O’Reilly members or to users only within your organization.
Have a problem or question? Reach out.
For issues and support regarding your O’Reilly account, please contact the customer support team directly by emailing