Getting Started

It's time to begin your journey and launch Access. You'll start at a spiffy Getting Started page (Figure 1-1).

The Getting Started page is a bit of a cross between a Windows program and a Web page. Use the links on the left to browse through different categories of templates (ready-to-go databases that you can download and fill with your own information). Or check out the links on the bottom, which show you the latest Access news and tips.

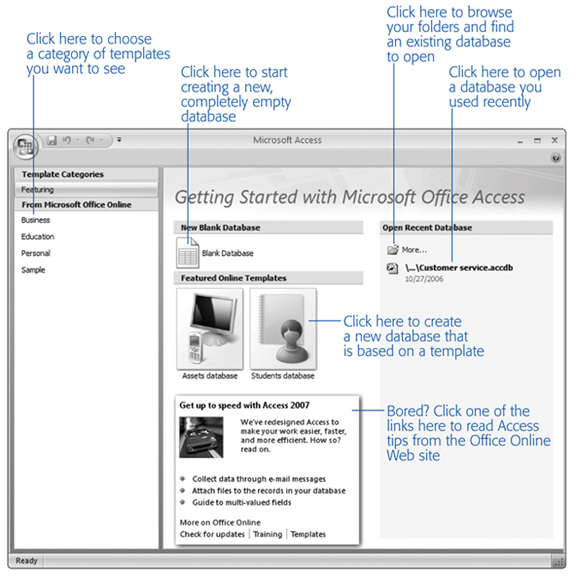
Figure 1-1. The Getting Started page is a bit of a cross between a Windows program and a Web page. Use the links on the left to browse through different categories of templates (ready-to-go databases that you can download and fill with your own information). Or check out the links on the bottom, which show you the latest Access news and tips.

The Getting Started page looks a little dizzying at first glance, but it really serves just three purposes:

  • It shows you recent content from Microsoft's Office Online Web site. For example, you can read helpful articles about Access, find timesaving tips, or download updates. All links open in a separate browser window.

  • It lets you open a database you used recently. Look for the Open Recent Data-base section on the right, which gives you a list.

  • It lets you create a new database. You can start off with an empty database (use the Blank Database button), or you can try to find a ready-made template that fits the bill.

You may think that it would be nice to customize the Getting Started page. Access does let you do so, but it's not all that easy—and it's recommended only for organizations that want to standardize the Getting Started page to better suit their employees. A business could add links to a company Web site or a commonly used database template. If you're interested in this feature, you'll need another tool: the freely downloadable Access Developer's Toolkit, which you can search for at http://msdn.microsoft.com. (This tool wasn't yet released at the time of this writing.)

The Getting Started page is only the front door to the features in Access—there's lot more in store once you get rolling. You won't be able to try out other parts of the Access until you create a new database, and the next section shows you how.

Creating a New Database

In this chapter, you'll slap together a fairly straightforward database. The example's designed to store a list of prized bobblehead dolls. (For those not in the know, a bobblehead doll is a toy figure with an outsize head on a spring, hence the signature "bobbling" motion. Bobblehead dolls usually resemble a famous celebrity, politician, athlete, or fictional character.)

Tip

You can get the Bobblehead database, and all the databases in this book, on the Web. Check out Section 03.3.4 in the Introduction for more details.

Here's how to create a blank new database:

  1. On the Getting Started page, click the Blank Database button.

    A side panel appears on the right (see Figure 1-2).

    The database Bobblehead.accdb will be placed in the folder C:\Documents and Settings\Matt\My Documents. You can edit the file name by clicking in the File Name box, and you can browse to a different folder by clicking the folder icon.

    Figure 1-2. The database Bobblehead.accdb will be placed in the folder C:\Documents and Settings\Matt\My Documents. You can edit the file name by clicking in the File Name box, and you can browse to a different folder by clicking the folder icon.

  2. Type in a file name.

    Access stores all the information for a database in a single file with the extension .accdb (which stands for Access database). Don't stick with the name Access picks automatically (like Database1.accdb). Instead, pick something more suit-able. In this example, Bobblehead.accdb does the trick.

    As with any other file, Access files can contain a combination of letters, spaces, numbers, parentheses, hyphens (-), and the underscore (_). It's generally safest to stay away from other special characters, some of which aren't allowed.

    Note

    Depending on your computer settings, Windows may hide file extensions. Instead of seeing the Access database file MyScandalousWedding.accdb in file-browsing tools like Windows Explorer, you may just see the name MyScandalousWedding (without the .accdb part on the end). In this case, you can still tell the file type by looking at the icon. If you see a small Access icon next to the file name (which looks like a key), that's your signal that you're looking at an Access database. If you see something else (like a tiny paint palette), you need to make a logical guess about what type of file it is.

  3. Choose a folder.

    Like all Office programs, Access assumes you want to store every file you create in your personal My Documents folder. If this isn't the case, click the folder icon to show the File New Database dialog box, browse to the folder you want (Figure 1-3), and then click OK.

  4. Click the Create button (at the bottom-right of the Access window).

    Access creates your database file and then pops up a datasheet where you can get to work creating your first table.

Once you create or open a database, the Access window changes quite a bit. An impressive-looking toolbar (the ribbon) appears at the top of your screen, and a navigation pane shows up on the left. You're now in the control center where you'll perform all your database tasks (as shown in Figure 1-4).

The Introduction covers the basics of how the ribbon works. (Jump to Section 03.2 for the full details.) But first, it's time to consider how you can make use of your brand-new, empty database by adding a table.

Understanding Tables

Tables are information containers. Every database needs at least one table—without it, you can't store any data. In a simple database, like the Bobblehead database, a single table (which we'll call Dolls) is enough. But if you find yourself wanting to store several lists of related information, then you need more than one table. In the database BigBudgetWedding.accdb, you might want to keep track of the guests that you invited to your wedding, the gifts that you requested, and the loot that you actually received. In Chapter 5, you'll see plenty of examples of databases that use multiple tables.

The File New Database dialog box lets you choose where you'll store a new Access data-base file. It also gives you the option to create your database in the format used by previous versions of Access (.mdb). To do so, you need to choose either the 2000 or 2002-2003 format options from the "Save as type" list, as shown here. If you're running Windows Vista, you'll notice that the File New Database dialog box has a whole different look, but all the same features.

Figure 1-3. The File New Database dialog box lets you choose where you'll store a new Access data-base file. It also gives you the option to create your database in the format used by previous versions of Access (.mdb). To do so, you need to choose either the 2000 or 2002-2003 format options from the "Save as type" list, as shown here. If you're running Windows Vista, you'll notice that the File New Database dialog box has a whole different look, but all the same features.

Figure 1-5 shows a sample table.

Before you start designing this table, you need to know some very basic rules:

  • A table's nothing more than a group of records . A record's a collection of information about a single thing. In the Dolls table, for example, each record represents a single bobblehead doll. In a Family table, each record would represent a single relative. In a Products table, each record would represent an item that's for sale. You get the idea.

    The navigation pane on the left lets you see different items (or objects) in your database. You can use the navigation pane to jump from a list of products to a list of customers and back again. The ribbon along the top groups together every Access command. This ribbon's the mission control that lets you perform various tasks with your database.

    Figure 1-4. The navigation pane on the left lets you see different items (or objects) in your database. You can use the navigation pane to jump from a list of products to a list of customers and back again. The ribbon along the top groups together every Access command. This ribbon's the mission control that lets you perform various tasks with your database.

  • Each record's subdivided into fields . Each field stores a distinct piece of information. For example, in the Dolls table, one field stores the person on whom the doll's based, another field stores the price, another field stores the date you bought it, and so on.

  • Tables have a rigid structure. In other words, you can't bend the rules. If you create four fields, every record must have four fields (although it's acceptable to leave some fields blank if they don't apply).

Creating a Simple Table

When you first create a database, it's almost empty. But in order to get you started, Access creates your first database object—a table named Table1. The problem is, this table begins life completely blank, with no defined fields (and no data).

If you followed the steps to create a new database (Section 1.2.1), you're already at the Datasheet view (Figure 1-5), which is where you enter data into a table. All you need to do is customize this table so that it meets your needs.

In a table, each record occupies a separate row. Each field is represented by a separate column. In this table, it's clear that you've added six bobblehead dolls. You're storing information for each doll in five fields (ID, Character, Manufacturer, PurchasePrice, and DateAcquired).

Figure 1-5. In a table, each record occupies a separate row. Each field is represented by a separate column. In this table, it's clear that you've added six bobblehead dolls. You're storing information for each doll in five fields (ID, Character, Manufacturer, PurchasePrice, and DateAcquired).

There are two ways to customize a table:

  • Design view lets you precisely define all aspects of a table before you start using it. Almost all database pros prefer Design view, and you'll start using it in Chapter 2.

  • Datasheet view is where you enter data into a table. Datasheet view also lets you build a table on the fly as you insert new information. You'll use this approach in this chapter.

The following steps show you how to turn a blank new table (like Table1) into the Dolls table using the Datasheet view:

  1. To define your table, you need to add your first record.

    In this case, that means mentally picking a bobblehead doll to add to the list. For this example, you'll use a nifty Homer Simpson replica.

    Note

    It doesn't matter which doll you enter first. Access tables are unsorted, which means they have no underlying order. However, you can sort them any way you want when you need to retrieve information later on.

  2. In the datasheet's Add New Field column, type the first piece of information for the record (see Figure 1-6).

    Based on the simple analysis you performed earlier (Section 1.2.3), you know that you need to enter four fields of information for every doll. For the Homer Simpson doll, this information is: "Homer Simpson" (the name), "Fictional Industries" (the manufacturer), $7.99 (the price), and today's date (the purchase date). Although you could start with any field, it makes sense to begin with the name, which is clearly an identifying detail.

    To fill in your first record, start by entering something in the first field of information (like the doll name "Homer Simpson"). Then, hit Tab to jump to the second column, and then enter the second piece of information. Ignore the ID column for now—Access adds that to every table to identify your rows.

    Figure 1-6. To fill in your first record, start by entering something in the first field of information (like the doll name "Homer Simpson"). Then, hit Tab to jump to the second column, and then enter the second piece of information. Ignore the ID column for now—Access adds that to every table to identify your rows.

  3. Press Tab to move to the next field, and return to step 2.

    Repeat steps 2 and 3 until you've added every field you need, being careful to put each separate piece of information into a different column.

    If you want to get a little fancier, include the currency symbol ($) when you enter the price, and make sure you put the data in a recognized date format (like January 1, 2008 or 01-01-2008). These clues tell Access what type of information you're putting in the column. (In Chapter 2, you'll learn how to take complete control of the type of data in each column and avoid possible misunderstandings.) Figure 1-7 shows the finalized record.

    The only problem with the example so far is that as you enter a new record, Access creates spectacularly useless field names. You'll see its choices at the top of each column (they'll have names like Field1, Field2, Field3, and so on). The problem with using these meaningless names is that they might lead you to enter a piece of information in the wrong place. You could all too easily put the purchase price in the date column. To prevent these slip-ups, you need to set better field names.

    Figure 1-7. The only problem with the example so far is that as you enter a new record, Access creates spectacularly useless field names. You'll see its choices at the top of each column (they'll have names like Field1, Field2, Field3, and so on). The problem with using these meaningless names is that they might lead you to enter a piece of information in the wrong place. You could all too easily put the purchase price in the date column. To prevent these slip-ups, you need to set better field names.

    Note

    If you hit Tab without entering any information, you'll move to the next row and start inserting a new record. If you make a mistake, you can backtrack using the arrow keys.

  4. It's time to fix your column names. Double-click the first column title (like Field1).

    The field name switches into Edit mode.

  5. Type in a new name, and then press Enter. Return to step 4.

    Repeat this process until you've cleaned up all the field names. The proper field names for this example are Character, Manufacturer, PurchasePrice, and Date-Acquired. Figure 1-8 shows how it works.

    To choose better field names, double-click the column title. Next, type in the real field name, and then press Enter. Section 2.5.1 has more about field naming, but for now just stick to short, text-only titles that don't include any spaces, as shown here.

    Figure 1-8. To choose better field names, double-click the column title. Next, type in the real field name, and then press Enter. Section 2.5.1 has more about field naming, but for now just stick to short, text-only titles that don't include any spaces, as shown here.

    Tip

    Don't be too timid about tweaking your table. You can always rename fields later, or even add entirely new fields. (It's also possible to delete existing fields, but that has the drawback of also clearing out all the data that's stored in that field.)

  6. Choose Office button → Save (or use the Ctrl+S shortcut) to save your table.

    Access asks you to supply a table name (see Figure 1-9).

    A good table name's a short text title that doesn't have any spaces (like Dolls here).

    Figure 1-9. A good table name's a short text title that doesn't have any spaces (like Dolls here).

  7. Type a suitable table name, and then click OK.

    Congratulations! The table's now a part of your database.

Note

Technically, you don't need to save your table right away. Access prompts you to save it when you close the datasheet (by clicking the X at the document window's top-right corner), or when you close Access.

As you can see, creating a simple table in Access is almost as easy as laying out information in Excel or Word. If you're itching to try again, you can create another table in your database by choosing Create → Table from the ribbon. But before you get to that stage, it makes sense to take a closer look at how you edit your table.

Editing a Table

You now have a fully functioning (albeit simple) database, complete with one table, which in turn contains one record. Your next step's filling your table with useful information. This often-tedious process is data entry.

To fill the Dolls table, you use the same datasheet you used to define the table. You can perform three basic tasks:

  • Editing a record. Move to the appropriate spot in the datasheet (using the arrow keys or the mouse), and then type in a replacement. You may also want to use Edit mode, which is described in the next section.

  • Inserting a new record. Move down to the bottom of the table, to the row that has an asterisk (*) on the left. This row doesn't actually exist until you start typing in some information. At that point, Access creates the row and moves the asterisk down to the next row underneath. You can repeat this process endlessly to add as many rows as you want (Access can handle millions).

  • Deleting a record. You have several ways to remove a record, but the easiest is to right-click the margin immediately to the left of the record, and then choose Delete Record. Access asks you to confirm that you really want to remove the selected record, because you can't reverse the change later on.

Edit mode

You'll probably spend a lot of time working with the datasheet. So settle in. To make your life easier, it helps to understand a few details.

As you already know, you can use the arrow keys to move from field to field or row to row. However, you might have a bit of trouble editing a value. When you start typing, Access erases any existing content. To change this behavior, you need to switch into Edit mode by pressing the F2 key; in Edit mode, your typing doesn't delete the stuff that's already in that field. Instead, you get to change or add to it. To switch out of Edit mode, you press F2 again. Figure 1-10 shows a closeup look at the difference.

Tip

You can also switch in and out of Edit mode by double-clicking a cell.

Top: Normal mode. If you start typing now, you'll immediately erase the existing text ("Hobergarten"). The fact that all the text in the field's selected is a big clue that you're about to wipe it out.Bottom: Edit mode. The cursor shows where you're currently positioned in the current field. If you start typing now, you'll insert text in between "Hober" and "garten".

Figure 1-10. Top: Normal mode. If you start typing now, you'll immediately erase the existing text ("Hobergarten"). The fact that all the text in the field's selected is a big clue that you're about to wipe it out. Bottom: Edit mode. The cursor shows where you're currently positioned in the current field. If you start typing now, you'll insert text in between "Hober" and "garten".

Edit mode also affects how the arrow keys work. In Edit mode, the arrow keys move through the current field. For example, to move to the next cell, you need to move all the way to the end of the current text, and then press the right arrow ( → ) key again. But in Normal mode, the arrow keys always move you from cell to cell.

Shortcut keys

Power users know the fastest way to get work done is to use tricky keyboard combinations like Ctrl+Alt+Shift+*. Although you can't always easily remember these combinations, a couple of tables can help you out. Table 1-1 lists some useful keys that can help you whiz around the datasheet.

Table 1-1. Keys for Moving Around the Datasheet

Key

Result

Tab (or Enter)

Moves the cursor one field to the right, or down when you reach the edge of the table. This key also turns off Edit mode if it's currently switched on.

Shift+Tab

Moves the cursor one field to the left, or up when you reach the edge of the table. This key also turns off Edit mode.

→

Moves the cursor one field to the right (in Normal mode), or down when you reach the edge of the table. In Edit mode, this key moves the cursor through the text in the current field.

←

Moves the cursor one field to the left (in Normal mode), or up when you reach the edge of the table. In Edit mode, this key moves the cursor through the text in the current field.

↑

Moves the cursor up one row (unless you're already at the top of the table). This key also turns off Edit mode.

↓

Moves the cursor down one row (or it moves you to the "new row" position if you're at the bottom of the table). This key also turns off Edit mode.

Home

Moves the cursor to the first field in the current row. This key brings you to beginning of the current field if you're in Edit mode.

End

Moves the cursor to the last field in the current row. This key brings you to end of the current field if you're in Edit mode.

Page Down

Moves the cursor down one screenful (assuming you have a large table of information that doesn't all fit in the Access window at once). This key also turns off Edit mode.

Page Up

Moves the cursor up one screenful. This key also turns off Edit mode.

Ctrl+Home

Moves the cursor to the first field in the first row. This key doesn't do anything if you're in Edit mode.

Ctrl+End

Moves the cursor to the last field in the last row. This key doesn't do anything if you're in Edit mode.

Table 1-2 lists some convenient keys for editing records.

Table 1-2. Keys for Editing Records

Key

Result

Esc

Cancels any changes you've made in the current field. This key works only if you use it in Edit mode. Once you move to the next cell, change is applied. (For additional cancellation control, try the Undo feature, described next.)

Ctrl+Z

Reverses the last edit. Unfortunately, the Undo feature in Access isn't nearly as powerful as it is in other Office programs. For example, Access allows you to reverse only one change, and if you close the datasheet, you can't even do that. You can use Undo right after you insert a new record to remove it, but you can't use the Undo feature to reverse a delete operation.

Ctrl+"

Copies a value from the field that's immediately above the current field. This trick's handy when you need to enter a batch of records with similar information. Figure 1-11 shows this often-overlooked trick in action.

Ctrl+;

Inserts today's date into the current field. The date format's based on computer settings, but expect to see something like 24-12-2007. You'll learn more about how Access works with dates in Section 2.3.5.

Ctrl+Alt+Space

Inserts the default value for the field. You'll learn how to designate a default value in Section 4.1.2.

An Access user has been on an eBay buying binge and needs to add several dolls at once. With a quick Ctrl+" keystroke, the acquire date from the previous record's pasted into the cur-rent field.

Figure 1-11. An Access user has been on an eBay buying binge and needs to add several dolls at once. With a quick Ctrl+" keystroke, the acquire date from the previous record's pasted into the cur-rent field.

Cut, copy, and paste

Access, like virtually every Windows program, lets you cut and paste bits of information from one spot to another. This trick's easy using just three shortcut keys: Ctrl+C to copy, Ctrl+X to cut (similar to copy, but the original content's deleted), and Ctrl+V to paste. When you're in Edit mode, you can use these keys to copy whatever you've selected. If you're not in Edit mode, the copying or cutting operation grabs all the content in the field.

Get Access 2007 for Starters: The Missing Manual now with the O’Reilly learning platform.

O’Reilly members experience books, live events, courses curated by job role, and more from O’Reilly and nearly 200 top publishers.