Chapter 2. A Pattern-Led Tutorial
THIS CHAPTER INTRODUCES AJAX AND THE AJAX PATTERNS IN A THREE-PART TUTORIAL. THE FIRST section is a whirlwind tour of the key technologies, recommended if you’ve never worked with Ajax before. The second section shows how the higher-level patterns work to enhance a system; if you’ve already tinkered with Ajax, you might like to jump straight there. The final section proposes some exercises to try on your own.
The online home for this tutorial is http://ajaxify.com/tutorial/, where you’ll discover running demos for each example here. To work locally, you’ll need a standard PHP installation (version 5 or later) with Apache or a similar web server (no database is required). If you want the completed code, you’ll find a downloadable package at the above URL—consult Appendix B for more details on installation. Each section in the tutorial begins with a summary of the corresponding online demo as well as the directory within the code package where you’ll find the completed code.
Ajax Technologies in a Blink
This section includes a few exercises to get up to speed with the basic Ajax technologies. Each section is independent from the others, and each corresponds to a group in the Foundational Technologies Patterns (Part II), which are patterns about the raw technologies on which all Ajax applications are based.
Preparing the Demos
Each demo should live in its own directory, so create a tutorial directory under your server’s document root, and then create three fresh directories underneath that:
 cd /apache/docroot (substitute your own document root)
 mkdir tutorial
 cd tutorial
 mkdir display remoting dynamic
For Unix systems, ensure permissions are appropriate for your web server (e.g., make the directories globally readable and executable). Each directory will begin with the same “blank slate” HTML file, index.html. Open up your favorite editor and save the following file to display/index.html, remoting/index.html, and dynamic/index.html:
  <html>

  <head>
    <title>AjaxPatterns.org - Tutorial</title>
    <script type="text/javascript" src="tutorial.js"></script>
  </head>

  <body>

    <h1>AjaxPatterns Tutorial</h1>

    <div id="sandbox">
    </div>

  </body>
Remember to set file permissions according to the web server’s requirements. Now point your browser to one of the new files and check that you can see the above content. The URL should be http://localhost/tutorial/display/ or, failing that, try http://localhost/tutorial/display/index.html.
The HTML file loads the JavaScript file tutorial.js, which isn’t there yet. The next three demos will leave the HTML file alone and illustrate Ajax concepts with code in their respective tutorial.js files.
Display Manipulation and the DOM in a Blink
Hello World!
To begin, go to the working directory (tutorial/display/). Note that there’s an online demo of the application we’re going to build at http://ajaxify.com/tutorial/display.
The first thing we want to do with Ajax is update the display—change controls, run animations, and so on. We do that by manipulating the DOM so this tutorial will change the DOM as soon as the page loads. We’ll do all our work in the working directory, tutorial/display, so once you’re in there, save the following as tutorial.js:
  window.onload = function( ) {
    var greeting = document.createElement("span");
    greeting.style.backgroundColor = "yellow";
    greeting.innerHTML = "Hello World!";
    document.getElementById("sandbox").appendChild(greeting);
  }
Now point your browser to the display demo (http://localhost/tutorial/display/index.html) and you should see a "Hello World!" message with yellow background. As explained in Display Morphing (Chapter 5), the DOM is a tree structure representing the current page, and the browser will keep the display synchronized with programmatic changes to the DOM. You can, if you like, confirm this by visualizing the DOM after running the script above. There are numerous visualization tools, described in DOM Inspection (Chapter 18).
In the above code, greeting is a new DOM node that’s
appended to the existing sandbox DOM node. After creating
greeting, we set its background
color as a CSS style property, and we use innerHTML as a simple means of setting
its content. The resulting DOM is the same as if the page had been
loaded with the following HTML:
  <div id="sandbox">
    <span style="background-color:yellow;">Hello World!</span>
  </div>
$( ) Convenience function
Now, a quick refactoring. Since we often need the
function, document.getElementById(
), all the demos here will use a convenient alias, so
append the following function:
function $(id) { return document.getElementById(id); }Now we can make the final line of the earlier code more concise:
$("sandbox").appendChild(greeting);Verify the page works as before. The $( ) notation[*] is used throughout this book. In fact, it’s
sometimes used repeatedly to refer to the same DOM element, which
is a slight performance overhead, since each reference will cause
a DOM lookup. In production systems, consider using $( ) just once to assign a DOM element
to a temporary variable, and then reference the temporary variable
after that. You’ll gain some performance at the expense of a
little code clarity.
Adding a link
We’ll complete this section by dynamically creating a link.
Append some code to onload(
):
window.onload = function( ) {
var greeting = document.createElement("span");
greeting.style.backgroundColor = "yellow";
greeting.innerHTML
= "Hello World!";
$("sandbox").appendChild(greeting);
$("sandbox").appendChild(document.createElement("hr"));
var link = document.createElement("a");
link.href = "http://ajaxpatterns.org";
link.appendChild(document.createTextNode("More Ajax Stuff ..."));
$("sandbox").appendChild(link);
}
function $(id) { return document.getElementById(id); }Reload the page and confirm it looks like Figure 2-1.

We’ve just added two further child nodes to the sandbox. The
first child is an hr element
for aesthetic purposes. Then comes the link, an anchor tag with
appropriate href property (just
like an HTML <a
href="..."> declaration). To set the link text, we
append a new child text node. Contrast this with the earlier
example, where we used innerHTML to set an element’s contents.
With innerHTML, the browser
will parse the HTML content and attempt update the DOM on that
basis. It’s convenient, but somewhat more error-prone than the
kind of direct DOM manipulation performed with the link
text.
Web Remoting in a Blink
To begin, go to the working directory (tutorial/remoting/). Note that there’s an online demo of the application we’re going to build at http://ajaxify.com/tutorial/remoting/.
We’re going to use web remoting to do something very basic: dynamically inject a server-side HTML segment onto the page. First, create the HTML page to be injected: message.html:
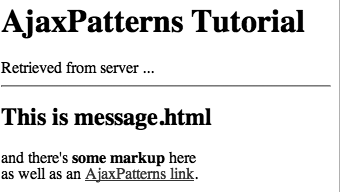
<h2>This is message.html</h2> and there's <strong>some markup</strong> here<br/> as well as an <a href="http://ajaxpatterns.org">AjaxPatterns link</a>.
Now we have to code tutorial.js
to retrieve the message and put it in the "sandbox" container. We’ll perform
remoting with XMLHttpRequest,
detailed in the XMLHttpRequest Call (Chapter 6) pattern. Since its creation
is browser-specific, begin tutorial.js with a
createXMLHttpRequest( ) factory
function:
function createXMLHttpRequest( ) {
try { return new ActiveXObject("Msxml2.XMLHTTP"); } catch (e) {}
try { return new ActiveXObject("Microsoft.XMLHTTP"); } catch (e) {}
try { return new XMLHttpRequest( ); } catch(e) {}
alert("XMLHttpRequest not supported");
return null;
}As in the previous demo, create the $( ) convenience function as well:
function $(id) { return document.getElementById(id); }With these library functions in place, the only remaining task
is to have XMLHttpRequest pull
down the content and display it once loaded:
window.onload = function( ) {
var xhr = createXMLHttpRequest( );
xhr.onreadystatechange = function( ) {
if (xhr.readyState==4) { // Request is finished
if (xhr.status==200) {
$("sandbox").innerHTML = "Retrieved from server ...<hr/>";
$("sandbox").innerHTML += xhr.responseText;
} else {
alert("Message returned, but with error status.");
}
}
}
xhr.open("GET", "message.html", true);
xhr.send(null);
}And what you’ll see is the contents of message.html inside the sandbox, as shown in Figure 2-2.
The code demonstrates XMLHttpRequest usage in a nutshell. Three things happen:
XMLHttpRequest.onreadystatechangeis defined. This is a callback method that’s notified several times throughout the call lifecycle, including when the call has completed. For convenience, we’ve assigned the property to a “closure”—an anonymous method insidefunction( ) {...}—to save creating a separate method. The closure’s contents are explained below.Next,
XMLHttpRequest.open( )will open up a new connection. The parameters say that a GET request should be sent, and the URL is message.html. [See XMLHttpRequest Call (Chapter 6) for details on the third argument.]XMLHttpRequest.send( )will complete the request. The argument isnullbecause the request only has headers, but no body.
How is the XMLHttpRequest
callback mechanism used here? During a call, XMLHttpRequest progresses through several
stages, from 0, before the connection’s open, to 4, when the
response has arrived. Here, we only care about that final state, so
onreadystatechange ignores any
prior states. At that stage, we have a complete response, but is it
valid? We have to check that the header has a successful response
code, which is 200. If all has gone well, XMLHttpRequest.responseText will then hold
the content that was retrieved from the server.
So, after the screening the response, responseText is a string reflecting
precisely the contents of message.html:
“<h2>This is message.html</h2>...AjaxPatterns
link</a>.” It can then be displayed by appending it to the
sandbox’s innerHTML.
A response doesn’t have to be HTML. It could also be a piece of data, like “5,” “OK,” or “1,1,2,3,5.” Also, the response handler can use it however it wants to. It doesn’t have to place the response directly onto the page, and in fact, it doesn’t have to change the display at all—it might just store the value for later on. Furthermore, the target URL could be any location on our server. More often that not, it’s a dynamic script rather than a static HTML file like the message file used here. The URL will often contain CGI-style variables as input for the server-side script.
Dynamic Behavior in a Blink
To begin, go to the working directory (/tutorial/dynamic/). Note that there’s an online demo of the application we’re going to build at http://ajaxify.com/tutorial/dynamic/.
This demo shows how to handle events in JavaScript. Begin
creating tutorial.js with the usual $( ) definition:
function $(id) { return document.getElementById(id); }Once the page has loaded, we’ll invite the user to click on the sandbox:
window.onload = function( ) {
$("sandbox").innerHTML = "Click Here!<br/>";
};
}So what we want to do is catch the event of a user clicking on the sandbox. When that happens, we’ll append a message to the sandbox:
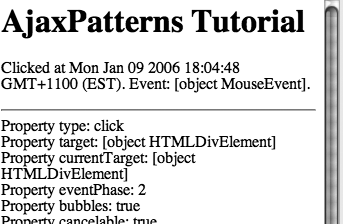
window.onload = function( ) {
$("sandbox").innerHTML = "Click Here!<br/>";
$("sandbox").onclick = function(ev) {
ev = ev || window.event;
$("sandbox").innerHTML =
Clicked at " + new Date() + ". Event: " + ev + ";
for (property in ev) {
var message = "Property " + property + ": " + ev[property] + ";
$("sandbox").innerHTML += message;
}
};Clicking on the sandbox triggers the event handler, which outputs the event contents, shown in Figure 2-3.
We assigned $("sandbox").onclick to an anonymous
function that will handle the event. That’s one common way of
registering an event handler. We could just as easily register
$("sandbox").onmouseover if we
want to capture mouse movement instead of clicking activity.
Browsers usually generate an event object with information about
what just happened, such as the time and mouse location. It’s either
passed into the callback or set as the global window.event, depending on the browser.
The first line of the callback ensures ev is set to whichever of these is valid,
so we can assume for the rest of the callback that ev is a proper representation of the event
that took place. The handler then shows a detailed report of the
event by looping across each property.
Ajaxifying a Web App: One Pattern at a Time
Patterns aren’t necessarily about big upfront design; more often, they’re used for refactoring and enhancing existing systems. The foundational technologies from the previous section can be seen as techniques for Ajaxifying a conventional web app in addition to being useful for building a new one. In the same way, many of the subsequent patterns can be seen as techniques for improving an existing Ajax App.
Here, we’ll look at how a few patterns can be progressively applied to enhance a web app. The conventional app is initially described for comparison, but we really begin building the app at Step 1, where we produce a basic Ajax version. In all, there are four steps. In the packaged code, you’ll find the complete code for each step. So if you get lost in the middle of Step 2, you can start Step 3 afresh by taking a clean copy of the completed Step 2 directory. Note that all the application files reside in just the one directory.
Background: Old-School Ajaxagram
There is no working directory (no coding required here). See the location of the completed code within the installation package at /tutorial/ajaxagram/. There’s an online demo at http://ajaxify.com/tutorial/ajaxagram/.
Starting on familiar ground, the initial version is a conventional web app—no Ajax here. It takes a word and lists all anagrams; i.e., all possible combinations of the letters (Figure 2-4). For simplicity, there’s no dictionary comparison to look for real words, and for the sake of performance, the input field is limited to just five characters. We won’t actually build this conventional version, but you might want to peruse the code (in tutorial/ajaxagram/) for comparison with the next Ajaxified version. There are two source files:
- anagram.php
The server-side business logic for finding anagrams, described later in the section "Business logic: the anagram web service.”
- index.phtml
The application’s view, a query form, and the list of anagrams. The page submits back to itself; the results area always shows all anagrams arising from the previous form submission (if there was one).

Step 1: Ajaxagram Done Ajax-Style
Ensure you’re in the working directory for this demo (/tutorial/ajaxagram/; this is the same for all steps). Note that you’ll find completed code for this step within the installation package under directory /tutorial/ajaxagram/ajaxified/, and an online demo for this step at http://ajaxify.com/tutorial/ajaxagram//ajaxified.
The initial Ajax version looks and feels just like the conventional version. The only difference is that there’s no page refresh as the query word is passed via web remoting [see the Web Remoting (Chapter 6) patterns], and the results updated using display manipulation [see the Display Manipulation (Chapter 5) patterns]. As an overview, we’ll be creating four files inside the one directory:
- anagram.php
The server-side business logic for finding anagrams; described in the next section.
- anagram.phtml
A server-side web service; accepts a word and outputs a comma-separated list of anagrams.
- index.html
The browser-side application’s view; a plain HTML file that contains the form and list of anagrams.
- ajaxagram.js
The browser-side application logic; waits for a submission, passes the query word to
anagram.phtml, and alters the display accordingly.
Begin the application by creating a fresh directory; e.g., tutorial/ajaxagram/ (you’ll need to create tutorial/ if you didn’t already do so).
mkdir tutorial cd tutorial mkdir ajaxagram
For Unix systems, ensure permissions are appropriate for your web server (e.g., make the directories globally readable and executable). All the files throughout the four steps described next should go in this directory.
Business logic: the anagram web service
We’ll begin the web service by creating a backend
module that knows only the business logic related to anagrams, and
nothing about HTML. Since we’re talking pure business logic, I’ll
just show you the entire file and skim over the details. Create
the following as anagram.php
(or copy it from the code package):
<?
/* Cleans input word and passes into findAnagramsRecursive */
function findAnagrams($word) {
$sorted = str_split(filterInput($word));
sort($sorted);
return findAnagramsRecursive(implode($sorted));
}
/* Convert to lowercase and only include letters */
function filterInput($word) {
$word = strtolower($word);
$word = ereg_replace("[^a-z]","", $word);
return $word;
}
/* Assumes $word is sorted */
function findAnagramsRecursive($word) {
if (strlen($word)==0) { return array( ); }
if (strlen($word)==1) { return array($word); }
// For each character in the word, extract it and find all anagrams
// where it's the first character.
$anagrams = array( );
for ($pos=0; $pos<strlen($word); $pos++) {
$extractedChar = substr($word,$pos,1);
// If same as previous, don't process any further as it will only
// create duplicates (this is the only check against duplicates,
// since the word is sorted).
$sameAsPreviousChar =
($pos > 0 && $extractedChar==substr($word,$pos-1,1));
if (!$sameAsPreviousChar) {
$remaining = removeCharAt($word, $pos);
$anagramsOfRemaining = findAnagramsRecursive($remaining);
foreach ($anagramsOfRemaining as $anagramOfRemaining) {
array_push($anagrams, $extractedChar . $anagramOfRemaining);
}
}
}
return $anagrams;
}
/* Return word without character at pos */
function removeCharAt($word, $pos) {
return substr($word, 0, $pos) . substr($word, $pos+1);
}
?>There’s also a packaged test case, AnagramTest.php; it’s good practice to test backend business logic
in isolation. If you want to run the test, install
PHPUnit2 (http://www.phpunit.de/pocket_guide/3.0/en/index.html)
first and see its documentation for details on running
tests.
With the business logic now in the server, we need a thin
wrapper to expose it as a clean Web Service.
Placing it in a separate file helps separate business logic from
concerns about how it will be invoked from the browser. Thus,
create the web service anagrams.phtml as follows:
<?
require_once("anagram.php");
$word = array_key_exists('word', $_GET) ? $_GET['word'] : "";
$anagramsArray = findAnagrams($word);
print implode(",", $anagramsArray);
?>You can test the web service: point your browser at http://localhost/tutorial/ajaxagram/anagrams.phtml?word=ajax, and you should see a comma-separated list of “ajax” anagrams. Notice that this is a raw response intended for easy script processing and not the sort of thing you’d show a user. Our script will need to parse it in order to present the results to users.
Presentation: initial HTML
The initial HTML file contains the basic display detail—a form and a list of anagrams—and also pulls in the required JavaScript. Create index.html as follows:
<html>
<head>
<title>AjaxPatterns.org - Ajaxagram (Basic Ajax Version)</title>
<script type="text/javascript" src="ajaxagram.js">
</script>
</head>
<body>
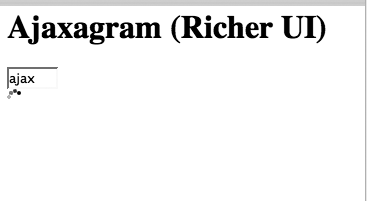
<h1>Ajaxagram (Basic Ajax Version)</h1>
<div>
<input type="text" id="word" size="5" maxlength="5" />
<button id="findAnagrams">Find Anagrams!</button>
</div>
<div id="results">
</div>
</body>Point your browser to the HTML; you should see the heading and the form, but probably not the results area as it’s initially empty.
There are a few things to note about the HTML, and you might
like to contrast it with index.phtml packaged in the conventional
version. First, the “form” is not a true HTML <form> element because we don’t
need the browser to submit it to the server; our script will issue
the query manually. Second, as there’s no HTML form here, a
button element is used instead
of a submit control. Third, the
results div is empty. It will
be populated each time our script receives a list of anagrams from
the server. Finally, note the absence of any JavaScript code here;
all the application logic is isolated in a separate file,
ajaxagram.js.
Application logic: JavaScript
The final task is coding the application logic that acts as the glue between the server-side web service and the browser-side web page. Create ajaxagram.js with the following generic methods, explained earlier in the “In A Blink” tutorials. Keep these at the end of the file as we build the rest of the JavaScript.
// -- Generic functions --------------------------------------------------
function createXMLHttpRequest( ) {
try { return new ActiveXObject("Msxml2.XMLHTTP"); } catch (e) {}
try { return new ActiveXObject("Microsoft.XMLHTTP"); } catch (e) {}
try { return new XMLHttpRequest( ); } catch(e) {}
alert("XMLHttpRequest not supported");
return null;
}
function $(id) {
return document.getElementById(id);
}The JavaScript needs to handle the query lifecycle, which has three stages:
The user clicks the
findAnagramsbutton.XMLHttpRequestsubmitswordinput to theanagarams.phtmlweb service.When the anagram list arrives from server, the
anagramsblock is updated.
We’ll now create three JavaScript functions, with each
function roughly corresponding to each of these stages. The first
of these ensures the findAnagrams button will trigger the
query:
window.onload = function( ) {
$("findAnagrams").onclick = function( ) {
submitWord( );
}
}If you like, you can test the application now. Upon
submitting, you should see an error message because submitWord( ) is not there yet. We’ll create submitWord( ) now, using essentially the
same boilerplate code as in the earlier "Web Remoting in a Blink"
tutorial.
function submitWord( ) {
var xhr = createXMLHttpRequest( );
xhr.onreadystatechange = function( ) {
if (xhr.readyState==4) { // Request is finished
if (xhr.status==200) {
var anagramsCSV = xhr.responseText;
updateAnagramsDisplay(anagramsCSV);
} else {
alert("An error occurred.");
}
}
}
var word = $("word").value;
xhr.open("GET", "anagrams.phtml?word="+word, true);
xhr.send(null);
}After adding submitWord(
), the browser submits the query word to anagrams.phtml. You can check it by
clicking on the Find Anagrams! button and verifying that your web
server logs the call to anagrams.phtml. You might also monitor
the browser-server traffic using a tool mentioned in
Traffic Sniffing (Chapter 18). Once the script has
returned successfully, updateAnagramsDisplay( ) is called.
updateAnagramsDisplay( )
receives the comma-separated list of anagrams, splits it to form
an array, and outputs each anagram on a separate line:
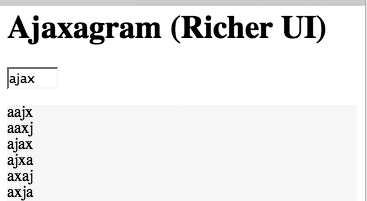
function updateAnagramsDisplay(anagramsCSV) {
$("results").innerHTML = "";
var anagrams = anagramsCSV.split(",");
for (var i=0; i<anagrams.length; i++) {
$("results").innerHTML += anagrams[i] + "<br/>";
}
}Ajaxagram should now work as described earlier. Congratulations, you’ve built a working Ajax application! You built it using several of the patterns described in the first part of the Ajax Patterns language—the patterns of foundational technologies. Those patterns are enough to build an application, but the patterns of the latter sections consider real-world issues like usability and maintainability. Those are illustrated in the next few sections.
Incidentally, you might notice a small bug. If you search too quickly, you’ll see the results for different searches blending together. This is a consequence of the asynchronous nature of Ajax, with results being processed simultaneously in the browser. We’ll eventually fix the problem in Step 3, where we introduce one of several possible techniques to prevent issues like this.
Step 2: Enhancing Functionality and Usability
Ensure you’re in the working directory for this demo (/tutorial/ajaxagram/; this is the same for all steps). Note that you’ll find completed code for this step within the installation package under directory /tutorial/ajaxagram/ajaxified/richer, and an online demo for this step at http://ajaxify.com/tutorial/ajaxagram/ajaxified/richer/.
So far, Ajaxagram is impressive insofar as you can now tell your tech friends you’ve coded an Ajax application. Still, your boss/client/shareholder is going to have a hard time telling it apart from the conventional version. We’re going to have to jazz the user interface up if we want to make a true impression. (And hopefully improve usability in the process.) We’ll refactor according to Functionality and Usability Patterns (Part IV). By the way, we’re only “refactoring by patterns” for demonstration purposes; in real life, it’s a lot wiser to let the requirements drive the changes you make and let the patterns follow from there.
Note that the tutorial code package includes the completed files for each step. If you had any problems with the initial version, simply start from here using the files in /tutorial/ajaxagram/ajaxified/.
Live Search
We’ll begin the UI face-lift by making the input mechanism become a Live Search (Chapter 14). No more pressing the Find Anagrams! button because the results will update on each keystroke. Incidentally, Live Search needs to be applied with caution in the real world, because it can sometimes be more of an annoyance than an aid.
Where we previously submitted upon button click, we now submit upon each keypress:
window.onload = function( ) {
$("word").onkeyup = function( ) {
submitWord( );
}
}And that’s that! Reload the page and we now have a working Live Search. Frankly, there’s more work required to make it production-ready, but it’s pretty neat that our basic Ajax code could be modified so easily to do it. Complete the Live Search by scrapping the Find Anagrams! button, which is now obsolete. This will leave the input area as follows:
<div>
<input type="text" id="word" size="5" maxlength="5" />
</div>Progress Indicator
The input field is limited to five characters because long queries take a very long time. But even with five characters, the delay will be noticeable, especially in a real-world context, so we’ll ease the pain with a Progress Indicator (Chapter 14). This is an animated GIF that’s always present on the page, with its visibility toggled on and off, depending on whether we’re waiting for a response.
<div>
<input type="text" id="word" size="5" maxlength="5" />
</div>
<img id="progress"
src="http://ajaxify.com/tutorial/resources/progress.gif"
class="notWaiting"/>You can leave the image URL pointing to my ajaxify.com
server—you’re welcome to do so and it will work fine—or
alternatively, download the image (or copy it from the code
package tutorial/resources/) to the current
directory and reference it locally (using src="progress.gif").
Next, we’re going to introduce a CSS file with the styles
for waiting and notWaiting modes. Just as we’ve
separated JavaScript from HTML, we’ll also separate CSS. To that
end, add the following line near the top of index.html:
<head>
<title>AjaxPatterns.org - Ajaxagram (Basic Ajax Version)</title>
<script type="text/javascript" src="ajaxagram.js"></script>
<link rel="stylesheet" type="text/css" href="ajaxagram.css"/>
</head>Now create the new CSS file, ajaxagram.css, in the same directory.
.waiting {
visibility: visible;
}
.notWaiting {
visibility: hidden;
}Now we can just flip the image’s CSS class between waiting and notWaiting, according to the request state. The image enters waiting mode when a query is submitted,
in the submitWord( ) method, and enters notWaiting when the query
returns.
function submitWord( ) {
// Show progress indicator and clear existing results
$("progress").className = "waiting";
$("results").innerHTML = "";
...
}
function updateAnagramsDisplay(anagramsCSV) {
$("progress").className = "notWaiting";
var anagrams = anagramsCSV.split(",");
...
}At this stage, you should see the Progress
Indicator while waiting (Figure 2-5). If the wait is
too short to see it, buy yourself a slower PC or alternatively,
instrument anagrams.phtml with
a delay; e.g., sleep(1);.
That’s a basic illustration of the Progress Indicator pattern. For
a harder problem, increase the width of the input field to allow
longer anagrams, and then change the Progress Indicator to show
percent complete. (Hint: use a Guesstimate
[Chapter 13] or create a
monitoring channel.)
One-Second Spotlight (Yellow Fade Technique)
Along with Progress Indicators,
one of Ajax’s great visual landmarks is the Yellow Fade
Technique, or the more general One-Second
Spotlight (Chapter
16) pattern. Here, we’re going to fade results in each time
they update. The div will
suddenly become yellow and gradually settle back to white over the
space of a second. It will happen frequently enough to be
considered an abuse of the technique, but hey, it’s nice eye candy
and good enough for demo purposes.
The fade animation here is super-simplistic. In 10 steps,
each 100 milliseconds apart, it pumps up the RGB value from (100%,
100%, 0%) to (100%, 100%, 100%). That is, from yellow to white.
Thus, red and green components of the div color are fixed at 100 percent,
while blue increases by 10 percent each iteration:
// Caller-friendly front-end to fadeLoop
function fade( ) {
fadeLoop(0);
}
function fadeLoop(nextBluePercent) {
$("results").style.backgroundColor = "rgb(100%, 100%, "+nextBluePercent+"%)";
nextBluePercent += 10;
if (nextBluePercent<=100) {
setTimeout("fadeLoop("+nextBluePercent+")", 100);
}
}Invoke fade( ) just prior
to outputting the fresh anagram list:
function updateAnagramsDisplay(anagramsCSV) {
$("progress").className = "notWaiting";
fade(0);
...
}Now click on Find Anagrams! and enjoy the hypnotic Ajax fade effect (Figure 2-6).
Step 3: Refactoring for Performance
Ensure you’re in the working directory for this demo (/tutorial/ajaxagram/; this is the same for all the steps). Note that you’ll find completed code for this step within the installation package under directory /tutorial/ajaxagram/ajaxified/richer/performant/, and an online demo for this step at http://ajaxify.com/tutorial/ajaxagram/ajaxified/richer/performant/.
The previous section shows how the Ajax Patterns go beyond foundational technologies to look at usability and functionality issues. That alone would be useful, but we still need to address the nonfunctional aspects of a rich web application, like performance, data integrity, testability, and programmer productivity. That’s the domain of Programming Patterns (Part III), as well as Development Patterns (Part V). Here we’ll treat the application with Submission Throttling, a programming pattern.
The problem we’re dealing with arises from the Live Search capability. Responding to each keystroke is nice, but unfortunately impractical in most real-world settings. We want a way to limit—throttle—the submissions. The solution is very simple: submit only after an idle period of one second. Modify ajaxagram.js as follows:
var submitTimer;window.onload = function( ) { $("word").onkeyup = function( ) {clearTimeout(submitTimer);// Clears any previously scheduled submission } }
Reload the application and you should see the delay between typing the word and seeing the results appear. We’ve now capped the number of browser-server calls to one per second, which is one style of Submission Throttling. It works using timers; as explained in the Scheduling (Chapter 7) pattern, JavaScript lets us set a one-off event in the future and cancel it too. The above code ensures that each keystroke schedules a call in one second and cancels any pending call.
Step 4: Refactoring to an External Library
Go to the working directory (/tutorial/ajaxagram/; this is the same for all the steps). Note that you’ll find completed code within the installation package under directory /tutorial/ajaxagram/ajaxified/richer/performant/library/, and on online demo for this step at http://ajaxify.com/tutorial/ajaxagram/ajaxified/richer/performant/library/.
The final refactoring isn’t actually related to a particular pattern, but is a reminder of the importance of libraries and frameworks throughout the patterns. While most patterns cover low-level JavaScript concepts that are worth knowing, that doesn’t mean you have to hand-code everything yourself. There’s an ever-growing list of production-ready components available, as documented in Appendix A. The demo here shows how we can achieve the same functionality by reusing a library.
A prime candidate is the remoting performed by Ajaxagram.
There’s very little reason to directly use XMLHttpRequest nowadays, so we’ll refactor
to one of the many libraries that wraps it in a clean API. We’ll use
ajaxCaller (http://www.ajaxify.com/run/testAjaxCaller/),
a small component developed specifically for the demos in this
book.
Add a new <script>
tag to index.html to include the
library:
<head>
<title>AjaxPatterns.org - Ajaxagram ()</title>
<script type="text/javascript" src="ajaxagram.js"></script>
<script type="text/javascript" src="http://ajaxify.com/tutorial/resources/
ajaxCaller.js"></script>
<link rel="stylesheet" type="text/css" href="ajaxagram.css" />
</head>The above line will pull the script down from my ajaxify.com
server; as with the progress indicator earlier, you’re welcome to
leave it like that.[*] Alternatively, you can download the script (or copy it
from the code package tutorial/resources)/ to
the current directory and change the URL accordingly (use src="ajaxCaller.js").
submitWord( ) now becomes
almost trivial:
function submitWord( ) {
// Show progress indicator and clear existing results
$("progress").className = "waiting";
$("results").innerHTML = "";
var word = $("word").value;
ajaxCaller.getPlainText("anagrams.phtml?word="+word,updateAnagramsDisplay);
}In addition, you can remove the generic createXMLHttpRequest( ) function. That’s a
lot of code we no longer need thanks to the external library.
Refactoring Exercises
The final Ajaxagram makes a simple platform on which to play around with further patterns. Here are a few exercises you can try out. Let me know how it goes (contact me at michael@mahemoff.com). I’d be pleased to link to any examples from the tutorial’s homepage.
Foundational technology patterns
- On-Demand JavaScript (Chapter 6)
Instead of downloading all of ajaxagram.js at the start, simply download the bootstrapping code and have it fetch the rest of the script on demand.
Programming patterns
- Web Services (Chapter 9) patterns
Experiment with the response emerging from the
anagrams.phtmlweb service. Try returning an HTML Message (Chapter 9) or an XML Message (Chapter 9) instead.- Call Tracking (Chapter 10)
As the first step mentioned, the anagrams list sometimes contains results for several queries at once. The refactoring to the Submission Throttling (Chapter 10) pattern basically fixed this by enforcing a gap between submissions. However, you don’t always want to use Submission Throttling; even if you do, there’s no guarantee it will solve this problem. Introduce Call Tracking for a more direct attack.
- Submission Throttling (Chapter 10)
We applied one kind of Submission Throttling, but try for the kind discussed in the Code Example section of Chapter 10.
- Cross-Domain Proxy (Chapter 10)
Instead of calling your own server for the anagrams, relay the call to my server at ajaxify.com/tutorial/ajaxagram/ajaxified/anagrams.phtml.
- Browser-Side XSLT (Chapter 11
Transmit the anagrams in XML format and convert them with XSLT for display.
- Browser-Side Templating (Chapter 11)
Show the results using a template framework.
- Browser-Side Cache (Chapter 13)
Cache previous anagram lists.
- Predictive Fetch (Chapter 13)
For the basic version, which uses a button for submission, make a pre-emptive call in anticipation of a button press.
- Fat Client (Chapter 13)
Forget the server altogether and compute the anagrams in the browser.
Functionality and Usability patterns
- Data Grid (Chapter 14)
Show the list of anagrams in a Data Grid, allowing for search, filtering, and so on.
- Suggestion (Chapter 14)
Suggest words from a dictionary as the user types.
- On-Demand JavaScript (Chapter 6)
Instead of downloading all of ajaxagram.js at the start, simply download the bootstrapping code and have it fetch the rest of the script on demand.
- Popup (Chapter 15)
Produce the results in a Popup.
- Portlet (Chapter 15)
Encapsulate the search as a Portlet and slap it on a web site you maintain.
- Virtual Workspace (Chapter 15)
The demo produces many, many results for long queries, which is why the input field is limited to five letters. Allow more letters and show the results as a Virtual Workspace. You’ll probably want to make the algorithm itself more flexible.
- Unique URLs (Chapter 17)
Make sure each query corresponds to a unique URL.
Development patterns
- Diagnosis (Chapter 18) patterns
Apply the various tools mentioned in this chapter.
- Service Test (Chapter 19)
Create a standalone HTTP client to test anagrams.phtml. Note that
AnagramTestalready tests the backend logic, so the most important thing is simply to check the service interface works.- System Test (Chapter 19)
Apply the various tools mentioned in System Test.
Projects and Katas
Now it’s over to you. Here are some suggestions for projects you can work on. You might like to approach these as “Katas” (http://blogs.pragprog.com/cgi-bin/pragdave.cgi/Practices/Kata/), short exercises that you can keep returning to. Alternatively, add all the bells and whistles and make them full-blown projects. Check http://ajaxpatterns.org/Katas for the latest list, and please add links to any of your online efforts.
- Two-Person chat
Allow two people to chat in real-time via the browser.
- Filesystem navigator
Navigate a server-side filesystem. Bonus points for sanely displaying file contents.
- Search portlet
Build a portlet to access your favorite web service, using a Cross-Domain Proxy (Chapter 10) pattern or an On-Demand JavaScript (Chapter 6) pattern if the web service happens to offer a compatible service (such as Yahoo’s JSON API). Results should be displayed inside the portlet, without any page refresh.
- Drag-And-Drop cart
Create a shopping cart that allows items to be dragged in and out and uploads details to the server. Note that several libraries support drag-and-drop.
- Am I Ajax Or Not
Create a clone of AmIHotOrNot.com. Show two random images (or even just random numbers), let the user click on their favorite, and ensure the server records their choice. For bonus points, show scores in the browser; e.g., offer a popup showing the number of “wins” for the two items being displayed.
- Whack-A-Mole game
“Moles” appear at random places on the page and the user must quickly eradicate them by clicking on them. Provide a timer and report the user’s score.
- Image slideshow
Present a sequence of images using Ajax for navigation. You might also include some visual effects.
- Web Site Tuning bookmarklet
Build a bookmarklet that allows the user to tweak the page’s style settings; pop up a dialog with fields such as background color and font size.Bookmarklets (http://en.wikipedia.org/wiki/Bookmarklet) aren’t regular Ajax applications, but they are still a great way to play with Ajax technologies.
Conclusions
The first part of this chapter showed you how to create a basic Ajax application. After performing that section, you should be comfortable about the basics of Display Manipulation (Chapter 5), Web Remoting (Chapter 6), and Dynamic Behavior (Chapter 7. The second part of this chapter introduced a number of the Ajax Patterns—the point is not to understand those patterns in detail, but to get a feel for the sort of thing the patterns do. That is, to see how they build on top of the basic technologies to improve usability, maintainability, and so on. The final part of this chapter suggested several exercises—I recommend you try one or two if you’re still coming to grips with Ajax.
It should be clear by now that although Ajax is a great leap forward for the Web, it’s no magic bullet. Developers need to tread carefully in order to ensure their Ajax apps are easy to maintain and easy to use. The next chapter summarizes several key principles for Ajax system design and introduces the Ajax Patterns, which offer practical advice on applying those design principles.
[*] The $( ) alias for
document.getElementById(
            )
is based on the prototype library (http://prototype.conio.net/). Because
many popular Ajax libraries build on prototype, it’s becoming
something of a standard idiom in Ajax scripts.
Get Ajax Design Patterns now with the O’Reilly learning platform.
O’Reilly members experience books, live events, courses curated by job role, and more from O’Reilly and nearly 200 top publishers.

