Chapter 6. Blending and Augmented Reality
If you’ve ever used Photoshop to place yourself in front of the Taj Mahal in a paroxysm of wishful thinking, you’re probably familiar with layers and opacity. Alpha simply represents opacity on a zero-to-one scale: zero is transparent, one is fully opaque. Alpha can be used both with and without textures, and in this chapter we’ll pay special attention to textures that contain alpha. Blending is the process of compositing a source color with an existing pixel in the framebuffer.
Tangentially related to blending is anti-aliasing, or the attempt to mask “jaggies.” Antialiased vector art (such as the circle texture we generated in the previous chapter) varies the alpha along the edges of the artwork to allow it to blend into the background. Anti-aliasing is also often used for lines and triangle edges, but unfortunately the iPhone’s OpenGL implementation does not support this currently. Fret not, there are ways to get around this limitation, as you’ll see in this chapter.
Also associated with blending are heads-up displays and augmented reality. Augmented reality is the process of overlaying computer-generated imagery with real-world imagery, and the iPhone is particularly well-suited for this. We’ll wrap up the chapter by walking through a sample app that mixes OpenGL content with the iPhone’s camera interface, and we’ll use the compass and accelerometer APIs to compute the view matrix. Overlaying the environment with fine Mughal architecture will be left as an exercise to the reader.
Blending Recipe
Some of my favorite YouTube videos belong to the Will It Blend? series. The episode featuring the pulverization of an iPhone is a perennial favorite, seconded only by the Chuck Norris episode. Alas, this chapter deals with blending of a different sort. OpenGL blending requires five ingredients:
For step 5, I’m giving a rather classic blending equation as an example, but that’s not always what you’ll want! (More on this later.) Specifically, the previous function call sets up the following equation:
S is the source color, D is the starting destination color, and F is the final destination color. By default, OpenGL’s blending equation is this:
Since the default blending function ignores
alpha, blending is effectively turned off even when you’ve enabled it with
glEnable. So, always remember to set your blending
function—this is a common pitfall in OpenGL programming.
Here’s the formal declaration of
glBlendFunc:
void glBlendFunc (GLenum sfactor, GLenum dfactor);
The blending equation is always an operation on two scaled operands: the source color and the destination color. The template to the equation is this:
The sfactor and
dfactor arguments can be any of the
following:
- GL_ZERO
- GL_ONE
- GL_SRC_ALPHA
Multiplies the operand by the alpha component of the source color.
- GL_ONE_MINUS_SRC_ALPHA
Multiplies the operand by the inverted alpha component of the source color.
- GL_DEST_ALPHA
Multiplies the operand by the alpha component of the destination color.
- GL_ONE_MINUS_DEST_ALPHA
Multiplies the operand by the inverted alpha component of the destination color.
Additionally, the
sfactor parameter supports the following:
- GL_DST_COLOR
Component-wise multiplication of the operand with the destination color.
- GL_ONE_MINUS_DST_COLOR
Component-wise multiplication of the operand with the inverted destination color.
- GL_SRC_ALPHA_SATURATE
Returns the minimum of source alpha and inverted destination alpha. This exists mostly for historical reasons, because it was required for an outmoded anti-aliasing technique.
And the dfactor
parameter also supports the following:
OpenGL ES 2.0 relaxes the blending constraints
by unifying the set of choices for sfactor and
dfactor, with the exception of
GL_SRC_ALPHA_SATURATE.
Note
ES 2.0 also adds the concept of “constant
color,” specified via glBlendColor. For more
information, look up glBlendColor and
glBlendFunc at the Khronos website:
| http://www.khronos.org/opengles/sdk/docs/man/ |
Wrangle Premultiplied Alpha
One of the biggest gotchas with textures on Apple devices is the issue of premultiplied alpha. If the RGB components in an image have already been scaled by their associated alpha value, the image is considered to be premultiplied. Normally, PNG images do not store premultiplied RGB values, but Xcode does some tampering with them when it creates the application bundle.
You might recall that we passed in a flag to
the CGBitmapInfo mask that’s related to this; Example 6-1 shows a snippet of the
ResourceManager class presented in the previous
chapter, with the flag of interest highlighted in bold.
CGColorSpaceRef colorSpace = CGColorSpaceCreateDeviceRGB();
CGBitmapInfo bitmapInfo =
  kCGImageAlphaPremultipliedLast | kCGBitmapByteOrder32Big;
CGContextRef context = CGBitmapContextCreate(data,
    description.Size.x,
    description.Size.y,
    description.BitsPerComponent,
    bpp * description.Size.x,
    colorSpace,
    bitmapInfo);
CGColorSpaceRelease(colorSpace);
CGRect rect = CGRectMake(0, 0, description.Size.x, description.Size.y);
CGContextDrawImage(context, rect, uiImage.CGImage);
CGContextRelease(context);
For nonpremultiplied alpha, there’s a flag
called kCGImageAlphaLast that you’re welcome to try,
but at the time of this writing, the Quartz implementation on the iPhone
does not support it, and I doubt it ever will, because of the funky
preprocessing that Xcode performs on image files.
So, you’re stuck with premultiplied alpha. Don’t panic! There are two rather elegant ways to deal with it:
Use PVRTexTool to encode your data into a PVR file. Remember, PVRTexTool can encode your image into any OpenGL format; it’s not restricted to the compressed formats.
Or, adjust your blending equation so that it takes premultiplied alpha into account, like so:
glBlendFunction(GL_ONE, GL_ONE_MINUS_SRC_ALPHA)
By using
GL_ONEfor thesfactorargument, you’re telling OpenGL there’s no need to multiply the RGB components by alpha.
Warning
In the previous chapter, we also presented a
method of loading PNG files using
CGDataProviderCopyData, but with that technique, the
simulator and the device can differ in how they treat alpha. Again, I
recommend using PVR files for fast and reliable results.
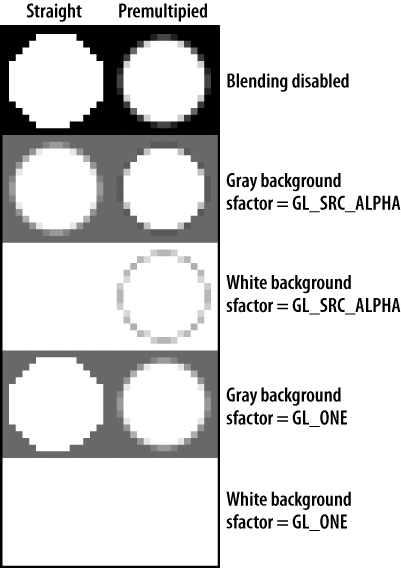
In Figure 6-1, the
left column contains a normal texture, and the right column contains a
texture with premultiplied alpha. In every row, the
dfactor argument is
GL_ONE_MINUS_SRC_ALPHA.
The following list summarizes the best results from Figure 6-1:
Blending Caveats
It’s important to remember to disable depth testing when blending is enabled. If depth testing is turned on, triangles that lie beneath other triangles get completely rejected, so their color can’t contribute to the framebuffer.
An equally important caveat is that you should render your triangles in back-to-front order; the standard blending math simply doesn’t work if you try to draw the top layer before the layer beneath it. Let’s demonstrate why this is so. Suppose you’d like to depict a half-opaque red triangle on top of a half-opaque green triangle. Assuming the clear color is black, the history of a pixel in the framebuffer would look like this if you use back-to-front ordering:
So, the resulting pixel is a yellowish red; this is what you’d expect. If you try to draw the red triangle first, the result is different:
Now you have yellowish green. Order matters when you’re blending! Incidentally, there’s a way to adjust the blending equations so that you can draw in front-to-back order instead of back-to-front; we’ll show how in the next section.
Blending Extensions and Their Uses
Always remember to check for extension support using the method described in Dealing with Size Constraints. At the time of this writing, the iPhone supports the following blending-related extensions in OpenGL ES 1.1:
- GL_OES_blend_subtract (all iPhone models)
Allows you to specify a blending operation other than addition, namely, subtraction.
- GL_OES_blend_equation_separate (iPhone 3GS and higher)
Allows you to specify two separate blending operations: one for RGB, the other for alpha.
- GL_OES_blend_func_separate (iPhone 3GS and higher)
Allows you to specify two separate pairs of blend factors: one pair for RGB, the other for alpha.
With OpenGL ES 2.0, these extensions are part of the core specification. Together they declare the following functions:
void glBlendEquation(GLenum operation)
void glBlendFuncSeparate(GLenum sfactorRGB, GLenum dfactorRGB,
                         GLenum sfactorAlpha, GLenum dfactorAlpha);
void glBlendEquationSeparate(GLenum operationRGB, GLenum operationAlpha);
For ES 1.1, remember to append OES to the end of each function since that’s the naming convention for extensions.
The parameters to
glBlendEquation and
glBlendEquationSeparate can be one of the
following:
Again, remember to append _OES for these constants when working with ES 1.1.
When all these extensions are supported, you effectively have the ability to specify two unique equations: one for alpha, the other for RGB. Each equation conforms to one of the following templates:
FinalColor = SrcColor * sfactor + DestColor * dfactor
FinalColor = SrcColor * sfactor - DestColor * dfactor
FinalColor = DestColor * dfactor - SrcColor * sfactor
Why Is Blending Configuration Useful?
You might wonder why you’d ever need all the flexibility given by the aforementioned blending extensions. You’ll see how various blending configurations come in handy with some samples presented later in the chapter, but I’ll briefly go over some common uses here.
One use of
GL_FUNC_SUBTRACT is inverting a region of color on
the screen to highlight it. Simply draw a solid white rectangle and use
GL_ONE for both sfactor and
dfactor. You could also use subtraction to perform a
comparison, or visual “diff,” between two images.
The separate blending equations can be useful too. For example, perhaps you’d like to leave the destination’s alpha channel unperturbed because you’re storing information there for something other than transparency. In such a case, you could say the following:
glBlendFuncSeparate(GL_SRC_ALPHA, GL_ONE_MINUS_SRC_ALPHA, GL_ZERO, GL_ONE);
Another time to use separate blending equations is when you need to draw your triangles in front-to-back order rather than the usual back-to-front order. As you’ll see later in the chapter, this can be useful for certain effects. To pull this off, take the following steps:
To see why this works, let’s go back to the example of a half-opaque red triangle being rendered on top of a half-opaque green triangle:
The resulting pixel is yellowish red, just as you’d expect. Note that the framebuffer’s alpha value is always inverted when you’re using this trick.
Shifting Texture Color with Per-Vertex Color
Sometimes you’ll need to uniformly tweak the alpha values across an entire texture. For example, you may want to create a fade-in effect or make a texture semitransparent for drawing a heads-up display (HUD).
With OpenGL ES 1.1, this can be achieved simply by adjusting the current vertex color:
glColor4f(1, 1, 1, alpha);
By default, OpenGL multiplies each component of the current vertex color with the color of the texel that it’s rendering. This is known as modulation, and it’s actually only one of many ways that you can combine texture color with per-vertex color (this will be discussed in detail later in this book).
If you’re using a texture with premultiplied alpha, then the vertex color should also be premultiplied. The aforementioned function call should be changed to the following:
glColor4f(alpha, alpha, alpha, alpha);
Sometimes you may want to throttle back only one color channel. For example, say your app needs to render some red and blue buttons and that all the buttons are identical except for their color. Rather than wasting memory with multiple texture objects, you can create a single grayscale texture and modulate its color, like this:
// Bind the grayscale button texture.
glBindTexture(GL_TEXTURE_2D, buttonTexture)

// Draw green button.
glColor4f(0, 1, 0, 1);
glDrawElements(...);

// Draw red button.
glColor4f(1, 0, 0, 1);
glDrawElements(...);
With ES 2.0, the modulation needs to be performed within the pixel shader itself:
varying lowp vec4 Color;
varying mediump vec2 TextureCoord;

uniform sampler2D Sampler;

void main(void)
{
    gl_FragColor = texture2D(Sampler, TextureCoord) * Color;
}
The previous code snippet should look familiar. We used the same technique in Chapter 5 when combining lighting color with texture color.
Poor Man’s Reflection with the Stencil Buffer
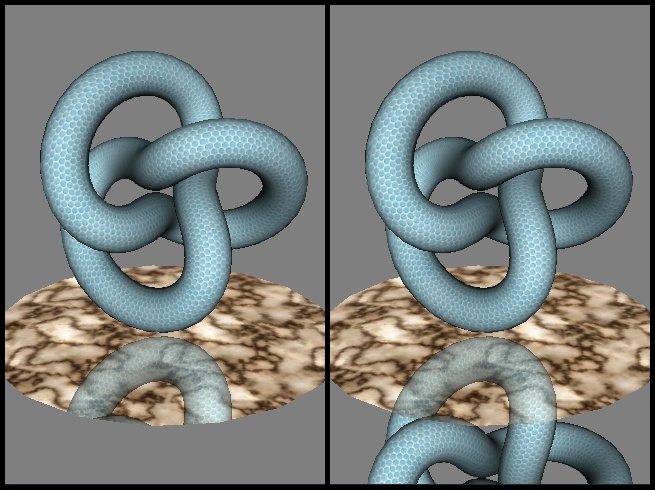
One use for blending in a 3D scene is overlaying a reflection on top of a surface, as shown on the left of Figure 6-2. Remember, computer graphics is often about cheating! To create the reflection, you can redraw the object using an upside-down projection matrix. Note that you need a way to prevent the reflection from “leaking” outside the bounds of the reflective surface, as shown on the right in Figure 6-2. How can this be done?
It turns out that third-generation iPhones and iPod touches have support for an OpenGL ES feature known as the stencil buffer, and it’s well-suited to this problem. The stencil buffer is actually just another type of renderbuffer, much like color and depth. But instead of containing RGB or Z values, it holds a small integer value at every pixel that you can use in different ways. There are many applications for the stencil buffer beyond clipping.
To check whether stenciling is supported on the
iPhone, check for the GL_OES_stencil8 extension using
the method in Dealing with Size Constraints. At the time
of this writing, stenciling is supported on third-generation devices and
the simulator, but not on first- and second-generation devices.
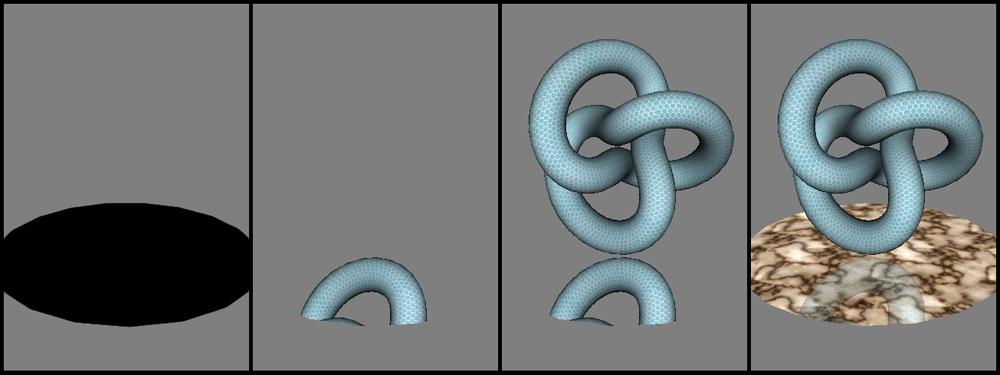
The reflection trick can be achieved in four steps (see Figure 6-3):
Note that the reflection is drawn before the textured podium, which is the reason for the front-to-back blending. We can’t render the reflection after the podium because blending and depth-testing cannot both be enabled when drawing complex geometry.
The complete code for this sample is available from this book’s website, but we’ll go over the key snippets in the following subsections. First let’s take a look at the creation of the stencil buffer itself. The first few steps are generating a renderbuffer identifier, binding it, and allocating storage. This may look familiar if you remember how to create the depth buffer:
GLuint stencil;
glGenRenderbuffersOES(1, &stencil);
glBindRenderbufferOES(GL_RENDERBUFFER_OES, stencil);
glRenderbufferStorageOES(GL_RENDERBUFFER_OES, GL_STENCIL_INDEX8_OES, width, height);
Next, attach the stencil buffer to the framebuffer object, shown in bold here:
GLuint framebuffer;
glGenFramebuffersOES(1, &framebuffer);
glBindFramebufferOES(GL_FRAMEBUFFER_OES, framebuffer);
glFramebufferRenderbufferOES(GL_FRAMEBUFFER_OES, GL_COLOR_ATTACHMENT0_OES,
                             GL_RENDERBUFFER_OES, color);
glFramebufferRenderbufferOES(GL_FRAMEBUFFER_OES, GL_DEPTH_ATTACHMENT_OES,
                             GL_RENDERBUFFER_OES, depth);
glFramebufferRenderbufferOES(GL_FRAMEBUFFER_OES, GL_STENCIL_ATTACHMENT_OES,
                             GL_RENDERBUFFER_OES, stencil);
glBindRenderbufferOES(GL_RENDERBUFFER_OES, color);
As always, remember to omit the OES endings when working with ES 2.0.
To save memory, sometimes you can interleave
the depth buffer and stencil buffer into a single renderbuffer. This is
possible only when the OES_packed_depth_stencil
extension is supported. At the time of this writing, it’s available on
third-generation devices, but not on the simulator or older devices. To
see how to use this extension, see Example 6-2.
Relevant portions are highlighted in bold.
GLuint depthStencil;
glGenRenderbuffersOES(1, &depthStencil);
glBindRenderbufferOES(GL_RENDERBUFFER_OES, depthStencil);
glRenderbufferStorageOES(GL_RENDERBUFFER_OES, GL_DEPTH24_STENCIL8_OES, width, height);

GLuint framebuffer;
glGenFramebuffersOES(1, &framebuffer);
glBindFramebufferOES(GL_FRAMEBUFFER_OES, framebuffer);
glFramebufferRenderbufferOES(GL_FRAMEBUFFER_OES, GL_COLOR_ATTACHMENT0_OES,
                             GL_RENDERBUFFER_OES, color);
glFramebufferRenderbufferOES(GL_FRAMEBUFFER_OES, GL_DEPTH_ATTACHMENT_OES,
                             GL_RENDERBUFFER_OES, depthStencil);
glFramebufferRenderbufferOES(GL_FRAMEBUFFER_OES, GL_STENCIL_ATTACHMENT_OES,
                             GL_RENDERBUFFER_OES, depthStencil);
glBindRenderbufferOES(GL_RENDERBUFFER_OES, color);
Rendering the Disk to Stencil Only
Recall that step 1 in our reflection demo renders the disk to the stencil buffer. Before drawing to the stencil buffer, it needs to be cleared, just like any other renderbuffer:
glClearColor(0, 0, 0, 1);
glClear(GL_COLOR_BUFFER_BIT | GL_DEPTH_BUFFER_BIT | GL_STENCIL_BUFFER_BIT);
Next you need to tell OpenGL to enable writes to the stencil buffer, and you need to tell it what stencil value you’d like to write. Since you’re using an 8-bit buffer in this case, you can set any value between 0x00 and 0xff. Let’s go with 0xff and set up the OpenGL state like this:
glEnable(GL_STENCIL_TEST);
glStencilOp(GL_REPLACE, GL_REPLACE, GL_REPLACE);
glStencilFunc(GL_ALWAYS, 0xff, 0xff);
The first line enables
GL_STENCIL_TEST, which is a somewhat misleading name
in this case; you’re writing to the stencil buffer,
not testing against it. If you don’t enable
GL_STENCIL_TEST, then OpenGL assumes you’re not
working with the stencil buffer at all.
The next line,
glStencilOp, tells OpenGL which stencil operation
you’d like to perform at each pixel. Here’s the formal
declaration:
void glStencilOp(GLenum fail, GLenum zfail, GLenum zpass);
Since the disk is the first draw call in the scene, we don’t care whether any of these tests fail, so we’ve set them all to the same value.
Each of the arguments to
glStencilOp can be one of the following:
Again, this may seem like way too much
flexibility, more than you’d ever need. Later in this book, you’ll see
how all this freedom can be used to perform interesting tricks. For now,
all we’re doing is writing the shape of the disk out to the stencil
buffer, so we’re using the GL_REPLACE
operation.
The next function we called to set up our
stencil state is glStencilFunc. Here’s its function
declaration:
void glStencilFunc(GLenum func, GLint ref, GLuint mask);
- GLenum func
This specifies the comparison function to use for the stencil test, much like the depth test Creating and Using the Depth Buffer.
- GLint ref
- GLuint mask
Before performing a comparison, this bitmask gets ANDed with both the reference value and the value that’s already in the buffer.
Again, this gives the developer quite a bit of power, but in this case we only need something simple.
Getting back to the task at hand, check out Example 6-3 to see how to render the disk to the stencil buffer only. I adjusted the indentation of the code to show how certain pieces of OpenGL state get modified before the draw call and then restored after the draw call.
// Prepare the render state for the disk.
glEnable(GL_STENCIL_TEST);
glStencilOp(GL_REPLACE, GL_REPLACE, GL_REPLACE);
glStencilFunc(GL_ALWAYS, 0xff, 0xff);

// Render the disk to the stencil buffer only.
glDisable(GL_TEXTURE_2D);
 glTranslatef(0, DiskY, 0);
  glDepthMask(GL_FALSE);
   glColorMask(GL_FALSE, GL_FALSE, GL_FALSE, GL_FALSE);
   RenderDrawable(m_drawables.Disk); // private method that calls glDrawElements
   glColorMask(GL_TRUE, GL_TRUE, GL_TRUE, GL_TRUE);
  glDepthMask(GL_TRUE);
 glTranslatef(0, -DiskY, 0);
glEnable(GL_TEXTURE_2D);
Two new function calls appear in Example 6-3: glDepthMask and
glColorMask. Recall that we’re interested in
affecting values in the stencil buffer only. It’s actually perfectly
fine to write to all three renderbuffers (color, depth, stencil), but to
maximize performance, it’s good practice to disable any writes that you
don’t need.
The four arguments to
glColorMask allow you to toggle each of the
individual color channels; in this case we don’t need any of them. Note
that glDepthMask has only one argument, since it’s a
single-component buffer. Incidentally, OpenGL ES also provides a
glStencilMask function, which we’re not using
here.
Rendering the Reflected Object with Stencil Testing
Step 2 renders the reflection of the object and uses the stencil buffer to clip it to the boundary of the disk. Example 6-4 shows how to do this.
glTranslatef(0, KnotY, 0);
glStencilOp(GL_KEEP, GL_KEEP, GL_KEEP);
glStencilFunc(GL_EQUAL, 0xff, 0xff);
glEnable(GL_LIGHTING);
glBindTexture(GL_TEXTURE_2D, m_textures.Grille);

const float alpha = 0.4f;
vec4 diffuse(alpha, alpha, alpha, 1 - alpha);
glMaterialfv(GL_FRONT_AND_BACK, GL_DIFFUSE, diffuse.Pointer());

glMatrixMode(GL_PROJECTION);
 glLoadMatrixf(m_mirrorProjection.Pointer());
   RenderDrawable(m_drawables.Knot); // private method that calls glDrawElements
 glLoadMatrixf(m_projection.Pointer());
glMatrixMode(GL_MODELVIEW);
This time we don’t need to change the values
in the stencil buffer, so we use GL_KEEP for the
argument to glStencilOp. We changed the stencil
comparison function to GL_EQUAL so that only the
pixels within the correct region will pass.
There are several ways you could go about
drawing an object upside down, but I chose to do it with a
quick-and-dirty projection matrix. The result isn’t a very accurate
reflection, but it’s good enough to fool the viewer! Example 6-5 shows how I did this using a
mat4 method from the C++ vector library in the
appendix. (For ES 1.1, you could simply use the provided
glFrustum function.)
Rendering the “Real” Object
The next step is rather mundane; we simply
need to render the actual floating object, without doing anything with
the stencil buffer. Before calling glDrawElements for
the object, we turn off the stencil test and disable the depth
buffer:
glDisable(GL_STENCIL_TEST);
glClear(GL_DEPTH_BUFFER_BIT);
For the first time, we’ve found a reason to
call glClear somewhere in the middle
of the Render method! Importantly, we’re
clearing only the depth buffer, leaving the color buffer intact.
Remember, the reflection is drawn just like any other 3D object, complete with depth testing. Allowing the actual object to be occluded by the reflection would destroy the illusion, so it’s a good idea to clear the depth buffer before drawing it. Given the fixed position of the camera in our demo, we could actually get away without performing the clear, but this allows us to tweak the demo without breaking anything.
Rendering the Disk with Front-to-Back Blending
The final step is rendering the marble disk underneath the reflection. Example 6-6 sets this up.
That’s it for the stencil sample! As always, head over to this book’s website to download (see How to Contact Us) the complete code.
Stencil Alternatives for Older iPhones
If your app needs to accommodate first- and second-generation iPhones, in many cases you can use a trick that acts like stenciling without actually requiring a stencil buffer. These various tricks include the following:
Using the framebuffer’s alpha component to store the “stencil” values and setting up a blending equation that tests against those values.
Turning off color writes and writing to the depth buffer to mask out certain regions. (The easiest way to uniformly offset generated depth values is with the
glDepthRangefunction.)Cropping simple rectangular regions can be achieved with OpenGL’s
glScissorfunction.Some of the bitwise operations available with stencil buffers are actually possible with colors as well. In fact, there are additional operations possible with colors, such as XOR. To see how to do this, check out the
glLogicOpfunction.
Let’s demonstrate the first trick in the previous list: using framebuffer alpha as a fake stencil buffer. With this technique, it’s possible to achieve the result shown in Figure 6-2 on older iPhones. The sequence of operations becomes the following:
Example 6-7 shows the rendering code for these nine steps. As always, the entire sample code is available from this book’s website.
glClear(GL_DEPTH_BUFFER_BIT);

// Set up the transforms for the background.
glMatrixMode(GL_PROJECTION);
glLoadIdentity();
glFrustumf(-0.5, 0.5, -0.5, 0.5, NearPlane, FarPlane);
glMatrixMode(GL_MODELVIEW);
glLoadIdentity();
glTranslatef(0, 0, -NearPlane * 2);

// Render the dark background with alpha = 0.
glDisable(GL_DEPTH_TEST);
glColor4f(0.5, 0.5, 0.5, 0);
glBindTexture(GL_TEXTURE_2D, m_textures.Tiger);
RenderDrawable(m_drawables.Quad);

// Set up the transforms for the 3D scene.
glMatrixMode(GL_PROJECTION);
glLoadMatrixf(m_projection.Pointer());
glMatrixMode(GL_MODELVIEW);
glRotatef(20, 1, 0, 0);
glBindTexture(GL_TEXTURE_2D, m_textures.Marble);

// Render the disk normally.
glColor4f(1, 1, 1, 1);
glTranslatef(0, DiskY, 0);
RenderDrawable(m_drawables.Disk);
glTranslatef(0, -DiskY, 0);
glEnable(GL_DEPTH_TEST);

// Render the reflection.
glPushMatrix();
glRotatef(theta, 0, 1, 0);
glTranslatef(0, KnotY, 0);
glEnable(GL_LIGHTING);
glBindTexture(GL_TEXTURE_2D, m_textures.Grille);
glBlendFunc(GL_DST_ALPHA, GL_ONE_MINUS_DST_ALPHA);
glEnable(GL_BLEND);
glMatrixMode(GL_PROJECTION);
glLoadMatrixf(m_mirror.Pointer());
RenderDrawable(m_drawables.Knot);
glLoadMatrixf(m_projection.Pointer());
glMatrixMode(GL_MODELVIEW);
glDisable(GL_LIGHTING);
glPopMatrix();

// Render the disk again to make the reflection fade out.
glBlendFunc(GL_SRC_ALPHA, GL_ONE_MINUS_SRC_ALPHA);
glBindTexture(GL_TEXTURE_2D, m_textures.Marble);
glColor4f(1, 1, 1, 0.5);
glDisable(GL_DEPTH_TEST);
glTranslatef(0, DiskY, 0);
RenderDrawable(m_drawables.Disk);
glTranslatef(0, -DiskY, 0);
glEnable(GL_DEPTH_TEST);
glColor4f(1, 1, 1, 1);
glDisable(GL_BLEND);

// Clear the depth buffer.
glClear(GL_DEPTH_BUFFER_BIT);

// Render the floating object.
glEnable(GL_LIGHTING);
glBindTexture(GL_TEXTURE_2D, m_textures.Grille);
glPushMatrix();
glTranslatef(0, KnotY, 0);
glRotatef(theta, 0, 1, 0);
RenderDrawable(m_drawables.Knot);
glPopMatrix();
glDisable(GL_LIGHTING);
Anti-Aliasing Tricks with Offscreen FBOs
The iPhone’s first-class support for framebuffer objects is perhaps its greatest enabler of unique effects. In every sample presented so far in this book, we’ve been using a single FBO, namely, the FBO that represents the visible Core Graphics layer. It’s important to realize that FBOs can also be created as offscreen surfaces, meaning they don’t show up on the screen unless bound to a texture. In fact, on most platforms, FBOs are always offscreen. The iPhone is rather unique in that the visible layer is itself treated as an FBO (albeit a special one).
Binding offscreen FBOs to textures enables a whole slew of interesting effects, including page-curling animations, light blooming, and more. We’ll cover some of these techniques later in this book, but recall that one of the topics of this chapter is anti-aliasing. Several sneaky tricks with FBOs can be used to achieve full-scene anti-aliasing, even though the iPhone does not directly support anti-aliasing! We’ll cover two of these techniques in the following subsections.
Note
One technique not discussed here is performing a postprocess on the final image to soften it. While this is not true anti-aliasing, it may produce good results in some cases. It’s similar to the bloom effect covered in Chapter 8.
A Super Simple Sample App for Supersampling
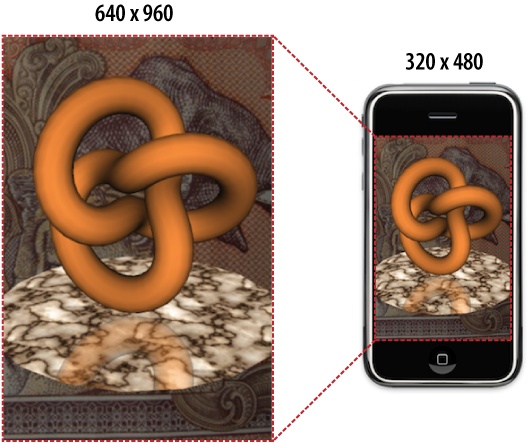
The easiest and crudest way to achieve full-scene anti-aliasing on the iPhone is to leverage bilinear texture filtering. Simply render to an offscreen FBO that has twice the dimensions of the screen, and then bind it to a texture and scale it down, as shown in Figure 6-4. This technique is known as supersampling.
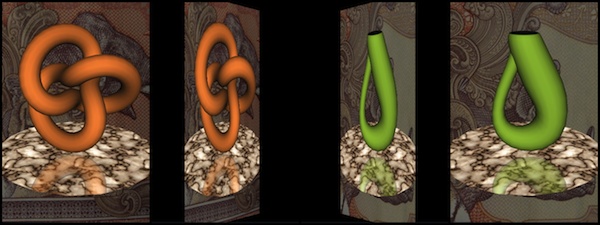
To demonstrate how to achieve this effect, we’ll walk through the process of extending the stencil sample to use supersampling. As an added bonus, we’ll throw in an Apple-esque flipping animation, as shown in Figure 6-5. Since we’re creating a secondary FBO anyway, flipping effects like this come virtually for free.
Example 6-8 shows the
RenderingEngine class declaration and related type
definitions. Class members that carry over from previous samples are
replaced with an ellipses for brevity.
struct Framebuffers {
    GLuint Small;
    GLuint Big;
};

struct Renderbuffers {
    GLuint SmallColor;
    GLuint BigColor;
    GLuint BigDepth;
    GLuint BigStencil;
};

struct Textures {
    GLuint Marble;
    GLuint RhinoBackground;
    GLuint TigerBackground;
    GLuint OffscreenSurface;
};

class RenderingEngine : public IRenderingEngine {
public:
    RenderingEngine(IResourceManager* resourceManager);
    void Initialize();
    void Render(float objectTheta, float fboTheta) const;
private:
    ivec2 GetFboSize() const;
    Textures m_textures;
    Renderbuffers m_renderbuffers;
    Framebuffers m_framebuffers;
    // ...
};

The “small” FBO is attached to the visible EAGL layer (320×480). The “big” FBO is the 640×960 surface that contains the 3D scene.

The small FBO does not need depth or stencil attachments because the only thing it contains is a full-screen quad; the big FBO is where most of the 3D rendering takes place, so it needs depth and stencil.

The 3D scene requires a marble texture for the podium and one background for each side of the animation (Figure 6-5). The fourth texture object,
OffscreenSurface, is attached to the big FBO.
The application layer passes in
objectThetato control the rotation of the podium and passes infboThetato control the flipping transitions.
GetFboSizeis a new private method for conveniently determining the size of the currently bound FBO. This method helps avoid the temptation to hardcode some magic numbers or to duplicate state that OpenGL already maintains.
First let’s take a look at the
GetFboSize implementation (Example 6-9), which returns a width-height pair for the
size. The return type is an instance of ivec2, one of
the types defined in the C++ vector library in the appendix.
Next let’s deal with the creation of the two FBOs. Recall the steps for creating the on-screen FBO used in almost every sample so far:
In the
RenderingEngineconstructor, generate an identifier for the color renderbuffer, and then bind it to the pipeline.In the
GLViewclass (Objective-C), allocate storage for the color renderbuffer like so:[m_context renderbufferStorage:GL_RENDERBUFFER fromDrawable:eaglLayer]
In the
RenderingEngine::Initializemethod, create a framebuffer object, and attach the color renderbuffer to it.If desired, create and allocate renderbuffers for depth and stencil, and then attach them to the FBO.
For the supersampling sample that we’re writing, we still need to perform the first three steps in the previous sequence, but then we follow it with the creation of the offscreen FBO. Unlike the on-screen FBO, its color buffer is allocated in much the same manner as depth and stencil:
glRenderbufferStorageOES(GL_RENDERBUFFER_OES, GL_RGBA8_OES, width, height);See Example 6-10 for the
Initialize method used in the supersampling
sample.
void RenderingEngine::Initialize()
{
    // Create the on-screen FBO.

    glGenFramebuffersOES(1, &m_framebuffers.Small);
    glBindFramebufferOES(GL_FRAMEBUFFER_OES, m_framebuffers.Small);
    glFramebufferRenderbufferOES(GL_FRAMEBUFFER_OES,
                                 GL_COLOR_ATTACHMENT0_OES,
                                 GL_RENDERBUFFER_OES,
                                 m_renderbuffers.SmallColor);

    // Create the double-size off-screen FBO.

    ivec2 size = GetFboSize() * 2;

    glGenRenderbuffersOES(1, &m_renderbuffers.BigColor);
    glBindRenderbufferOES(GL_RENDERBUFFER_OES, m_renderbuffers.BigColor);
    glRenderbufferStorageOES(GL_RENDERBUFFER_OES, GL_RGBA8_OES,
                             size.x, size.y);

    glGenRenderbuffersOES(1, &m_renderbuffers.BigDepth);
    glBindRenderbufferOES(GL_RENDERBUFFER_OES, m_renderbuffers.BigDepth);
    glRenderbufferStorageOES(GL_RENDERBUFFER_OES, GL_DEPTH_COMPONENT24_OES,
                             size.x, size.y);

    glGenRenderbuffersOES(1, &m_renderbuffers.BigStencil);
    glBindRenderbufferOES(GL_RENDERBUFFER_OES, m_renderbuffers.BigStencil);
    glRenderbufferStorageOES(GL_RENDERBUFFER_OES, GL_STENCIL_INDEX8_OES,
                             size.x, size.y);

    glGenFramebuffersOES(1, &m_framebuffers.Big);
    glBindFramebufferOES(GL_FRAMEBUFFER_OES, m_framebuffers.Big);
    glFramebufferRenderbufferOES(GL_FRAMEBUFFER_OES,
                                 GL_COLOR_ATTACHMENT0_OES,
                                 GL_RENDERBUFFER_OES,
                                 m_renderbuffers.BigColor);
    glFramebufferRenderbufferOES(GL_FRAMEBUFFER_OES,
                                 GL_DEPTH_ATTACHMENT_OES,
                                 GL_RENDERBUFFER_OES,
                                 m_renderbuffers.BigDepth);
    glFramebufferRenderbufferOES(GL_FRAMEBUFFER_OES,
                                 GL_STENCIL_ATTACHMENT_OES,
                                 GL_RENDERBUFFER_OES,
                                  m_renderbuffers.BigStencil);

    // Create a texture object and associate it with the big FBO.

    glGenTextures(1, &m_textures.OffscreenSurface);
    glBindTexture(GL_TEXTURE_2D, m_textures.OffscreenSurface);
    glTexParameteri(GL_TEXTURE_2D, GL_TEXTURE_MIN_FILTER, GL_LINEAR);
    glTexParameteri(GL_TEXTURE_2D, GL_TEXTURE_MAG_FILTER, GL_LINEAR);
    glTexParameteri(GL_TEXTURE_2D, GL_TEXTURE_WRAP_S, GL_CLAMP_TO_EDGE);
    glTexParameteri(GL_TEXTURE_2D, GL_TEXTURE_WRAP_T, GL_CLAMP_TO_EDGE);
    glTexImage2D(GL_TEXTURE_2D, 0, GL_RGBA, size.x, size.y, 0,
                 GL_RGBA, GL_UNSIGNED_BYTE, 0);
    glFramebufferTexture2DOES(GL_FRAMEBUFFER_OES, GL_COLOR_ATTACHMENT0_OES,
                              GL_TEXTURE_2D, m_textures.OffscreenSurface, 0);

    // Check FBO status.

    GLenum status = glCheckFramebufferStatusOES(GL_FRAMEBUFFER_OES);
    if (status != GL_FRAMEBUFFER_COMPLETE_OES) {
        cout << "Incomplete FBO" << endl;
        exit(1);
    }

    // Load textures, create VBOs, set up various GL state.
    ...
}
You may have noticed two new FBO-related
function calls in Example 6-10:
glFramebufferTexture2DOES and
glCheckFramebufferStatusOES. The formal function
declarations look like this:
void glFramebufferTexture2DOES(GLenum target,
                               GLenum attachment, GLenum textarget,
                               GLuint texture, GLint level);

GLenum glCheckFramebufferStatusOES(GLenum target);
(As usual, the OES suffix can be removed for ES 2.0.)
The
glFramebufferTexture2DOES function allows you to cast
a color buffer into a texture object. FBO texture objects get set up
just like any other texture object: they have an identifier created with
glGenTextures, they have filter and wrap modes, and
they have a format that should match the format of the FBO. The main
difference with FBO textures is the fact that null gets passed to the
last argument of glTexImage2D, since there’s no image
data to upload.
Note that the texture in Example 6-10 has non-power-of-two dimensions,
so it specifies clamp-to-edge wrapping to accommodate third-generation
devices. For older iPhones, the sample won’t work; you’d have to change
it to POT dimensions. Refer to Dealing with Size Constraints for hints on how to do this.
Keep in mind that the values passed to glViewport
need not match the size of the renderbuffer; this comes in handy when
rendering to an NPOT subregion of a POT texture.
The other new function,
glCheckFramebufferStatusOES, is a useful sanity check
to make sure that an FBO has been set up properly. It’s easy to bungle
the creation of FBOs if the sizes of the attachments don’t match up or
if their formats are incompatible with each other.
glCheckFramebufferStatusOES returns one of the
following values, which are fairly self-explanatory:
Next let’s take a look at the render method
of the supersampling sample. Recall from the class declaration that the
application layer passes in objectTheta to control
the rotation of the podium and passes in fboTheta to
control the flipping transitions. So, the first thing the
Render method does is look at
fboTheta to determine which background image should
be displayed and which shape should be shown on the podium. See Example 6-11.
void RenderingEngine::Render(float objectTheta, float fboTheta) const
{
    Drawable drawable;
    GLuint background;
    vec3 color;

    // Look at fboTheta to determine which "side" should be rendered:
    //   1) Orange Trefoil knot against a Tiger background
    //   2) Green Klein bottle against a Rhino background

    if (fboTheta > 270 || fboTheta < 90) {
        background = m_textures.TigerBackground;
        drawable = m_drawables.Knot;
        color = vec3(1, 0.5, 0.1);
    } else {
        background = m_textures.RhinoBackground;
        drawable = m_drawables.Bottle;
        color = vec3(0.5, 0.75, 0.1);
    }

    // Bind the double-size FBO.
    glBindFramebufferOES(GL_FRAMEBUFFER_OES, m_framebuffers.Big);
    glBindRenderbufferOES(GL_RENDERBUFFER_OES, m_renderbuffers.BigColor);
    ivec2 bigSize = GetFboSize();
    glViewport(0, 0, bigSize.x, bigSize.y);

    // Draw the 3D scene - download the example to see this code.
    ...

    // Render the background.
    glColor4f(0.7, 0.7, 0.7, 1);
    glBindTexture(GL_TEXTURE_2D, background);
    glMatrixMode(GL_PROJECTION);
    glLoadIdentity();
    glFrustumf(-0.5, 0.5, -0.5, 0.5, NearPlane, FarPlane);
    glMatrixMode(GL_MODELVIEW);
    glLoadIdentity();
    glTranslatef(0, 0, -NearPlane * 2);
    RenderDrawable(m_drawables.Quad);
    glColor4f(1, 1, 1, 1);
    glDisable(GL_BLEND);

    // Switch to the on-screen render target.
    glBindFramebufferOES(GL_FRAMEBUFFER_OES, m_framebuffers.Small);
    glBindRenderbufferOES(GL_RENDERBUFFER_OES, m_renderbuffers.SmallColor);
    ivec2 smallSize = GetFboSize();
    glViewport(0, 0, smallSize.x, smallSize.y);

    // Clear the color buffer only if necessary.
    if ((int) fboTheta % 180 != 0) {
        glClearColor(0, 0, 0, 1);
        glClear(GL_COLOR_BUFFER_BIT);
    }

    // Render the offscreen surface by applying it to a quad.
    glDisable(GL_DEPTH_TEST);
    glRotatef(fboTheta, 0, 1, 0);
    glBindTexture(GL_TEXTURE_2D, m_textures.OffscreenSurface);
    RenderDrawable(m_drawables.Quad);
    glDisable(GL_TEXTURE_2D);
}
Most of Example 6-11 is fairly straightforward. One piece that may have caught your eye is the small optimization made right before blitting the offscreen FBO to the screen:
// Clear the color buffer only if necessary.
if ((int) fboTheta % 180 != 0) {
    glClearColor(0, 0, 0, 1);
    glClear(GL_COLOR_BUFFER_BIT);
}
This is a sneaky little trick. Since the quad
is the exact same size as the screen, there’s no need to clear the color
buffer; unnecessarily issuing a glClear can hurt
performance. However, if a flipping animation is currently underway, the
color buffer needs to be cleared to prevent artifacts from appearing in
the background; flip back to Figure 6-5 and
observe the black areas. If fboTheta is a multiple of
180, then the quad completely fills the screen, so there’s no need to
issue a clear.
That’s it for the supersampling sample. The
quality of the anti-aliasing is actually not that great; you can still
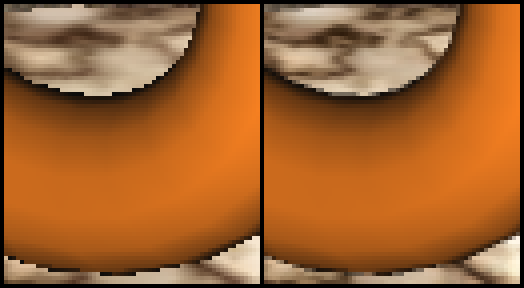
see some “stair-stepping” along the bottom outline of the shape in Figure 6-6. You might think that creating an even
bigger offscreen buffer, say quadruple-size, would provide
higher-quality results. Unfortunately, using a quadruple-size buffer would require two
passes; directly applying a 1280×1920 texture to a 320×480 quad isn’t
sufficient because GL_LINEAR filtering only samples
from a 2×2 neighborhood of pixels. To achieve the desired result, you’d
actually need three FBOs as follows:
Not only is this laborious, but it’s a memory hog. Older iPhones don’t even support textures this large! It turns out there’s another anti-aliasing strategy called jittering, and it can produce high-quality results without the memory overhead of supersampling.
Jittering
Jittering is somewhat more complex to implement than supersampling, but it’s not rocket science. The idea is to rerender the scene multiple times at slightly different viewpoints, merging the results along the way. You need only two FBOs for this method: the on-screen FBO that accumulates the color and the offscreen FBO that the 3D scene is rendered to. You can create as many jittered samples as you’d like, and you still need only two FBOs. Of course, the more jittered samples you create, the longer it takes to create the final rendering. Example 6-12 shows the pseudocode for the jittering algorithm.
BindFbo(OnscreenBuffer)
glClear(GL_COLOR_BUFFER_BIT)

for (int sample = 0; sample < SampleCount; sample++) {
   BindFbo(OffscreenBuffer)

   vec2 offset = JitterTable[sample]

   SetFrustum(LeftPlane + offset.x, RightPlane + offset.x,
              TopPlane + offset.y, BottomPlane + offset.y,
              NearPlane, FarPlane)

   Render3DScene()

   f = 1.0 / SampleCount
   glColor4f(f, f, f, 1)
   glEnable(GL_BLEND)
   glBlendFunc(GL_ONE, GL_ONE)

   BindFbo(OnscreenBuffer)
   BindTexture(OffscreenBuffer)
   RenderFullscreenQuad()
}
The key part of Example 6-12 is the blending configuration. By using a
blend equation of plain old addition (GL_ONE, GL_ONE)
and dimming the color according to the number of samples, you’re
effectively accumulating an average color.
An unfortunate side effect of jittering is reduced color precision; this can cause banding artifacts, as shown in Figure 6-7. On some platforms the banding effect can be neutralized with a high-precision color buffer, but that’s not supported on the iPhone. In practice, I find that creating too many samples is detrimental to performance anyway, so the banding effect isn’t usually much of a concern.
Determining the jitter offsets
(JitterTable in Example 6-12)
is a bit of black art. Totally random values don’t work well since they
don’t guarantee uniform spacing between samples. Interestingly, dividing
up each pixel into an equally spaced uniform grid does not work well
either! Example 6-13 shows some commonly used
jitter offsets.
const vec2 JitterOffsets2[2] =
{
    vec2(0.25f, 0.75f), vec2(0.75f, 0.25f),
};

const vec2 JitterOffsets4[4] =
{
    vec2(0.375f, 0.25f), vec2(0.125f, 0.75f),
    vec2(0.875f, 0.25f), vec2(0.625f, 0.75f),
};

const vec2 JitterOffsets8[8] =
{
    vec2(0.5625f, 0.4375f), vec2(0.0625f, 0.9375f),
    vec2(0.3125f, 0.6875f), vec2(0.6875f, 0.8125f),

    vec2(0.8125f, 0.1875f), vec2(0.9375f, 0.5625f),
    vec2(0.4375f, 0.0625f), vec2(0.1875f, 0.3125f),
};

const vec2 JitterOffsets16[16] =
{
    vec2(0.375f, 0.4375f), vec2(0.625f, 0.0625f),
    vec2(0.875f, 0.1875f), vec2(0.125f, 0.0625f),

    vec2(0.375f, 0.6875f), vec2(0.875f, 0.4375f),
    vec2(0.625f, 0.5625f), vec2(0.375f, 0.9375f),

    vec2(0.625f, 0.3125f), vec2(0.125f, 0.5625f),
    vec2(0.125f, 0.8125f), vec2(0.375f, 0.1875f),

    vec2(0.875f, 0.9375f), vec2(0.875f, 0.6875f),
    vec2(0.125f, 0.3125f), vec2(0.625f, 0.8125f),
};
Let’s walk through the process of creating a simple app with jittering. Much like we did with the supersample example, we’ll include a fun transition animation. (You can download the full project from the book’s website at http://oreilly.com/catalog/9780596804831.) This time we’ll use the jitter offsets to create a defocusing effect, as shown in Figure 6-8.
To start things off, let’s take a look at the
RenderingEngine class declaration and related types.
It’s not unlike the class we used for supersampling; the main
differences are the labels we give to the FBOs.
Accumulated denotes the on-screen buffer, and
Scene denotes the offscreen buffer. See Example 6-14.
struct Framebuffers {
    GLuint Accumulated;
    GLuint Scene;
};

struct Renderbuffers {
    GLuint AccumulatedColor;
    GLuint SceneColor;
    GLuint SceneDepth;
    GLuint SceneStencil;
};

struct Textures {
    GLuint Marble;
    GLuint RhinoBackground;
    GLuint TigerBackground;
    GLuint OffscreenSurface;
};


class RenderingEngine : public IRenderingEngine {
public:
    RenderingEngine(IResourceManager* resourceManager);
    void Initialize();
    void Render(float objectTheta, float fboTheta) const;
private:
    void RenderPass(float objectTheta, float fboTheta, vec2 offset) const;
    Textures m_textures;
    Renderbuffers m_renderbuffers;
    Framebuffers m_framebuffers;
    // ...
};
Example 6-14 also
adds a new private method called RenderPass; the
implementation is shown in Example 6-15. Note that
we’re keeping the fboTheta argument that we used in
the supersample example, but now we’re using it to compute a scale
factor for the jitter offset rather than a y-axis rotation. If
fboTheta is 0 or 180, then the jitter offset is left
unscaled, so the scene is in focus.
void RenderingEngine::RenderPass(float objectTheta, float fboTheta, vec2 offset) const
{
    // Tweak the jitter offset for the defocus effect:

    offset -= vec2(0.5, 0.5);
    offset *= 1 + 100 * sin(fboTheta * Pi / 180);

    // Set up the frustum planes:

    const float AspectRatio = (float) m_viewport.y / m_viewport.x;
    const float NearPlane = 5;
    const float FarPlane = 50;
    const float LeftPlane = -1;
    const float RightPlane = 1;
    const float TopPlane = -AspectRatio;
    const float BottomPlane = AspectRatio;

    // Transform the jitter offset from window space to eye space:

    offset.x *= (RightPlane - LeftPlane) / m_viewport.x;
    offset.y *= (BottomPlane - TopPlane) / m_viewport.y;

    // Compute the jittered projection matrix:

    mat4 projection = mat4::Frustum(LeftPlane + offset.x,
                                    RightPlane + offset.x,
                                    TopPlane + offset.y,
                                    BottomPlane + offset.y,
                                    NearPlane, FarPlane);

    // Render the 3D scene - download the example to see this code.
    ...
}
Example 6-16 shows the
implementation to the main Render method. The call to
RenderPass is shown in bold.
void RenderingEngine::Render(float objectTheta, float fboTheta) const
{

    // This is where you put the jitter offset declarations
    // from Example 6-13.

    const int JitterCount = 8;
    const vec2* JitterOffsets = JitterOffsets8;

    glBindFramebufferOES(GL_FRAMEBUFFER_OES, m_framebuffers.Accumulated);
    glBindRenderbufferOES(GL_RENDERBUFFER_OES,
                          m_renderbuffers.AccumulatedColor);

    glClearColor(0, 0, 0, 1);
    glClear(GL_COLOR_BUFFER_BIT);

    for (int i = 0; i < JitterCount; i++) {

        glBindFramebufferOES(GL_FRAMEBUFFER_OES, m_framebuffers.Scene);
        glBindRenderbufferOES(GL_RENDERBUFFER_OES,
                              m_renderbuffers.SceneColor);

        RenderPass(objectTheta,
                   fboTheta, JitterOffsets[i]);

        glMatrixMode(GL_PROJECTION);
        glLoadIdentity();

        const float NearPlane = 5, FarPlane = 50;
        glFrustumf(-0.5, 0.5, -0.5, 0.5, NearPlane, FarPlane);

        glMatrixMode(GL_MODELVIEW);
        glLoadIdentity();
        glTranslatef(0, 0, -NearPlane * 2);

        float f = 1.0f / JitterCount;
        f *= (1 + abs(sin(fboTheta * Pi / 180)));
        glColor4f(f, f, f, 1);

        glEnable(GL_BLEND);
        glBlendFunc(GL_ONE, GL_ONE);
        glBindFramebufferOES(GL_FRAMEBUFFER_OES,
                             m_framebuffers.Accumulated);
        glBindRenderbufferOES(GL_RENDERBUFFER_OES,
                              m_renderbuffers.AccumulatedColor);
        glDisable(GL_DEPTH_TEST);
        glBindTexture(GL_TEXTURE_2D, m_textures.OffscreenSurface);
        RenderDrawable(m_drawables.Quad);
        glDisable(GL_TEXTURE_2D);
        glDisable(GL_BLEND);
    }
}
Example 6-16 might give you sense of déjà vu; it’s basically an implementation of the pseudocode algorithm that we already presented in Example 6-12. One deviation is how we compute the dimming effect:
float f = 1.0f / JitterCount;
f *= (1 + abs(sin(fboTheta * Pi / 180)));
glColor4f(f, f, f, 1);
The second line in the previous snippet is
there only for the special transition effect. In addition to defocusing
the scene, it’s also brightened to simulate pupil dilation. If
fboTheta is 0 or 180, then f is
left unscaled, so the scene has its normal brightness.
Other FBO Effects
An interesting variation on jittering is depth of field, which blurs out the near and distant portions of the scene. To pull this off, compute the viewing frustum such that a given slice (parallel to the viewing plane) stays the same with each jitter pass; this is the focus plane.
Yet another effect is motion
blur, which simulates the ghosting effect seen on displays
with low response times. With each pass, make incremental adjustments to
your animation, and gradually fade in the alpha value using
glColor.
Rendering Anti-Aliased Lines with Textures
Sometimes full-screen anti-aliasing is more than you really need and can cause too much of a performance hit. You may find that you need anti-aliasing only on your line primitives rather than the entire scene. Normally this would be achieved in OpenGL ES like so:
glEnable(GL_LINE_SMOOTH);
Alas, none of the iPhone models supports this at the time of this writing. However, the simulator does support line smoothing; watch out for inconsistencies like this!
A clever trick to work around this limitation is filling an alpha texture with a circle and then tessellating the lines into short triangle strips (Figure 6-9). Texture coordinates are chosen such that the circle is stretched in the right places. That has the added benefit of allowing round end-cap styles and wide lines.
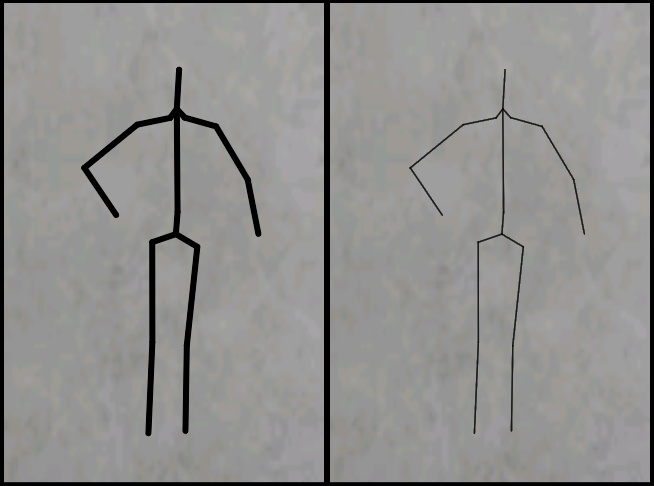
Using a 16×16 circle for the texture works well for thick lines (see the left circle in Figure 6-9 and left panel in Figure 6-10). For thinner lines, I find that a highly blurred 16x16 texture produces good results (see the right circle in Figure 6-9 and right panel in Figure 6-10).
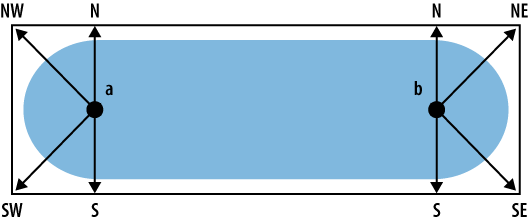
Let’s walk through the process of converting a line list into a textured triangle list. Each source vertex needs to be extruded into four new vertices. It helps to give each extrusion vector a name using cardinal directions, as shown in Figure 6-11.
Before going over the extrusion algorithm,
let’s set up an example scenario. Say we’re rendering an animated stick
figure similar to Figure 6-10. Note that some vertices
are shared by multiple lines, so it makes sense to use an index buffer.
Suppose the application can render the stick figure using either line
primitives or textured triangles. Let’s define a
StickFigure structure that stores the vertex and index
data for either the non-AA variant or the AA variant; see Example 6-17. The non-AA variant doesn’t need
texture coordinates, but we’re including them for simplicity’s
sake.
The function prototype for the extrusion
method needs three arguments: the source StickFigure
(lines), the destination StickFigure (triangles), and
the desired line width. See Example 6-18 and refer
back to Figure 6-11 to visualize the six
extrusion vectors (N, S, NE, NW, SW, SE).
void ExtrudeLines(const StickFigure& lines, StickFigure& triangles, float width)
{
    IndexList::iterator sourceIndex = lines.Indices.begin();
    VertexList::iterator destVertex = triangles.Vertices.begin();
    while (sourceIndex != lines.Indices.end()) {

        vec3 a = lines.Vertices[lines.Indices[*sourceIndex++]].Position;
        vec3 b = lines.Vertices[lines.Indices[*sourceIndex++]].Position;
        vec3 e = (b - a).Normalized() * width;

        vec3 N = vec3(-e.y, e.x, 0);
        vec3 S = -N;
        vec3 NE = N + e;
        vec3 NW = N - e;
        vec3 SW = -NE;
        vec3 SE = -NW;

        destVertex++->Position = a + SW;
        destVertex++->Position = a + NW;
        destVertex++->Position = a + S;
        destVertex++->Position = a + N;
        destVertex++->Position = b + S;
        destVertex++->Position = b + N;
        destVertex++->Position = b + SE;
        destVertex++->Position = b + NE;
    }
}
At this point, we’ve computed the positions of the extruded triangles, but we still haven’t provided texture coordinates for the triangles, nor the contents of the index buffer. Note that the animated figure can change its vertex positions at every frame, but the number of lines stays the same. This means we can generate the index list only once; there’s no need to recompute it at every frame. The same goes for the texture coordinates. Let’s declare a couple functions for these start-of-day tasks:
void GenerateTriangleIndices(size_t lineCount, IndexList& triangles);
void GenerateTriangleTexCoords(size_t lineCount, VertexList& triangles);
Flip back to Figure 6-9, and note the number of triangles and vertices.
Every line primitive extrudes into six triangles composed from eight
vertices. Since every triangle requires three indices, the number of
indices in the new index buffer is lineCount*18. This
is different from the number of vertices, which is
only lineCount*8. See Example 6-19.
void GenerateTriangleIndices(size_t lineCount, IndexList& triangles)
{
    triangles.resize(lineCount * 18);
    IndexList::iterator index = triangles.begin();
    for (GLushort v = 0; index != triangles.end(); v += 8) {
        *index++ = 0 + v; *index++ = 1 + v; *index++ = 2 + v;
        *index++ = 2 + v; *index++ = 1 + v; *index++ = 3 + v;
        *index++ = 2 + v; *index++ = 3 + v; *index++ = 4 + v;
        *index++ = 4 + v; *index++ = 3 + v; *index++ = 5 + v;
        *index++ = 4 + v; *index++ = 5 + v; *index++ = 6 + v;
        *index++ = 6 + v; *index++ = 5 + v; *index++ = 7 + v;
    }
}

void GenerateTriangleTexCoords(size_t lineCount, VertexList& triangles)
{
    triangles.resize(lineCount * 8);
    VertexList::iterator vertex = triangles.begin();
    while (vertex != triangles.end()) {
        vertex++->TexCoord = vec2(0, 0);
        vertex++->TexCoord = vec2(0, 1);
        vertex++->TexCoord = vec2(0.5, 0);
        vertex++->TexCoord = vec2(0.5, 1);
        vertex++->TexCoord = vec2(0.5, 0);
        vertex++->TexCoord = vec2(0.5, 1);
        vertex++->TexCoord = vec2(1, 0);
        vertex++->TexCoord = vec2(1, 1);
    }
}
Et voilà…you now know how to render antialiased lines on a device that doesn’t support antialiased lines! To see this in action, check out the AaLines sample from this book’s example code.
Holodeck Sample
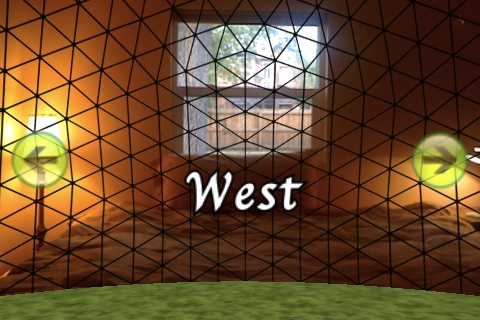
In this chapter’s introduction, we promised to present a poor man’s augmented reality app. As a starting point, we’ll create a 3D environment that includes the aforementioned geodesic dome with antialiased borders. We’ll also render a mossy ground plane and some moving clouds in the background. Later we’ll replace the clouds with a live camera image. Another interesting aspect to this sample is that it’s designed for landscape mode; see Figure 6-12.
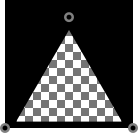
For rendering the AA lines in the dome, let’s use a different trick than the one presented in the previous section. Rather than a filling a texture with a circle, let’s fill it with a triangle, as shown in Figure 6-13. By choosing texture coordinates in the right places (see the hollow circles in the figure), we’ll be creating a thick border at every triangle.
For controlling the camera, the app should use the compass and accelerometer APIs to truly qualify as an augmented reality app. However, initially let’s just show four buttons in a HUD: touching any button will cause the environment to “scroll.” Horizontal buttons control azimuth (angle from north); vertical buttons control altitude (angle above horizon). These terms may be familiar to you if you’re an astronomy buff.
Later we’ll replace the azimuth/altitude buttons with the compass and accelerometer APIs. The benefit of this approach is that we can easily provide a fallback option if the app discovers that the compass or accelerometer APIs are not available. This allows us to gracefully handle three scenarios:
- iPhone Simulator
Show buttons for both azimuth and altitude.
- First- and second-generation iPhones
Show buttons for azimuth; use the accelerometer for altitude.
- Third-generation iPhones
Hide all buttons; use the accelerometer for altitude and the compass for azimuth.
In honor of my favorite TV show, the name of this sample is Holodeck. Without further ado, let’s begin!
Application Skeleton
The basic skeleton for the Holodeck sample is
much like every other sample we’ve presented since Chapter 3. The main difference is that we forgo the creation
of an IApplicationEngine interface and instead place
the application logic directly within the GLView
class. There’s very little logic required for this app anyway; most of
the heavy footwork is done in the rendering engine. Skipping the
application layer makes life easier when we add support for the
accelerometer, compass, and camera APIs.
Another difference lies in how we handle the dome geometry. Rather than loading in the vertices from an OBJ file or generating them at runtime, a Python script generates a C++ header file with the dome data, as shown in Example 6-20; you can download the full listing, along with the Holodeck project, from this book’s website. This is perhaps the simplest possible way to load geometry into an OpenGL application, and some modeling tools can actually export their data as a C/C++ header file!
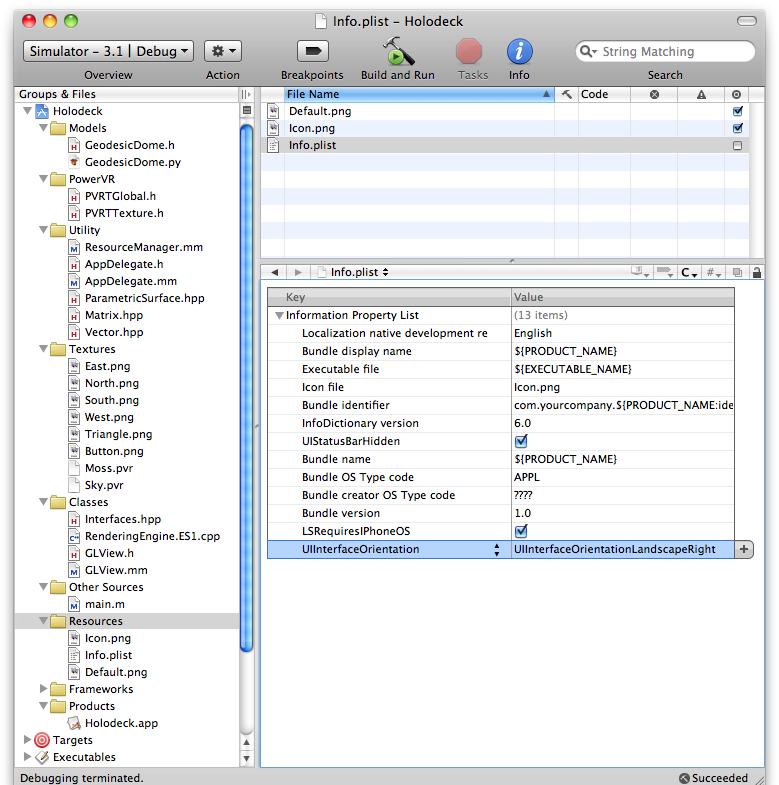
Figure 6-14 shows the overall structure of the Holodeck project.
Note that this app has quite a few textures
compared to our previous samples: six PNG files and two compressed PVRTC
files. You can also see from the screenshot that we’ve added a new
property to Info.plist called
UIInterfaceOrientation. Recall that this is a
landscape-only app; if you don’t set this property, you’ll have to
manually rotate the virtual iPhone every time you test it in the
simulator.
Interfaces.hpp is much the same as in our other sample apps, except that the rendering engine interface is somewhat unique; see Example 6-21.
...

enum ButtonFlags {
    ButtonFlagsShowHorizontal = 1 << 0,
    ButtonFlagsShowVertical = 1 << 1,
    ButtonFlagsPressingUp = 1 << 2,
    ButtonFlagsPressingDown = 1 << 3,
    ButtonFlagsPressingLeft = 1 << 4,
    ButtonFlagsPressingRight = 1 << 5,
};

typedef unsigned char ButtonMask;

struct IRenderingEngine {
    virtual void Initialize() = 0;
    virtual void Render(float theta, float phi,
                        ButtonMask buttons) const = 0;
    virtual ~IRenderingEngine() {}
};

...
The new Render method
takes three parameters:
The idea behind the
buttons mask is that the Objective-C code
(GLView.mm) can determine the capabilities of the
device and whether a button is being pressed, so it sends this
information to the rendering engine as a set of flags.
Rendering the Dome, Clouds, and Text
For now let’s ignore the buttons and focus on
rendering the basic elements of the 3D scene. See Example 6-22 for the rendering engine
declaration and related types. Utility methods that carry over from
previous samples, such as CreateTexture, are replaced
with ellipses for brevity.
struct Drawable {
    GLuint VertexBuffer;
    GLuint IndexBuffer;
    int IndexCount;
    int VertexCount;
};

struct Drawables {
    Drawable GeodesicDome;
    Drawable SkySphere;
    Drawable Quad;
};

struct Textures {
    GLuint Sky;
    GLuint Floor;
    GLuint Button;
    GLuint Triangle;
    GLuint North;
    GLuint South;
    GLuint East;
    GLuint West;
};

struct Renderbuffers {
    GLuint Color;
    GLuint Depth;
};

class RenderingEngine : public IRenderingEngine {
public:
    RenderingEngine(IResourceManager* resourceManager);
    void Initialize();
    void Render(float theta, float phi, ButtonMask buttonFlags) const;
private:
    void RenderText(GLuint texture, float theta, float scale) const;
    Drawable CreateDrawable(const float* vertices, int vertexCount);
    // ...
    Drawables m_drawables;
    Textures m_textures;
    Renderbuffers m_renderbuffers;
    IResourceManager* m_resourceManager;
};
Note that Example 6-22 declares two new private
methods: RenderText for drawing compass direction
labels and a new CreateDrawable method for creating
the geodesic dome. Even though it declares eight different texture
objects (which could be combined into a texture atlas; see Chapter 7), it declares only three VBOs. The
Quad VBO is re-used for the buttons, the floor, and
the floating text.
Example 6-23 is fairly straightforward. It first creates the VBOs and texture objects and then initializes various OpenGL state.
#include "../Models/GeodesicDome.h"

...

void RenderingEngine::Initialize()
{
    // Create vertex buffer objects.
    m_drawables.GeodesicDome =
      CreateDrawable(DomeVertices, DomeVertexCount);
    m_drawables.SkySphere = CreateDrawable(Sphere(1));
    m_drawables.Quad = CreateDrawable(Quad(64));

    // Load up some textures.
    m_textures.Floor = CreateTexture("Moss.pvr");
    m_textures.Sky = CreateTexture("Sky.pvr");
    m_textures.Button = CreateTexture("Button.png");
    m_textures.Triangle = CreateTexture("Triangle.png");
    m_textures.North = CreateTexture("North.png");
    m_textures.South = CreateTexture("South.png");
    m_textures.East = CreateTexture("East.png");
    m_textures.West = CreateTexture("West.png");

    // Extract width and height from the color buffer.
    int width, height;
    glGetRenderbufferParameterivOES(GL_RENDERBUFFER_OES,
                                    GL_RENDERBUFFER_WIDTH_OES, &width);
    glGetRenderbufferParameterivOES(GL_RENDERBUFFER_OES,
                                    GL_RENDERBUFFER_HEIGHT_OES, &height);
    glViewport(0, 0, width, height);

    // Create a depth buffer that has the same size as the color buffer.
    glGenRenderbuffersOES(1, &m_renderbuffers.Depth);
    glBindRenderbufferOES(GL_RENDERBUFFER_OES, m_renderbuffers.Depth);
    glRenderbufferStorageOES(GL_RENDERBUFFER_OES,
                             GL_DEPTH_COMPONENT16_OES, width, height);

    // Create the framebuffer object.
    GLuint framebuffer;
    glGenFramebuffersOES(1, &framebuffer);
    glBindFramebufferOES(GL_FRAMEBUFFER_OES, framebuffer);
    glFramebufferRenderbufferOES(GL_FRAMEBUFFER_OES,
                                 GL_COLOR_ATTACHMENT0_OES,
                                 GL_RENDERBUFFER_OES,
                                 m_renderbuffers.Color);
    glFramebufferRenderbufferOES(GL_FRAMEBUFFER_OES,
                                 GL_DEPTH_ATTACHMENT_OES,
                                 GL_RENDERBUFFER_OES,
                                 m_renderbuffers.Depth);
    glBindRenderbufferOES(GL_RENDERBUFFER_OES, m_renderbuffers.Color);

    // Set up various GL state.
    glEnableClientState(GL_VERTEX_ARRAY);
    glEnableClientState(GL_TEXTURE_COORD_ARRAY);
    glEnable(GL_TEXTURE_2D);
    glEnable(GL_DEPTH_TEST);
    glBlendFunc(GL_SRC_ALPHA, GL_ONE_MINUS_SRC_ALPHA);

    // Set the model-view transform.
    glMatrixMode(GL_MODELVIEW);
    glRotatef(90, 0, 0, 1);

    // Set the projection transform.
    float h = 4.0f * height / width;
    glMatrixMode(GL_PROJECTION);
    glFrustumf(-2, 2, -h / 2, h / 2, 5, 200);
    glMatrixMode(GL_MODELVIEW);
}

Drawable RenderingEngine::CreateDrawable(const float* vertices,
                                         int vertexCount)
{
    // Each vertex has XYZ and ST, for a total of five floats.
    const int FloatsPerVertex = 5;

    // Create the VBO for the vertices.
    GLuint vertexBuffer;
    glGenBuffers(1, &vertexBuffer);
    glBindBuffer(GL_ARRAY_BUFFER, vertexBuffer);
    glBufferData(GL_ARRAY_BUFFER,
                 vertexCount * FloatsPerVertex * sizeof(float),
                 vertices,
                 GL_STATIC_DRAW);

    // Fill in the description structure and return it.
    Drawable drawable = {0};
    drawable.VertexBuffer = vertexBuffer;
    drawable.VertexCount = vertexCount;
    return drawable;
}
Let’s finally take a look at the
all-important Render method; see Example 6-24.
void RenderingEngine::Render(float theta, float phi,
                             ButtonMask buttons) const
{
    static float frameCounter = 0;
    frameCounter++;

    glPushMatrix();

    glRotatef(phi, 1, 0, 0);
    glRotatef(theta, 0, 1, 0);

    glClear(GL_DEPTH_BUFFER_BIT);

    glPushMatrix();
    glScalef(100, 100, 100);
    glRotatef(frameCounter * 2, 0, 1, 0);
    glBindTexture(GL_TEXTURE_2D, m_textures.Sky);
    RenderDrawable(m_drawables.SkySphere);
    glPopMatrix();

    glEnable(GL_BLEND);
    glBindTexture(GL_TEXTURE_2D, m_textures.Triangle);
    glPushMatrix();
    glTranslatef(0, 10, 0);
    glScalef(90, 90, 90);
    glColor4f(1, 1, 1, 0.75f);
    RenderDrawable(m_drawables.GeodesicDome);
    glColor4f(1, 1, 1, 1);
    glPopMatrix();

    float textScale = 1.0 / 10.0 + sin(frameCounter / 10.0f) / 150.0;

    RenderText(m_textures.East, 0, textScale);
    RenderText(m_textures.West, 180, textScale);
    RenderText(m_textures.South, 90, textScale);
    RenderText(m_textures.North, -90, textScale);
    glDisable(GL_BLEND);

    glTranslatef(0, 10, -10);
    glRotatef(90, 1, 0, 0);
    glScalef(4, 4, 4);
    glMatrixMode(GL_TEXTURE);
    glScalef(4, 4, 1);
    glBindTexture(GL_TEXTURE_2D, m_textures.Floor);
    RenderDrawable(m_drawables.Quad);
    glLoadIdentity();
    glMatrixMode(GL_MODELVIEW);
    glPopMatrix();

    if (buttons) {
        ...
    }
}

Use a static variable to keep a frame count for animation. I don’t recommend this approach in production code (normally you’d use a delta-time value), but this is fine for an example.

Rotate theta degrees (azimuth) around the y-axis and phi degrees (altitude) around the x-axis.

We’re clearing depth only; there’s no need to clear color since we’re drawing a sky sphere.


Create an animated variable called
textScalefor the pulse effect, and then pass it in to theRenderTextmethod.

Render the buttons only if the
buttonsmask is nonzero. We’ll cover button rendering shortly.
The RenderText method is
fairly straightforward; see Example 6-25. Some
glScalef trickery is used to stretch out the quad and
flip it around.
Handling the Heads-Up Display
Most applications that need to render a HUD take the following approach when rendering a single frame of animation:
Warning
Always remember to completely reset your
transforms at the beginning of the render routine; otherwise, you’ll
apply transformations that are left over from the previous frame. For
example, calling glFrustum alone simply multiplies
the current matrix, so you might need to issue a glLoadIdentity immediately before
calling glFrustum.
Let’s go ahead and modify the
Render method to render buttons; replace the ellipses
in Example 6-24 with the code in Example 6-26.
glEnable(GL_BLEND);
glDisable(GL_DEPTH_TEST);
glBindTexture(GL_TEXTURE_2D, m_textures.Button);
glMatrixMode(GL_PROJECTION);
glPushMatrix();
glLoadIdentity();
glOrthof(-160, 160, -240, 240, 0, 1);

if (buttons & ButtonFlagsShowHorizontal) {
    glMatrixMode(GL_MODELVIEW);
    glTranslatef(200, 0, 0);
    SetButtonAlpha(buttons, ButtonFlagsPressingLeft);
    RenderDrawable(m_drawables.Quad);
    glTranslatef(-400, 0, 0);
    glMatrixMode(GL_TEXTURE);
    glRotatef(180, 0, 0, 1);
    SetButtonAlpha(buttons, ButtonFlagsPressingRight);
    RenderDrawable(m_drawables.Quad);
    glRotatef(-180, 0, 0, 1);
    glMatrixMode(GL_MODELVIEW);
    glTranslatef(200, 0, 0);
}

if (buttons & ButtonFlagsShowVertical) {
    glMatrixMode(GL_MODELVIEW);
    glTranslatef(0, 125, 0);
    glMatrixMode(GL_TEXTURE);
    glRotatef(90, 0, 0, 1);
    SetButtonAlpha(buttons, ButtonFlagsPressingUp);
    RenderDrawable(m_drawables.Quad);
    glMatrixMode(GL_MODELVIEW);
    glTranslatef(0, -250, 0);
    glMatrixMode(GL_TEXTURE);
    glRotatef(180, 0, 0, 1);
    SetButtonAlpha(buttons, ButtonFlagsPressingDown);
    RenderDrawable(m_drawables.Quad);
    glRotatef(90, 0, 0, 1);
    glMatrixMode(GL_MODELVIEW);
    glTranslatef(0, 125, 0);
}


glColor4f(1, 1, 1, 1);
glMatrixMode(GL_PROJECTION);
glPopMatrix();
glMatrixMode(GL_MODELVIEW);
glEnable(GL_DEPTH_TEST);
glDisable(GL_BLEND);
Note that Example 6-26 contains quite a few transform operations; while this is fine for teaching purposes, in a production environment I recommend including all four buttons in a single VBO. You’d still need four separate draw calls, however, since the currently pressed button has a unique alpha value.
In fact, making this optimization would be an
interesting project: create a single VBO that contains all four
pretransformed buttons, and then render it with four separate draw
calls. Don’t forget that the second argument to
glDrawArrays can be nonzero!
The SetButtonAlpha method
sets alpha to one if the button is being pressed; otherwise, it makes
the button semitransparent:
void RenderingEngine::SetButtonAlpha(ButtonMask buttonFlags,
                                     ButtonFlags flag) const
{
    float alpha = (buttonFlags & flag) ? 1.0 : 0.75;
    glColor4f(1, 1, 1, alpha);
}
Next let’s go over the code in
GLView.mm that detects button presses and maintains
the azimuth/altitude angles. See Example 6-27 for
the GLView class declaration and Example 6-28 for the interesting potions of the class
implementation.
#import "Interfaces.hpp"
#import <UIKit/UIKit.h>
#import <QuartzCore/QuartzCore.h>
#import <CoreLocation/CoreLocation.h>

@interface GLView : UIView {
@private
    IRenderingEngine* m_renderingEngine;
    IResourceManager* m_resourceManager;
    EAGLContext* m_context;
    bool m_paused;
    float m_theta;
    float m_phi;
    vec2 m_velocity;
    ButtonMask m_visibleButtons;
    float m_timestamp;
}

- (void) drawView: (CADisplayLink*) displayLink;

@end
...


- (id) initWithFrame: (CGRect) frame
{
    m_paused = false;
    m_theta = 0;
    m_phi = 0;
    m_velocity = vec2(0, 0);
    m_visibleButtons = ButtonFlagsShowHorizontal | ButtonFlagsShowVertical;

    if (self = [super initWithFrame:frame]) {
        CAEAGLLayer* eaglLayer = (CAEAGLLayer*) self.layer;
        eaglLayer.opaque = YES;

        EAGLRenderingAPI api = kEAGLRenderingAPIOpenGLES1;
        m_context = [[EAGLContext alloc] initWithAPI:api];

        if (!m_context || ![EAGLContext setCurrentContext:m_context]) {
            [self release];
            return nil;
        }

        m_resourceManager = CreateResourceManager();

        NSLog(@"Using OpenGL ES 1.1");
        m_renderingEngine = CreateRenderingEngine(m_resourceManager);

        [m_context
            renderbufferStorage:GL_RENDERBUFFER
            fromDrawable: eaglLayer];

        m_timestamp = CACurrentMediaTime();

        m_renderingEngine->Initialize();
        [self drawView:nil];

        CADisplayLink* displayLink;
        displayLink = [CADisplayLink displayLinkWithTarget:self
                                     selector:@selector(drawView:)];

        [displayLink addToRunLoop:[NSRunLoop currentRunLoop]
                     forMode:NSDefaultRunLoopMode];
    }
    return self;
}

- (void) drawView: (CADisplayLink*) displayLink
{
    if (m_paused)
        return;

    if (displayLink != nil) {
        const float speed = 30;
        float elapsedSeconds = displayLink.timestamp - m_timestamp;
        m_timestamp = displayLink.timestamp;
        m_theta -= speed * elapsedSeconds * m_velocity.x;
        m_phi += speed * elapsedSeconds * m_velocity.y;
    }

    ButtonMask buttonFlags = m_visibleButtons;
    if (m_velocity.x < 0) buttonFlags |= ButtonFlagsPressingLeft;
    if (m_velocity.x > 0) buttonFlags |= ButtonFlagsPressingRight;
    if (m_velocity.y < 0) buttonFlags |= ButtonFlagsPressingUp;
    if (m_velocity.y > 0) buttonFlags |= ButtonFlagsPressingDown;

    m_renderingEngine->Render(m_theta, m_phi, buttonFlags);
    [m_context presentRenderbuffer:GL_RENDERBUFFER];
}

bool buttonHit(CGPoint location, int x, int y)
{
    float extent = 32;
    return (location.x > x - extent && location.x < x + extent &&
            location.y > y - extent && location.y < y + extent);
}

- (void) touchesBegan: (NSSet*) touches withEvent: (UIEvent*) event
{
    UITouch* touch = [touches anyObject];
    CGPoint location  = [touch locationInView: self];
    float delta = 1;

    if (m_visibleButtons & ButtonFlagsShowVertical) {
        if (buttonHit(location, 35, 240))
            m_velocity.y = -delta;
        else if (buttonHit(location, 285, 240))
            m_velocity.y = delta;
    }

    if (m_visibleButtons & ButtonFlagsShowHorizontal) {
        if (buttonHit(location, 160, 40))
            m_velocity.x = -delta;
        else if (buttonHit(location, 160, 440))
            m_velocity.x = delta;
    }
}

- (void) touchesEnded: (NSSet*) touches withEvent: (UIEvent*) event
{
    m_velocity = vec2(0, 0);
}
{
UITouch* touch = [touches anyObject];
CGPoint location = [touch locationInView: self];
float delta = 1;
if (m_visibleButtons & ButtonFlagsShowVertical) {
if (buttonHit(location, 35, 240))
m_velocity.y = -delta;
else if (buttonHit(location, 285, 240))
m_velocity.y = delta;
}
if (m_visibleButtons & ButtonFlagsShowHorizontal) {
if (buttonHit(location, 160, 40))
m_velocity.x = -delta;
else if (buttonHit(location, 160, 440))
m_velocity.x = delta;
}
}
- (void) touchesEnded: (NSSet*) touches withEvent: (UIEvent*) event
{
m_velocity = vec2(0, 0);
}

For now, we’re hardcoding both button visibility flags to true. We’ll make this dynamic after adding compass and accelerometer support.

The theta and phi angles are updated according to the current velocity vector and delta time.

Right before passing in the button mask to the
Rendermethod, take a look at the velocity vector to decide which buttons are being pressed.
Simple utility function to detect whether a given point (
location) is within the bounds of a button centered at (x,y). Note that we’re allowing the intrusion of a vanilla C function into an Objective-C file.
To make things simple, the
velocityvector is set up in response to a “finger down” event and reset to zero in response to a “finger up” event. Since we don’t need the ability for several buttons to be pressed simultaneously, this is good enough.
At this point, you now have a complete app that lets you look around inside a (rather boring) virtual world, but it’s still a far cry from augmented reality!
Replacing Buttons with Orientation Sensors
The next step is carefully integrating support for the compass and accelerometer APIs. I say “carefully” because we’d like to provide a graceful runtime fallback if the device (or simulator) does not have a magnetometer or accelerometer.
We’ll be using the accelerometer to obtain the gravity vector, which in turn enables us to compute the phi angle (that’s “altitude” for you astronomers) but not the theta angle (azimuth). Conversely, the compass API can be used to compute theta but not phi. You’ll see how this works in the following sections.
Adding accelerometer support
Using the low-level accelerometer API directly is ill advised; the signal includes quite a bit of noise, and unless your app is somehow related to The Blair Witch Project, you probably don’t want your camera shaking around like a shivering chihuahua.
Discussing a robust and adaptive low-pass filter implementation is beyond the scope of this book, but thankfully Apple includes some example code for this. Search for the AccelerometerGraph sample on the iPhone developer site (http://developer.apple.com/iphone) and download it. Look inside for two key files, and copy them to your project folder: AccelerometerFilter.h and AccelerometerFilter.m.
Note
You can also refer to Stabilizing the counter with a low-pass filter for an example implementation of a simple low-pass filter.
After adding the filter code to your Xcode project, open up GLView.h, and add the three code snippets that are highlighted in bold in Example 6-29.
#import "Interfaces.hpp"
#import "AccelerometerFilter.h"
#import <UIKit/UIKit.h>
#import <QuartzCore/QuartzCore.h>

@interface GLView : UIView <UIAccelerometerDelegate> {
@private
    IRenderingEngine* m_renderingEngine;
    IResourceManager* m_resourceManager;
    EAGLContext* m_context;
    AccelerometerFilter* m_filter;
    ...
}

- (void) drawView: (CADisplayLink*) displayLink;

@end
Next, open GLView.mm,
and add the lines shown in bold in Example 6-30. You might grimace at the sight of
the #if block, but it’s a necessary evil because
the iPhone Simulator pretends to support the accelerometer APIs by
sending the application fictitious values (without giving the user
much control over those values). Since the fake accelerometer won’t do
us much good, we turn it off when building for the
simulator.
Note
An Egyptian software company called vimov produces a compelling tool called iSimulate that can simulate the accelerometer and other device sensors. Check it out at http://www.vimov.com/isimulate.
- (id) initWithFrame: (CGRect) frame
{
    m_paused = false;
    m_theta = 0;
    m_phi = 0;
    m_velocity = vec2(0, 0);
    m_visibleButtons = 0;

    if (self = [super initWithFrame:frame]) {
        CAEAGLLayer* eaglLayer = (CAEAGLLayer*) self.layer;
        eaglLayer.opaque = YES;

        EAGLRenderingAPI api = kEAGLRenderingAPIOpenGLES1;
        m_context = [[EAGLContext alloc] initWithAPI:api];

        if (!m_context || ![EAGLContext setCurrentContext:m_context]) {
            [self release];
            return nil;
        }

        m_resourceManager = CreateResourceManager();

        NSLog(@"Using OpenGL ES 1.1");
        m_renderingEngine = CreateRenderingEngine(m_resourceManager);

#if TARGET_IPHONE_SIMULATOR
        BOOL compassSupported = NO;
        BOOL accelSupported = NO;
#else
        BOOL compassSupported = NO; // (We'll add compass support shortly.)
        BOOL accelSupported = YES;
#endif

        if (compassSupported) {
            NSLog(@"Compass is supported.");
        } else {
            NSLog(@"Compass is NOT supported.");
            m_visibleButtons |= ButtonFlagsShowHorizontal;
        }

        if (accelSupported) {
            NSLog(@"Accelerometer is supported.");
            float updateFrequency = 60.0f;
            m_filter =
              [[LowpassFilter alloc] initWithSampleRate:updateFrequency
                                        cutoffFrequency:5.0];
            m_filter.adaptive = YES;

            [[UIAccelerometer sharedAccelerometer]
              setUpdateInterval:1.0 / updateFrequency];
            [[UIAccelerometer sharedAccelerometer] setDelegate:self];
        } else {
            NSLog(@"Accelerometer is NOT supported.");
            m_visibleButtons |= ButtonFlagsShowVertical;
        }

        [m_context
            renderbufferStorage:GL_RENDERBUFFER
            fromDrawable: eaglLayer];

        m_timestamp = CACurrentMediaTime();

        m_renderingEngine->Initialize();
        [self drawView:nil];

        CADisplayLink* displayLink;
        displayLink = [CADisplayLink displayLinkWithTarget:self
                                     selector:@selector(drawView:)];

        [displayLink addToRunLoop:[NSRunLoop currentRunLoop]
                     forMode:NSDefaultRunLoopMode];
    }
    return self;
}
Since GLView sets itself
as the accelerometer delegate, it needs to implement a response
handler. See Example 6-31.
You might not be familiar with the
atan2 function, which takes the arctangent of the
its first argument divided by the its second argument (see Equation 6-1). Why not use the plain old single-argument
atan function and do the division yourself? You
don’t because atan2 is smarter; it uses the signs
of its arguments to determine which quadrant the angle is in. Plus, it
allows the second argument to be zero without throwing a
divide-by-zero exception.
Note
An even more rarely encountered math
function is hypot. When used together,
atan2 and hypot can convert
any 2D Cartesian coordinate into a polar coordinate.
Equation 6-1 shows how we compute phi from the accelerometer’s input values. To understand it, you first need to realize that we’re using the accelerometer as a way of measuring the direction of gravity. It’s a common misconception that the accelerometer measures speed, but you know better by now! The accelerometer API returns a 3D acceleration vector according to the axes depicted in Figure 6-15.
When you hold the device in landscape mode, there’s no gravity along the y-axis (assuming you’re not slothfully laying on the sofa and turned to one side). So, the gravity vector is composed of X and Z only—see Figure 6-16.
Adding compass support
The direction of gravity can’t tell you which direction you’re facing; that’s where the compass support in third-generation devices comes in. To begin, open GLView.h, and add the bold lines in Example 6-32.
#import "Interfaces.hpp"
#import "AccelerometerFilter.h"
#import <UIKit/UIKit.h>
#import <QuartzCore/QuartzCore.h>
#import <CoreLocation/CoreLocation.h>

@interface GLView : UIView <CLLocationManagerDelegate,
                            UIAccelerometerDelegate> {
@private
    IRenderingEngine* m_renderingEngine;
    IResourceManager* m_resourceManager;
    EAGLContext* m_context;
    CLLocationManager* m_locationManager;
    AccelerometerFilter* m_filter;
    ...
}

- (void) drawView: (CADisplayLink*) displayLink;

@end
The Core Location API is an umbrella for
both GPS and compass functionality, but we’ll be using only the
compass functionality in our demo. Next we need to create an instance
of CLLocationManger somewhere in
GLview.mm; see Example 6-33.
- (id) initWithFrame: (CGRect) frame
{
    ...

    if (self = [super initWithFrame:frame]) {

        ...

        m_locationManager = [[CLLocationManager alloc] init];

#if TARGET_IPHONE_SIMULATOR
        BOOL compassSupported = NO;
        BOOL accelSupported = NO;
#else
        BOOL compassSupported = m_locationManager.headingAvailable;
        BOOL accelSupported = YES;
#endif

        if (compassSupported) {
            NSLog(@"Compass is supported.");
            m_locationManager.headingFilter = kCLHeadingFilterNone;
            m_locationManager.delegate = self;
            [m_locationManager startUpdatingHeading];
        } else {
            NSLog(@"Compass is NOT supported.");
            m_visibleButtons |= ButtonFlagsShowHorizontal;
        }

        ...
    }
    return self;
}
Similar to how it handles the accelerometer
feedback, GLView sets itself as the compass
delegate, so it needs to implement a response handler. See Example 6-31. Unlike the accelerometer, any noise
in the compass reading is already eliminated, so there’s no need for
handling the low-pass filter yourself. The compass API is
embarrassingly simple; it simply returns an angle in degrees, where 0
is north, 90 is east, and so on. See Example 6-34 for the compass response
handler.
The only decision you have to make when
writing a compass handler is whether to use
magneticHeading or trueHeading.
The former returns magnetic north, which isn’t quite the same as
geographic north. To determine the true direction of the geographic
north pole, the device needs to know where it’s located on the planet,
which requires usage of the GPS. Since our app is looking around a
virtual world, it doesn’t matter which heading to use. I chose to use
magneticHeading because it allows us to avoid
enabling GPS updates in the location manager object. This simplifies
the code and may even improve power consumption.
Overlaying with a Live Camera Image
To make this a true augmented reality app, we need to bring the camera into play. If a camera isn’t available (as in the simulator), then the app can simply fall back to the “scrolling clouds” background.
The first step is adding another protocol to
the GLView class—actually we need
two new protocols! Add the bold lines in Example 6-35, noting the new data fields as well
(m_viewController and
m_cameraSupported).
#import "Interfaces.hpp"
#import "AccelerometerFilter.h"
#import <UIKit/UIKit.h>
#import <QuartzCore/QuartzCore.h>
#import <CoreLocation/CoreLocation.h>

@interface GLView : UIView <UIImagePickerControllerDelegate,
                            UINavigationControllerDelegate,
                            CLLocationManagerDelegate,
                            UIAccelerometerDelegate> {
@private
    IRenderingEngine* m_renderingEngine;
    IResourceManager* m_resourceManager;
    EAGLContext* m_context;
    CLLocationManager* m_locationManager;
    AccelerometerFilter* m_filter;
    UIViewController* m_viewController;
    bool m_cameraSupported;
    ...
}

- (void) drawView: (CADisplayLink*) displayLink;

@end
Next we need to enhance the
initWithFrame and drawView
methods. See Example 6-36. Until now, every
sample in this book has set the opaque property in
the EAGL layer to YES. In this sample, we decide its
value at runtime; if a camera is available, don’t make the surface
opaque to allow the image “underlay” to show through.
- (id) initWithFrame: (CGRect) frame
{
    ...

    if (self = [super initWithFrame:frame]) {

        m_cameraSupported = [UIImagePickerController isSourceTypeAvailable:
                             UIImagePickerControllerSourceTypeCamera];

        CAEAGLLayer* eaglLayer = (CAEAGLLayer*) self.layer;
        eaglLayer.opaque = !m_cameraSupported;
        if (m_cameraSupported)
            NSLog(@"Camera is supported.");
        else
            NSLog(@"Camera is NOT supported.");

        ...

#if TARGET_IPHONE_SIMULATOR
        BOOL compassSupported = NO;
        BOOL accelSupported = NO;
#else
        BOOL compassSupported = m_locationManager.headingAvailable;
        BOOL accelSupported = YES;
#endif

        m_viewController = 0;

        ...

        m_timestamp = CACurrentMediaTime();

        bool opaqueBackground = !m_cameraSupported;
        m_renderingEngine->Initialize(opaqueBackground);

        // Delete the line [self drawView:nil];

        CADisplayLink* displayLink;
        displayLink = [CADisplayLink displayLinkWithTarget:self
                                     selector:@selector(drawView:)];

        ...
    }
    return self;
}

- (void) drawView: (CADisplayLink*) displayLink
{
    if (m_cameraSupported && m_viewController == 0)
        [self createCameraController];

    if (m_paused)
        return;

    ...

    m_renderingEngine->Render(m_theta, m_phi, buttonFlags);
    [m_context presentRenderbuffer:GL_RENDERBUFFER];
}
Next we need to implement the
createCameraController method that was called from
drawView. This is an example of lazy
instantiation; we don’t create the camera controller until we
actually need it. Example 6-37 shows the
method, and a detailed explanation follows the listing. (The
createCameraController method needs to be defined
before the drawView method to avoid a compiler
warning.)
- (void) createCameraController
{
    UIImagePickerController* imagePicker =
      [[UIImagePickerController alloc] init];
    imagePicker.delegate = self;
    imagePicker.navigationBarHidden = YES;
    imagePicker.toolbarHidden = YES;
    imagePicker.sourceType = UIImagePickerControllerSourceTypeCamera;
    imagePicker.showsCameraControls = NO;
    imagePicker.cameraOverlayView = self;

    // The 54 pixel wide empty spot is filled in by scaling the image.
    // The camera view's height gets stretched from 426 pixels to 480.

    float bandWidth = 54;
    float screenHeight = 480;
    float zoomFactor = screenHeight / (screenHeight - bandWidth);

    CGAffineTransform pickerTransform =
      CGAffineTransformMakeScale(zoomFactor, zoomFactor);
    imagePicker.cameraViewTransform = pickerTransform;

    m_viewController = [[UIViewController alloc] init];
    m_viewController.view = self;
    [m_viewController presentModalViewController:imagePicker animated:NO];
}
}

Set the image picker’s delegate to the
GLViewclass. Since we aren’t using the camera to capture still images, this isn’t strictly necessary, but it’s still a good practice.
Hide the navigation bar. Again, we aren’t using the camera for image capture, so there’s no need for this UI getting in the way.


Set the source type of the image picker to the camera. You might recall this step from the camera texture sample in the previous chapter.

Hide the camera control UI. Again, we’re using the camera only as a backdrop, so any UI would just get in the way.

Set the camera overlay view to the
GLViewclass to allow the OpenGL content to be rendered.
The UI that we’re hiding would normally leave an annoying gap on the bottom of the screen. By applying a scale transform, we can fill in the gap. Maintaining the correct aspect ratio causes a portion of the image to be cropped, but it’s not noticeable in the final app.

Finally, present the view controller to make the camera image show up.
Since we’re using the camera API in a way that’s quite different from how Apple intended, we had to jump through a few hoops: hiding the UI, stretching the image, and implementing a protocol that never really gets used. This may seem a bit hacky, but ideally Apple will improve the camera API in the future to simplify the development of augmented reality applications.
You may’ve noticed in Example 6-36 that the view class is now passing
in a boolean to the rendering engine’s Initialize
method; this tells it whether the background should contain clouds as
before or whether it should be cleared to allow the camera underlay to
show through. You must modify the declaration of
Initialize in Interfaces.cpp
accordingly. Next, the only remaining changes are shown in Example 6-38.
...

class RenderingEngine : public IRenderingEngine {
public:
    RenderingEngine(IResourceManager* resourceManager);
    void Initialize(bool opaqueBackground);
    void Render(float theta, float phi, ButtonMask buttons) const;
private:
    ...
    bool m_opaqueBackground;
};

void RenderingEngine::Initialize(bool opaqueBackground)
{
    m_opaqueBackground = opaqueBackground;

    ...
}

void RenderingEngine::Render(float theta, float phi, ButtonMask buttons) const
{
    static float frameCounter = 0;
    frameCounter++;

    glPushMatrix();

    glRotatef(phi, 1, 0, 0);
    glRotatef(theta, 0, 1, 0);

    if (m_opaqueBackground) {
        glClear(GL_DEPTH_BUFFER_BIT);

        glPushMatrix();
        glScalef(100, 100, 100);
        glRotatef(frameCounter * 2, 0, 1, 0);
        glBindTexture(GL_TEXTURE_2D, m_textures.Sky);
        RenderDrawable(m_drawables.SkySphere);
        glPopMatrix();
    } else {
        glClearColor(0, 0, 0, 0);
        glClear(GL_COLOR_BUFFER_BIT | GL_DEPTH_BUFFER_BIT);
    }

    ...
}
Note that the alpha value of the clear color is zero; this allows the underlay to show through. Also note that the color buffer is cleared only if there’s no sky sphere. Experienced OpenGL programmers make little optimizations like this as a matter of habit.
That’s it for the Holodeck sample! See Figure 6-17 for a depiction of the app as it now stands.
Wrapping Up
In this chapter we learned how to put FBOs to good use for the first time. We learned how to achieve anti-aliasing in sneaky ways, how to layer a scene by mixing 2D content with 3D content, and how to use the iPhone’s orientation sensors in tandem with OpenGL.
We explored the concept of a 2D HUD in the Holodeck sample, but we largely glossed over the subject of text. Supplying ready-made textures of complete words (as we did for Holodeck) can be a bit cumbersome; often an application needs to render large amounts of dynamic text together with a 3D scene. Since text is something that OpenGL can’t really handle on its own (and justifiably so), it deserves more attention. This brings us to the next chapter.
Get iPhone 3D Programming now with the O’Reilly learning platform.
O’Reilly members experience books, live events, courses curated by job role, and more from O’Reilly and nearly 200 top publishers.
