Chapter 8. Advanced Lighting and Texturing
At this point in this book, you may have written a couple simple OpenGL demos to impress your co-workers and family members. But, your app may need that extra little something to stand out from the crowd. This chapter goes over a small selection of more advanced techniques that can give your app an extra oomph.
The selection of effects dealt with in this chapter is by no means comprehensive. I encourage you to check out other graphics books, blogs, and academic papers to learn additional ways of dazzling your users. For example, this book does not cover rendering shadows; there are too many techniques for rendering shadows (or crude approximations thereof), so I can’t cover them while keeping this book concise. But, there’s plenty of information out there, and now that you know the fundamentals, it won’t be difficult to digest it.
This chapter starts off by detailing some of the more obscure texturing functionality in OpenGL ES 1.1. In a way, some of these features—specifically texture combiners, which allow textures to be combined in a variety of ways—are powerful enough to serve as a substitute for very simple fragment shaders.
The chapter goes on to cover normal maps and DOT3 lighting, useful for increasing the amount of perceived detail in your 3D models. (DOT3 simply refers to a three-component dot product; despite appearances, it’s not an acronym.) Next we discuss a technique for creating reflective surfaces that employs a special cube map texture, supported only in ES 2.0. We’ll then briefly cover anisotropic texturing, which improves texturing quality in some cases. Finally, we’ll go over an image-processing technique that adds a soft glow to the scene called bloom. The bloom effect may remind you of a camera technique used in cheesy 1980s soap operas, and I claim no responsibility if it compels you to marry your nephew in order to secure financial assistance for your father’s ex-lover.
Texture Environments under OpenGL ES 1.1
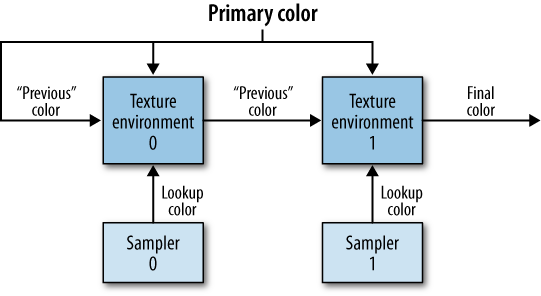
Multitexturing was briefly introduced in the previous chapter (Image Composition and a Taste of Multitexturing), but there’s a lot more to explain. See Figure 8-1 for a high-level overview of the iPhone’s texturing capabilities.
Note
This section doesn’t have much in the way of example code; if you’re not interested in the details of texture combination under OpenGL ES 1.1, skip to the next section (Bump Mapping and DOT3 Lighting).
Here are a few disclaimers regarding Figure 8-1. First, the diagram assumes that both texture stages are enabled; if stage 1 is disabled, the “previous color” gets passed on to become the “final color.” Second, the diagram shows only two texture stages. This is accurate for first- and second-generation devices, but newer devices have eight texture units.
In Figure 8-1, the
“primary” color comes from the interpolation of per-vertex colors.
Per-vertex colors are produced by lighting or set directly from the
application using glColor4f or
GL_COLOR_ARRAY.
The two lookup colors are the postfiltered texel colors, sampled from a particular texture image.
Each of the two texture environments is configured to combine its various inputs and produce an output color. The default configuration is modulation, which was briefly mentioned in Chapter 5; this means that the output color results from a per-component multiply of the previous color with the lookup color.
There are a whole slew of ways to configure
each texture environment using the glTexEnv function. In my opinion, this is
the worst function in OpenGL, and I’m thankful that it doesn’t exist in
OpenGL ES 2.0. The expressiveness afforded by GLSL makes
glTexEnv unnecessary.
glTexEnv has the following
prototypes:
void glTexEnvi(GLenum target, GLenum pname, GLint param);
void glTexEnviv(GLenum target, GLenum pname, const GLint* params);
void glTexEnvf(GLenum target, GLenum pname, GLfloat param);
void glTexEnvfv(GLenum target, GLenum pname, const GLfloat* params);
Note
There are actually a couple more variants for fixed-point math, but I’ve omitted them since there’s never any reason to use fixed-point math on the iPhone. Because of its chip architecture, fixed-point numbers require more processing than floats.
The first parameter, target,
is always set to GL_TEXTURE_ENV, unless you’re enabling
point sprites as described in Rendering Confetti, Fireworks, and More: Point Sprites. The second
parameter, pname, can be any of the
following:
- GL_TEXTURE_ENV_COLOR
Sets the constant color. As you’ll see later, this used only if the mode is
GL_BLENDorGL_COMBINE.- GL_COMBINE_RGB
Sets up a configurable equation for the RGB component of color. Legal values of
paramare discussed later.- GL_COMBINE_ALPHA
Sets up a configurable equation for the alpha component of color. Legal values of
paramare discussed later.- GL_RGB_SCALE
Sets optional scale on the RGB components that takes place after all other operations. Scale can be 1, 2, or 4.
- GL_ALPHA_SCALE
Sets optional scale on the alpha component that takes place after all other operations. Scale can be 1, 2, or 4.
- GL_TEXTURE_ENV_MODE
Sets the mode of the current texture environment; the legal values of
paramare shown next.
If pname is
GL_TEXTURE_ENV_MODE, then param
can be any of the following:
- GL_REPLACE
Set the output color equal to the lookup color:
OutputColor = LookupColor
- GL_MODULATE
This is the default mode; it simply does a per-component multiply of the lookup color with the previous color:
OutputColor = LookupColor * PreviousColor
- GL_DECAL
Use the alpha value of the lookup color to overlay it with the previous color. Specifically:
OutputColor = PreviousColor * (1 - LookupAlpha) + LookupColor * LookupAlpha
- GL_BLEND
Invert the lookup color, then modulate it with the previous color, and then add the result to a scaled lookup color:
OutputColor = PreviousColor * (1 - LookupColor) + LookupColor * ConstantColor
- GL_ADD
Use per-component addition to combine the previous color with the lookup color:
OutputColor = PreviousColor + LookupColor
- GL_COMBINE
Generate the RGB outputs in the manner configured by
GL_COMBINE_RGB, and generate the alpha output in the manner configured byGL_COMBINE_ALPHA.
The two texture stages need not have the same
mode. For example, the following snippet sets the first texture
environment to GL_REPLACE and the second environment to
GL_MODULATE:
glActiveTexture(GL_TEXTURE0);
glEnable(GL_TEXTURE_2D);
glBindTexture(GL_TEXTURE_2D, myFirstTextureObject);
glTexEnvi(GL_TEXTURE_ENV, GL_TEXTURE_ENV_MODE, GL_REPLACE);

glActiveTexture(GL_TEXTURE1);
glEnable(GL_TEXTURE_2D);
glBindTexture(GL_TEXTURE_2D, mySecondTextureObject);
glTexEnvi(GL_TEXTURE_ENV, GL_TEXTURE_ENV_MODE, GL_MODULATE);
Texture Combiners
If the mode is set to
GL_COMBINE, you can set up two types of combiners:
the RGB combiner and the alpha
combiner. The former sets up the output color’s RGB
components; the latter configures its alpha value.
Each of the two combiners needs to be set up
using at least five additional (!) calls to glTexEnv.
One call chooses the arithmetic operation (addition, subtraction, and so
on), while the other four calls set up the arguments to the operation.
For example, here’s how you can set up the RGB combiner of texture stage
0:
glActiveTexture(GL_TEXTURE0);
glEnable(GL_TEXTURE_2D);
glBindTexture(GL_TEXTURE_2D, myTextureObject);
glTexEnvi(GL_TEXTURE_ENV, GL_TEXTURE_ENV_MODE, GL_COMBINE);

// Tell OpenGL which arithmetic operation to use:
glTexEnvi(GL_TEXTURE_ENV, GL_COMBINE_RGB, <operation>);

// Set the first argument:
glTexEnvi(GL_TEXTURE_ENV, GL_SRC0_RGB, <source0>);
glTexEnvi(GL_TEXTURE_ENV, GL_OPERAND0_RGB, <operand0>);

// Set the second argument:
glTexEnvi(GL_TEXTURE_ENV, GL_SRC1_RGB, <source1>);
glTexEnvi(GL_TEXTURE_ENV, GL_OPERAND1_RGB, <operand1>);
Setting the alpha combiner is done in the same way; just swap the RGB suffix with ALPHA, like this:
// Tell OpenGL which arithmetic operation to use:
glTexEnvi(GL_TEXTURE_ENV, GL_COMBINE_ALPHA, <operation>);

// Set the first argument:
glTexEnvi(GL_TEXTURE_ENV, GL_SRC0_ALPHA, <source0>);
glTexEnvi(GL_TEXTURE_ENV, GL_OPERAND0_ALPHA, <operand0>);

// Set the second argument:
glTexEnvi(GL_TEXTURE_ENV, GL_SRC1_ALPHA, <source1>);
glTexEnvi(GL_TEXTURE_ENV, GL_OPERAND1_ALPHA, <operand1>);
The following is the list of arithmetic
operations you can use for RGB combiners (in other words, the legal
values of <operation> when
pname is set to
GL_COMBINE_RGB):
- GL_REPLACE
OutputColor = Arg0
- GL_MODULATE
OutputColor = Arg0 * Arg1
- GL_ADD
OutputColor = Arg0 + Arg1
- GL_ADD_SIGNED
OutputColor = Arg0 + Arg1 - 0.5
- GL_INTERPOLATE
OutputColor = Arg0 ∗ Arg2 + Arg1 ∗ (1 − Arg2)
- GL_SUBTRACT
OutputColor = Arg0 - Arg1
- GL_DOT3_RGB
OutputColor = 4 * Dot(Arg0 - H, Arg1 - H) where H = (0.5, 0.5, 0.5)
- GL_DOT3_RGBA
OutputColor = 4 * Dot(Arg0 - H, Arg1 - H) where H = (0.5, 0.5, 0.5)
Note that GL_DOT3_RGB and
GL_DOT3_RGBA produce a scalar rather than a vector.
With GL_DOT3_RGB, that scalar is duplicated into each
of the three RGB channels of the output color, leaving alpha untouched.
With GL_DOT3_RGBA, the resulting scalar is written
out to all four color components. The dot product combiners may seem
rather strange, but you’ll see how they come in handy in the next
section.
GL_INTERPOLATE actually
has three arguments. As you’d expect, setting up
the third argument works the same way as setting up the others; you use
GL_SRC2_RGB and
GL_OPERAND2_RGB.
For alpha combiners
(GL_COMBINE_ALPHA), the list of legal arithmetic
operations is the same as RGB combiners, except that the two dot-product
operations are not supported.
The <source> arguments in the preceding code snippet can be any of the following:
For RGB combiners, the <operand> arguments can be any of the following:
For alpha combiners, only the last two of the preceding list can be used.
By now, you can see that combiners effectively allow you to set up a set of equations, which is something that’s much easier to express with a shading language!
All the different ways of calling
glTexEnv are a bit confusing, so I think it’s best to
go over a specific example in detail; we’ll do just that in the next
section, with an in-depth explanation of the DOT3 texture combiner and
its equivalent in GLSL.
Bump Mapping and DOT3 Lighting
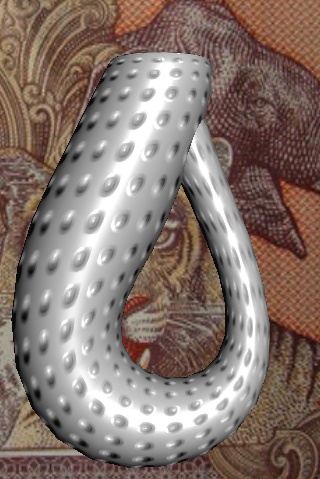
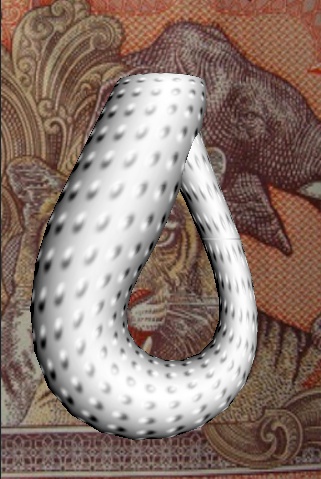
If you’d like to render an object with fine surface detail but you don’t want to use an incredibly dense mesh of triangles, there’s a technique called bump mapping that fits the bill. It’s also called normal mapping, since it works by varying the surface normals to affect the lighting. You can use this technique to create more than mere bumps; grooves or other patterns can be etched into (or raised from) a surface. Remember, a good graphics programmer thinks like a politician and uses lies to her advantage! Normal mapping doesn’t actually affect the geometry at all. This is apparent when you look along the silhouette of a normal-mapped object; it appears flat. See Figure 8-2.
You can achieve this effect with either OpenGL ES 2.0 or OpenGL ES 1.1, although bump mapping under 1.1 is much more limited.
Either approach requires the use of a normal map, which is a texture that contains normal vectors (XYZ components) rather than colors (RGB components). Since color components are, by definition, non-negative, a conversion needs to occur to represent a vector as a color:
vec3 TransformedVector = (OriginalVector + vec3(1, 1, 1)) / 2
The previous transformation simply changes the range of each component from [–1, +1] to [0, +1].
Representing vectors as colors can sometimes cause problems because of relatively poor precision in the texture format. On some platforms, you can work around this with a high-precision texture format. At the time of this writing, the iPhone does not support high-precision formats, but I find that standard 8-bit precision is good enough in most scenarios.
Note
Another way to achieve bump mapping with shaders is to cast aside the normal map and opt for a procedural approach. This means doing some fancy math in your shader. While procedural bump mapping is fine for simple patterns, it precludes artist-generated content.
There are a number of ways to generate a normal map. Often an artist will create a height map, which is a grayscale image where intensity represents surface displacement. The height map is then fed into a tool that builds a terrain from which the surface normals can be extracted (conceptually speaking).
PVRTexTool
(see The PowerVR SDK and Low-Precision Textures) is such a tool. If you invoke
it from a terminal window, simply add -b to the command
line, and it generates a normal map. Other popular tools include Ryan
Clark’s crazybump application and NVIDIA’s
Melody, but neither of these is supported on
Mac OS X at the time of this writing. For professional
artists, Pixologic’s Z-Brush is probably the most
sought-after tool for normal map creation (and yes, it’s Mac-friendly).
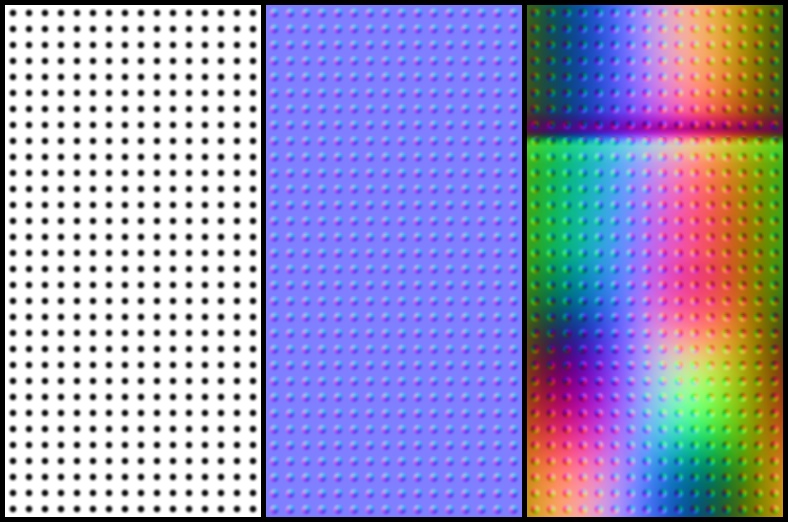
For an example of a height map and its resulting normal map, see the left
two panels in Figure 8-3.
An important factor to consider with normal maps is the “space” that they live in. Here’s a brief recap from Chapter 2 concerning the early life of a vertex:
For bog standard lighting (not bump mapped), normals are sent to OpenGL in object space. However, the normal maps that get generated by tools like crazybump are defined in tangent space (also known as surface local space). Tangent space is the 2D universe that textures live in; if you were to somehow “unfold” your object and lay it flat on a table, you’d see what tangent space looks like.
Another tidbit to remember from an earlier chapter is that OpenGL takes object-space normals and transforms them into eye space using the inverse-transpose of the model-view matrix (Normal Transforms Aren’t Normal). Here’s the kicker: transformation of the normal vector can actually be skipped in certain circumstances. If your light source is infinitely distant, you can simply perform the lighting in object space! Sure, the lighting is a bit less realistic, but when has that stopped us?
So, normal maps are (normally) defined in tangent space, but lighting is (normally) performed in eye space or object space. How do we handle this discrepancy? With OpenGL ES 2.0, we can revise the lighting shader so that it transforms the normals from tangent space to object space. With OpenGL ES 1.1, we’ll need to transform the normal map itself, as depicted in the rightmost panel in Figure 8-3. More on this later; first we’ll go over the shader-based approach since it can give you a better understanding of what’s going on.
Another Foray into Linear Algebra
Before writing any code, we need to figure out how the shader should go about transforming the normals from tangent space to object space. In general, we’ve been using matrices to make transformations like this. How can we come up with the right magical matrix?
Any coordinate system can be defined with a set of basis vectors. The set is often simply called a basis. The formal definition of basis involves phrases like “linearly independent spanning set,” but I don’t want you to run away in abject terror, so I’ll just give an example.
For 3D space, we need three basis vectors, one for each axis. The standard basis is the space that defines the Cartesian coordinate system that we all know and love:
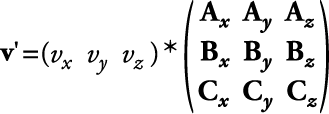
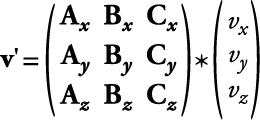
Any set of unit-length vectors that are all perpendicular to each other is said to be orthonormal. Turns out that there’s an elegant way to transform a vector from any orthonormal basis to the standard basis. All you need to do is create a matrix by filling in each row with a basis vector:
If you prefer column-vector notation, then the basis vectors form columns rather than rows:
In any case, we now have the magic matrix for transforming normals! Incidentally, basis vectors can also be used to derive a matrix for general rotation around an arbitrary axis. Basis vectors are so foundational to linear algebra that mathematicians are undoubtedly scoffing at me for not covering them much earlier. I wanted to wait until a practical application cropped up—which brings us back to bump mapping.
Generating Basis Vectors
So, our bump mapping shader will need three
basis vectors to transform the normal map’s values from tangent space to
object space. Where can we get these three basis vectors? Recall for a
moment the ParametricSurface class that was
introduced early in this book. In The Math Behind Normals, the
following pseudocode was presented:
p = Evaluate(s, t)
u = Evaluate(s + ds, t) - p
v = Evaluate(s, t + dt) - p
n = Normalize(u × v)
The three vectors u, v, and
n are all perpendicular to each
other—perfect for forming an orthonormal basis! The
ParametricSurface class already computes n for us, so all we need to do is amend it to
write out one of the tangent vectors. Either u or v will work
fine; there’s no need to send both because the shader can easily compute
the third basis vector using a cross product. Take a look at Example 8-1; for a baseline, this uses the
parametric surface code that was first introduced in Chapter 3 and enhanced in subsequent chapters. New lines are
highlighted in bold.
void ParametricSurface::GenerateVertices(vector<float>& vertices,
                                         unsigned char flags) const
{
    int floatsPerVertex = 3;
    if (flags & VertexFlagsNormals)
        floatsPerVertex += 3;
    if (flags & VertexFlagsTexCoords)
        floatsPerVertex += 2;
    if (flags & VertexFlagsTangents)
        floatsPerVertex += 3;

    vertices.resize(GetVertexCount() * floatsPerVertex);
    float* attribute = &vertices[0];

    for (int j = 0; j < m_divisions.y; j++) {
        for (int i = 0; i < m_divisions.x; i++) {

            // Compute Position
            vec2 domain = ComputeDomain(i, j);
            vec3 range = Evaluate(domain);
            attribute = range.Write(attribute);

            // Compute Normal
            if (flags & VertexFlagsNormals) {
                ...
            }

            // Compute Texture Coordinates
            if (flags & VertexFlagsTexCoords) {
                ...
            }

            // Compute Tangent
            if (flags & VertexFlagsTangents) {
                float s = i, t = j;
                vec3 p = Evaluate(ComputeDomain(s, t));
                vec3 u = Evaluate(ComputeDomain(s + 0.01f, t)) - p;
                if (InvertNormal(domain))
                   u = -u;
                attribute = u.Write(attribute);
            }
        }
    }
}
Normal Mapping with OpenGL ES 2.0
Let’s crack some knuckles and write some shaders. A good starting point is the pair of shaders we used for pixel-based lighting in Chapter 4. I’ve repeated them here (Example 8-2), with uniform declarations omitted for brevity.
attribute vec4 Position;
attribute vec3 Normal;

varying mediump vec3 EyespaceNormal;

// Vertex Shader
void main(void)
{
    EyespaceNormal = NormalMatrix * Normal;
    gl_Position = Projection * Modelview * Position;
}

// Fragment Shader
void main(void)
{
    highp vec3 N = normalize(EyespaceNormal);
    highp vec3 L = LightVector;
    highp vec3 E = EyeVector;
    highp vec3 H = normalize(L + E);
    highp float df = max(0.0, dot(N, L));
    highp float sf = max(0.0, dot(N, H));
    sf = pow(sf, Shininess);

    lowp vec3 color = AmbientMaterial + df
      * DiffuseMaterial + sf * SpecularMaterial;
    gl_FragColor = vec4(color, 1);
}
To extend this to support bump mapping, we’ll need to add new attributes for the tangent vector and texture coordinates. The vertex shader doesn’t need to transform them; we can leave that up to the pixel shader. See Example 8-3.
attribute vec4 Position;
attribute vec3 Normal;
attribute vec3 Tangent;
attribute vec2 TextureCoordIn;

uniform mat4 Projection;
uniform mat4 Modelview;

varying vec2 TextureCoord;
varying vec3 ObjectSpaceNormal;
varying vec3 ObjectSpaceTangent;

void main(void)
{
    ObjectSpaceNormal = Normal;
    ObjectSpaceTangent = Tangent;
    gl_Position = Projection * Modelview * Position;
    TextureCoord = TextureCoordIn;
}
Before diving into the fragment shader, let’s review what we’ll be doing:
Extract a perturbed normal from the normal map, transforming it from [0, +1] to [–1, +1].
Create three basis vectors using the normal and tangent vectors that were passed in from the vertex shader.
Perform a change of basis on the perturbed normal to bring it to object space.
Execute the same lighting algorithm that we’ve used in the past, but use the perturbed normal.
Now we’re ready! See Example 8-4.
Warning
When computing
tangentSpaceNormal, you might need to swap the
normal map’s x and y components,
just like we did in Example 8-4. This may or may not be
necessary, depending on the coordinate system used by your normal map
generation tool.
varying mediump vec2 TextureCoord;
varying mediump vec3 ObjectSpaceNormal;
varying mediump vec3 ObjectSpaceTangent;

uniform highp vec3 AmbientMaterial;
uniform highp vec3 DiffuseMaterial;
uniform highp vec3 SpecularMaterial;
uniform highp float Shininess;
uniform highp vec3 LightVector;
uniform highp vec3 EyeVector;

uniform sampler2D Sampler;

void main(void)
{
    // Extract the perturbed normal from the texture:
    highp vec3 tangentSpaceNormal =
      texture2D(Sampler, TextureCoord).yxz * 2.0 - 1.0;

    // Create a set of basis vectors:
    highp vec3 n = normalize(ObjectSpaceNormal);
    highp vec3 t = normalize(ObjectSpaceTangent);
    highp vec3 b = normalize(cross(n, t));

    // Change the perturbed normal from tangent space to object space:
    highp mat3 basis = mat3(n, t, b);
    highp vec3 N = basis * tangentSpaceNormal;

    // Perform standard lighting math:
    highp vec3 L = LightVector;
    highp vec3 E = EyeVector;
    highp vec3 H = normalize(L + E);
    highp float df = max(0.0, dot(N, L));
    highp float sf = max(0.0, dot(N, H));
    sf = pow(sf, Shininess);

    lowp vec3 color = AmbientMaterial + df
      * DiffuseMaterial + sf * SpecularMaterial;
    gl_FragColor = vec4(color, 1);
}
We’re not done just yet, though—since the
lighting math operates on a normal vector that lives in object space,
the LightVector and EyeVector
uniforms that we pass in from the application need to be in object space
too. To transform them from world space to object space, we can simply
multiply them by the model matrix using our C++ vector library. Take
care not to confuse the model matrix with the model-view matrix; see
Example 8-5.
void RenderingEngine::Render(float theta) const
{
    // Render the background image:
    ...

    const float distance = 10;
    const vec3 target(0, 0, 0);
    const vec3 up(0, 1, 0);
    const vec3 eye = vec3(0, 0, distance);
    const vec3 view = mat4::LookAt(eye, target, up);
    const mat4 model = mat4::RotateY(theta);
    const mat4 modelview = model * view;

    const vec4 lightWorldSpace = vec4(0, 0, 1, 1);
    const vec4 lightObjectSpace = model * lightWorldSpace;

    const vec4 eyeWorldSpace(0, 0, 1, 1);
    const vec4 eyeObjectSpace = model * eyeWorldSpace;

    glUseProgram(m_bump.Program);
    glUniform3fv(m_bump.Uniforms.LightVector, 1,
                 lightObjectSpace.Pointer());
    glUniform3fv(m_bump.Uniforms.EyeVector, 1, eyeObjectSpace.Pointer());
    glUniformMatrix4fv(m_bump.Uniforms.Modelview, 1,
                       0, modelview.Pointer());
    glBindTexture(GL_TEXTURE_2D, m_textures.TangentSpaceNormals);

    // Render the Klein bottle:
    ...
}
Normal Mapping with OpenGL ES 1.1
You might be wondering why we used object-space lighting for shader-based bump mapping, rather than eye-space lighting. After all, eye-space lighting is what was presented way back in Chapter 4 as the “standard” approach. It’s actually fine to perform bump map lighting in eye space, but I wanted to segue to the fixed-function approach, which does require object space!
Note
Another potential benefit to lighting in object space is performance. I’ll discuss this more in the next chapter.
Earlier in the chapter, I briefly mentioned that OpenGL ES 1.1 requires the normal map itself to be transformed to object space (depicted in the far-right panel in Figure 8-3). If it were transformed it to eye space, then we’d have to create a brand new normal map every time the camera moves. Not exactly practical!
The secret to bump mapping with
fixed-function hardware lies in a special texture combiner operation
called GL_DOT3_RGB. This technique is often simply
known as DOT3 lighting. The basic idea is to have
the texture combiner generate a gray color whose intensity is determined
by the dot product of its two operands. This is sufficient for simple
diffuse lighting, although it can’t produce specular highlights. See
Figure 8-4 for a screenshot of the Bumpy app with
OpenGL ES 1.1.
Here’s the sequence of
glTexEnv calls that sets up the texturing state used
to generate Figure 8-4:
glTexEnvi(GL_TEXTURE_ENV, GL_TEXTURE_ENV_MODE, GL_COMBINE);
glTexEnvi(GL_TEXTURE_ENV, GL_COMBINE_RGB, GL_DOT3_RGB);
glTexEnvi(GL_TEXTURE_ENV, GL_SRC0_RGB, GL_PRIMARY_COLOR);
glTexEnvi(GL_TEXTURE_ENV, GL_OPERAND0_RGB, GL_SRC_COLOR);
glTexEnvi(GL_TEXTURE_ENV, GL_SRC1_RGB, GL_TEXTURE);
glTexEnvi(GL_TEXTURE_ENV, GL_OPERAND1_RGB, GL_SRC_COLOR);
The previous code snippet tells OpenGL to set up an equation like this:
Curious about the H offset and the final multiply-by-four? Remember, we had to transform our normal vectors from unit space to color space:
vec3 TransformedVector = (OriginalVector + vec3(1, 1, 1)) / 2
The H offset and multiply-by-four simply puts the final result back into unit space. Since this assumes that both vectors have been transformed in the previous manner, take care to transform the light position. Here’s the relevant snippet of application code, once again leveraging our C++ vector library:
vec4 lightWorldSpace = vec4(0, 0, 1, 0);
vec4 lightObjectSpace = modelMatrix * lightWorldSpace;
lightObjectSpace = (lightObjectSpace + vec4(1, 1, 1, 0)) * 0.5f;

glColor4f(lightObjectSpace.x,
          lightObjectSpace.y,
          lightObjectSpace.z, 1);
The result from DOT3 lighting is often modulated with a second texture stage to produce a final color that’s nongray. Note that DOT3 lighting is basically performing per-pixel lighting but without the use of shaders!
Generating Object-Space Normal Maps
Perhaps the most awkward aspect of DOT3 lighting is that it requires you to somehow create a normal map in object space. Some generator tools don’t know what your actual geometry looks like; these tools take only a simple heightfield for input, so they can generate the normals only in tangent space.
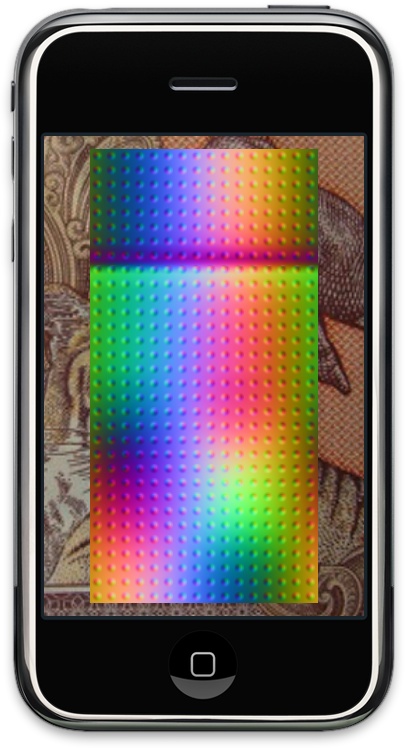
The trick I used for the Klein bottle was to use OpenGL ES 2.0 as part of my “art pipeline,” even though the final application used only OpenGL ES 1.1. By running a modified version of the OpenGL ES 2.0 demo and taking a screenshot, I obtained an object-space normal map for the Klein bottle. See Figure 8-5.
Examples 8-6 and 8-7 show the shaders for this. Note that
the vertex shader ignores the model-view matrix and the incoming vertex
position. It instead uses the incoming texture coordinate to determine
the final vertex position. This effectively “unfolds” the object. The
Distance, Scale, and
Offset constants are used to center the image on the
screen. (I also had to do some cropping and scaling on the final image
to make it have power-of-two dimensions.)
attribute vec3 Normal;
attribute vec3 Tangent;
attribute vec2 TextureCoordIn;

uniform mat4 Projection;

varying vec2 TextureCoord;
varying vec3 ObjectSpaceNormal;
varying vec3 ObjectSpaceTangent;

const float Distance = 10.0;
const vec2 Offset = vec2(0.5, 0.5);
const vec2 Scale = vec2(2.0, 4.0);

void main(void)
{
    ObjectSpaceNormal = Normal;
    ObjectSpaceTangent = Tangent;

    vec4 v = vec4(TextureCoordIn - Offset, -Distance, 1);
    gl_Position = Projection * v;
    gl_Position.xy *= Scale;

    TextureCoord = TextureCoordIn;
}
The fragment shader is essentially the same as what was presented in Normal Mapping with OpenGL ES 2.0, but without the lighting math.
varying mediump vec2 TextureCoord;
varying mediump vec3 ObjectSpaceNormal;
varying mediump vec3 ObjectSpaceTangent;

uniform sampler2D Sampler;

void main(void)
{
    // Extract the perturbed normal from the texture:
    highp vec3 tangentSpaceNormal =
      texture2D(Sampler, TextureCoord).yxz * 2.0 - 1.0;

    // Create a set of basis vectors:
    highp vec3 n = normalize(ObjectSpaceNormal);
    highp vec3 t = normalize(ObjectSpaceTangent);
    highp vec3 b = normalize(cross(n, t));

       // Change the perturbed normal from tangent space to object space:
    highp mat3 basis = mat3(n, t, b);
    highp vec3 N = basis * tangentSpaceNormal;

    // Transform the normal from unit space to color space:
    gl_FragColor = vec4((N + 1.0) * 0.5, 1);
}
Reflections with Cube Maps
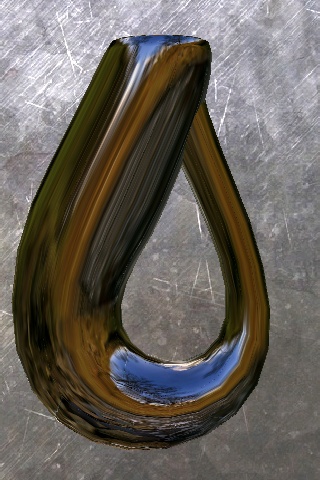
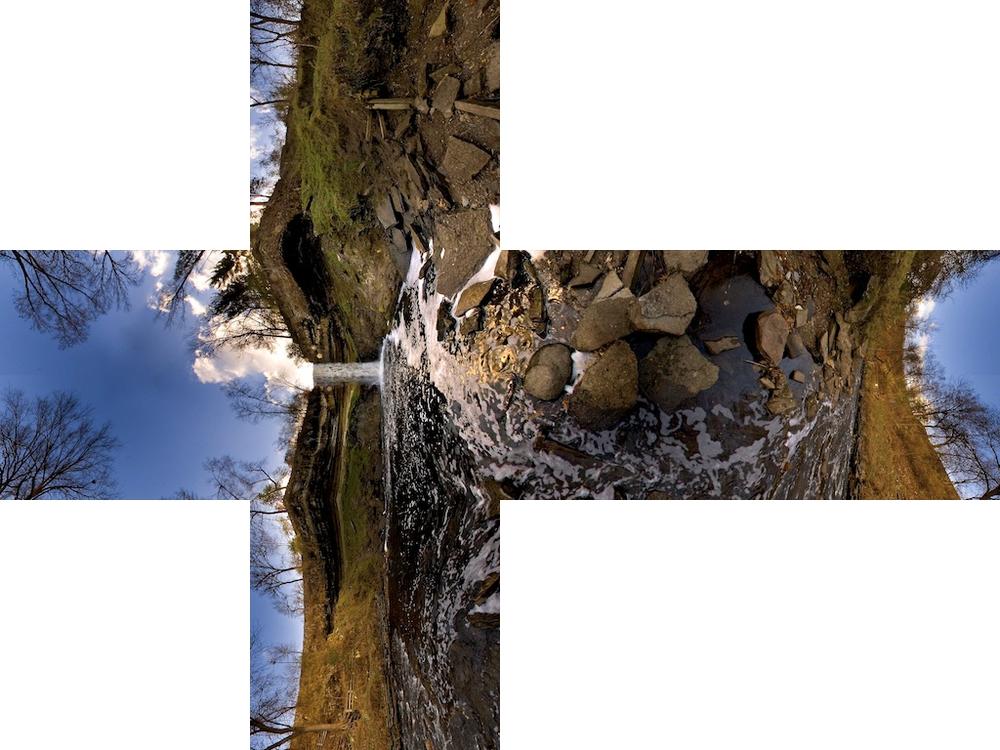
You might recall a technique presented in Chapter 6, where we rendered an upside-down object to simulate reflection. This was sufficient for reflecting a limited number of objects onto a flat plane, but if you’d like the surface of a 3D object to reflect a richly detailed environment, as shown in Figure 8-6, a cube map is required. Cube maps are special textures composed from six individual images: one for each of the six axis-aligned directions in 3D space. Cube maps are supported only in OpenGL ES 2.0.
Cube maps are often visualized using a cross shape that looks like an unfolded box, as shown in Figure 8-7.
The cross shape is for the benefit of humans only; OpenGL does expect it when you give it the image data for a cube map. Rather, it requires you to upload each of the six faces individually, like this:
glTexImage2D(GL_TEXTURE_CUBE_MAP_POSITIVE_X, mip, format,
             w, h, 0, format, type, data[0]);
glTexImage2D(GL_TEXTURE_CUBE_MAP_NEGATIVE_X, mip, format,
             w, h, 0, format, type, data[1]);
glTexImage2D(GL_TEXTURE_CUBE_MAP_POSITIVE_Y, mip, format,
             w, h, 0, format, type, data[2]);
glTexImage2D(GL_TEXTURE_CUBE_MAP_NEGATIVE_Y, mip, format,
             w, h, 0, format, type, data[3]);
glTexImage2D(GL_TEXTURE_CUBE_MAP_POSITIVE_Z, mip, format,
             w, h, 0, format, type, data[4]);
glTexImage2D(GL_TEXTURE_CUBE_MAP_NEGATIVE_Z, mip, format,
             w, h, 0, format, type, data[5]);
Note that, for the first time, we’re using a
texture target other than GL_TEXTURE_2D. This can be a
bit confusing because the function call name still has the 2D suffix. It
helps to think of each face as being 2D, although the texture object
itself is not.
The enumerants for the six faces have contiguous values, so it’s more common to upload the faces of a cube map using a loop. For an example of this, see Example 8-8, which creates and populates a complete mipmapped cube map.
GLuint CreateCubemap(GLvoid** faceData, int size, GLenum format, GLenum type)
{
    GLuint textureObject;
    glGenTextures(1, &textureObject);
    glBindTexture(GL_TEXTURE_CUBE_MAP, textureObject);
    for (int f = 0; f < 6; ++f) {
        GLenum face = GL_TEXTURE_CUBE_MAP_POSITIVE_X + f;
        glTexImage2D(face, 0, format, size, size, 0, format, type, faceData[f]);
    }
    glTexParameteri(GL_TEXTURE_CUBE_MAP,
                    GL_TEXTURE_MIN_FILTER,
                    GL_LINEAR_MIPMAP_LINEAR);
    glTexParameteri(GL_TEXTURE_CUBE_MAP, GL_TEXTURE_MAG_FILTER, GL_LINEAR);
    glGenerateMipmap(GL_TEXTURE_CUBE_MAP);
    return textureObject;
}
Note
Example 8-8 is part of the rendering engine in a sample app in this book’s downloadable source code (see How to Contact Us).
In Example 8-8, the
passed-in size parameter is the width (or height) of
each cube map face. Cube map faces must be square. Additionally, on the
iPhone, they must have a size that’s a power-of-two.
Example 8-9 shows the vertex shader that can be used for cube map reflection.
attribute vec4 Position;
attribute vec3 Normal;

uniform mat4 Projection;
uniform mat4 Modelview;
uniform mat3 Model;
uniform vec3  EyePosition;

varying vec3 ReflectDir;

void main(void)
{
    gl_Position = Projection * Modelview * Position;

    // Compute eye direction in object space:
    mediump vec3 eyeDir = normalize(Position.xyz - EyePosition);

    // Reflect eye direction over normal and transform to world space:
    ReflectDir = Model * reflect(eyeDir, Normal);
}
Newly introduced in Example 8-9 is GLSL’s built-in reflect
function, which is defined like this:
float reflect(float I, float N)
{
    return I - 2.0 * dot(N, I) * N;
}
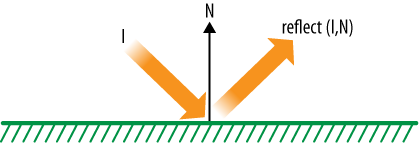
N is the surface normal;
I is the incident vector, which
is the vector that strikes the surface at the point of interest (see Figure 8-8).
Note
Cube maps can also be used for refraction,
which is useful for creating glass or other transparent media. GLSL
provides a refract function to help with this.
The fragment shader for our cube mapping example is fairly simple; see Example 8-10.
Newly introduced in Example 8-10 is a new uniform type called
samplerCube. Full-blown desktop OpenGL has many sampler
types, but the only two sampler types supported on the iPhone are
samplerCube and sampler2D. Remember,
when setting a sampler from within your application, set it to the stage
index, not the texture handle!
The sampler function in Example 8-10 is also new: textureCube differs
from texture2D in that it takes a
vec3 texture coordinate rather than a
vec2. You can think of it as a direction vector
emanating from the center of a cube. OpenGL finds which of the three
components have the largest magnitude and uses that to determine which
face to sample from.
A common gotcha with cube maps is incorrect face orientation. I find that the best way to test for this issue is to render a sphere with a simplified version of the vertex shader that does not perform true reflection:
//ReflectDir = Model * reflect(eyeDir, Normal);
ReflectDir = Model * Position.xyz; // Test the face orientation.
Using this technique, you’ll easily notice
seams if one of your cube map faces needs to be flipped, as shown on the
left in Figure 8-9. Note that only five faces
are visible at a time, so I suggest testing with a negated
Position vector as well.
Render to Cube Map
Instead of using a presupplied cube map texture, it’s possible to generate a cube map texture in real time from the 3D scene itself. This can be done by rerendering the scene six different times, each time using a different model-view matrix. Recall the function call that attached an FBO to a texture, first presented in A Super Simple Sample App for Supersampling:
GLenum attachment = GL_COLOR_ATTACHMENT0;
GLenum textureTarget = GL_TEXTURE_2D;
GLuint textureHandle = myTextureObject;
GLint mipmapLevel = 0;
glFramebufferTexture2D(GL_FRAMEBUFFER, attachment,
                       textureTarget, textureHandle, mipmapLevel);
The textureTarget
parameter is not limited to GL_TEXTURE_2D; it can be
any of the six face enumerants
(GL_TEXTURE_CUBE_MAP_POSITIVE_X and so on). See Example 8-11 for a high-level overview of a render
method that draws a 3D scene into a cube map. (This code is
hypothetical, not used in any samples in the book’s downloadable
source code.)
glBindFramebuffer(GL_FRAMEBUFFER, fboHandle);
glViewport(0, 0, fboWidth, fboHeight);

for (face = 0; face < 6; face++) {

    // Change the FBO attachment to the current face:
    GLenum textureTarget = GL_TEXTURE_CUBE_MAP_POSITIVE_X + face;
    glFramebufferTexture2D(GL_FRAMEBUFFER, GL_COLOR_ATTACHMENT0,
                           textureTarget, textureHandle, 0);

    // Set the model-view matrix to point toward the current face:
    ...

    // Render the scene:
    ...
}
Anisotropic Filtering: Textures on Steroids
An issue with standard bilinear texture filtering is that it samples the texture using the same offsets, regardless of how the primitive is oriented on the screen. Bilinear filtering samples the texture four times across a 2×2 square of texels; mipmapped filtering makes a total of eight samples (2×2 on one mipmap level, 2×2 on another). The fact that these methods sample across a uniform 2×2 square can be a bit of a liability.
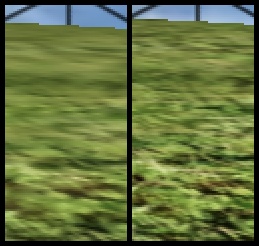
For example, consider a textured primitive viewed at a sharp angle, such as the grassy ground plane in the Holodeck sample from Chapter 6. The grass looks blurry, even though the texture is quite clear. Figure 8-10 shows a zoomed-in screenshot of this.
A special type of filtering scheme called anisotropic filtering can alleviate blurriness with near edge-on primitives. Anisotropic filtering dynamically adjusts its sampling distribution depending on the orientation of the surface. Anisotropic is a rather intimidating word, so it helps to break it down. Traditional bilinear filtering is isotropic, meaning “uniform in all dimensions”; iso is Greek for “equal,” and tropos means “direction” in this context.
Anisotropic texturing is made available via the
GL_EXT_texture_filter_anisotropic extension. Strangely,
at the time of this writing, this extension is available only on older
iPhones. I strongly suggest checking for support at runtime before making
use of it. Flip back to Dealing with Size Constraints to
see how to check for extensions at runtime.
Note
Even if your device does not support the anisotropic extension, it’s possible to achieve the same effect in a fragment shader that leverages derivatives (discussed in Smoothing and Derivatives).
The anisotropic texturing extension adds a new
enumerant for passing in to glTexParameter:
glTexParameterf(GL_TEXTURE_2D, GL_TEXTURE_MAX_ANISOTROPY_EXT, 2.0f);
The
GL_TEXTURE_MAX_ANISOTROPY_EXT constant sets the maximum
degree of anisotropy; the higher the number, the more texture lookups are
performed. Currently, Apple devices that support this extension have a
maximum value of 2.0, but you should query it at runtime, as shown in
Example 8-12.
For highest quality, you’ll want to use this anisotropic filtering in concert with mipmapping. Take care with this extension; the additional texture lookups can incur a loss in performance.
Image-Processing Example: Bloom
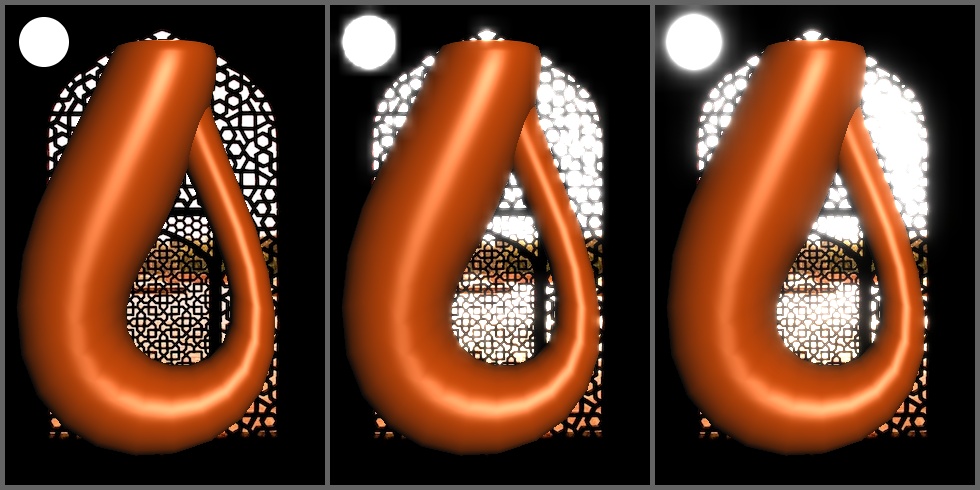
Whenever I watch a classic Star Trek episode from the 1960s, I always get a good laugh when a beautiful female (human or otherwise) speaks into the camera; the image invariably becomes soft and glowy, as though viewers need help in understanding just how feminine she really is. Light blooming (often called bloom for short) is a way of letting bright portions of the scene bleed into surrounding areas, serving to exaggerate the brightness of those areas. See Figure 8-11 for an example of light blooming.
For any postprocessing effect, the usual strategy is to render the scene into an FBO then draw a full-screen quad to the screen with the FBO attached to a texture. When drawing the full-screen quad, a special fragment shader is employed to achieve the effect.
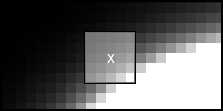
I just described a single-pass process, but for many image-processing techniques (including bloom), a single pass is inefficient. To see why this is true, consider the halo around the white circle in the upper left of Figure 8-11; if the halo extends two or three pixels away from the boundary of the original circle, the pixel shader would need to sample the source texture over an area of 5×5 pixels, requiring a total of 25 texture lookups (see Figure 8-12). This would cause a huge performance hit.
There are several tricks we can use to avoid a huge number of texture lookups. One trick is downsampling the original FBO into smaller textures. In fact, a simple (but crude) bloom effect can be achieved by filtering out the low-brightness regions, successively downsampling into smaller FBOs, and then accumulating the results. Example 8-13 illustrates this process using pseudocode.
// 3D Rendering:
Set the render target to 320x480 FBO A.
Render 3D scene.

// High-Pass Filter:
Set the render target to 320x480 FBO B.
Bind FBO A as a texture.
Draw full-screen quad using a fragment shader that removes low-brightness regions.

// Downsample to one-half size:
Set the render target to 160x240 FBO C.
Bind FBO B as a texture.
Draw full-screen quad.

// Downsample to one-quarter size:
Set the render target to 80x120 FBO D.
Bind FBO C as a texture.
Draw full-screen quad.

// Accumulate the results:
Set the render target to the screen.
Bind FBO A as a texture.
Draw full-screen quad.
Enable additive blending.
Bind FBO B as a texture.
Draw full-screen quad.
Bind FBO C as a texture.
Draw full-screen quad.
Bind FBO D as a texture.
Draw full-screen quad.
This procedure is almost possible without the use of shaders; the main difficulty lies in the high-pass filter step. There are a couple ways around this; if you have a priori knowledge of the bright objects in your scene, simply render those objects directly into the FBO. Otherwise, you may be able to use texture combiners (covered at the beginning of this chapter) to subtract the low-brightness regions and then multiply the result back to its original intensity.
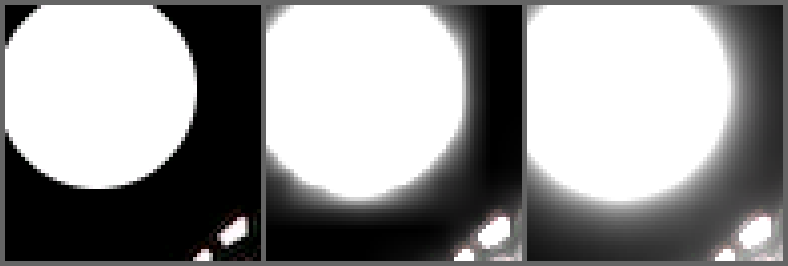
The main issue with the procedure outlined in Example 8-13 is that it’s using nothing more than OpenGL’s native facilities for bilinear filtering. OpenGL’s bilinear filter is also known as a box filter, aptly named since it produces rather boxy results, as shown in Figure 8-13.
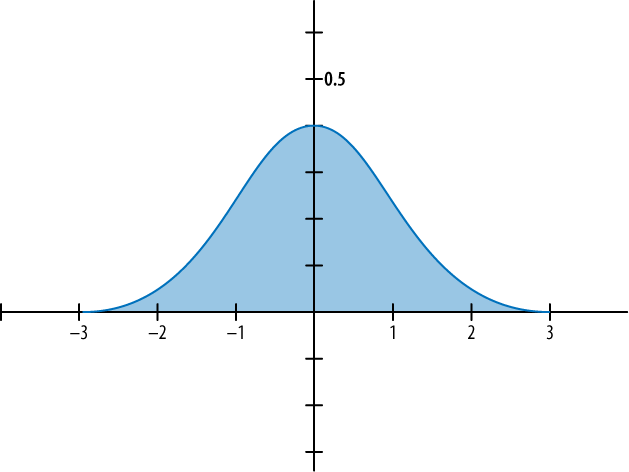
A much higher-quality filter is the Gaussian filter, which gets its name from a function often used in statistics. It’s also known as the bell curve; see Figure 8-14.
Much like the box filter, the Gaussian filter samples the texture over the square region surrounding the point of interest. The difference lies in how the texel colors are averaged; the Gaussian filter uses a weighted average where the weights correspond to points along the bell curve.
The Gaussian filter has a property called separability, which means it can be split into two passes: a horizontal pass then a vertical one. So, for a 5×5 region of texels, we don’t need 25 lookups; instead, we can make five lookups in a horizontal pass then another five lookups in a vertical pass. The complete process is illustrated in Figure 8-15. The labels below each image tell you which framebuffer objects are being rendered to. Note that the B0–B3 set of FBOs are “ping-ponged” (yes, this term is used in graphics literature) to save memory, meaning that they’re rendered to more than once.
Yet another trick to reduce texture lookups is to sample somewhere other than at the texel centers. This exploits OpenGL’s bilinear filtering capabilities. See Figure 8-16 for an example of how five texture lookups can be reduced to three.
A bit of math proves that the five-lookup and three-lookup cases are equivalent if you use the correct off-center texture coordinates for the three-lookup case. First, give the row of texel colors names A through E, where C is the center of the filter. The weighted average from the five-lookup case can then be expressed as shown in Equation 8-1.
For the three-lookup case, give the names F and G to the colors resulting from the off-center lookups. Equation 8-2 shows the weighted average.
The texture coordinate for F is chosen such that A contributes one-fifth of its color and B contributes four-fifths. The G coordinate follows the same scheme. This can be expressed like this:
Substituting F and G in Equation 8-2 yields the following:
This is equivalent to Equation 8-1, which shows that three carefully chosen texture lookups can provide a good sample distribution over a 5-pixel area.
Better Performance with a Hybrid Approach
Full-blown Gaussian bloom may bog down your frame rate, even when using the sampling tricks that we discussed. In practice, I find that performing the blurring passes only on the smaller images provides big gains in performance with relatively little loss in quality.
Sample Code for Gaussian Bloom
Enough theory, let’s code this puppy. Example 8-14 shows the fragment shader used for high-pass filtering.
varying mediump vec2 TextureCoord;

uniform sampler2D Sampler;
uniform mediump float Threshold;

const mediump vec3 Perception = vec3(0.299, 0.587, 0.114);

void main(void)
{
    mediump vec3 color = texture2D(Sampler, TextureCoord).xyz;
    mediump float luminance = dot(Perception, color);
    gl_FragColor = (luminance > Threshold) ? vec4(color, 1) : vec4(0);
}
Of interest in Example 8-14 is how we evaluate the perceived brightness of a given color. The human eye responds differently to different color components, so it’s not correct to simply take the “length” of the color vector.
Next let’s take a look at the fragment shader that’s used for Gaussian blur. Remember, it has only three lookups! See Example 8-15.
varying mediump vec2 TextureCoord;

uniform sampler2D Sampler;
uniform mediump float Coefficients[3];
uniform mediump vec2 Offset;

void main(void)
{
    mediump vec3 A = Coefficients[0]
      * texture2D(Sampler, TextureCoord - Offset).xyz;
    mediump vec3 B = Coefficients[1]
      * texture2D(Sampler, TextureCoord).xyz;
    mediump vec3 C = Coefficients[2]
      * texture2D(Sampler, TextureCoord + Offset).xyz;
    mediump vec3 color = A + B + C;
    gl_FragColor = vec4(color, 1);
}
By having the application code supply
Offset in the form of a vec2
uniform, we can use the same shader for both the horizontal and vertical
passes. Speaking of application code, check out Example 8-16. The Optimize boolean
turns on hybrid Gaussian/crude rendering; set it to false for a
higher-quality blur at a reduced frame rate.
const int OffscreenCount = 5;
const bool Optimize = true;

struct Framebuffers {
    GLuint Onscreen;
    GLuint Scene;
    GLuint OffscreenLeft[OffscreenCount];
    GLuint OffscreenRight[OffscreenCount];
};

struct Renderbuffers {
    GLuint Onscreen;
    GLuint OffscreenLeft[OffscreenCount];
    GLuint OffscreenRight[OffscreenCount];
    GLuint SceneColor;
    GLuint SceneDepth;
};

struct Textures {
    GLuint TombWindow;
    GLuint Sun;
    GLuint Scene;
    GLuint OffscreenLeft[OffscreenCount];
    GLuint OffscreenRight[OffscreenCount];
};

...

GLuint RenderingEngine::CreateFboTexture(int w, int h) const
{
    GLuint texture;
    glGenTextures(1, &texture);
    glBindTexture(GL_TEXTURE_2D, texture);
    glTexParameteri(GL_TEXTURE_2D, GL_TEXTURE_MIN_FILTER, GL_LINEAR);
    glTexParameteri(GL_TEXTURE_2D, GL_TEXTURE_MAG_FILTER, GL_LINEAR);
    glTexParameteri(GL_TEXTURE_2D, GL_TEXTURE_WRAP_S, GL_CLAMP_TO_EDGE);
    glTexParameteri(GL_TEXTURE_2D, GL_TEXTURE_WRAP_T, GL_CLAMP_TO_EDGE);
    glTexImage2D(GL_TEXTURE_2D, 0, GL_RGBA, w, h,
                 0, GL_RGBA, GL_UNSIGNED_BYTE, 0);
    glFramebufferTexture2D(GL_FRAMEBUFFER,
                           GL_COLOR_ATTACHMENT0,
                           GL_TEXTURE_2D,
                           texture,
                           0);
    return texture;
}

void RenderingEngine::Initialize()
{
    // Load the textures:
    ...

    // Create some geometry:
    m_kleinBottle = CreateDrawable(KleinBottle(0.2), VertexFlagsNormals);
    m_quad = CreateDrawable(Quad(2, 2), VertexFlagsTexCoords);

    // Extract width and height from the color buffer:
    glGetRenderbufferParameteriv(GL_RENDERBUFFER,
                                 GL_RENDERBUFFER_WIDTH,
                                 &m_size.x);
    glGetRenderbufferParameteriv(GL_RENDERBUFFER,
                                 GL_RENDERBUFFER_HEIGHT,
                                 &m_size.y);

    // Create the onscreen FBO:
    glGenFramebuffers(1, &m_framebuffers.Onscreen);
    glBindFramebuffer(GL_FRAMEBUFFER, m_framebuffers.Onscreen);
    glFramebufferRenderbuffer(GL_FRAMEBUFFER, GL_COLOR_ATTACHMENT0,
                              GL_RENDERBUFFER, m_renderbuffers.Onscreen);
    glBindRenderbuffer(GL_RENDERBUFFER, m_renderbuffers.Onscreen);

    // Create the depth buffer for the full-size offscreen FBO:
    glGenRenderbuffers(1, &m_renderbuffers.SceneDepth);
    glBindRenderbuffer(GL_RENDERBUFFER, m_renderbuffers.SceneDepth);
    glRenderbufferStorage(GL_RENDERBUFFER,
                          GL_DEPTH_COMPONENT16,
                          m_size.x,
                          m_size.y);
    glGenRenderbuffers(1, &m_renderbuffers.SceneColor);
    glBindRenderbuffer(GL_RENDERBUFFER, m_renderbuffers.SceneColor);
    glRenderbufferStorage(GL_RENDERBUFFER,
                          GL_RGBA8_OES,
                          m_size.x,
                          m_size.y);
    glGenFramebuffers(1, &m_framebuffers.Scene);
    glBindFramebuffer(GL_FRAMEBUFFER, m_framebuffers.Scene);
    glFramebufferRenderbuffer(GL_FRAMEBUFFER, GL_COLOR_ATTACHMENT0,
                              GL_RENDERBUFFER, m_renderbuffers.SceneColor);
    glFramebufferRenderbuffer(GL_FRAMEBUFFER, GL_DEPTH_ATTACHMENT,
                              GL_RENDERBUFFER, m_renderbuffers.SceneDepth);
    m_textures.Scene = CreateFboTexture(m_size.x, m_size.y);

    // Create FBOs for the half, quarter, and eighth sizes:
    int w = m_size.x, h = m_size.y;
    for (int i = 0;
         i < OffscreenCount;
         ++i, w >>= 1, h >>= 1)
    {
        glGenRenderbuffers(1, &m_renderbuffers.OffscreenLeft[i]);
        glBindRenderbuffer(GL_RENDERBUFFER,
                           m_renderbuffers.OffscreenLeft[i]);
        glRenderbufferStorage(GL_RENDERBUFFER, GL_RGBA8_OES, w, h);
        glGenFramebuffers(1, &m_framebuffers.OffscreenLeft[i]);
        glBindFramebuffer(GL_FRAMEBUFFER,
                          m_framebuffers.OffscreenLeft[i]);
        glFramebufferRenderbuffer(GL_FRAMEBUFFER,
                                  GL_COLOR_ATTACHMENT0,
                                  GL_RENDERBUFFER,
                                  m_renderbuffers.OffscreenLeft[i]);
        m_textures.OffscreenLeft[i] = CreateFboTexture(w, h);

        glGenRenderbuffers(1, &m_renderbuffers.OffscreenRight[i]);
        glBindRenderbuffer(GL_RENDERBUFFER,
                           m_renderbuffers.OffscreenRight[i]);
        glRenderbufferStorage(GL_RENDERBUFFER, GL_RGBA8_OES, w, h);
        glGenFramebuffers(1, &m_framebuffers.OffscreenRight[i]);
        glBindFramebuffer(GL_FRAMEBUFFER,
                          m_framebuffers.OffscreenRight[i]);
        glFramebufferRenderbuffer(GL_FRAMEBUFFER,
                                  GL_COLOR_ATTACHMENT0,
                                  GL_RENDERBUFFER,
                                  m_renderbuffers.OffscreenRight[i]);
        m_textures.OffscreenRight[i] = CreateFboTexture(w, h);
    }

    ...
}

void RenderingEngine::Render(float theta) const
{
    glViewport(0, 0, m_size.x, m_size.y);
    glEnable(GL_DEPTH_TEST);

    // Set the render target to the full-size offscreen buffer:
    glBindTexture(GL_TEXTURE_2D, m_textures.TombWindow);
    glBindFramebuffer(GL_FRAMEBUFFER, m_framebuffers.Scene);
    glBindRenderbuffer(GL_RENDERBUFFER, m_renderbuffers.SceneColor);

    // Blit the background texture:
    glUseProgram(m_blitting.Program);
    glUniform1f(m_blitting.Uniforms.Threshold, 0);
    glDepthFunc(GL_ALWAYS);
    RenderDrawable(m_quad, m_blitting);

    // Draw the sun:
    ...

    // Set the light position:
    glUseProgram(m_lighting.Program);
    vec4 lightPosition(0.25, 0.25, 1, 0);
    glUniform3fv(m_lighting.Uniforms.LightPosition, 1,
                 lightPosition.Pointer());

    // Set the model-view transform:
    const float distance = 10;
    const vec3 target(0, -0.15, 0);
    const vec3 up(0, 1, 0);
    const vec3 eye = vec3(0, 0, distance);
    const mat4 view = mat4::LookAt(eye, target, up);
    const mat4 model = mat4::RotateY(theta * 180.0f / 3.14f);
    const mat4 modelview = model * view;
    glUniformMatrix4fv(m_lighting.Uniforms.Modelview,
                       1, 0, modelview.Pointer());

    // Set the normal matrix:
    mat3 normalMatrix = modelview.ToMat3();
    glUniformMatrix3fv(m_lighting.Uniforms.NormalMatrix,
                       1, 0, normalMatrix.Pointer());

    // Render the Klein bottle:
    glDepthFunc(GL_LESS);
    glEnableVertexAttribArray(m_lighting.Attributes.Normal);
    RenderDrawable(m_kleinBottle, m_lighting);

    // Set up the high-pass filter:
    glUseProgram(m_highPass.Program);
    glUniform1f(m_highPass.Uniforms.Threshold, 0.85);
    glDisable(GL_DEPTH_TEST);

    // Downsample the rendered scene:
    int w = m_size.x, h = m_size.y;
    for (int i = 0; i < OffscreenCount; ++i, w >>= 1, h >>= 1) {
        glViewport(0, 0, w, h);
        glBindFramebuffer(GL_FRAMEBUFFER, m_framebuffers.OffscreenLeft[i]);
        glBindRenderbuffer(GL_RENDERBUFFER,
                           m_renderbuffers.OffscreenLeft[i]);
        glBindTexture(GL_TEXTURE_2D, i ? m_textures.OffscreenLeft[i - 1] :
                                         m_textures.Scene);
        RenderDrawable(m_quad, m_blitting);
        glUseProgram(m_blitting.Program);
    }

    // Set up for Gaussian blur:
    float kernel[3] = { 5.0f / 16.0f, 6 / 16.0f, 5 / 16.0f };
    glUseProgram(m_gaussian.Program);
    glUniform1fv(m_gaussian.Uniforms.Coefficients, 3, kernel);

    // Perform the horizontal blurring pass:
    w = m_size.x; h = m_size.y;
    for (int i = 0; i < OffscreenCount; ++i, w >>= 1, h >>= 1) {
        if (Optimize && i < 2)
            continue;
        float offset = 1.2f / (float) w;
        glUniform2f(m_gaussian.Uniforms.Offset, offset, 0);
        glViewport(0, 0, w, h);
        glBindFramebuffer(GL_FRAMEBUFFER,
                          m_framebuffers.OffscreenRight[i]);
        glBindRenderbuffer(GL_RENDERBUFFER,
                           m_renderbuffers.OffscreenRight[i]);
        glBindTexture(GL_TEXTURE_2D, m_textures.OffscreenLeft[i]);
        RenderDrawable(m_quad, m_gaussian);
    }

    // Perform the vertical blurring pass:
    w = m_size.x; h = m_size.y;
    for (int i = 0; i < OffscreenCount; ++i, w >>= 1, h >>= 1) {
        if (Optimize && i < 2)
            continue;
        float offset = 1.2f / (float) h;
        glUniform2f(m_gaussian.Uniforms.Offset, 0, offset);
        glViewport(0, 0, w, h);
        glBindFramebuffer(GL_FRAMEBUFFER, m_framebuffers.OffscreenLeft[i]);
        glBindRenderbuffer(GL_RENDERBUFFER, m_renderbuffers.OffscreenLeft[i]);
        glBindTexture(GL_TEXTURE_2D, m_textures.OffscreenRight[i]);
        RenderDrawable(m_quad, m_gaussian);
    }

    // Blit the full-color buffer onto the screen:
    glUseProgram(m_blitting.Program);
    glViewport(0, 0, m_size.x, m_size.y);
    glDisable(GL_BLEND);
    glBindFramebuffer(GL_FRAMEBUFFER, m_framebuffers.Onscreen);
    glBindRenderbuffer(GL_RENDERBUFFER, m_renderbuffers.Onscreen);
    glBindTexture(GL_TEXTURE_2D, m_textures.Scene);
    RenderDrawable(m_quad, m_blitting);

    // Accumulate the bloom textures onto the screen:
    glBlendFunc(GL_ONE, GL_ONE);
    glEnable(GL_BLEND);
    for (int i = 1; i < OffscreenCount; ++i) {
        glBindTexture(GL_TEXTURE_2D, m_textures.OffscreenLeft[i]);
        RenderDrawable(m_quad, m_blitting);
    }
    glDisable(GL_BLEND);
}
In Example 8-16, some utility methods and structures are omitted for brevity, since they’re similar to what’s found in previous samples. As always, you can download the entire source code for this sample from this book’s website.
Keep in mind that bloom is only one type of image-processing technique; there are many more techniques that you can achieve with shaders. For example, by skipping the high-pass filter, you can soften the entire image; this could be used as a poor man’s anti-aliasing technique.
Also note that image-processing techniques are often applicable outside the world of 3D graphics—you could even use OpenGL to perform a bloom pass on an image captured with the iPhone camera!
Wrapping Up
This chapter picked up the pace a bit, giving a quick overview of some more advanced concepts. I hope you feel encouraged to do some additional reading; computer graphics is a deep field, and there’s plenty to learn that’s outside the scope of this book.
Many of the effects presented in this chapter are possible only at the cost of a lower frame rate. You’ll often come across a trade-off between visual quality and performance, but there are tricks to help with this. In the next chapter, we’ll discuss some of these optimization tricks and give you a leg up in your application’s performance.
Get iPhone 3D Programming now with the O’Reilly learning platform.
O’Reilly members experience books, live events, courses curated by job role, and more from O’Reilly and nearly 200 top publishers.
