Word processing isn’t just about words—and neither is Word 2013. Although text probably accounts for the bulk of your documents, you can liven up the proceedings and make your points more clearly by adding other elements. Tables organize information into rows and columns so that readers can easily navigate large collections of data. Charts take the same kind of information and present it graphically, which is great when you want to make a high-impact presentation of comparisons or trends. Graphics can be any kind of image: family vacation photos, a company logo, whimsical clip art, executive portraits, product photos—if you’ve got a picture on your computer (or stored in the cloud), you can put it in your document.
This chapter shows you how to work with nontext elements in Word: inserting them into a document, resizing and moving them, editing them. Your documents will be that much more interesting, and your points will come across that much better.
For centuries, philosophers have puzzled over the question “Which came first, the chicken or the egg?” When you’re working with tables in Word, a less mind-bending—and far more practical—question is “Which comes first, a table or its data?” The answer is entirely up to you.
When you create a table in Word, you can start by designing an empty table and adding information to it later, or you can start with the information the table will hold, and then use that to create the table. Whichever way you prefer, it’s easy.
If you like creating tables by drawing them first and then filling in their cells with data, you have several options: Insert an empty table, insert one that’s preformatted, or draw it yourself. Best of all, when you adopt this design-first, enter-data-later approach, you’re not stuck with the table’s structure if you need to change it down the road. Later in this chapter, you’ll get the scoop on how to edit a table.
To quickly draw and insert a basic grid of equal-sized cells, start by putting the cursor where you want the new table to appear. Then follow these steps:
Head to the Insert tab and click the Table button (Alt, N, T).
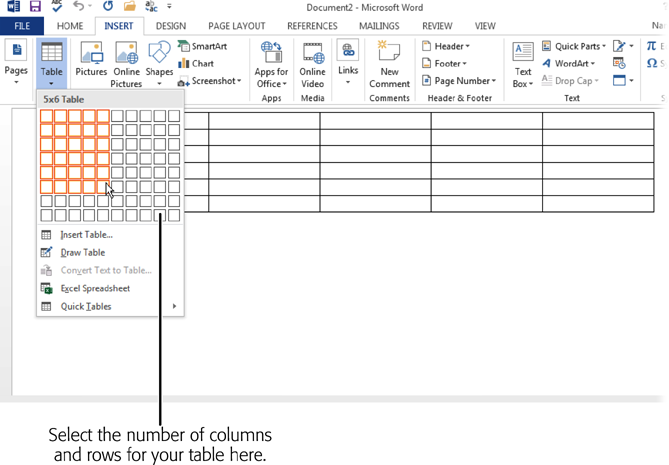
The Insert Table menu, shown in Figure 4-1, appears, showing a 10 x 8 grid of squares.
Use your mouse pointer or your keyboard’s arrow keys to move over the grid.
As you select the number of rows and columns, Word highlights the number of cells you’ve chosen, giving you an idea of how the table will look. It also displays a preview of the table in your document.
When the table is the size you want (for now), click or press Enter.
The table appears in your document.
Note
When you create a table, the Table Tools contextual tab appears, adding two tabs specific to working with tables—Table Tools | Design and Table Tools | Layout. When you move outside the table to work on another part of your document, these babies disappear. So you only see ’em when you need ’em.
If you have a certain type of table in mind—like a calendar or an expense list, for example—or if you just want a nice-looking table without doing all the work of designing it yourself, take advantage of one of Word’s predesigned, preformatted tables.
Position the cursor where you want this new grid to appear. From there, you’re only a couple of steps away from inserting the table:
Select Insert→Table→Quick Tables (Alt, N, T, T).
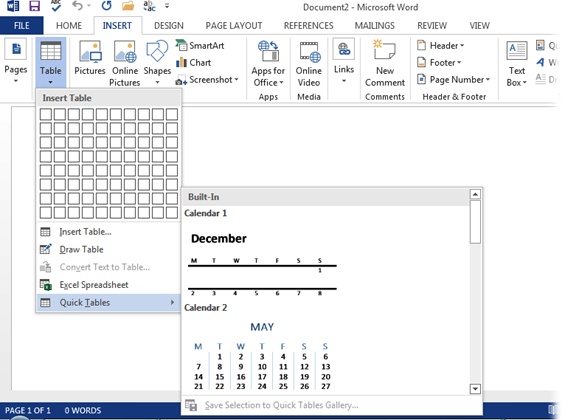
A fly-out menu of built-in tables appears, as shown in Figure 4-2. Use the scroll bar or arrow keys to browse through them.
When you find the table you want, simply click it in the list.
Word inserts the preformatted table into your document.
Preformatted tables contain some placeholder data, such as a month’s name, days of the week, and dates for a calendar table. To clear a table’s contents, select the whole thing by clicking Table Tools | Layout→Select→Select Table (Alt, JL, K, T) and then press the Delete key. This deletes the table’s data while keeping its structure and formatting.
If you need a table that goes beyond simple rows and columns—one with different-sized cells, for example—whip out a virtual pencil and design your own table by drawing it. Here’s how:
Select Insert→Table→Draw Table (Alt, N, T, D).
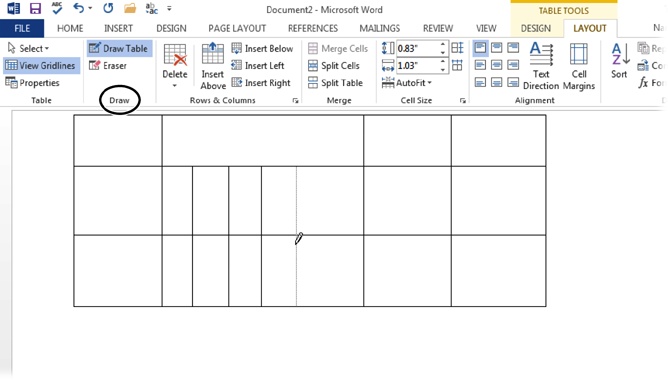
The mouse pointer changes to a pencil, as shown in Figure 4-3.
Click and drag diagonally to draw the table’s outer boundaries.
As you drag, a dotted line shows the size of the rectangle you’re drawing.
When the rectangle is the size you want for your table, let go of the mouse button.
Word creates the boundaries of your table and opens the Table Tools | Layout tab, with Draw Table selected.
Draw gridlines between the rows and columns of your table.
As you draw, dotted lines snap into place, keeping your lines straight and perfectly horizontal or vertical.
When you’re finished drawing, click inside any cell and start typing there.
The pencil icon disappears, and you’ve got a custom table in your document, ready and waiting for your data.
Tip
If you make a mistake as you’re drawing the table (or if you want to merge some cells by removing gridlines), use the Eraser to get rid of any line you’ve drawn. Select Table Tools | Layout→Eraser (Alt, JL, SE), and the pointer morphs into an eraser. Click any line to erase it. When you’re done, you can go back to drawing lines by selecting Table Tools | Layout→Draw Table (Alt, JL, TA).
Many people like to start by getting all their data entered and then using it to build a table. If that’s your style, Word is happy to accommodate. To begin, type in your data, pressing the Tab key to separate the info into columns and the Enter key to separate it into rows. (You can use other characters to mark your columns, but tabs make it easiest to see how your table-to-be is shaping up.) Here’s a simple example:
Pet Vampire Names | Age | Preferred Food |
Giselle | 2 | Llamas |
Hercules | 7 | Marshmallows |
Mujibar | 3.5 | Beer |
When you’re ready to convert the data to a table, follow these steps:
Select the text or data you’ve entered and then choose Insert→Table→Convert Text to Table (Alt, N, T, V).
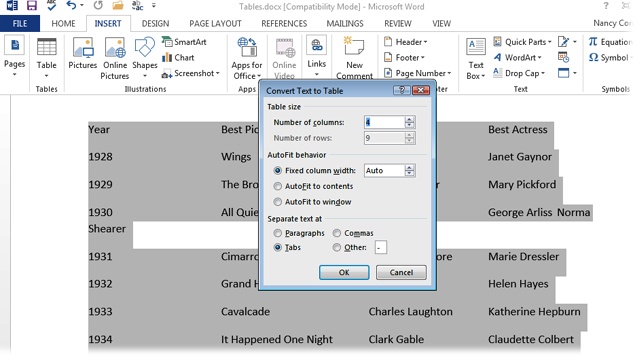
The Convert Text to Table dialog box, shown in Figure 4-4, opens. Word has already filled in the number of columns and rows, based on the text you selected, but you can use the drop-down lists to adjust these numbers if necessary. There are also sections for “AutoFit behavior” (which determines the size of the table) and “Separate text at” (which tells Word how to determine when to create a new column).
Choose the options you want for your table and click OK.
Word converts your data into a table.
Now you can edit and format your new table however you want—the following sections give you the details on how to do that.
Tip
If you live, breathe, and think Excel (covered in Part 4 of this book), you can build a Word table by starting with an Excel-style spreadsheet. In Word, position your cursor where you want the table to appear and then select Insert→Table→Excel Spreadsheet (Alt, N, T, X). Word inserts a spreadsheet that looks just like an Excel spreadsheet and changes the ribbon’s tabs to match those in Excel. When you’re done adding data, click outside the spreadsheet to turn it into a table and bring back Word’s ribbon tabs. If you want to go back and work with the table’s data later, double-click inside the table, and it becomes a spreadsheet-style table again.
When you’ve created a table in your document, all you have to do to add information is click any cell and start typing. You move around inside a table a little differently than you move around a document, as Table 4-1 shows, although pointing and clicking with the mouse will always put the cursor where you want it.
Table 4-1. Keyboard shortcuts for working with tables
KEYBOARD SHORTCUT | |
|---|---|
Select next cell | Tab |
Select previous cell | Shift+Tab |
Jump to the first cell in a row | Alt+Home |
Jump to the last cell in a row | Alt+End |
Jump to the first cell in a column | Alt+Page Up |
Jump to the last cell in a column | Alt+Page Down |
Create a new paragraph within a cell | Enter |
Ctrl+Tab |
After you’ve created a table, you may find you need to change it. You might, for example, want to make the table bigger to hold more data, or perhaps you didn’t need as many rows as you thought you would. Tables are very flexible; it’s easy to edit them to meet your needs.
Just as you can select different parts of the text that makes up a document, you can select different parts of a table. Once you’ve made your selection, you can format, copy, or delete its contents.
Here’s how to make selections in a table by using your computer’s mouse or touchpad:
Select a cell. Move your mouse pointer to the lower-left corner of any cell. The pointer changes to a thick black arrow pointing toward the upper right, as shown in Figure 4-5. (On a compass, the arrow would be pointing toward the northeast.) Click to select the cell and its contents.
Select a range of cells. Click in the first cell of the range you want. Holding down the Shift key, click in the last cell of the range. Alternatively, you can select a cell (as described in the previous bullet) and then, while holding down the mouse button, drag the selection pointer; let go of the mouse button when you’ve selected the range you want.
Select a row. Move your mouse pointer to the lower-left corner of any cell in the row you want. When the pointer changes to a thick black arrow, double-click to select the entire row.
Select a column. Move your mouse pointer above the column you want. When it becomes a thick black arrow pointing downward, click to select the column.
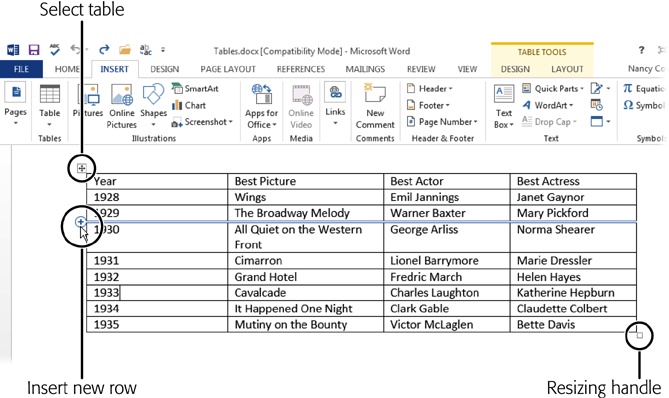
Select an entire table. Pass your mouse pointer over the table. When you do, a small button containing a four-way arrow appears just outside the table’s upper-left corner. This is the Select Table button, shown in Figure 4-5. Click it to select the whole enchilada.
You can also select all or part of a table from the Table Tools | Layout tab. Click inside the table to make this tab appear, and then click Select. From the menu that appears, choose Select Cell, Select Column, Select Row, or Select Table. Or use these ribbon-based keyboard shortcuts:
Select a cell: Alt, JL, K, L.
Select a row: Alt, JL, K, R.
Select a column: Alt, JL, K, C.
Select the entire table: Alt, JL, K, T.
As you work with a table, you might discover you need more rows or columns to hold all your information. No problem. The quickest way to add a single row or column uses the mouse pointer. If you want to add a row, move the pointer to the left side of the table and point to the gridline where you want to insert the new row. A blue + sign in a circle appears, and blue lines stretch across the table to indicate where the new row will be. Click the + sign to insert the row there. If you want to add more rows, keep clicking the + sign.
This method also works for columns. Position the pointer above the table, aimed where you want to put the new column. When you see the blue + sign in the circle, click to insert the column.
Tip
If you’re entering data in the last cell of your table (the cell in the lower-right corner) and you need to add a new row, hit the Tab key. When you’re in the table’s last cell, doing so adds a new row at the bottom of the table.
Another way to add rows and columns to a table is by using the Table Tools | Layout tab. Start by clicking in a cell next to where you want to insert the row or column. Then take one of these actions:
To insert a row above the insertion point, select Table Tools | Layout→Insert Above (Alt, JL, A).
To insert a row below the insertion point, select Table Tools | Layout→Insert Below (Alt, JL, BE).
To insert a column to the left of the insertion point, select Table Tools | Layout→Insert Left (Alt, JL, L).
To insert a column to the right of the insertion point, select Table Tools | Layout→Insert Right (Alt, JL, R).
Tip
Here’s a great timesaver when you need to insert multiple, adjacent rows or columns all at once. Start by selecting the same number of rows or columns you want to insert. If you want to insert two new columns at the right side of your table, for example, select the two columns currently at right. Then use any of the insertion methods described in this section, and Word inserts the same number of rows or columns you selected.
What if a row or column somehow landed in the wrong place? You can move it to its proper location with good ol’ cutting and pasting. Select the row or column you want to move, and then do this:
Select Home→Cut (Alt, H, X or Ctrl+X).
Word deletes the row or column you selected and puts a copy of it on the Clipboard.
Click a cell that’s adjacent to where you want to paste the row or column.
For a row, click in a cell that’s in the row below where the new row will appear. For a column, click in a cell that’s immediately to the right of where the new column will appear.
Select Home→Paste (Alt, H, V or Ctrl+V).
The row or column appears immediately above or to the left of the insertion point.
You might think of a table as a perfect grid, with uniform, evenly spaced cells. But tables are more flexible than that. You can merge cells to make a super-cell that spans multiple columns or rows, or you can split a cell to divide it more narrowly than the other cells in its row or column.
Whether you want to merge cells or split them, head to the Table Tools | Layout tab’s Merge section:
To merge cells, select the cells you want to fuse into one and then select Table Tools | Layout→Merge Cells (Alt, JL, M).
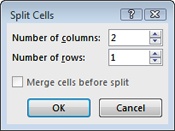
To split a single cell, click the cell you want to divide and select Table Tools | Layout→Split Cells (Alt, JL, P). This opens the Split Cells dialog box, shown in Figure 4-6. Set the number of columns and/or rows you want the split cells to have, and then click OK.
To split a range of cells, select the range you want to split and then click Table Tools | Layout→Split Cells (Alt, JL, P). When the Split Cells dialog box (Figure 4-6) opens, make sure that the “Merge cells before split” checkbox is turned on. This makes your range one big cell first, and then splits that cell into the number of columns and rows you select. Click OK to split the cells.
Figure 4-6. When you split a cell, you need to set the number of rows and columns you want to create. If you selected a range of cells to split and mark the “Merge cells before split” checkbox, Word merges the range into one big cell, and then splits it according to how many columns and rows you set.
To split a table, position the cursor in the first row of what will become the new table. Select Table Tools | Layout→Split Table (Alt, JL, Q). Word splits the table into two separate ones and inserts a line between them.
Tip
If you’ve ever created a table at the very top of a document, then tried to add a line of regular text above the table, you know it’s hard to do—Word wants to put your text into the table. When you’ve got a table at the top of a document, here’s a trick that lets you insert a line of text above it: Put the cursor at the beginning of the table’s upper-left cell—the one that’s in the first row and the first column. Split the table, and Word pushes the whole table down a line. Now you have room to type above the table.
You can delete any cell, row, or column from a table, or the table itself. First, select what you want to make go away. Then use one of the following methods:
To delete a cell, select Table Tools | Layout→Delete→Delete Cells (Alt, JL, D, D). The Delete Cells dialog box opens. Select “Shift cells left” if you want the cells to the right of the deleted cell to move over to the left; select “Shift cells up” if you want the cells below the deleted cell to move up a row. (You can also choose to delete the entire row or column in which the selected cell appears.) Click OK to delete.
To delete a row, select Table Tools | Layout→Delete→Delete Rows (Alt, JL, D, R).
To delete a column, select Table Tools | Layout→Delete→Delete Columns (Alt, JL, D, C).
To delete a table, select Table Tools | Layout→Delete→Delete Table (Alt, JL, D, T).
A table is all about the information it holds. But you can make your tables eye-catching and easier to read by formatting them in various ways. For example, you might set off column headings with a different color or shade alternating rows. The easiest way to format a table is to use Word’s built-in styles, but you can also format your table by hand.
To make your table look good, you can choose a predesigned style. When you do, Word automatically formats the table according to the style you chose. Say you want the table in shades of blue, with a dark blue row at the top to distinguish headings and alternating white and light blue rows to make it easier to read each row. Sounds like a lot of formatting work, doesn’t it? Not with Table Styles. You don’t have to figure out how to do all that formatting—just pick the style you want, and Word does the rest.
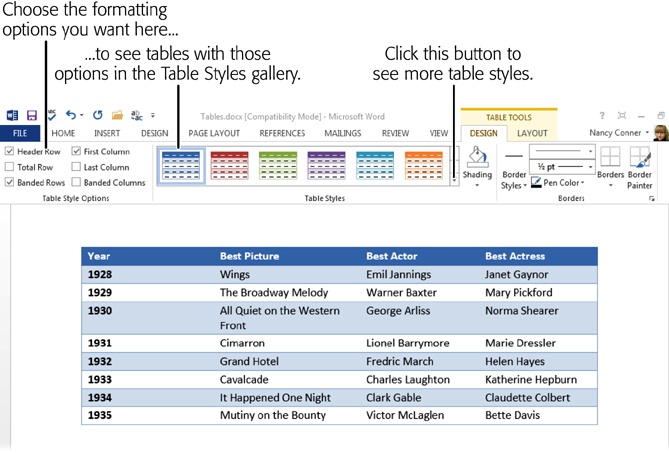
The Table Tools | Design tab has two sections for table styles, as shown in Figure 4-7:
Figure 4-7. Choose the options you want, and then pick a table style. To pop out a larger selection of styles, click the Table Styles section’s lower-right More button.
Here’s how to format a table using Table Styles:
Click anywhere in the table you want to format to bring up the Table Tools contextual tabs; click the Design tab (Alt, JT).
The ribbon changes to show sections and buttons for formatting tables. In the Table Style Options section, you have these choices:
Header Row (Alt, JT, A) sets off the top row from the rest of the table to emphasize column headings.
Total Row (Alt, JT, T) sets off the very last row from the rest of the table—useful if you’ve got columns of figures to add up.
Banded Rows (Alt, JT, R) alternates colors between rows—for example, blue, white, blue, and so on—which is great for helping readers trace information across the table.
First Column (Alt, JT, M) emphasizes the table’s far-left column. You might do this to set off names, for example, from information about each name.
Last Column (Alt, JT, N) emphasizes the table’s far-right column, which is useful if the far-right column holds totals.
Banded Columns (Alt, JT, U) alternates colors between columns. If people are likely to read down the columns rather than across the table (if columns hold numbers you’re summing, for example), this style helps them stay in a column as they read.
Turn on the checkboxes of the Table Style Options you want for your formatted table.
The checkboxes you turn on determine the styles that appear in the Table Styles section.
Use the arrows in the Table Styles section (Figure 4-7) to view styles with the options you chose. Use the up and down arrows or click the More arrow below the down arrow (Alt, JT, S) to open a gallery where you can view more styles at once.
As you pass the mouse pointer over the various choices, Word displays a live preview of how your table looks in that style.
Click the style you want.
If you’re the do-it-yourself type, you can format a table yourself using the Shading and Borders buttons in the Table Styles section of the Table Tools | Design tab. (Click any table to see this tab.) You can also use these buttons to change the look of a table you’ve formatted using Table Styles.
You can shade any part of a table—a cell, a row, a column, or multiples of these—to call attention to it. You might want to set off the row that contains the column headings from the table’s data, for example, or highlight a row or column that contains totals. In a table you’re using as a calendar, you could use shading to highlight important dates, such as project due dates.
To add shading to a table, start by selecting the part you want to shade. (You can select multiple elements by holding down the Ctrl key as you make your selections.) Then, add shading using this method:
Select Table Tools | Design→Shading (Alt, JT, H).
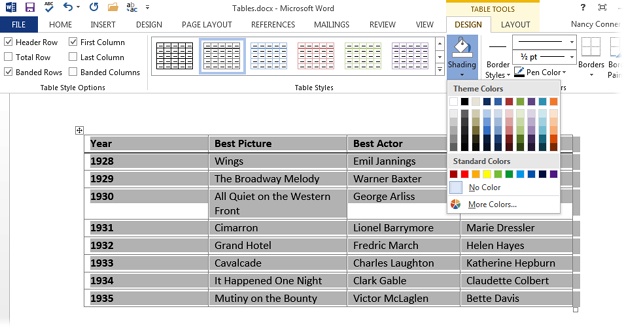
The Shading menu, shown in Figure 4-8, appears. This menu shows Theme Colors, drawn from the document’s theme (Themes: The Way to Better Designs); Standard Colors; No Color (Alt, JT, H, N); and More Colors (Alt, JT, H, M), which opens a dialog box that lets you choose from a wider range of hues. As you pass over the different possibilities, the live preview shows how that color looks on your table.
Click the color you want.
Word shades your selection with the color you chose.
A basic table is a grid with borders around all sides and between the rows and columns to define each cell. You can show or hide any or all of those borders to give your table the look you want. (Borders still exist if you hide them—they’re how Word knows where each cell begins and ends—you just make them invisible.) Select the table (or the part of it you want to work with), and then do this:
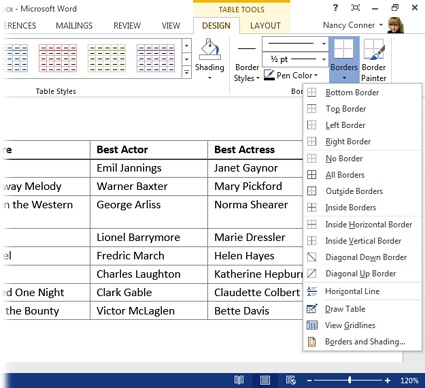
Select Table Tools | Design→Borders (Alt, JT, B).
The Borders menu, shown in Figure 4-9, opens, giving you all the possible options for showing and hiding borders, both inside and outside inside the table. Borders that are currently visible in your table are highlighted.
Choose the border you want to apply (if it’s currently invisible) or erase (if it’s currently visible).
Word closes the Borders menu and applies your change to the table.
Tip
To adjust the line style, width, or color, use the drop-down options in the Borders section of the Table Tools | Design tab.
The Borders menu makes one change at a time, closing after each one, which can get pretty tedious if you want to alter multiple borders. Here’s how to apply multiple changes without opening and reopening the Borders menu:
Select Table Tools | Design→Borders→Borders and Shading (Alt, JT, B, O).
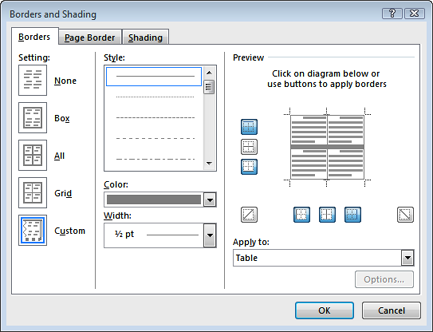
The Borders and Shading dialog box, shown in Figure 4-10, opens with the Borders tab selected.
In the Setting section, choose the basis for your formatted table.
Here are your options:
None removes all external and internal borders from the table.
Box applies external borders and removes internal borders.
All applies the same borders internally and externally.
Grid applies one border style externally and standard borders internally.
Custom lets you choose and apply different border styles to different parts of your table.
In the middle section of the dialog box, choose how you want to format the borders.
The Style drop-down menu offers a selection of lines, including solid, dotted, dashed, wavy, double, triple, and so on. The Color drop-down menu gives you a choice of line colors—similar to the Shading menu shown in Figure 4-8. The Width drop-down menu is where you choose a thickness for the border.
In the Preview section, use the buttons or click the diagram to apply the border where you want it to appear in your table.
The preview changes as you make your selections to give you an idea of how the table will look.
When you’re finished, click OK.
Your table now has a custom-designed border.
Here’s another way to custom-design your table: Choose your own border style, thickness, and color, and then apply these wherever you like. You can do this from the Table Tools | Design tab’s Borders section.
The Border Styles gallery offers a wide range of predesigned borders that you can quickly select and apply to your table. Select Table Tools | Design→Border Styles (Alt, JT, G) to see a menu of—you guessed it—border styles, with borders you’ve used recently conveniently displayed in an easy-to-find section of their own. Click the style you want, and the mouse pointer turns into a paintbrush. Click any border segment to apply that border to it, or click and drag to style a longer border segment. As you drag, a thick gray line shows you which border lines are affected.
You don’t have to choose from the Border Styles gallery; you can design your own borders. The Table Tools | Design tab gives you these options:
Line Style (Alt, JT, L) offers all kinds of lines: solid, dotted, dashed, wavy, double, triple.
Line Weight (Alt, JT, W) ranges from one-quarter of a point (the thinnest) to six points (very thick).
Pen Color (Alt, JT, C) lets you choose the color of your border.
When you select a style, weight, or color, Word turns on Border Painter, making the mouse pointer change to a paintbrush. Click a border segment, or click and drag, and Border Painter applies your custom border to the table. When you’re done formatting borders, you can turn Border Painter off by selecting Table Tools | Design→Border Painter (Alt, JT, P) again.
Picture this: You’re writing to family members about your new puppy, trying to describe just how darn cute he is. You could write a couple of paragraphs and still not get the message across as eloquently as one big-eyed puppy photo could.
Images enliven a document, adding visual interest and illustrating key points. Whether you’re adding snapshots of the kids to a holiday letter, putting flowcharts into a project management plan, or including screenshots of designs for a website, showing—not just telling—is what makes your documents stand out.
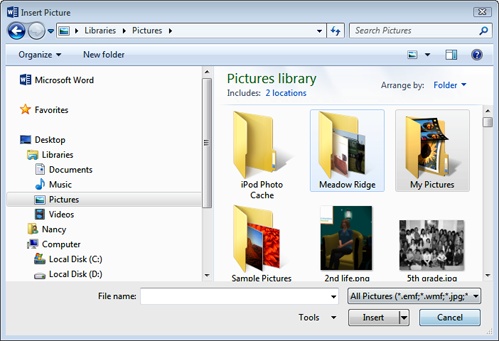
If you’ve got a picture stored on your computer—like that photo of your cute puppy—you can insert it into a document. Position the cursor where you want the image to appear, and then select Insert→Pictures (Alt, N, P). This opens the Insert Picture dialog box, shown in Figure 4-11. Navigate to the file, click to select it, and then click the Insert button. Word puts the picture where you positioned the cursor.
Tip
Here’s another quick way to get a picture into your document. Open File Explorer (Windows 7 users know this program as Windows Explorer) and size the window so you can see both File Explorer and your document on your screen. Then, in File Explorer, find and select the image you want. Drag it into the Word document and drop it in place.
Nowadays, few people store all of their images on just on their computer’s hard drive and nowhere else. You might have posted your images on Flickr, a photo-sharing website, to show family, friends, or colleagues. You might have stored your pictures in SkyDrive, so you could access them from any Internet-connected device. Or you might not have the perfect image to suit your needs and want to find one on the web.
To put an online picture into your Word document, first make sure that your computer is connected to the Internet. Next, place the cursor where you want the image to appear, and then select Insert→Online Pictures (Alt, N, F). This opens the Insert Pictures dialog box, which gives you these options for tracking down the online image you want:
Office.com Clip Art. Clip art is a collection of images, ranging from cartoonish drawings to basic animations to photographs, that you can use to illustrate Word documents and other Office files (like PowerPoint presentations). Microsoft maintains a huge library of clip art at its Office.com website. To find an image, type a descriptive word or phrase into the search box, such as beach or conference room, and then press Enter. Word shows you a list of images you can scroll through.
Bing Image Search. Bing, Microsoft’s search engine, expands your image search to the entire Web. Type in a word or phrase that describes the image you want, and Bing quickly shows you matching results. The images Bing returns are licensed under Creative Commons, which means the images’ creators have agreed to share them with others who want to use them. (Some restrictions may apply. To find out whether your intended use of a specific image is legit under its license, select the image, and then click the web address that appears in the dialog box’s lower left. This opens your web browser and takes you to the website where Bing found the image, so you can review its license there.)
Your SkyDrive. If you’ve stored some pictures in your SkyDrive account, you can grab any one you want to put into a Word document. Make sure you’re signed into the SkyDrive account you want to use. (If not, find your name on the upper-right part of the Word window and click the down arrow beside it, select “Switch account,” and then choose the account and sign in.) Click the Browse button to see your SkyDrive folders. Navigate to the image you want and click it to select it.
After you’ve selected an image, click Insert, and Word puts it in your document.
Tip
Want to save that image you just inserted to your computer’s hard drive? Right-click the image. From the shortcut menu, select “Save as Picture.” Word opens the File Save box. Choose the folder where you want to store the image and give the file a name. When you’ve done that, click Save to store the image on your computer.
If you’ve ever needed to show an image of a Web page or a dialog box, you know that getting that screenshot into a document can take a lot of work: You have to use some program to take the screenshot, save it on your computer, and then insert it into your document as an image. Happily, Word lets you cut out the middleman by taking screenshots and inserting them directly into your document—all in Word. It really couldn’t be easier.
Position the cursor where you want the image to appear and then select Insert→Screenshot (Alt, N, SC).
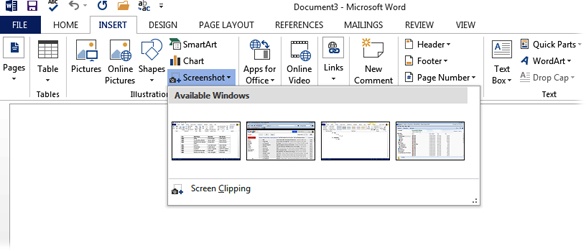
A menu of Available Windows opens, as shown in Figure 4-12. This menu shows a miniature version of each window you have open.
In the menu, select the window you want and then click or press Enter.
The screenshot of that window appears as an image in your document.
Now, you can work with the screenshot just as you’d edit any image in Word (the next section tells you how).
But what if you don’t want to insert an image of the whole window? For example, maybe you’re interested in the main part of a web page but not the ads along its sides. In that case, you can select a region of the window you’re shooting, and then insert just that region. Position the cursor where you want to insert the image and minimize all windows except for Word and the window you want to shoot. Then proceed like this:
Select Insert→Screenshot (Alt, N, SC).
The Available Windows menu (Figure 4-12) opens, showing just the open window.
At the bottom of the Available Window menu, click Screen Clipping (or press C if you’ve got keyboard shortcuts turned on).
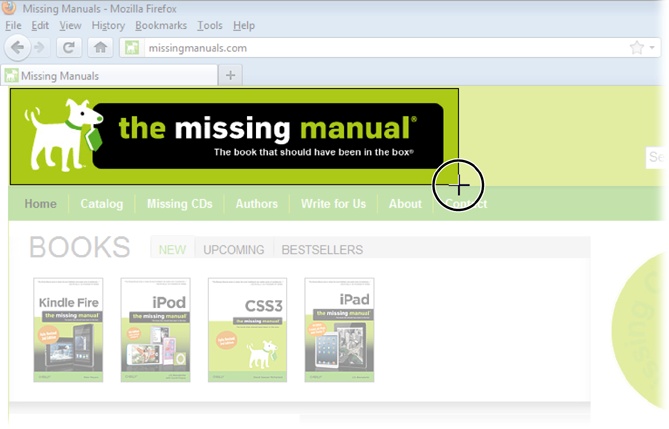
The window opens and grays over, and a pointer shaped like a + sign appears, as shown in Figure 4-13.
Move the pointer to the upper-left corner of the section you want to clip. Click and drag to select a region.
As you drag, you create a rectangle around your selection. Inside the rectangle, the section you’re selecting loses the gray tint of the rest of the window, making it easier to see what you’re selecting.
When you’ve selected the region you want, let go of the mouse button.
Word takes a snapshot of the region and inserts it into your document.
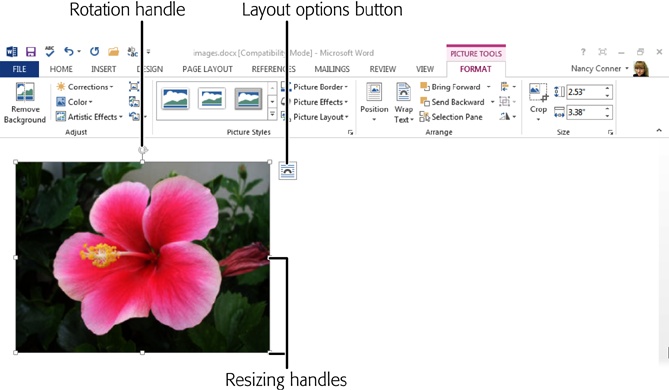
When you insert an image, Word automatically opens the Picture Tools | Format contextual tab, shown in Figure 4-14. This tab also appears whenever you click an image to select it, and it’s what you use to edit or format an image. As you’ll see in this section, Word (and Office) has tons of tools for working with images—and those tools are great for making minor adjustments to a document’s pictures. But if you need to do some heavy-duty image editing, you still need a specialized photo-editing program like Photoshop to do the job.
Figure 4-14. The commands on the Picture Tools | Format tab are divided into four sections: Adjust (for brightening or sharpening an image, adjusting its color, or applying effects), Picture Styles (to frame the image or give it shadows, beveling, or other effects), Arrange (to position the image in relation to other elements in your document), and Size (to crop the image or adjust its size in inches).
Resizing an image makes it fit better on the page, but there are some limits to what you can accomplish when you change a picture’s size. For example, if you try to take a small image and make it much bigger, it will appear blurry and pixelated (the small squares that make up the image will become visible). Resizing works best for relatively small adjustments.
When you select an image, square white handles appear at the image’s corners and halfway along each side, as you can see in Figure 4-14. The easiest way to make the image larger or smaller is to click a handle and hold down the mouse button as you drag. If you use this method, drag a corner handle; these handles keep the image’s width and height in proportion as you change its size.
You can also resize an image using the drop-down lists of the Picture Tools | Format tab’s Size section. The Shape Height (Alt, JP, H) and Shape Width (Alt, JP, W) boxes show the image’s current size in inches. Change one dimension (use the up and down arrows or type in the number you want), and the other changes to retain the original proportions.
Cropping is different from resizing. When you resize an image, you grow or shrink the whole image. But when you crop an image, you cut out parts of it that you don’t want. If you want only part of an image that you’ve inserted, you can crop the image directly in Word. Select the image to open the Picture Tools | Format tab, and then click Crop; on the menu that opens, click Crop again (Alt, JP, V, C).
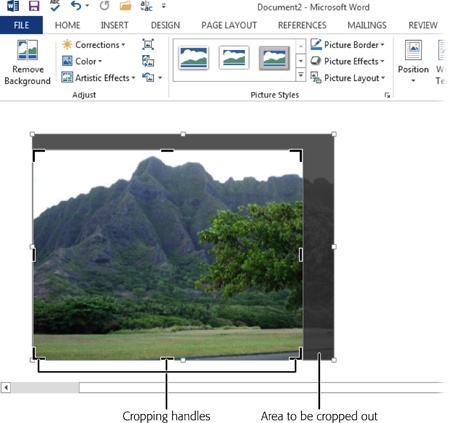
Cropping handles appear around the image. As Figure 4-15 shows, these cropping handles are at the same points as the resizing handles and look like bold black lines. Move the mouse pointer over a cropping handle until the cursor changes shape to match the cropping handle. Click (the cursor becomes a + sign when you do) and drag to crop out parts of the image you don’t want. As you drag, the original outline of the image remains. Let go of the mouse button to crop.
Figure 4-15. Remove parts of a picture that you don’t want by clicking and dragging any cropping handle. As you drag, the grayed-out part of the image shows what will be cropped out.
You can drag cropping handles both ways. So if you crop too far and want to restore some of what you’ve cropped, simply drag the handle back out to restore the image. You can do this even after you’ve finished cropping the image.
Repeat with other cropping handles as necessary. When you’re done, click outside the image to save your changes.
Tip
To add a fun effect to an image, crop it to a shape. Click the image and select Picture Tools | Format→Crop→Crop to Shape (Alt, JP, V, S). A menu opens showing shapes—hearts, triangle, arrows, lightning bolts, and more—that work like cookie cutters. When you choose a shape, Word crops the photo to make it fit within that shape.
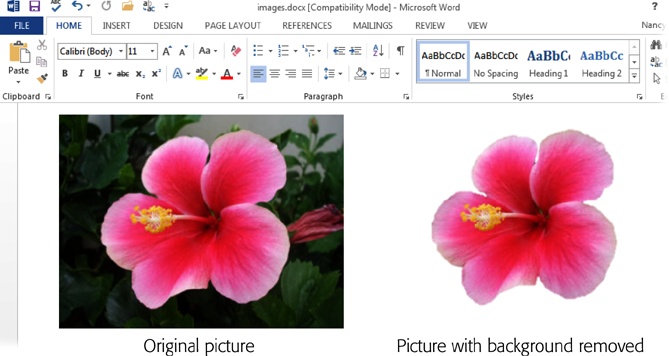
Some pictures have busy backgrounds that steal the focus from the main image. It can take a keen eye, a steady hand, and a lot of concentration to remove the background from an image. But Word makes that job a whole lot easier. As you can see in Figure 4-16, you can remove an image’s background after you’ve inserted the image into Word.
Figure 4-16. ‘Fraid of Photoshop? You don’t need image-editing software to remove the background from a picture—you can do it right in Word.
Note
Removing a picture’s background works only with .docx files—you can’t do this if Word 2013 is working with an older .doc file in Compatibility Mode.
Here’s how to make the main subject of an image stand out by getting rid of the background:
Click the image whose background you want to remove and then select Picture Tools | Format→Remove Background (Alt, JP, E).
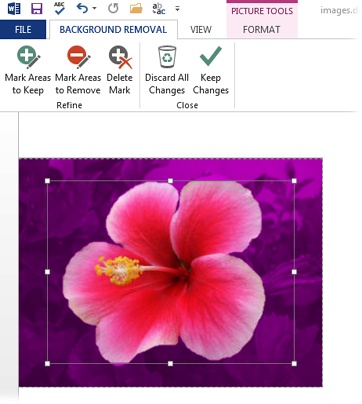
The Background Removal tab, shown in Figure 4-17 opens. Word tries to guess which part of the photo you want to emphasize and places a selection box around it. Any part of the photo that Word considers background gets a purple overlay.
If necessary, adjust the selection box. You can also mark areas you want to keep or discard using the buttons on the Background Removal tab.
When you click the appropriate button, the pointer turns into a pencil. Use the pencil to draw lines around any part of the image you want to select or remove. If you make a mistake, press the Delete Mark button, and when the pointer changes to an arrow, click the marker you want to remove.
When you’re done selecting and marking the image, click Keep Changes.
The image’s background disappears like magic, as you can see for the flower on the right in Figure 4-16.
Background removal works best with clearly defined objects that contrast strongly with their backgrounds, but you can use the Background Removal tab’s tools to fine-tune which parts of the image stay and which parts go.
Tip
You can tweak an image after you’ve removed its background. Click the image to select it and then choose Picture Tools | Format→Remove Background (Alt, JP, E). The image changes to background-removal mode, looking something like the image in Figure 4-17. From there, you can make whatever adjustments you want; click Keep Changes to apply them.
Inserting an image into your document is just the beginning. Once you’ve got a picture in there, you can move it to a new position or adjust its angle.
The easiest way is to use the Clipboard: Select the image, cut it from its current location (Ctrl+X), move the cursor to the new location, and then paste the image there (Ctrl+V).
You can also drag the image to its new home: Click the picture to select it and move your pointer over the image until it becomes a selection arrow combined with a four-way arrow. Click and drag the image to its new position; let go of the mouse button to drop the image there.
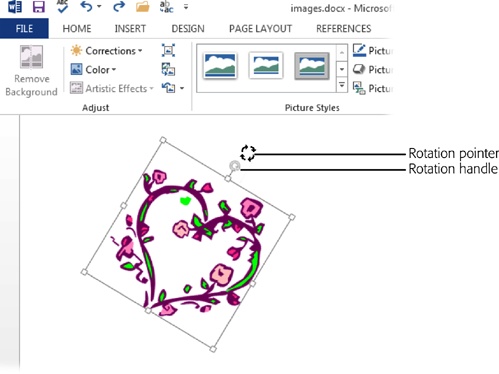
When you insert an image, it appears in either vertical (portrait) or horizontal (landscape) orientation. To tilt the image at a rakish angle or turn it upside down, use the rotation handle. First, click the image to show the sizing handles. Above the image is a circular arrow; that’s the rotation handle. When you click it, the pointer becomes four arrows pointing in a circle, as shown in Figure 4-18. Drag the rotation handle, and a ghost of the image moves with it. When the ghost image is at the angle you want, let go of the mouse button to rotate the image to that angle.
Amateur and professional photographers alike adjust their pictures—sharpening here, brightening there, maybe adjusting the color saturation—to make the images look their best. You can make these same adjustments right in Word—no need to mess around with photo-editing software. You adjust a picture’s appearance in the Picture Tools | Format tab’s Adjust section (click the image to open this tab). Here are the buttons to use:
Corrections (Alt, JP, R). Use this button to sharpen (increase focus) or soften (blur) an image and to adjust its brightness and contrast.
Color (Alt, JP, I). This button is where you adjust color saturation (purity) or color tone (the actual color that appears—red, blue, fuchsia, whatever). It’s also where you can recolor an image—making a full-color image grayscale, for example.
Artistic Effects (Alt, JP, X). Make a photograph look like a painting, a chalk sketch, an image seen through glass, or a whole bunch of other things. If you feel like getting creative, check out the effects here.
The basic drill for any of these adjustments is the same:
Select the image you want to adjust to open the Picture Tools | Format tab (Alt, JP).
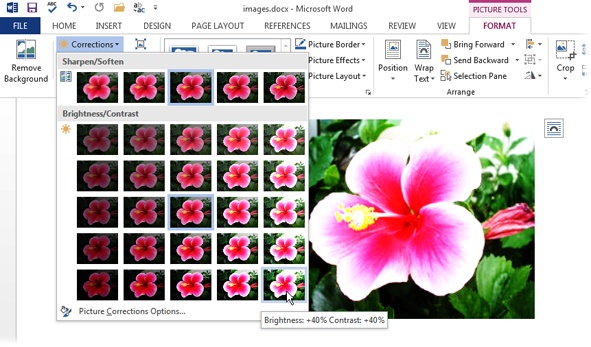
In the Adjust section, click the kind of adjustment you want to make: Corrections, Color, or Artistic Effects. A menu like the one in Figure 4-19 opens.
The menu’s selections depend on the kind of adjustment you chose, but they all work the same way: You see a gallery of thumbnail images illustrating changes to the image (pass the mouse pointer over the thumbnails to see a live preview of the full-sized image in your document).
Click a thumbnail to change the image in the document.
Figure 4-19. You don’t have to guess how changes you make to brightness will affect an image; the thumbnails in the Brightness/Contrast menu show you. When you pass the mouse pointer over a thumbnail, Word tells you what you’re adjusting and shows a live preview of the effect on the image in your document (this may take a few seconds).
The Picture Tools | Format tab’s Adjust section also gives you these options:
Compress Pictures (Alt, JP, M). This reduces the size of the image within the document, which can keep your document to a reasonable size—a plus if you plan to email the document as an attachment. When you click this button, you can choose to compress only this particular image and to delete any cropped areas. You can also choose the compressed image’s resolution, depending on whether it will be printed (higher resolution), viewed on a screen, or emailed (these last two are lower resolutions).
Change Picture (Alt, JP, G). If you’re reviewing a document and decide the picture isn’t quite what you want, you can change the image—while keeping any formatting or sizing you’ve already applied. Click this button to choose a new picture.
Reset Picture (Alt, JP, Q). Got a bit carried away with formatting and sizing, did you? It happens. You can easily undo any and all changes you made to the image after inserting it by clicking this button.
Picture Styles add frames and other effects—like shadows, soft edges, beveling, and reflections—to your images. To apply one of these effects, select the image to open the Picture Tools | Format tab (Alt, JP). Quick Styles appear in the Picture Styles section of that tab, showing you some previews of different styles. You can use the up and down arrow buttons to scroll through the styles, but to save yourself some squinting and see all the options at once, look below the scroll-down arrow and click the More button (Alt, JP, K).
Take a look at the different styles available and use your mouse pointer to see a live preview of any of them on your image. Click the style you want—and now your image has style!
Tip
On the Picture Tools | Format tab, use the Picture Border (Alt, JP, SO) and Picture Effects (Alt, JP, F) buttons to create do-it-yourself picture styles. These buttons give you more options than the quick styles, including border colors, glow colors and widths, and various options for shadows, reflections, and rotation effects.
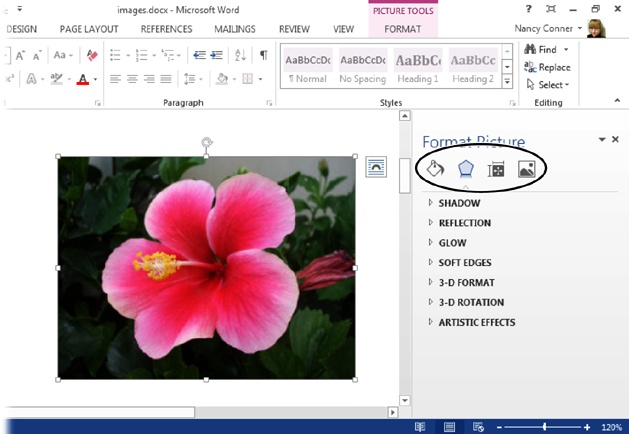
The Format Picture pane, shown in Figure 4-20, gathers together some of the most common picture-tweaking tools. To open it, right-click the picture you want to format and select Format Picture from the shortcut menu. When the pane opens, you have these options to choose from:
Fill & Line. Click the tipping paint can to add background fill to shapes or to draw a line around your picture.
Effects. You can apply and adjust various effects to the picture, including shadow, reflection, glow, and more.
Layout & Properties. If your image incorporates a text box, you can adjust the size of that box here. You can also give your picture an alternative, text-based title and description (which helps people with disabilities grasp graphics and tables).
Picture. Adjust sharpness, brightness, and color, or crop the image to your desired size, using the options available here.
When you’re finished adjusting your image, click the Format Pane’s upper-right X to close it.
Figure 4-20. The Format Picture pane makes it easy to make multiple tweaks to an image, all at once. Use the buttons across the top (circled) to select the kind of formatting you want to do, and then choose specific settings below that.
Tip
If you’ve got a lot of formatting to do in a document, leave the Format Picture pane open. The pane changes to accommodate whatever part of the document you’ve selected. For example, if you’re finished formatting a picture and you click some text, the pane automatically changes to the Format Text Effects pane. If you click a chart, the Format pane is now the Format Chart Area pane. And if you click an image again, you’re back to the Format Picture pane. Whatever you’re formatting, this pane has you covered.
An image can be a pretty decoration, or it can be an essential part of your document. To incorporate an image into the text that it illustrates, you can wrap text around the image. That way, instead of looking lonely sitting all by itself on its own line, the image gets surrounded by text. This makes it clear which part of the text goes with the image, saves space, and gives your document a professional-looking layout.
The two buttons you use to position an image in relation to text are in the Picture Tools | Format tab’s Arrange section:
Position (Alt, JP, PO) lets you left-, center-, or right-align the image at the top, middle, or bottom of the page. Thumbnails show you what each layout looks like.
Wrap Text (Alt, JP, TW) tells Word how to place the image in relation to the text:
In Line with Text. The bottom of the image is even with the first line of the paragraph that follows it.
Square. The text forms a neat-looking square around the image, even if the image has an irregular shape.
Tight. The text approaches the image more closely than with normal wrapping. For an irregularly shaped image, the text is straight across the top and bottom of the image but approaches the contours on the sides.
Through. When you select this option, you can place the image anywhere in your document, and the text will wrap around its edges, with a little white space between the text and the image. If the image has an irregular shape, the text wraps to follow its contours.
Top and Bottom. The image appears on its own line, with text above and below it but not on either side.
Behind Text. The text runs right across the image. (Depending on your image, this effect can make the text hard to read.)
In Front of Text. The text runs behind the image, which blocks some of the text.
As you move the mouse pointer over the various wrap options, a live preview shows how each looks in your document, so you can select the one that looks best.
Tip
You can also find the Position and Wrap Text buttons in the Arrange section of the Page Layout tab (Alt, P, PO for Position and Alt, P, TW for Wrap Text).
You can manually adjust how closely the text wraps around your image by selecting the image and then taking these steps:
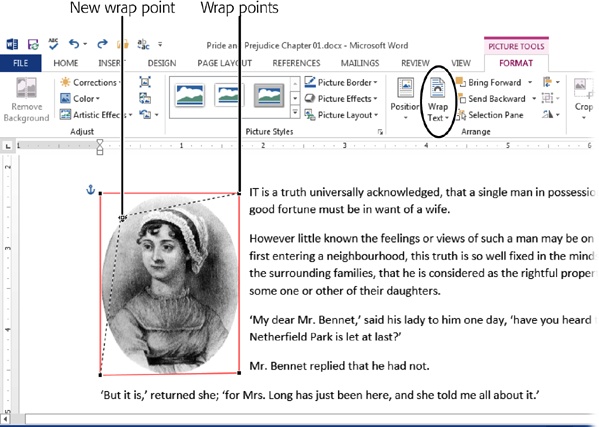
Choose Picture Tools | Format→Wrap Text→Edit Wrap Points (Alt, JP, TW, E).
Word puts a box around the image, with a small black square at each corner, as shown in Figure 4-21. These square are the image’s wrap points, which determine the distance between text and image.
Click any wrap point, and then drag it closer to the image to bring the words closer, or drag it away from the image to push the text back.
As you drag, Word shows both where the wrap point was and where you’re moving it (connected to other wrap points by a dotted line).
Let go of the mouse button to reposition the wrap point.
Word moves the text according to the new wrap point.
When you have multiple images, especially in a long document, it’s a pain to scroll through page by page, looking for a particular picture. Word’s Navigation pane lets you jump from one image to the next, browsing quickly through the document until you find the one you want. Here’s how:
Open the Navigation pane by going to the View tab and, in the Show section, turning on the Navigation Pane checkbox (Alt, W, K). If you prefer, you can select Home→Find (Alt, H, FD) instead.
The Navigation pane opens.
At the top of the Navigation pane is the Search Document box. Click Find Options (the down arrow at the far right of the Search Document box).
In the menu’s Find section, select Graphics.
Word jumps to the first image that appears after the location of your cursor in the document. In the Navigation pane, you can click Headings to see images that are included in a document’s headings, or click Pages to see a preview of any page that contains an image.
Use the up and down arrows beneath the search box to move between images.
As you click the arrows, Word jumps to the next (or previous) image in your document.
You don’t have to be an artist or a graphic designer to add professional-looking graphic effects to your documents. WordArt bends and twists words in all kinds of ways—it’s great for creating things like attention-getting flyers (and it’s just plain fun to play with). And SmartArt adds punch to your words and ideas by representing them visually, graphically showing relationships between ideas, such as a hierarchy chart, or steps in a process—a flowchart, for example. Both features are easy to use—and you’ll look good, because your document looks so good.
You can find WordArt in the Text section of the Insert tab. Here’s how to use it:
Position the cursor where you want the WordArt, and then select Insert→WordArt (Alt, N, W).
The WordArt gallery opens, showing examples of WordArt styles. These include colors, shadows, outlines, reflections—lots of ways to make your text stand out.
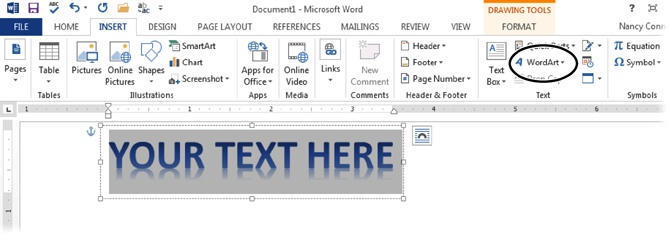
Word inserts a text box in your document (which has some placeholder text in the style you chose) and opens the Drawing Tools | Format contextual tab, as shown in Figure 4-22.
Figure 4-22. The WordArt button (circled) is in the Insert tab’s Text section. After you choose a WordArt style, Word inserts a text box with placeholder text in that style. Start typing to replace that with your own text. You can adjust the size of the text box by clicking and dragging any of its handles.
Click inside the text box, select the placeholder text, and start typing. As you type, the text box automatically expands to accommodate what you type.
Word overwrites the placeholder text with your new text.
When you’re finished, click outside of the text box to go back to working with normal text.
If you need to make changes to what WordArt text says, click the WordArt to display the text box that holds it. Position the cursor where you need to make changes, and edit as necessary.
And here’s where WordArt gets really fun: adding effects. To change the look of the WordArt, head for the Drawing Tools | Format tab’s WordArt Styles section, shown in Figure 4-23. Click the WordArt in your document, and the ribbon automatically switches to that tab at the same time the text box appears. Inside the text box, select the text you want to monkey with. The WordArt Styles section gives you these options:
Quick Styles (Alt, JD, Q). Click this button to open the gallery of WordArt styles and change the current style to a different one.
Text Fill (Alt, JD, TI). This option changes the fill color of the letters, turning blue letters, for example, purple. Clicking it opens a menu of colors; choose one from the menu or click More Fill Colors to expand your choices. The Gradient option lets you choose a pattern of lighter-and-darker shading. Click No Fill to remove fill color, leaving only an outline.
Text Outline (Alt, JD, TO). This changes the color of letters’ outlines. As with text fill colors, you can select from colors related to the current theme or any color you like. Select Weight to change outlines’ thickness or Dashes to pick a different line style (dotted, dashed, and so on). Don’t want the letters to have outlines? Select No Outline to remove them.
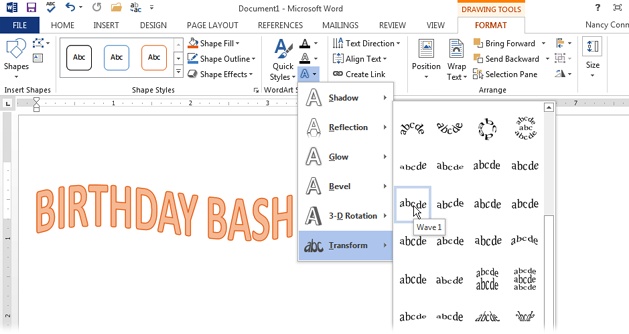
Text Effects (Alt, JD, TX). You can add a lot of special effects to WordArt, including shadows, reflections, glow, beveling, 3-D rotations, and transforms, which warp the letters into waves, circles, and other patterns. Figure 4-23 shows an example of a wave transform effect. Select the kind of effect you want, and a fly-out menu appears to show you a gallery of options for that effect. Some of these effects make text hard to read, so watch the live preview to make sure your WordArt remains legible.
Note
If you add a text effect to WordArt, when you bring up the text box to edit the text, Word temporarily removes the effect so you can see the letters clearly. When you click outside the box, it reapplies the effect.
Figure 4-23. There are dozens of options for adding effects to your WordArt text. Transform effects bend words into circles, waves, arcs, and other shapes.
To position WordArt on the page, click it to reveal its text box. Move the pointer over any of the dashed lines that make up the text box’s borders so that the pointer becomes a four-way arrow. Click, and the dashed line turns solid. Then, with the pointer still on the border, click and drag the WordArt wherever you want it.
Tip
The circular rotation handle above the WordArt text box lets you change the angle of the WordArt on the page. Click and drag until the text box is at the angle you want.
To delete WordArt, click it to display its text box, click any border of the box, and then press Delete or Backspace.
Word 2013 gives you fine-grained control for getting your WordArt to look just the way you want it, thanks to the Format Shape pane. This pane is the place to go if you want to define and apply multiple affects to your WordArt.
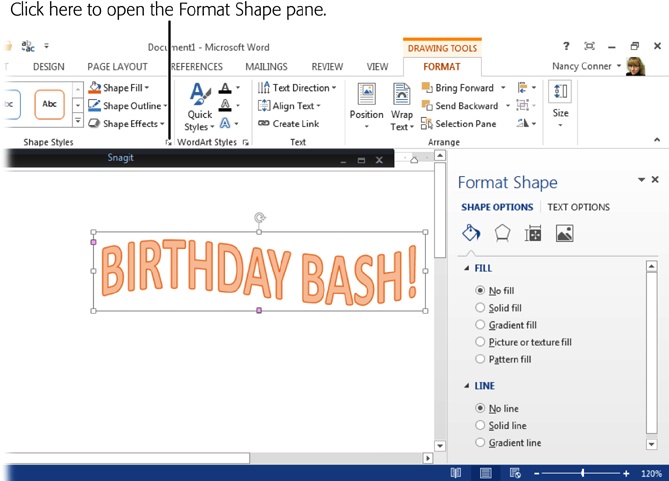
To open the Format Shape pane, select the WordArt you want to format, then head to the Drawing Tools | Format tab and, in the WordArt Styles section, click the lower-right button (Alt, JD, G). The Format Shape pane (Figure 4-24) opens, giving you options for formatting the shape and the text of your WordArt.
Figure 4-24. Creating WordArt is just the beginning. Give it your own stylish spin with the Format Shape pane, where you can customize its color, effects, alignment, and more.
Shape options are the same as the options available in the Format Picture pane (Using Picture Styles). Use them to give the text box that contains your WordArt a background fill color or a border, add special effects such as shadows or soft edges, tweak the size of the text box, and so on. Only the effects and corrections that apply to WordArt will be active here; any others are grayed out.
Here’s where the “art” in WordArt comes into play. When you click Text Options in the Format Shape pane, Word gives you these choices:
Text Fill & Outline. These options focus on the appearance of the letters that make up the WordArt:
Text Fill is where you tweak the appearance of the inner part of the letters. You can choose a color and transparency level, and make the fill solid or a gradient (so the color is lighter in some parts and darker in others). You can also choose No fill, which shows only the outline of the letters.
Text Outline. The options here apply to the outline of each letter. Work with thickness, color, and style of line. Or if you prefer, you can remove all outlines.
Text Effects. Here’s where you can fine-tune the effects you apply to your WordArt: shadows, glow, beveling, rotation, and so on. When you click a triangle to expand the options here, you can select a preset effect or set the color, transparency, blur, and other parameters related to that particular effect.
Layout & Properties. Use this section to adjust how your WordArt appears in relation to the text box that contains it. For example, you can adjust how close the text comes to any border of the box, change the text’s orientation to stand it on its head, or tell Word to wrap text inside the box (normally, Word resizes the box to fit what you type).
When you’ve finished formatting your WordArt, click the Format Shape pane’s upper-right X to close it.
Originally introduced in PowerPoint, SmartArt offered a way to add visual interest to ho-hum PowerPoint slides, replacing boring old bullets and cockeyed flowcharts with professional-looking graphics. And SmartArt can do the same for your Word documents, impressing colleagues, clients, and higher-ups with your attention-getting graphics.
Chapter 22 discusses working with SmartArt in detail (it’s consistent across Office programs). So head there to see examples and read about editing and formatting SmartArt. Here’s how to insert SmartArt into a Word document:
Place the cursor where you want SmartArt to appear in your document and then select Insert→SmartArt (Alt, N, M).
The Choose a SmartArt Graphic dialog box opens. A menu on the left lists the different kinds of graphics you can insert: list, process, cycle, hierarchy, and so on. A gallery of SmartArt appears in the middle of the box, and there’s a preview of the selected SmartArt graphic on the right. Each preview includes commentary on when you might want to use that graphic.
Choose the kind of SmartArt you want on the left, and then select a specific graphic from the gallery. Click OK.
The graphic you selected appears in your document, along with a pane where you can type text that will appear on the graphic, such as labels on a chart or points or steps on a list.
Use the typing pane to add text to the graphic and the arrow keys to move between text boxes.
As you type, your text appears on the graphic.
When you’re finished adding text, click the typing pane’s upper-right X to close it.
Your graphic shows the text you entered.
To edit what you’ve written on a SmartArt graphic, click its text to reveal the text box that contains it and type inside the box. Alternatively, click the tab on the left side of the frame that holds the graphic to reopen the typing pane.
If a picture’s worth a thousand words, a good chart is probably worth ten times that amount. Charts and diagrams take data and express it in an easy-to-understand visual form. When you insert a chart into Word, you present information that readers can easily interpret and absorb at a glance.
Here’s how to insert a chart into a Word document:
With the cursor in the spot where you want to insert the chart, select Insert→Chart (Alt, N, C).
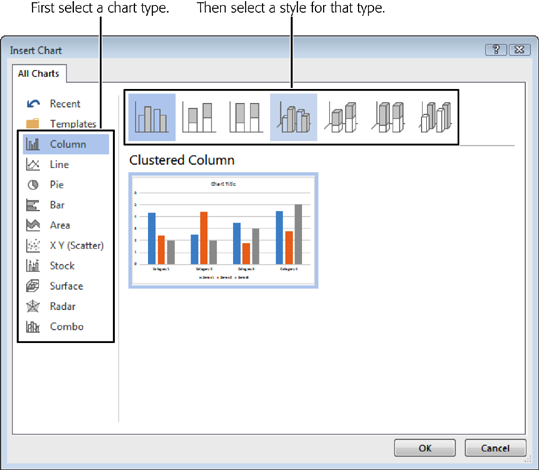
The Insert Chart dialog box, shown in Figure 4-25, opens. On the left is a menu of different chart types, including column, line, pie, bar, and so on. The rest of the dialog box shows a gallery of specific chart styles for each type.
Select the chart type and style you want, and then click OK.
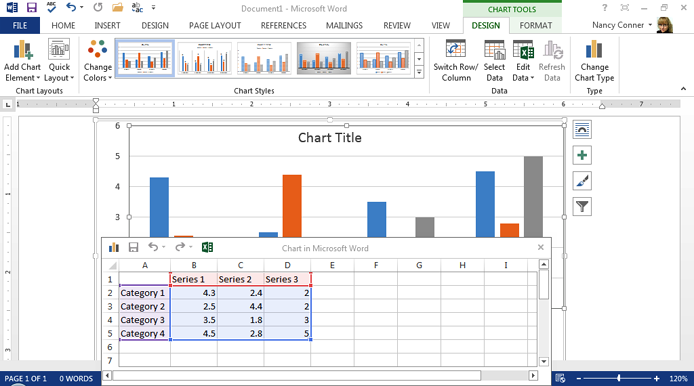
Word inserts the chart into your document and opens a mini-version of Excel in another window with some sample data, as shown in Figure 4-26.
In the Excel window, replace the placeholder data with your own.
For example, say you were comparing quarterly sales for four different territories. You’d replace the categories in Column A with time periods: 1st Quarter, 2nd Quarter, 3rd Quarter, and 4th Quarter. And you’d replace the series in Row 1 with territories: say, North, South, East, and West. Then fill in your data in the appropriate cells.
As you type, the changes you make in Excel appear immediately in your chart in Word. If you need more rows or columns, click the lower-right corner of the blue box that surrounds the data in Excel and drag it to expand the range of cells.
When you’re finished entering data, close the mini Excel window by clicking its upper-right X.
Excel closes, and the window containing Word expands to its full size. Your chart displays the labels and data you entered in Excel.
When you click a chart you’ve inserted into a Word document, four buttons appear to the chart’s right. Here’s what they do:
Layout Options. This button offers the same layout options that you get when you insert a picture, such as whether and how to wrap text around the object. Wrapping Text Around an Image gives details on layout options.
Chart Elements. Lets you show or hide elements of the chart, including axes and their titles, a chart title, data labels, gridlines, a legend, and so on. When you click this button, checkboxes show which elements the chart currently displays. Turn on any checkbox to show its element; turn off the checkbox to hide the element.
Chart Styles. Does your chart clash with the colors in your document? You can change the chart’s appearance by clicking this button and choosing an appearance and color scheme you like better.
Chart Filters. If your chart is showing too much information, confusing readers and obscuring your point, you can filter the chart to show only pertinent info. Click this button and use the checkboxes to show or hide values and labels in the chart.
Tip
The buttons just listed provide a quick, easy way to format your chart. If you prefer, you can use the ribbon’s Chart Tools | Design (Alt, JC) and Chart Tools | Format (Alt, JA) tabs to do the same formatting tasks.
If you need to change the information in your chart, select Chart Tools | Design→Edit Data→Edit Data (Alt, JC, D, E) to reopen the mini Excel window and edit the data. To change a chart’s type, click the chart to display its frame. Then right-click the chart and, from the shortcut menu that appears, select Change Chart Type. This opens a dialog box that looks just like Insert Chart; select a type and style of chart and then click OK. Word converts the current chart to that style.
If you want to work with the full version of Excel to edit your chart’s data, select Chart Tools | Design→Edit Data→Edit Data in Excel 2013 (Alt, JC, D, D). The full version of Excel opens in another window, letting you use any and all of that program’s features.
To delete a chart from a Word document, click the chart to select it and then press Delete or Backspace.
Tip
For more about working with charts, see Chapter 20.
Get Office 2013: The Missing Manual now with the O’Reilly learning platform.
O’Reilly members experience books, live events, courses curated by job role, and more from O’Reilly and nearly 200 top publishers.
