Calendar is not so different from those “Hunks of the Midwest Police Stations” paper calendars that people leave hanging on the walls for months past their natural life span.
But Calendar offers several advantages over paper calendars. For example:
It can automate the process of entering repeating events, such as weekly staff meetings or gym workouts.
Calendar can give you a gentle nudge (with a sound and a message) when an important appointment is approaching.
It can subscribe to online calendars from Outlook, Hotmail, or even your company’s Exchange calendar, so you have all your life’s agendas in one place.
Note
There may already be stuff on your calendar the first time you open it—if, elsewhere in Windows, you’ve already entered account information for an online account. For example, if you’ve entered your Facebook details, then all your friends’ birthdays appear in Calendar automatically. You can, of course, turn off one account or another; read on.
That said, you may find that Calendar is among the simplest, most bare-bones calendar programs ever written. At least it won’t overwhelm you.
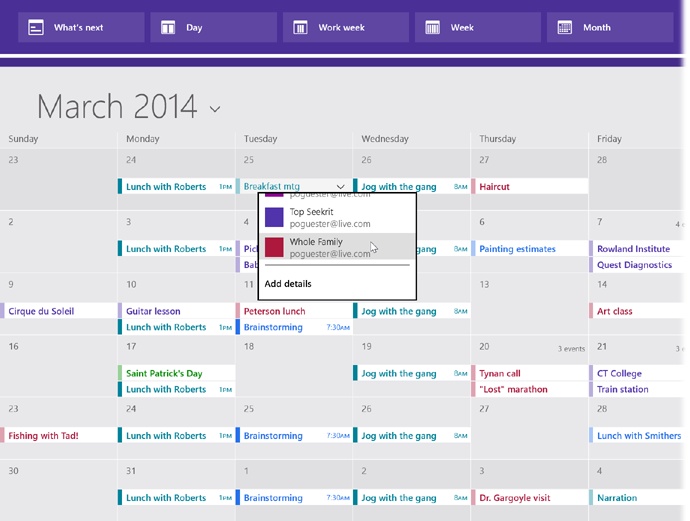
When you open Calendar, you see something like Figure 4-3 (a Microsoft account is required). On the App bar (The App Bar) shown at top in the figure, you can switch among these views:
Figure 4-3. The Windows 8 calendar is very, very simple. Switch views
using the App bar, shown here at top. Click or tap a square
to add a one-hour appointment. Use the ![]() button to produce the list of categories
shown here.
button to produce the list of categories
shown here.
What’s next shows your next few bookings, exhibited like train cars in a horizontal row across the bottom of your screen. If you keep your tablet propped up in a charger all day, for example, it makes a handy, very attractive, self-updating day planner. (If you have a keyboard, you can press the End key to jump to the end of the list of events.)
Day looks exactly like a day-at-a-time desk calendar. On the left “page,” you get a simple list of appointments for today; on the right, tomorrow. Scroll up and down to see the rest of the day.
Work week fills the main display area with five columns, reflecting the current work week (that is, Monday through Friday).
Week fills the main display area with seven columns, reflecting the current week.
Month shows the entire month that contains today’s date.
If a Month-view square is too small to show everything you’ve got scheduled that day, you’ll see a notation at the top of the square like “5 events.” It’s letting you know that there may be more events than you can currently see. Switch to Day or Week view to see what they all are.
Tip
If you have a keyboard, you can also hit Ctrl+1, 2, 3, 4, and 5 for the views listed above. Or use their slightly more memorizable equivalents: Ctrl+A for What’s Next, Ctrl+D for Day view, Ctrl+O for Work week, Ctrl+ W for Week, and Ctrl+M for Month view.
Moving among the days, weeks, or months is easy and fun for the whole family:
You can jump back to today’s date in two steps. Hit the
![]() next to the view title (“This week,” the
month name, or whatever); in the pop-up calendar, hit Today.
next to the view title (“This week,” the
month name, or whatever); in the pop-up calendar, hit Today.
Or, if you have a keyboard, press Ctrl+T.
The basic calendar is easy to figure out. After all, with the exception of one unfortunate Gregorian incident, we’ve been using calendars successfully for centuries.
In Windows 8.1, there’s a quick and easy way to record an appointment. In Day, Work week, Week, or Month view, tap or click the correct time slot or date square, and just type the name for your appointment (“Lunch with Chris” or whatever). You’ve just created a tidy one-hour appointment.
Tip
The ![]() next to the view name (“This week,” for
example, or “October”) makes a compact calendar appear. You can
use it to jump quickly to a date that’s far in the future (or in
the past, if you like to rewrite history).
next to the view name (“This week,” for
example, or “October”) makes a compact calendar appear. You can
use it to jump quickly to a date that’s far in the future (or in
the past, if you like to rewrite history).
In Day view or either Week view, round handles appear. They let you adjust the length of this event by dragging vertically.
That “click-to-make-a-one-hour-appointment” method is quick and easy. But what if there’s more to the story? What if you want to record a location for this event? Or you want a reminder? Or you want it to occur every week?
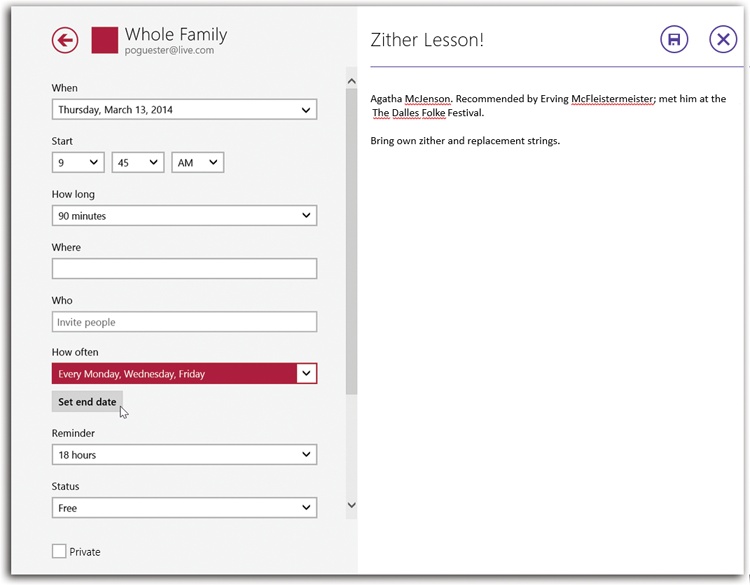
In that case, you should Ctrl-click the time slot you want. Doing so opens the Details screen shown in Figure 4-4.
Other ways to open Details:
Press Ctrl+N. Of course, this method is slower than the Ctrl-click method, because you have to specify the time and date manually.
Open the App bar and tap New. Once again, you have to specify the time and date manually.
Create a one-click appointment first, as described above. Then use the
 at the right end of the title box and
choose “Add details.”
On the Details screen (Figure 4-4), you can specify everything about the new appointment:
Account (calendar). At the upper-left corner of the screen, the account name you see here is actually a pop-up menu. Use it to specify which account or category gets this appointment: your Live.com account, Gmail, Exchange, or whatever.
What. That’s the name of your appointment. For example, you might type Fly to Phoenix.
When. Separate pop-up boxes offer a choice of month, date/day of week, and year. You can scroll through these lists with your finger, scroll wheel, mouse, or Page Up/Page Down keys.
How long. Your choices are 0 minutes, 30 minutes, 1 hour, 90 minutes, 2 hours, All day, or Custom.
An “All day” event, of course, refers to something that has no specific time of day associated with it: a holiday, a birthday, a book deadline. When you turn on this box, you see the name of the appointment jump to the top of the day/week/month square, in the area reserved for this kind of thing.
You’ll probably use the Custom option a lot. It makes a set of “End” controls appear. This is the only way to specify an appointment that (a) has a duration not listed, like “45 minutes” or “3 hours,” or (b) lasts more than a day, like a 3-day trip.
Start. Here you enter the starting time for the appointment.
Where. This field makes a lot of sense; if you think about it, almost everyone needs to record where a meeting is to take place. You might type a reminder for yourself like My place, a specific address like 212 East 23, or some other helpful information, like a contact phone number or a flight number.
Who. If the appointment is a meeting or some other gathering, you can type the participants’ names here. If a name is already in your People app, Calendar proposes autocompleting the name for you. Or you can hit the
 button and choose from your People
list.
button and choose from your People
list.Once you’ve added a person’s name, you can add another, and then another. When you’re finished, tap
 at the top-right corner of the screen, or
press Ctrl+S; your lucky recipients have just been invited by
email. Each message comes with an iCal.ics
attachment: a calendar-program invitation file. In many mail and
calendar programs, opening this attachment automatically
presents your invitation; the recipients can respond (by
choosing the Accept, Maybe, or Decline buttons that appear in
their calendar programs).
at the top-right corner of the screen, or
press Ctrl+S; your lucky recipients have just been invited by
email. Each message comes with an iCal.ics
attachment: a calendar-program invitation file. In many mail and
calendar programs, opening this attachment automatically
presents your invitation; the recipients can respond (by
choosing the Accept, Maybe, or Decline buttons that appear in
their calendar programs).Note
If you see a button called “Scheduling assistant,” you’re in for some fun. Your company uses a recent version of Exchange Server (2010 or later), and therefore you can see a handy map of when people are free or busy. That makes it much easier to find a meeting time when the necessary people can attend.
Add a message. Here’s your chance to customize your calendar event. You can type or paste any text you like in the note area—driving directions, contact phone numbers, a call history, or whatever.
For each appointment, you can also hit “Show more” to expand the options. Now you can also indicate the following:
How often. The pop-up menu here contains common options for recurring events: every day, every week, and so on. It starts out saying Once.
Unfortunately, there’s no way to specify any more complicated repeating pattern, like “Tuesdays and Wednesdays” or “First Monday of every month.” (If you’ve subscribed to an online calendar like Google, though, oddball repetitions you’ve set up there work just fine.)
You can, however, set an end date, using the Set End Date button—a date when you want the repetitions to stop.
Reminder. This pop-up menu tells Calendar when to notify you when a certain appointment is about to begin. You can specify how much advance notice you want for this particular appointment. If it’s a TV show, then a reminder 5 minutes before airtime is probably fine. If it’s a birthday, then you might set up a warning a week in advance, so there’s time to buy a present.
Status. This little item communicates to your colleagues when you might be available for meetings. The menu’s options are Free, Busy, Out of office, and Tentative.
You might think: “Well, duh—if I’ve got something on the calendar, then I’m obviously busy!” But not necessarily. Some Calendar entries might just be placeholders, reminders to self, TV shows you wanted to watch, appointments you’d be willing to change—not things that would necessarily render you unavailable if a better invitation should come along.
Private. If other people can see your chosen account (for example, if it’s an Exchange calendar you use at work), then turning on this box means that they can’t see this particular appointment. Great for events like “Colonoscopy” or “Court date re: public nuisance charge.”
When you’re finished setting up the appointment, tap the Save
button (![]() ) at the top right (or press Ctrl+S). Your
newly scheduled event now shows up on your calendar, complete with
the color coding that corresponds to the calendar category you’ve
assigned.
) at the top right (or press Ctrl+S). Your
newly scheduled event now shows up on your calendar, complete with
the color coding that corresponds to the calendar category you’ve
assigned.
To edit an event, just tap it. You return to the screen shown in Figure 4-4, where you can make any changes you like.
Sometimes things change. In Calendar, alas, you can’t drag an appointment block to another time or date. You have to open its Details screen and change its scheduled time or date manually.
To delete an appointment, select it to open it. (If you’re opening a recurring event, like a weekly meeting, Calendar asks whether you want to operate on only that particular instance of the event or on the whole series from that point forward.)
Then, on the Details screen, tap the Trash icon
(![]() ) or press Ctrl+D. (If other people have been
invited, then Calendar asks if you want to email them to let them
know about the change.)
) or press Ctrl+D. (If other people have been
invited, then Calendar asks if you want to email them to let them
know about the change.)
In most calendar programs, you can set up different categories, which are often called calendars. One person might have calendars called Home, Work, and TV Reminders. Another might have Me, Spouse ’n’ Me, and Whole Family. A small business could have categories called Deductible Travel, R&D, and R&R.
Unfortunately, the TileWorld Calendar doesn’t let you create categories.
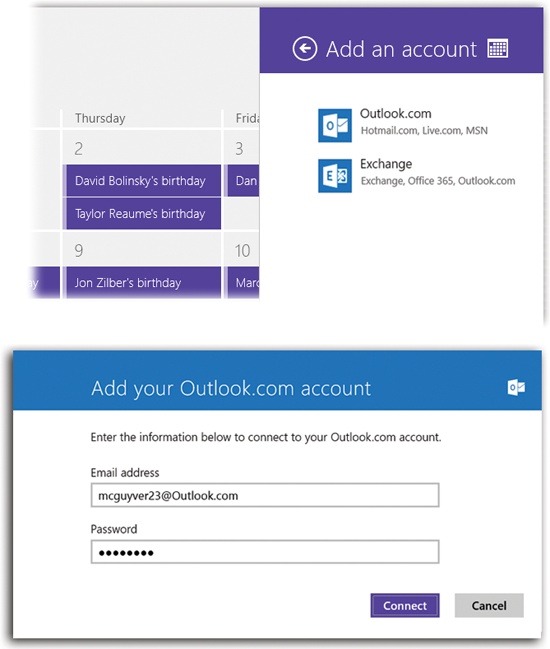
It does, however, let you subscribe to Microsoft online calendars from Hotmail, Microsoft Exchange, Office 365, and Outlook.com. To subscribe to an account, see Figure 4-5.
Tip
Alas, you can no longer subscribe to a Google calendar. If you keep your life in a Google online calendar, Microsoft cheerfully suggests that you sign up for a Microsoft account that Windows 8.1 can display, like an Outlook.com account, and import your Google events into it.
When you create an appointment, you can use the Calendar pop-up menu to specify which account it belongs to, as shown in Figure 4-4.
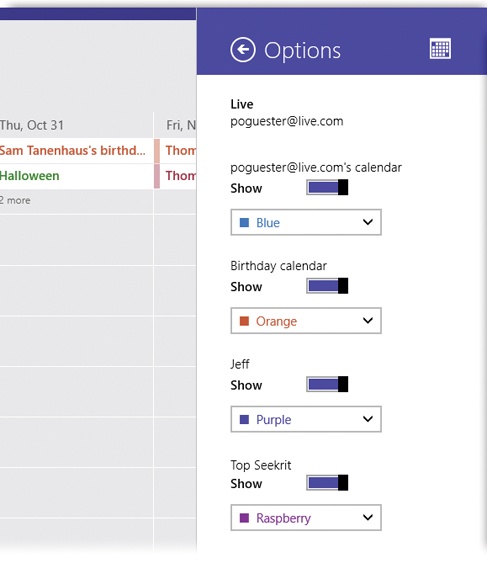
Figure 4-6. To hide a certain account, open the Charms bar. Tap Settings, then Options. You’ll see individual Hide switches for each account. Some, like your Microsoft account, even have sub-switches for things like birthdays and holidays.
Tip
You can choose a color for each account. To do that, open the Options panel shown in Figure 4-6.
Once you’ve got a bunch of calendar categories bubbling away in Calendar, each in its own color coding, you may feel a little overwhelmed—or at least crowded, since only a couple of them fit on each calendar square in Month view.
Fortunately, you can hide or show an entire category of appointments at once—a handy trick when you’re trying to wade through it all.
To do that, see Figure 4-6. When you’re finished tweaking, just tap anywhere on the calendar itself.
Get Windows 8.1: The Missing Manual now with the O’Reilly learning platform.
O’Reilly members experience books, live events, courses curated by job role, and more from O’Reilly and nearly 200 top publishers.


