When you start Access, you begin in backstage view, with the New command already selected. From there, youâre just a few clicks away from generating a database of your very own.
In this chapter, youâll slap together a fairly straightforward database. The example is designed to store a list of prized bobblehead dolls. (For those not in the know, a bobblehead doll is a toy figure with an oversized head on a spring, hence the signature âbobblingâ motion. Bobblehead dolls usually resemble a famous celebrity, politician, athlete, or fictional character.)
Tip
You can get the Bobblehead database, and all the databases in this book, on the Missing CD page at www.missingmanuals.com/cds.
Hereâs how to create a blank new database:
If youâre currently working with a database, choose FileâNew. If youâve just started Access, youâre there already.
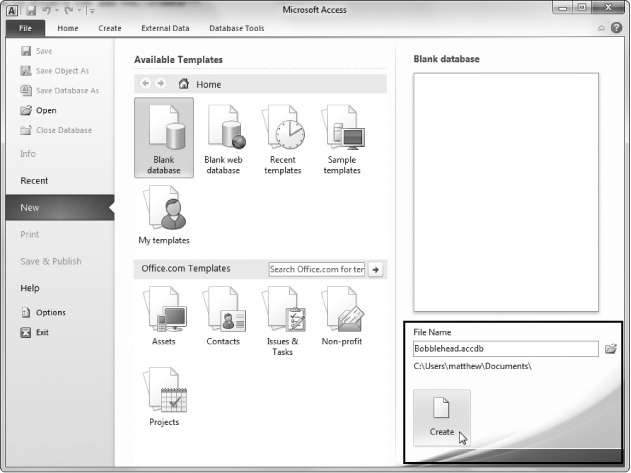
The Access window now has three columns (Figure 1-1). At left is a narrow strip of backstage commands. In the middle section, you choose the type of database you want. At far right is an optional picture that previews your choice, a text box for you to pick the file name, and the all-important Create button.
At the far right, in the File Name box, type a file name for the database youâre about to create.
Access stores all the information for a database in a single file with the extension .accdb (which stands for âAccess databaseâ). Donât stick with the name Access picks automatically (like âDatabase1.accdbâ). Instead, pick something more suitable. In this example, Bobblehead.accdb does the trick.
As with any other file, Access files can contain a combination of letters, spaces, numbers, parentheses, hyphens (-), and the underscore (_). Itâs generally safest to stay away from other special characters, some of which arenât allowed.
Figure 1-1. This database will be named Bobblehead.accdb. As you can see by the file path below the File Name box, it will be saved in the folder C:\Users\matthew\Documents. You can edit the file name by typing in the File Name box, and you can browse to a different folder by clicking the folder icon.
Note
Depending on your computer settings, Windows may hide file extensions. Instead of seeing the Access database file MyScandalousWedding.accdb in file-browsing tools like Windows Explorer, you may just see the name MyScandalousWedding (without the .accdb part on the end). In this case, you can still tell the file type by looking at the icon. If you see a small Access icon (which looks like a key) next to the file name, thatâs your signal that youâre looking at an Access database.
Choose a folder.
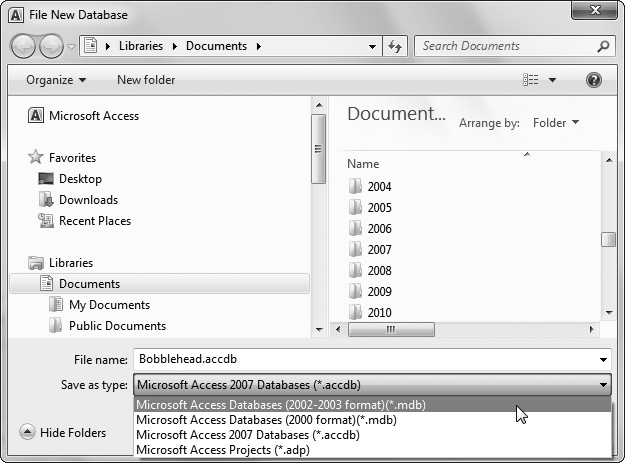
Like all Office programs, Access assumes you want to store every file you create in your personal Documents folder. If this isnât what you want, click the folder icon to show the File New Database dialog box, browse to the folder you want (Figure 1-2), and then click OK.
In the middle of the window, choose âBlank databaseâ.
When you choose to create a blank database, thatâs exactly what you getâa new, empty database file with no tables or other database objects. Starting from scratch is the best way to learn about Access. Itâs also the favorite choice of database experts, who prefer to create everything themselves so itâs exactly the way they like it. That said, you can click one of the other pictures under the Available Templates heading to build a database based on a template. The box on Templates: One Size Fits Some has more about this approach.
Figure 1-2. The File New Database dialog box lets you choose where youâll store a new Access database file. It also gives you the option to create your database in the format used by older versions of Access (.mdb), instead of the more modern format used by Access 2010 and Access 2007 (.accdb). To do so, you need to choose either the 2000 or 2002-2003 format options from the âSave as typeâ list, as shown here.
Click the big Create button (under the File Name box).
Access creates your database file and then shows a datasheet where you can get to work creating your first table.
Once you create or open a database, the Access window changes quite a bit. An impressive-looking toolbar (the ribbon) appears at the top of your screen, and a navigation pane shows up on the left. Youâre now in the control center where youâll perform all your database tasks (as shown in Figure 1-3).
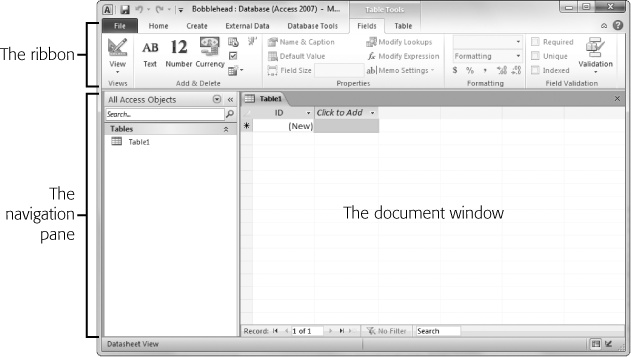
Figure 1-3. The navigation pane on the left lets you see different items (or objects) in your database. You can use the navigation pane to jump from a list of products to a list of customers and back again. The ribbon along the top groups together every Access command. This ribbon is the mission control that lets you perform various tasks with your database. The document window in the middle takes up the rest of the window. This window is where youâll do your work, such as designing tables and entering data.
The Introduction covers the basics of how the ribbon works. (Jump to The Ribbon for the full details.) Now, itâs time to consider how you can make use of your brand-new, empty database by adding a table.
Note
Keen eyes will notice that the title bar of the Access window has the text âAccess 2007â in it. (For example, if you created a database named Bobblehead, youâll see the text âBobblehead: Database (Access 2007).â Donât worry, you donât have a bum copy of Access. The 2007 simply denotes that youâre using the modern format of database, which was was introduced in Access 2007 and is still used in Access 2010. As youâll discover in later chapters, there are a few new Access 2010 features that can break this compatibility, so your database wonât work completely in Access 2007. But even in this situation, the title bar still says âAccess 2007â.
Tables are information containers. Every database needs at least one tableâwithout it, you canât store any data. In a simple database, like the Bobblehead database, a single table (which weâll call Dolls) is enough. But if you find yourself wanting to store several lists of related information, then you need more than one table. In the database BigBudgetWedding.accdb, you might want to keep track of the guests that you invited to your wedding, the gifts that you requested, and the loot that you actually received. In Chapter 5, youâll see plenty of examples of databases that use multiple tables.
Figure 1-4 shows a sample table.
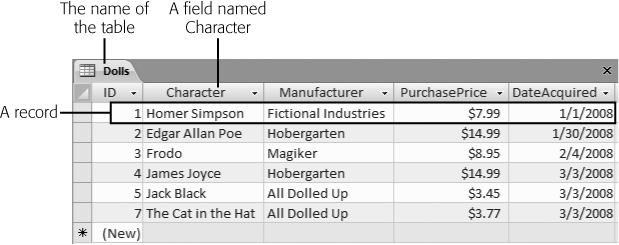
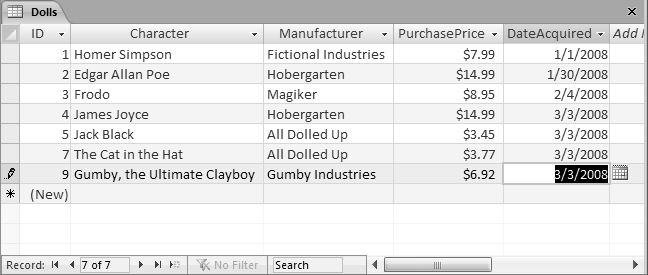
Figure 1-4. In a table, each record occupies a separate row. Each field is represented by a separate column. In this table, itâs clear that youâve added six bobblehead dolls. Youâre storing information for each doll in five fields (ID, Character, Manufacturer, PurchasePrice, and DateAcquired).
Before you start designing this table, you need to know some very basic rules:
A table is a group of records. A record is a collection of information about a single thing. In the Dolls table, for example, each record represents a single bobblehead doll. In a Family table, each record would represent a single relative. In a Products table, each record would represent an item thatâs for sale. You get the idea. When you create a new database, Access starts you out with a new table named Table1, although you can choose a more distinctive name when you decide to save it.
Each record is subdivided into fields. Each field stores a distinct piece of information. For example, in the Dolls table, one field stores the person on whom the doll is based, another field stores the price, another field stores the date you bought it, and so on.
Tables have a rigid structure. In other words, you canât bend the rules. If you create four fields, every record must have four fields (although itâs acceptable to leave some fields blank if they donât apply).
Newly created tables get an ID field for free. The ID field stores a unique number for each record. (Think of it as a reference number that will let you find a specific record later on.) The best part about the ID field is that you can ignore it when youâre entering a new record. Access chooses a new ID number for you and inserts it in the record automatically. Youâll learn much more about ID fields on AutoNumber.
When you first create a database, itâs almost empty. But in order to get you started, Access creates your first database objectâa table named Table1. The problem is, this table begins life completely blank, with no defined fields (and no data).
If you followed the steps to create a new database (Getting Started with Your First Database), youâre already at the Datasheet view (Figure 1-4), which is where you enter data into a table. All you need to do is customize this table so that it meets your needs.
There are two ways to customize a table:
Design view lets you precisely define all aspects of a table before you start using it. Almost all database pros prefer Design view, and youâll start using it in Chapter 2.
Datasheet view is where you enter data into a table. Datasheet view also lets you build a table on the fly as you insert new information. Youâll use this approach in this chapter.
The following steps show you how to turn a blank new table (like Table1) into the Dolls table using the Datasheet view:
To define your table, you need to add your first record.
In this case, that means choosing a bobblehead doll to add to the list. For this example, youâll use a nifty Homer Simpson replica.
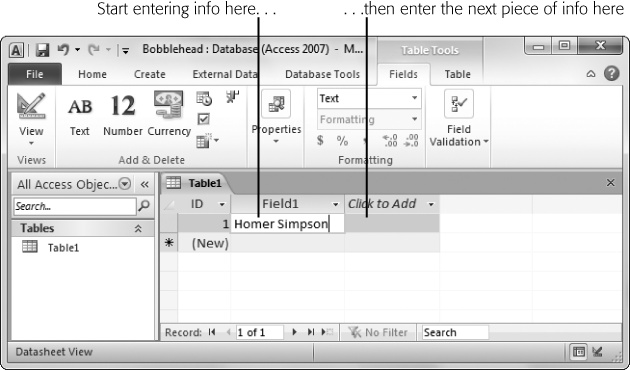
In the datasheetâs rightmost column, under the âClick to Addâ heading, type the first piece of information for the record (see Figure 1-5).
Based on the simple analysis you performed earlier, you know that you need to enter four fields of information for every doll. For the Homer Simpson doll, this information is âHomer Simpsonâ (the name), âFictional Industriesâ (the manufacturer), â$7.99â (the price), and todayâs date (the purchase date). Although you could start with any field, it makes sense to begin with the name, which is clearly an identifying detail.
Figure 1-5. To fill in your first record, start by entering something in the first field of information (like the doll name âHomer Simpsonâ). Then, hit Tab to jump to the second column, and then enter the second piece of information. Ignore the ID column for nowâAccess adds that to every table to identify your records.
Press Tab to move to the next field, and return to step 2.
Repeat steps 2 and 3 until youâve added every field you need, being careful to put each separate piece of information into a different column.
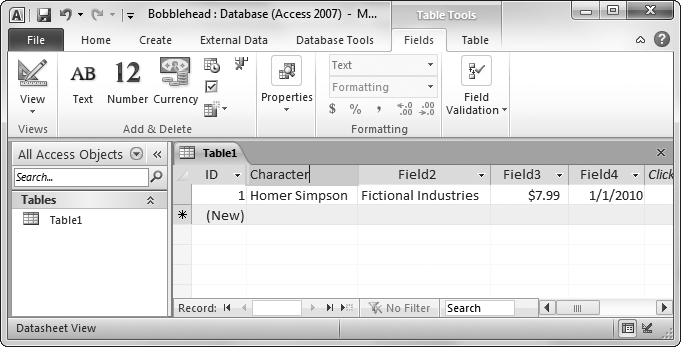
Figure 1-6. The only problem with the example so far is that as you enter a new record, Access creates spectacularly useless field names. Youâll see its choices at the top of each column (theyâll have names like Field1, Field2, Field3, and so on). The problem with using these meaningless names is that they might lead you to enter a piece of information in the wrong place. You could all too easily put the purchase price in the date column.
Itâs time to fix your column names. Double-click the first column title (like Field1).
The field name switches into Edit mode.
Type in a new name, and then press Enter. Return to step 4.
Repeat this process until youâve cleaned up all the field names. The proper field names for this example are Character, Manufacturer, PurchasePrice, and Date-Acquired. Figure 1-7 shows how it works.
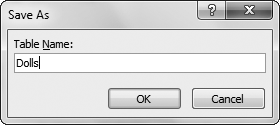
Choose FileâSave (or press Ctrl+S) to save your table.
Access asks you to supply a table name (see Figure 1-8).
Type a suitable table name, and then click OK.
Congratulations! The table is now a part of your database.

Note
Technically, you donât need to save your table right away. Access prompts you to save it when you close the datasheet (by clicking the X at the document windowâs top-right corner), or when you close Access.
As you can see, creating a simple table in Access is almost as easy as laying out information in Excel or Word. If youâre itching to try again, you can create another table in your database by choosing CreateâTablesâTable from the ribbon. But before you get to that stage, it makes sense to take a closer look at how you edit your table.
You now have a fully functioning (albeit simple) database, complete with one table, which in turn contains one record. Your next step is filling your table with useful information. This often-tedious process is data entry.
To fill the Dolls table, you use the same datasheet you used to define the table. You can perform three basic tasks:
Editing a record. Move to the appropriate spot in the datasheet (using the arrow keys or the mouse), and then type in a replacement value. You may also want to use Edit mode, which is described in the next section.
Inserting a new record. Move down to the bottom of the table to the row that has an asterisk (*) on the left. This row doesnât actually exist until you start typing in some information. At that point, Access creates the row and moves the asterisk down to the next row underneath. You can repeat this process endlessly to add as many rows as you want (Access can handle millions).
Deleting a record. You have several ways to remove a record, but the easiest is to right-click the margin immediately to the left of the record, and then choose Delete Record. Access asks you to confirm that you really want to remove the selected record, because you canât reverse the change later on.
Youâll probably spend a lot of time working with the datasheet. So settle in. To make your life easier, it helps to understand a few details.
As you already know, you can use the arrow keys to move from field to field or row to row. However, you might have a bit of trouble editing a value. When you start typing, Access erases any existing content. To change this behavior, you need to switch into Edit mode by pressing the F2 key; in Edit mode, your typing doesnât delete the stuff thatâs already in that field. Instead, you get to change or add to it. To switch out of Edit mode, you press F2 again. Figure 1-9 shows a closeup look at the difference.
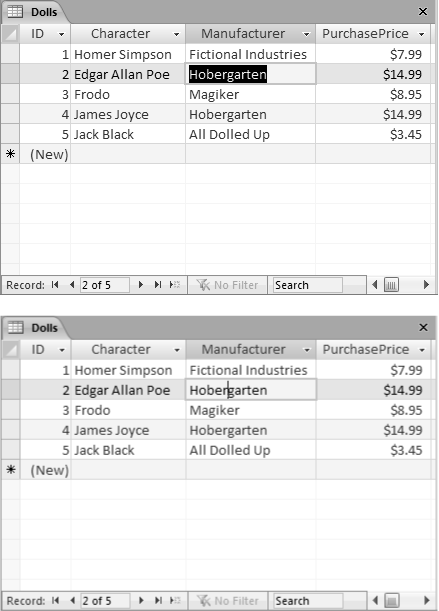
Figure 1-9. Top: Normal mode. If you start typing now, youâll immediately erase the existing text (âHobergartenâ). The fact that all the text in the field is selected is a big clue that youâre about to wipe it out. Bottom: Edit mode. The cursor shows where youâre currently positioned in the current field. If you start typing now, youâll insert text in between âHoberâ and âgartenâ.
Edit mode also affects how the arrow keys work. In Edit mode, the arrow keys move through the current field. For example, to move to the next cell, you need to move all the way to the end of the current text, and then press the right arrow key again. But in Normal mode, pressing the arrow keys always moves you from cell to cell.
Power users know the fastest way to get work done is to use tricky keyboard combinations like Ctrl+Alt+Shift+*. Although you canât always easily remember these combinations, a couple of tables can help you out. Table 1-1 lists some useful keys that can help you whiz around the datasheet.
Table 1-1. Keys for Moving Around the Datash
Table 1-2 lists some convenient keys for editing records.
Table 1-2. Keys for Editing Records
Key | Result |
|---|---|
Cancels any changes youâve made in the current field. This key works only if you use it in Edit mode. Once you move to the next cell, the change is applied. (For additional cancellation control, try the Undo feature, described next.) | |
Reverses the last edit. Unfortunately, the Undo feature in Access isnât nearly as powerful as it is in other Office programs. For example, Access lets you reverse only one change, and if you close the datasheet, you canât even do that. You can use Undo right after you insert a new record to remove it, but you canât use the Undo feature to reverse a delete operation. | |
Ctrl+â | Copies a value from the field thatâs immediately above the current field. This trick is handy when you need to enter a batch of records with similar information. Figure 1-10 shows this often-overlooked trick in action. |
Inserts todayâs date into the current field. The date format is based on computer settings, but expect to see something like â24-12-2010â. Youâll learn more about how Access works with dates on Date/Time. | |
Replaces whatever value youâve entered with the fieldâs default value. Youâll learn how to designate a default value on Setting Default Values. |
Access, like virtually every Windows program, lets you cut and paste bits of information from one spot to another. This trick is easy using just three shortcut keys: Ctrl+C to copy, Ctrl+X to cut (similar to copy, but the original content is deleted), and Ctrl+V to paste. When youâre in Edit mode, you can use these keys to copy whatever youâve selected. If youâre not in Edit mode, the copying or cutting operation grabs all the content in the field.
Get Access 2010: The Missing Manual now with the O’Reilly learning platform.
O’Reilly members experience books, live events, courses curated by job role, and more from O’Reilly and nearly 200 top publishers.

