COM programming requires lots of housekeeping and infrastructure-level code to build large-scale, enterprise applications. Making it easier to develop and deploy transactional and scalable COM applications, Microsoft released Microsoft Transaction Server (MTS). MTS allows you to share resources, thereby increasing the scalability of an application. COM+ Services were the natural evolution of MTS. While MTS was just another library on top of COM, COM+ Services were subsumed into the COM library, thus combining both COM and MTS into a single runtime.
COM+ Services have been very valuable to the development shops using the COM model to build applications that take advantage of transactions, object pooling, role-based security, and so forth. If you develop enterprise .NET applications, the COM+ Services in .NET are a must.
In the following examples, rather than feeding you more principles, we’ll show you examples for using major COM+ Services in .NET, including examples on transactional programming, object pooling, and role-based security. But before you see these examples, let’s talk about the key element—attributes—that enable the use of these services in .NET.
Attributes
are the key elements that help you
write less code and allow an infrastructure to automatically inject
the necessary code for you at runtime. If you’ve used
IDL (Interface
Definition Language) before, you have seen the in
or out attributes, as in the following example:
HRESULT SetAge([in] short age);
HRESULT GetAge([out] short *age);
IDL allows you to add these attributes so that the marshaler will
know how to optimize the use of the network. Here, the
in attribute tells the marshaler to send the
contents from the client to the server, and the
out attribute tells the marshaler to send the
contents from the server to the client. In the SetAge( ) method,
passing age from the server to the client will
just waste bandwidth. Similarly, there’s no need to pass
age from the client to the server in the GetAge( )
method.
While
in
and
out
are built-in attributes that the MIDL
compiler supports, .NET allows you to create your own custom
attributes by deriving from the System.Attribute class. Here’s
an example of a custom attribute:
using System;

public enum Skill {  Guru, Senior, Junior }[AttributeUsage(AttributeTargets.Class      |
                  AttributeTargets.Field      |
                  AttributeTargets.Method     |
                  AttributeTargets.Property   |
                  AttributeTargets.Constructor|
                  AttributeTargets.Event)]
                  public class AuthorAttribute : System.Attribute
{
  public AuthorAttribute(Skill s)
  {
    level = s;
  }
  public Skill level;
}
The AttributeUsage attribute that we’ve applied to our
AuthorAttribute class specifies the rules for using
AuthorAttribute.[29] Specifically, it says that
AuthorAttribute can prefix or describe a class or
any class member.
Given that we have this attribute, we can write a simple class to
make use of it. To apply our attribute to a class or a member, we
simply make use of the attribute’s available constructors. In
our case, we have only one and it’s AuthorAttribute( ), which
takes an author’s skill level. While you can use
AuthorAttribute( ) to instantiate this attribute, .NET allows you to
drop the Attribute suffix for convenience, as
shown in the following code listing:
[Author(Skill.Guru)]public class Customer {[Author(Skill.Senior)]public void Add(string strName) { }[Author(Skill.Junior)]public void Delete(string strName) { } }
You’ll notice that we’ve applied the Author attribute to the Customer class, telling the world that a guru wrote this class definition. This code also shows that a senior programmer wrote the Add( ) method and that a junior programmer wrote the Delete( ) method.
You will not see the full benefits of attributes until you write a simple interceptor-like program, which looks for special attributes and provides additional services appropriate for these attributes. Examples of real interceptors are marshaling, transaction, security, pooling, and other services in MTS and COM+.
Here’s a simple interceptor-like program that uses the
Reflection API to look for AuthorAttribute and provide additional
services. You’ll notice that we can ask a type,
Customer in this case, for all of its custom
attributes. In our code, we ensure that the Customer class has
attributes and that the first attribute is
AuthorAttribute before we output the appropriate
messages to the console. In addition, we look for all members that
belong to the Customer class and check whether they have custom
attributes. If they do, we ensure that the first attribute is an
AuthorAttribute before we output the appropriate
messages to the console.
using System.Reflection;

public class interceptor
{
  public static void Main(  )
  {Object[] attrs = typeof(Customer).GetCustomAttributes(false);
                  if ((attrs.Length > 0) && (attrs[0] is AuthorAttribute))
    {
      Console.WriteLine("Class [{0}], written by a {1} programmer.",
          typeof(Customer).Name, ((AuthorAttribute)attrs[0]).level);
    }

    MethodInfo[] mInfo = typeof(Customer).GetMethods(  );
    for ( int i=0; i < mInfo.Length; i++ )
    {
      attrs = mInfo[i].GetCustomAttributes(false);if ((attrs.Length > 0) && (attrs[0] is AuthorAttribute))
      {
        AuthorAttribute a = (AuthorAttribute)attrs[0];
        Console.WriteLine("Method [{0}], written by a {1} programmer.",
            mInfo[i].Name, (a.level));if (a.level == Skill.Junior)
        {Console.WriteLine("***Performing automatic " +
                  "review of {0}'s code***", a.level);
        }
      }
    }
  }
}
It is crucial to note that when this program sees a piece of code written by a junior programmer, it automatically performs a rigorous review of the code. If you compile and run this program, it will output the following to the console:
Class [Customer], written by a Guru programmer. Method [Add], written by a Senior programmer.Method [Delete], written by a Junior programmer.***Performing automatic review of Junior's code***
While our interceptor-like program doesn’t intercept any object-creation and method invocations, it does show how a real interceptor can examine attributes at runtime and provide necessary services stipulated by the attributes. Again, the key here is the last boldface line, which represents a special service that the interceptor provides as a result of attribute inspection.
It is elementary to write a .NET class to take advantage of the transaction support that COM+ Services provide. All you need to supply at development time are a few attributes, and your .NET components are automatically registered against the COM+ catalog the first time they are used. Put differently, not only do you get easier programming, but you also get just-in-time and automatic registration of your COM+ application.[30] To develop a .NET class that supports transactions, here’s what must happen:
Besides these two requirements, you can use the ContextUtil class (which is a part of the System.EnterpriseServices namespace) to obtain information about the COM+ object context. This class exposes the major functionality found in COM+, including methods such as SetComplete( ), SetAbort( ), and IsCallerInRole( ), and properties such as IsInTransaction and MyTransactionVote.
In addition, while it’s not necessary to specify any COM+ application installation options, you should do so because you get to specify what you want, including the name of your COM+ application, its activation setting, its versions, and so on. For example, in the following code listing, if you don’t specify the ApplicationName attribute, .NET will use the module name as the COM+ application name, displayed in the Component Services Explorer (or COM+ Explorer). For example, if the name of module is crm.dll, the name of your COM+ application will be crm. Other than this attribute, we also use the ApplicationActivation attribute to specify that this component will be installed as a library application, meaning that the component will be activated in the creator’s process.
using System; using System.Reflection; using System.EnterpriseServices;[assembly: ApplicationName(".NET Essentials CRM")][assembly: ApplicationActivation(ActivationOption.Library)][assembly: AssemblyKeyFile("originator.key")] [assembly: AssemblyVersion("1.0.0.0")]
The rest should look extremely familiar. In the Add( ) method, we simply call SetComplete( ) when we’ve successfully added the new customer into our databases. If something has gone wrong during the process, we will vote to abort this transaction by calling SetAbort( ).
[Transaction(TransactionOption.Required)]public class Customer : ServicedComponent{ public void Add(string strName) { try { Console.WriteLine("New customer: {0}", strName); // Add the new customer into the system, // and make appropriate updates to // several databases.ContextUtil.SetComplete( );} catch(Exception e) { Console.WriteLine(e.ToString( ));ContextUtil.SetAbort( );} } }
Instead of calling SetComplete( ) and SetAbort( ) yourself, you can also use the AutoComplete attribute, as in the following code, which is conceptually equivalent to the previously shown Add( ) method:
[AutoComplete]
public void Add(string strName)
{
  Console.WriteLine("New customer: {0}", strName);

  // Add the new customer into the system,
  // and make appropriate updates to
  // several databases.
}
Here’s how you build this assembly:
csc /t:library /out:crm.dll crm.cs
Since this is a shared assembly, remember to register it against the GAC by using the GAC utility:
gacutil /i crm.dll
At this point, the assembly has not been registered as a COM+ application, but we don’t need to register it manually. Instead, .NET automatically registers and hosts this component for us in a COM+ application the first time we use this component. So, let’s write a simple client program that uses this component at this point. As you can see in the following code, we instantiate a Customer object and add a new customer:
using System;

public class Client
{
  public static void Main(  )
  {
    try
    {
      Customer c = new Customer(  );
      c.Add("John Osborn");
    }
    catch(Exception e)
    {
      Console.WriteLine(e.ToString(  ));
    }
  }
}
We can build this program as follows:
csc /r:crm.dll /t:exe /out:client.exe client.cs
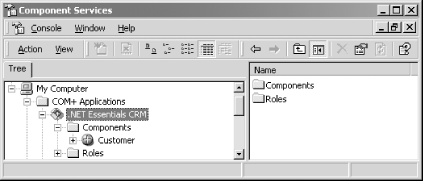
When we run this application, COM+ Services automatically create a
COM+ application called .NET
Essentials
CRM to host our
crm.dll .NET assembly, as shown in Figure 4-5. In addition to adding our component to the
created COM+ application, .NET also inspects our metadata for
provided attributes and configures the associated services in the
COM+ catalog.
As you can see, developing transactional components in .NET is quite easy.
A pool is technical term that refers to a group of resources, such as connections, threads, and objects. Putting a few objects into a pool allows hundreds of clients to share these few objects (you can make the same assertion for threads, connections, and other objects). Pooling is therefore a technique that minimizes the use of system resources, improves performance, and helps system scalability.
Missing in MTS, object pooling is a nice feature in COM+ that allows you to pool objects that support transactions but are expensive to create. Similar to providing support for transactions, if you want to support object pooling in a .NET class, you need to derive from ServicedComponent, override any of the Activate( ), Deactivate( ), and CanBePooled( ) methods, and specify the object-pooling requirements in an ObjectPooling attribute, as shown in the following example:[31]
using System;
using System.Reflection;
using System.EnterpriseServices;

[assembly: ApplicationName(".NET Essentials CRM")]
[assembly: ApplicationActivation(ActivationOption.Library)]
[assembly: AssemblyKeyFile("originator.key")]
[assembly: AssemblyVersion("1.0.0.0")]

[Transaction(TransactionOption.Required)][ObjectPooling(MinPoolSize=1, MaxPoolSize=5)]
public class Customer : ServicedComponent
{
  public Customer(  )
  {Console.WriteLine("Some expensive object construction.");
  }

  [AutoComplete]
  public void Add(string strName)
  {
    Console.WriteLine("Add customer: {0}", strName);
    // Add the new customer into the system,
    // and make appropriate updates to
    // several databases.
  }
override public void Activate(  )
  {
    Console.WriteLine("Activate");
    // Pooled object is being activated.
    // Perform the appropriate initialization.
  }
override public void Deactivate(  )
  {
    Console.WriteLine("Deactivate");
    // Object is about to be returned to the pool.
    // Perform the appropriate clean up.
  }
override public bool CanBePooled(  )
  {
    Console.WriteLine("CanBePooled");
    return true; // Return the object to the pool.
  }
}
Take advantage of the Activate( ) and Deactivate( ) methods to perform appropriate initialization and cleanup. The CanBePooled( ) method lets you tell COM+ whether your object can be pooled when this method is called. You need to provide the expensive object-creation functionality in the constructor, as shown in the constructor of this class.
Given this Customer class that supports both transaction and object
pooling, you can write the following client-side code to test object
pooling. For brevity, we will create only two objects, but you can
change this number to anything you like so that you can see the
effects of object pooling. Just to ensure that you have the correct
configuration, delete the current .NET
Essentials
CRM COM+ application
from the Component Services Explorer before running the following
code:
for (int i=0; i<2; i++)
{
  Customer c = new Customer(  );
  c.Add(i.ToString(  ));
}
Running this code produces the following results:
Some expensive object construction.
Activate
Add customer: 0
Deactivate
CanBePooled
Activate
Add customer: 1
Deactivate
CanBePooled
We’ve created two objects, but since we’ve used object
pooling, only one object is really needed to support our calls, and
that’s why you see only one output statement that says,
Some
expensive
object
construction. In this
case, COM+ creates only one Customer object, but activates and
deactivates it twice to support our two calls. After each call, it
puts the object back into the object pool. When a new call arrives,
it picks the same object from the pool to service the request.
Role-based security in MTS and COM+ has drastically simplified the development and configuration of security for business applications. This is because it abstracts away the complicated details for dealing with access control lists (ACL) and security identifiers (SID). All .NET components that are hosted in a COM+ application can take advantage of role-based security. You can fully configure role-based security using the Component Services Explorer, but you can also manage role-based security in your code to provide fine-grain security support that’s missing from the Component Services Explorer.
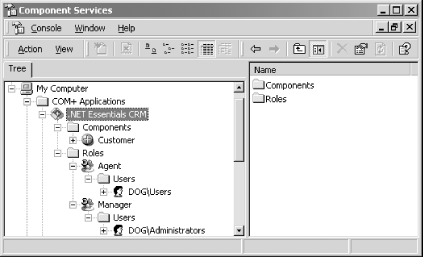
In order to demonstrate role-based security, let’s add two
roles to our COM+ application, .NET
Essentials
CRM. The first role
represents Agents
who can use the Customer class in every way but can’t delete
customers. You should create this role and add to it the local
Users
group, as shown in Figure 4-6. The second role represents
Managers who can use the Customer class in every
way, including deleting customers. Create this role, and add to it
the local Administrators
group.
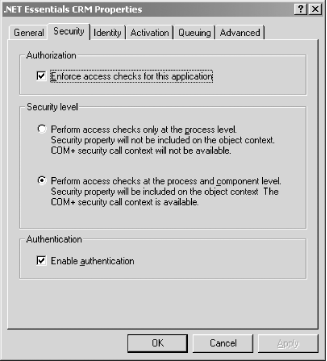
Once you’ve created these roles, you need to enable access
checks for the .NET
EssentialsCRM COM+ application. Launch the COM+ application’s
Properties sheet (by selecting .NET Essentials CRM
and pressing Alt-Enter), and select the Security tab. Enable access
checks to your COM+ application by providing the options as shown in
Figure 4-7.
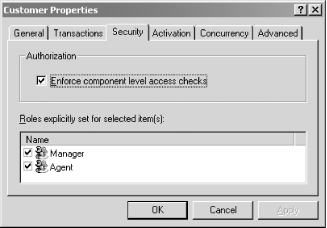
Once you have enabled access checks at the application level, you
need to enforce access checks at the class level too. To do this,
launch Customer’s Properties sheet, and
select the Security tab. Enable access checks to this .NET class by
providing the options shown in Figure 4-8. Here,
we’re saying that no one can access the Customer class except
for those that belong to the Manager
or Agent role.
Now, if you run the client application developed in the last section,
everything will work because you are a user on your machine. But if
you uncheck both the Manager
[32] and
Agent roles in Figure 4-8 and
rerun the client application, you get the following message as part
of your output:
System.UnauthorizedAccessException: Access is denied.
   at Client.Main(  )
You’re getting this exception because you’ve removed yourself from the roles that have access to the Customer class. Once you’ve verified this, put the configuration back to what is shown in Figure 4-8 to prepare the environment for the next test that we’re about to illustrate.
We’ve allowed
anyone in the Agent and Manager
roles to access our class, but let’s invent a rule allowing
only users under the Manager role to delete a
customer from the system (for lack of a better example). So
let’s add a new method to the Customer class—we’ll
call this method Delete( ), as shown in the following
code. Anyone belonging to the Agent or
Manager role can invoke this method, so
we’ll first output to the console the user account that invokes
this method. After doing this, we’ll check to ensure that this
user belongs to the Manager role. If so, we allow
the call to go through; otherwise, we throw an exception indicating
that only managers can perform a deletion. Believe it our not, this
is the basic premise for programming role-based security.
[AutoComplete]
public void Delete(string strName)
{
  try
  {
    SecurityCallContext sec;
    sec = SecurityCallContext.CurrentCall;
    string strCaller = sec.DirectCaller.AccountName;Console.WriteLine("Caller: {0}", strCaller);
                  bool bInRole = sec.IsCallerInRole("Manager");
    if (!bInRole)
    {
      throw new Exception ("Only managers can delete customers.");
    }

    Console.WriteLine("Delete customer: {0}", strName);

    // Delete the new customer from the system,
    // and make appropriate updates to
    // several databases.
  }
  catch(Exception e)
  {
    Console.WriteLine(e.ToString(  ));
  }
}
Here’s the client code that includes a call to the Delete( ) method:
using System;

public class Client
{
  public static void Main(  )
  {
    try
    {
      Customer c = new Customer(  );
      c.Add("John Osborn");
      // Success depends on the role
      // under which this this method
      // is invoked.
      c.Delete("Jane Smith");
    }
    catch(Exception e)
    {
      Console.WriteLine(e.ToString(  ));
    }
  }
}
Once you’ve built this program, you can test it using an
account that belongs to the local Users group,
since we added this group to the Agent role
earlier. On Windows 2000, you can use the
following command to launch a command window using a specific
account:
runas /user:dog\thuant cmd
Of course, you should replace dog and
thuant with your own machine name and user
account, respectively. After running this command, you will need to
type in the correct password, and a new command window will appear.
Execute the client under this user account, and you’ll see the
following output:
Add customer: John OsbornCaller: DOG\thuantSystem.Exception: Only managers can delete customers.at Customer.Delete(String strName)
You’ll notice that the Add( ) operation went through
successfully, but the Delete( ) operation failed because we executed
the client application under an account that’s missing from the
Manager role.
To remedy this, we need to use a user account that belongs to the
Manager role—any account that belongs to the
Administrators group will do. So, start another
command window using the following command:
runas /user:dog\administrator cmd
Execute the client application again, and you’ll get the following output:
Add customer: John Osborn
Caller: DOG\Administrator
Delete customer: Jane Smith
As you can see, since we’ve executed the client application
using an account that belongs to the Manager role,
the Delete( ) operation went through
without
problems.
[29] You don’t have to postfix your
attribute class name with the word Attribute, but
this is a standard naming convention that Microsoft uses. C# lets you
name your attribute class any way you like; for example,
Author is a valid class name for your
attribute.
[30] Automatic registration is nice during development, but don’t use this feature in a production environment, because not all clients will have the administrative privilege to set up COM+ applications.
[31] Mixing transactions and object pooling should be done with care. See Juval Lowy’s COM+ Services (O’Reilly, 2001).
[32] Since
you’re a developer, you’re probably an administrator on
your machine, so you need to uncheck the Manager
role too in order to see an access violation in the test that
we’re about to illustrate.
Get .Net Framework Essentials now with the O’Reilly learning platform.
O’Reilly members experience books, live events, courses curated by job role, and more from O’Reilly and nearly 200 top publishers.

