Now that I have discussed the three ways to secure your wireless connection, I’ll dive deep into the details of Wi-Fi security. A secure network should (ideally) have the following:
- Authentication
This is the process of verifying the identity of a user and making sure that she is who she claims. When you log in to your Windows computer, you are being authenticated via the username and password. In a Wi-Fi network, authentication comes into play when the access point has to determine whether a machine can connect to it.
- Authorization
This is the process of allowing or denying access to a specific resource. You may be authenticated as a user, but you may not be authorized to use certain feature perhaps due to your user role (such as Guest, User, Power User, Administrator). For example, suppose you are at a wireless hotspot and have used up your allotted connection time: the network knows who you are, but won’t authorize you to access the Internet until you pay for more minutes.
- Confidentiality
This ensures the privacy of information that is being transmitted. Only an authorized party (such as the recipient of an email message) can see the information being transmitted. In a Wi-Fi network, confidentiality is supported by protocols such as WEP, WPA, and 802.1X, which encrypt the data that moves through the air.
- Integrity
This ensures that the information that you have transmitted has not been tampered with en route to its destination.
Authentication, authorization, confidentiality, and integrity are also addressed by other systems on your network, just as they are on a wired network:
Passwords can be used to authenticate users when they log into a file server.
User roles control which files a given user has access to.
Web and email communications can be secured with SSL.
Network traffic can be tunneled through a VPN.
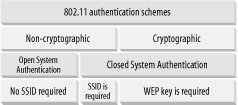
In Wi-Fi, there are two main authentication schemes (see Figure 4-19):
Under the noncryptographic scheme, you can authenticate in two ways: one without an SSID and one with an SSID. If a wireless network allows clients to connect to it without specifying an SSID, it is known as Open System Authentication .
For Closed System Authentication , two methods are possible: one using an SSID and one using a cryptographic key.
In an Open System Authentication scheme, there is no encryption performed on the packets transmitted between the client and the access point. The client does not need any SSID to join a network. This is the simplest mode as the configuration is straightforward and does not require any administration.
In the Closed System Authentication scheme, a client needs to specify an SSID that is identical to that specified by the access point in order to join the network. In addition, a shared key may also be used to encrypt the data packets transmitted between the client and the access point. In 802.11, the encryption method is known as Wired Equivalent Privacy (WEP), which we discuss in greater length in Section 4.5.1, next.
To get connected to a network in a closed system, a client must fulfill one or several of the following criteria:
The SSID of the client must match that of the access point. If a wireless access point has SSID broadcast turned on, your Windows XP computer should be able to detect its presence and allow you to connect to it. If the SSID broadcast is turned off, then the client must manually enter the SSID in order to associate with the access point. Getting associated with the access point is the first step in joining a network. Using an SSID to prevent people from accessing your network is not effective, since the SSID is often guessable and can be “sniffed” by network tools such as AiroPeek (more on this later).
Tip
There are actually two steps to gaining network access. The first is associating with the access point , which means that the access point is willing to talk to your machine. The second step is joining the network , which usually means that your machine has been assigned an IP address and can talk to other hosts on the network. Unless I need to specifically discuss one or the other of these steps, I’ll say “connected to the wireless network,” which means that the client has been associated to the access point and joined the network.
Some access points use MAC address filtering to prevent clients from associating with them. You can enter a list of MAC addresses that you would allow (or deny) association with the access point (this is usually done through a web-based configuration interface on the access point). Even if a client has the correct SSID, if its MAC address is not listed in the allow-list of the access point, it cannot be associated with the access point. Again, using MAC address filtering to prevent unauthorized access to the network is not foolproof — an unauthorized user can easily change his network card’s MAC address to that of an authorized client.
If WEP encryption is used on a wireless network, the client must specify the same WEP key as entered in the access point. Using a WEP key protects the data that is exchanged between the client and the access point. It also has the side effect of preventing unauthorized access to the network since a client needs the WEP key to encrypt and decrypt the packets exchanged. However, it has been proven that WEP is not secure and the WEP key can easily be recovered using freely available tools.
The main goal of WEP is to provide confidentiality of data packets. One secondary function of WEP is to provide authorization to a wireless network. This is, however, not the originally intended design goal of WEP (but see the section on 802.1X later in this chapter). Although WEP was initially designed to safeguard the confidentiality of the data in a wireless network, it has been proven to be insecure. To understand how WEP compromises your data in a wireless network, let’s first understand how WEP works.
WEP uses the RC4 stream cipher algorithm (search the FAQ at http://www.rsasecurity.com/rsalabs/faq for “RC4”). It takes in a key and generates a larger pseudorandom bit sequence (the key stream ) that serves as an encryption key. The key stream is then XOR’ed (a logical operation that returns true if one, but not both, of two binary values are true) with the original message (the plaintext ) to produce the ciphertext.
When the recipient receives the encrypted stream (the ciphertext ), it uses the shared key (to produce the same pseudorandom key stream) and performs an XOR function to derive the original message.
Here is how WEP uses RC4 to encrypt network communications:
Before encryption, the packet is run through an integrity check algorithm to generate a checksum. This is to prevent the message from being tampered with.
The 40-bit WEP key is then combined with the 24-bit Initialization Vector (IV) to form a 64-bit key.
RC4 then uses the 64-bit key to generate a keystream equal to the length of the plaintext to be encrypted (including the checksum generated by the integrity check algorithm in step 1).
The keystream is then XOR’ed with the plaintext to generate the encrypted packet. The IV is also appended in the header of the encrypted packet to create the ciphertext.
This encryption process is shown in Figure 4-20.
There are many security concerns that have been raised with respect to WEP. The first attack on WEP was identified by researchers Scott Fluhrer, Itsik Mantin, and Adi Shamir.
Here are some of the more important security concerns regarding WEP:
The use of a shared static key is a major concern as everyone uses the same static key to secure his communications. As soon as the key is made known, the network is no longer secure. Some access points use a passphrase to generate keys, which makes it easier to guess the key, since people tend to use familiar terms for passphrases.
Tip
Distributing WEP keys in a large network is not feasible. Imagine trying to obtain a WEP key at the airport, or hassling a busy barista at Starbucks for one.
The IV is only 24 bits in length, which means the same IV is reused many times over. This is especially true in a busy access point. Most network cards reset the IV to 0 when it is initialized, and increment the IV by 1 for each subsequent packet. (Although there are over 16 million different IVs, in practice you should begin to see the IVs repeat after more than 5000 packets are transmitted.) If an access point transmits packets of 1500 bytes in length, a 7 MB download would cause the same IV to be used again. It has been shown that when two eavesdroppers intercept two ciphertexts encrypted with the same keystream, it is possible to obtain the XOR of the two plaintexts. Over time, when more ciphertexts encrypted with the same keystream are collected, it is possible to recover the plaintext.
If the keystream is recovered by an eavesdropper, forging a packet is easy, since you now have the keystream to generate the ciphertext. This can facilitate man-in-the-middle attacks, when a hacker may forge the identity of a legitimate user, and intercept and reroute the data transmitted.
Due to the export regulations of the United States, the 802.11 standard called for 40-bit WEP only. Most vendors introduced longer key length for their products, making their products proprietary and often not interoperable. Even so, since WEP is not a well-designed cryptographic system, having extra key length does not make your communications more secure.
Tip
Many vendors have claimed that their products support longer encryption keys such as 128 or 256 bits (which promises to be more secure). This is not technically correct. Because the 128-bit or 256-bit designation is inclusive of the 24-bit IV, the effective key lengths are 104 and 232 bits, respectively. However, some vendors do have products that support 152 bits (128 bit keys + 24-bit IV).
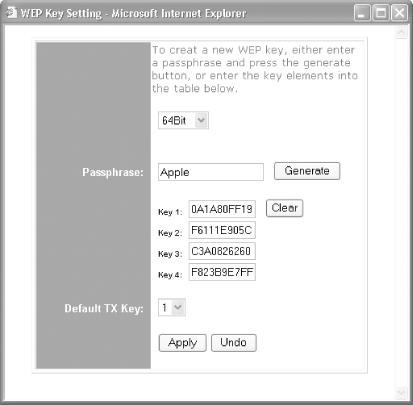
Figure 4-21 shows how you can enable WEP in a Linksys wireless router. For a 64-bit WEP key, only 40 bits (or 5 bytes) are specified by the user (since 24 bits are used by the IV). So for a 64-bit key, you need to enter 10 hexadecimal characters (since 2 hexadecimal characters make up 1 byte). For a 128-bit WEP key, 26 hexadecimal characters are needed.
Figure 4-21 also shows the Linksys wireless access point using a passphrase to generate four WEP keys. You can also manually set any of the four keys as your WEP key without using a passphrase. After you set the keys, click Apply.
A longer-term solution to resolve WEP’s inadequacies lies in the hands of the IEEE workgroup TGi (http://grouper.ieee.org/groups/802/11/Reports/tgi_update.htm) when they complete the 802.11i specifications at the end of 2003.
The 802.11i specifications will address the items in the list shown next.
- Use of 802.1X for authentication
The 802.1X specification is a framework for mutual authentication between a client and the access point. It may also use a RADIUS-based authentication server and one of the Extensible Authentication Protocols (EAP) variations. 802.1X uses a new key for each session; hence it replaces WEP’s static key.
- Use of the Temporal Key Integrity Protocol (TKIP)
TKIP will be used as a short-term solution to WEP’s flaws. It uses 128-bit dynamic keys that are utilized by different clients. Because of the changing keys, intruders would not have time to collect enough packets to compromise the security scheme.
- Use of Advanced Encryption Standard (AES)
The full implementation of 802.11i will utilize the AES encryption system for enhanced encryption in access points. However, use of AES requires changes in the chipsets used in wireless devices; thus, at the time of this writing, no wireless device supports AES.
The 802.11i specification is tentatively called WPA2. See the next section for more details.
While the industry is waiting for the 802.11i specification to be ratified, the Wi-Fi Alliance has addressed the present need for secure wireless communication by coming out with the Wi-Fi Protected Access (WPA).
WPA is a subset of the 802.11i standard and will be forward compatible with it. The key components of WPA are:
- 802.1X
802.1X is a port-based authentication mechanism . See the next section for a detailed discussion of 802.1X.
- TKIP technologies
TKIP provides data encryption enhancements including a per-packet key mixing function, a Message Integrity Check (MIC) called Michael, an extended Initialization Vector (IV) with sequencing rules, and a re-keying mechanism. In a nutshell, TKIP addresses WEP’s limitations by having dynamic keys coupled with a much longer IV (which means that the chances of reusing the same IV within a period of time are reduced).
So how does WPA differ from WEP? Table 4-1 shows the quick comparison.
Table 4-1. Comparing WPA to WEP
|
WPA |
WEP | |
|
Key length |
128-bit |
40-bit to 232-bit |
|
Key type |
Dynamic key; per-user, per-session, per-packet keys |
Static shared key; used by everyone in the network |
|
Key distribution |
Automatic key distribution |
Each user must type in the key |
|
Authentication |
Uses 802.1X and EAP |
Uses WEP key for authentication; flawed |
The 802.1X specification is a port-based network access control mechanism: when a client is authenticated, the port is granted access; if not, access to the port is denied. Although 802.1X was originally designed for Ethernet networks, it can be applied to wireless networks as well.
This is how 802.1X works (see Figure 4-22):
The Supplicant (the client that wants to access a network resource) connects to the Authenticator (whose resource is needed).
The Authenticator asks for credentials from the Supplicant and passes the credentials to the Authenticating Server.
The Authenticating Server authenticates the Supplicant on behalf of the Authenticator.
If the Supplicant is authenticated, access is then granted.
Note that before the authentication is performed, all the communications go through an uncontrolled port . After authentication, the controlled port is used.
For the Authentication Server to authenticate the Supplicant, the Point-to-Point Protocol Extensible Authentication Protocol (EAP) is used. EAP supports multiple authentication mechanisms and was originally developed for PPP.
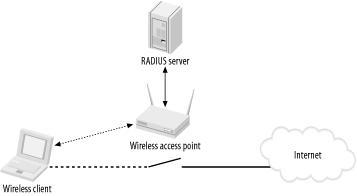
In a wireless network, a wireless client needs to connect to an access point; in this case, the wireless access point is the Authenticator. The Authenticator can maintain a database of users and their respective passwords. However, this is a huge administrative task, especially in a large network. So an access point can be connected to a RADIUS (Remote Authentication Dial-In User Service) server, which will maintain the database of users and perform authentication on behalf of the access point. This is as shown in Figure 4-23.
Using a RADIUS server takes care of the authentication aspect of security only. What about confidentiality? Packets traveling between the wireless clients and the access point must be encrypted to ensure confidentiality.
When a client is validated at the RADIUS server, an authentication key is transmitted to the access point. (This key is encrypted; only the access point can decrypt it.) The access point then decrypts the key and uses it to create a new key specific to that wireless client. That key is sent to the wireless client, where it’s used to encrypt the master global authentication key to the wireless client. To address WEP’s shortcoming of a fixed key, the access point will generate a new master authentication key at regular intervals.
There are many variants of Extensible Authentication Protocol (EAP). Here are some that you may come across in wireless security literature:
- EAP-MD5
EAP-MD5 uses the challenge/response method to allow a server to authenticate a user using a username and password. MD5 does not provide mutual authentication and is vulnerable to an offline dictionary attack.
- EAP-TLS (EAP-Transport Layer Security)
EAP-TLS is based on X.509 (an ITU standard specifying the contents of a digital certificate) certificates. It is currently the most commonly used EAP type for securing wireless networks. However, EAP-TLS requires the use of PKI (Public Key Infrastructure), which is not feasible to be implemented on small networks.
- PEAP (Protected EAP)
To counter the complexity of using EAP-TLS, PEAP was proposed as an alternative. PEAP uses a server-side certificate to allow the authentication of the server. It creates an EAP-TLS tunnel and then uses other authentication methods over the tunnel. EAP methods such as MD5, MS-CHAP, and MS-CHAP v2 are supported. PEAP was proposed as an IETF standard by Microsoft, Cisco, and RSA.
- EAP-TTLS (EAP Tunneled TLS)
EAP-TTLS is similar to PEAP. It creates a tunnel between the user and the RADIUS server. It supports EAP methods such as MD5, MS-CHAP, and MS-CHAP v2.
- LEAP (Lightweight EAP)
LEAP is Cisco’s proprietary version of EAP, which works mostly with Cisco’s wireless cards, RADIUS servers, and access points.
- MS-CHAP v2 (Microsoft Challenge-Handshake Authentication Protocol Version 2)
Originally designed by Microsoft as a PPP authentication protocol, MS-CHAP v2 is a password-based, challenge-response, mutual authentication protocol that uses the Message Digest 4 (MD4) and Data Encryption Standard (DES) algorithms to encrypt responses. MS-CHAP v2 is now an EAP type in Windows XP.
Windows XP (Service Pack 1) supports PEAP and EAP-TLS. Prior to Service Pack 1, EAP-TLS and EAP-MD5 are supported. Figure 4-24 shows the various layers of EAP and their relationships to 802.1X.
This section explains how to implement 802.1X authentication using PEAP and MS-CHAP v2 authentication methods in Windows XP. Using PEAP with MS-CHAP v2 authentication allows users to be authenticated using a username and password. This is much easier to administer than PEAP with EAP-TLS, which requires certificates to be installed on a user’s computer. Also, PEAP with MS-CHAP v2 requires only a server certificate to be installed.
Tip
If you are only interested in knowing how to log in to an 802.1X protected wireless network, you can skip to Section 4.5.4.4, later in this chapter.
For this section, I assume you have the following:
Windows 2000 Server SP3 or greater acting as a Domain controller using Active Directory.
Microsoft 802.1X Authentication Client for Windows 2000 (http://support.microsoft.com/default.aspx?scid=kb;en-us;313664) installed on your computer. Although the word “client” appears in the name, this is a required component for the server.
Tip
The Microsoft 802.1X Authentication Client for Windows 2000 contains support for PEAP, which is required if you specify the use of PEAP on the client side (this is supported in Windows XP if you install the “Windows XP Support Patch for Wireless Protected Access”).
Also, PEAP requires Certificate Services to be installed on your Windows 2000. You can install Certificate Services by going to the Control Panel and using Add/Remove Programs, then selecting Add/Remove Windows Components.
First, you must configure the RADIUS server (Internet Authentication Server) on the Windows 2000 Domain Controller:
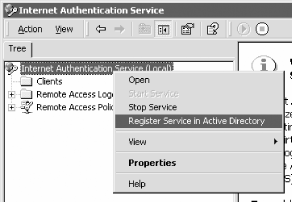
Launch Internet Authentication Service (IAS) by clicking on Start → Programs → Administrative Tools → Internet Authentication Service (see Figure 4-25).
Right-click on Internet Authentication Service (local) and select “Register Service in Active Directory”.
Right-click on Clients and select “New Client”.
Give a name to your client, say “AP” (which is your access point, the Authenticator).
Enter the IP address of the access point and check “Client must always send the signature attribute in the request”. Enter a secret key to be known by both the access point and IAS.
Right-click on Remote Access Policies and select “New Remote Access Policy”.
Give a name to your new policy, such as “Wireless access”. Click Next.
Add an attribute. Select the “Day-And-Time-Restriction” attribute and click Add.
Choose the time that you want the user to be allowed access to the network. Select all available time slots, click Permitted, and click OK. Click Next.
Select the “Grant remote access permission” option to allow the remote user to log on if he is authenticated. Click Next.
Click on Edit Profile... to choose the authentication type.
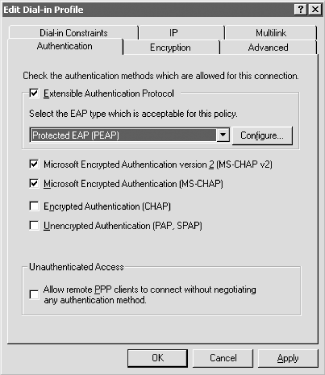
Click the Authentication tab and select the options as shown in Figure 4-26. Click OK.
When prompted to read the help files on the EAP types checked, click No.
Click Finish to complete the setup.
Once the RADIUS server is configured, you need to give access permission to users in Active Directory.
Click on Start → Programs → Administrative Tools → Active Directory Users and Computers.
Click the Users item and double-click on the username that you want to grant wireless access to.
Select the Dial-in tab and select the Allow access option. Click OK.
Most consumer access points available today do not support 802.1X authentication. You would need to buy enterprise-level access points in order to use 802.1X authentication. Fortunately, a few consumer access points, such as the D-Link 900AP+, support 802.1X via a firmware download. If you own the D-Link 900AP+ access point, be sure to check out D-Link’s web site to download the latest firmware. (If you purchased your access point after mid-2003, it may already have the firmware with 802.1X support).
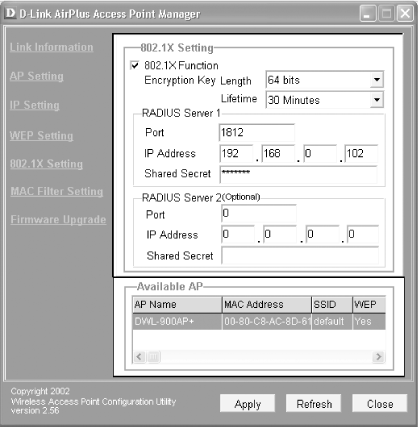
You can administer the DWL-900AP+ access point using either a web-based utility or the provided Access Point Manager (see Figure 4-27). You can access the Access Point Manager by clicking Start → Programs → D-Link Airplus Access Point → D-Link AirPlus Manager.
To configure the DWL-900AP+ for 802.1X authentication, click on the 802.1X Setting link in the Access Point Manager (see Figure 4-27).
Turn on the 802.1X Function checkbox.
Select the length of the key and enter the information for the RADIUS server that you set up in the previous section.
The last stage is configuring the client. This is also the stage for readers who are trying to log on to a network that uses 802.1X authentication.
Tip
The test computer that I used for this book was updated with the Windows XP Support Patch for Wireless Protected Access (see http://support.microsoft.com/?kbid=815485). If you have not installed the patch, some of the screen elements may differ slightly.
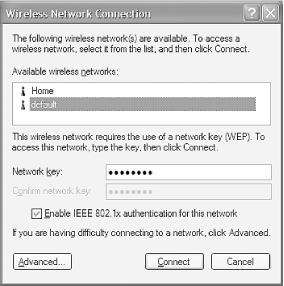
Right-click on the Wireless Network Connection icon located in the Tray and select “View Available Wireless Networks” (see Figure 4-28).
Select the SSID of the network that you wish to connect to. In my case, default is the network that implements 802.1X authentication. Select default and enter the network (WEP) key for this network. Turn on the checkbox “Enable IEEE 802.1X authentication for this network” (see Figure 4-29).
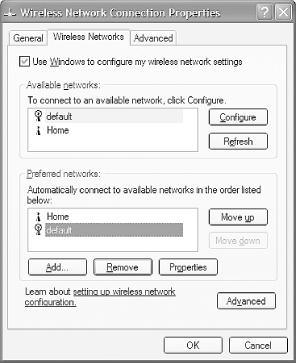
Click on Advanced... to configure the settings for the selected network (see Figure 4-30).
Under the Available networks section, select default and click Configure.
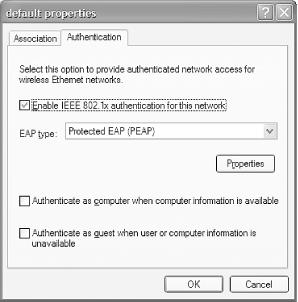
Click the Authentication tab (see Figure 4-31).
For EAP type, select Protected EAP (PEAP) and click Properties.
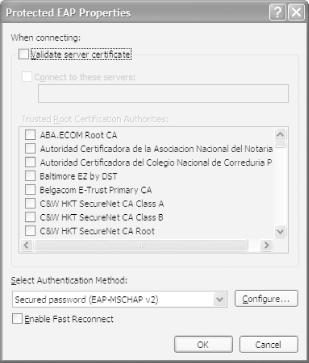
Select Secured password (EAP-MSCHAP v2) as the authentication method (see Figure 4-32). Click Configure....
Tip
Fast Reconnect allows PEAP to quickly resume a TLS session. It minimizes the connection delay in wireless networks when a wireless device roams from one access point to another.
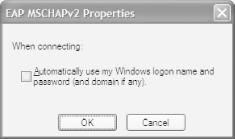
Turn off the checkbox “Automatically use my Windows logon name and password (and domain if any)” (see Figure 4-33). Click OK three times to complete the settings.
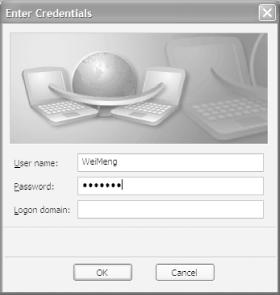
Finally, double-click the Wireless Network Connection icon located in the Tray again and connect to the default network. You will be asked to supply your credentials to log on to the network (see Figure 4-34).
Enter your username and password; if you are a valid user (see Figure 4-35), you will be connected to the network.
To confirm that you are connected to the network, launch your web
browser and see if you can connect to the Internet. You may also use
the ipconfig /all
command to see whether you are
assigned
an IP address.
Get Windows XP Unwired now with the O’Reilly learning platform.
O’Reilly members experience books, live events, courses curated by job role, and more from O’Reilly and nearly 200 top publishers.
