When you first open a new FileMaker database (the Contact Management template in this example), it has everything you need to make a database except, well, data. Now that you understand the basic components of a FileMaker database, it’s time to start adding your own content. Whether your database contains information about individual persons, objects, pictures, dung beetles, or whatever, FileMaker always thinks of that information in individual chunks called records. Each record contains everything the database knows about that person, thing, insect, or whatever.
Now, because you need to store many smaller pieces of information in each record (like a person’s phone number, address, birthday, and so on), FileMaker can bestow each record with an almost infinite number of fields—the specific bits of data that define each record and make it unique.
For example, each person in a database of magazine subscribers gets her own record. Her first name, last name, phone number, street address, city, state, Zip code, and the expiration date of her subscription are all examples of fields each record can include.
The techniques in this section work the same whether you’re creating a new database for the first time (from the Contact Management template you created on Creating a New Database, for example), or adding to an existing one.
Note
All records in a database must contain the same fields, but that doesn’t mean you fill them all in. For instance, in a gift list database, if your boyfriend refuses to disclose his hat size, you can just leave that field blank in his record.
When you opened the template for your Contact Management database (see Opening and Closing Database Files), it was blank and lacking even a single record, so the first thing you need to do is create one. It’s simple: Choose Records → New Record or press Ctrl+N (⌘-N). (Since you’ll be creating lots of records in your FileMaker career, this is one keyboard shortcut you’ll want to memorize.)
Note
When you’re adding new records, you must be in Browse mode (see Status area and the status area controls).
Now that you’ve created a record, you can enter information about the first person you want to keep track of. This is where those fields come in handy. To enter information in any field in a record, just point, click, and type. What to type? As Figure 1-9 illustrates, each field in this database has a label to its left, which indicates the type of information the field contains. Each field is also outlined in a light gray color.
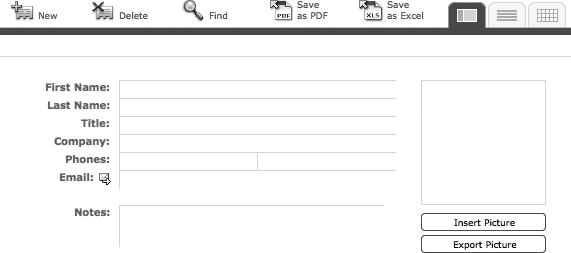
Figure 1-9. Fields can look like just about anything, but in the Contact Management database, they’re pretty simple. When you click in the content area, the fields you can edit are indicated by dotted borders. The field you’re currently editing gets a solid border.
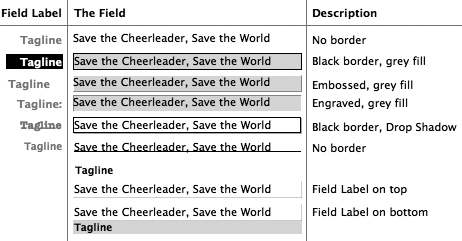
Figure 1-10. As you can see, the same field can appear many different ways, even on the same layout. Not all the graphic ideas in this illustration help make a field’s contents more readable, as you can see. In general, the smallest amount of extra detail, like a pale border, or even no border at all, is better.
To get from the field you’re in to another where you can add or edit text, the most obvious way is to reach for the mouse, slide over to the new field, and click. Unless you’re eager to burn that extra half a calorie, you may want to try a quicker, less exercise-intensive way, like the following:
Press the Tab key to move to the next field. If you’re not in any field, the Tab key puts you in the first field.
Hold down the Shift key and press Tab to move to the previous field. This time, if you’re not in any field, FileMaker puts you in the last field.
Note
If you’re wondering who decides which field is next or previous, dig this: you do. When you design a database, you get to set the Tab order, or the order FileMaker follows when you press Tab or Shift-Tab to move among fields. See Tab Order for details.
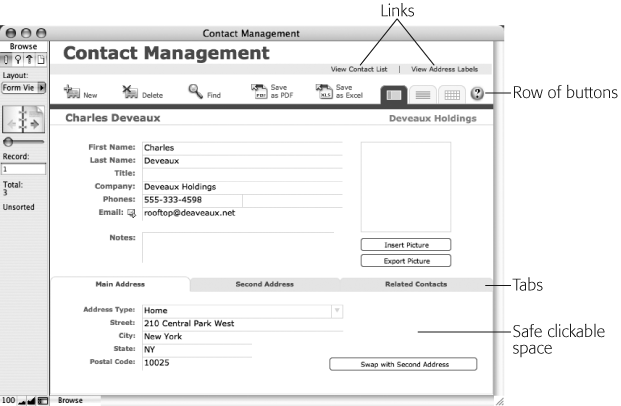
Figure 1-11. Just like their designers, all FileMaker databases are a little different, with Row of buttons different fields, buttons, and clickable things. But they all share some basic behaviors, so getting accustomed to basic behavior will stand you in good stead when you start poking around in other people’s databases.
When you’ve filled in all the fields and you’re ready to move on to your next subscriber, you must create an additional record to hold that contact, as each record can contain only one person’s information. You’ve probably already figured out that you can just select Records → New Record again, and get another empty record to fill. You’ve also figured out you’ll be creating records a lot as you enter all your subscribers. To speed things along, you can use the New Record keyboard shortcut: Ctrl+N (⌘-N).
While no two people are alike, it may not always seem that way from their contact information. For instance, if you want to include three people from the same company in your database, the data in the Company field is the same for each person.
The Email and Phone fields won’t be the same, but they may be close. It’s time for a little organized laziness to kick in: Instead of making new blank records and retyping all that stuff, just choose Records → Duplicate Record (see Figure 1-12). FileMaker displays a new record containing all the same information as the record you chose to duplicate. (FileMaker copied everything from the first record into a new one for you.) Now you can just edit the information that needs to be changed.
Last but not least, getting rid of a record you no longer need is a breeze. FileMaker Pro gives you three commands that let you delete one record, a group of records, or even all the records in your database.
Warning
Deleting records can’t be reversed. There’s no Undo option, since FileMaker saves changes automatically (see Closing a Database). So when you delete a record (or all the records in a database), make sure you’re ready to part with the data.
One record. Just choose Records → Delete Record to delete the record you’re currently on. FileMaker asks if you’re sure you want to delete the record, lest you accidentally send, say, your aunt’s address to the trash bin. If you’ve indeed written her—or anyone else—out of your life, simply click Delete in the message box to complete the purge.
Figure 1-12. If you go looking for your duplicated record later, you may be surprised where you find it. No matter where the original record is, the new record is created at the end. So if you have seven records in your database and you duplicate record #3, the duplicated record is #8. Notice the thin black line just to the left of record #3 in the top picture. That’s FileMaker’s way of telling you which record is active in a list.
Multiple records. FileMaker has a neat command (Records → Delete Found Records) that trashes any group of records of your choosing. Before you can use this command, you have to tell FileMaker what those records are, which you do by using the Find command (see Finding Records). In your FileMaker career, you’ll often use the Find command to locate the records you want to act upon before you tell FileMaker what to do with them.
All records. In some cases, you may want to delete all the records in a database. Maybe your friend wants an empty copy of your database for his own use. Or perhaps your database holds data you just don’t need anymore, like test results you’re about to reproduce. Complete record elimination is easily accomplished by way of two menu commands: Just choose Records → Show All Records, and then choose Records → Delete All Records.
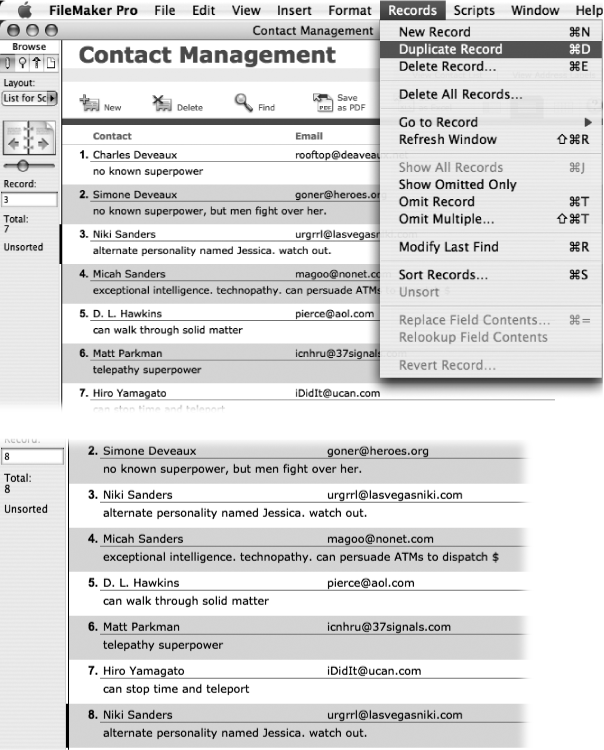
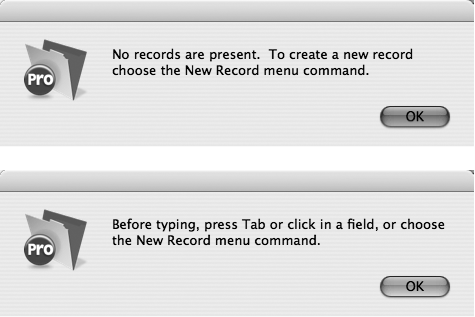
Figure 1-13. Top: It’s annoying to start typing only to get an error message before the first character is dry on the page. But FileMaker is trying to tell you something akin to “put some paper in this typewriter before you start typing madly away.” (You do remember typewriters, don’t you?) Bottom: This error message is the companion to the one in the previous figure. In this communique, FileMaker needs you to tell it where to put all that data your 110 wpm processing power is delivering. Without direction, your data is going into the vast emptiness of space, instead of into your Contact database.
Now that you know how to edit a record, and what it means to be in a record (see the box on Duplicating a record), you can learn about one of FileMaker’s most overlooked features: the Revert Record command. Its purpose is simple: Choose Records → Revert Record and FileMaker throws away any changes you made since you first entered the record. This trick comes in handy when you accidentally modify a field by bumping into the keyboard, or realize you accidentally entered Steve Jobs’ address in Bill Gates’ record. Just revert the record and you can be confident that whatever you did has been forgotten.
But keep in mind that the Revert Record command is available only when you’re in a record and you’ve made changes. If you don’t have the record open, or you haven’t made any changes since you last committed the record, the Revert Record command is grayed out.
Note
Committing a record isn’t exactly difficult: You just press Enter or click somewhere in the window, and FileMaker dutifully saves the record without a peep. Once this happens, you can no longer choose the Revert Record command. (How’s that for commitment?) If you want a little more control, you can tell FileMaker to ask you for confirmation before a record is committed. You’ll learn how to do this on Layout name.
Using the tools described so far for adding, deleting, and editing records in your database, you can quickly amass a large number of records. The next section explains how to find your way around this vast body of information.
Get FileMaker Pro 9: The Missing Manual now with the O’Reilly learning platform.
O’Reilly members experience books, live events, courses curated by job role, and more from O’Reilly and nearly 200 top publishers.

