As exciting as it is to enter data into a database—well, the first time anyway—chances are you’ll want to look at those records again at some point. In fact, some may say that’s the whole point of building a database. But first, you need to learn how to navigate the records in the database, which this section explains. Fortunately, moving around a database isn’t nearly as tough as following maps and highway signs in a foreign country. FileMaker makes it easy to skip from one record to the next, all the while keeping you abreast of where you are.
Tip
As you go through this section on navigating, it helps to have a database open in front of you so you can follow along and try some of these techniques. Since you probably don’t have many records in the Contact Management database you just created, there’s a sample one for you to download on the “Missing CD” page at www.missingmanuals.com/cds.
In the Contact Management database, you can add as many records as you want. But you can view only one at a time in the window FileMaker displays. To tell FileMaker which record you want to look at, you have three options:
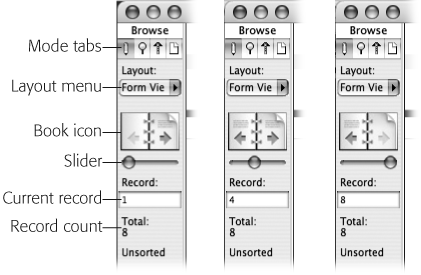
The book icon lets you flip from record to record one at a time. Pretend your database is a book, with each record on its own page. To get to the next record, click the right-hand page. To go back, click the left-hand page. If you can’t go any further in one direction, the appearance of the icon’s “page” changes, as shown in Figure 1-14.
The slider is kind of a turbo-charged version of the Book icon. Instead of clicking once for each record, you can advance through a bunch of records by dragging. If you know approximately where you want to go (like “around halfway” or “about one-third from the end”), then the slider is the quickest way to get there. The slider is most handy when you want to get to the beginning or the end of the database. In that case, just drag the slider as far as it will go in either direction.
Figure 1-14. The status area is the key to record navigation. In addition to displaying the controls for switching records, the status area indicates where you are in the database. This series of pictures, for example, shows the status area when you’re on the first record in the database (left), a record in the middle of the database (middle), and the last record (right). Notice how the appearance of the Book icon and slider changes in each picture.
The Current Record indicator serves two purposes. First, it shows you which record you’re on. Second, if you know which record you want to be on, you can simply type in the record number to jump to it. Below the Current Record, the status area also shows you how many records are in your database.
Note
All navigation methods let you move within what FileMaker calls a found set, which lets you look at a specific set of records at one time. Learn more about finds and found sets on Finding Records.
FileMaker also has a few keyboard shortcuts to make record navigation painless. If you haven’t used a database program before, you’ll notice that some keys act in ways you may not expect—like the Enter key, as described below. Still, spending a little time getting used to using these keystrokes will save you hours of time down the road.
To go to the next record, press Ctrl (Control)-Down Arrow.
To move to the previous record, press Ctrl (Control)-Up Arrow.
To activate the Current Record indicator without using the mouse, press Esc. Now type a record number and press Enter to go to that record. (This shortcut works only when you’re not in the record; see Duplicating a record.)
Pressing the Enter key commits the record, rather than inserting a new line in a field, as you may expect based on what the Enter key does in other programs. To insert a new line in FileMaker, press the Return key.
Pressing the Tab key moves you from one field to another. (To indent a line you have to type a tab character into a field, by pressing Ctrl+Tab [Option-Tab].)
Finally, bear in mind that you can change these things on a field-by-field basis when you’re designing a database, as you’ll learn in Chapter 3. For instance, FileMaker lets you decide that Return—not Tab—should move you from field to field. If you make that choice, Tab types a tab into a field, and Return doesn’t insert a blank line. Unfortunately, there’s no way for you to tell which key does what by looking at a field; you just have to try some of these keys to find out.
When your database really gains some size, you’ll realize that even keyboard shortcuts aren’t the fastest way to get to the record you want. You need to tell FileMaker to pull up the record for you. For example, you have a season ticket holder whose last name is Spinnet and who just renewed her subscription for a year. You need to find her record and make the update, and you don’t have all day.
Once you have hundreds of records in your Contact Management database, it could take ages to find the one you want by clicking the Book icon. Instead, switch to Find mode and tell FileMaker what you’re looking for, and the program finds it for you. This section explains how to use Find mode to search for a record or group of records, and how to edit your search if you don’t get the results you anticipated. (If you downloaded the example file discussed on Content Area, you can open it and try out Find mode now.)
You can get to Find mode in four ways:
Select Find from the Mode pop-up menu.
Choose View → Find Mode.
Click the Find mode tab in the status area.
Press Ctrl+F (⌘-F).
The Mode pop-up menu, Mode tabs, and View menu all indicate what mode you’re currently in. Once you’re in Find mode, your window should look like Figure 1-15.
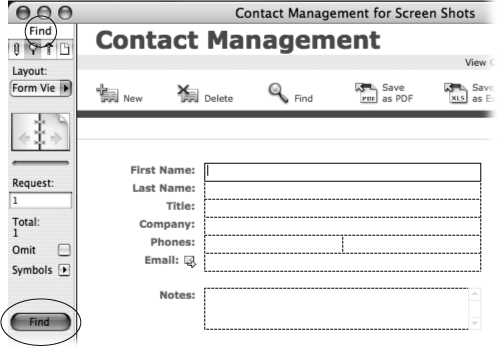
Figure 1-15. The View menu indicates you’re in Find mode, and every field is now empty, but everything else looks nearly the same. You can type information into fields, just as in Browse mode. You can even create requests, which look just like new records. The status area, though, looks slightly different, losing some record information and gaining a Find button.
Find mode looks just like Browse mode (where you’ve spent all your time up until now). The best way to tell that you’re in Find mode is to look for clues in the status area or Mode pop-up menu. Find mode also seems to work the same way—you can edit data in your fields and add, delete, or navigate through records. But don’t be deceived: Find mode is very different from Browse mode.
Note
Another subtle clue indicates you’re in Find mode: The borders around fields have a dashed-line appearance when the record is active. In Browse mode, active fields are bordered by a dotted line.
Even though it may seem like you’re editing records in Find mode, you’re actually not—you’re editing requests instead. Requests describe what certain records look like, so FileMaker can find them for you.
You just need to enter enough information to tell FileMaker what you want. It then looks for records that have the same information you entered, much like searches you conduct using other programs.
Say you want to find every person in your Contact Management database whose last name is Sanders. Here’s what you do:
Choose View → Find Mode (or use any of the other methods described above to get to Find mode).
The window is now in Find mode, as you can tell by a quick glance at the Mode pop-up menu.
Type Sanders into the Last Name field.
This works just like Browse mode: Simply click to place your cursor in the field, and then type. (Remember, you aren’t editing a record—you’re editing a request.)
Click the Find button in the status area.
(You can also choose Requests → Perform Find or simply press Enter.)
FileMaker then looks for any records that have “Sanders” in the Last Name field. If the program doesn’t find any, you see the message pictured in Figure 1-16. On the other hand, if FileMaker did find some records, you wind up back in Browse mode, presented with the records FileMaker found. (Technically, these records are called a found set. You’ll learn much more about found sets in the next chapter.)
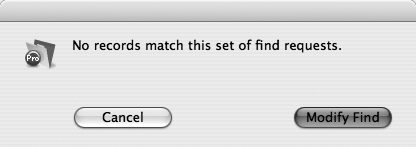
Figure 1-16. If FileMaker can’t find any records that match what you’re looking for, you see the message pictured in this dialog box. If that’s all you needed to know, just click Cancel and you’ll wind up back in Browse mode as though you’d never performed a find. But if you realize you misspelled your search term or were a little too specific in describing what you wanted, click Modify Find. FileMaker sends you back to Find mode, where you can edit your request and click Find again.
After you perform a find, FileMaker displays the set of records that matched your find request (in this case, all the records with the last name Sanders). You can see how many records you found by looking at the count in the status area, as shown in Figure 1-17.
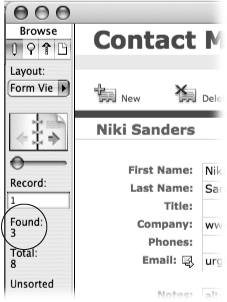
Figure 1-17. After you perform a find, the status area shows how many records match your request. In this case, FileMaker found three records with the last name of Sanders. You can flip through these three records to your heart’s content, but you can’t see any records not in your found set. If you want to look at all your other records (you’re done with those Sanders people), then choose Records → Show Omitted Only. FileMaker swaps your found set and shows you the other five records in your database. Then, when you’re ready to look at all your records again, choose Records → Show All Records and it’s one big, happy family again.
Although you’re in Browse mode, you can’t look through every record in the database—just the ones FileMaker found.
Tip
If your find didn’t come out exactly the way you wanted, don’t just return to Find mode. If you do, you’ll have an empty request, and have to start all over again. Instead, choose Records → Modify Last Find, which takes you to Find mode and displays the request you used last. Now you can simply make any necessary modifications and perform the find again.
In the previous find examples, you had FileMaker search for records by telling it what to look for. But sometimes you’re already looking at a record that has the right information in it—you just want to find more that match.
Say you need a list of everybody in the Contact Management file who has a super-power. Flip to any record with the word “superpower” in the Notes field. Drag to select the word “superpower.” Right-click the highlighted text (Control-click on a Mac).
From the shortcut menu that pops up, select Find Matching Records (see Figure 1-18). Shazaam! Faster than you can say “ordinary people,” FileMaker shows you a found set of all your contacts with superpowers.
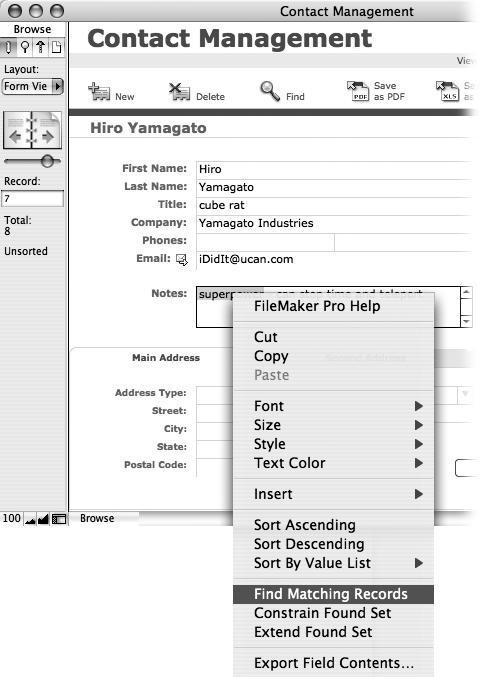
Figure 1-18. FastMatch lets you select a piece of information from the record you’re viewing (in this case, it’s “superpower” from the Notes field) and find all other records that match it without the rigmarole of switching to Find mode. Right-click the selection and choose Find Matching Records from the shortcut menu.
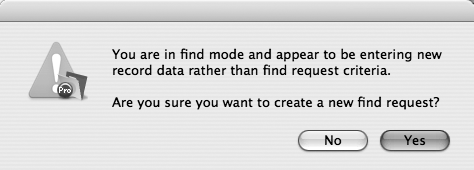
Figure 1-19. If you create more than ten requests in Find Mode, FileMaker wonders if you’re actually trying to enter data. If you’re setting up a magnificently complex find, you may be annoyed. Just click Yes and keep up the good work. But if you just forgot to switch back to Browse mode, this warning can save you lots of lost keystrokes.
Get FileMaker Pro 9: The Missing Manual now with the O’Reilly learning platform.
O’Reilly members experience books, live events, courses curated by job role, and more from O’Reilly and nearly 200 top publishers.

