Every FileMaker Pro database has two things in common: One, it stores heaps of information, and two, it gives you the tools to manage that information. Whether you start from one of FileMaker’s templates (see Creating a New Database) or a completely blank slate (see Defining Fields), your new database starts out data-free. It’s an empty vessel waiting to be filled. (It would be nice if the program could figure out what data you want and enter it for you, but that probably won’t happen until FileMaker Pro 9009.) You have to take care of the data entry yourself. At first, all you see in the window are the tools—buttons, controls, and pop-up menus—that you use to fill the database with data.
Every database window has the same basic structure. FileMaker provides a handful of special items around the window, as you can see in Figure 1-1.
Tip
You can download a sample database form the “Missing CD” page at www.missingmanuals.com/cds.

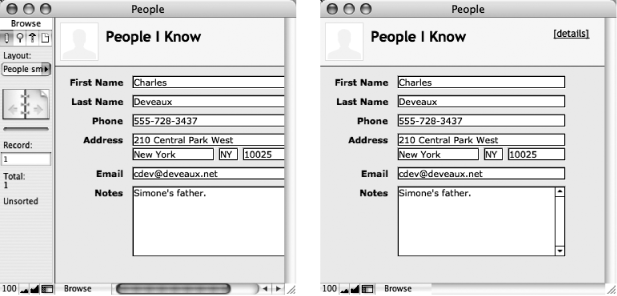
Figure 1-1. Every database window has the same apparatus around the edges—what’s inside the window is up to you. Compare this window with the one shown in Figure 1-2, left. Both windows have a status area, zoom controls, and a Mode pop-up menu. The content is the only difference.
While some features like the status area, zoom controls, and Mode pop-up menu stay the same no matter which database you’re using, what’s inside the content area is the actual information (data) that makes each database unique.
When you create a new FileMaker database, you start with something that looks a little like Figure 1-1: plain and simple. That’s because you haven’t added any content yet. In Figure 1-2, you can see what your database will look like once you’ve started to fill it in. Depending on how you want to look at your information, you can use the controls described below to alter how your content appears onscreen.
This unassuming menu may not be the most prominent control in the window, but it’s one of the most important. Each of FileMaker’s four modes is a work environment unto itself, specially designed to help you view, edit, organize, or present your information in a specific way. Use this menu to switch modes depending on what you need to do.
In contrast to rational expectations, you use Browse mode for more than browsing. In this mode, you can add, change, and view data in your database. Browse is the view shown in Figure 1-2, and it’s where you’ll spend most of this chapter.
When you have a lot of data, looking through it all for a particular bit of information can be tedious. Use Find mode to let FileMaker do the looking for you. You tell FileMaker what you’re looking for in Find mode; when it’s done looking, FileMaker returns you to Browse mode and shows what it found. You’ll see Find mode in action on Finding Records.
Figure 1-2. Unlike the stark emptiness shown in Figure 1-1, this database is well underway, as you can see by the abundance of the content area. Left: The status area is part of all FileMaker databases, regardless of what they contain. Right: Maximize your view of the content area by hiding the status area with a simple click on its control.
In addition to using databases (viewing, finding, sorting, adding, and changing data), you can use FileMaker to build databases. Layout mode is where you design the screens (or layouts) that present your database information to best advantage. Part 2 is all about Layout mode.
Although computers make maintaining and manipulating mountains of information a breeze, there’s still no avoiding paper. Eventually you’ll want to print something out, like a set of mailing labels or a paper backup of all your records. If you’re ever curious about how something will look when printed, switch to Preview mode. It shows a one-page-at-a-time view of your data exactly as it will appear when printed.
To use the Mode pop-up menu, just click it and choose one of the four modes. Your FileMaker window instantly switches to the new mode. You can also glance at the pop-up menu to see which mode you’re currently in. (The Mode pop-up menu is the most popular way to mode-hop, but there are plenty more; see the box on Zoom control.)
No matter what mode you’re in, the status area (see Figure 1-1, left) is your central command center. This slim panel lets you see how much information you’ve got in your database and your current position within it. It also has the controls you’ll use most often for both adding information to your database and accessing it later. If you’re like most people, at some point you’ll come to resent the fact that the status area takes up so much space on your screen. Despite the fact that it usually contains just a few numbers and icons, it eats up a good inch of space along the entire left edge of every window. Luckily, you can easily conceal the status area when you don’t need it, as shown in Figure 1-2.
One of FileMaker’s neatest features is the zoom control. No matter what you’re doing, you can always zoom in for a closer look or zoom out for the big picture. This feature works no matter what mode you’re in—even when you’re previewing a printout.
To use FileMaker’s zoom control, click the Zoom In button for a closer look (each click zooms in a little more). You can zoom in up to 400 percent, so that everything is four times bigger than normal. If you click Zoom Out, everything shrinks, to as small as one quarter of its normal size. The Zoom Level shows your current level, and clicking it takes you back to 100 percent. Clicking the Zoom Level a second time returns you to the last zoom level you were viewing (see Figure 1-3).
Note
Since you probably don’t need to examine the words and numbers in your database on a microscopic level, you’ll probably use the zoom control mostly in Preview mode to fit the whole page on the screen, or to adjust the contents of your FileMaker window to the most easily readable size (depending on the resolution of your monitor). It is not recommended that you use zoom control in place of reading glasses, though.
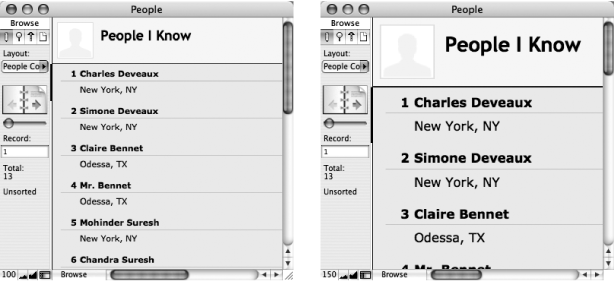
Figure 1-3. Left: The zoom level in this window is set to 100%. Right: Clicking the Zoom Level button once switches you the zoom level you last looked at (200 percent, in this case). Click it again to return to 100%. You can zoom in or out until you find a happy place, and then click Zoom Level again and again. This process can be a form of meditation? or procrastination, depending on your point of view.
Every window has horizontal and vertical scroll bars that appear whenever you have more content than the window can display. (For an example, see Figure 1-3.) If everything in the content area fits in the window, you won’t see scroll bars—after all, you don’t need them. FileMaker’s scroll bars work just like the ones in any other program, and you can use your keyboard to scroll up and down as well. Press Page Up to scroll up one screenful. Page Down scrolls the other direction. To scroll right and left, use the Home and End keys respectively.
If your mouse has a scroll wheel, you’ll notice that it works a little differently in FileMaker. What you scroll through varies based on where you put your mouse cursor—a feature called contextual scrolling. The wheel scrolls through the window when the cursor is inside the content area of the window. It scrolls through the records in your database if you run the cursor over the Book icon in the status area (see Zoom control). And if you put your cursor over a field that has a scroll bar (see Other field type formats), the scroll wheel scrolls through the text in the field.
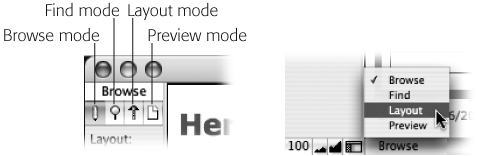
Figure 1-4. There are lots of ways to change modes. You’ve got a View menu (like the ones you’ve seen in countless other programs), FileMaker’s own Mode tabs, and a Mode pop-up menu. And if you resent the wasted energy of swinging your mouse to make things happen, you can use keyboard shortcuts, as noted on the View menu (see the box above). FileMaker believes in giving you choices, because that’s how it rolls.
Note
Don’t be alarmed when the menus across the top of your screen change a bit when you switch modes. That’s just FileMaker being smart. Some commands aren’t useful in some modes, so the program doesn’t clutter up your screen—or your brain space—with menus when you don’t need them. For example, the Insert and Format menus change from black to gray (meaning unavailable) when you enter Find mode. The Request menu, though, appears only in Find mode.
Get FileMaker Pro 9: The Missing Manual now with the O’Reilly learning platform.
O’Reilly members experience books, live events, courses curated by job role, and more from O’Reilly and nearly 200 top publishers.

